Complete guide
Last updated:
How to use Gravity Forms: A complete guide
Gravity Forms is the most powerful form plugin for WordPress, used by millions of websites to collect data, process payments, register users, and build complete web applications. This guide covers everything you need to know, from installation and form creation through advanced features like automation, calculations, and front-end data display. Each section provides context and links to in-depth guides where you can dive deeper.
Table of contents
- Why choose Gravity Forms?
- Gravity Forms pricing and licenses
- How to create your first form
- Embedding forms on your website
- Building multi-page forms
- Conditional logic
- Notifications
- Confirmations
- Merge tags
- Form feeds and integrations
- How to style your forms
- Spam prevention
- Viewing and managing entries
- Displaying entries on the front end
- Importing and exporting data
- Selling products with Gravity Forms
- User registration
- Calculations and dynamic pricing
- Automations and workflows
- Dynamic field population
- Best add-ons and extensions for Gravity Forms
- Real-world use cases
- Migrating from another form plugin
- Frequently asked questions
Why choose Gravity Forms?
Gravity Forms has earned its reputation as the leading WordPress form plugin for several reasons. It prioritizes accessibility with WCAG-compliant HTML5 markup, offers an intuitive drag-and-drop editor, and ships with over 30 field types. It also integrates with dozens of services including HubSpot, Mailchimp, Stripe, PayPal, and Zapier.
Built-in features like conditional logic, multi-page forms, spam prevention, and advanced notifications make it a complete solution for everything from simple contact forms to complex business workflows. If you are evaluating form plugins, these comparisons may help:
- Contact Form 7 vs. Gravity Forms
- Gravity Forms vs. Ninja Forms
- Gravity Forms vs. Elementor Forms
- 8 best contact form plugins for WordPress
Gravity Forms pricing and licenses
Gravity Forms offers three license tiers, each designed for different needs:
- Basic License ($59/year) – Includes 15 add-ons and covers the essentials for most small sites. Best for simple contact forms, surveys, and basic data collection.
- Pro License ($159/year) – Includes 33 add-ons, adding integrations like Mailchimp, HubSpot, and more advanced features. Best for businesses that need CRM or email marketing connections.
- Elite License ($259/year) – Includes all 46+ add-ons, priority support, and access to every official integration. Best for agencies, developers, and sites running complex workflows.
All licenses include one year of updates and support. If you need payment processing (Stripe, PayPal, Square), you will need at least the Pro license for most payment add-ons.
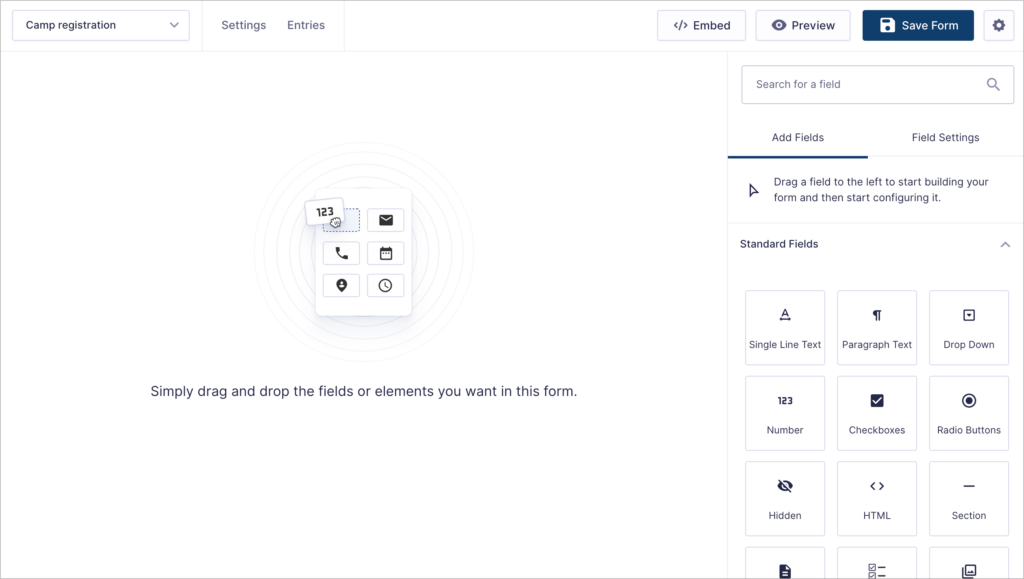
How to create your first form
Hover over Forms and click New Form to get started. You can choose from the built-in template library (pre-configured layouts for contact forms, surveys, registrations, and more) or start with a blank canvas. The visual form editor lets you drag fields from the right-hand panel, reorder them, and configure each field’s settings.
For a larger collection of ready-to-use starting points, check out our free Gravity Forms templates for download.
Form field types
Gravity Forms provides over 30 field types organized into four categories:
- Standard Fields – Text, paragraph, dropdown, checkboxes, radio buttons, number, and more. These cover the majority of common form inputs.
- Advanced Fields – Name, email, address, phone, date/time, file upload, and website URL. These include built-in validation and formatting.
- Post Fields – Title, body, excerpt, tags, category, and custom fields. These let form submissions create or update WordPress posts automatically.
- Pricing Fields – Product, quantity, option, shipping, and total fields. Use these to build order forms, donation forms, or any form that processes payments.
Each field type has its own set of configuration options. For example, the file upload field supports restricting file types and sizes. For a deep dive, see our comprehensive guide to Gravity Forms file uploads.
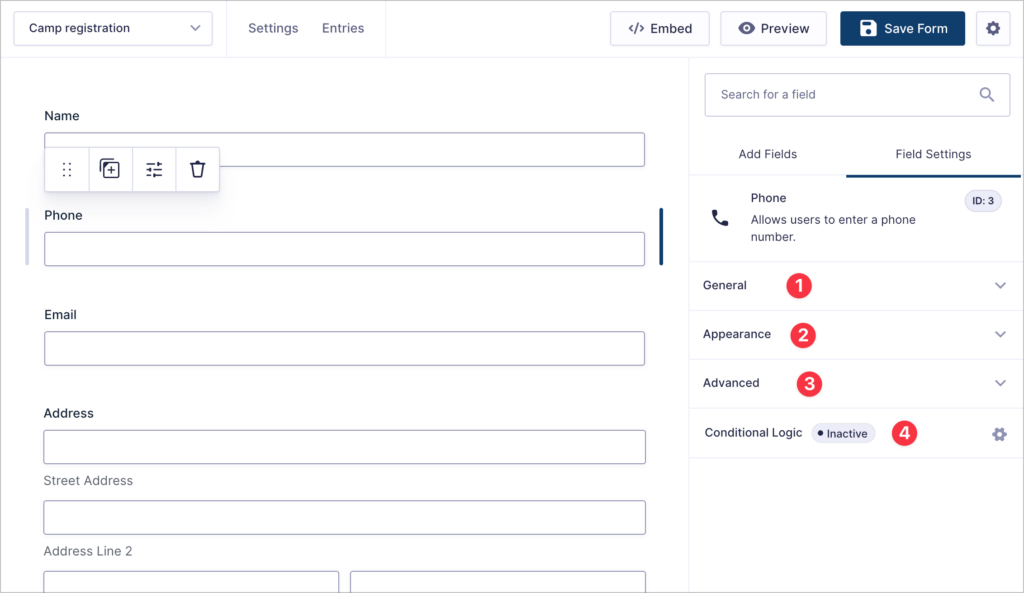
Customizing field settings
Every field has four settings tabs: General (label, description, required status), Appearance (placeholder, size, label placement), Advanced (default values, CSS classes, visibility, calculations), and Conditional Logic (show/hide based on other field values). These give you fine-grained control without writing code.
For a complete walkthrough of conditional logic across fields, notifications, and confirmations, see our Gravity Forms conditional logic guide.
Embedding forms on your website
Once you have built a form, you need to add it to a page or post. Gravity Forms supports several embedding methods:
- Block editor – Use the built-in Gravity Forms block. Just add a new block, search for “Gravity Forms,” select your form, and configure display options like title and description visibility.
- Shortcode – Use
[gravityform id="1" title="true"]in any post, page, or widget area. This works with any WordPress theme or page builder. Dive deeper into Gravity Forms shortcodes. - Page builders – Dedicated modules and widgets are available for Elementor, Divi, and Beaver Builder.
For step-by-step instructions on each method, read our complete guide on how to embed a Gravity Forms form on your WordPress site.
Building multi-page forms
For longer forms, like applications, surveys, or multi-step registrations, you can split a single form across multiple pages using the Page field. Simply drag a Page field into your form where you want a page break. Gravity Forms automatically adds navigation buttons (Next, Previous, Submit) and can display a progress bar or step indicator at the top.
Multi-page forms reduce user fatigue and can improve completion rates. Combine them with conditional logic to skip pages that are not relevant based on earlier answers.
Conditional logic
Conditional logic is one of the most powerful features in Gravity Forms. It lets you create dynamic, responsive forms that adapt based on user input. You can apply conditional logic to:
- Fields – Show or hide fields based on other field values.
- Form sections and pages – Skip entire pages when they are not relevant.
- Notifications – Send different emails depending on what the user submitted.
- Confirmations – Display different messages or redirect to different pages based on form data.
- Feeds – Only trigger integrations when specific conditions are met.
This means a single form can serve multiple purposes. For example, a support request form could route technical issues to your engineering team and billing questions to your finance team—all automatically.
Read our complete guide to Gravity Forms conditional logic to learn how to set up rules for every scenario.
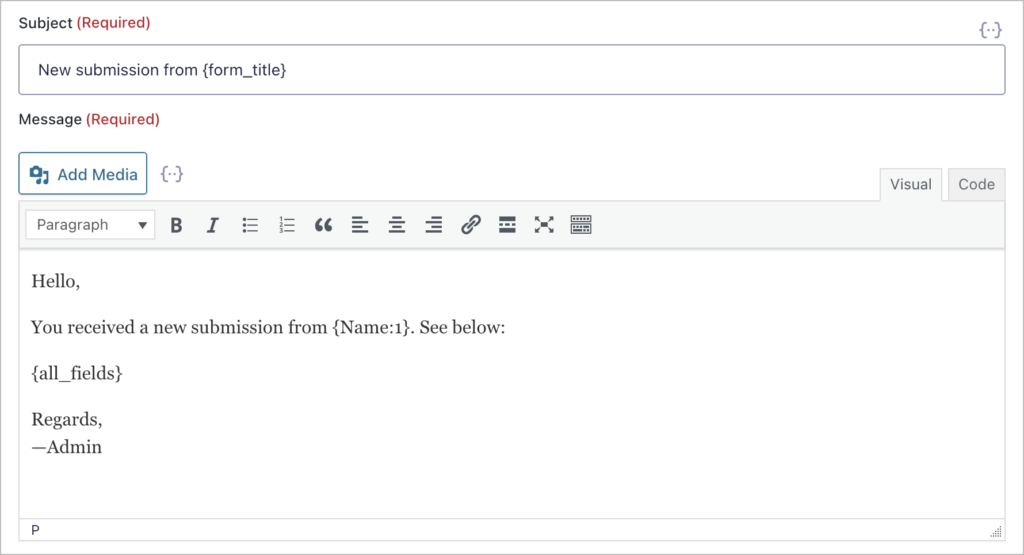
Notifications
Notifications are the emails Gravity Forms sends when a form is submitted. Every form includes a default admin notification, and you can create user-facing notifications for order confirmations, application receipts, and more. Each notification supports merge tags for dynamic content and conditional logic for routing different emails based on submission data.
For advanced workflows, you can attach PDF exports to notification emails or send notifications when entries are approved or rejected.
Confirmations
A confirmation is what the user sees after submitting a form. Gravity Forms supports three confirmation types:
- Text – Display a custom message on the same page (the default)
- Page – Redirect the user to a specific WordPress page
- Redirect – Send the user to any URL
Like notifications, confirmations support merge tags and conditional logic. You can personalize the confirmation message with the user’s name and submitted data, or redirect different users to different pages based on their answers.
Go deeper: how to create custom confirmation messages in Gravity Forms.
Merge tags
Merge tags are placeholder tokens (like {Field Name:1}) that Gravity Forms replaces with actual data at runtime. Use them to personalize notification emails, display submitted values in confirmations, pre-populate fields, and pass values through redirect URLs.
For a full reference, see our guide on everything you need to know about Gravity Forms merge tags.
Form feeds and integrations
Feeds are the mechanism Gravity Forms uses to send submission data to external services. When a user submits a form, feeds can automatically trigger actions like processing a payment, adding a subscriber to your email list, registering a user on your site, or creating a record in your CRM. Each feed can include conditional logic, so you can control exactly when it fires.
Gravity Forms has official add-ons for dozens of services, including:
- Payments – Stripe, PayPal, Square, Authorize.net, Mollie. For a full overview of payment options, see our guide to Gravity Forms payment gateways.
- Email marketing – Mailchimp, ActiveCampaign, AWeber, ConvertKit
- CRM – HubSpot, Zoho, Salesforce (via third-party add-ons)
- Automation – Zapier, Webhooks, Slack
- Plenty more
How to style your forms
Gravity Forms provides several ways to control the look and feel of your forms without writing custom CSS:
- Orbital Theme – The modern default theme framework that provides clean, contemporary styling out of the box. It includes built-in support for rounded corners, input sizing, and color customization.
- Block editor styling – When you embed a form using the Gravity Forms block, the right-hand sidebar includes options for adjusting colors, spacing, and field sizes.
- CSS Ready Classes – Pre-built CSS classes like
gf_left_half,gf_right_third, andgf_list_inlinethat let you create multi-column layouts by simply adding a class name to a field.
Go deeper: See our step-by-step guide to styling Gravity Forms and our overview of Gravity Forms themes.
Spam prevention
Spam submissions are a common problem with web forms, but Gravity Forms gives you several tools to fight back:
- Honeypot field – An invisible field that only bots fill in. If it contains a value, the submission is blocked. This is enabled by default.
- Gravity Forms Zero Spam – A free add-on from GravityKit that blocks spam using a JavaScript-based technique. No CAPTCHAs required, so it does not affect the user experience.
- reCAPTCHA and hCaptcha – Google’s reCAPTCHA (v2 or v3) and hCaptcha can be added as form fields for an additional layer of protection.
- Akismet – Gravity Forms integrates with the Akismet anti-spam service to filter submissions.
For a comprehensive look at all your options, read our guide on 8 proven tactics to stop Gravity Forms spam.
Viewing and managing entries
Every form submission is saved as an “entry” in the WordPress Database and shown in the admin. Go to Forms > Entries to view, search, filter, star, print, and manage submissions. You can add notes, mark entries as spam, and trash submissions you no longer need.

For bulk operations, GravityEdit lets you edit multiple entries in a spreadsheet-like interface, and GravityActions adds bulk action capabilities. Learn more in our guide on how to bulk update entries in Gravity Forms.
Displaying entries on the front end
By default, Gravity Forms entries are only accessible in the WordPress admin. But with GravityView, you can display entries on the front end of your website as directories, tables, lists, maps, or data dashboards—all without code.
GravityView is useful for building:
- Business or member directories
- Staff or team pages
- Event listings and calendars (with GravityCalendar)
- Knowledge bases and FAQ pages
- Job boards and career pages
You can also enable front-end editing so users can update their own submissions and set up entry approval workflows to moderate submissions.
For a complete walkthrough, read our guide on displaying Gravity Forms entries using GravityView.
Importing and exporting data
Gravity Forms includes built-in export functionality, but certified add-ons extend it significantly:
Exporting entries:
- Export to CSV directly from the WordPress admin
- Export to Excel workbook for further analysis
- Export to PDF for reports and receipts
- Export to Google Sheets for collaborative analysis
Importing entries:
- Import from CSV or Excel files using GravityImport
- Migrate forms and entries between sites with our migration guide
For a full overview, see our guides on exporting data from Gravity Forms and importing entries to Gravity Forms.
Selling products with Gravity Forms
Gravity Forms can function as a lightweight eCommerce solution using its Pricing fields and payment add-ons. Product, Quantity, Option, Shipping, and Total fields let you build order forms, donation forms, and registration forms that collect payments.
To process payments, you will need a payment gateway add-on. Gravity Forms offers official integrations for Stripe, PayPal, Square, Authorize.net, and Mollie. Each gateway add-on creates a feed that processes the payment when the form is submitted.
For an overview of all available options, see our guide to Gravity Forms payment gateways.
For stores that need a full shopping cart, Gravity Forms also integrates with WooCommerce to add custom product configuration fields.
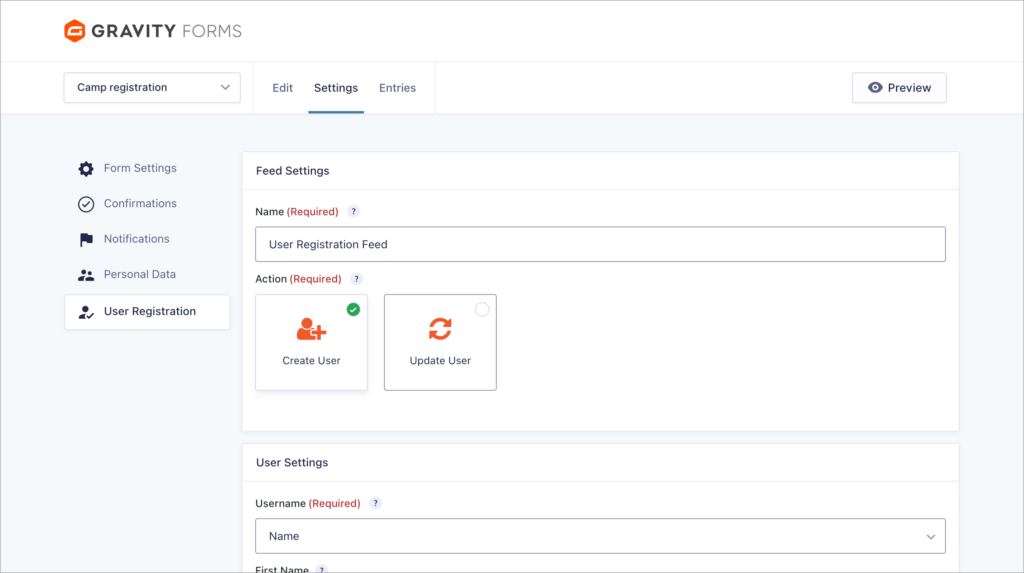
User registration
The User Registration add-on (available with the Elite license) creates WordPress user accounts automatically when a form is submitted. It is useful for membership sites, community platforms, and client portals. You configure it through a feed that maps form fields to user profile fields, set the default user role, and optionally combine registration with payment processing so accounts are only created after a successful transaction.
Calculations and dynamic pricing
Gravity Forms includes a built-in calculation engine that lets you perform math operations using field values. Any Number field can be turned into a calculation field, and Pricing fields support calculations for dynamic pricing.
Common use cases include:
- Quote calculators for service businesses
- Mortgage calculators for financial sites
- ROI calculators for SaaS and marketing
- Insurance quote calculators for agencies
- Dynamic order totals that update as users select options
Need advanced calculations that reference data across multiple forms or entries? Read our complete guide to Gravity Forms calculations.
Automations and workflows
Gravity Forms becomes even more powerful when connected to automation platforms. You can trigger actions in hundreds of external apps whenever a form is submitted, or an entry is updated.
Popular automation options include:
- Zapier – Connect Gravity Forms to 8,000+ apps with no code
- Make (formerly Integromat) – Build complex multi-step workflows visually
- Uncanny Automator – Automate actions between Gravity Forms and other WordPress plugins
- WP Webhooks – Send form data to any webhook endpoint
For approval-based workflows where entries need to be reviewed before processing, Gravity Flow adds multi-step approval, user input, and notification steps.
Dynamic field population
Dynamic field population lets you pre-fill form fields with data from URL parameters, user meta, or other sources. This is useful for personalizing forms for logged-in users, tracking marketing campaigns, and reducing data entry for returning visitors.
Gravity Forms supports dynamic population natively. For advanced lookups, like populating a field from another entry or a custom database table, the Dynamic Lookup add-on extends this functionality.
Go deeper: Populating fields dynamically in Gravity Forms (the ultimate guide).
Best add-ons and extensions for Gravity Forms
Beyond the official add-ons included with your license, third-party Certified Developers have built hundreds of extensions. For example, GravityKit offers solutions for exporting, importing, editing and displaying Gravity Forms data:
- GravityView – Display entries as directories, tables, lists, and maps
- GravityImport – Import entries from CSV and Excel files
- GravityExport – Export entries automatically on a schedule
- GravityEdit – Bulk edit entries in a spreadsheet-like interface
- GravityCalendar – Display date-based entries on a calendar
- GravityCharts – Create charts and visual reports from entry data
- GravityMath – Perform calculations across entries and forms
Browse all available add-ons (including free ones!) on the GravityKit products page.
Real-world use cases
Gravity Forms and GravityKit are used to build far more than simple contact forms. Here are some of the most popular real-world applications:
- Directories and listings –Business directories, member directories, and staff pages powered by GravityView
- Event management – Dynamic event registration systems with calendars and attendee management
- HR and internal tools – Vacation request systems, careers pages, and student report cards
- Content management – Testimonial walls, content publishing pipelines, and user-submitted content
- User profiles – Front-end profile editing for members and clients
- Project management – Kanban boards with GravityBoard for visual task tracking
Organizations like Princeton University, the Jacksonville Port Authority, and LifterLMS rely on Gravity Forms and GravityKit for mission-critical workflows. See our guide on building web apps with WordPress for more ideas.
Migrating from another form plugin
Switching to Gravity Forms from another plugin is straightforward with the right tools. GravityKit provides migration guides and tools for the most popular form plugins:
- Migrate from WPForms to Gravity Forms
- Migrate from Ninja Forms to Gravity Forms
- Import Contact Form 7 entries to Gravity Forms
- Migrate from Formidable Forms to Gravity Forms
- Migrate from Caldera Forms to Gravity Forms
Related guides
This guide is part of a series covering the most important Gravity Forms topics in depth. Explore the other guides in this set:
- Editing entries in Gravity Forms: A complete guide
- Importing entries to Gravity Forms: A complete guide
- Exporting data from Gravity Forms: A complete guide
- Displaying Gravity Forms entries: A complete guide
- Gravity Forms conditional logic: A complete guide
- Gravity Forms calculations: A complete guide
Frequently asked questions
All three licenses include the core form builder, conditional logic, and unlimited forms. The main differences are in add-ons and site limits. Basic ($59/year) covers one site and includes essential add-ons. Pro ($159/year) adds more integrations like Stripe, PayPal, and HubSpot. Elite ($259/year) unlocks everything, including priority support, the Conversational Forms add-on, and use on unlimited sites. If you’re unsure, start with Basic—you can upgrade anytime and only pay the difference.
Gravity Forms is a premium-only plugin with no free tier, which is its biggest difference from alternatives like WPForms Lite or Contact Form 7. Where it stands out is in advanced features: calculations, multi-page forms, conditional logic, payment integrations, and a large ecosystem of third-party add-ons. Free plugins handle simple contact forms well, but if you need features like file uploads with restrictions, user registration, or entry management, Gravity Forms is typically the more capable option. The choice depends on your project’s complexity.
Yes. Gravity Forms has a built-in export/import tool for forms and entries, but it handles them separately. You export the form structure as JSON and entries as CSV, then import each on the new site. For a more complete migration that preserves entries, feeds, notifications, views, and file uploads together, GravityMigrate transfers everything in one step. If you’re switching from another plugin like WPForms, GravityKit also has a migration guide covering the process.
Gravity Forms is the form plugin itself—it handles form creation, submissions, notifications, and entry storage. GravityKit is a separate company (a Gravity Forms Certified Developer) that builds add-ons extending what Gravity Forms can do. GravityKit’s products include GravityView (display entries on the front end), GravityEdit (inline entry editing), GravityExport (advanced exports to Excel/PDF), GravityMath (calculations across entries), and more. You need a Gravity Forms license first; GravityKit products are purchased separately.
Yes to both. Gravity Forms has an official User Registration add-on (available the Elite license) that creates WordPress user accounts from form submissions, including mapping form fields to user profile data. For post creation, the built-in Post Fields or the Advanced Post Creation add-on, let users submit content that gets published as a WordPress post or custom post type, complete with categories, tags, and featured images. Both features work with conditional logic so you can control when registration or post creation happens.
Gravity Forms includes a built-in Orbital theme that provides modern, accessible styling out of the box. You can adjust colors, border radius, font sizes, and spacing directly in the form editor without writing CSS. For deeper customization, you can add custom CSS in your theme’s stylesheet or use a page builder’s styling options (Gravity Forms works with Elementor, Divi, Beaver Builder, and others). If you need per-form styling control, the form editor includes a CSS class setting on each field for targeted adjustments. See our Gravity Forms styling guide for more information.
Yes. Gravity Forms has an official Quiz add-on (available with Elite licenses) that lets you create graded quizzes with multiple question types, automatic scoring, and pass/fail logic. You can display results immediately using conditional confirmations or email them via notifications. For weighted scoring or more complex assessment logic, like scoring subsections independently, you can use calculation fields with conditional logic to build custom formulas. If you need to generate a downloadable PDF report of results, a plugin like Gravity PDF can render scores and answers into a formatted document.
Gravity Forms itself is not HIPAA compliant out of the box—no WordPress plugin is, since compliance depends on your entire hosting and data handling setup. However, the HIPAA Forms add-on (a third-party add-on) provides encrypted form submissions, secure entry storage, and other safeguards required for handling protected health information. You’ll also need a HIPAA-compliant hosting provider and a Business Associate Agreement (BAA) with any service that touches patient data. If you’re in healthcare or handle sensitive information, consult with a compliance specialist alongside your technical setup.
Yes, at multiple levels. Gravity Forms natively supports dynamic population, enabling you to pass values into fields via URL parameters (e.g., ?first_name=Jane) or use merge tags and hooks to set defaults programmatically. For more advanced scenarios like pulling data from the WordPress database, custom tables, or other forms’ entries, the Populate Anything perk from Gravity Wiz lets you build dynamic queries directly in the form editor.