Published
•
Updated
How to style Gravity Forms: The ultimate step-by-step guide
Style Gravity Forms using built-in themes, custom CSS, or page builder integrations. This guide covers every approach to matching your form design to your site.

While Gravity Forms is a leading data management solution for WordPress, its default form styles may not fully align with the unique design and requirements of your website.
Fear not! In this post, we’re going to show you all the ways to style Gravity Forms—from using form themes, to writing your own custom CSS code. We leave no stone unturned in our mission to aid you in elevating your design game and making your forms not just functional but visually stunning 😉
Ready to transform your Gravity Forms from mundane to magnificent? Keep reading!
Why form styles are important to think about
The significance of interface design and UX design for Gravity Forms may be more important than you think! A well-designed form plays a crucial role in improving the user experience, and ultimately leading to better outcomes for your business.
Gravity Forms delivers a top-notch experience when it comes to usability and functionality. However, the Gravity Forms default styling often leaves much to be desired. Exerting a little extra effort to spruce up your forms can help your site achieve a consistent look and impressive your visitors.
How far can you get without custom styles?
Before we start explaining the different ways to style your forms, it’s important to know what’s possible using the Gravity Forms editor alone.
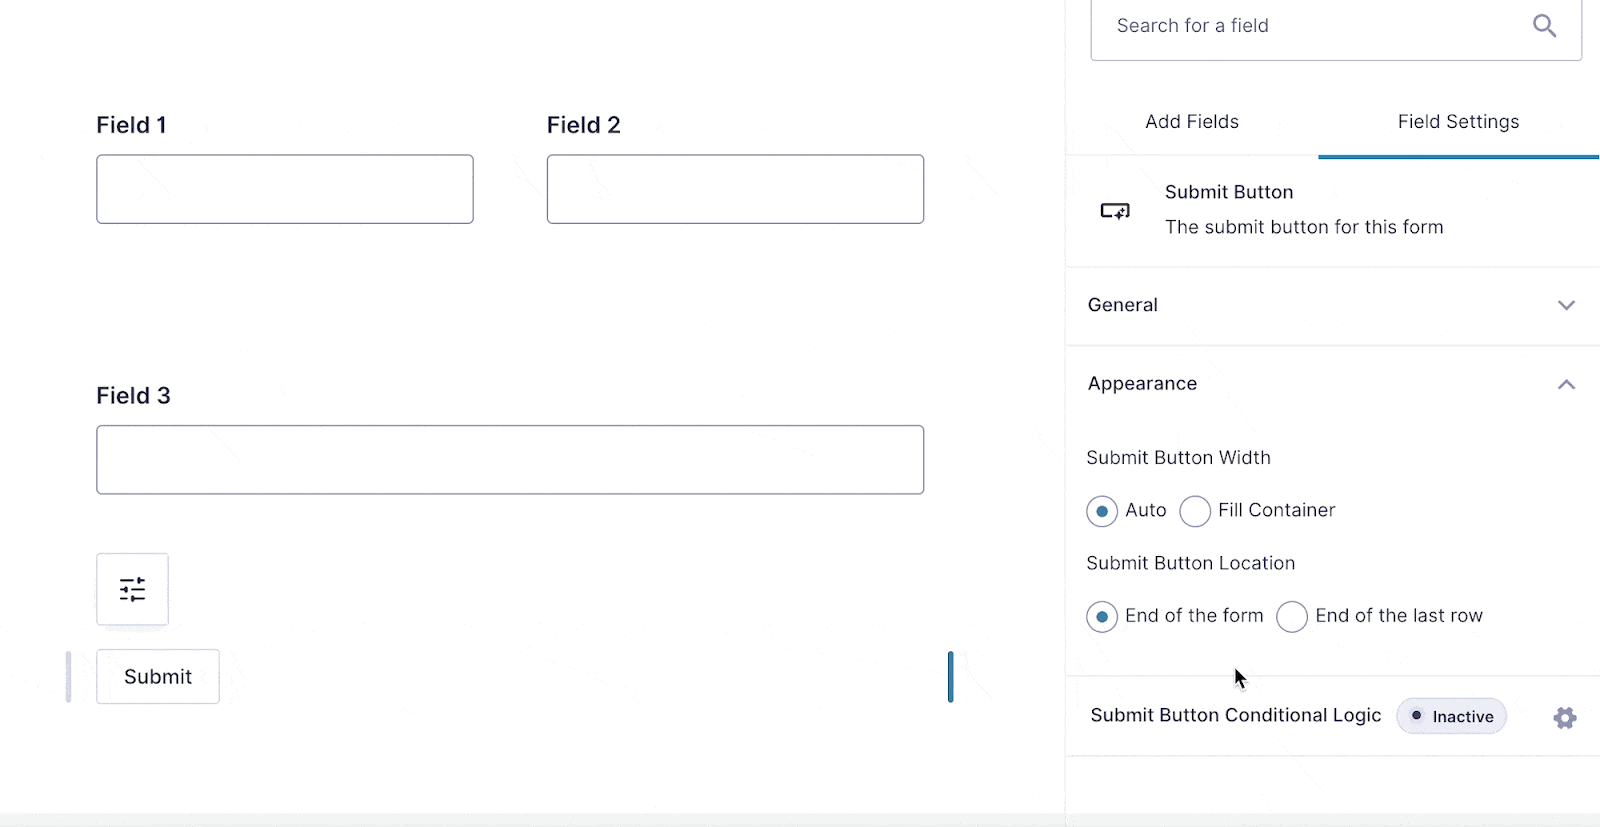
For example, you can display form fields side-by-side by simply dragging and dropping them next to each other.
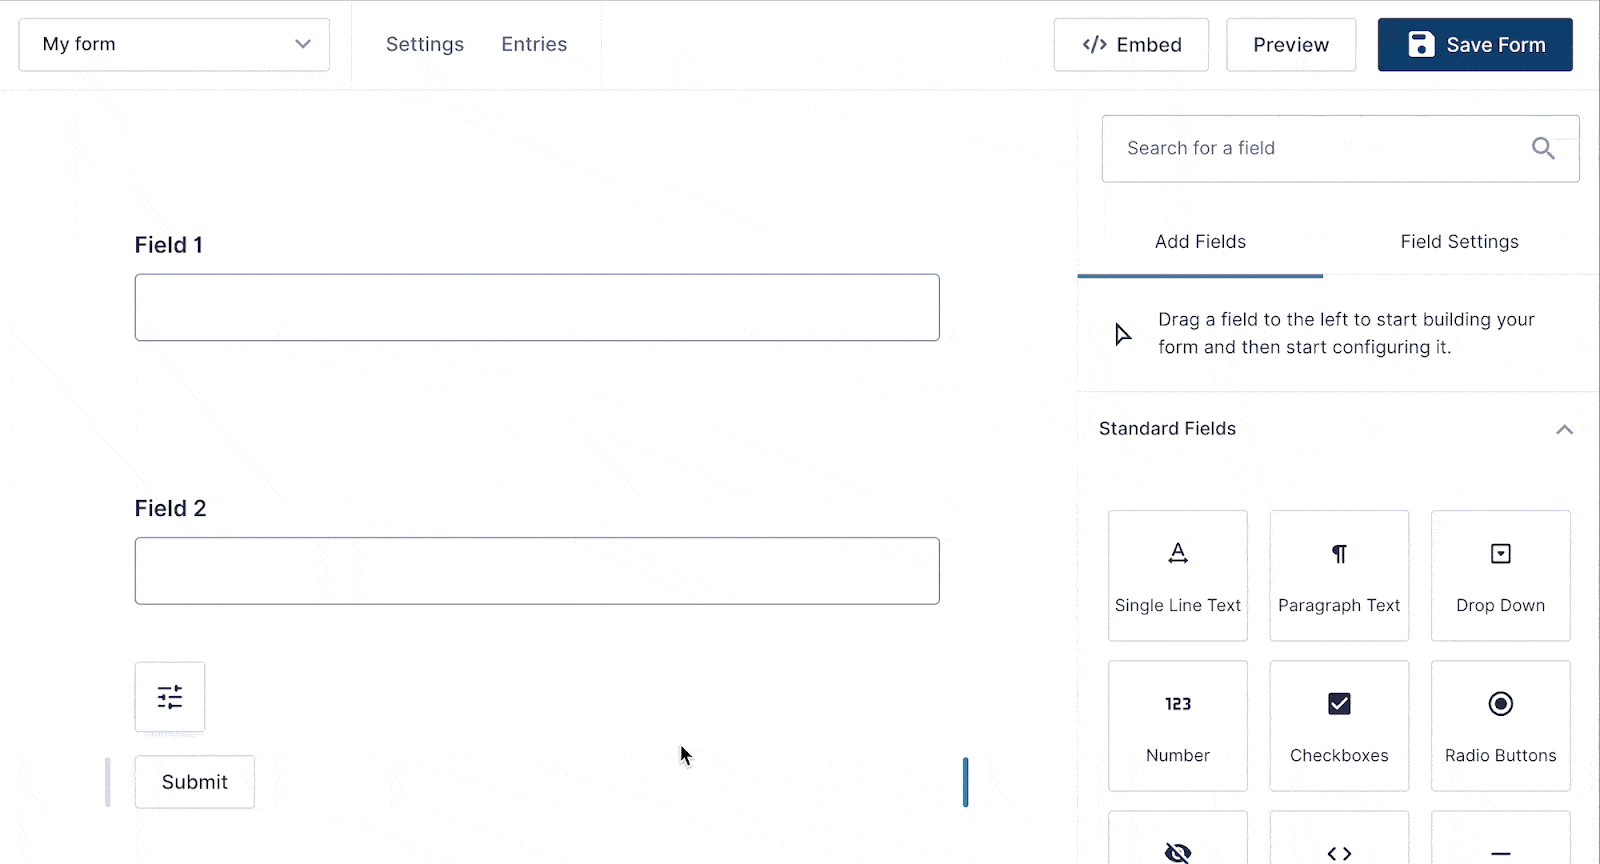
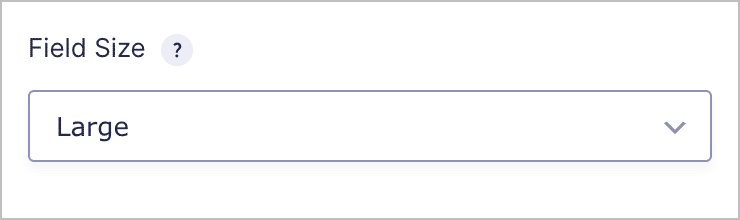
In the field settings, under “Appearance”, you can adjust the size of your form fields by selecting either small, medium or large.
Finally, there are also several options for customizing the submit button.
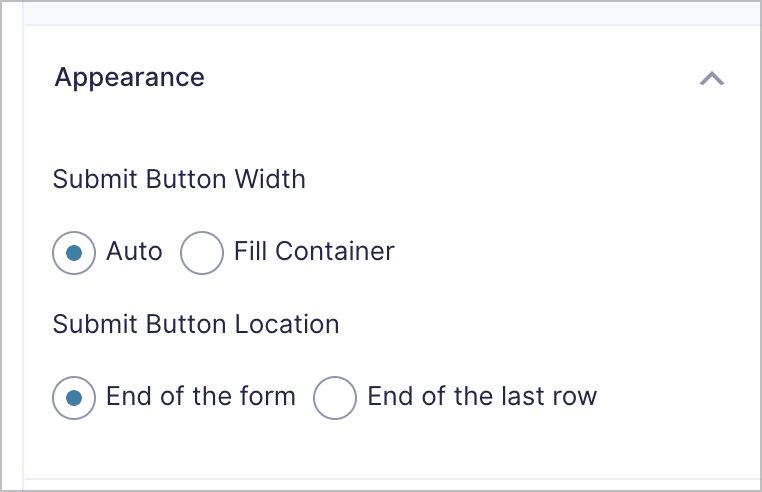
Here you can alter the size or location of the button.
Now that you know what’s possible using the Gravity Forms editor alone, let’s take a look at all the ways to add custom styles to your forms.
1. Styling Gravity Forms using form themes
The easiest way to style your Gravity Forms is by using form themes.
Form themes change the look and feel of your forms with preset styles. Currently, there’s only one theme available for Gravity Forms—Orbital. However, if the Orbital default styles don’t align with your site, then you can customize things yourself using the built in block styling options!
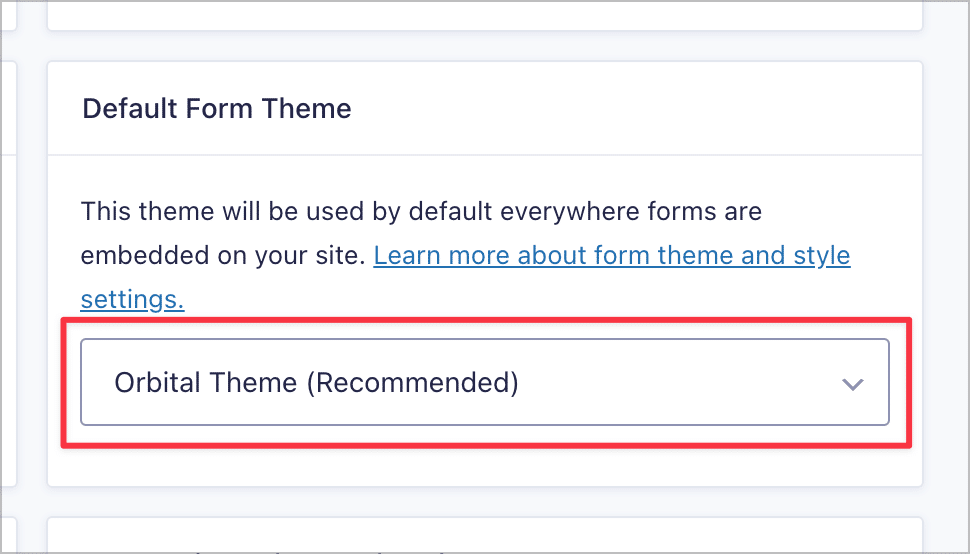
Before we get into that, it’s worth noting that you can set a default form theme for all new forms that you create. To do this, simply hover over “Forms”, click “Settings”, scroll down to Default Form Theme, and select your chosen theme from the dropdown (e.g. “Orbital”).
Using the Orbital form theme, you can add custom styles to your form from inside the WordPress editor. Start by adding a “Form” block to your page and selecting your chosen form from the dropdown. Next, ensure that the theme is set to “Orbital”.
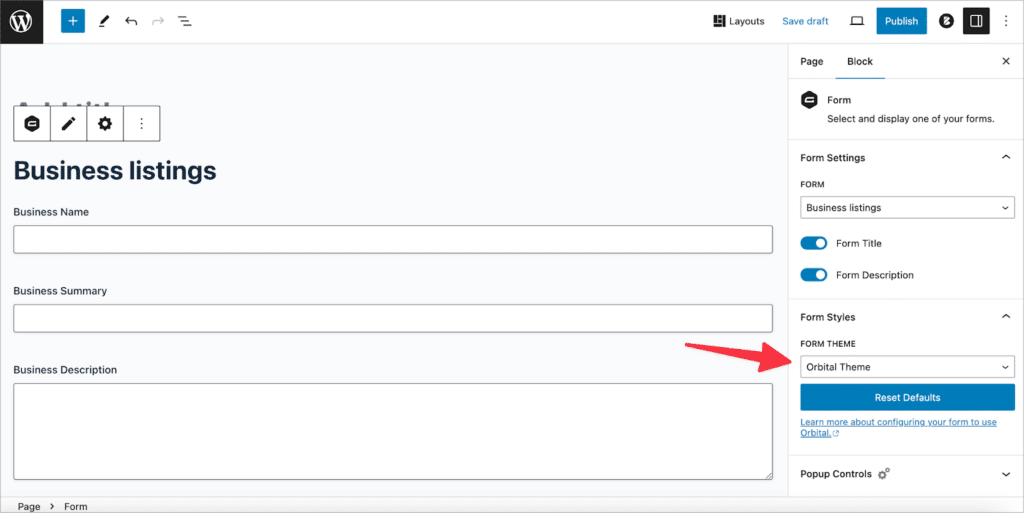
You will now see several tabs in the block settings for styling different elements of your form, this includes the inputs, labels, button, and description!
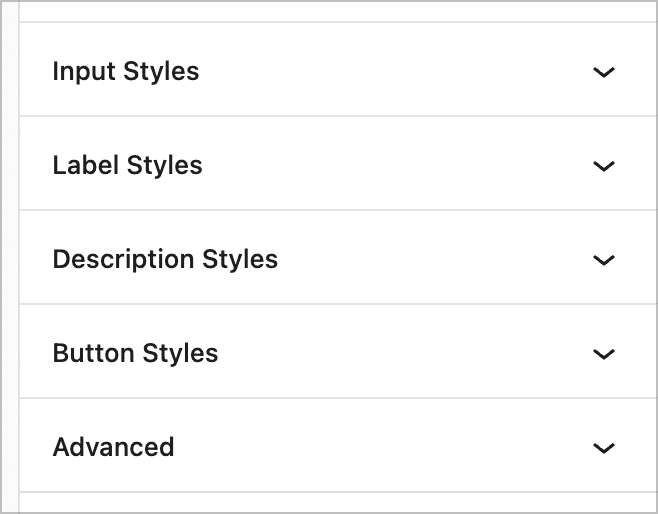
Let’s go through each option, one by one.
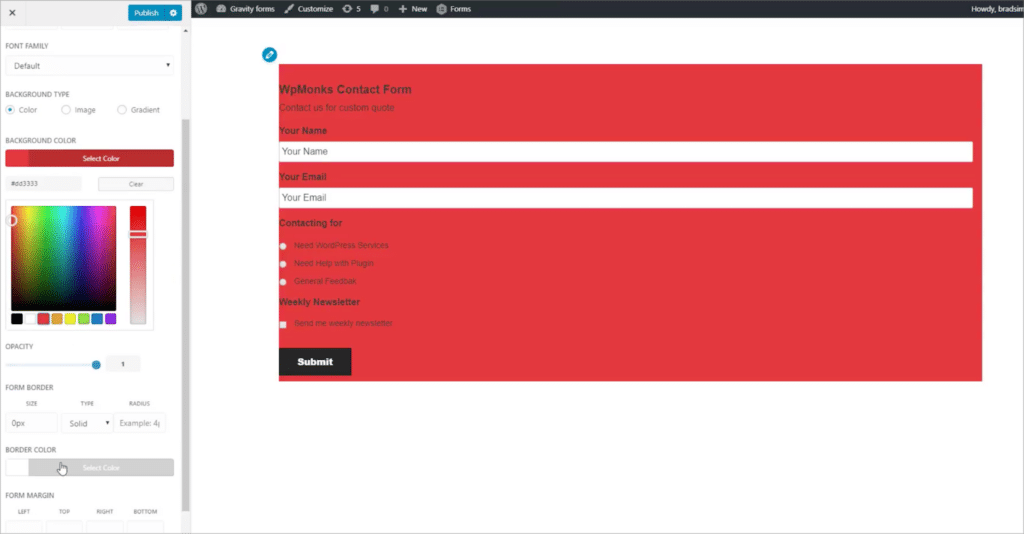
Input styles
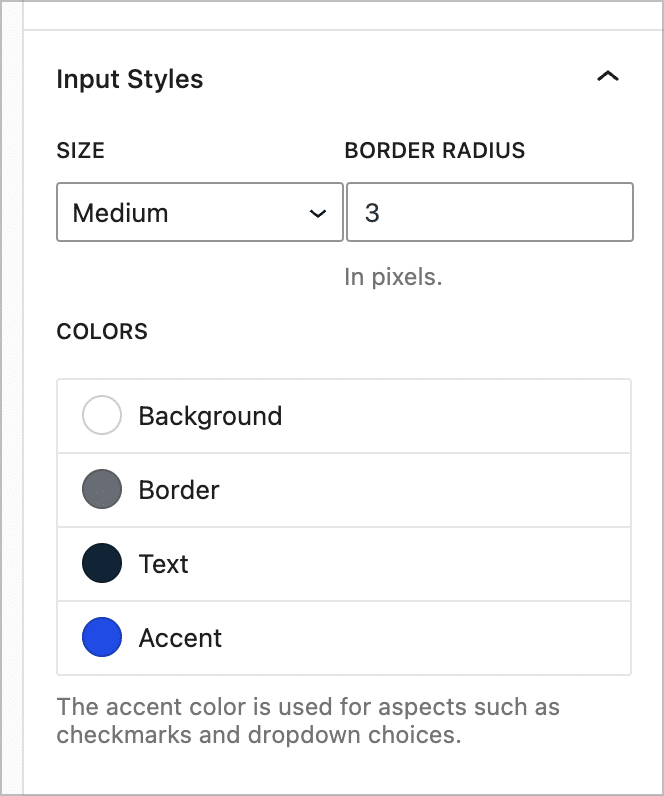
The “Input Styles” panel allows you to modify the size, border radius, background color, border color, accent color, and text color of your form input fields. This applies to all input types including text inputs, radio buttons, dropdowns, checkboxes, etc.
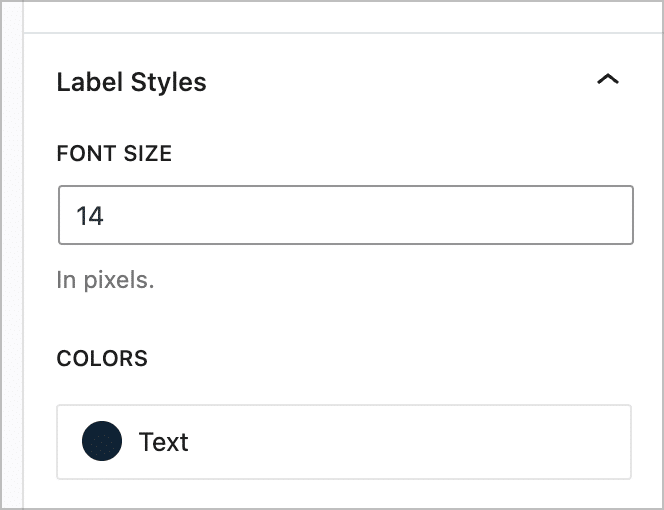
Label styles
The “Label Styles” panel allows you to change the font size and colors of your form’s field input labels.
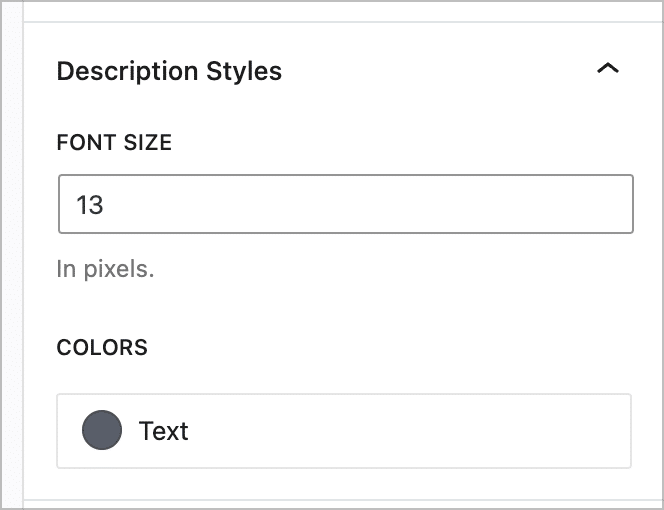
Description styles
The “Description Styles” panel allows you to change the font size and color of your form’s field description text.
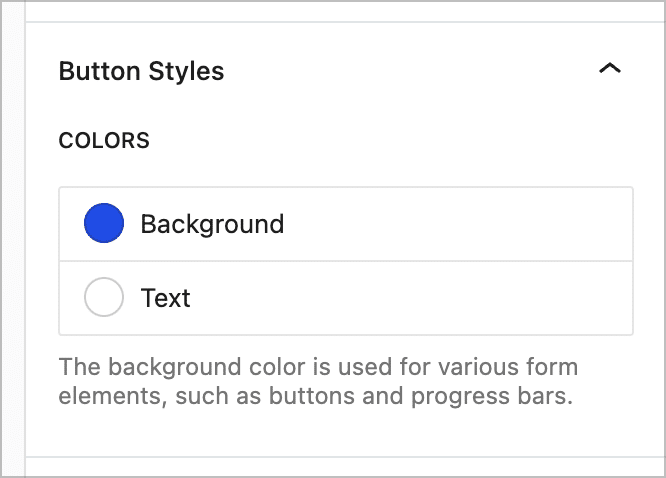
Button styles
The “Button Styles” panel allows you to change the background and text color of your form’s submit button.
While these style options aren’t exhaustive, they do enable you to create great looking forms without needing custom code or additional plugins!
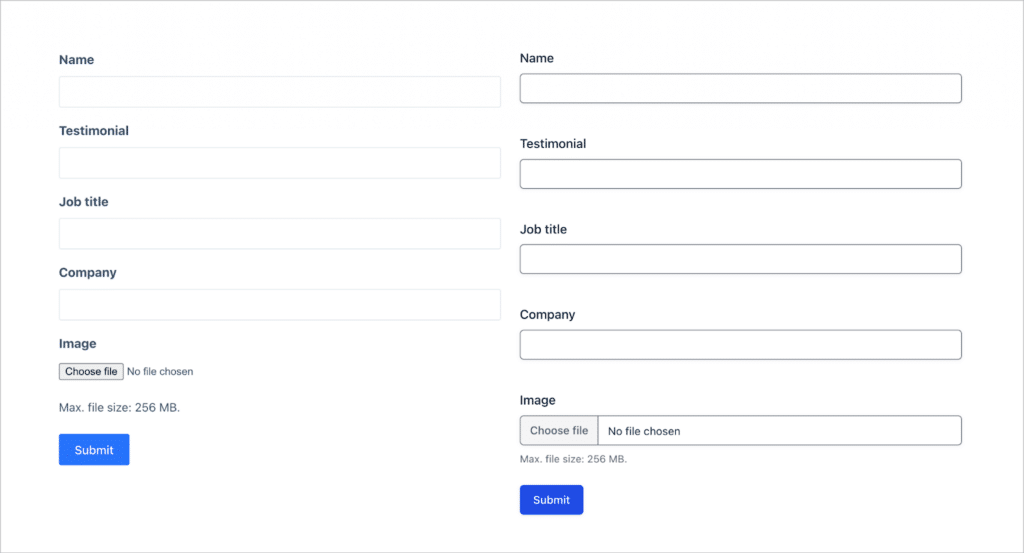
In the below example, the form on the left is using the default form styles, and the form on the right is using the Orbital theme (without any customization).
Pro tipYou can learn more about the Orbital theme and style options in the Gravity Forms documentation.
If you want more granular control over the look and feel of your forms, you can add styles using custom CSS code.
2. Styling Gravity Forms using CSS
Using CSS allows you to style all aspects of your Gravity Forms! There’s almost no limit to what you can achieve with clever use of CSS, but that doesn’t mean it’s easy. On the contrary, mastering CSS can be a challenge!
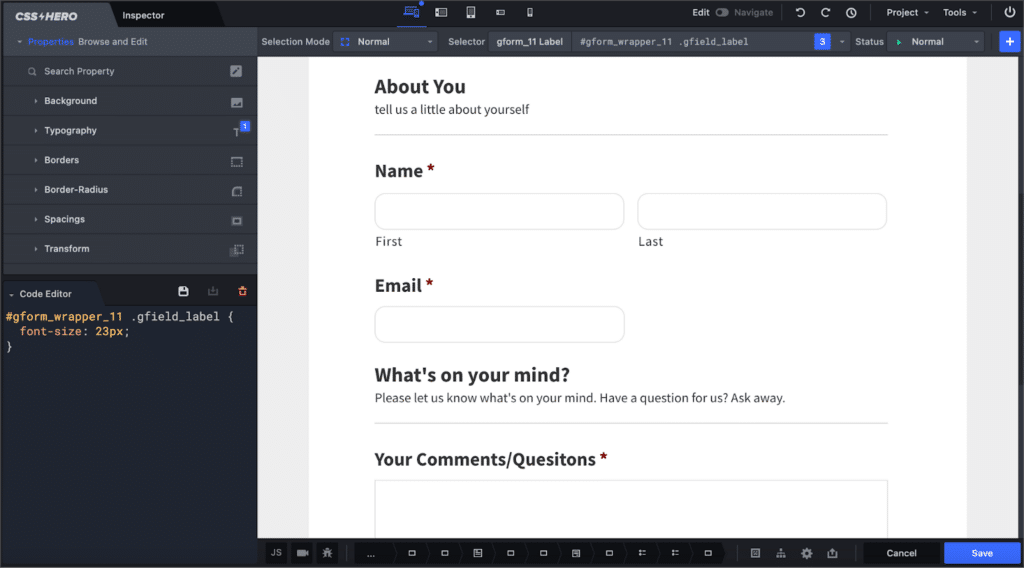
Luckily, Gravity Forms has some great resources to help you in this regard. For example, their visual CSS guide gives you a visual look at how forms are structured and all the CSS classes and IDs associated with different elements.
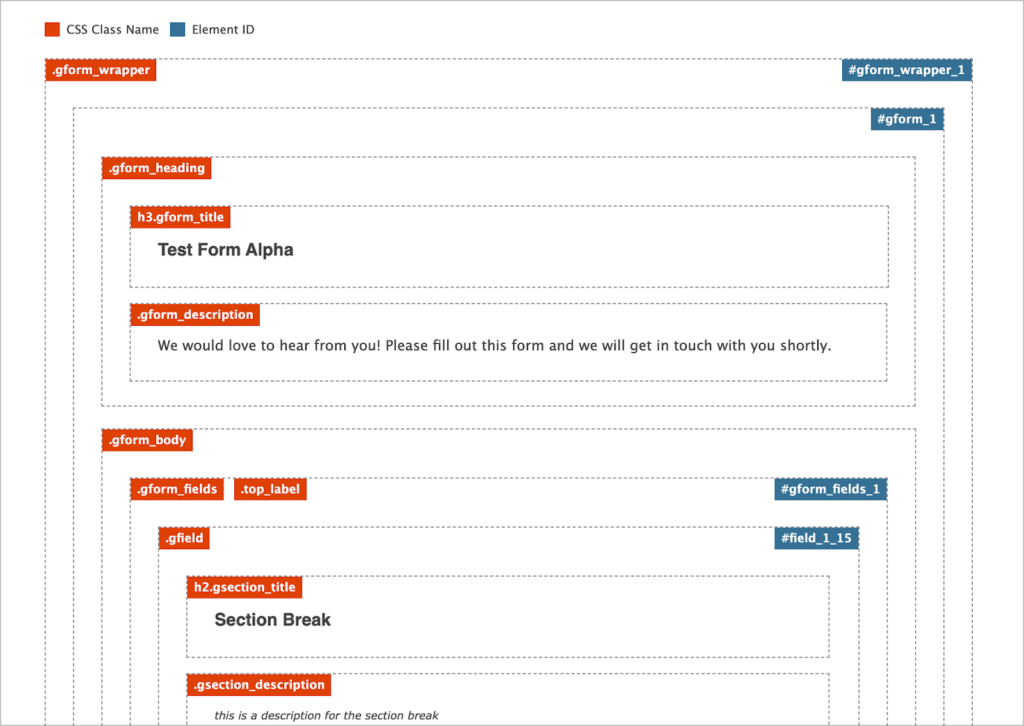
This can help you to target the correct elements with your CSS to achieve the look that you want. Gravity Forms also provides a number of “CSS ready classes”, which are classes that you can add to form elements to achieve a specific look.
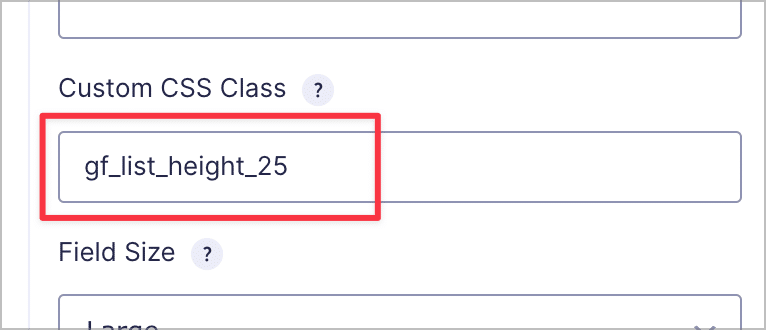
CSS ready classes
CSS ready classes are preset classes supported by Gravity Forms. You can use these to alter the look and feel of your forms without needing to write your own CSS styles! You can find a full list of all supported classes here.
To add a CSS class to a form field, open the field settings in the form editor, click the “Appearance” panel and add the class to the “Custom CSS Class” box.
Pro tipFor more information on CSS ready classes in Gravity Forms and how best to use them, read this helpful guide.
Style the Gravity Forms submit button with CSS
If you’re looking to style your form’s submit button, you can do so by using the following CSS selector:
body #gform_wrapper_1 .gform_footer input[type=submit] {// your styles}Just remember to replace “1” with your form’s ID.
If you want to learn more about adding custom styles to the submit button, adding hover effects, and more, read this article on the Gravity Forms docs site.
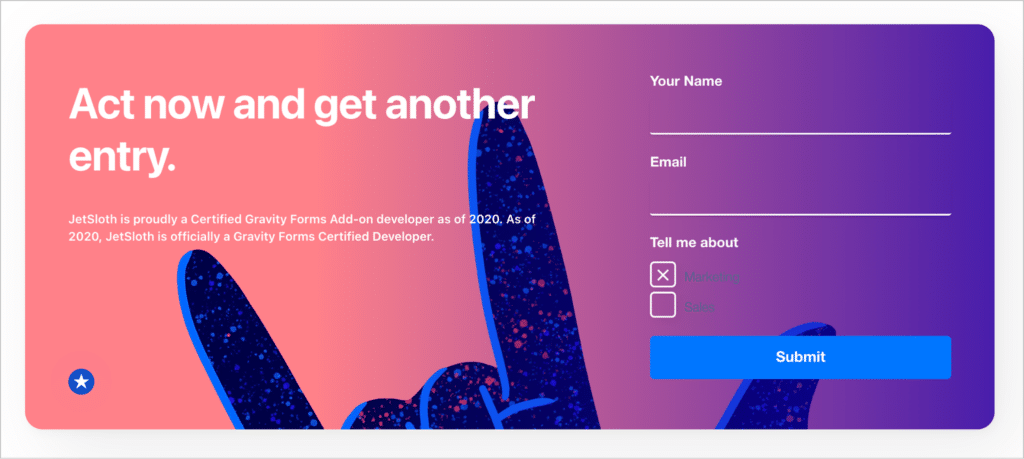
JetSloth’s design examples
Finally, we have to give a shoutout to JetSloth and their awesome Gravity Forms CSS design tutorials and examples. JetSloth is a Gravity Forms Certified Developer that builds add-ons focused around design enhancements.
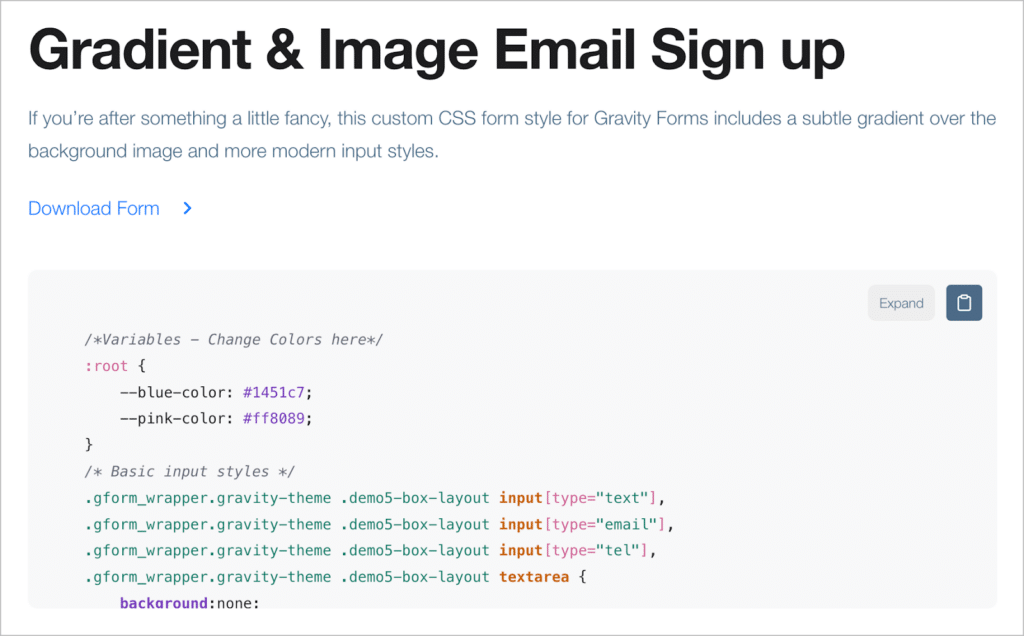
The JetSloth team are experts with it comes to design (including UI/UX) and have written some helpful guides on styling Gravity Forms with CSS! Just take a look at one of their stunning examples below:
For more CSS guides from JetSloth, check out their blog!
3. Styling Gravity Forms with a plugin
If you’re not comfortable with CSS, you can style your Gravity Forms using a plugin! There are several plugins out there built for this purpose. We’ll review a few of the best ones below.
Styles and Layouts for Gravity Forms
This is a free plugin, available for download on the WordPress.org plugin directory. Styles and Layouts for Gravity Forms allows you to style your Gravity Forms using the WordPress Customizer. There are over 150 options in total for customizing different aspects of your forms.
Furthermore, the changes you make reflect instantly, enabling you to see exactly what your changes look like when you make them.
Gravity Forms Styles Pro Add-on
This is a paid plugin that allows you to style your Gravity Forms by choosing from a range of design options. Gravity Forms Styles Pro Add-on also includes 9 built in, preset themes to choose from, which you can use as a starting point for your own designs.
CSS Hero
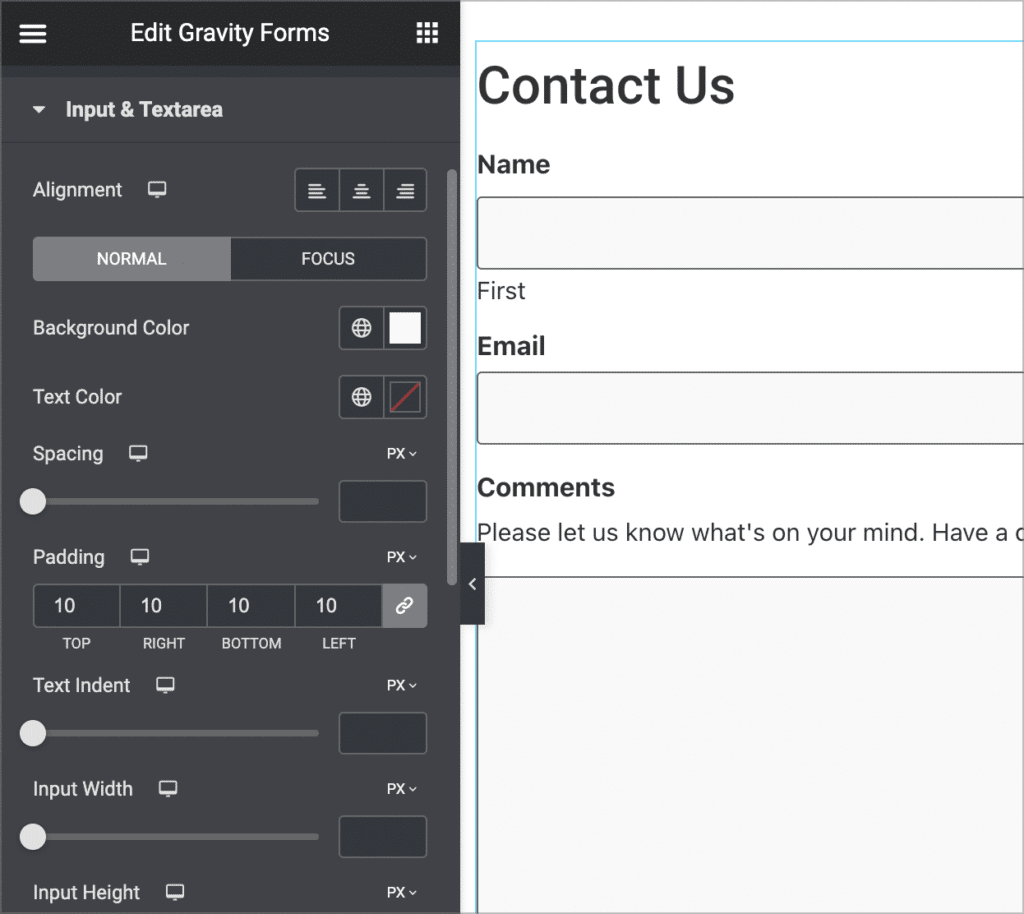
CSS Hero is the ideal plugin for those who aren’t confident in their CSS knowledge. After installing the plugin, you will be able to edit your forms live using point-and-click functionality!
You can use your mouse to select the specific part of the form you want to style and then customize the look and feel using the options on the left. CSS Hero will then output the correct CSS based on the styles you choose.
That’s right. You can style your forms with custom CSS, without actually writing any CSS code yourself. Pretty nifty, right?
Now let’s look at how to style Gravity Forms using popular page builders.
4. Styling Gravity Forms using page builders
WordPress page builder plugins allow you to build complex page layouts using drag and drop, without needing to write any custom code. Most popular page builders also have add-ons that allow you to style Gravity Forms! Below are some of the most popular ones.
Styling Gravity Forms in Elementor
If you’re using the Elementor page builder, you’ll need to install the PowerPack add-on in order to style your Gravity Forms using Elementor’s visual interface.
After installing the add-on, you’ll see a “Gravity Forms” widget inside Elementor, which you can add to your page layouts. After adding the widget, you’ll need to select the form you want to display. You can then style it from the “Styles” tab.
Pro tipIf you’re an Elementor users, you can learn more about these two no-code tools by reading our complete guide to Gravity Forms and Elementor.
Styling Gravity Forms in Beaver Builder
PowerPack also offers a range of add-ons for Beaver Builder, including a Gravity Forms styler! So, if you’re a Beaver Builder user, simply install the add-on to start styling your Gravity Forms without any code.
Styling Gravity Forms in Divi
If you use the Divi builder, then you’re in luck! The Gravity Forms Styler for Divi add-on allows you to add Gravity Forms to your Divi layouts (without a shortcode) and style them without needing to write custom CSS code.
The plugin includes support for a wide range of Gravity Forms field types, such as File Uploads, and other input fields.
How do you change the font on Gravity Forms?
Gravity Forms inherits the font and text size from your theme. However, if you want to change this, you can use the below CSS snippets.
Change the font size for all of your forms:
body .gform_wrapper .gform_body {

    font-size: 18px;

}
Change the font type for all of your forms:
body .gform_wrapper .gform_body {

    font-family: Arial, Helvetica, sans-serif;

}
Pro tipYou can learn more about the CSS font family property here.
Where do I put CSS for Gravity Forms?
If you have decided to style your forms using CSS, you may be wondering where to actually put the CSS code! You have three options:
- Add the code to your theme customizer
- Add the code using a plugin like Code Snippets
- Add the code to your theme directly by modifying the stylesheet

Enhance Gravity Forms to fit your design
In this post, we showed you several different ways to customize Gravity Forms, and ensure your forms align with the unique design and needs of your website!
Using Gravity Forms’ built in form themes is the easiest way to customize the look and feel of your forms on the front end. However, for more granular control over form styles, you’ll need to add your own CSS code or use a plugin that does it for you.
We hope this walkthrough helps you refine your forms to better match your site’s design. Remember, simplicity often achieves the most elegant results!

Helpful tips right in your inbox.
Subscribe to get the latest articles, information on releases and helpful Gravity Forms tips!
More articles

10 things you can ask AI to do with Gravity Forms (using the free GravityKit MCP)
See 10 practical things you can ask AI to do with Gravity Forms using the free GravityKit MCP: create forms, manage entries, build Views, and more.

Launch Log: theme template editing in Block MCP, Shield silentCAPTCHA for Zero Spam, and GravityView fixes
Block MCP adds safe theme template editing, Gravity Forms Zero Spam gains Shield silentCAPTCHA support, and GravityView fixes lightbox and notice bugs.

GravityKit turns 12: a year in review, and 30% off Lifetime All Access
GravityKit turns 12. A look back at a year of GravityView 3.0, GravitySearch, and AI-assisted building, plus a birthday sale on the Lifetime All Access Pass.
