Published
•
Updated
How to build a quote calculator for lead gen using Gravity Forms (step by step tutorial)
Build a lead-generating quote calculator with Gravity Forms and GravityView. Collect pricing requests, capture lead data, and follow up with potential clients without writing code.

Offering a quote calculator on your website is a powerful way to convert site visitors into leads. In this step-by-step guide, we’ll show you how to build a fully functional quote calculator using Gravity Forms, and manage leads on the front-end using GravityView.
Whether you’re a freelancer, consultant, or run a service-based agency, a quote calculator gives potential clients quick pricing estimates while enabling you to collect lead data and follow up effectively.
Download the free quote calculator form template now!
Import the template into Gravity Forms and customize as necessary.
We’ll email it to you right away!
What you’ll need
Here are the plugins you’ll need to build a quote calculator like the one in this tutorial:
- Gravity Forms (any license level)
- GravityView (optional – manage leads on your site)
What is a quote calculator?
A quote calculator is an interactive form that helps visitors estimate the cost of services or products based on inputs they select (like company size, number of projects, or consulting hours).
On top of streamlining the pricing conversation, quote calculators offer two major benefits:
- Save time by answering common pricing queries automatically
- Capture valuable leads by requesting contact details like name and email
Why use Gravity Forms to build a quote calculator?
Gravity Forms is a powerful form builder plugin for WordPress that comes with advanced features like conditional logic, calculations, and merge tags. With a few number fields and simple formulas, you can turn any form into a smart quote calculator.
Quote calculators are also great lead generators! Here are some businesses that can benefit from having a quote calculator:
- Consultants
- Freelancers
- Web design agencies
- Insurance companies
- Many more!
Step 1: Create the quote calculator form
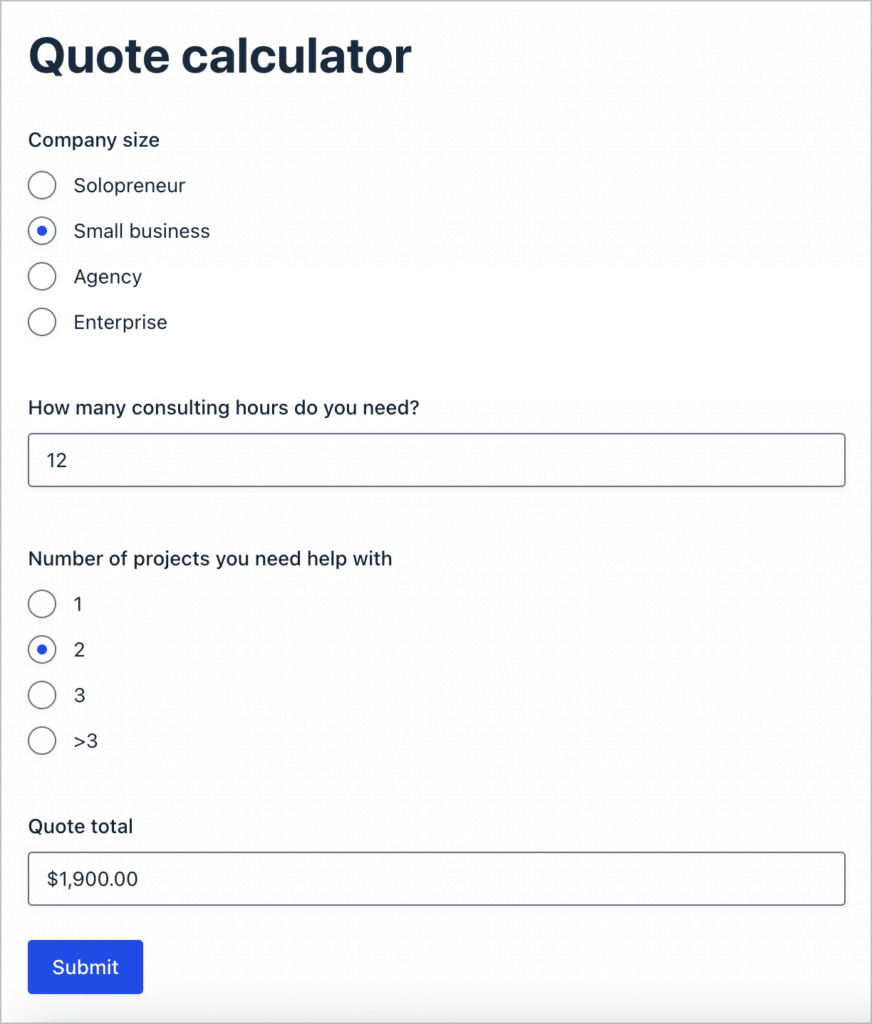
In this example, we’ll create a quote calculator for a consulting business.
To create a new form in Gravity Forms, we’ll hover over “Forms” and click “New Form”. After giving our form a name, we can start adding fields using the drag-and-drop editor.
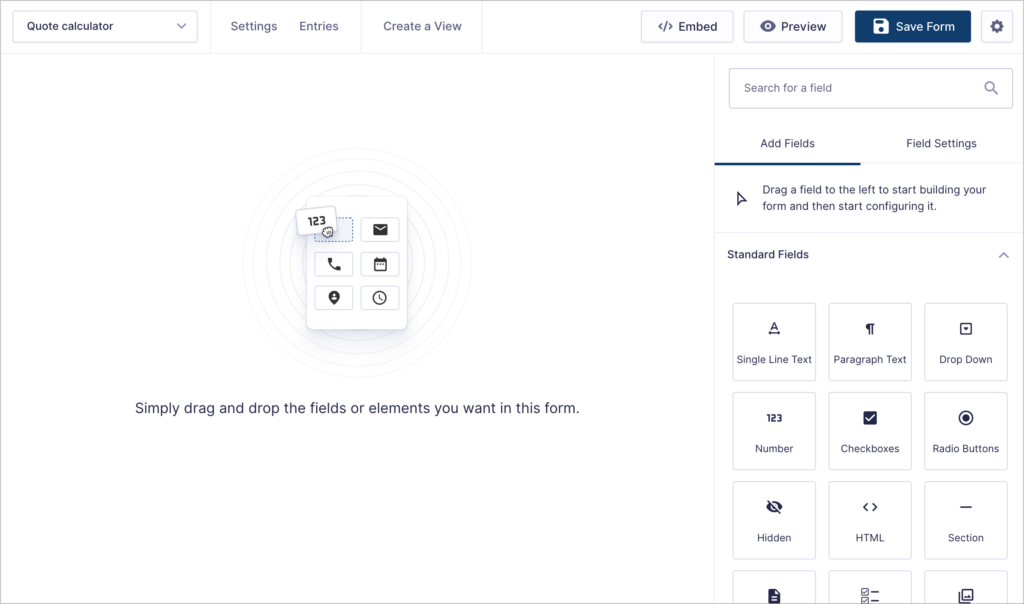
In order for us to send the client an estimated quote, we’ll need them to tell us a bit about their business and what they require. With this in mind, we’ll add the following fields to our form:
- Name (Name field)
- Email (Email field)
- Company size (Radio Buttons)
- Number of projects you need help with (Radio Buttons)
- How many consultation hours do you need? (Number)
- Price per hour (Hidden Number field)
- Quote estimate (Hidden Number field)
Step 2: Configure the pricing logic
The estimated quote we give to the client is going to differ depending on their company size, number of projects, and number of consulting hours needed.
Here’s the formula we’ll use:
Company size + Number of projects + (Consultation hours × Hourly rate)Here’s how we can set this up:
- We’ll assign dollars values to the different options for “Company Size” and “Number of Projects”
- Set the hourly rate (e.g., $50) in the hidden “Price per Hour” field.
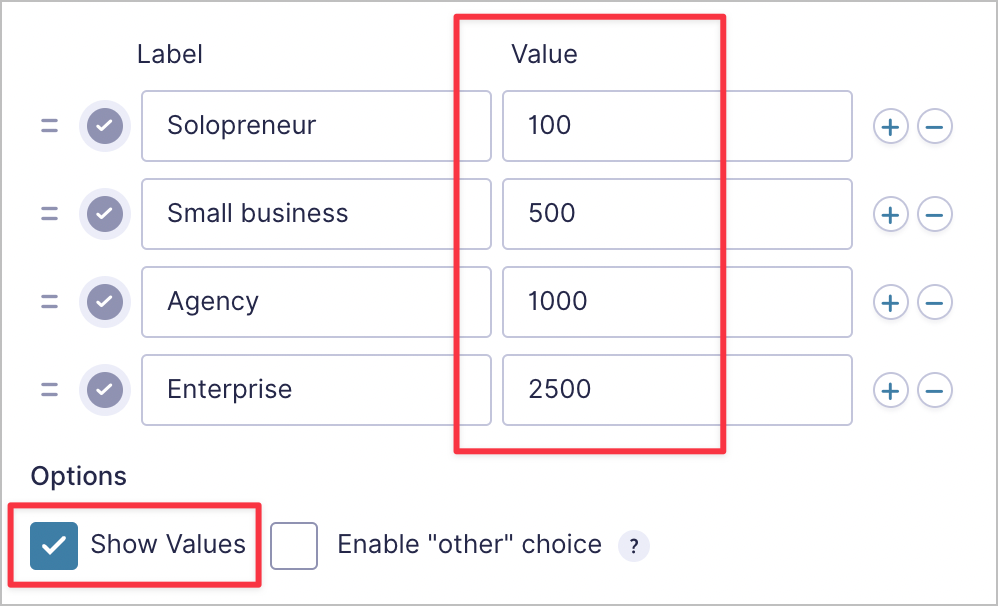
As you can see from the screenshot above, we’ve attached a value (in dollars) to each company size. So, the larger the company, the more we’ll charge as a base consulting rate.
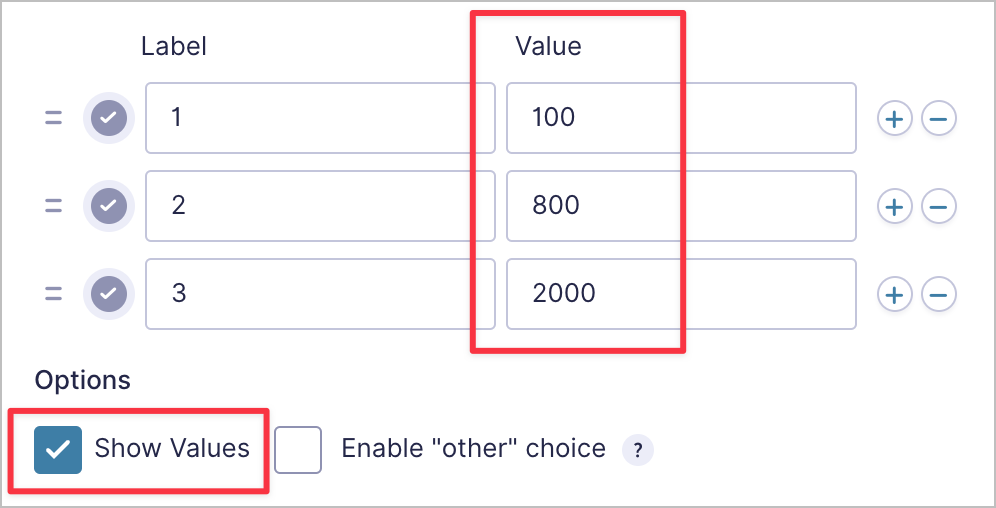
We’ll do the same thing for the number of projects. In other words, the more projects the client needs help with, the more we’ll charge.
Next, we ask the client how many consulting hours they think they’ll need. For this, we’re using a “Number” field, allowing the client to input any number of hours they like. We’ll need to attach a dollar value to this, so for that, we’ll use a separate hidden field containing our standard hourly rate (e.g. $50).

If the user enters 10 hours, then the overall cost should amount to $500. So far, so good!
Finally, we’ll add another hidden “Number” field to our form labeled “Quote estimate”. We’ll use this field to output the final amount of the quote.

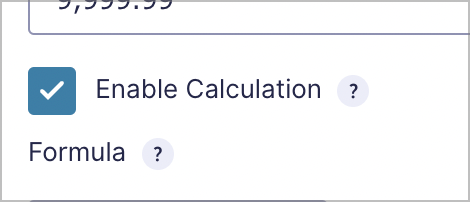
To do this, we’ll open the field settings, scroll down and check the box that says “Enable Calculation”.
We can now use Gravity Forms merge tags to input the formula that works out the estimated quote:
{Company size: 6} + {Number of projects you need help with: 10} + ({Price per hour:4} * {How many consultation hours do you need?:8})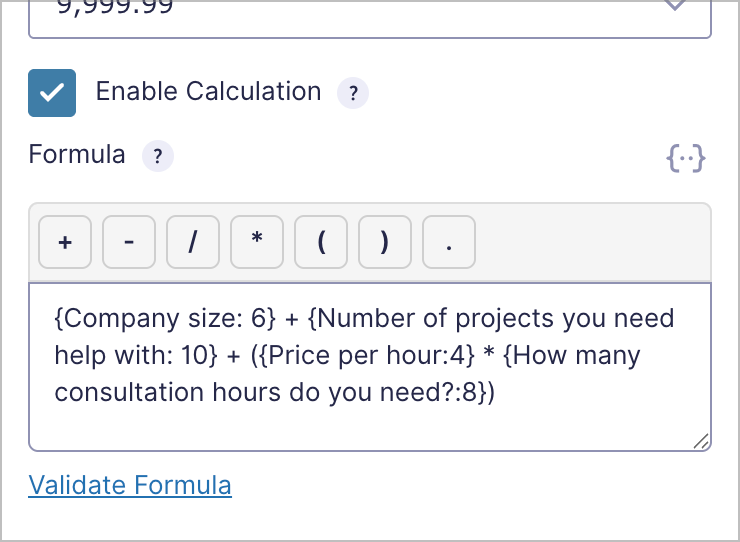
Step 3: Display the quote upon submission
The next step is to take the estimated quote amount and display it in the confirmation message after the user submits the form. To do that, we’ll hover over “Settings”, click “Confirmations”, edit the default confirmation message and add the following text:
Here’s your estimated quote: ${Quote Estimate:9}.

Want to take the next step? [Contact us here].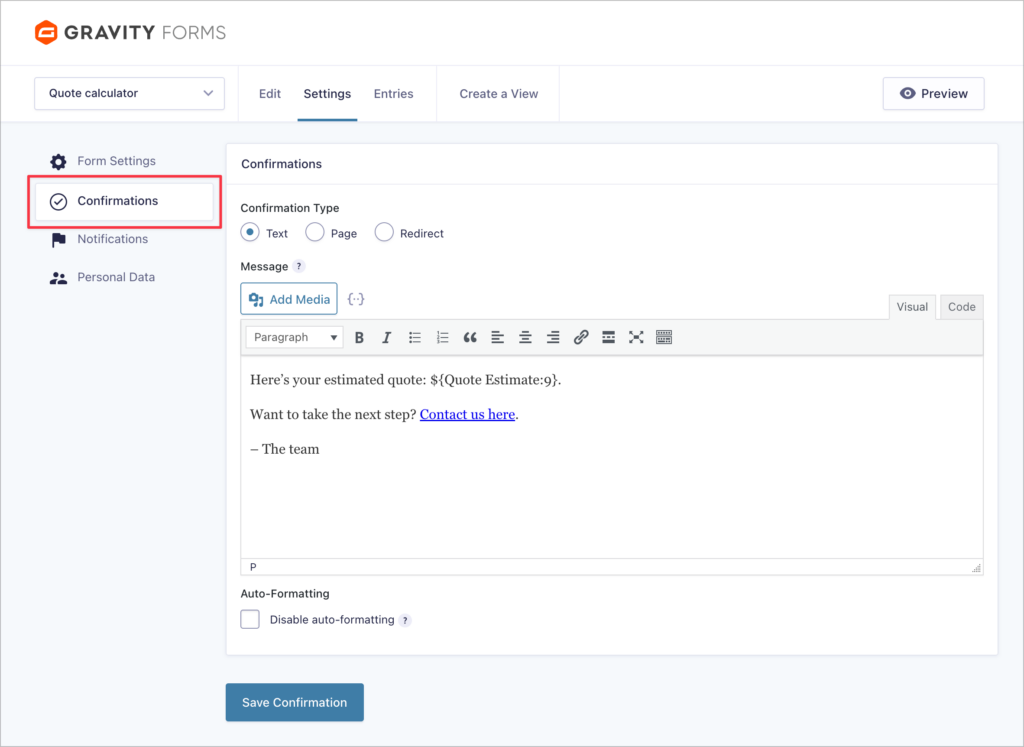
That’s it!
Now, when a potential client submits our form, like this:

They’ll see a message with their estimated quote, along with a link to contact us so we can start working together!
Pretty cool, right? Feel free to take this example and run with it! You can build a simpler or more sophisticated quote calculator form depending on your use case.
Pro tipYou can also email quotes to customers by adding the quote total inside a notification email. Learn more about Gravity Forms Notifications.
Step 4 (Optional): Manage leads from the frontend using GravityView
If your quote form gets used frequently, you’ll want a way to track submissions and follow up with clients—all without logging into the WordPress backend.
Using GravityView, you can create a searchable, sortable “Quote Requests” table that displays form entries directly on a front-facing web page.
Here’s how to do it:
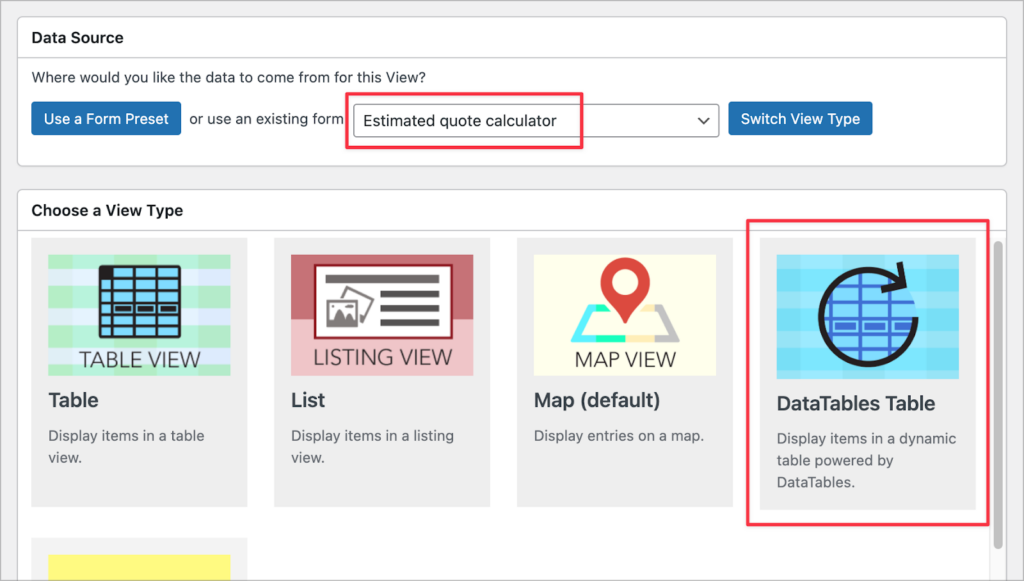
- Hover over GravityKit and click “New View”
- Pick your quote form as the data source
- Choose a layout (e.g. DataTables for sorting/searching)
- Add the form fields you want to display in the “Entries Fields” section
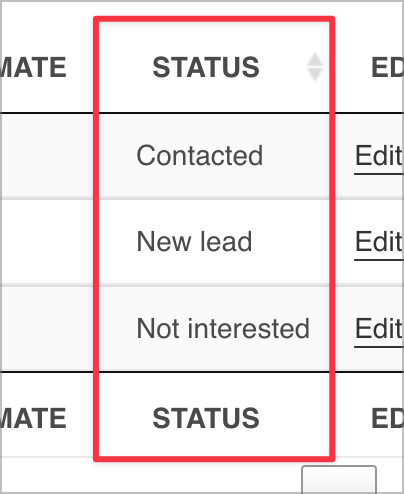
- Add a “Status” field to track each submission (e.g. “New,” “Contacted,” “In Progress”)
Configuring the View
We’ll create a new View by hovering over “GravityKit” in the sidebar and clicking on “New View”. After giving our View a name, we’ll select our quote form as the data source and choose a View layout. For this example, we’ll use the DataTables layout.
Now we can start adding fields to our table using GravityView’s drag-and-drop editor. To add new fields, we’ll scroll down to the “Entries Fields” section and click on the ‘Add Field’ button.
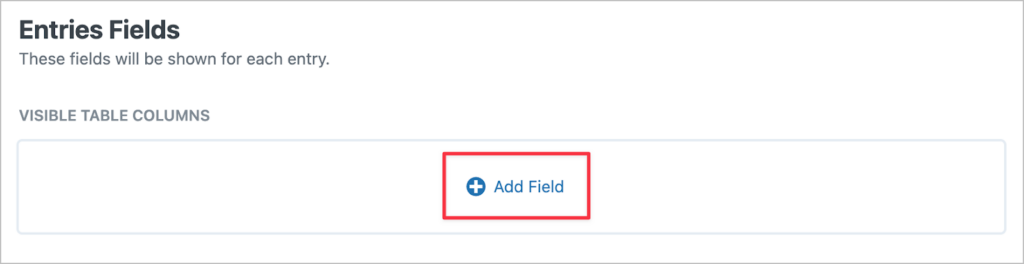
This brings up a list of all our form fields; we can click on one to add it to our layout.
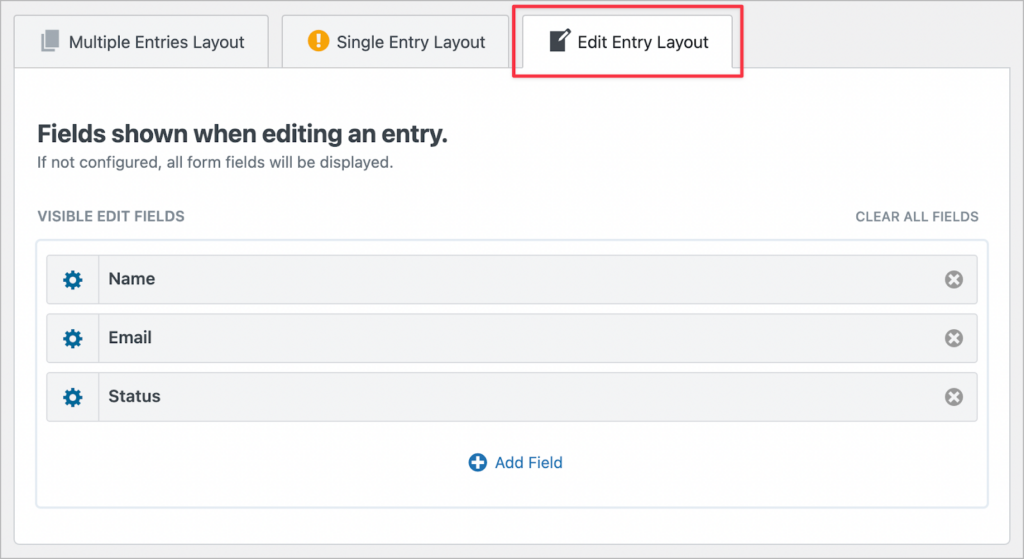
GravityView also allows users to edit form entries from the frontend. To enable this functionality, all we need to do is click on the “Edit Entry Layout” tab at the top of the View editor and add the fields we want to be editable. After that, we’ll add a link to the Edit Entry page in our table.
Now we can add a search bar, allowing users to search for specific entries and filter entries by specific values. We’ll do this by adding a Search Bar widget to the Multiple Entries Layout and configuring the different search inputs.
Okay, let’s take a look at our View on the front end.
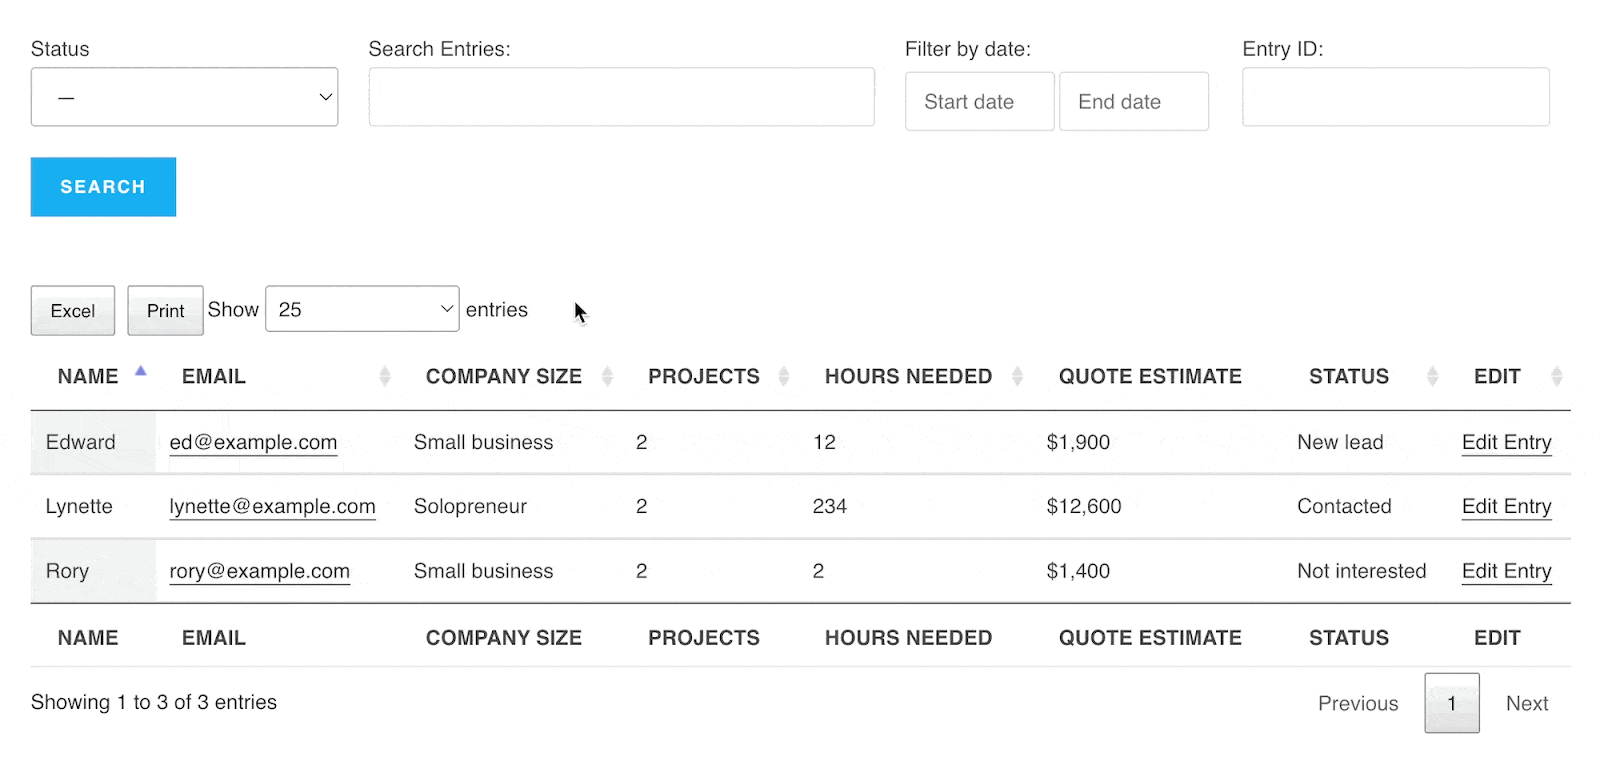
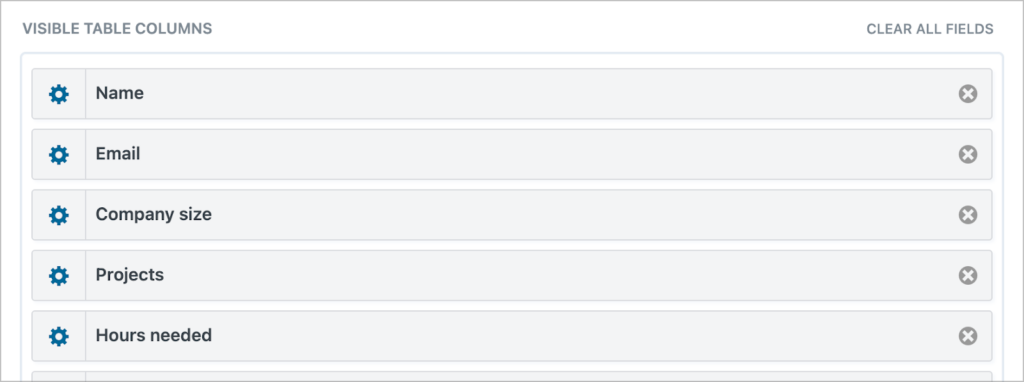
As you can see, each new lead is displayed in a table, along with the information they filled out in the form. We also added a “Status” column, allowing us to track the status of each lead. This is how we know whether it’s a new lead and whether they’ve already been contacted by our marketing team.
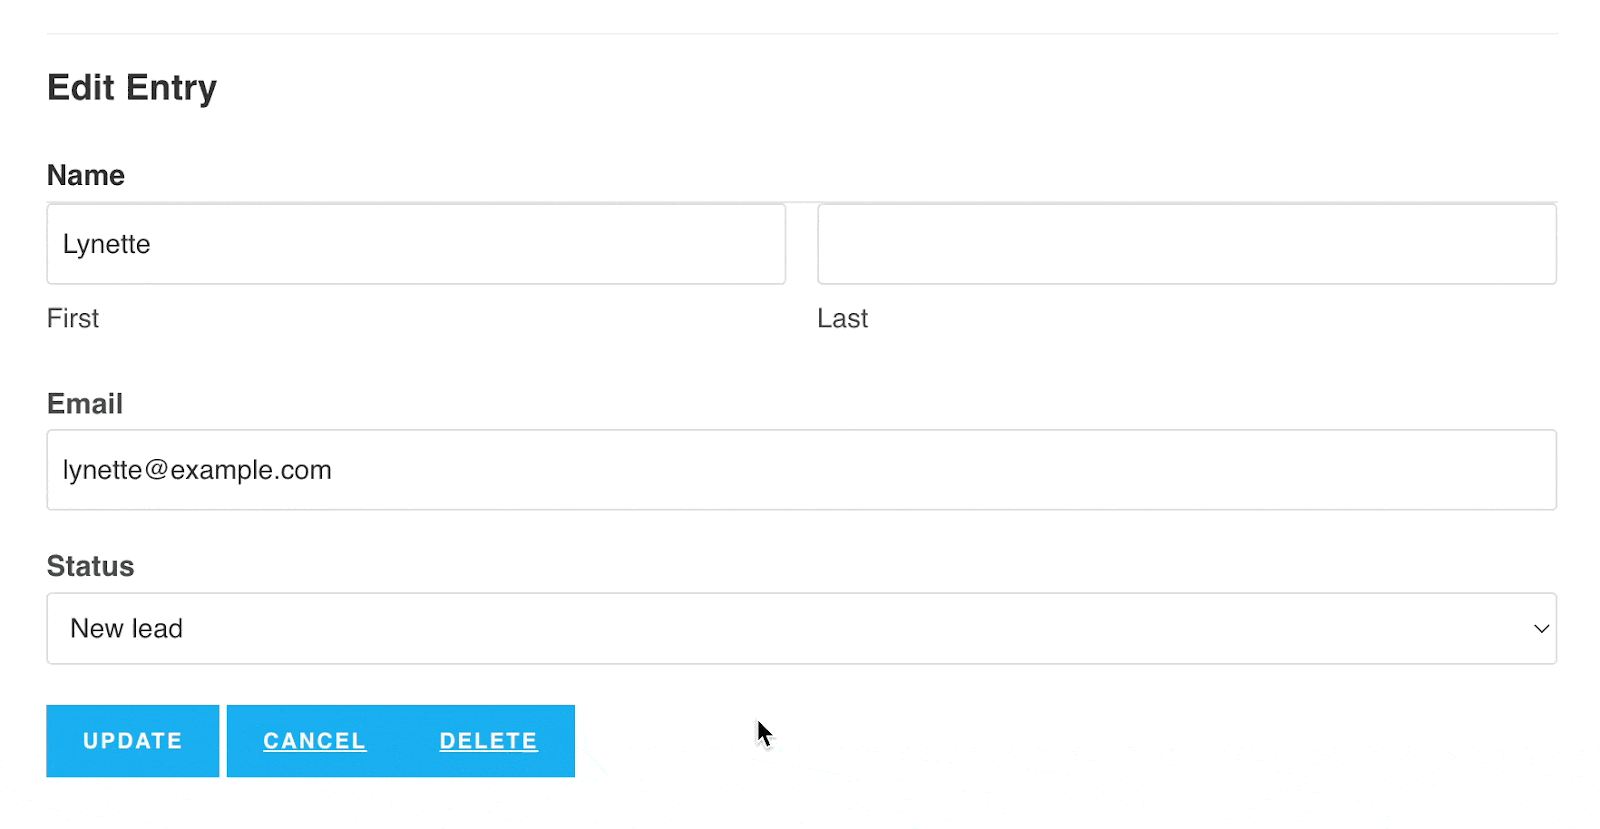
To update the status of an entry, all we need to do is click on the “Edit Entry” link. This takes us through to the Edit Entry screen, where we can update the entry’s status directly from the frontend.
This system allows our sales team to see new leads without having to log in to the backend of our site. They can also track their statuses and update information as required.
Pro tipIf you want to learn more about GravityView and see what else is possible, check out our live demos.
Add-ons for more advanced quote calculators
Gravity Forms’ built-in calculations cover most quote calculator needs, but if you’re building something more complex, these add-ons can help:
- Gravity Forms Advanced Calculations (by Gravity Wiz) – Adds advanced math functions (rounding, min/max, trigonometry), if/else conditional logic inside formulas, and a formula editor with syntax highlighting. Useful when your pricing involves tiered rates, volume discounts, or complex conditional pricing that’s hard to express with Gravity Forms’ default formula builder.
- GravityMath – Performs advanced calculations on Gravity Forms entries using a simple shortcode. You can use it to display running totals, averages, or summary stats from your quote submissions anywhere on your site. For example, showing “Average quote value this month” or “Total quotes submitted” on an internal dashboard.
- GravityCharts – Creates charts and graphs directly from your Gravity Forms entries. You can visualize quote data with bar charts, pie charts, or line graphs. For example, showing a breakdown of quotes by service type or a trend of quote values over time.
- Gravity PDF – A free community add-on that automatically generates PDF documents from form submissions. You can use it to email a professionally formatted quote to the customer as soon as they submit the form. It includes four customizable templates out of the box, and you can add your logo, colors, and branding.
- GravityView – As we showed in Step 4 of this tutorial, GravityView lets you build a front-end dashboard to manage all your quote submissions. Your sales team can search, sort, filter, and edit entries without needing WordPress admin access.
Build a Gravity Forms quote calculator today!
In this tutorial, we created a fully functioning quote calculator that:
- Generates tailored estimates for users
- Captures leads via email
- Lets your team manage and follow up with entries
Ready to build yours? Download our free template and import it into Gravity Forms to get started in minutes.
If you want to go even further, check out additional tutorials:

Helpful tips right in your inbox.
Subscribe to get the latest articles, information on releases and helpful Gravity Forms tips!
More articles

Launch Log: Row headers for screen readers, smarter conditional logic, and multi-View fixes
GravityView 3.1 adds row headers for screen readers, plus smarter conditional logic in GravityCalendar and fixes for DataTables, Maps, and Dynamic Lookup.

Ecommerce platform market share 2026: WooCommerce leads the web, Shopify leads the top tier
Ecommerce platform market share in 2026, from HTTP Archive data. WooCommerce leads the whole web at 6.64%, but Shopify already leads the top 1M sites.

Launch Log: 3D map enhancements, smarter filtering, and improved performance on large data sets
GravityKit’s July 9 launch log: 3D map starting views and viewport loading, searchable field-to-field filtering, and fixes across DataTables and more.