Published
•
Updated
How to build a WordPress document library (in 5 simple steps)
Ensuring that your digital documents are organized and easy to find can be a challenge! That’s why an effective document management system is so important in today’s data-oriented world. A document management system, or document library, is a collection of digital documents presented in...
Ensuring that your digital documents are organized and easy to find can be a challenge! That’s why an effective document management system is so important in today’s data-oriented world.
A document management system, or document library, is a collection of digital documents presented in a manner that’s easy to navigate. A document library helps you stay organized by allowing you to store and quickly find the files you need.
In this post, we’ll show you how to create a document library on WordPress in minutes using Gravity Forms and GravityView.
Download the free document upload form template now!
Import the template into Gravity Forms and customize as necessary.
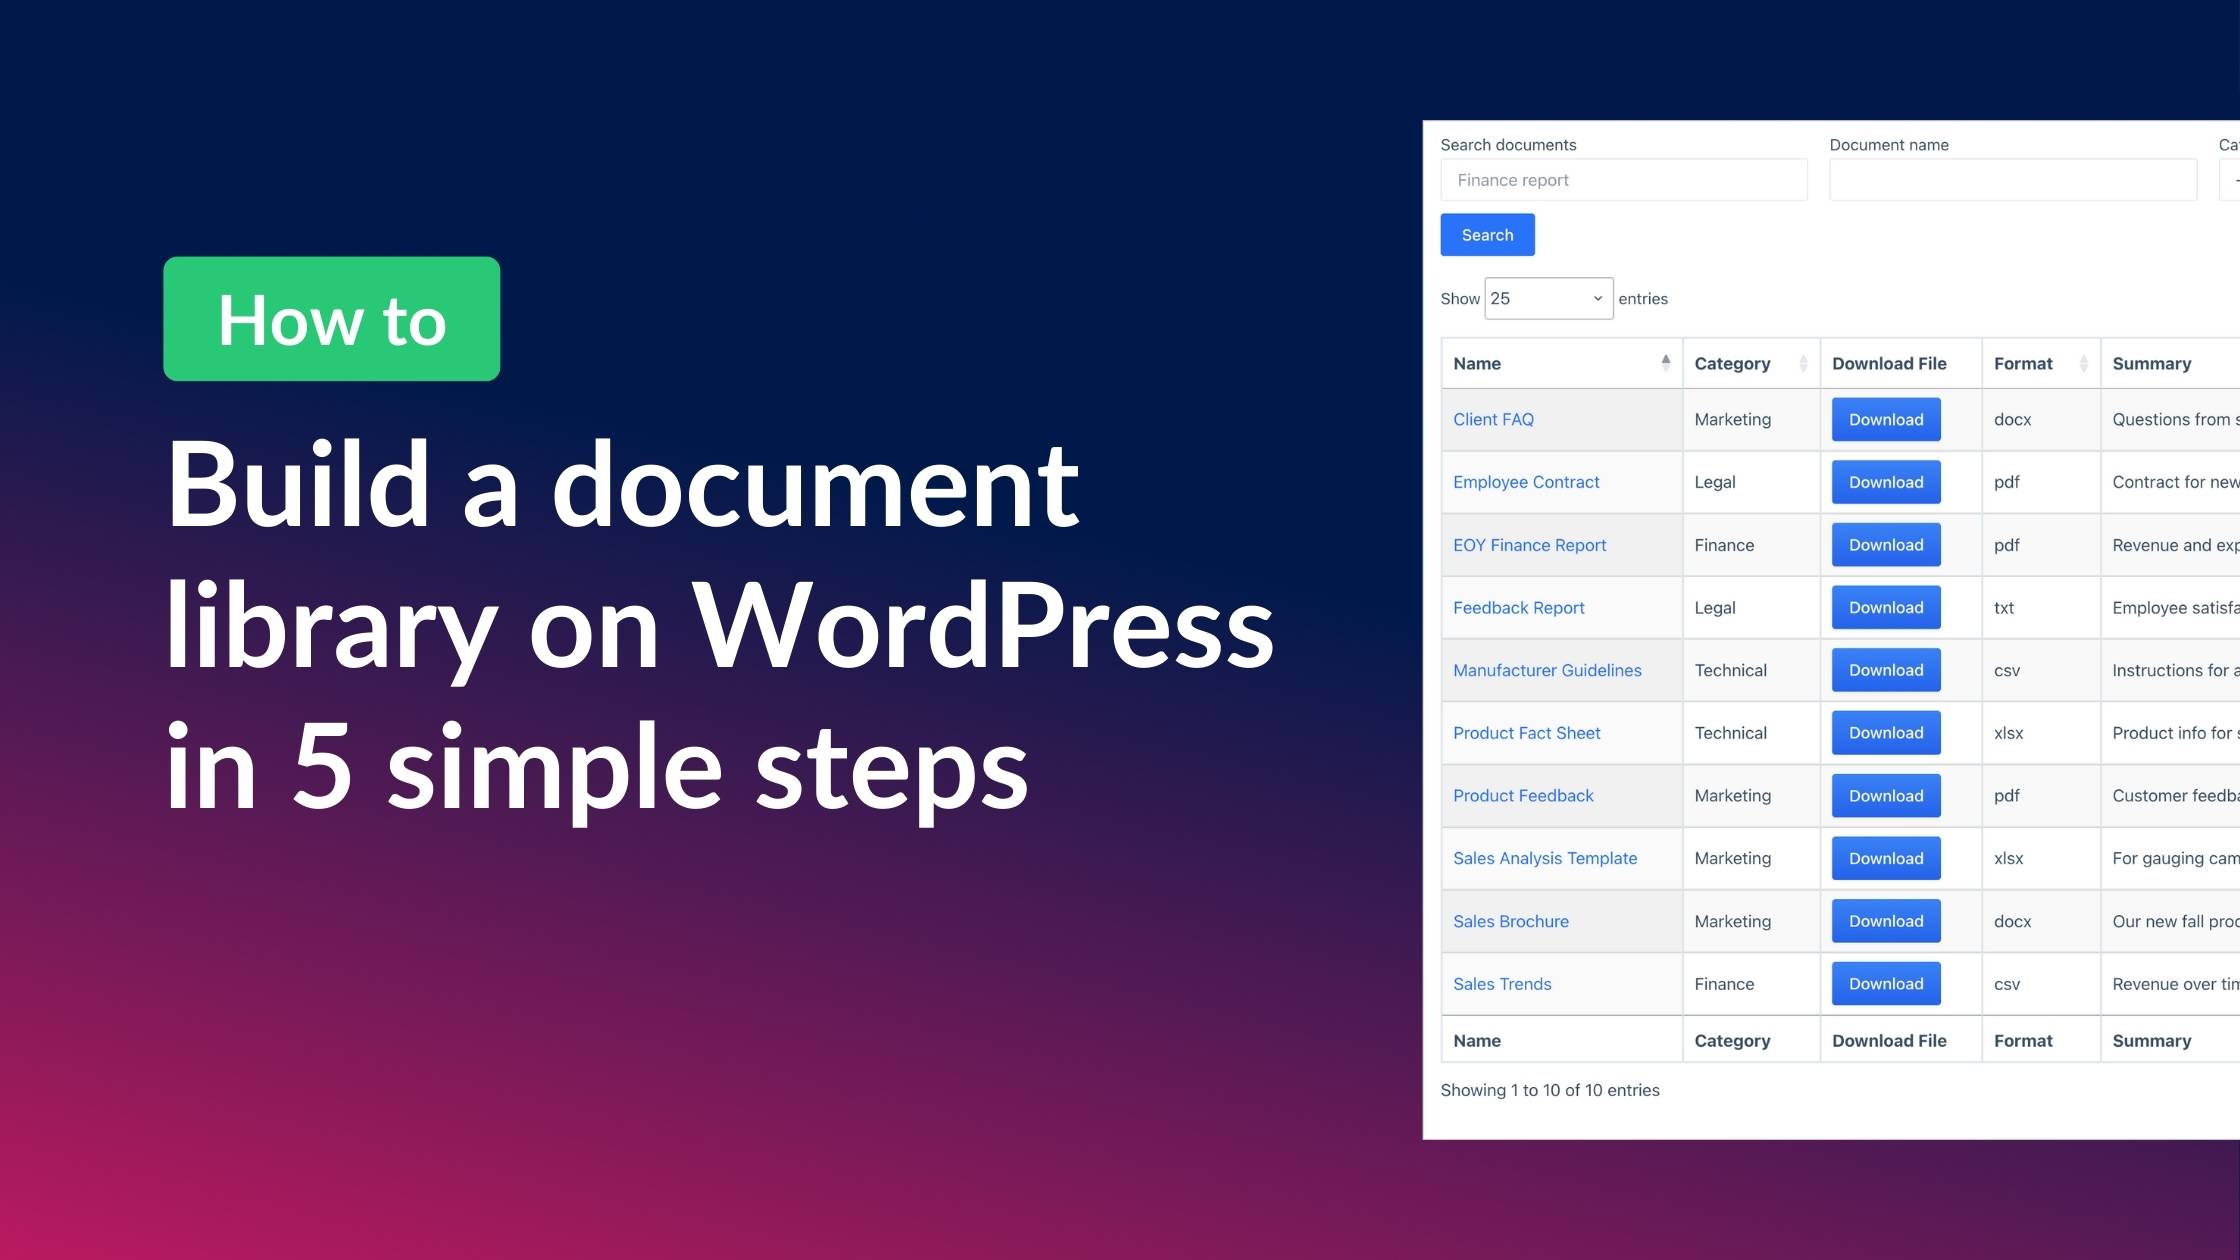
Sneak peek
Here’s a preview of the finished document library built using Gravity Forms and GravityView. As you can see, there’s a search bar allowing users to filter documents by various criteria, a download button to download the full document, and a “View Details” link to see more information about the document.
Clicking “View Details” takes the user to the Single Entry page where they can see additional information, leave notes for other team members, and even edit the entry if they have the required permissions.

Pro Tip
Check out a live demo of the finished document library and get your own free trial site preloaded with all GravityKit add-ons!
What you’ll need
Here are the plugins you’ll need to create a document library like the one in this example:
Why use Gravity Forms and GravityView?
There are several WordPress plugins for document and resource management. The problem is that many of them fail to deliver on certain key features, or they’re overly restrictive, not giving you the freedom to design a document library that works for your particular use case.
Using Gravity Forms and GravityView is the ideal way to create a document library tailor made for your website. Here’s how it works:
- Gravity Forms – Handles document submission and data collection. You can create structured upload forms, require specific files or information, and securely store submissions in your WordPress database.
- GravityView – An add-on for Gravity Forms that enables you to display and manage form submissions on the frontend. You can build searchable document libraries using different layouts, control who can see or download files, restrict access by user role, and present entries in a clear, organized format without exposing the WordPress admin area.
Supported documents and file types
Gravity Forms and GravityView support any file type allowed by WordPress.
- Upload and manage any file type – Create a centralized library for PDFs, Word documents, spreadsheets, CSV files, eBooks, text files, audio, video, and more.
- For business or personal use – Store and organize contracts, financial records, marketing materials, technical documentation, datasets, manuscripts, templates, educational resources, manuals, and other digital assets.
- Build audio and video libraries – Embed external media such as YouTube or SoundCloud, making it easy to create searchable video galleries or audio libraries directly on your WordPress site.
Now let’s go through the process of building a WordPress document gallery using GravityView DataTables.
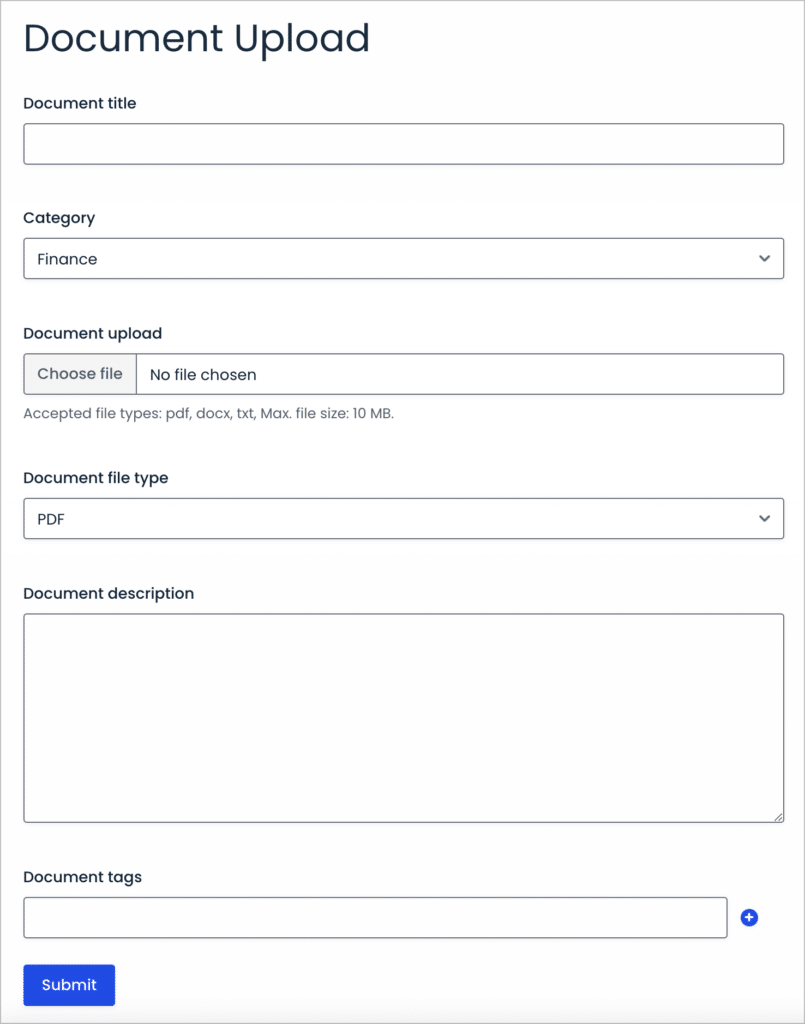
Step 1: Create the document upload form
After installing all the required plugins, the first step is to create the document upload form. To do this, hover over Forms and click New Form. Next, give your form a name and click Create Form.
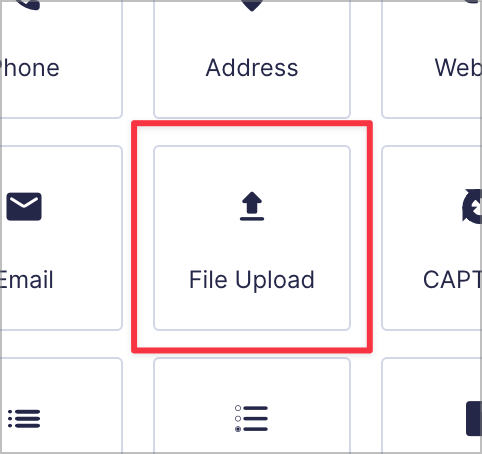
Now, you can construct your document upload form using the Gravity Forms visual editor. The most important field is the File Upload field, as this will allow users to upload documents to the library. You can find the File Upload field under the Advanced tab on the right.
The Gravity Forms File Upload field is fully configurable, enabling you to specify allowed file types, enable multi-file upload, and define a file size limit.
After configuring your File Upload field, add any other necessary form fields. For example, you may want a description field where users can include information about the uploaded document, or a date field to capture the date it was uploaded/modified.
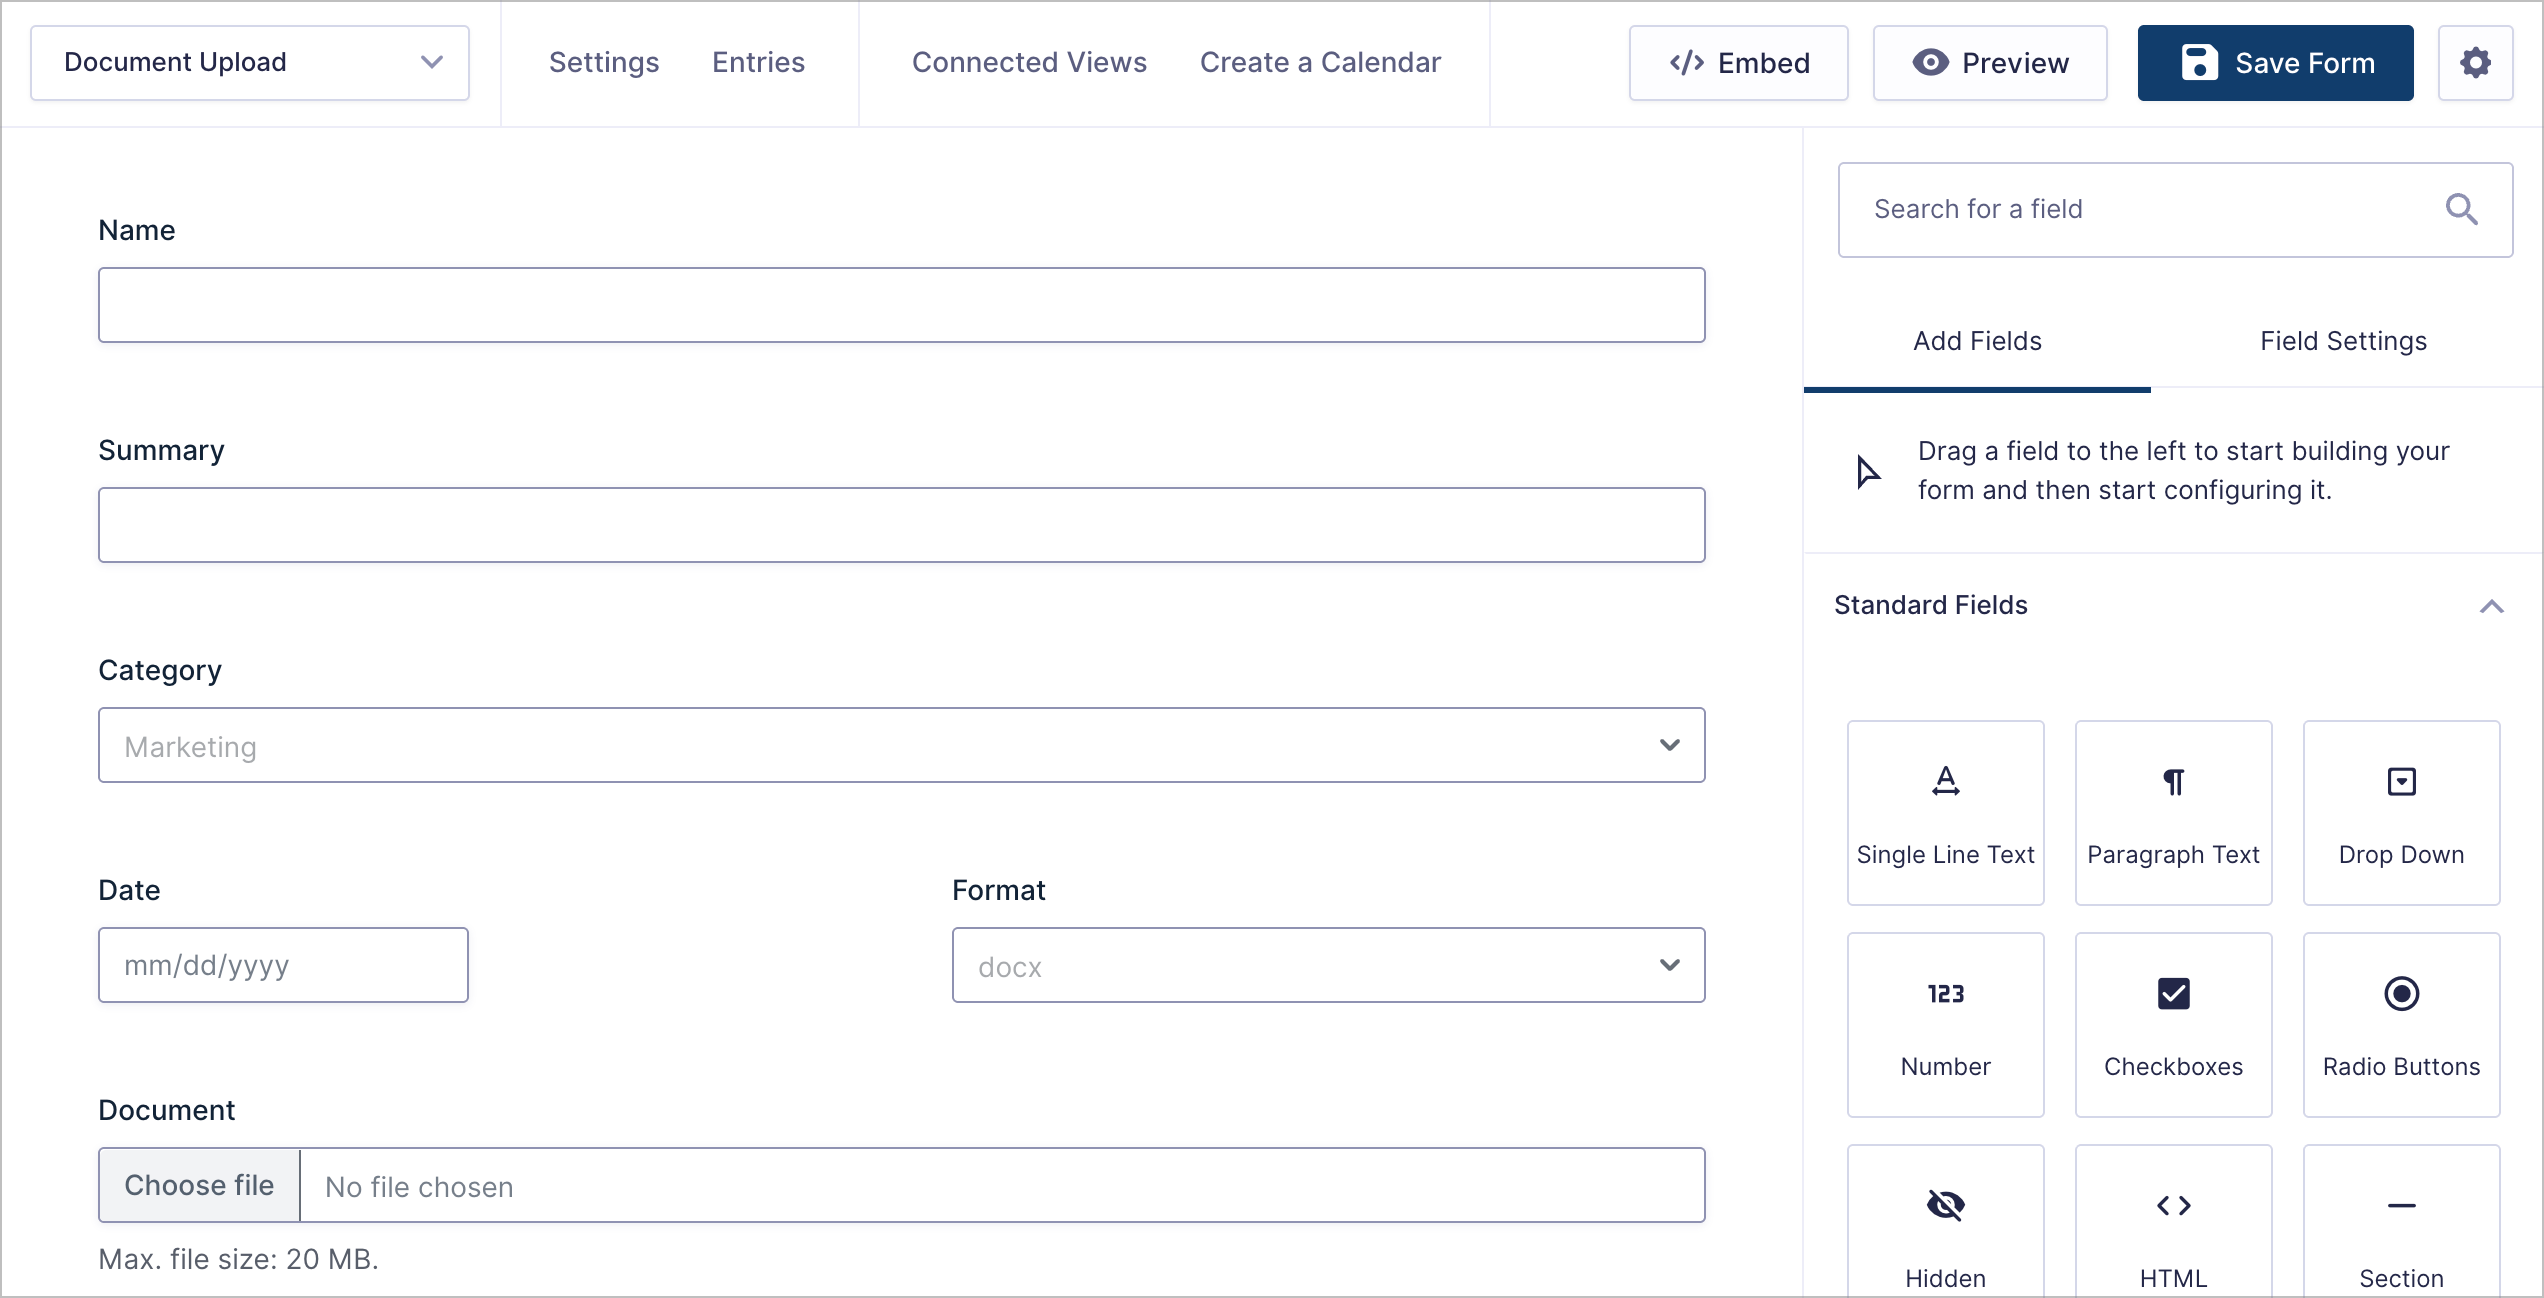
When you’re done, make sure to save your form. Here’s what our document upload form looks like on the frontend:

One of the key advantages of using Gravity Forms to capture documents is its powerful form editor, which includes a wide range of field types and configuration options to suit any workflow.
Save time by downloading the free document upload form template now!
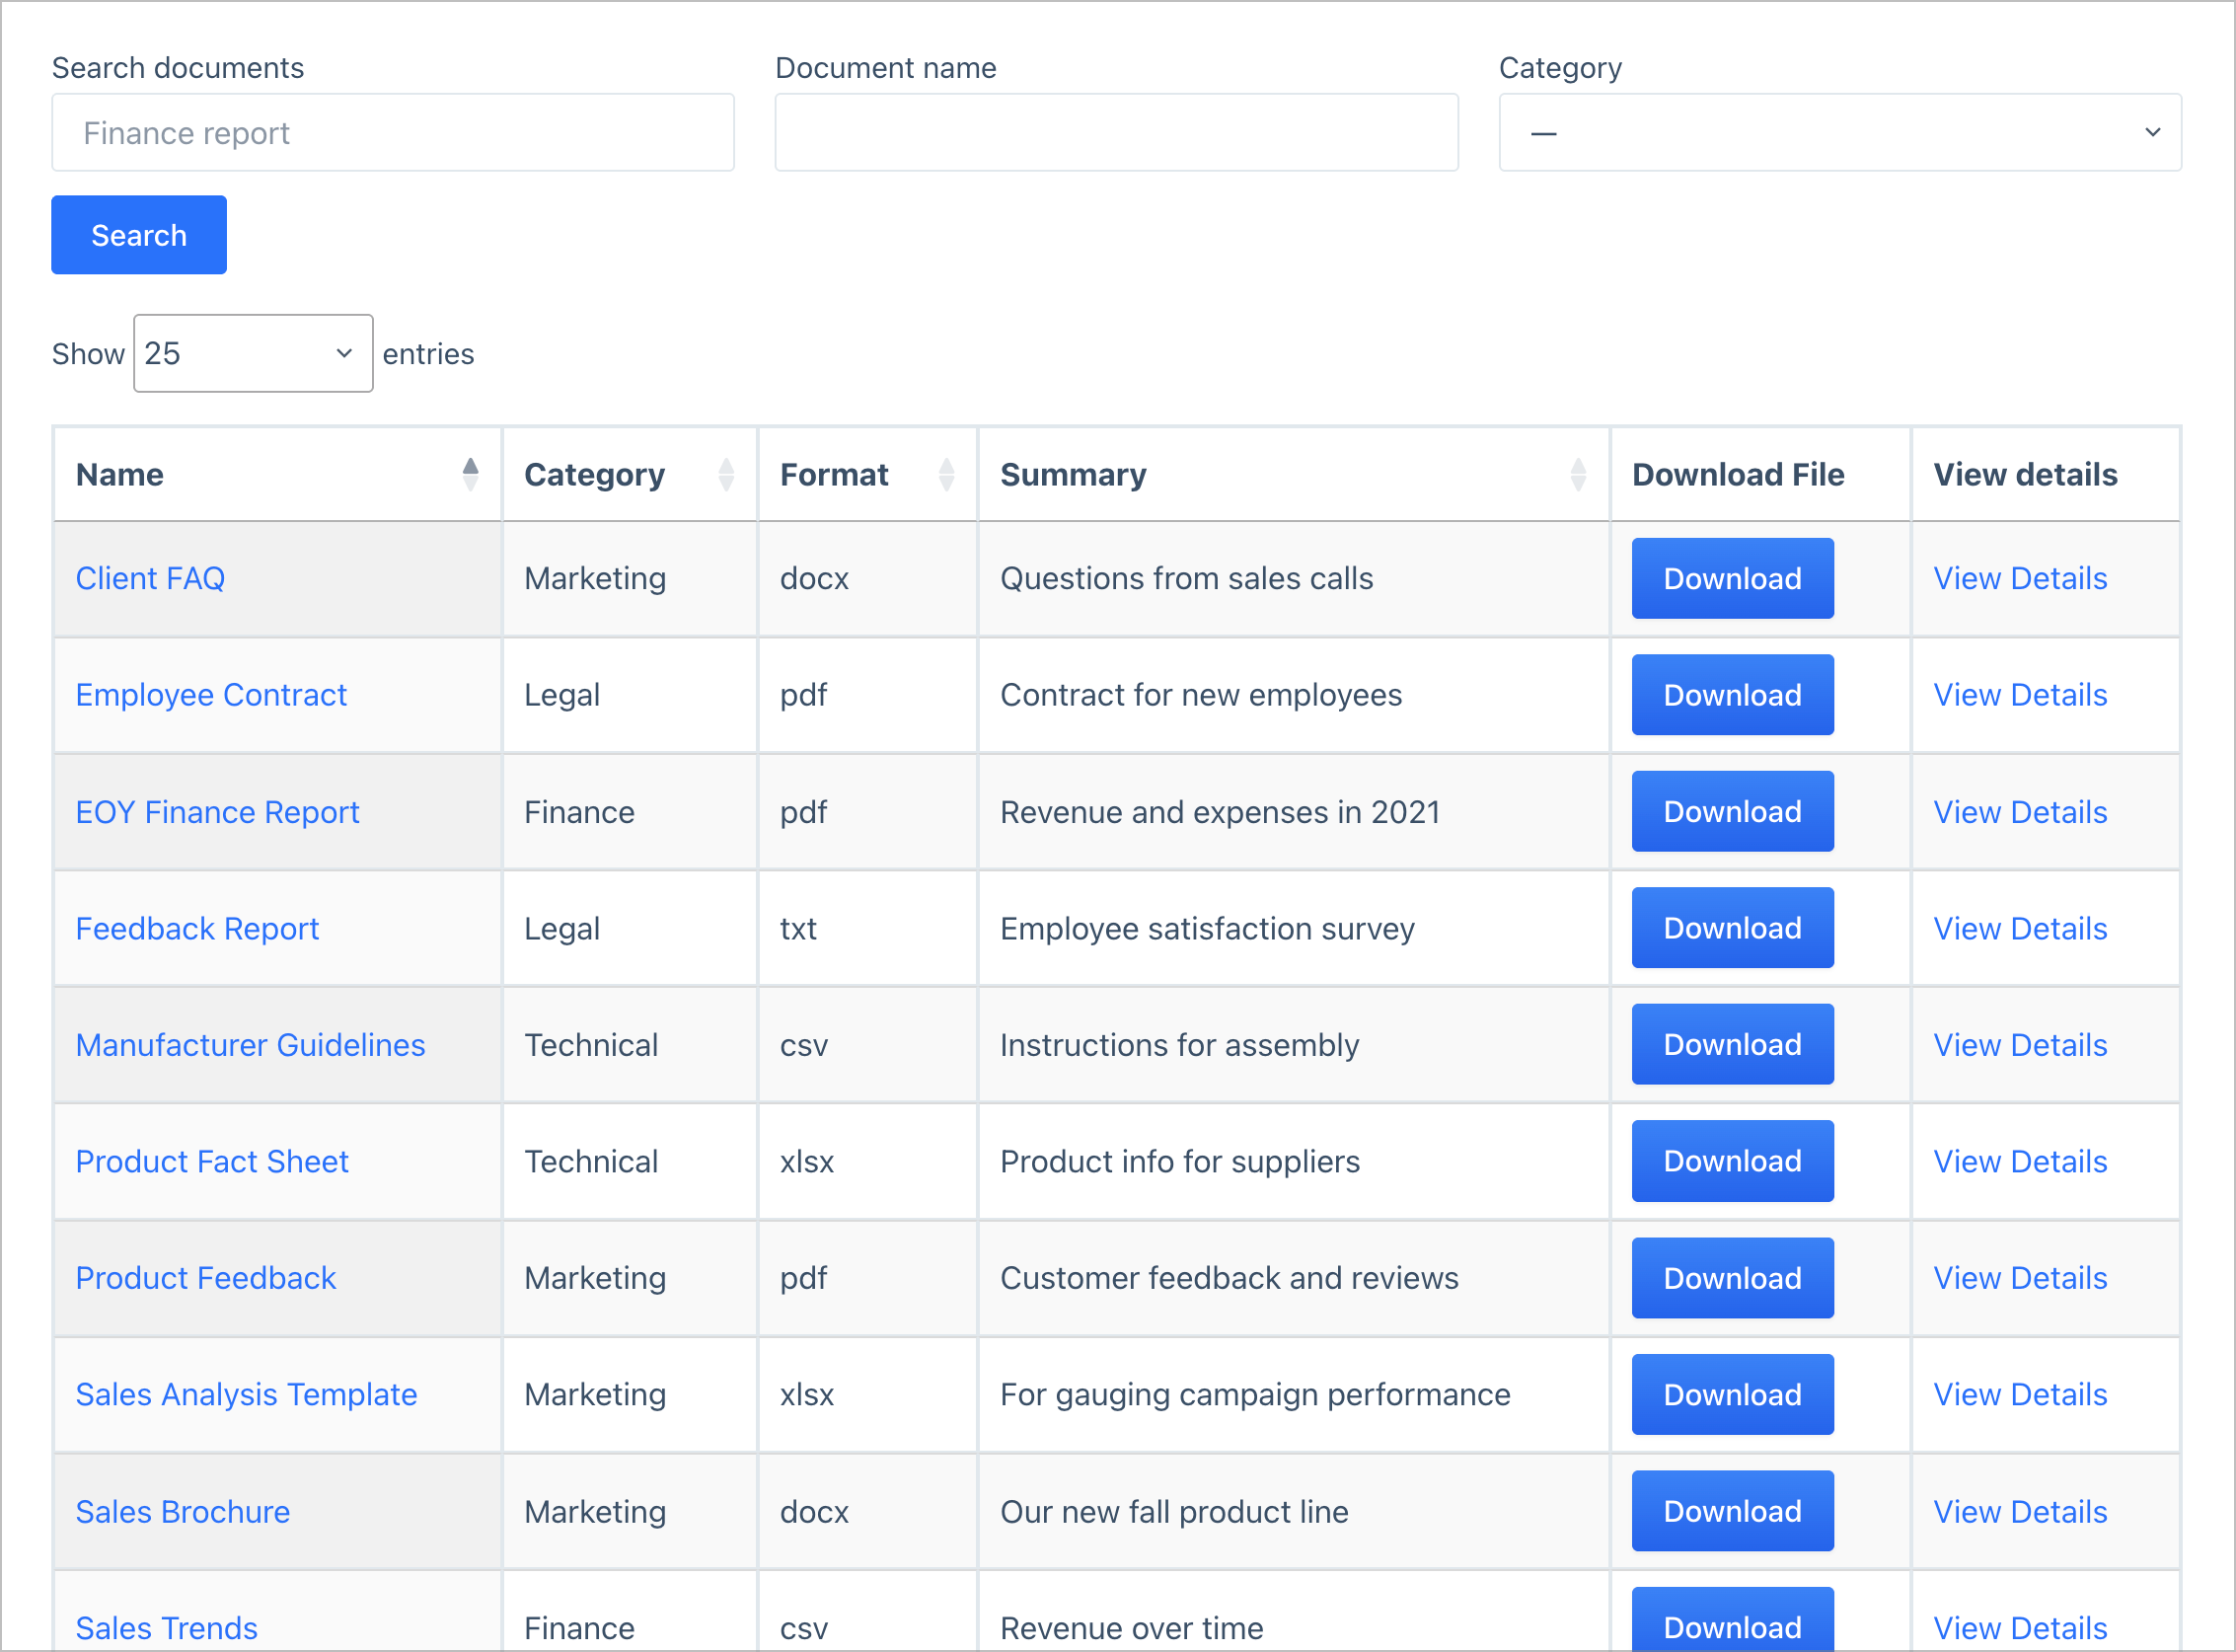
Step 2: Create the document library View
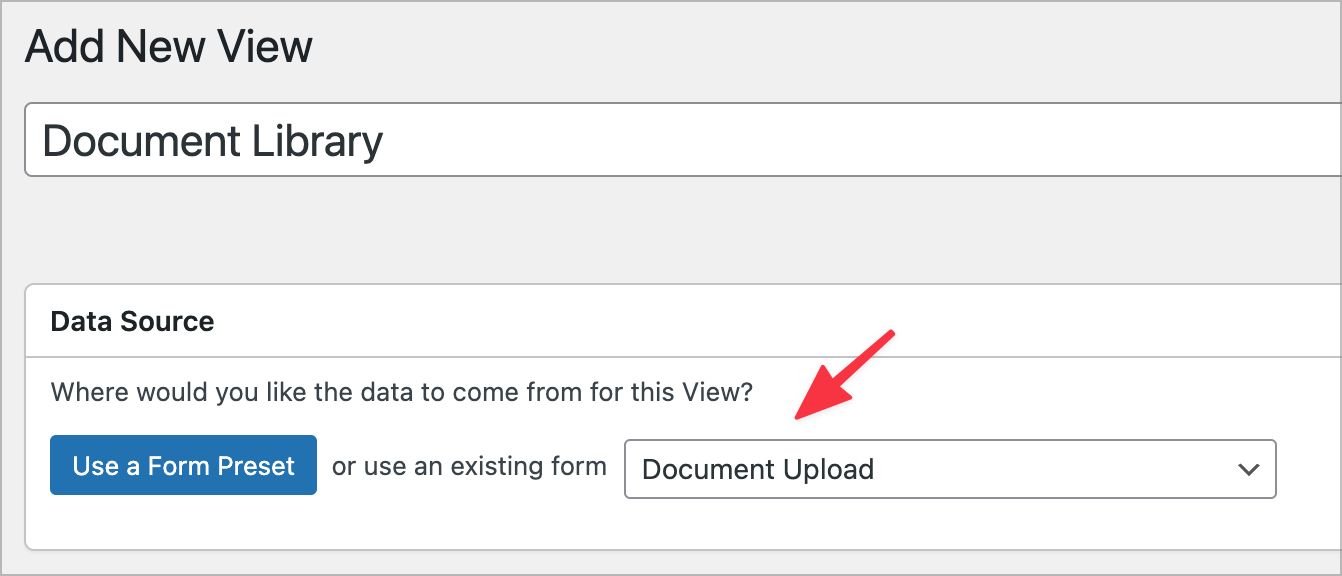
Now that we have a form where users can upload documents, we’re going to create a View using GravityView to display those documents on the frontend.
To create a new View, hover over Views and click New View. Now give your new View a name (“Document Library”) and select your document upload form as the data source.
Next, you’ll need to choose a View Type. GravityView supports several View Types that enable you to display data using different layouts. For a simple table, select Table. For a more advanced table with sorting, exporting and filtering capabilities, select DataTables Table.

Using the GravityView visual editor, we can now create our document library by adding the fields we want to display. We’ll scroll down to the Entries Fields section of the editor and click Add Field to select the fields we want to make visible.
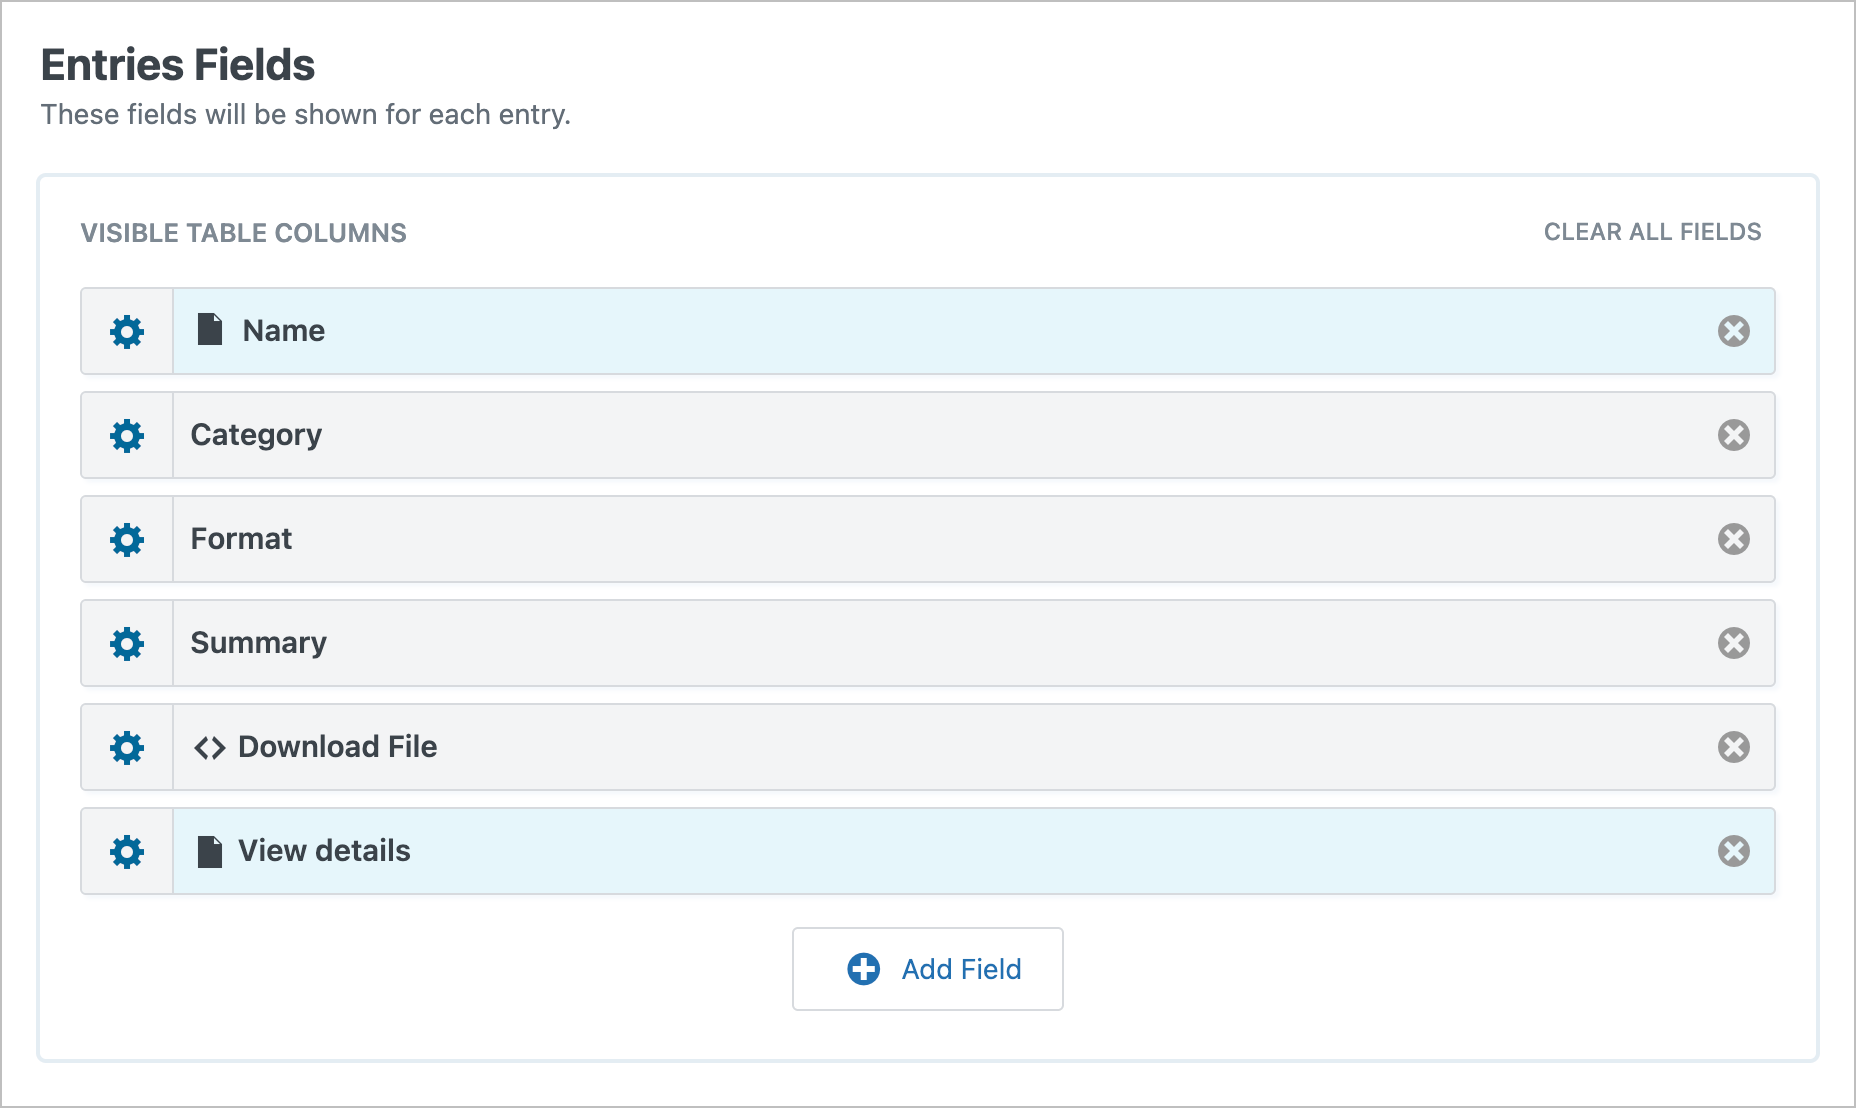
Make sure to include a Link to Single Entry field so the user can click to view more information about a specific uploaded document. We’ll configure this functionality in step 4.
Pro Tip
To add a download button to your View, simply use GravityView’s highly flexible Custom Content field to build your own button with HTML/CSS.
After adding the fields you want to be visible in the document library, the next step is to add a search bar so users can filter documents from the frontend.
Step 3: Add a search bar
GravityView supports a variety of widgets, such as search bars, page links and other tools for navigating Views.
To add a search bar to our document library, we’ll scroll up to the Top Widgets section, click on the Add Widget button and select Search Bar. To configure the search settings, we’ll click on the gear icon next to the widget label. Here you can choose which fields to make searchable, adjust the search layout, and more.

Any field in your form can be added as a search field in the search bar.
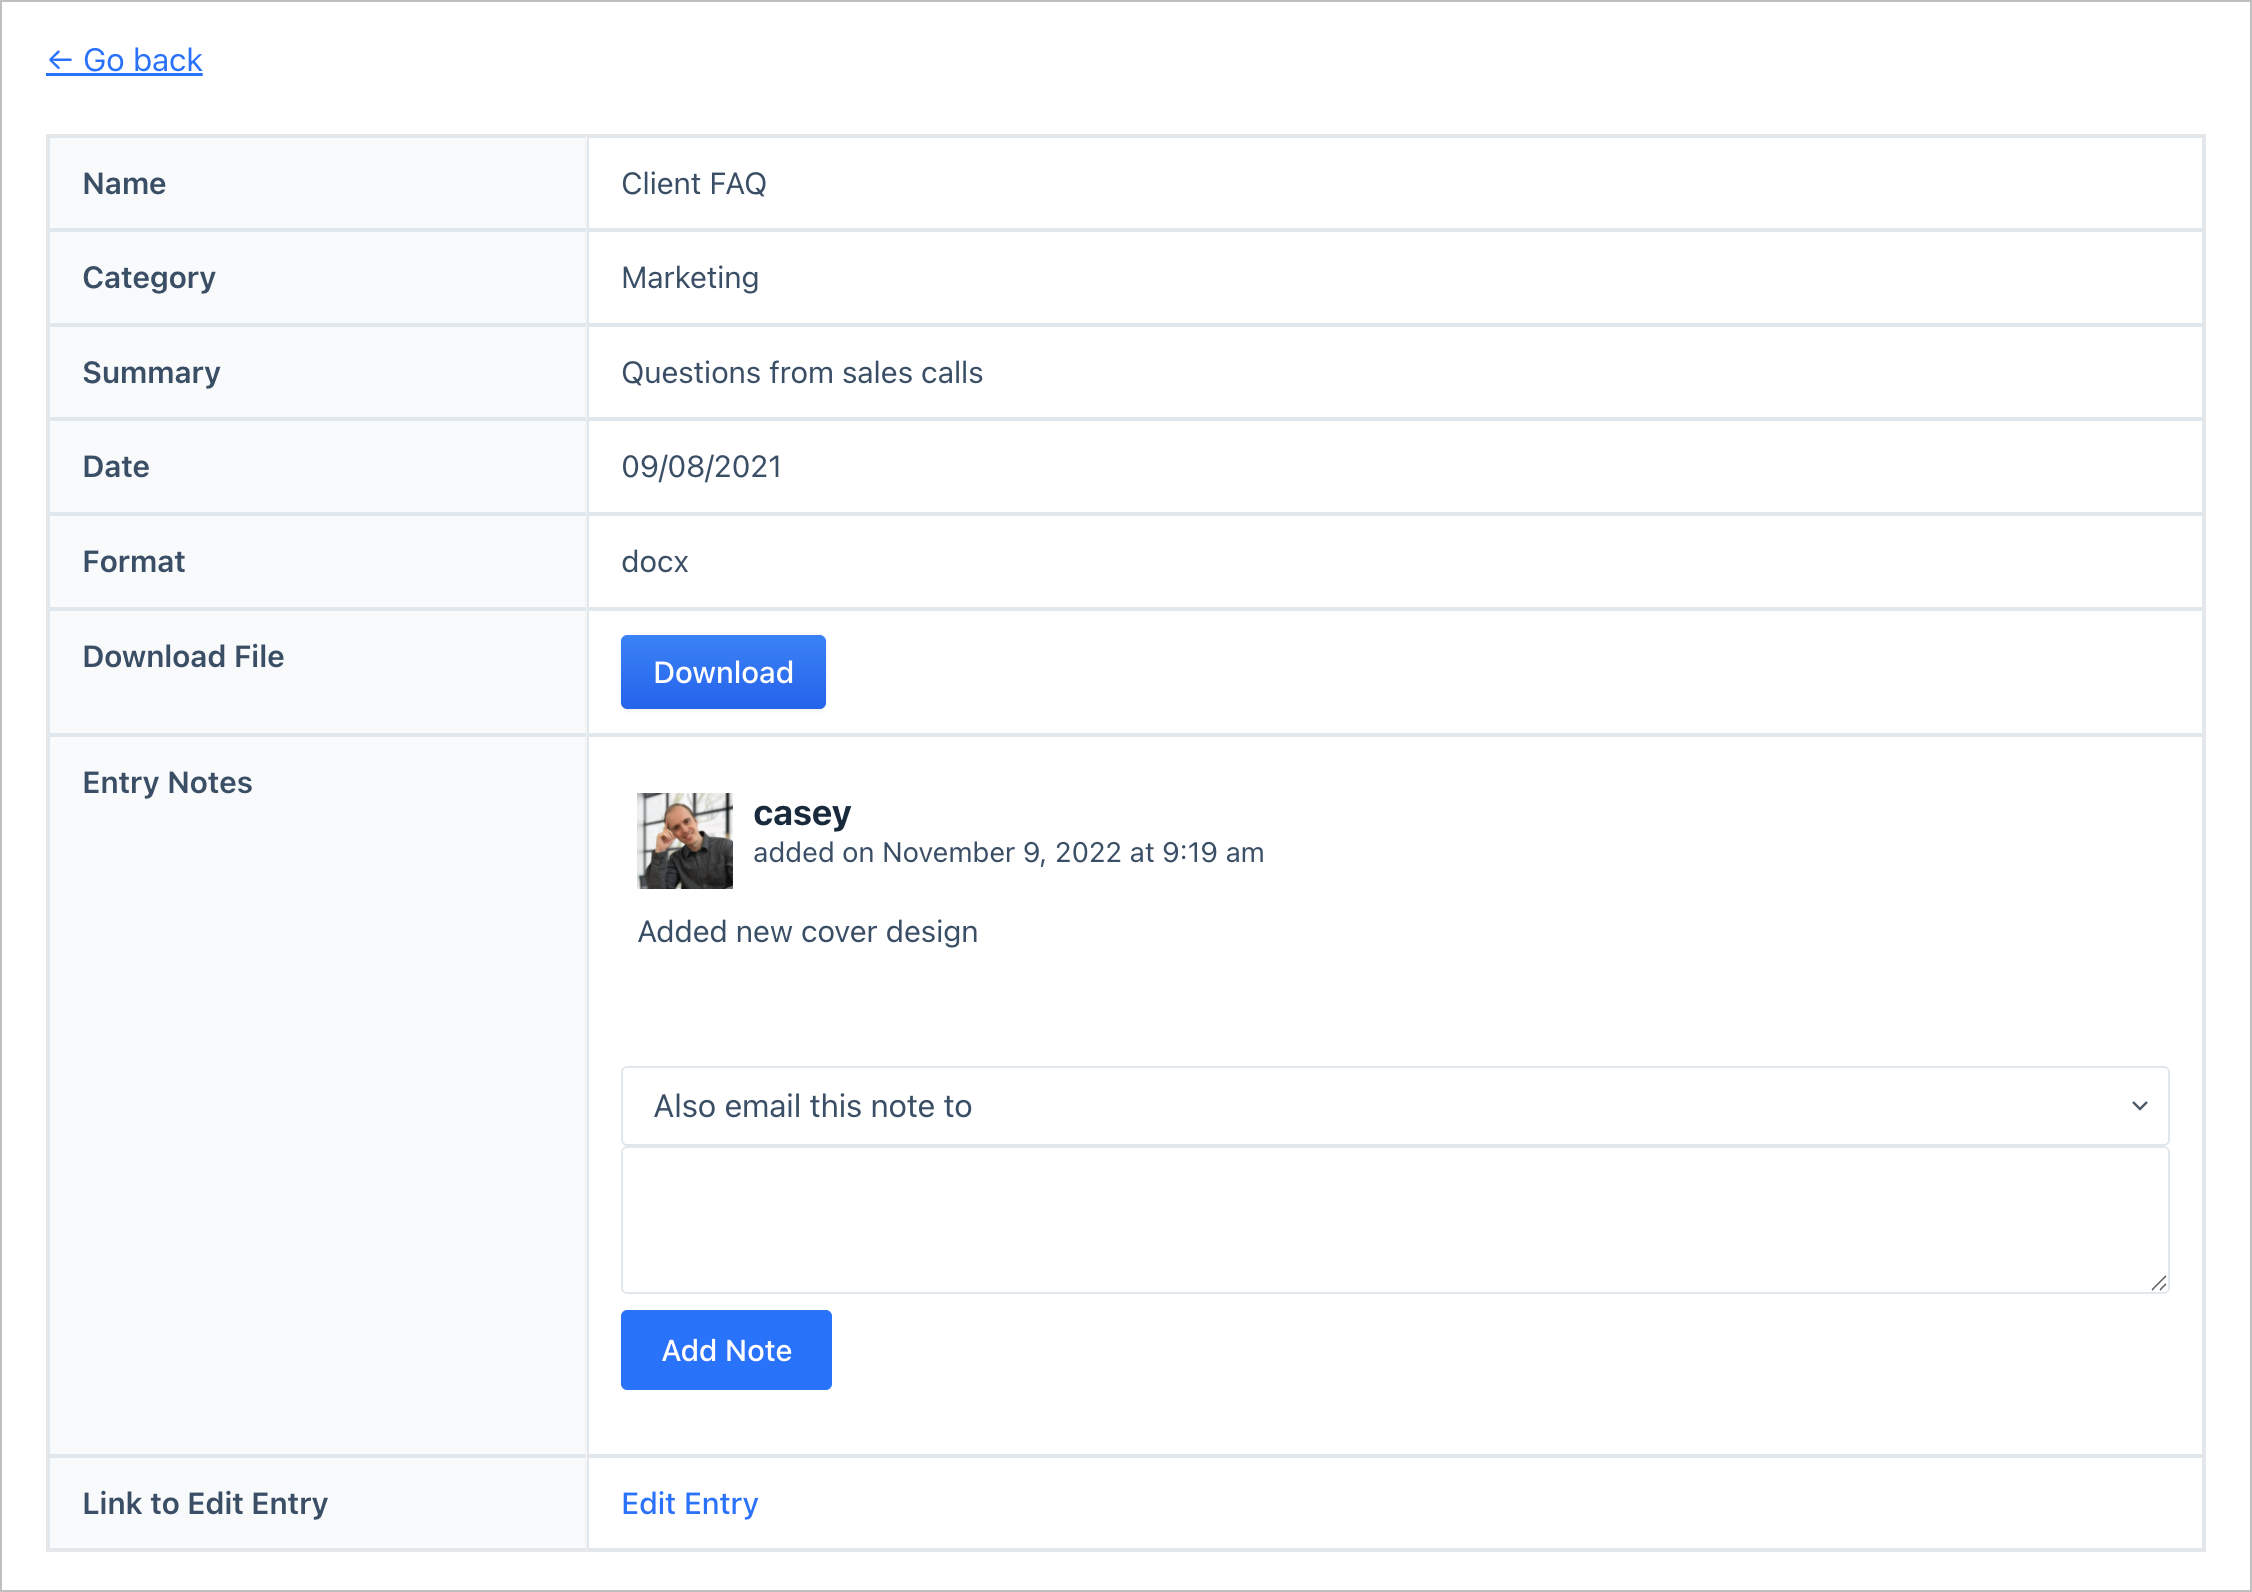
Step 4: Configure the Single Entry Layout
Up until now, we’ve been working in the Multiple Entries Layout—the layout that controls how multiple entries are displayed on the frontend. GravityView’s Single Entry Layout, on the other hand, controls the layout of single entries. We can use this layout to add additional information about uploaded documents.
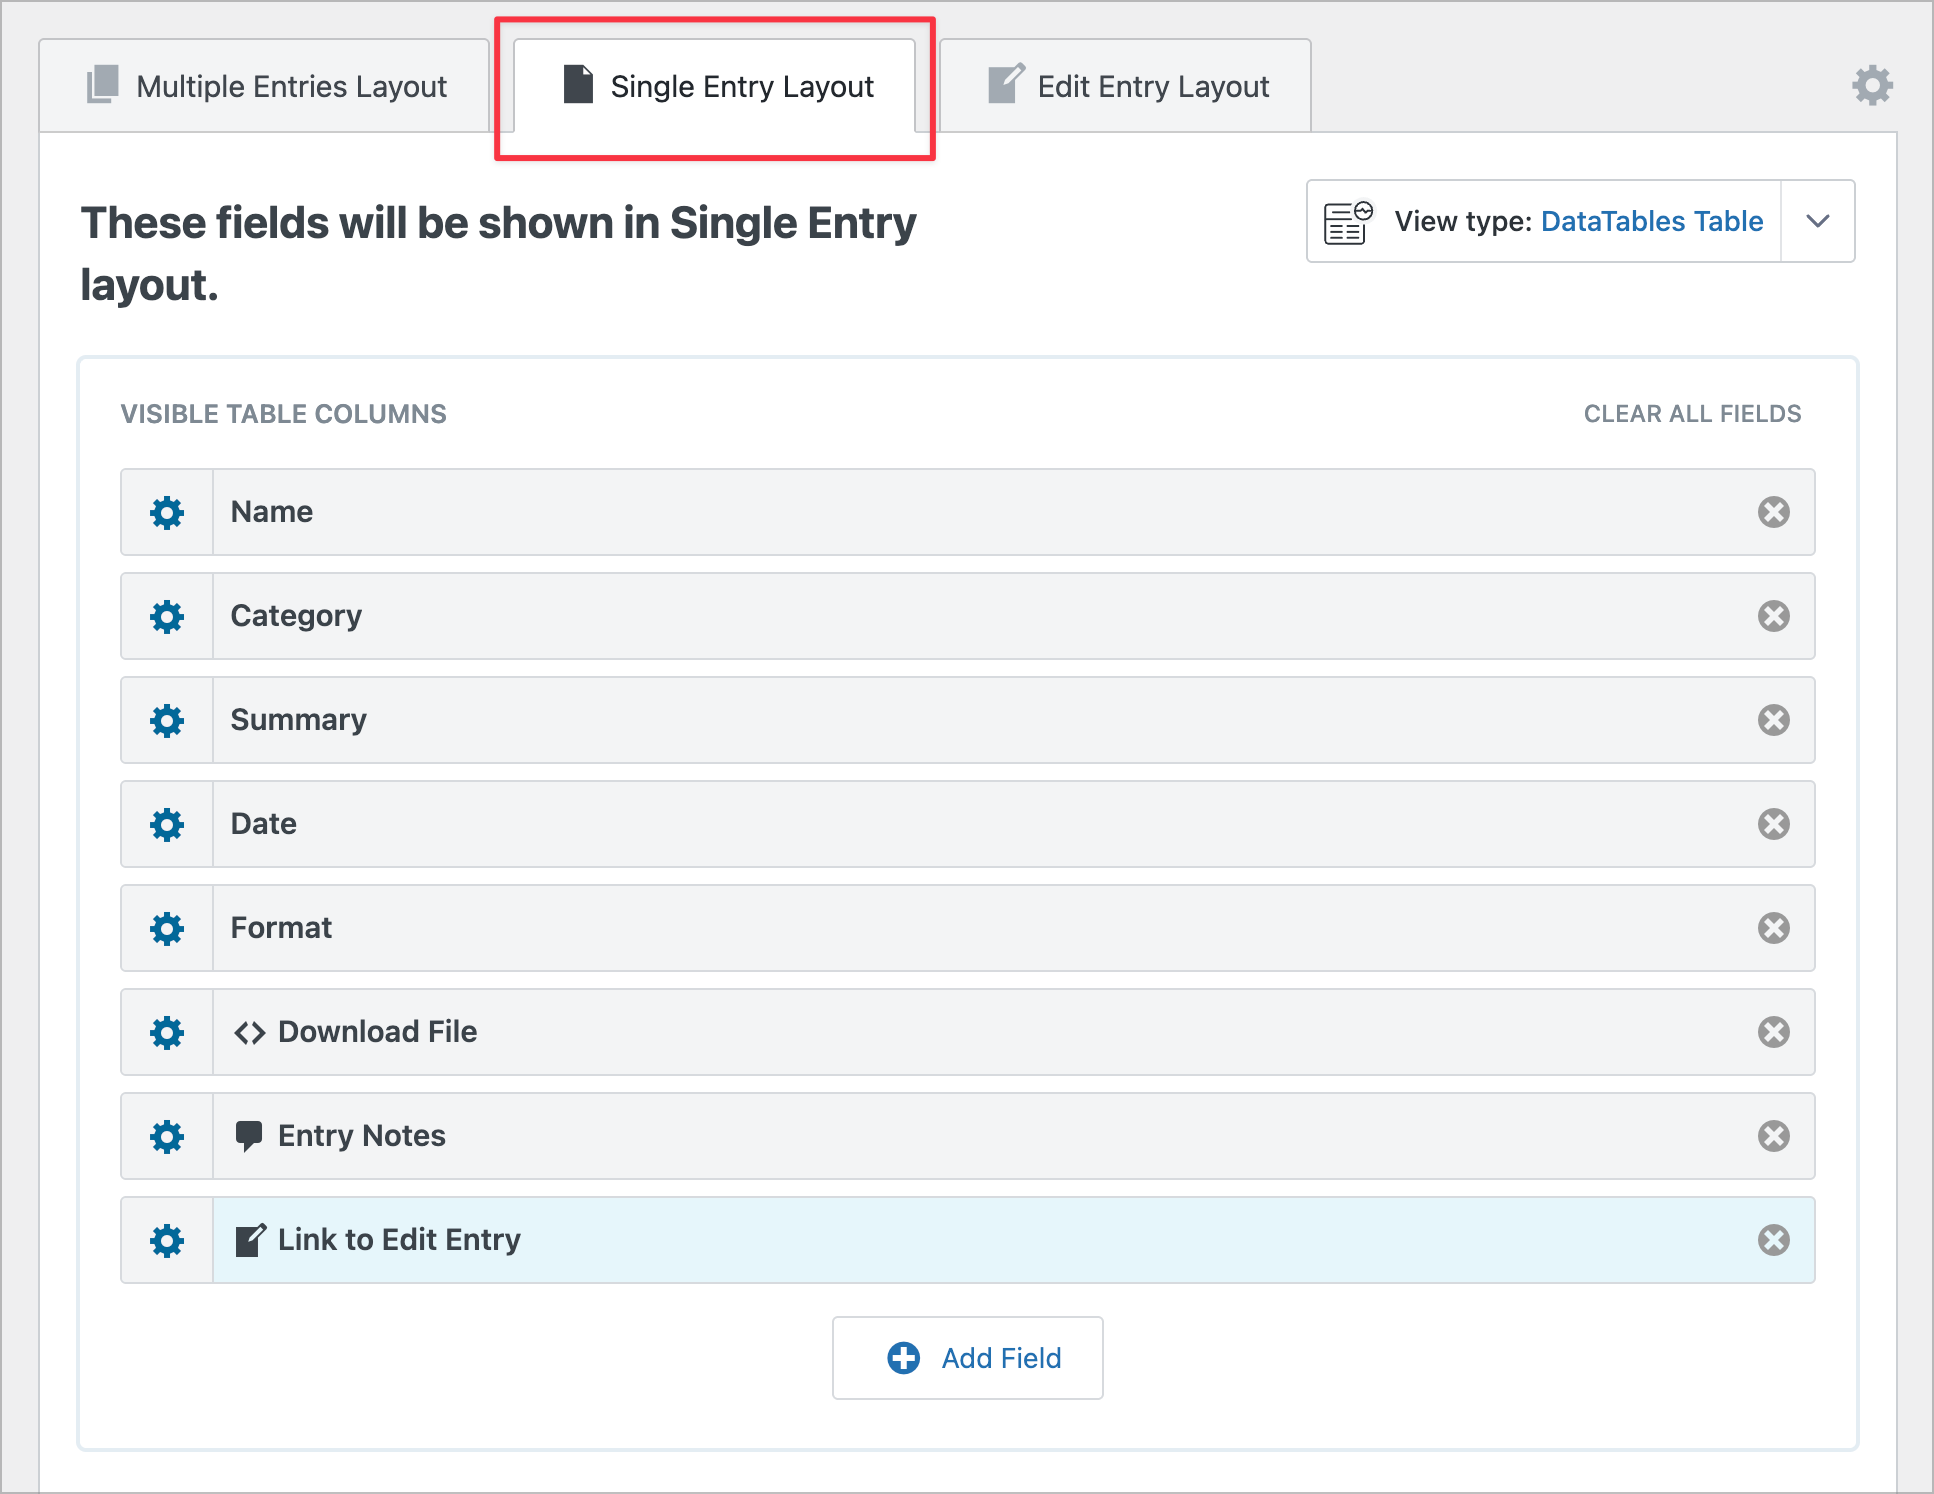
Here are the additional fields we’ll add to the Single Entry Layout:
- Entry Notes – Allows logged-in users or administrators to add internal notes to an entry, such as comments or feedback.
- Entry Date – Displays the date the entry was submitted.
- Link to Edit Entry – Adds an edit link so authorized users can update the entry directly from the frontend.
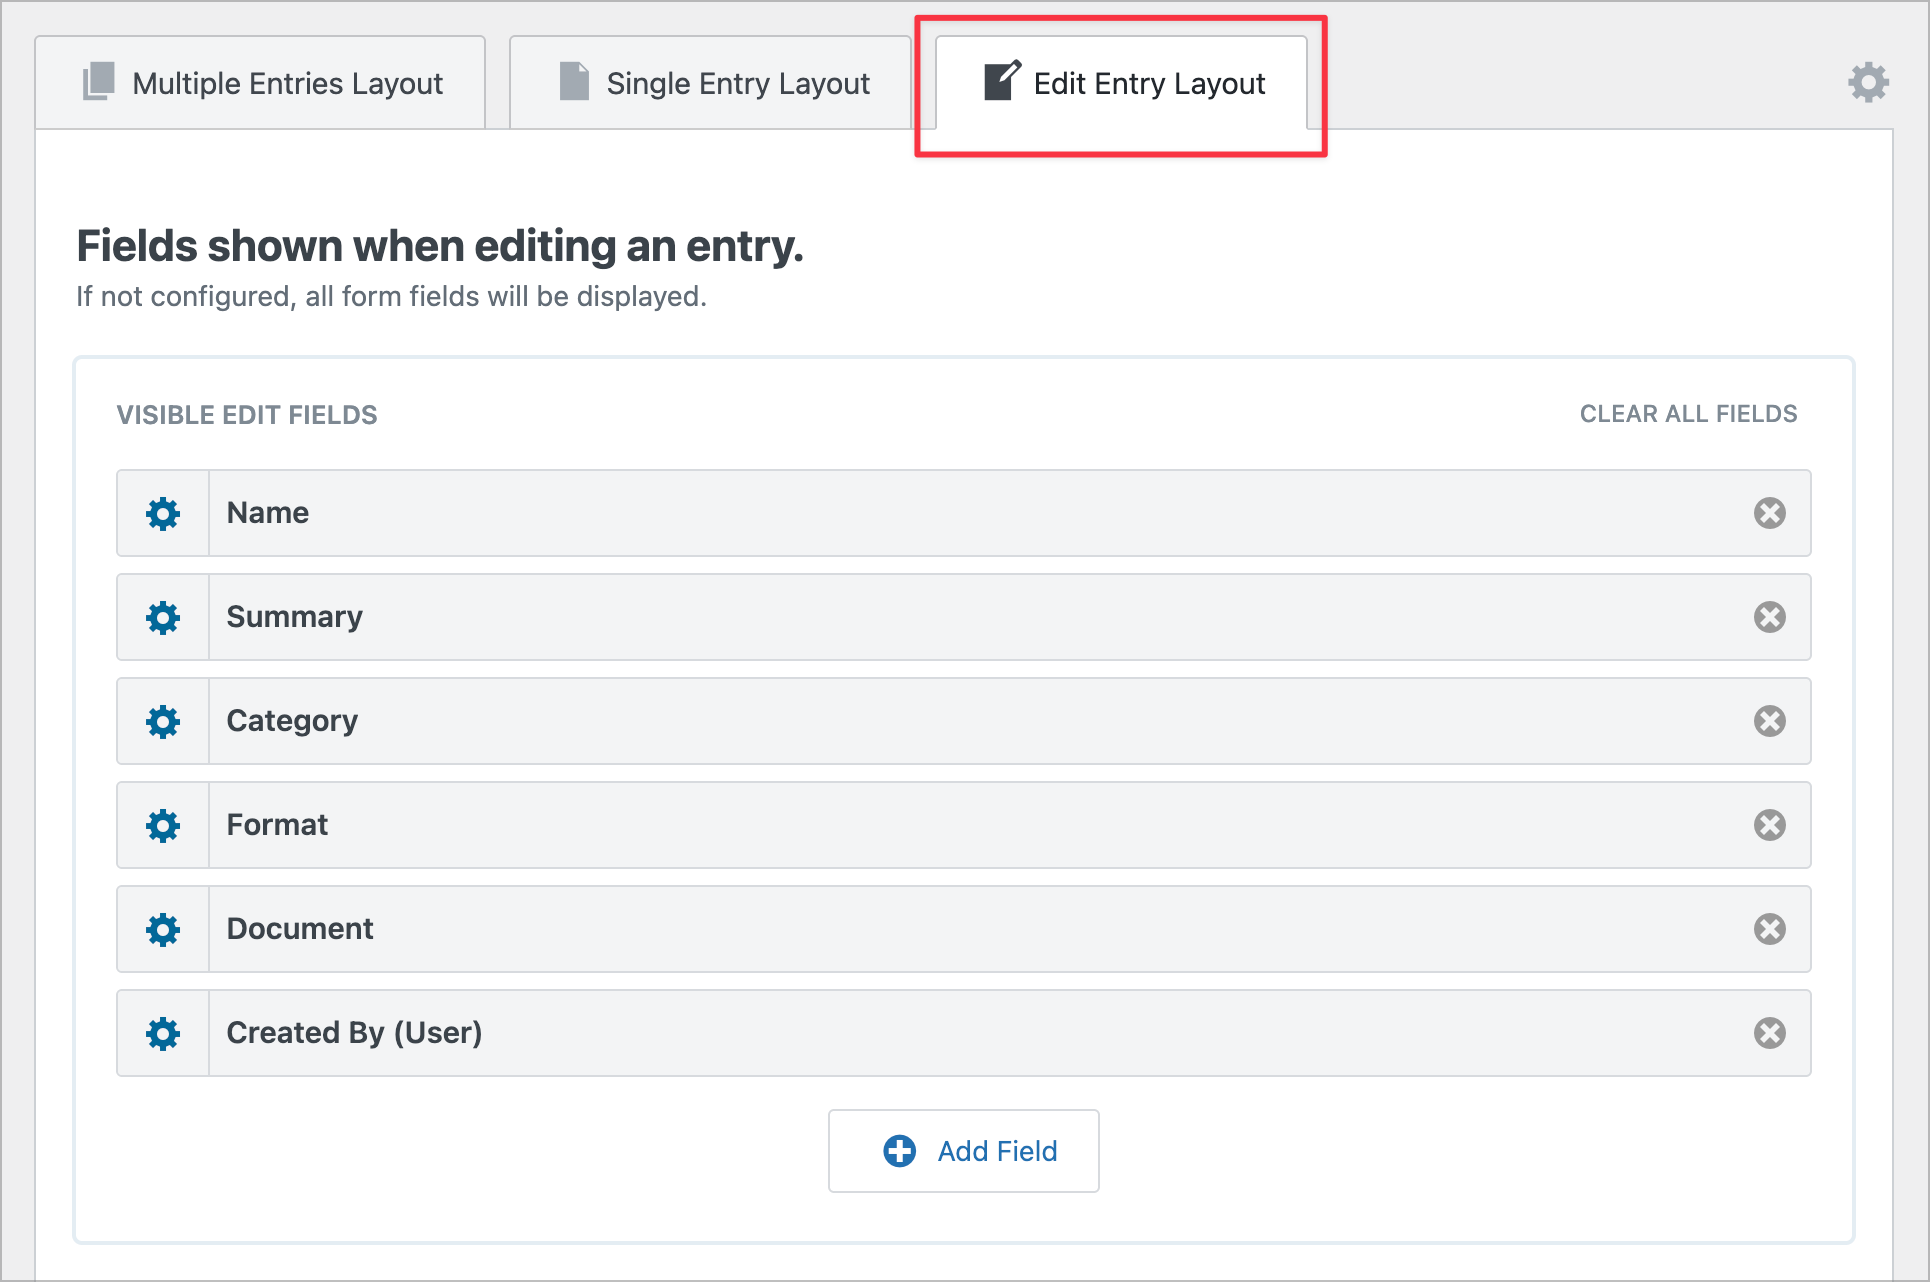
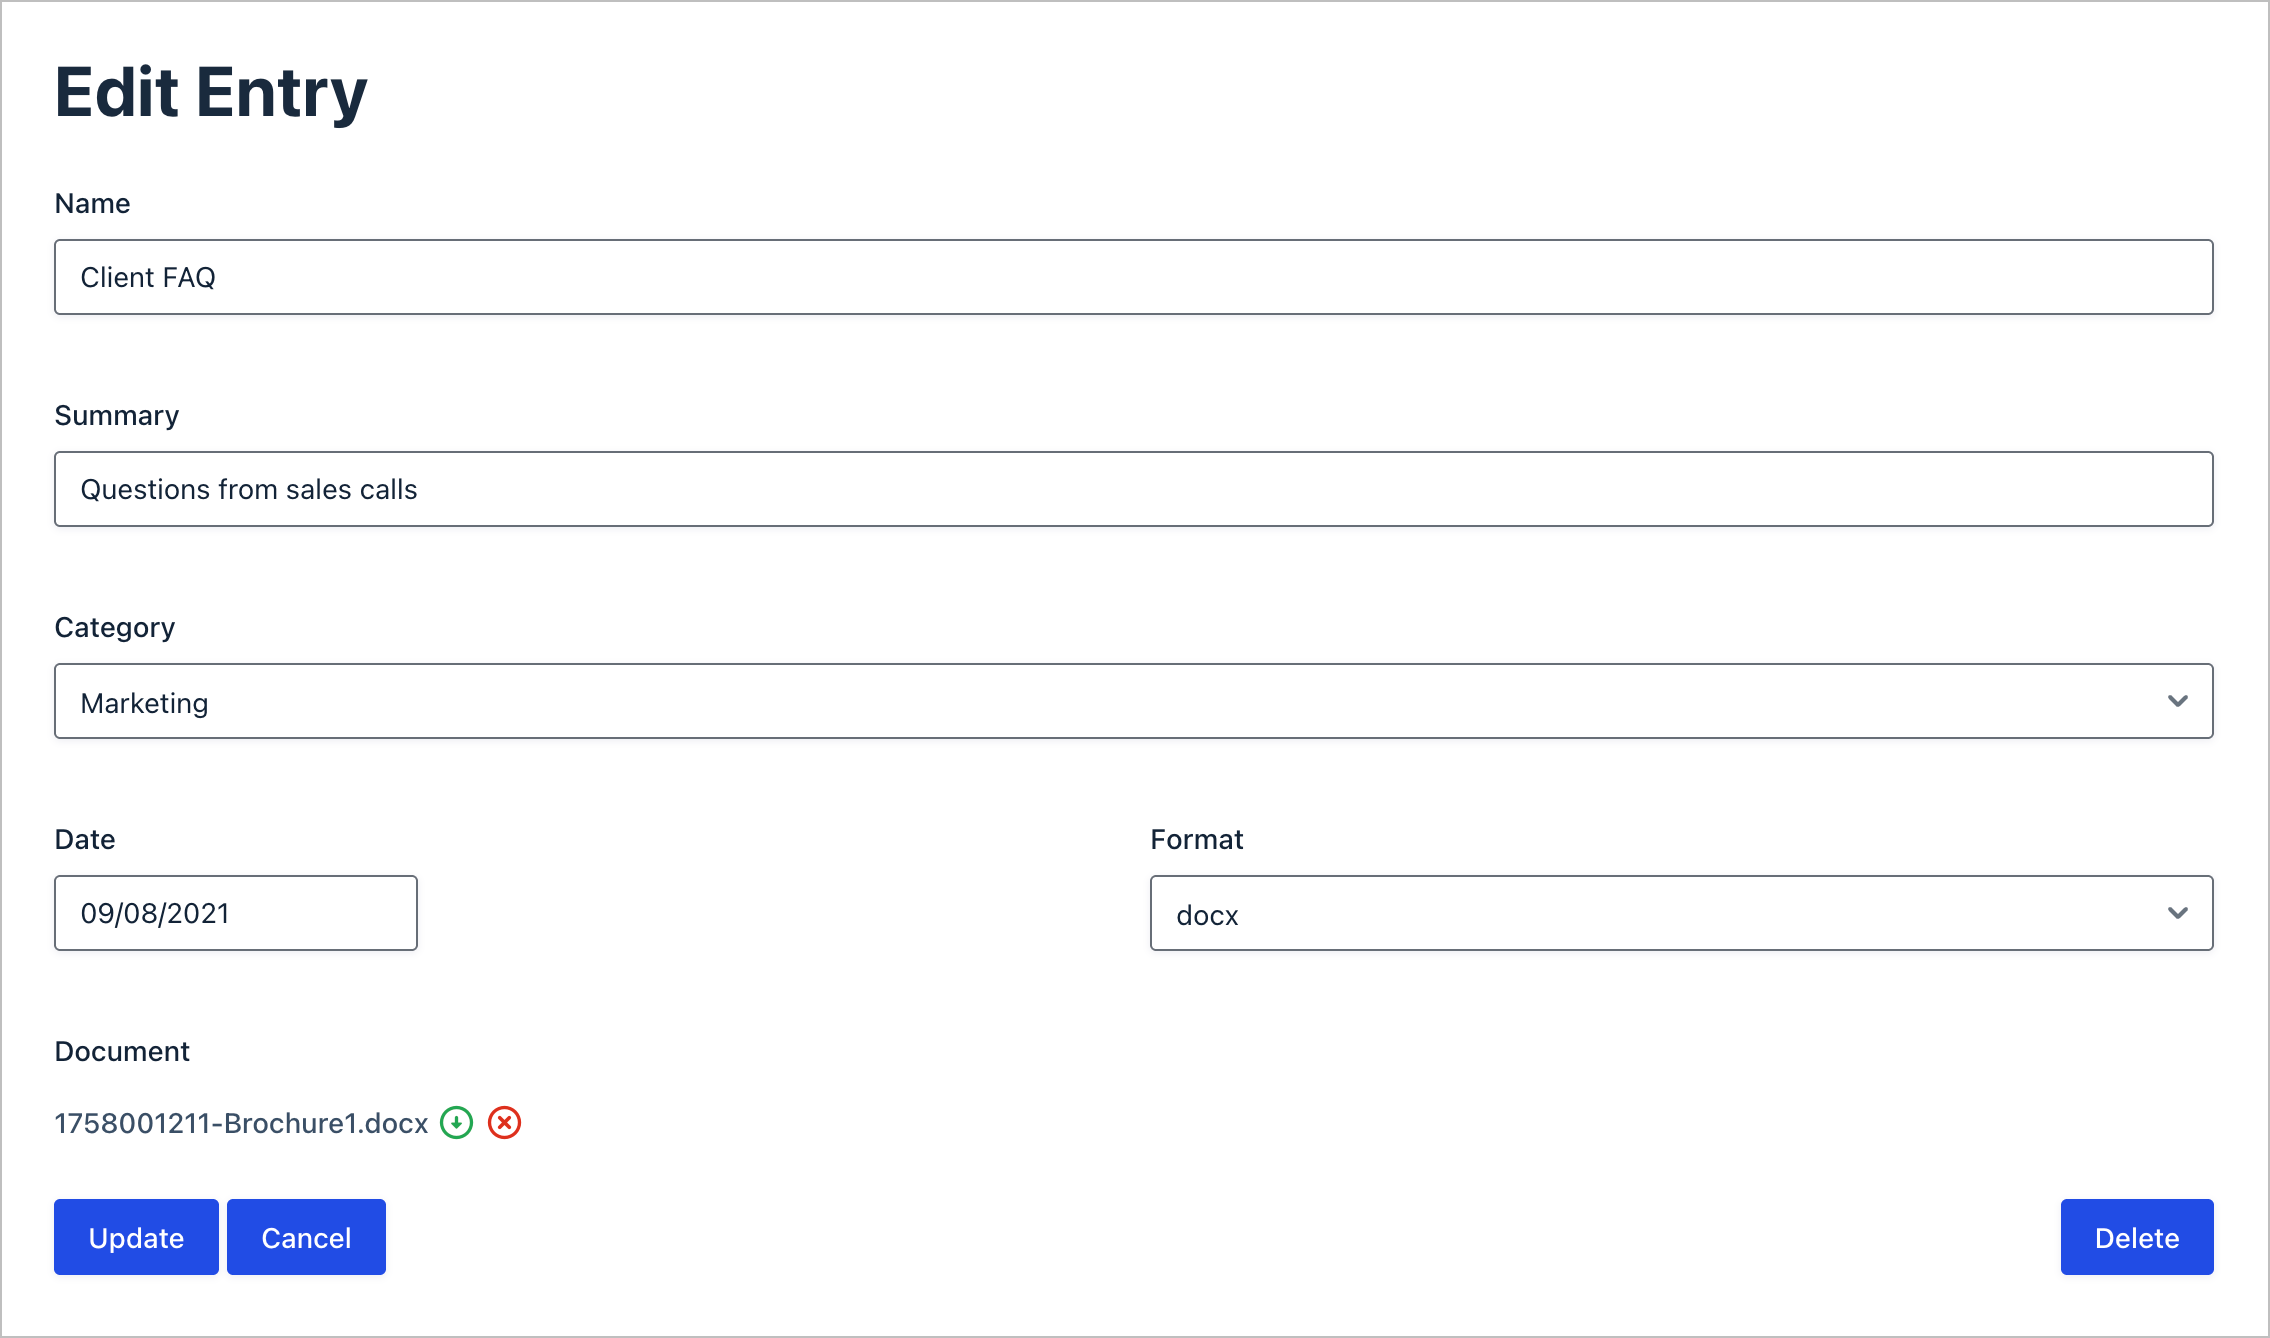
Step 5: Make document entries editable
Sometimes authorized users may need the ability to update or delete existing documents in the library. To enable this functionality, we can configure GravityView’s Edit Entry Layout. By adding fields here, they will become editable directly from the frontend.
Here’s what it looks like on the frontend:
That’s it! In just 5 simple steps, you can have a fully functioning document management system set up on your WordPress website.
Take things further
Leverage the power of GravityKit to add additional features such as:
- Role-based restrictions
- Custom content
- Entry approval processes
- Conditional View and field visibility
- Customizable entry exports and reports
- Revisions and version control
- Charts and dashboards
- And much more
Why build a WordPress document management system?
Many companies face obstacles managing their digital assets! Creating a custom document library is the perfect solution for any business wanting to organize their files.
Creating a document library allows you to:
- Manage your internal company resources
- Store educational materials
- Create a repository of your marketing materials
- Safely store your legal documents
Working with paper documents is slow and inefficient. A WordPress digital document management system ensures that each member of your team knows where a document is housed, how to find it and whether it needs updating.
Why Gravity Forms + GravityView is the best WordPress document library solution
Most WordPress document library plugins focus only on file display. Gravity Forms and GravityView take a different approach by combining structured data capture, powerful front-end display, and full control over access and workflows.
- Secure uploads with full control
Gravity Forms lets you securely upload documents to WordPress with fine-grained control over allowed file types, maximum file size, and submission rules, helping protect your site while ensuring consistent uploads.
- Powerful front-end search and filtering
Using GravityView, your document library becomes fully searchable and sortable from the frontend. Users can quickly filter documents by category, date, type, or other fields—no admin access required.
- Front-end document editing and replacement
With GravityView’s Edit Entry layout, authorized users can replace files, delete outdated documents, or update associated fields (such as category, date, or file type) directly from the front end.
- Support for all WordPress file types
Gravity Forms supports any file type allowed by WordPress, including PDFs, Word documents, spreadsheets, CSV files, text files, and more—making it suitable for a wide range of document management needs.
- Custom download buttons and links
GravityView’s Custom Content field allows you to design custom download buttons or links, giving you full control over how files are accessed and presented to users.
- Structured metadata with categories and tags
You can capture rich metadata alongside each file, including titles, categories, tags, dates, and descriptions. All of this information can be displayed, searched, and filtered from the frontend, keeping your library organized and easy to navigate.
- Easy and controlled file sharing
GravityView makes it easy to share documents with colleagues or members through a front-end document library, with visibility controlled by user roles, permissions, or login status.
- Internal notes and collaboration
Using Entry Notes, team members can add internal comments to documents and trigger email notifications when updates are made, supporting review, approval, and collaboration workflows.
When to use Gravity Forms + GravityView
While there are purpose-built document library plugins like Document Library Pro and FileBird, using Gravity Forms + GravityView gives you more flexibility and customization options when designing your library. It’s ideal if you already use Gravity Forms on your site or if you need users to not only download files but also submit and manage their own documents in a custom workflow.
It’s also the go-to solution if you want to capture extensive metadata with each document (beyond what standalone plugins offer). You can add any number of form fields (tags, descriptions, related project info, etc.) and then display or filter by these in the View.
Bottom line: Choose a standalone document library plugin if you want simplicity. Choose Gravity Forms + GravityView if you want the ability to build a custom-tailored file upload form and frontend that matches your needs.
Build your WordPress document library today!
Managing digital files is difficult without an efficient document management system. In this post, we showed you how to build a WordPress document library using Gravity Forms and GravityView. If you found this post interesting, see how to build a knowledge base next.

Helpful tips right in your inbox.
Subscribe to get the latest articles, information on releases and helpful Gravity Forms tips!
More articles

How to build a WordPress CRM without code (a contact database you own)
Build a simple WordPress CRM with GravityView. Turn the Gravity Forms entries you already collect into a no-code contact database you own, with no monthly fees.

Launch Log: Distance sorting for radius searches, DataTables search improvements, and import reliability fixes
The latest GravityKit releases add distance sorting to map searches, bring built-in search to DataTables, and fix GravityCharts and GravityImport edge cases.

WordPress page builder market share 2026: Elementor leads at 32.67%
Elementor reaches 32.7% of WordPress sites. WordPress Block Editor 20.6%, wpBakery 8.5%, Divi 5.7%. Latest HTTP Archive crawl, share-of-WordPress basis throughout.