Complete guide
Last updated:
Gravity Forms conditional logic: A complete guide
Conditional logic is one of the most powerful features in Gravity Forms. It lets you create dynamic, personalized forms that respond to user input in real time. You can show or hide fields, send targeted notifications, display custom confirmations, and route data to external services based on what users enter in their submission. This guide covers every aspect of conditional logic in Gravity Forms and links to deeper tutorials for each topic.
Table of contents
- What is conditional logic in Gravity Forms?
- How to show and hide fields using conditional logic
- How to show or hide the submit button conditionally
- How to display different confirmation messages using conditional logic
- How to send conditional email notifications
- How to use feed conditional logic for third-party integrations
- Conditional logic with calculations and pricing
- Conditional logic in multi-page forms
- Real-world examples and use cases
- Advanced conditional logic with the [gvlogic] shortcode
- Common conditional logic patterns
- Troubleshooting conditional logic issues
- Frequently asked questions
What is conditional logic in Gravity Forms?
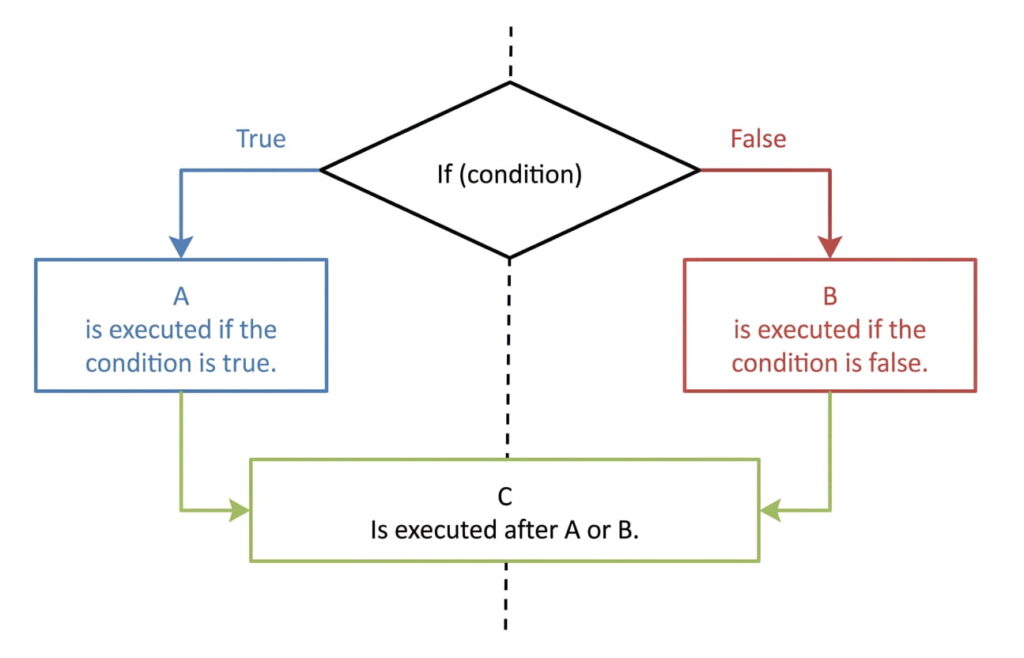
Conditional logic in Gravity Forms works on a simple principle: if X, then do Y. You define a set of rules, and the form responds automatically when those rules are met. For example, “If the user selects ‘Other,’ show an additional text field.” This lets you keep forms short and relevant by only displaying what each user actually needs to see.
You can apply conditional logic to individual fields, sections, pages, confirmations, notifications, and even third-party feed integrations. It’s built into the Gravity Forms interface (so no code required!) and it works across all standard field types including dropdowns, checkboxes, radio buttons, and number fields.
How to show and hide fields using conditional logic
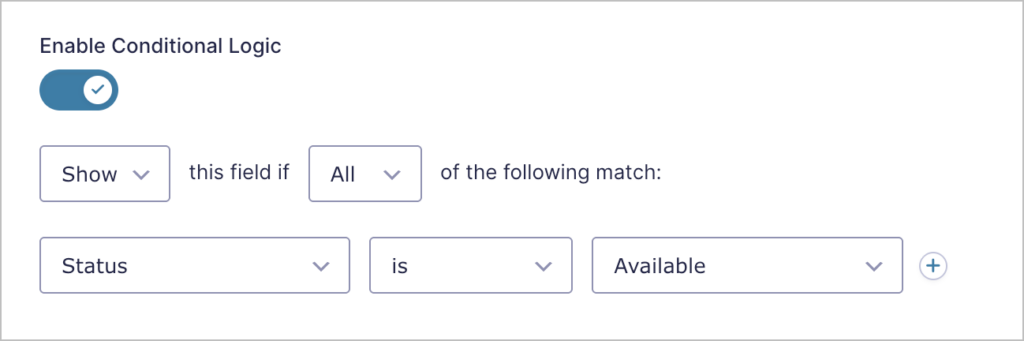
The most common use of conditional logic is controlling field visibility. You can set any field to show or hide based on the value of another field. This keeps your forms clean and prevents users from being overwhelmed by irrelevant options.
To enable it, open the field settings in the Gravity Forms editor, navigate to the “Conditional Logic” section, and define your rules. You can create rules based on a single condition or combine multiple conditions using “all” (AND) or “any” (OR) logic. Conditional logic also works on HTML fields, and entire sections so you can show or hide groups of related fields at once.
How to show or hide the submit button conditionally
You can also apply conditional logic to the submit button itself. This is useful when you need users to complete a specific action before they can submit the form, such as agreeing to terms of service or filling in a required selection.
To set this up, go to the form editor, click on the submit button, then open the conditional logic settings. Define the conditions that must be met for the button to appear. A common pattern is hiding the submit button until a “I agree to the terms” checkbox is checked.
Be aware that adding conditional logic to the form submit button could cause usability problems for some users and negatively impact the accessibility of your form.
How to display different confirmation messages using conditional logic
Gravity Forms lets you create multiple confirmation messages and display them conditionally based on form responses. Instead of showing every user the same generic “Thank you” message, you can tailor the response to what they submitted.
For example, you could display a different confirmation depending on whether someone selected “Sales inquiry” or “Support request.” Each confirmation can include merge tags to personalize the message with the user’s actual form data. You can also redirect users to different pages based on their responses.
Go deeper: How to create custom confirmation messages in Gravity Forms.
How to send conditional email notifications
Conditional notifications let you route emails to different recipients or send different messages depending on what the user submitted. This is especially valuable for forms that serve multiple departments or purposes.
For instance, a contact form with a “Department” dropdown could send the submission to the sales team when “Sales” is selected and to the support team when “Support” is selected. You can create multiple notification rules, each with its own conditions, recipients, subject lines, and email body content.
You can take this further by attaching PDF exports to notification emails or sending notifications when an entry is approved or rejected.
How to use feed conditional logic for third-party integrations
Feed conditional logic controls when form data is sent to third-party services like Mailchimp, Zapier, Stripe, or PayPal. Instead of sending every submission to every connected service, you can define rules that determine which feeds activate based on the user’s responses.
A practical example: you might only add a user to your Mailchimp list if they check the “Subscribe to newsletter” box, or only process a Stripe payment if the order total is above a certain amount. Feed conditional logic is configured within each individual feed’s settings.
To learn more about feeds, and connecting Gravity Forms to external services, see our guide on How to use Gravity Forms.
Conditional logic with calculations and pricing
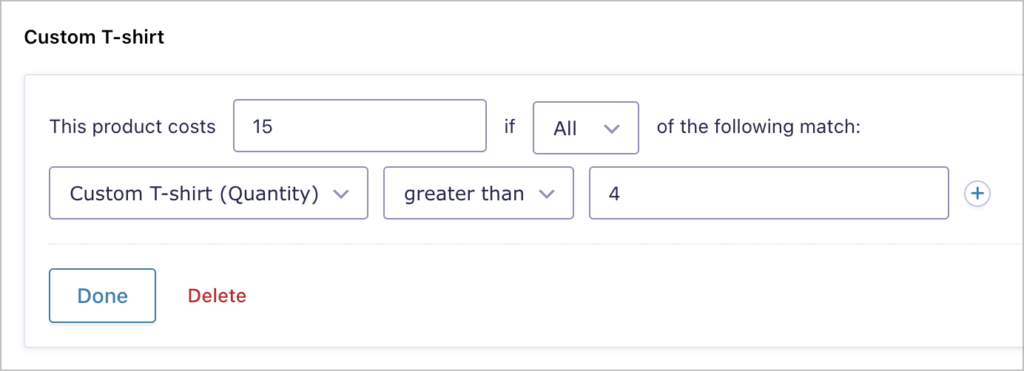
Conditional logic pairs well with calculations and pricing fields in Gravity Forms. You can show or hide pricing options based on user selections, and create dynamic order forms where the total updates in real time as users make choices.
The Conditional Pricing add-on from Gravity Wiz (a third-party developer) takes this further by letting you adjust product prices dynamically based on field values. For example, applying a bulk discount when a quantity exceeds a certain threshold or adding surcharges for premium options.
For a comprehensive walkthrough of how calculations work in Gravity forms, see Gravity Forms Calculations: The Ultimate Guide. If you want to go deeper into conditional product pricing, read Gravity Forms Product Calculations: The Complete Guide.
Conditional logic in multi-page forms
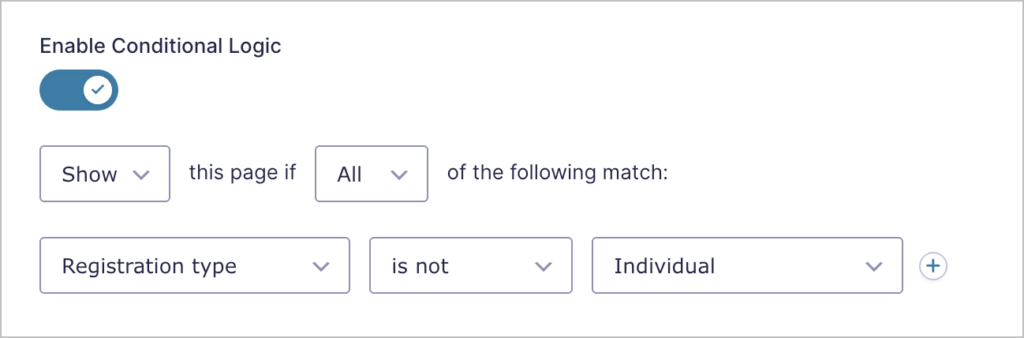
When building multi-step forms, you can apply conditional logic to page breaks to skip entire pages that aren’t relevant to a particular user. This creates a smoother experience where users only see the steps that apply to them.
For example, in a registration form, you might skip the “Company Details” page entirely if the user selects “Individual” as their registration type. Gravity Forms evaluates page-level conditions before advancing to the next page, so users move seamlessly through the form without seeing irrelevant sections.
Real-world examples and use cases
Conditional logic is versatile enough to handle a wide range of scenarios. Here are some of the most common patterns:
- Registration forms: Show different fields based on user role (e.g., “Student” vs. “Professional”), collect role-specific information, and skip irrelevant sections.
- Order forms: Display product-specific options (size, color, customization) only when that product is selected. Show quantity-based pricing or conditional shipping options.
- Support request forms: Route tickets to the right team based on the issue category. Show different follow-up questions depending on the type of problem reported.
- Event sign-up forms: Display session or workshop options based on the attendee’s selected track. Show meal preference fields only if the event includes catering.
- Survey forms: Branch questions based on previous answers to keep surveys focused and reduce abandonment.
How to use the Gravity Forms conditional shortcode
Gravity Forms includes a built-in conditional shortcode that lets you show or hide content inside confirmation messages and notification emails based on field values. This is useful when you want to personalize what users see after submitting a form. No need to install any additional plugins!
The basic syntax looks like this:
[gravityforms action="conditional" merge_tag="{Field Name:1}" condition="is" value="Yes"]
This content only appears if the user selected "Yes."
[/gravityforms]
The shortcode takes four required parameters:
- action — always set to
conditional - merge_tag — the merge tag for the field you want to evaluate (e.g.,
{Department:5}) - condition — the comparison type:
is,isnot,greater_than,less_than,contains,starts_with, orends_with - value — the value to compare against
You can use this to display different messages based on dropdown selections, show content only when a field contains a specific value, or compare numeric responses against a threshold.
For a full walkthrough with examples, read All you need to know about the Gravity Forms conditional shortcode.
Advanced conditional logic with the [gvlogic] shortcode
The [gvlogic] shortcode added by GravityView (a third-party add-on from GravityKit) extends conditional logic beyond forms and into your WordPress content. You can use it to show or hide content on any page or post based on Gravity Forms field values, user roles, or other conditions.
The basic syntax is:
[gvlogic if="{Field Name:1}" is="Yes"]
This content only appears if the user selected "Yes."
[else]
This content only appears if the user did not select "Yes."
[/gvlogic]
This is particularly useful for building personalized post-submission experiences. For example, displaying different instructions based on what a user selected in their form, or showing content only to users who meet certain criteria. The shortcode supports comparison operators like is, isnot, contains, greater_than, and more.
For full syntax details, see the official [gvlogic] shortcode documentation. Learn more in these detailed guides:
- Gravity Forms: Conditional Logic Using [gvlogic]
- How to Use the [gvlogic] Shortcode to Show or Hide Content
- Feature Highlight: The [gvlogic] Shortcode
Common conditional logic patterns
Here are some frequently used conditional logic configurations for quick reference:
- Show a field when a dropdown value is selected: Set the target field to “Show this field if Dropdown is [value].”
- Hide a field when a checkbox is unchecked: Set the target field to “Hide this field if Checkbox is not [value].”
- Require multiple conditions: Use “Show this field if all of the following match” and add multiple rules.
- Match any condition: Use “Show this field if any of the following match” for OR logic.
- Show a field based on a number range: Use “greater_than” and “less_than” operators on Number fields.
- Conditionally send a notification: Create a new notification, enable conditional logic, and set the rule (e.g., “Send if Department is Sales”).
Troubleshooting conditional logic issues
When conditional logic isn’t working as expected, the issue usually falls into one of these categories:
- Incorrect rule configuration: Double-check that your rules reference the correct fields and values. Remember that “is” requires an exact match, while “contains” is more flexible.
- Plugin conflicts: Other plugins (especially those that modify form output or load custom JavaScript) can interfere with conditional logic. Deactivate other plugins one by one to identify the conflict.
- Caching issues: Page caching or browser caching can serve a stale version of your form where conditional logic doesn’t fire. Exclude your form pages from caching or clear your cache after making changes.
- Optimization plugins: JavaScript minification or deferral plugins can break the Gravity Forms scripts that power conditional logic. Try excluding Gravity Forms scripts from any performance or caching plugins you have installed.
- JavaScript errors: Open your browser’s developer console and check for JavaScript errors. Conditional logic runs on the front end via JavaScript, so any script error on the page can prevent it from working.
If you’ve checked all of the above and conditional logic still isn’t working, try switching to a default WordPress theme temporarily to rule out theme-related conflicts.
Related guides
This guide is part of a series covering the most important Gravity Forms topics in depth. Explore the other guides in this set:
- How to use Gravity Forms: A complete guide
- Editing entries in Gravity Forms: A complete guide
- Importing entries to Gravity Forms: A complete guide
- Exporting data from Gravity Forms: A complete guide
- Displaying Gravity Forms entries: A complete guide
- Gravity Forms calculations: A complete guide
Frequently asked questions
Gravity Forms lets you set conditions to match “all” (AND) or “any” (OR), but not both in the same rule. There’s no native support for nested logic like “A AND (B OR C).” A common workaround is to use a hidden Number field with a calculation that scores your conditions numerically, then apply conditional logic based on the calculated result. Gravity Wiz’s Advanced Calculations perk can also simplify this with support for conditional formulas.
Fields hidden by conditional logic are completely excluded from the submission. Their values are not saved to the entry and are not available for notifications, calculations, or feed processing. This is intentional and cannot be changed. If you need to preserve a value regardless of field visibility, use a separate Hidden field (the field type, not a conditionally hidden field) to store the data independently of your show/hide rules.
The most common cause is a JavaScript conflict. Conditional logic runs on the client side, and another plugin loading a second copy of jQuery can break it. Check your browser’s developer console for JavaScript errors. Other frequent causes include: referencing a field that appears after the conditional logic field in the form layout, typos in dropdown values (conditions must match the stored value exactly), and nested conditional logic where a field’s condition depends on another field that also has conditions. The official Gravity Forms documentation has a dedicated page covering nested logic edge cases and workarounds.
Gravity Forms’ native conditional logic doesn’t support date comparisons, so you can’t set a rule like “show this field if today is before March 1.” For date-based conditions, the Conditional Logic Dates perk from Gravity Wiz extends the built-in conditional logic to support user-input dates, the current date, and relative dates (e.g., “30 days from now”). This is commonly used for early-bird pricing, age-based discounts, and event registration deadlines.
Yes, but it works differently than form-level conditional logic. GravityView provides three tools for this: Advanced Filtering controls which entries appear in a View by filtering at the database level; Field Conditional Logic shows or hides individual fields within a View based on entry values; and the [gvlogic] shortcode lets you wrap any content in conditional statements to change what’s displayed based on field values, user roles, or other criteria. For most use cases, start with Advanced Filtering for entry-level control and Field Conditional Logic for field-level control.
Not with Gravity Forms’ built-in conditional logic alone. While you can show or hide entire Product fields based on conditions, you can’t change the price of a single product dynamically. For true conditional pricing (tiered discounts, age-based rates, quantity-based pricing), the Conditional Pricing perk from Gravity Wiz lets you define multiple pricing levels for one Product field that adjust automatically based on other field values. You can also combine this with the Conditional Logic Dates perk for time-based pricing like early-bird discounts.
