Published
•
Updated
How to build a volunteer management system on WordPress without code
Nonprofits depend on volunteers, but managing them efficiently can be a challenge. While many organizations turn to expensive software solutions, there’s a more affordable, flexible alternative: build your own volunteer management system using WordPress. In this step-by-step guide, you’ll learn how to create a full-featured volunteer management system using Gravity Forms, GravityView, and optional add-ons.…
Nonprofits depend on volunteers, but managing them efficiently can be a challenge. While many organizations turn to expensive software solutions, there’s a more affordable, flexible alternative: build your own volunteer management system using WordPress.
In this step-by-step guide, you’ll learn how to create a full-featured volunteer management system using Gravity Forms, GravityView, and optional add-ons. We’ll cover:
- Creating a volunteer registration form
- Building a searchable volunteer database
- Setting up editable volunteer profiles
- Displaying everything on the front end of your site
- Optional: restricting access and allowing user edits
Let’s dive in!
Download the free volunteer registration form template now!
Import the template into Gravity Forms and customize as necessary.
Sneak peek
Here’s a preview of the volunteer database and management system that we’re going to build in this tutorial:

Wanna try it?
Spin up a demo
See what you can build with GravityView — explore the live demo.

What you’ll need
Here are the plugins you’ll need to create a volunteer management system like the one in this tutorial.
What is volunteer management for nonprofits?
Volunteer management refers to the process that nonprofits use to recruit, train, track, and engage with their volunteers. Successful volunteer management is crucial for most nonprofits as this allows them to recruit and maintain a dedicated and passionate group of productive volunteers.
A robust volunteer management system helps you:
- Stay organized
- Retain volunteers for longer
- Improve communication and productivity
- Scale up operations with limited staff
Summary of the steps
Time needed: 15 minutes
Steps for building a volunteer management system using Gravity Forms and GravityView:
- Create a volunteer registration form
Build a Gravity Forms form to collect volunteer information such as name, skills, and availability.
- Build the volunteer database
Use GravityView to display submitted entries in a searchable, filterable table on the frontend.
- Add individual volunteer profiles
Configure Single Entry Views in GravityView to display detailed volunteer profiles with customizable fields.
- Enable frontend profile editing
Allow volunteers to update their own profiles by enabling user editing and adding edit links to the View.
- Embed and restrict access to the View
Embed your database on a page and restrict access to sensitive information based on user roles or login status.
Step 1: Create a volunteer registration form
Let’s start by creating a new form in Gravity Forms. We’ll use this form to register new volunteers and add them to our database.
To create a new form, we’ll hover over “Forms” in the WordPress sidebar and click “New Form”. After giving our form a title (required) and description (optional), we’ll click “Create Form”.

Now we can start adding fields to our form using the Gravity Forms visual form builder. To add new fields, simply drag and drop them into place from the right-hand panel.
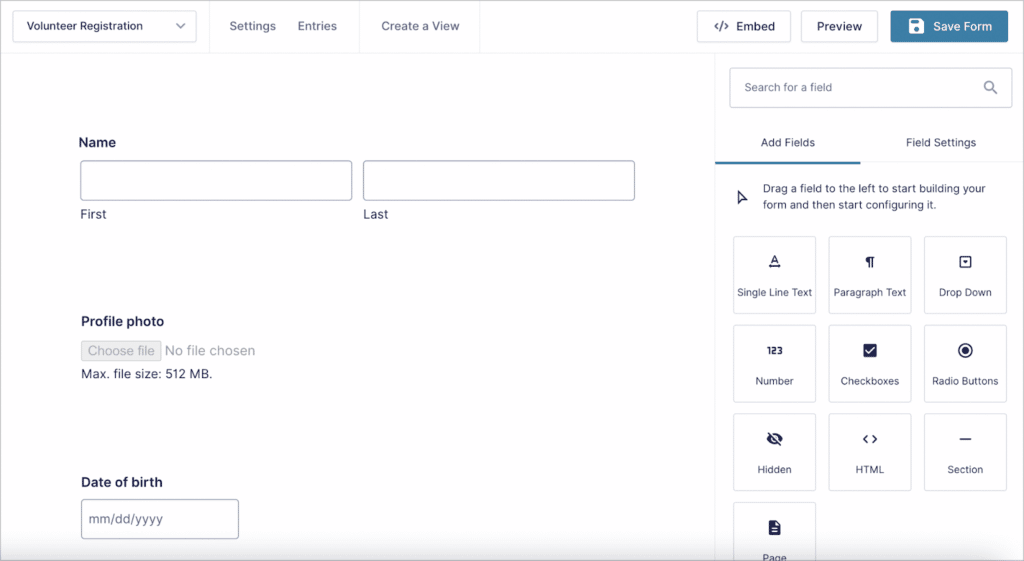
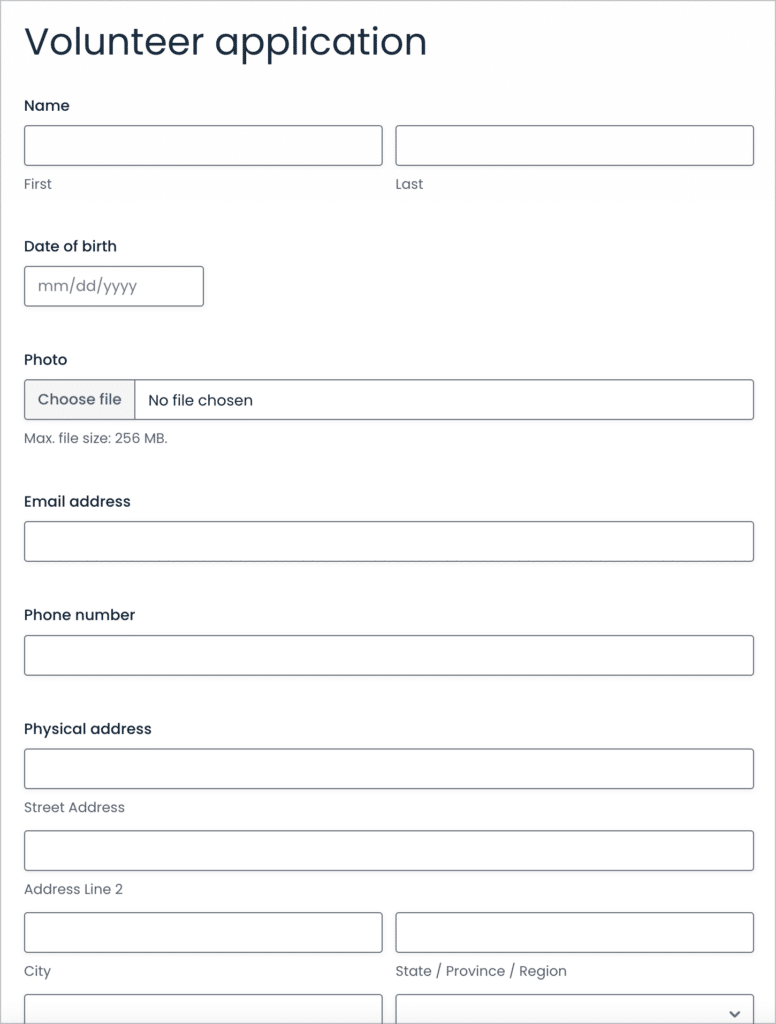
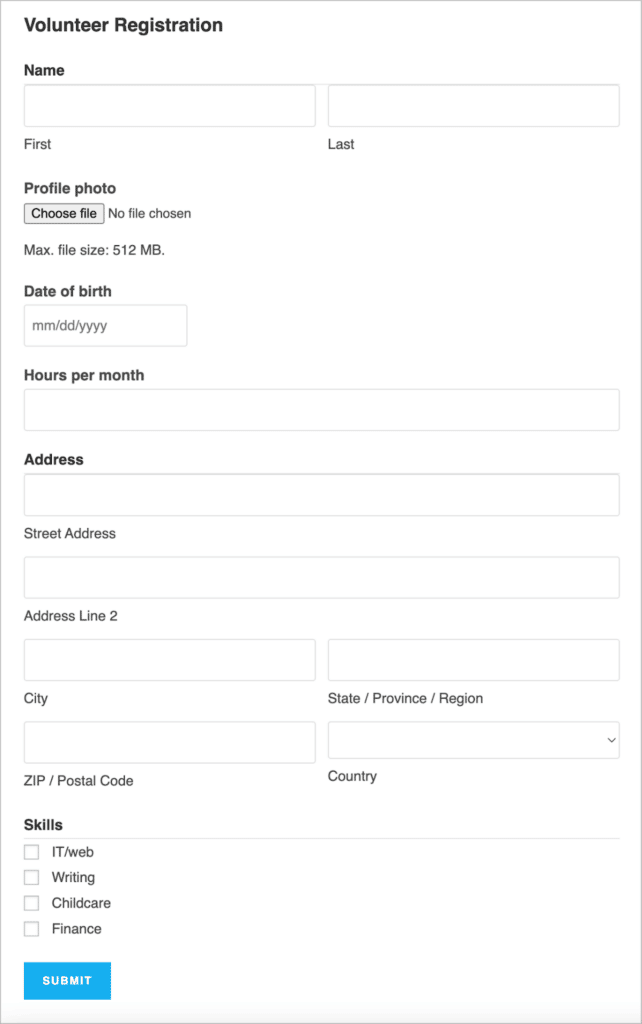
Feel free to add any fields you consider necessary. Here are the fields we’ll add for this example:
- Name (Name field)
- Profile photo (File Upload field)
- Date of birth (Date field)
- Hours per month (Number field)
- Address (Address field)
- Skills (Checkbox field)
After adding the File Upload field to your form, limit the accepted file types to common image formats such as .png, .jpg and .webp.
Here’s what our volunteer registration form looks like on the front end:
Pro tipSave time by downloading the volunteer registration form template now!
The next step is to embed your volunteer registration form on your site. To do this:
- Create or edit a WordPress page
- Add a Gravity Forms block
- Select your volunteer form from the dropdown

Step 2: Build the volunteer database with GravityView
Now that you have a volunteer registration form set up, you can start building a database to house information about each volunteer who signs up. We can do this using GravityView, an add-on for Gravity Forms that enables you to display form data on the front-end and build powerful web applications.
Create a new View
To create a new View:
- Hover over “GravityKit” and click “New View”
- Give your View a name (this is for your reference only)
- Set the data source to your volunteer registration form
- Choose the “Table” View Type for a database-style display

After selecting your View type, you can start building your database using the GravityView drag and drop builder.
Add a search bar
Start by adding a search bar to the top widgets area. The search bar will allow users to search and filter volunteers in the database.
To add a search bar, click on the “Add Widget” button and select the Search Bar widget.
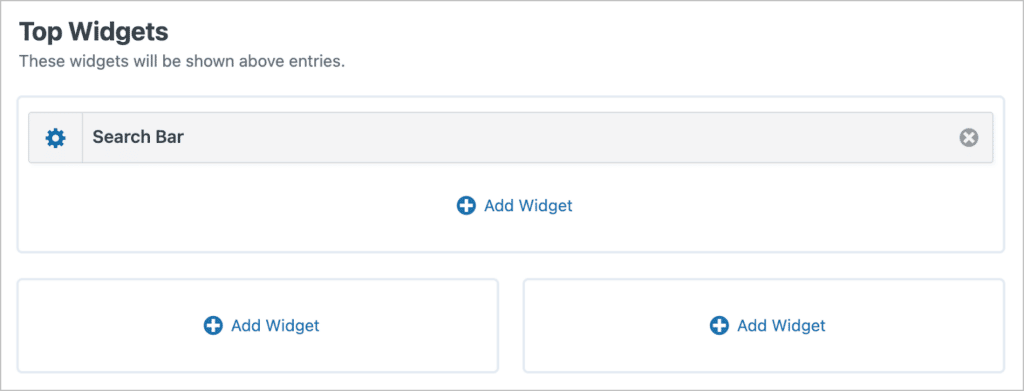
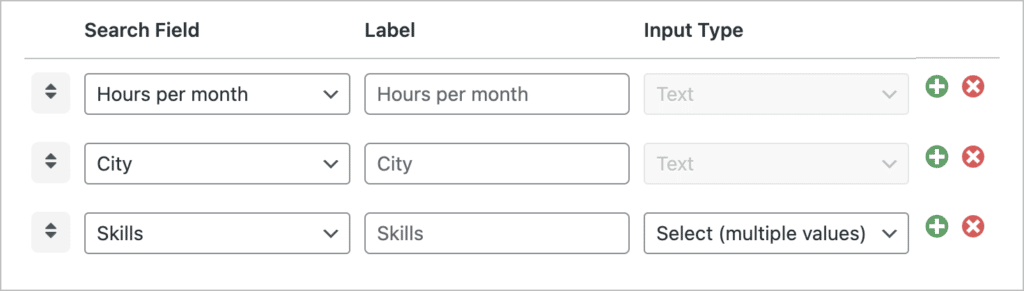
Now click on the gear icon next to the widget label to edit the search settings. Here, you can add multiple search inputs for different fields. Let’s enable filtering by skills, availability, and location.
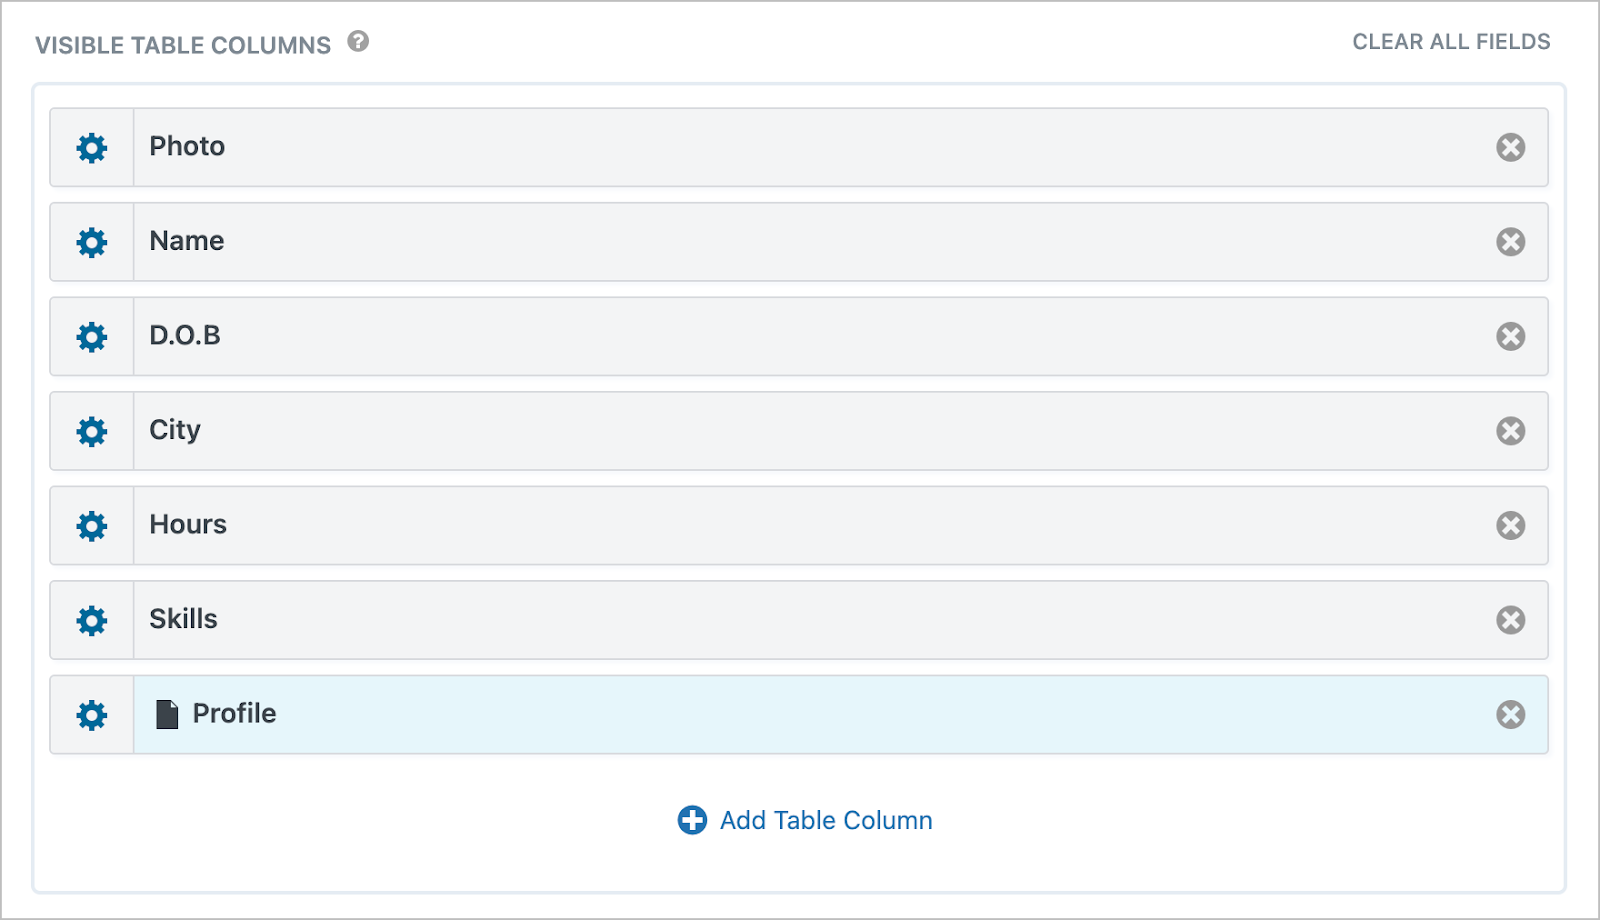
Add fields
After configuring the search bar, we’ll scroll down to the “Entries Fields” section of the View editor. Here we can add fields to the View. Fields are the same as those in our form and will display user-submitted data on the frontend. Each field we add here will appear as a column in our table:
- Photo
- Name
- Date of Birth
- City
- Hours per month
- Skills
- Link to Single Entry (Renamed to “Profile”)
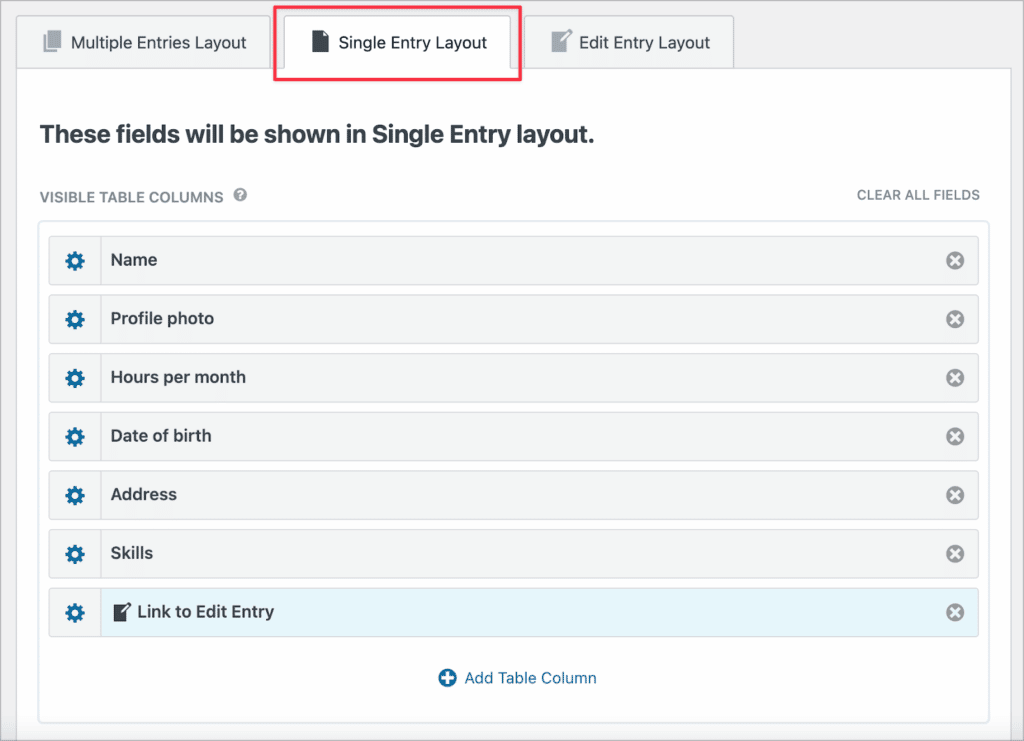
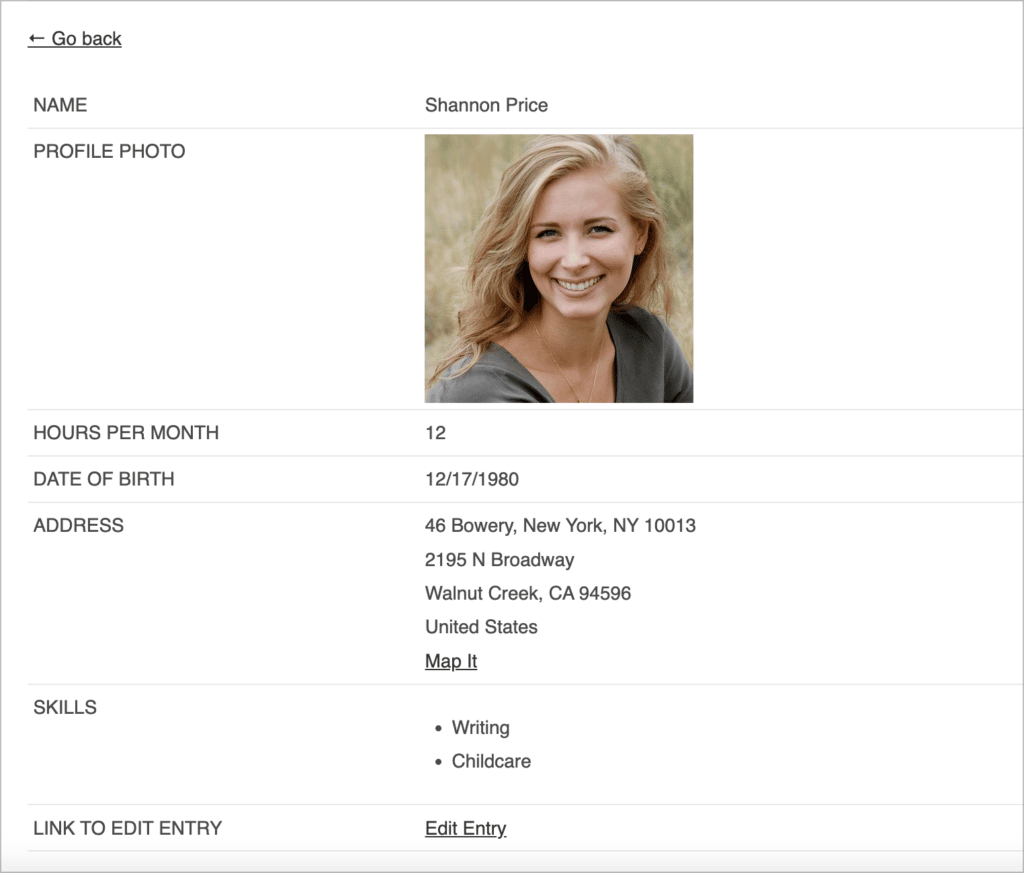
Configure individual volunteer profiles
We want each volunteer to have their own profile so that admins and recruiters can click through to view more information about them. This is easy to configure using GravityView’s Single Entry Layout.
We’ll click on the Single Entry Layout tab at the top of the View editor. Here, we can add the fields we want to be visible on each volunteer’s profile.
Testing it out
Here’s what our volunteer database looks like on the front end:
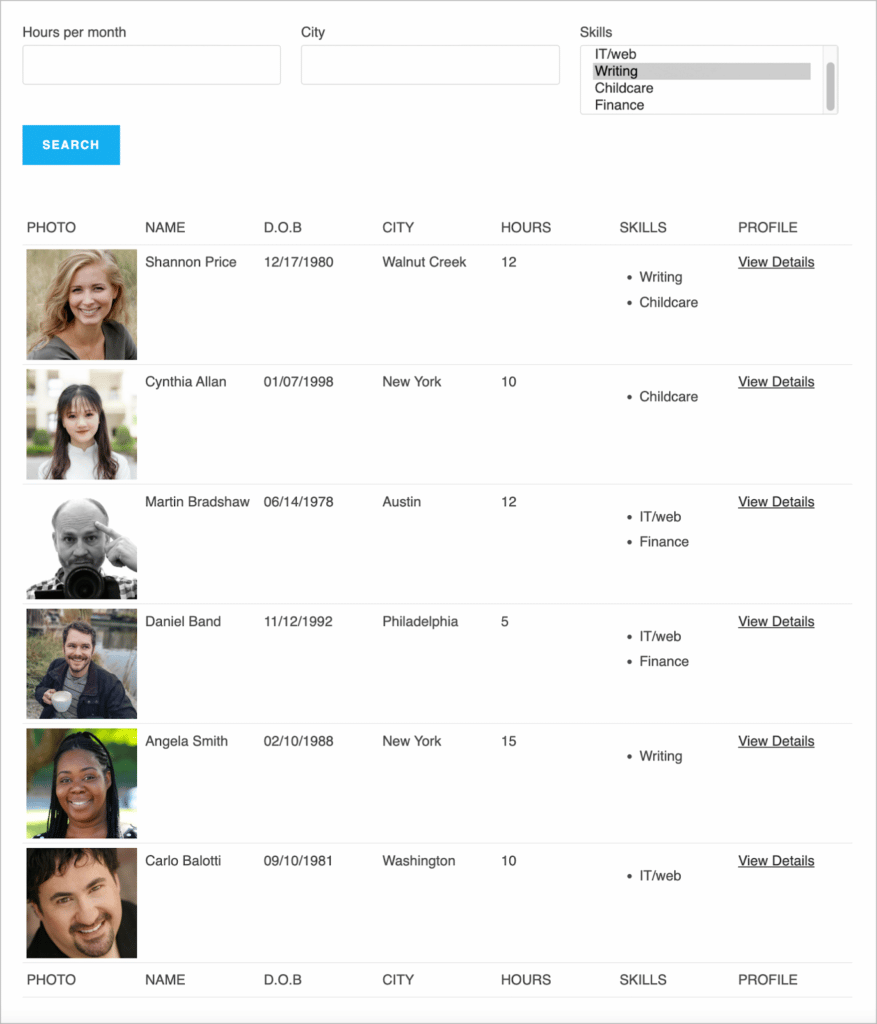
As you can see, the search bar at the top allows us to filter volunteers by their city, number of hours and skills. When we click on the “View Details” link on the right, we’re taken to that volunteer’s profile page where we can view more details about them.
Step 3 (optional): Allow volunteers to edit their profiles
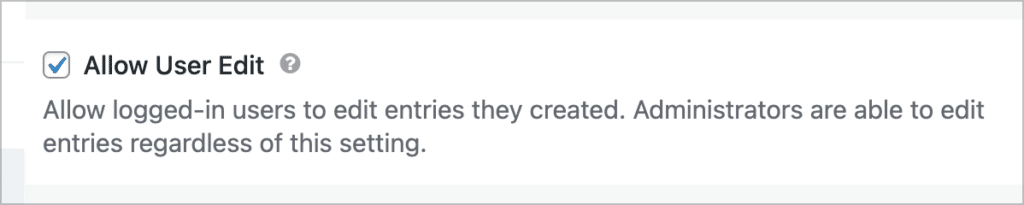
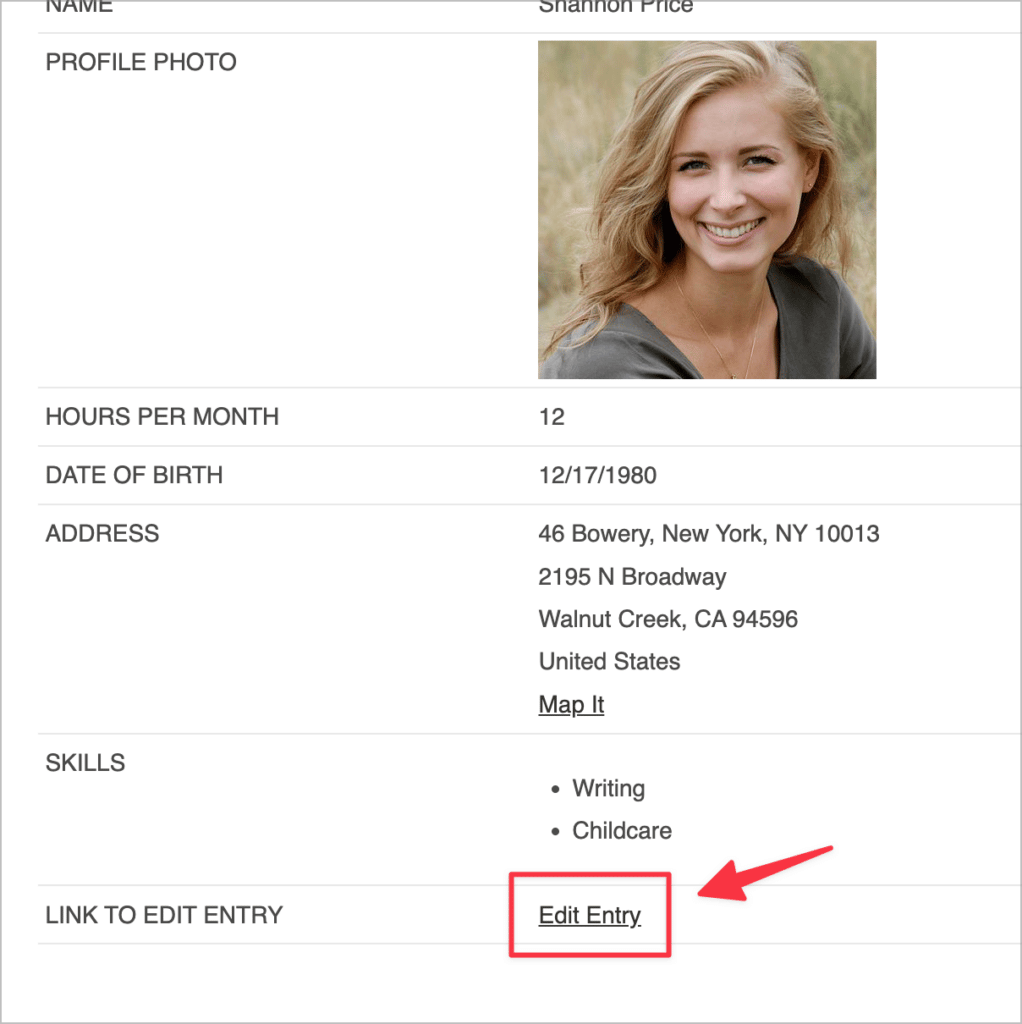
GravityView allows logged-in users to edit their own entries directly from the frontend.
To enable this feature, we’ll scroll down to the View Settings, click on the “Edit Entry” tab and check the box that says “Allow User Edit”.
Next, we’ll scroll back up to the View editor and add the “Link to Edit Entry” field. (You can add this field to either the Multiple Entries or Single Entry Layout).
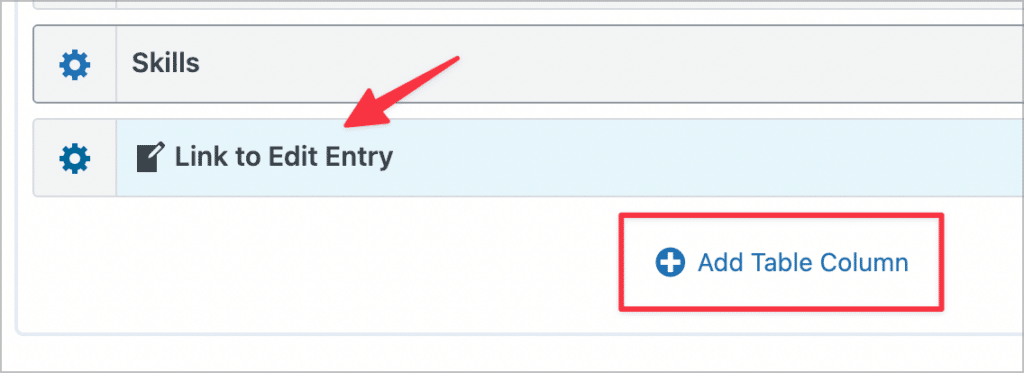
Now, when volunteers access their profile, they’ll see a link that says “Edit Entry”. Clicking on this will take them through to the Edit Entry Layout where they can update their profile information.
Step 4: Embed your View on a page
You can access your View directly or you can embed it on a page or post on your website. To do this:
- Add the “GravityView View” block to your chosen page/post
- Select your View from the dropdown field
Step 5 (optional): Restrict access to volunteer data
To ensure only authorized team members can view sensitive information, you can restrict your View based on login status or user role.
That’s it! You now have a fully functional volunteer management system.
Final thoughts and more inspiration
Managing volunteers doesn’t have to be complicated or costly. With Gravity Forms and GravityView, you can build an affordable, custom volunteer management system tailored to your nonprofit’s exact needs — all without touching a line of code.
For more inspiration, see how the Larry L. Hillblom Foundation uses GravityView for grant application management, or read our tutorial on building a fundraising dashboard next!

Helpful tips right in your inbox.
Subscribe to get the latest articles, information on releases and helpful Gravity Forms tips!
More articles

Launch Log: Drag-to-copy in the View editor, Gravity Forms 3.0 fixes
This week’s GravityKit releases add drag-to-copy and accessibility upgrades to the GravityView View editor, fix Gravity Forms 3.0 compatibility issues, and tighten security in the DataTables Layout.

How to build a searchable directory on Gravity Forms by chatting with AI
Build a searchable directory from your Gravity Forms entries by chatting with AI. See how the free GravityKit MCP creates a GravityView directory in minutes.

10 things you can ask AI to do with Gravity Forms (using the free GravityKit MCP)
See 10 practical things you can ask AI to do with Gravity Forms using the free GravityKit MCP: create forms, manage entries, build Views, and more.