🚀
How to display Gravity Forms entries on the front end of your WordPress website using GravityView; customize the layout, sort entries, and create powerful applications.
Estimated reading time: 19 minutes
Gravity Forms is one of the most powerful and versatile form plugins for WordPress. Gravity Forms allows you to collect information, send email notifications, hide fields with conditional logic, and much more.
With the GravityView plugin for Gravity Forms, you can also display entries on the front end of your website—No code required!
Displaying Gravity Forms entries on your website opens up a whole new world of possibilities in terms of what you can build using WordPress and Gravity Forms.
GravityView is a powerful plugin with an extensive range of features and extensions.
Whether you’re a Gravity Forms veteran or a new WordPress user, in this guide, you’ll find everything you need to get started displaying Gravity Forms entries on your website.
If you need help navigating this article, we’ve included a table of contents below:
Table of contents
- Why display Gravity Forms entries on your website?
- What is GravityView?
- Installing GravityView and creating a View
- Choosing the View layout
- Adding fields to your View
- Customizing the View
- Displaying Gravity Forms entries on a map
- Displaying different media types in GravityView
- Displaying Gravity Forms data from multiple forms
- Bonus: display Gravity Forms entries on a calendar
- Why you should use GravityView to display your Gravity Forms entries
- Final thoughts on displaying Gravity Forms entries
Why display Gravity Forms entries on your website?
There are many reasons why you may want to display Gravity Forms entries on your website. Having the ability to display Gravity Forms entries on the front end enables you to build all kinds of powerful applications.
What is GravityView?
GravityView is a WordPress plugin that extends Gravity Forms. Simply put, it’s the best way to display Gravity Forms data on your website.
💡 Pro tip: Learn more about GravityView and read about real-life success stories!
GravityView allows you to:
- Display form data using different layouts
- Search, sort, and filter entries
- Edit and delete entries from the front end
- Restrict information to logged-in users
Not only does GravityView allow you to do all this and more, but it also comes with a simple and intuitive drag and drop interface.
That’s right, you don’t need to write a single line of code, simply drag and drop fields to create new Views. You can then embed Views that you create into WordPress pages or posts.
GravityView is a flexible add-on that integrates seamlessly with Gravity Forms. In fact, GravityView is a Gravity Forms certified developer, so you can be sure it’s a quality plugin (with excellent support).
Build a member directory with GravityView
You can easily build a member directory using Gravity Forms and GravityView: use Gravity Forms to collect user information and then display that information using GravityView in the form of a user profile.
You can configure the permissions to allow users to edit their own profiles and you can also hide certain information depending on a user’s role. Take advantage of advanced filtering and sorting capabilities for further customization.
Create a front end database with GravityView
Maybe you run a modeling agency and you need to keep track of all the models contracted to you. You could use Gravity Forms to collect all the information you need and then display it on your website in the form of a database.
This allows members of your team to view/sort entries, and run reports without needing to view the backend of your website or log in as an administrator.
Build all kinds of powerful web apps!
There are so many other applications you can build by displaying Gravity Forms entries on the front end. Here are some examples of different apps you can build:
- Feedback board
- Job application management system
- Online marketplace
- Support ticketing system
- Store locator
- Issue tracker
- Task management system
- Real estate listing site
- Customer portal
- Artist portfolio (complete with image gallery)
- Geolocation directory
- Document library
- Volunteer management system
- An MVP for your startup
- Student registration portal
Clone popular web apps using GravityView
GravityView’s powerful front-end capabilities allow you to build clones of other, popular websites
- Build a Yelp clone
- Build a Hacker News clone
- Build a Zillow clone
- Build a Craigslist clone
- Build a Yellow Pages clone
As you can see, displaying Gravity Forms entries on your website using GravityView gives you access to powerful functionality that you can use to create diverse applications!
💡 Pro tip: Check our live demos to preview different applications and get your own, free demo site preloaded with all GravityKit add-ons!
Installing GravityView and creating a View
“Views” allow you to display Gravity Forms data on your site using different layouts. Each View you create connects to a single form, allowing you to display field values associated with that form.
After activating the GravityView plugin, you’ll see a new menu item titled “GravityKit” in your WordPress admin menu. Hover over it and click “New View”.
Next, name your View and select your form as the data source. You can either select a form preset or you can use your own form.
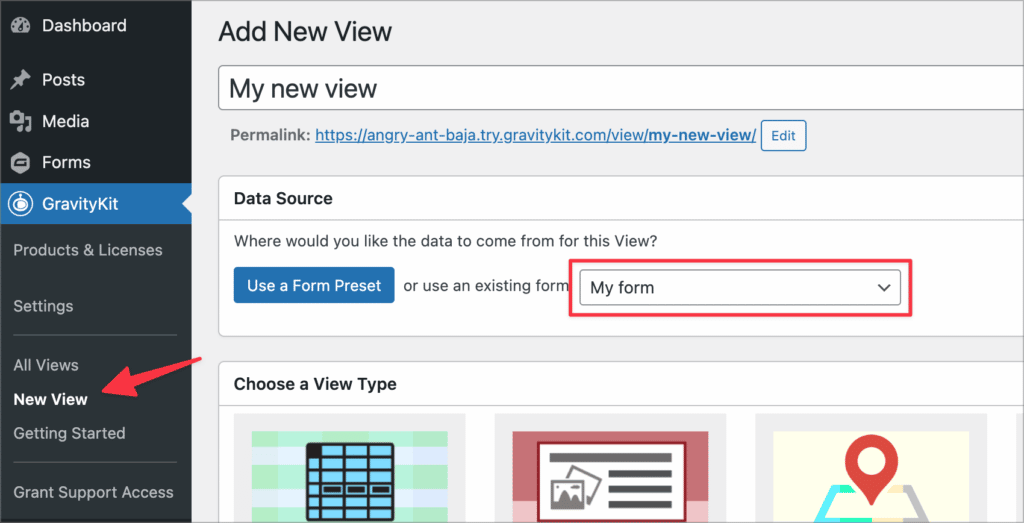
If you decide to use a form preset, GravityView will create a new form for you in Gravity Forms that contains all of the fields required for that preset configuration.
Before configuring your new View, the next step is to choose a View Layout.
Choosing the View layout
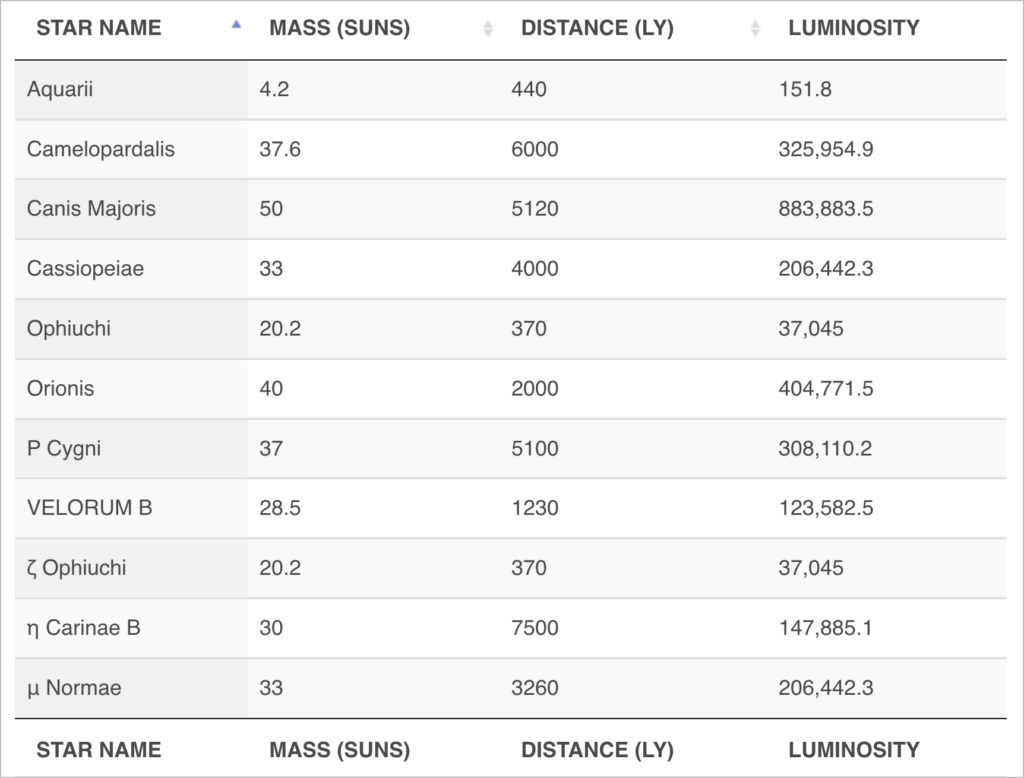
Depending on the View type you choose, your entries will display differently on the front end. For example, if you choose the Table Layout, each row in the table will be an entry and each column will be a form field.
GravityView supports five layout options in total:
- List
- Table
- Maps (covered below)
- DataTables
- DIY
The layout you choose will depend on what you’re building with GravityView.
If you want to create a business directory then the List layout is perfect. The Table layout, on the other hand, is best for numerical data or dense data that’s difficult to visualize. Here’s a quick overview of each View type.
Table layout
Displaying your Gravity Forms data in a table format is great if you’re building a database, or want an easy way to visualize complex data.
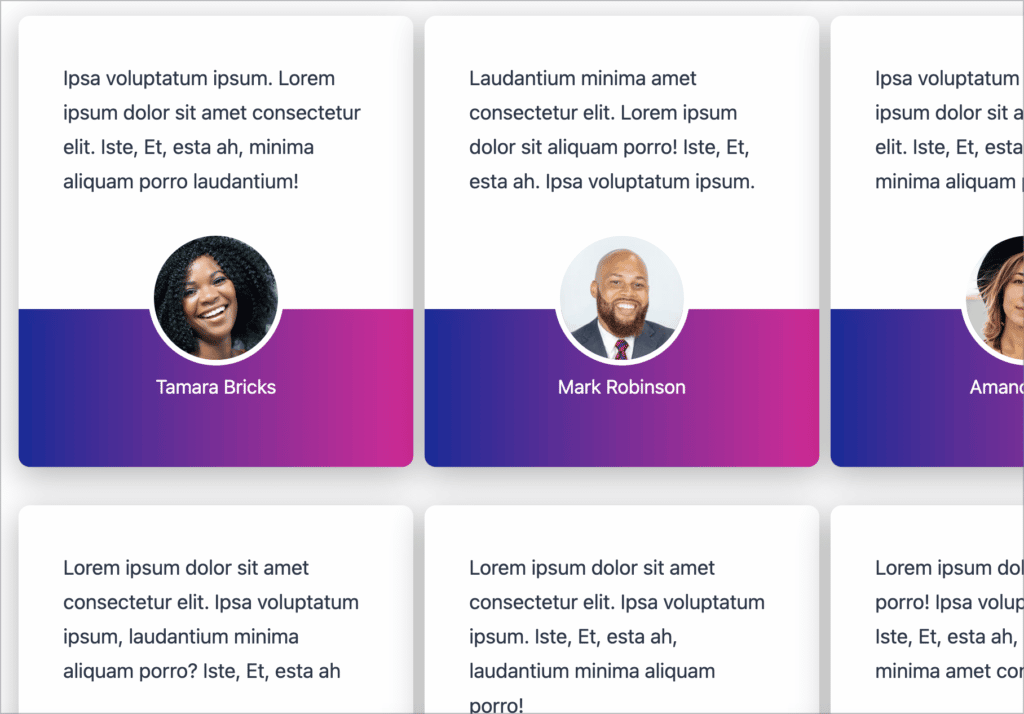
List layout
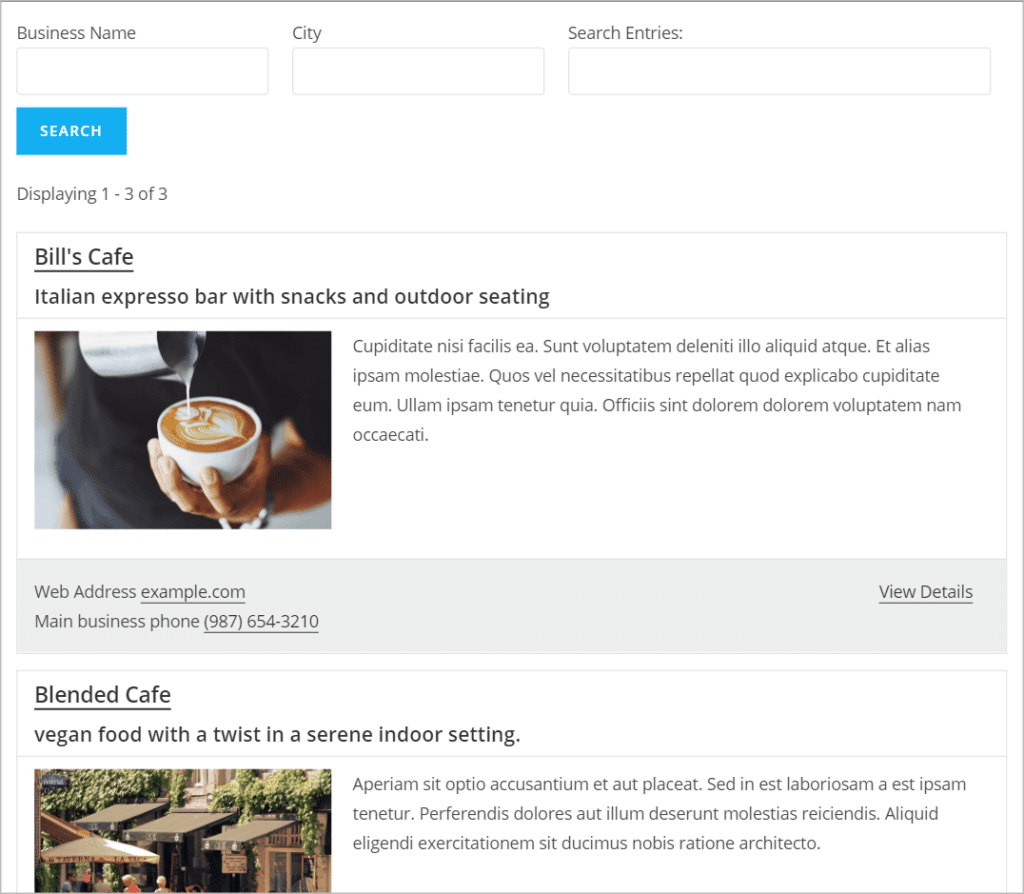
If you select the List layout, your entries will be displayed one after the other. The list layout has a dedicated space for images, making it perfect for user profiles, business directories, or product listings.
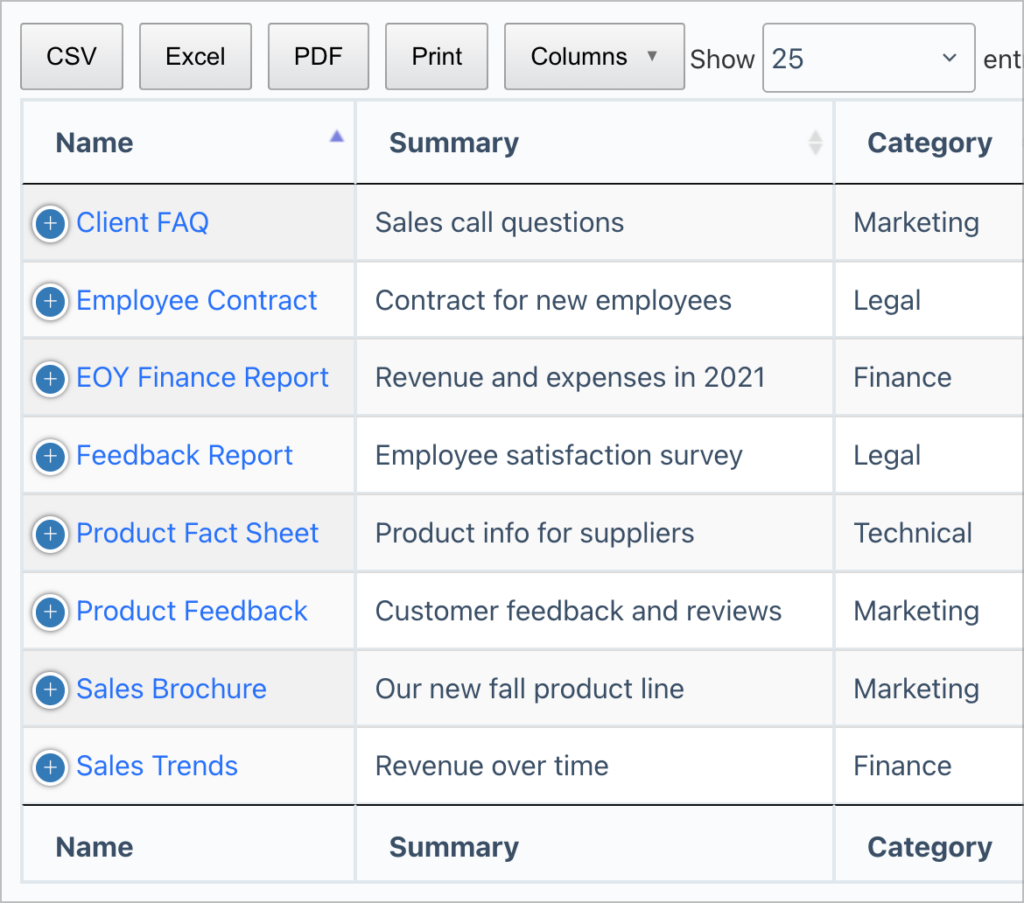
DataTables layout
The DataTables layout comes with advanced filtering and sorting options. This gives you full control over how your data is displayed. You can also export your data in a variety of formats, making DataTables the perfect layout option for analysis and reporting.
DIY layout
If you have basic knowledge of HTML and CSS, you can use the DIY layout to build your own custom View layout!
Designers and developers often want to have finer control over the way entries display on the front end. The DIY layout provides the flexibility to build any layout you want, without being bound by a preset template.
Adding fields to your View
After choosing a View Layout, you can start adding fields to your View using GravityView’s intuitive drag and drop interface.
There are three pages that make up a View – the Multiple Entries page, the Single Entry page, and the Edit Entry page.
- The Multiple Entries page is the main page that displays each of your entries one after the other.
- The Single Entry page allows you to narrow in on one entry and show more detailed information. (This is great if your form has a lot of fields and you don’t want to display them all on the Multiple Entries page).
- The Edit Entry page is where you can specify which fields are editable from the front end. (You can also limit editing capabilities to logged-in users only or restrict editing to specific user roles!).
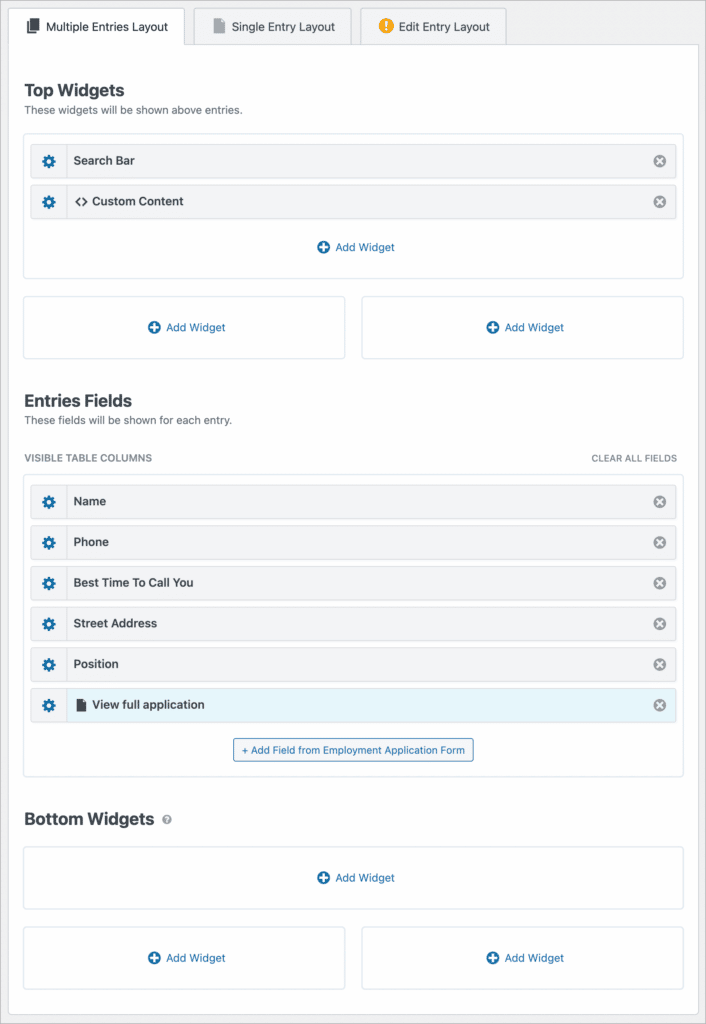
The Multiple Entries Layout has spaces for both widgets and fields. Widgets are tools that help you navigate your View (like a search bar, for example), while fields represent form field information.
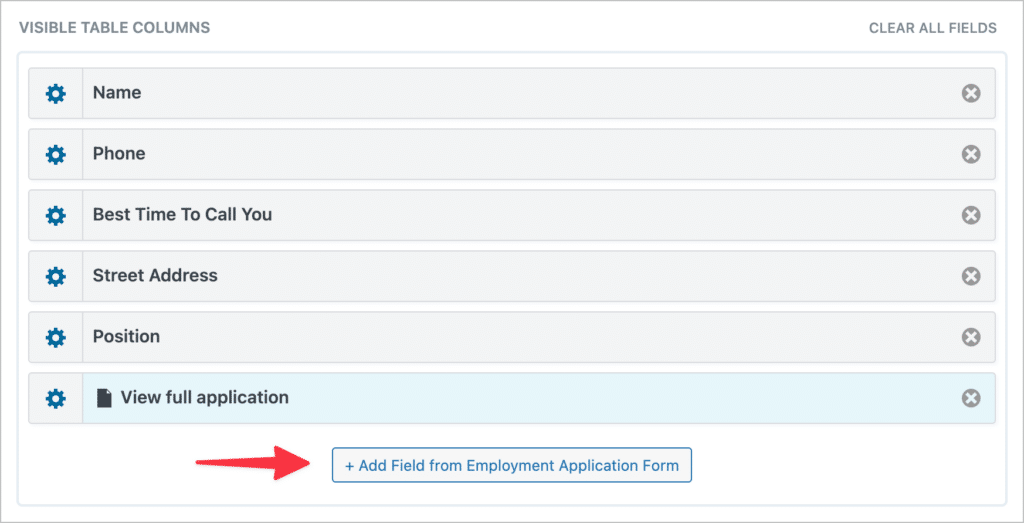
You can add new fields to your View by clicking the “Add Field” button.
You can also customize each field by clicking on the gear icon. This will open up the Field Settings popup window where you can add custom labels, restrict fields to logged-in users, and more.
You can find additional configuration options for your View in the View Settings meta box at the bottom of the page.
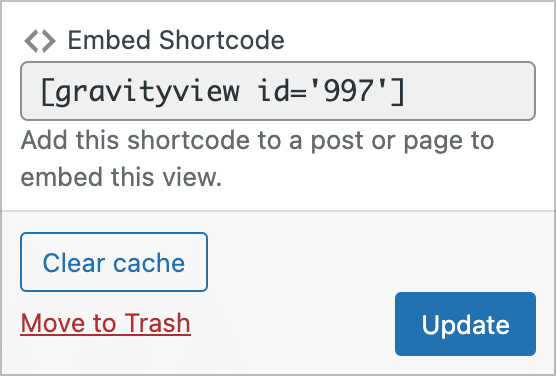
Once you’re happy with your View, you can embed it into a WordPress post or page by using the [gravityview] embed shortcode.
Customizing the View
Now that you know how to set up a basic View, you can start to explore all the different ways to customize the look and feel of your entries on the front end.
Custom content
The custom content field allows you to add custom content into your View. This includes HTML, shortcodes, and more.
To add it to your View, click on the “Add Field” button and select the “Custom Content” field. Then click on the gear icon to open the field settings and add your custom content into the text editor.
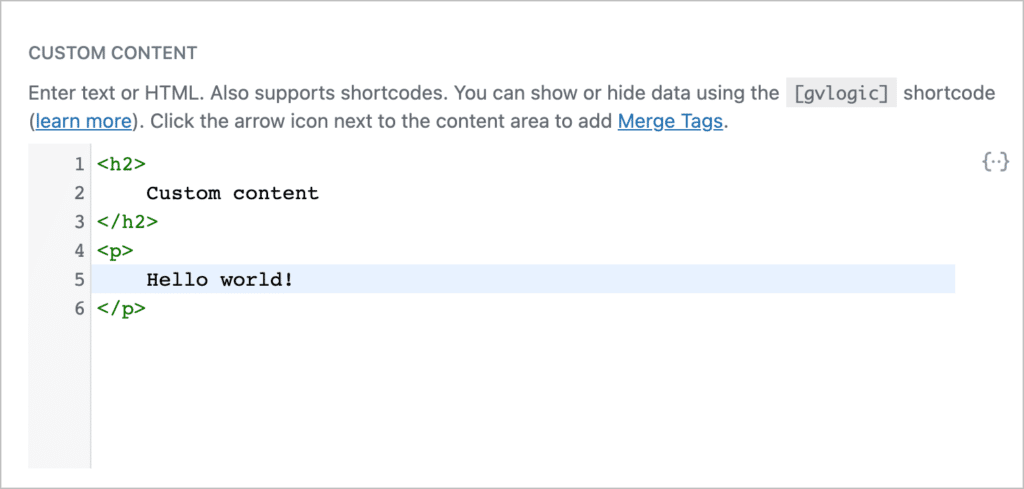
Custom content fields also support Gravity Forms merge tags, which allow you to display values from your form. You can add merge tags by clicking the button on the right side of the text editor.
Sorting and filtering your entries
GravityView also gives you the ability to sort and filter your entries. So, what’s the difference between sorting and filtering?
Filtering allows you to choose what entries appear in your View, based on parameters that you set. Sorting refers to the way your entries are organized (e.g. by First Name descending).
You can find the default filtering and sorting option under “Filter & Sort” in your View Settings.
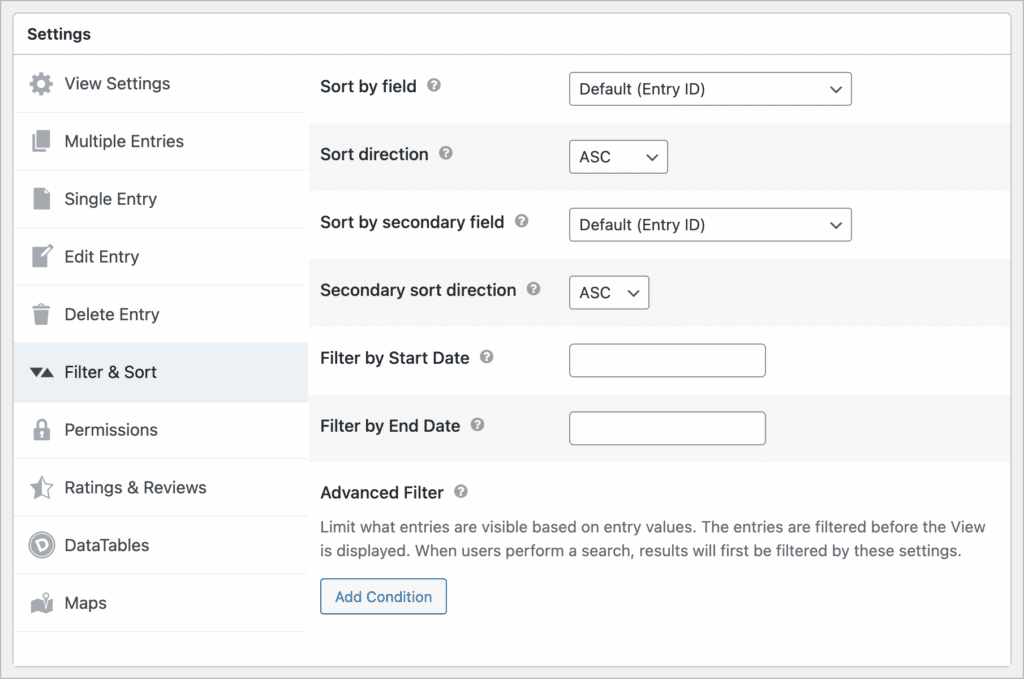
Here you’ll find a range of options for organizing your entries. Sort by a particular field value, choose the sort direction, and filter your View based on dates.
For more advanced filtering and sorting options, you’ll need the Advanced Filtering extension. This allows you to control what entries are displayed in your View based on conditional logic.
Here are some of the things you can do with Advanced Filtering in GravityView:
- Show only the entries created by the logged-in user
- Display entries that match a search value
- Display entries depending on a user’s role
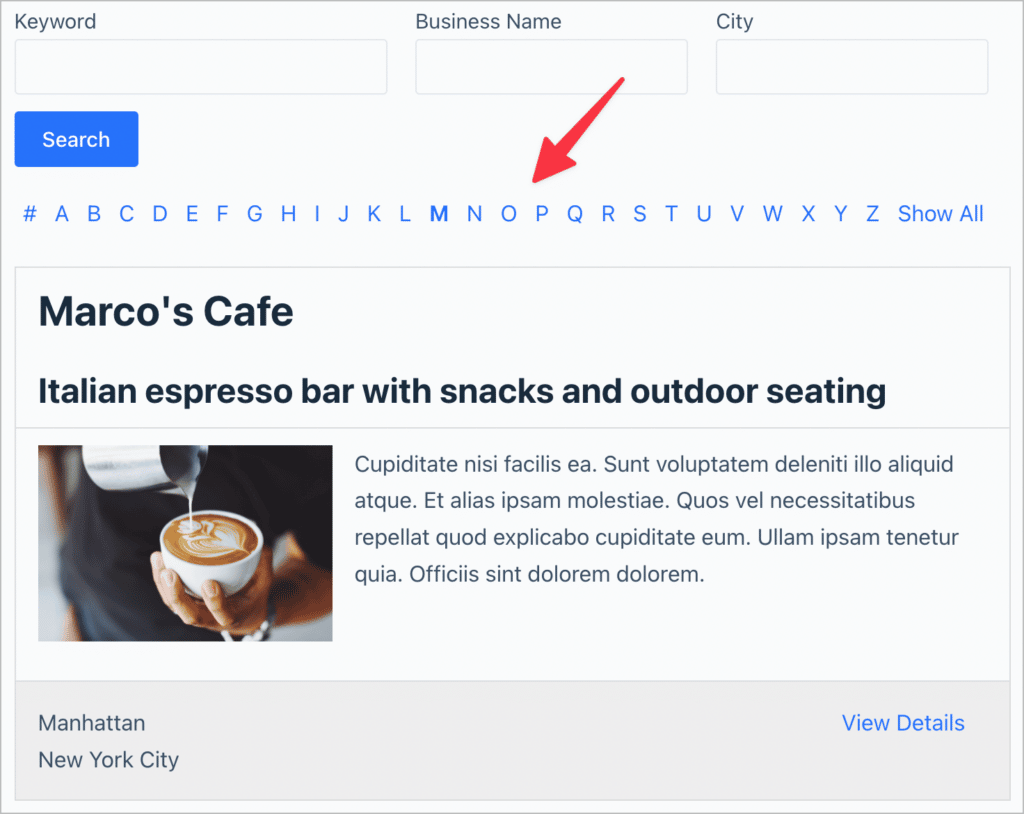
Do you want to make it even easier for users to navigate your View? In that case, you can use the A-Z Filters extension, which allows you to display a list of links from A-Z. The extension supports multiple languages!
Okay, let’s have a look at some of the other ways you can customize your View, including adding social sharing links, creating featured entries, and allowing users to leave ratings and reviews.
Add social sharing buttons to Views
The GravityView Social Sharing & SEO extension enables you to add social sharing buttons to your entries. It also integrates with Yoast SEO, one of the most popular WordPress SEO plugins.
This allows you to track the SEO status of your Views, add custom meta descriptions and utilize all of the other Yoast SEO features.
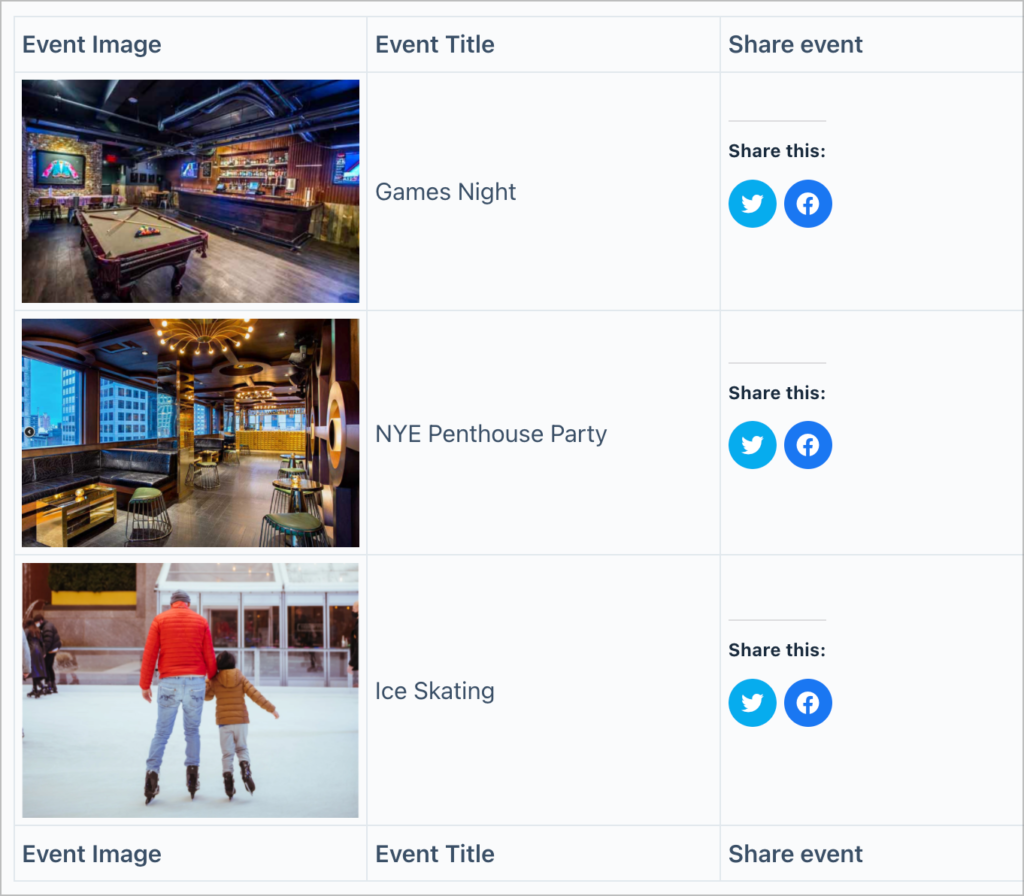
Social sharing also integrates with Jetpack, a free plugin provided by WordPress.com.
Social sharing buttons are a great way to encourage users to engage with your content. If you’re running a directory or an online marketplace, social sharing can help boost your organic traffic, leading to increased revenue over time.
Feature entries
If you’re running a directory, you probably want the ability to create ‘featured’ entries that show up at the top of the page. The GravityView Featured Entries extension gives you an easy way to do this.
All you need to do is mark an entry as ‘featured’ in Gravity Forms. It will then show up as highlighted and you can choose whether to display it at the top of the page or maintain your current listing order.
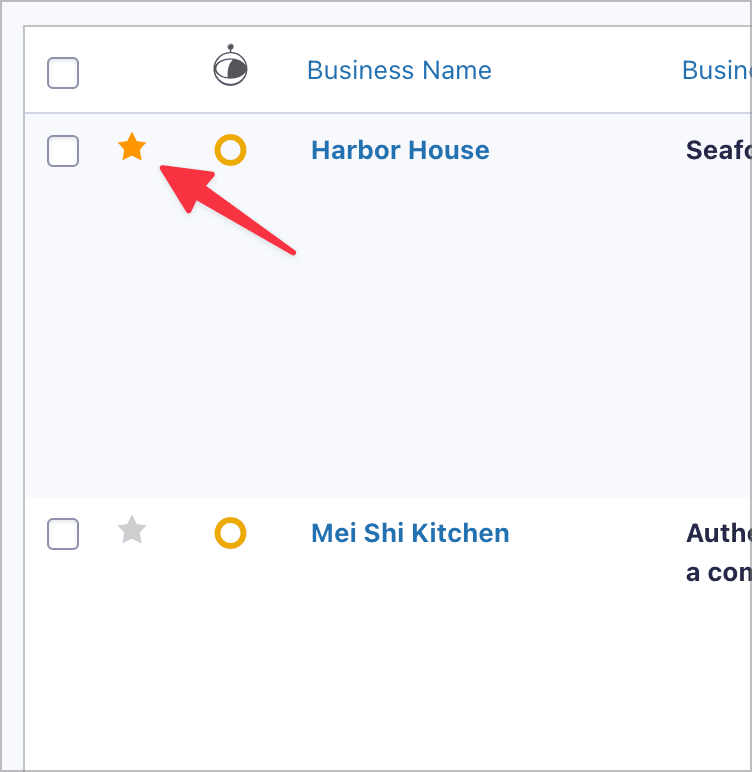
Many people are willing to pay a small fee to have their listing show up at the top of the search results. There are many ways you can use this feature, but one thing is for sure – featured entries have the potential to create a whole new revenue stream for your business!
Add support for ratings and reviews
With GravityView’s Ratings and Reviews extension, you can add the ability for users to rate, review and comment on your Gravity Forms entries.
This feature is ideal for business directories and event listings!
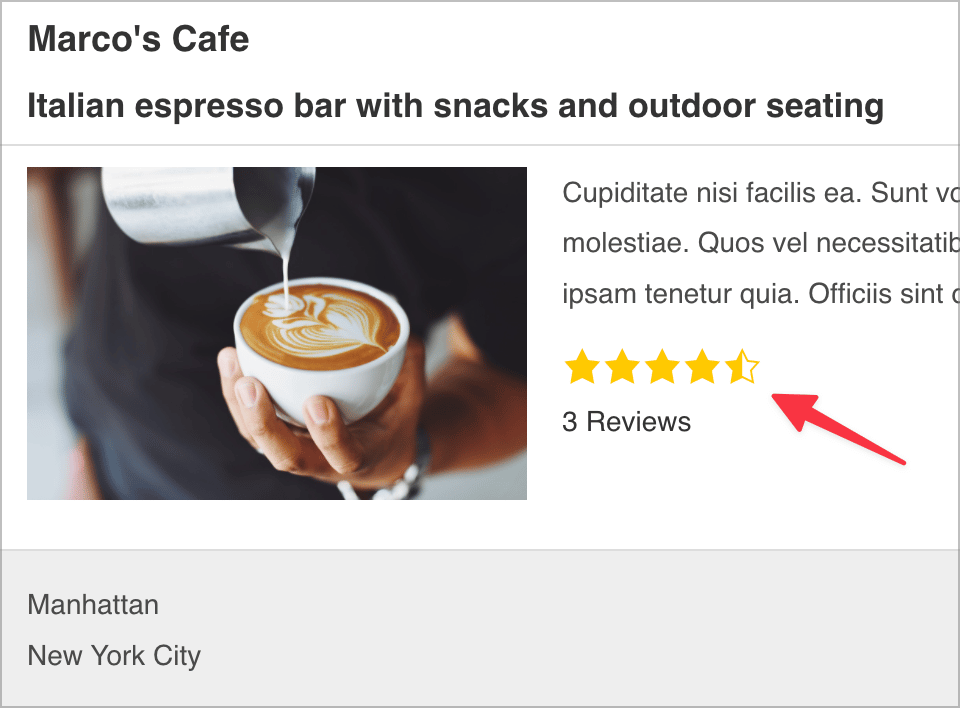
Allow users to up or down vote entries or display ratings using a 5-star system. Businesses can benefit tremendously from this feature as it allows them to receive valuable feedback from their customers.
To enable ratings and reviews, install the Ratings and Reviews extension. Next, edit your View and scroll down to the View Settings meta box. Here you’ll see a new tab called “Ratings & Reviews”. Check the box to enable entry reviews.
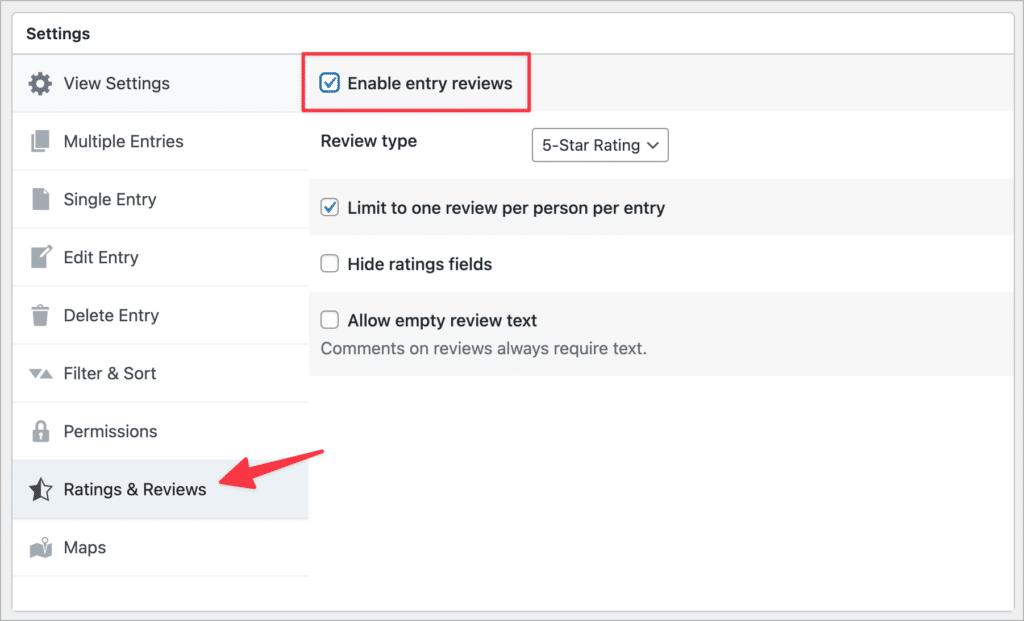
Displaying user ratings and reviews also allows users to make more informed decisions when browsing your directory, marketplace, or event catalog.
Displaying Gravity Forms entries on a map
The Maps Layout allows you to display Gravity Forms entries as markers on a Google Map. This layout is perfect for store locators, business directories, and service directories.
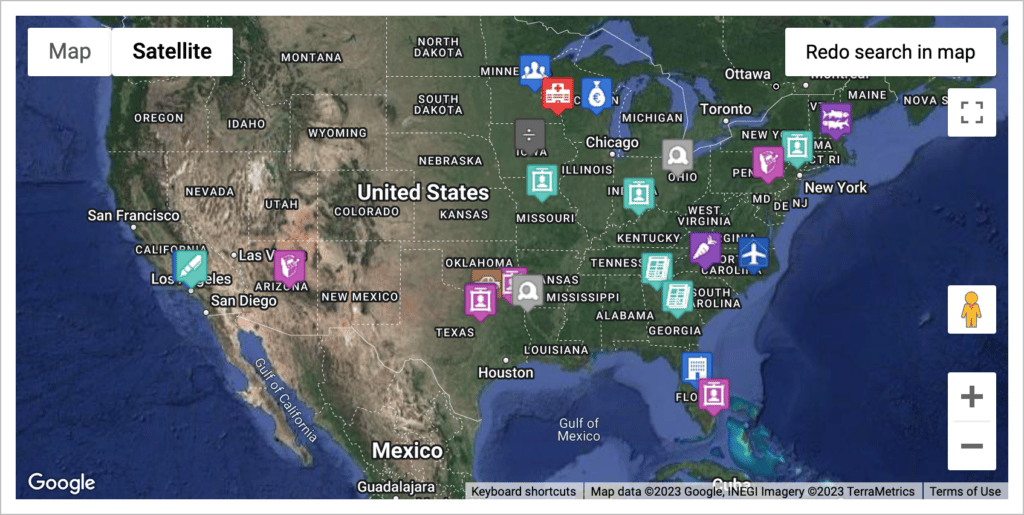
To get started with Maps, you need to create a Google Maps API key and enter it on the GravityView Settings page.
Next, create a form in Gravity Forms and ensure that it contains an Address field. Now, create a new View and select “Maps” as the View Type.
You can then scroll down to the View Settings panel, click on Maps and start configuring the different options. You can change the icon color, change the map position, select the map type, and much more.
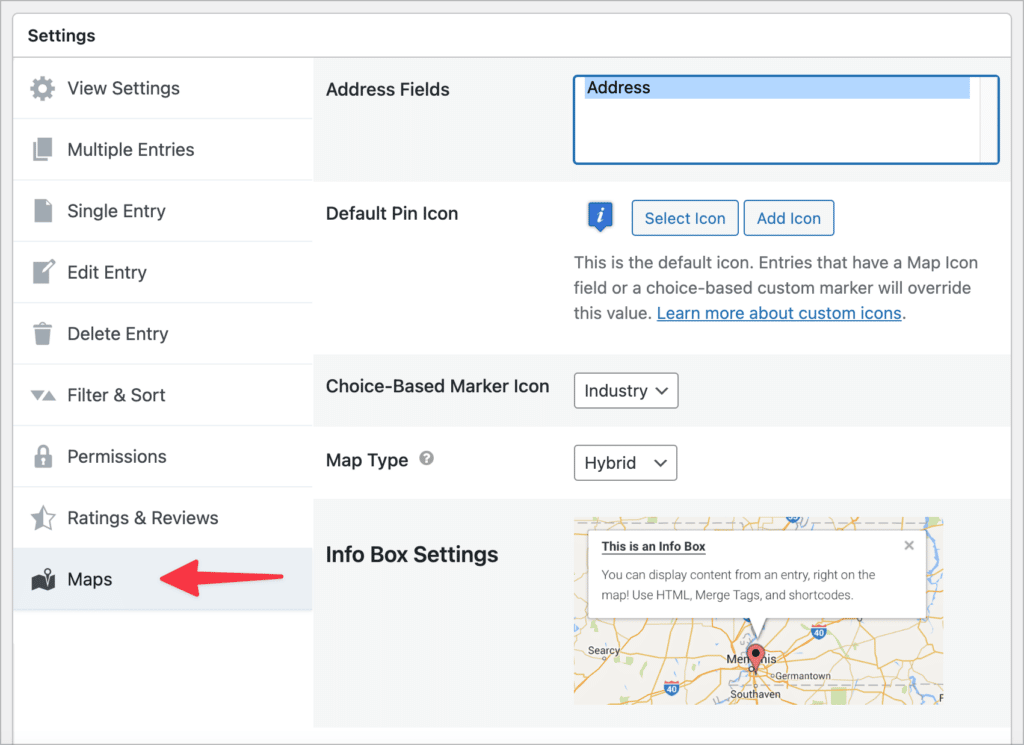
At the bottom, you’ll find a box where you can add your own custom CSS styles to your map. If you’d prefer to style your map without having to write code, then you can do so using the Snazzy Maps WordPress plugin.
Displaying different media types in GravityView
Along with a diverse set of layout options for creating powerful web apps, GravityView also allows you to display different media collected via Gravity Forms such as video and audio links.
By using GravityView’s Custom Content field and enabling the “Render oEmbeds” option, you can turn YouTube, Vimeo, Spotify, and Soundcloud links into embedded video/audio players.

Pretty cool, right?
Displaying Gravity Forms data from multiple forms
The Multiple Forms extension for GravityView makes it possible to combine data from multiple forms and display it inside a single View on the front end of your website.
For example, let’s say you have one form that collects contact information and another form that collects job information. You can join the forms together on a common field (e.g. “Name”) and then add information from both forms to your View.
Start by creating and publishing a new View. Then open up the “Data Source” meta box and click the button that says “Add Join Condition”. You can now select the form you want to join to and the field on which to join.
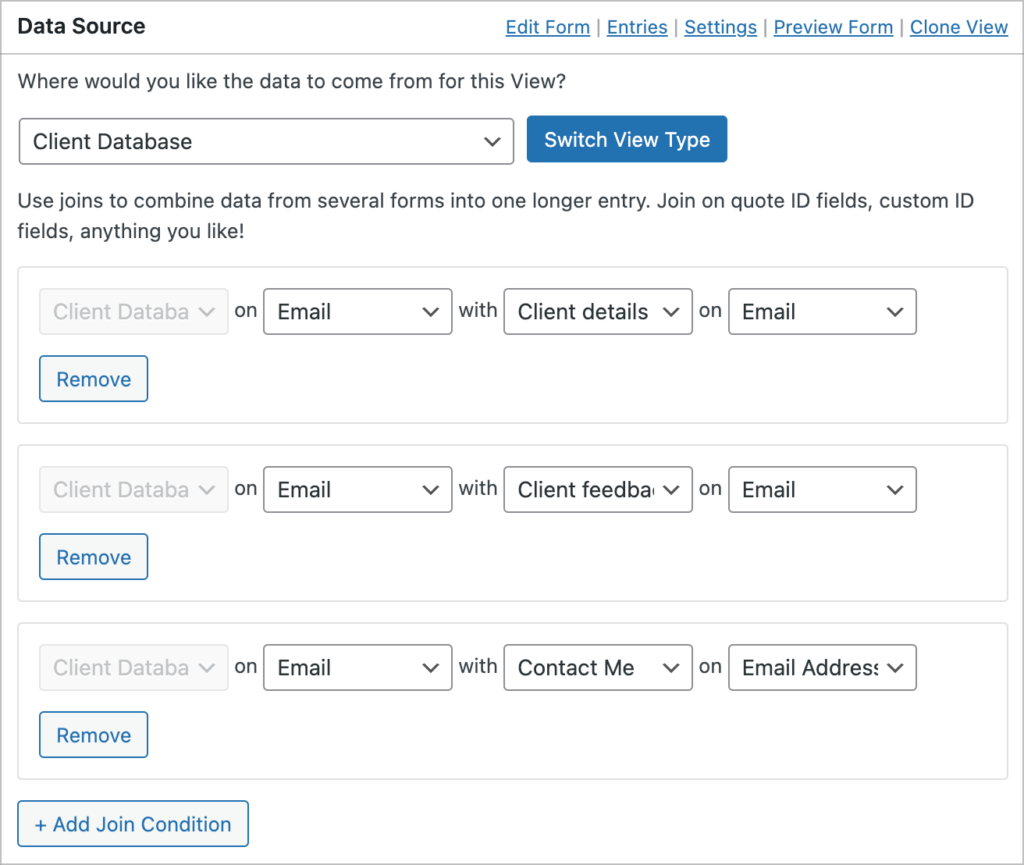
You can display connected values in one of two ways. Either you can show all fields from form A regardless of whether the field in form B has content, or you can only show entries from form A that contain values in form B.
Bonus: display Gravity Forms entries on a calendar
Displaying Gravity Forms entries on a calendar is helpful for showcasing upcoming events. The Gravity Forms Calendar integration allows you to embed a calendar on a page, post, or inside a sidebar widget.
You can customize the layout by choosing one of four options:
- Month
- Week
- Day
- Agenda
You can also control which events show up on the calendar by pre-filtering entries.
Editing calendar entries from the front end is made simple with an intuitive drag and drop interface.
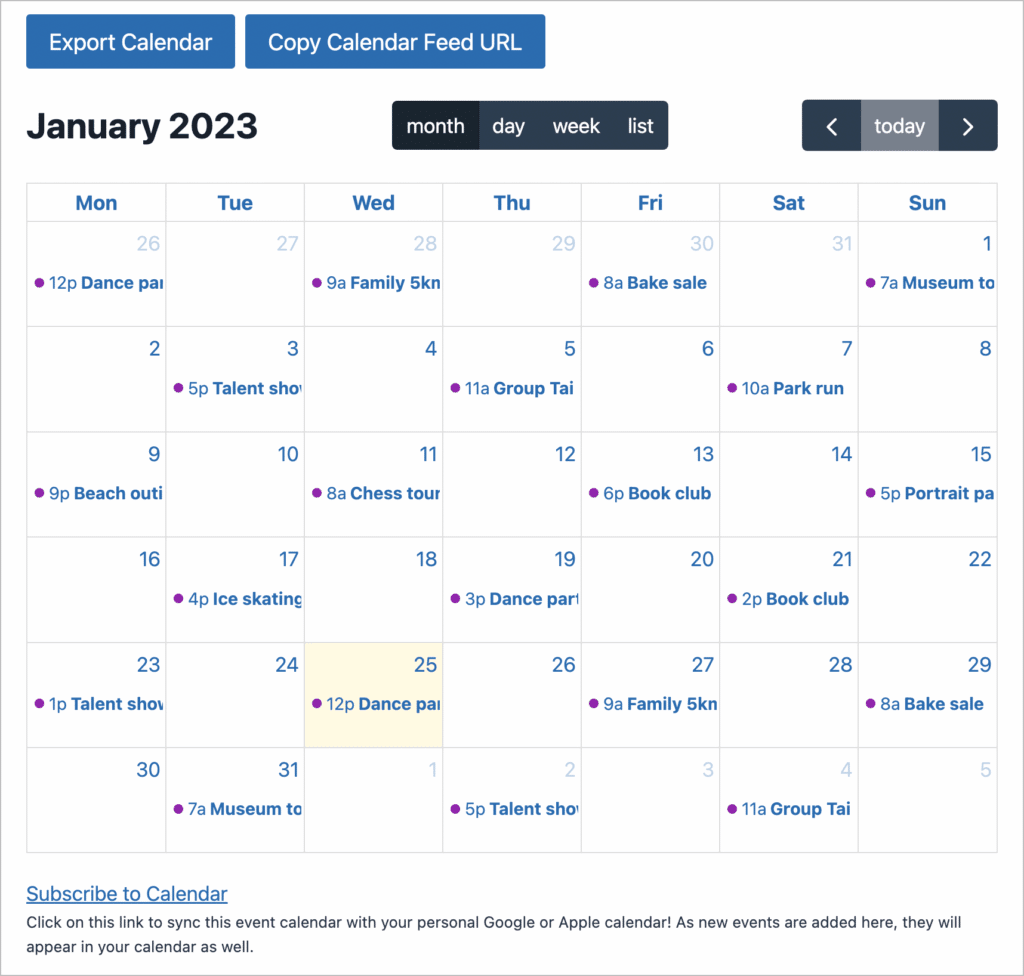
To display Gravity Forms entries on a calendar, first, download and install the GravityCalendar plugin by GravityView.
Next, edit your Form in Gravity Forms and click “Create a Calendar”.
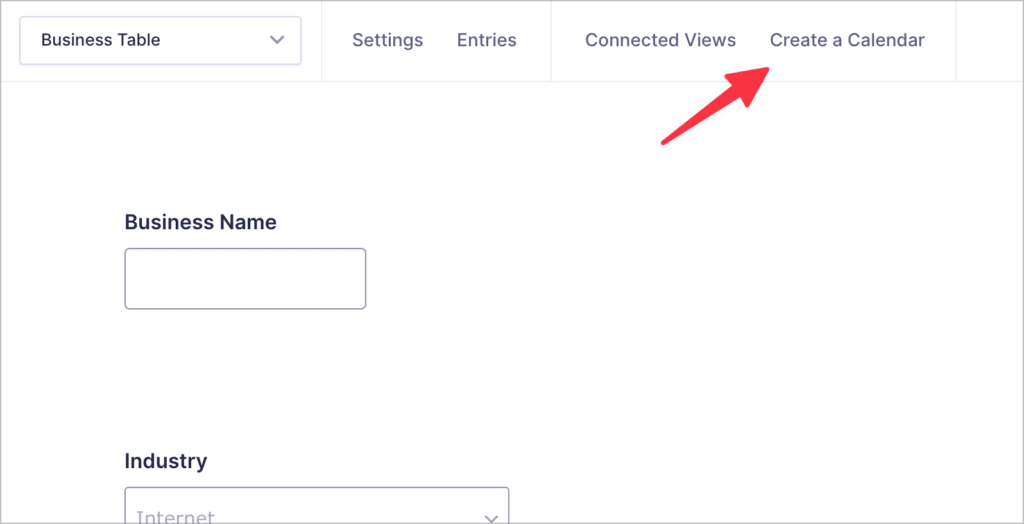
You will then need to configure a new Calendar feed by specifying which fields to include in your calendar, choosing a layout option, and selecting a color for your events. You can also add navigation controls above or below your calendar. This makes it easy for users to check events on different dates.
Why you should use GravityView to display your Gravity Forms entries
As you can see, displaying Gravity Forms data using GravityView is straightforward, without any unnecessary technical steps.
GravityView’s drag and drop interface makes it easy for users to customize layouts without needing any coding skills. You can set up a directory or a database in only a few clicks!
GravityView’s range of add-ons allows you to extend its functionality, giving you the ability to create powerful and robust CRUD applications. Developers can also take advantage of GravityView’s actions and filters to create additional customization options.
Final thoughts on displaying Gravity Forms entries
GravityView is a plugin that integrates seamlessly with Gravity Forms, allowing you to display entries on the front end of your website. Displaying Gravity Forms entries on your website allows you to build all kinds of diverse applications.
Business directories, marketplaces, store locators, and employee databases are just some examples of what you can build with GravityView!
GravityView comes equipped with multiple layout options, giving you control over how users view entries on the front end. Display entries in a list, a table, or on a Google Map!
Add custom content to your View using the Custom Content field and filter and sort your entries to create more advanced view configurations.
You can further customize your View by making use of GravityView’s library of powerful extensions. Add social sharing buttons, custom content, create featured entries, and more.
🙌 Check our blog for more helpful guides and tutorials!
