Published
•
Updated
How to Build a Gravity Forms Vacation Request System With a Calendar
Build an automated employee vacation request system using Gravity Forms and Gravity Flow, then display approved time off on a searchable calendar with GravityCalendar.
Do you need an easier way to manage employee vacation requests?
A streamlined vacation request system makes it easier for employees to ask for time off. It also makes it easier for managers and HR staff to process vacation requests and track the total days remaining.
In this tutorial, we’re going to build a Gravity Forms vacation request system. We’ll create an automated vacation request process using Gravity Flow and then display vacation times on a calendar using GravityCalendar. Keep reading to find out more! 👇
Check out a live demo of the finished vacation calendar and get your own free trial site preloaded with all GravityKit add-ons!
What you’ll need
Here are the plugins you’ll need to follow along with this tutorial:
- Gravity Forms
- Gravity Flow
- GravityCalendar
- Gravity Flow Vacation Requests extension (Optional)
You can build a vacation request system without the Gravity Flow Vacation Requests extension. However, the extension is helpful as it provides the following extra features for managing vacation requests.
- Adds a way to track the number of vacation days remaining for each user
- Adds a new “Vacation Days” field in Gravity Forms, allowing managers to view the employee’s remaining number of vacation days.
If you have either a Gravity Flow Pro or Core license, you can download the “Vacation Requests” extension from your Account page. After installing the extension, don’t forget to activate your license.
An overview of the vacation request process
In this tutorial, we’re going to create a vacation request workflow using Gravity Flow, allowing users to request days off and get approval from HR. Once a request has been approved, we’ll display it on a vacation calendar using GravityCalendar.
Here’s how the system will work:
- The employee requests time off by submitting a vacation request form. Email notifications are then sent to the employee acknowledging confirmation and also to their manager notifying him or her of the vacation request.
- The employee’s manager reviews the request and decides whether to approve or reject it. If the request is rejected, the form is sent back to the employee for editing. This loop continues until the request has been approved.
- Once the manager approves the vacation request, it’s sent to the Human Resources department for processing. The responsible person in HR registers the vacation days and leaves a comment if required.
- The approved request is sent to the vacation calendar, where it is displayed for all team members to see and synchronized with their individual calendars if desired.
Okay, let’s get started!
Pro tipDid you know that GravityView also has its own in-built approval system?
Creating the vacation request form
Hover over Forms in your WordPress sidebar and click New Form. Now give your new form a name (“Vacation Requests”) and click Create Form. You can now start building your form using the Gravity Forms visual editor.
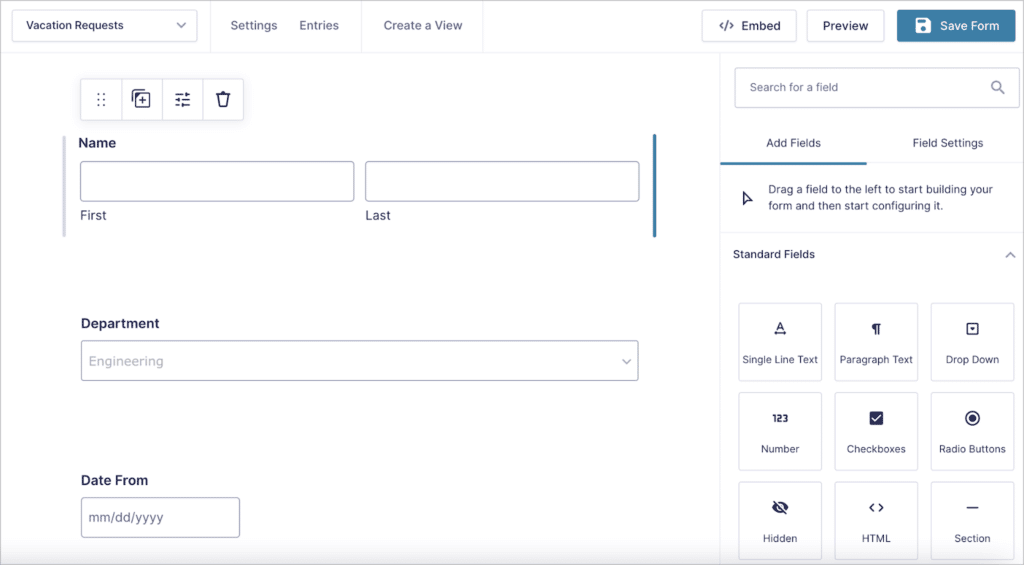
Feel free to add any fields you feel are necessary. It’s important that you include two date fields, allowing employees to specify when they want time off and until which date.
Here are the fields we added to our form in this example:
- Name (Name field)
- Department (Drop Down field)
- Date From (Date field)
- Date To (Date field)
- Number of Days Off (Vacation Days field)
- HR Comments (Administrative Paragraph field)
The final field (“HR Comments”) is an Administrative field, meaning that it is only visible to site administrators. This field will allow HR managers to add internal comments to vacation requests that only Admins can view.
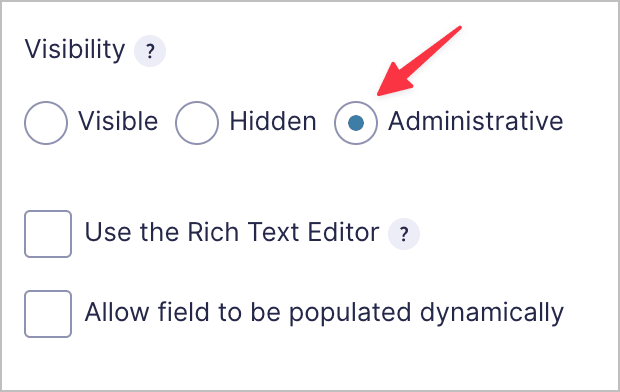
You’ll find the field visibility settings in the field settings under the “Advanced” tab.
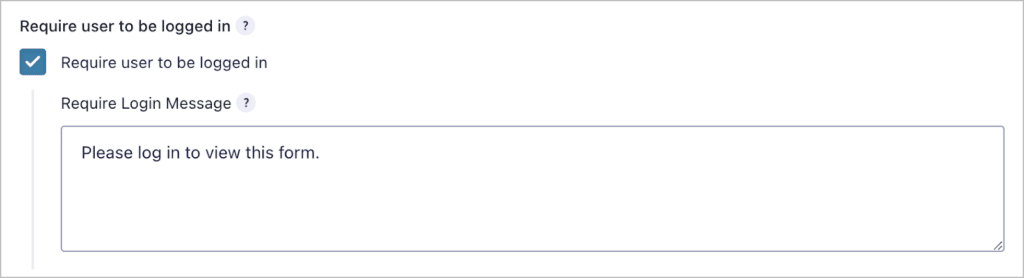
There’s one more important step to complete: we need to ensure that our vacation request form is only visible to logged-in users! If users aren’t logged-in, there’s no way to connect the vacation request with the correct user in Gravity Flow.
Go to the Form Settings page, scroll down and check the box that says “Require user to be logged in” (you can also enter an optional login message in the box).
When you’re done setting up your vacation request form, you’ll need to embed it on the front end of your site. You can do this using the Gravity Forms block in WordPress.
Here’s what our form looks like on the front end:

Now that we’ve set up our form, the next step is to create the vacation request workflow in Gravity Flow.
Adding the vacation workflow steps in Gravity Flow
Now let’s start configuring the workflow steps in Gravity Flow. We’ll need to create a workflow with three steps, here they are:
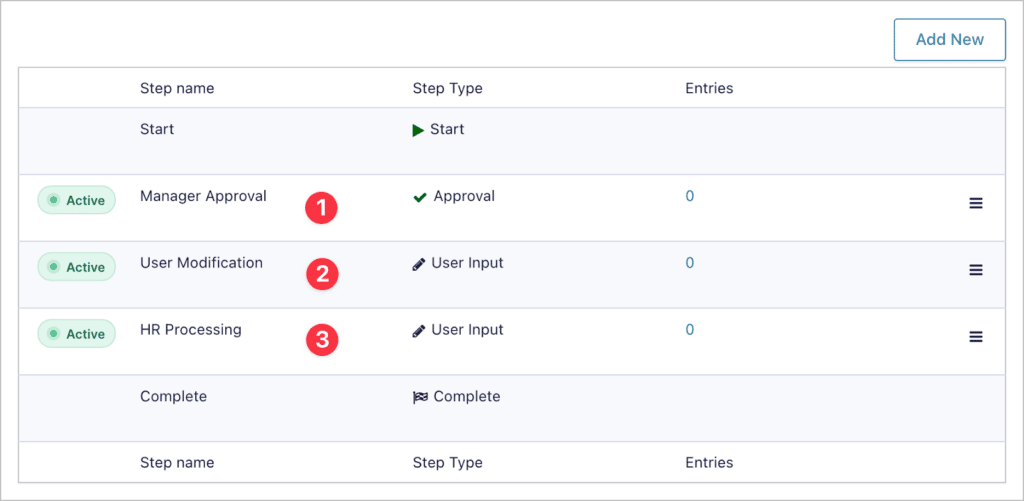
- Manager approval
- User modification
- HR Processing
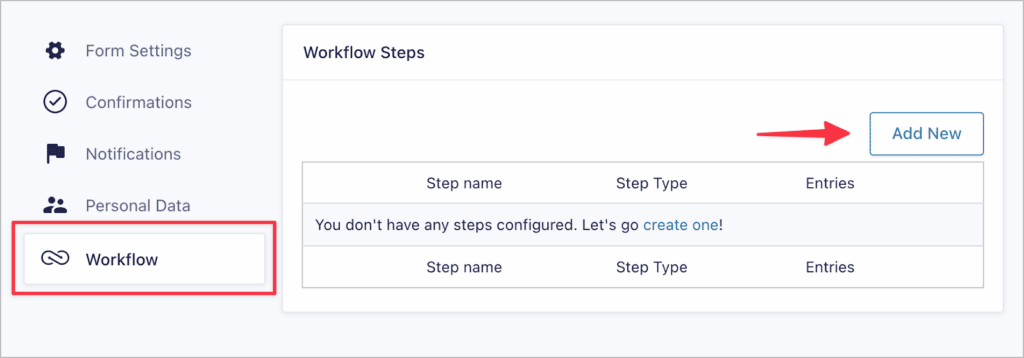
To create a new workflow, go to the form Settings page, select the “Workflow” tab on the left and click on the button that says “Add New”.
The first step we’re going to add is the manager approval step.
1. Configuring the manager approval step
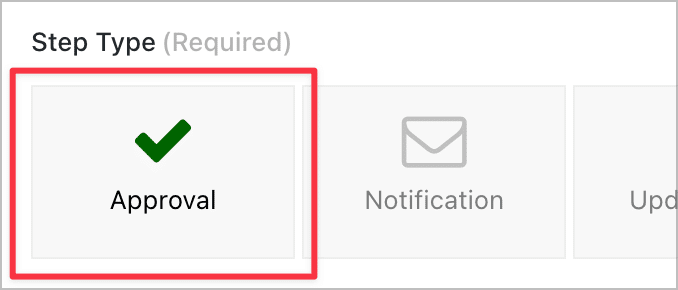
Start by giving the step a name (“Manager Approval”) and select “Approval” as the step type.
Now you need to select an assignee; this is the manager who needs to approve the vacation request. In our example, we have employees in different departments, so the manager will be different depending on which department the employee works in.
We can handle this by using Gravity Flow’s “Conditional Routing” feature. This allows us to send the vacation request to a different user depending on a certain condition. In this case, we’re assigning the request to a different manager, depending on the employee’s department.
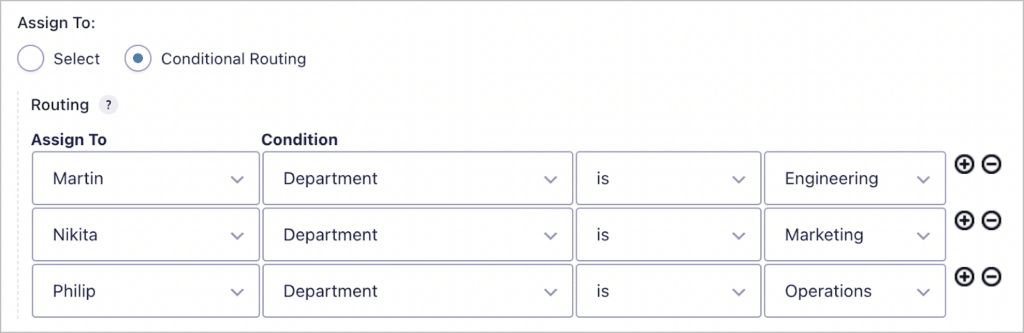
If your company only has one person approving vacation requests, you can select a single user instead.
Now scroll down to the “Emails” section of the workflow. Here you can configure email notifications to be sent when users take certain actions.
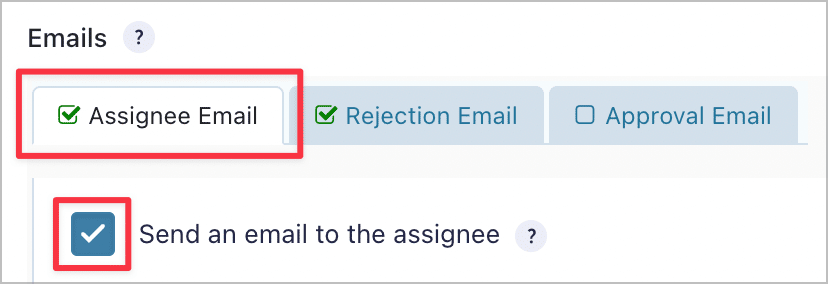
The assignee email will be sent to the manager when there’s a new vacation request requiring his or her approval. You can customize the email message below. Here’s our example:
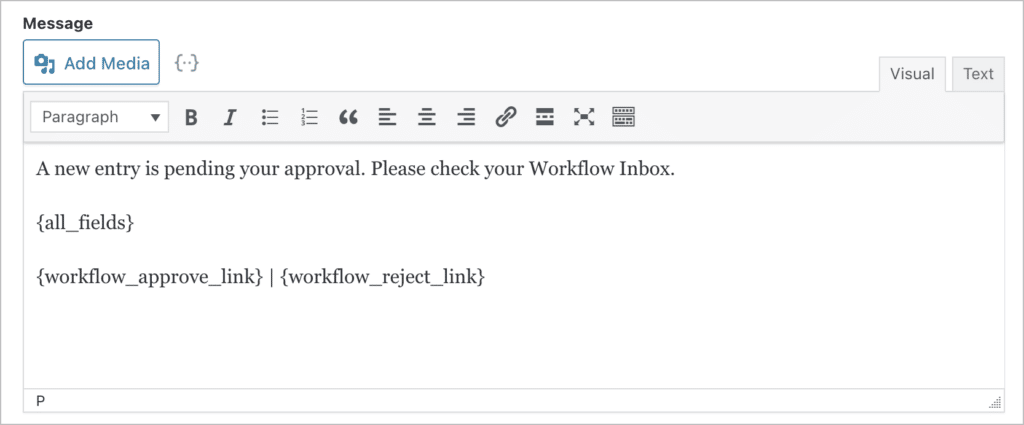
Notice that we’re using merge tags here to display content dynamically depending on the entry.
{all_fields}– displays the content of the entire vacation request{workflow_approve_link}– displays a link to approve the request{workflow_reject_link}– displays a link to reject the request
Pro tipLearn more about merge tags in Gravity Flow.
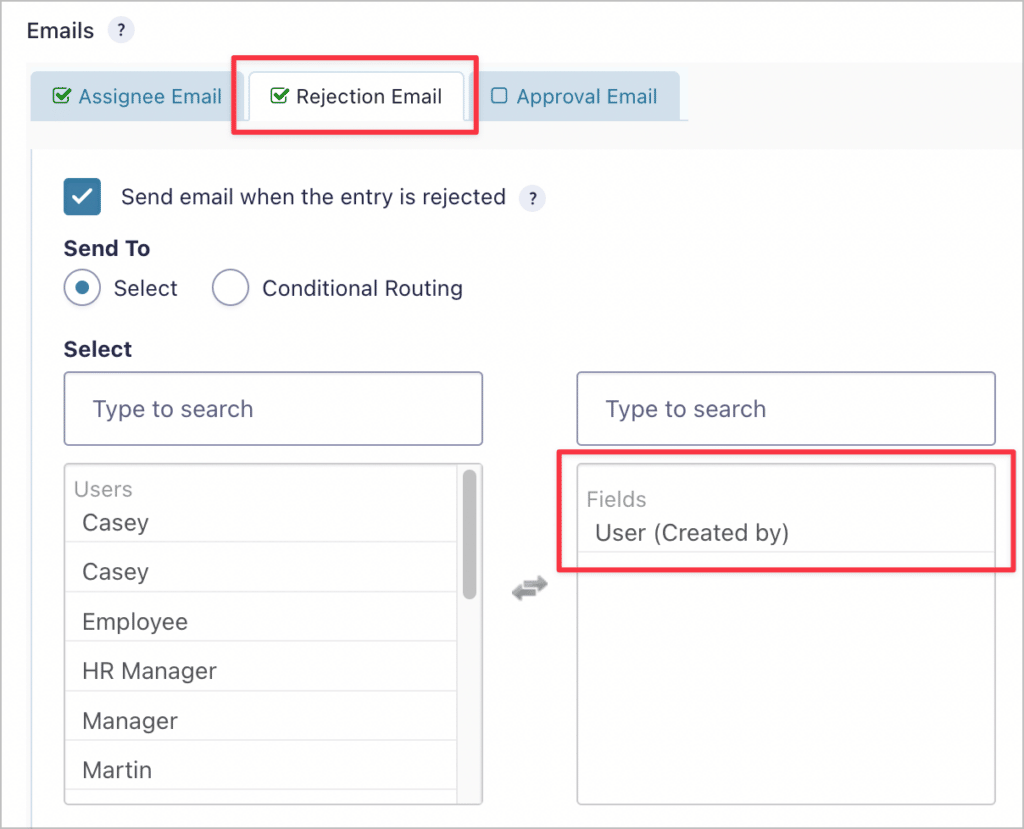
Now enable the rejection email. This is a notification that will be sent to the employee if their vacation request was rejected. To ensure it is sent to the correct user, select “User (Created by)”.
Now do the same for the “Approve Email”, so the employee is notified when their request has been approved.
Finally, you won’t be able to specify the next steps until they’ve been created so you’ll need to come back to finish the configuration of this step. We’ll show you how to set it up after creating the next two steps
This is very important! Don’t leave the configuration as it is above – this will cause problems in your workflow.
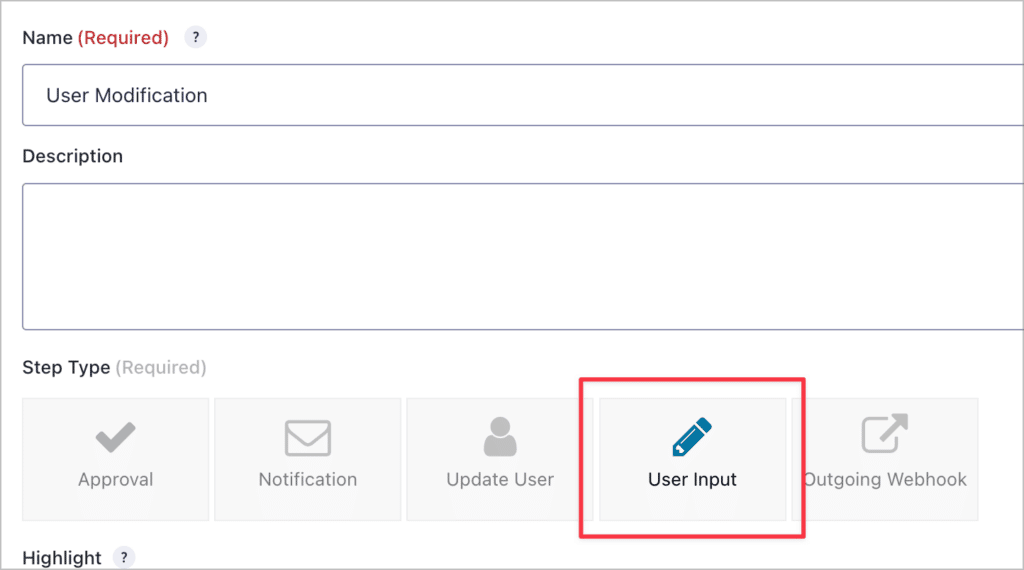
2. Configuring the user modification step
When you’re finished configuring the first step, add a new step called “User Modification” and set the step type to “User Input”.
This step will be triggered when a vacation request is rejected, causing the request will be sent back to the employee for modification.
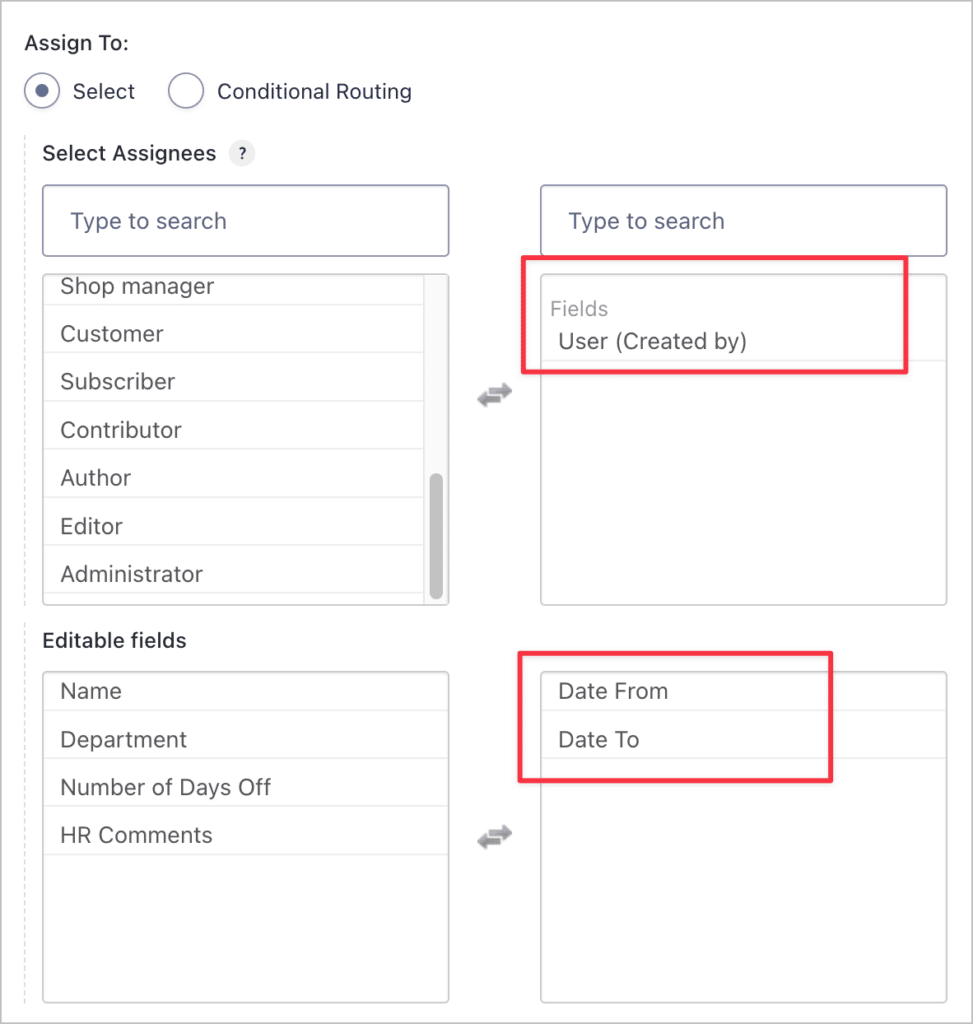
In the “Assignee” field, select the user who created the request. Next, you’ll need to select the editable fields. In this example, the editable fields with be the “Date From” and “Date To” fields.
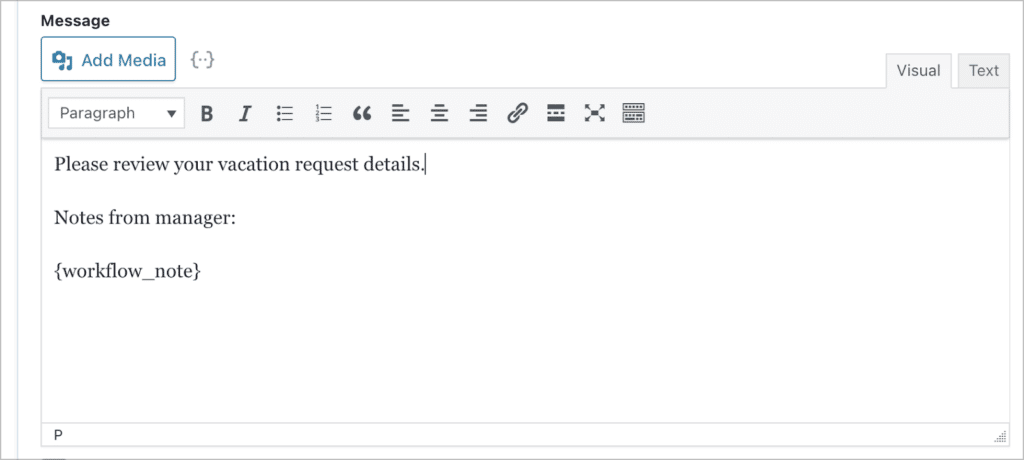
Finally, enable the assignee email notification so that users are notified when their vacation request is sent back for modification.
In the email message, we’re using the {workflow_note} merge tag to display the notes added by the manager in the previous step.
Finally, select the Manager Approval step as the next step in the workflow.

In this case, the next step is actually the previous step – this is what creates the review/modification loop. In other words, the request must go back and forth between the employee and manager until an agreement is reached and the request is approved.
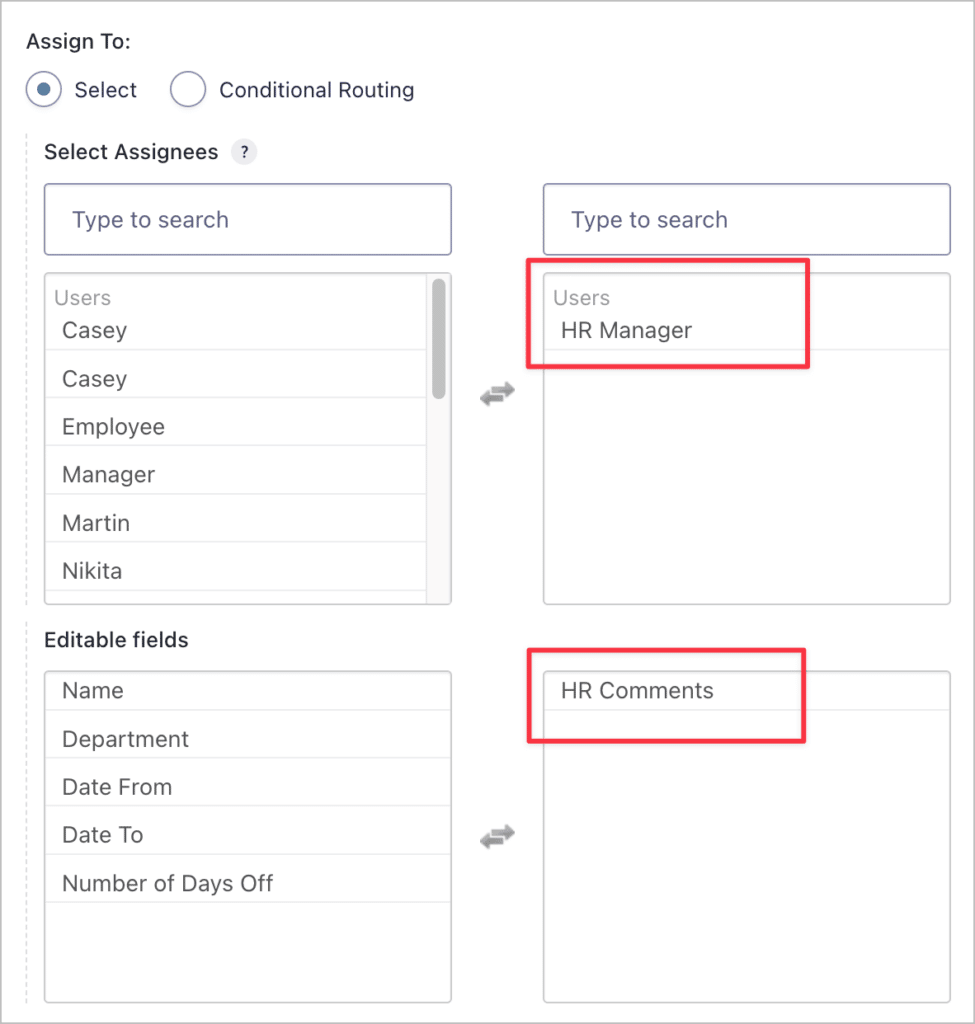
3. Configuring the HR processing step
Now we’re ready to add the third and final step in the vacation request workflow. When the manager approves a vacation request, it’s sent to HR for processing and further comment.
This workflow step should also be a “User Input” step, but this time it should be assigned to the HR manager. Next, select the “HR comments” field as the single editable field (this is an Administrative field so it’s not visible to regular users).
Finally, add an assignee email letting the HR manager know that the request was approved by the department manager and is now ready for processing!
Okay, there’s one thing left to do before our workflow is complete.
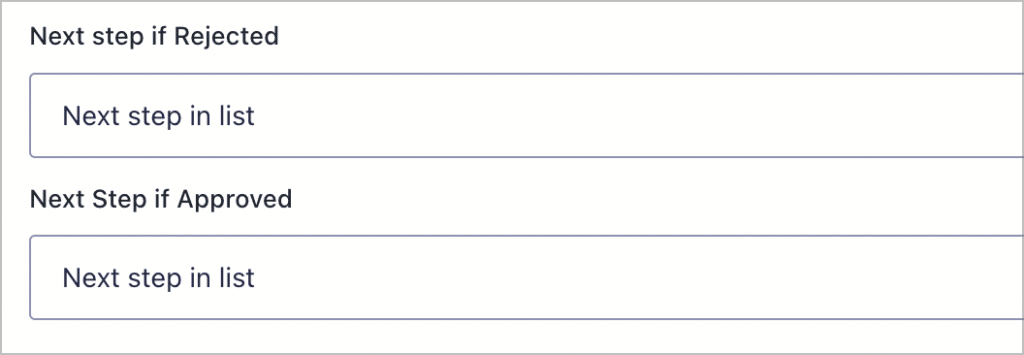
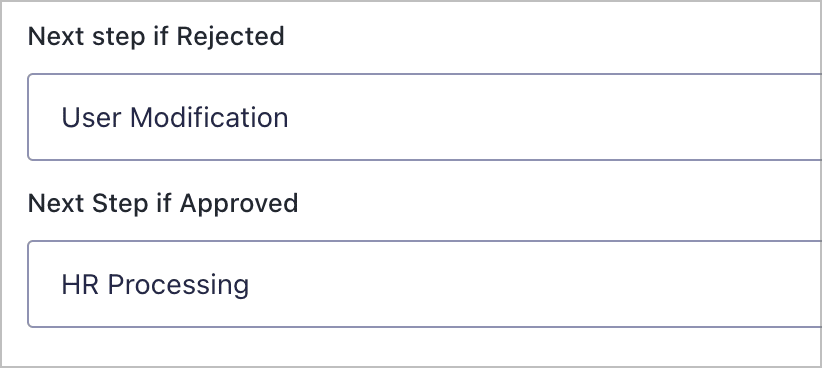
Update the first step
We need to edit the first step again and set the next steps. If the request was rejected, the next step should be the User Modification step. If the request was approved, the next step should be the HR Processing step.
That’s it!
Creating the vacation calendar
Now that our vacation request workflow has been configured, we’re ready to create the vacation calendar. This will be a calendar displaying all approved vacation requests, so that other company employees can see who is taking time off and when.
We’ll create the vacation request calendar using the GravityCalendar plugin by GravityKit. GravityCalendar is an add-on for Gravity Forms that allows you to display form entries on an interactive calendar, and sync events to external apps like Google or Apple calendar.
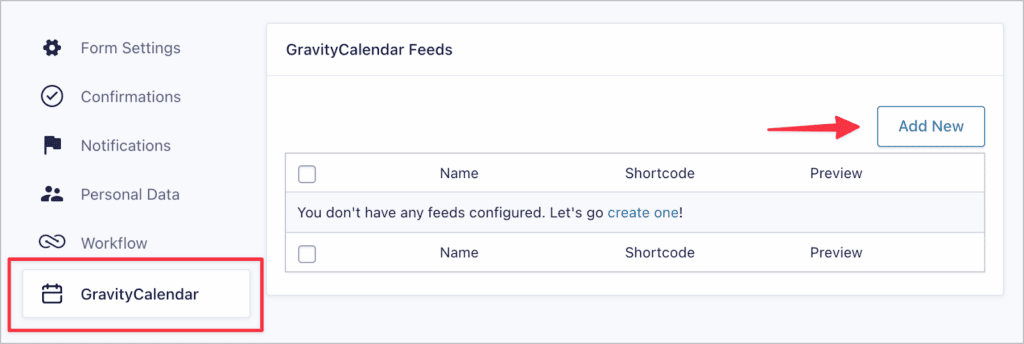
To create a calendar, go to the form settings, select “GravityCalendar” on the left and click “Add New”.
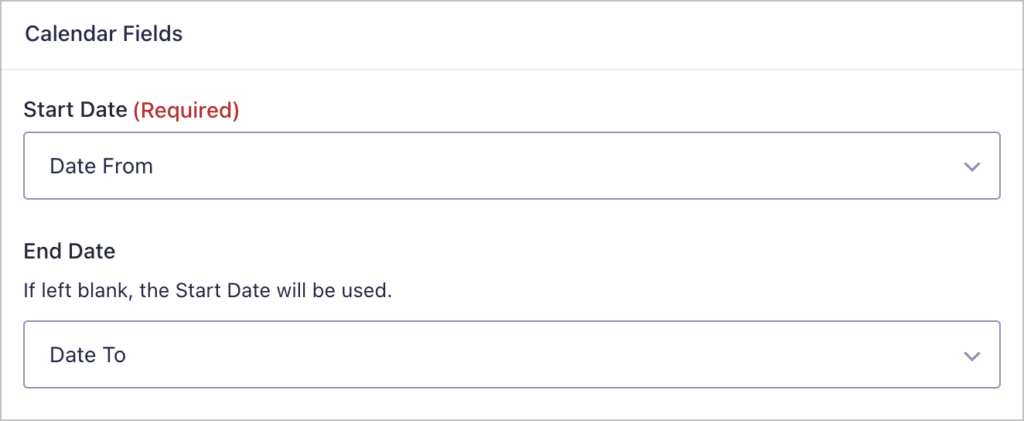
After giving your calendar a name, select the start date and end date fields.
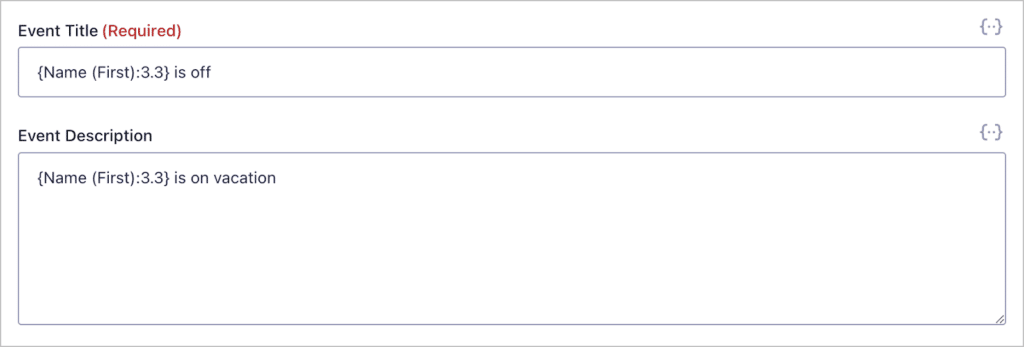
Next, set the event title and description (optional). You can do this using Gravity Forms merge tags.
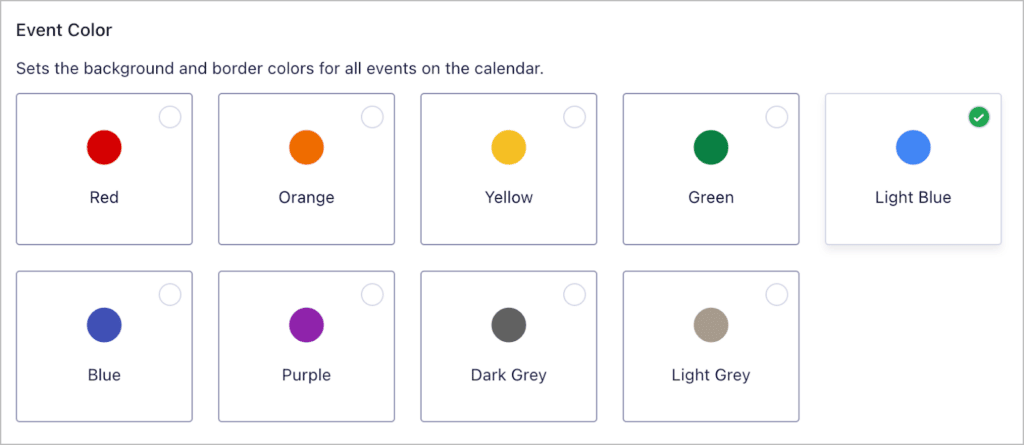
Now you can configure the layout of your calendar by choosing event colors, and adding calendar controls.
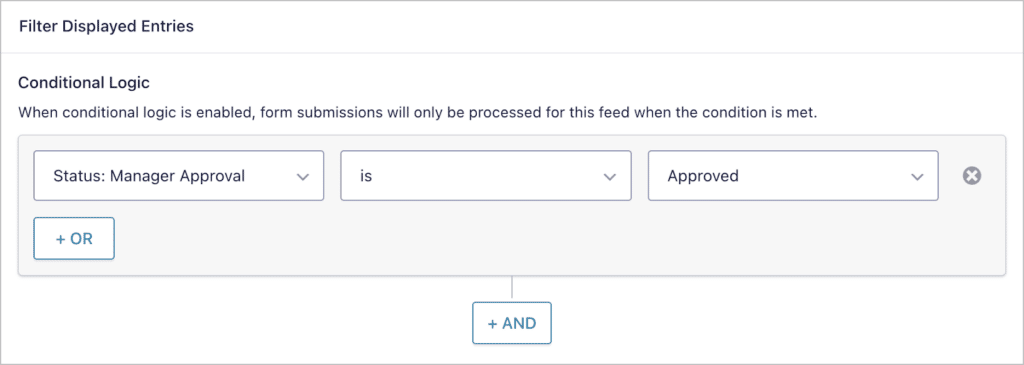
Adding a filter to only display approved requests
In order to ensure that only approved vacation time shows up on the calendar, we’ll add a conditional logic filter. In this case, we’re filtering the entries such that only entries approved by the relevant manager show up.
Optional: Enable the calendar subscription link
GravityCalendar includes a feature that allows users to “subscribe” to a calendar by syncing it with their Google or Apple calendar. You can enable this by creating a calendar subscription link.

You can embed the link on a page or post using a shortcode or calendar block.
Embedding your vacation calendar on the front end
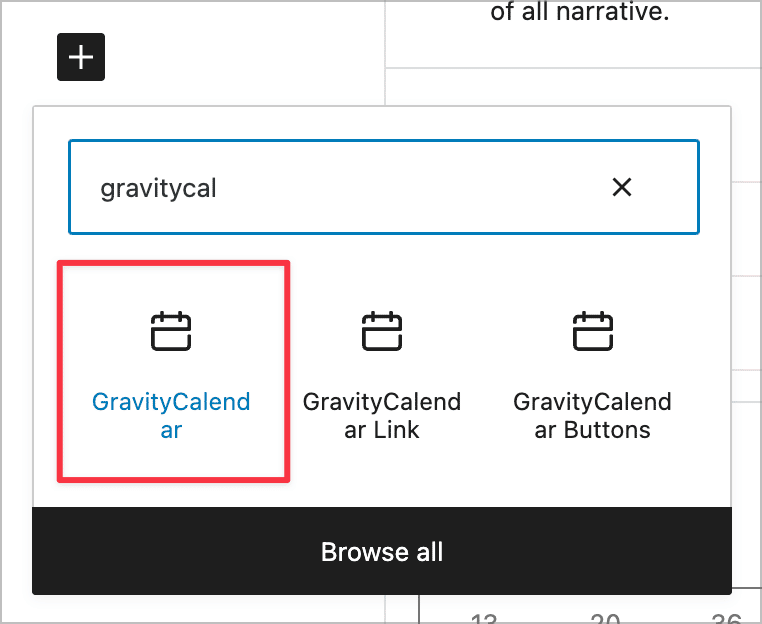
After creating your vacation calendar, you’ll need to embed it on your website. You can do this using the GravityCalendar WordPress block.
Here’s what our finished calendar looks like on the front end.

Okay we’re done! If you want to learn more about building CRUD applications using Gravity Forms, Check out our guide: How to Create a CRUD System on WordPress.
Create a vacation request workflow and calendar using Gravity Forms
Many companies have ineffective systems for managing vacation requests.
A streamlined vacation request system makes it easier for employees to ask for time off. It also makes it easier for managers and HR staff to process vacation requests and track the total days remaining for each employee.
In this tutorial, we showed you how to create a vacation request workflow using Gravity Flow and display vacation times on a calendar using GravityCalendar. If you enjoyed this Gravity Forms tutorial, subscribe to our newsletter so we can notify you when we publish new content!

Helpful tips right in your inbox.
Subscribe to get the latest articles, information on releases and helpful Gravity Forms tips!
More articles

Announcing GravityView 3.0: a fresh new look, AI View creation, and native page builder support
GravityView 3.0 is here: restyle Views with the new Vantage theme, build them with AI, embed them in any page builder, and run bulk actions on the front end.

Launch Log: GravitySearch arrives, plus AI spam review and GravityView fixes
This week, releases are anchored by a brand-new product! GravitySearch joins the GravityKit suite with cross-form entry search for Gravity Forms. Alongside it, Gravity Forms Zero Spam picks up an AI-powered review step, and GravityView sees fixes for Enhanced Security, Edit Entry, and Entry…

Meet GravitySearch: advanced global search for Gravity Forms
GravitySearch adds cross-form search to Gravity Forms: find any entry from one screen, build advanced filters, and preview results without leaving the page.