Published
•
Updated
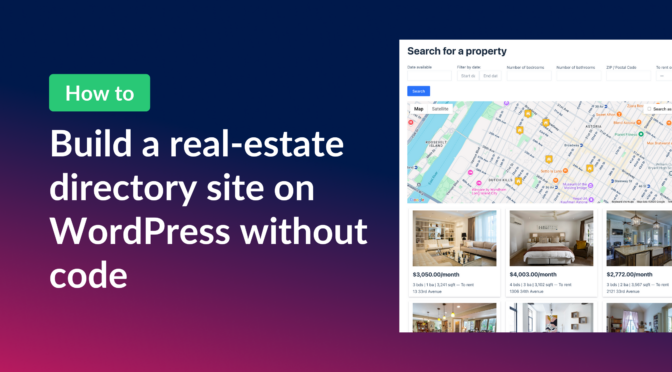
How to build a real-estate directory (Zillow clone) on WordPress with no code
Build a real estate listing directory like Zillow on WordPress using Gravity Forms and GravityView. Includes a free property form template and step-by-step setup with no code required.
If you’re looking to create a real estate website with similar features and functionality to Zillow, building a Zillow clone on WordPress using Gravity Forms and GravityView can be a great option.
Gravity Forms is a powerful form builder plugin for WordPress that can be used to create custom forms for property listings. GravityView is an add-on for Gravity Forms that allows you to build interactive directories and web apps using your form data.
In this article, we’ll walk you through the process of building a Zillow clone on WordPress using Gravity Forms and GravityView, step by step. Let’s get started!
Check out a live demo of the real estate directory and get your own free trial site preloaded with all GravityKit add-ons!
Download the free real estate listing form template now!
Import the template into Gravity Forms and customize as necessary.
Sneak peek
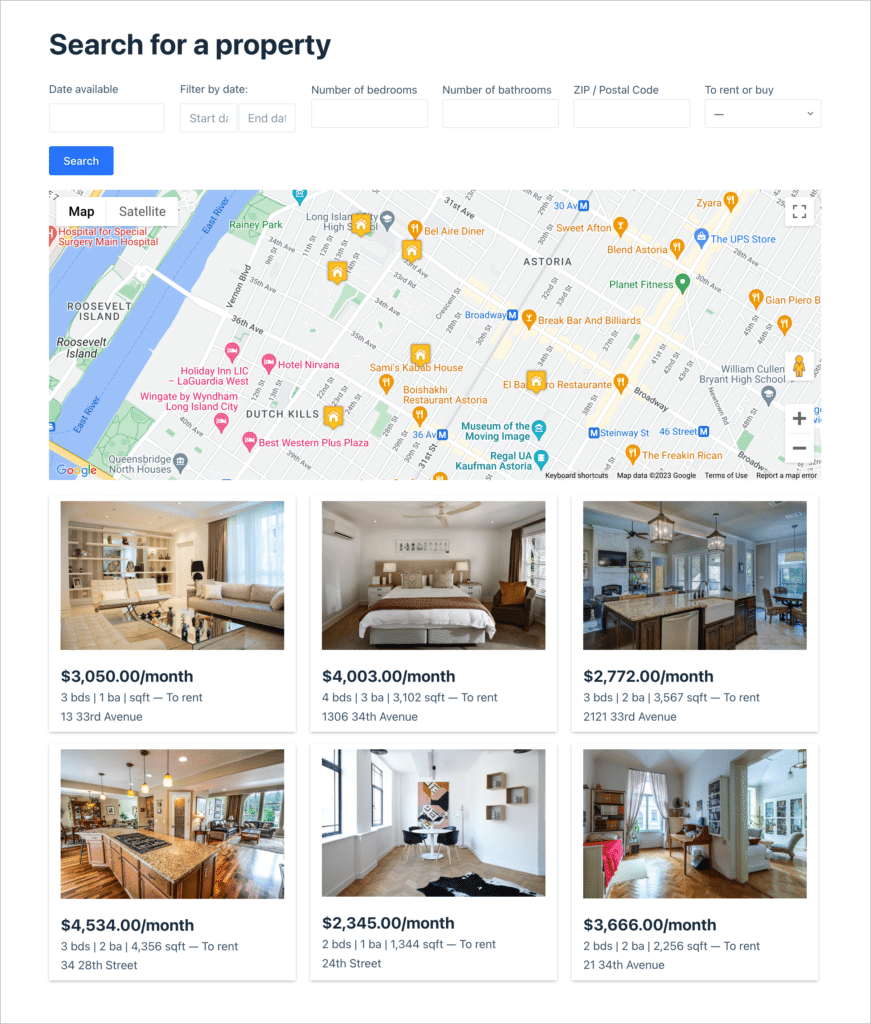
Here’s what our finished Zillow clone looks like on the front end:

When users click on a real-estate listing, they will be taken to the single entry page to view more information about that property.

What you’ll need
Here are the plugins/extensions you will need to build a Zillow clone:
What is Zillow?
Zillow is a popular online real estate platform that allows users to search for homes, apartments, and other properties for sale or rent across the United States.
The platform was founded in 2006 and has since grown to become one of the most recognized names in the real estate industry. In addition to providing property listings, Zillow also offers a range of tools and resources to help users and sellers make informed decisions when buying or renting a new property.
With its user-friendly interface and wealth of information, Zillow has become an essential tool for anyone looking to buy, sell, or rent property in the United States.
Why build a Zillow clone on WordPress
Building a Zillow clone on WordPress can be an effective way to create a real estate website that offers similar features and functionality as Zillow.
WordPress is a popular content management system (CMS) that offers a wide range of themes and plugins to help create a website quickly and easily. In addition, there are many plugins available for WordPress that can provide the same type of functionality as Zillow.
Using WordPress also offers the advantage of being easy to customize and modify to fit your specific needs. Building a Zillow clone on WordPress can be an effective way to create a real estate website that is both professional and functional!
Main features of Zillow
Let’s take a look at some of the main features of Zillow so we can recreate them later on:
- Property listings: Zillow offers a large database of real estate listings that can be searched by location, price range, and other criteria.
- Neighborhood information: Zillow provides detailed information about neighborhoods, including crime rates, school ratings, and local amenities.
- Mortgage calculator: Zillow offers a mortgage calculator that allows users to estimate their monthly mortgage payments based on the purchase price, down payment, and other factors.
Now we can start building our WordPress Zillow clone, step by step.
Steps for building a Zillow clone using Gravity Forms and GravityView
Gravity Forms is a powerful plugin for capturing and managing data. GravityView is an add-on for Gravity Forms that allows you to display your form data on the front end and build dynamic web applications!
Here are the steps we will follow to build a Zillow clone using Gravity Forms and GravityView:
- First, we will create a real-estate listing form allowing us to add new property listings to the site
- Next, we’ll build out a directory for displaying property listings on the front end
- Finally, we’ll add a map, allowing users to search by location
Let’s do this!
Creating the property submission form
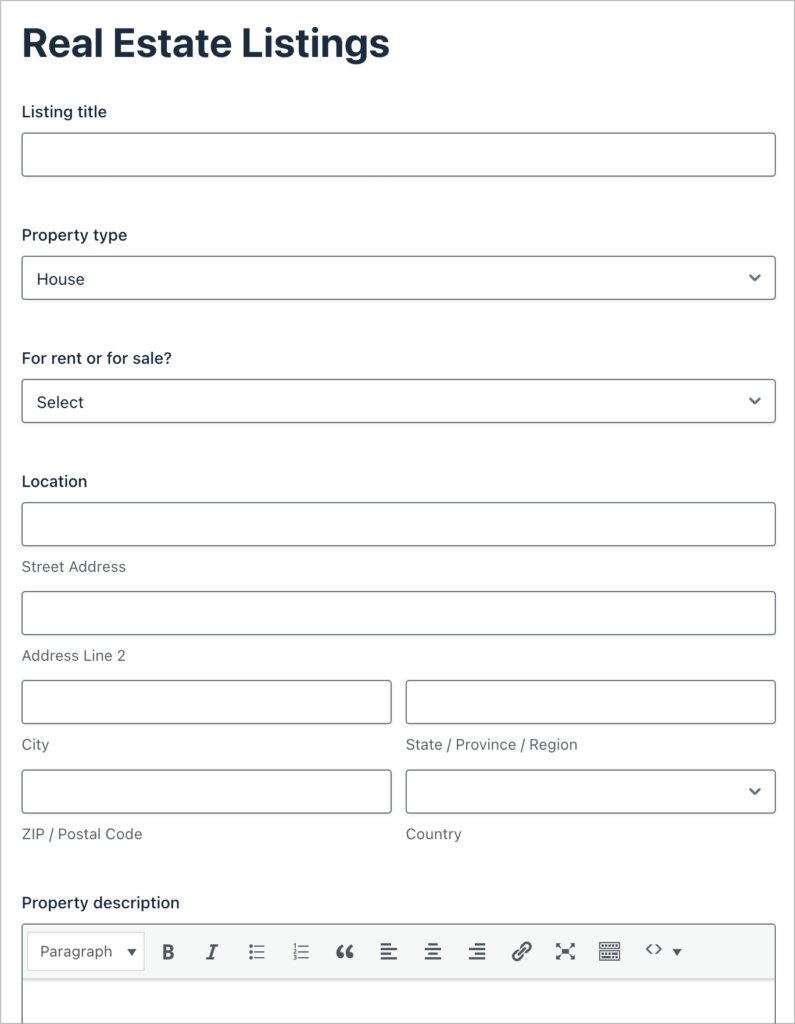
The first thing we need to do is build the property listing form in Gravity Forms. Gravity Forms provides a range of form field types, making it easy to build any kind of form!
To create a new form, we’ll hover over “Forms” and click “New Form”. After giving our form a name, we can start to add fields using the Gravity Forms visual builder.
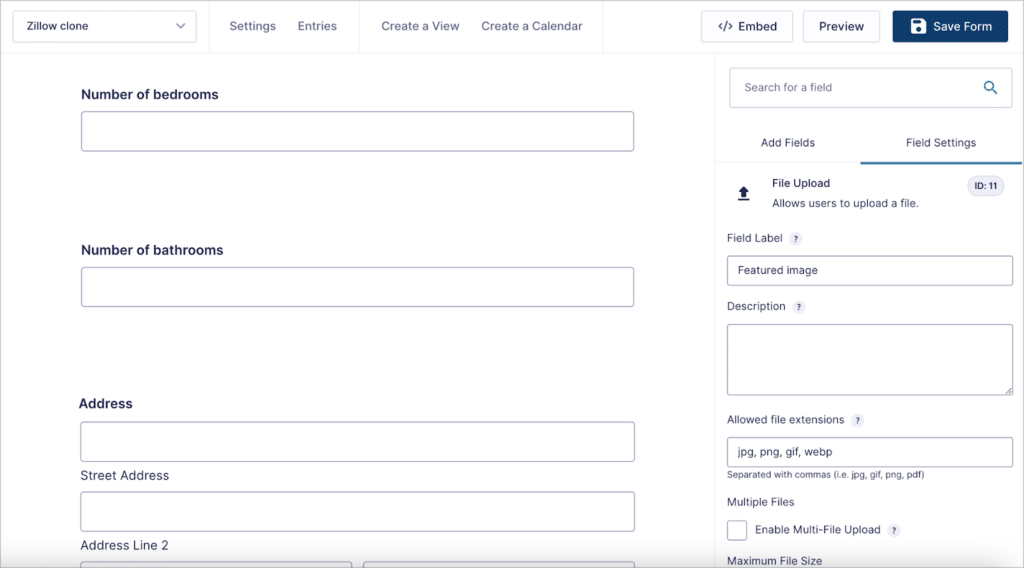
The fields you add here will depend on the information you want to capture. We’ll keep things simple by adding the following fields:
- Title (Single Line Text field)
- Price (Number field)
- Number of bedrooms (Number field)
- Number of bathrooms (Number field)
- Address (Address field)
- Property type (Drop Down field)
- Size (Number field)
- To rent or buy (Drop Down field)
- Property description (Paragraph Text field)
- Amenities (Checkbox field)
- Date available (Date field)
- Featured image (File Upload field)
- Additional images (Multi File Upload field)
Save time by downloading the free real estate listing form template!
The next step is for us to build a directory to display property listings on the front end.
Building the real-estate directory View using GravityView
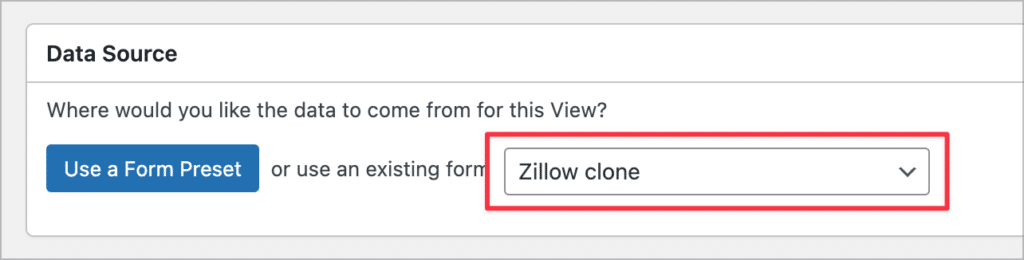
In GravityView, a “View” allows us to display Gravity Forms submission data on the front end. To create a new View, we’ll hover over “GravityKit” and click “New View”.
After giving our View a name, we’ll need to select a data source. The data source is a form in Gravity Forms with the submission data we want to display. We’ll go ahead and select the property listing form that we created in the previous step as our data source.
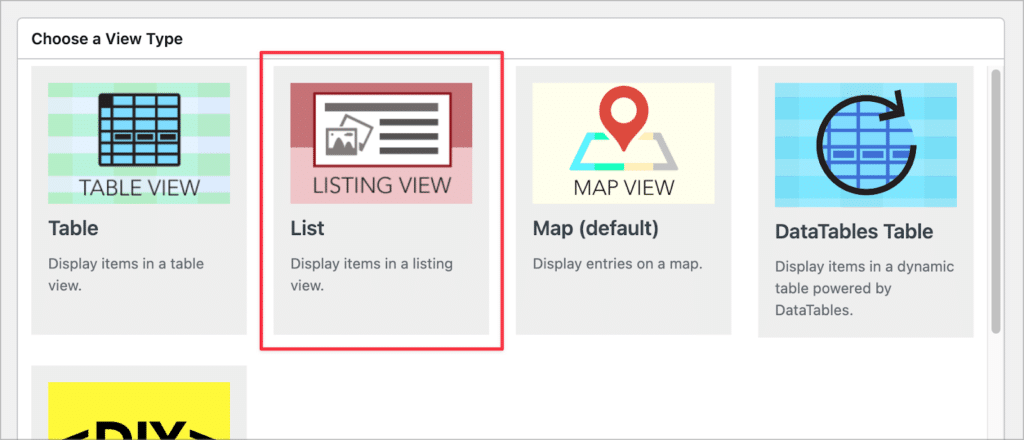
After selecting a data source, we’ll need to choose a View Type. GravityView supports several View Types, allowing us to display data in different ways. The View Type most suited to our use-case is the “List” type.
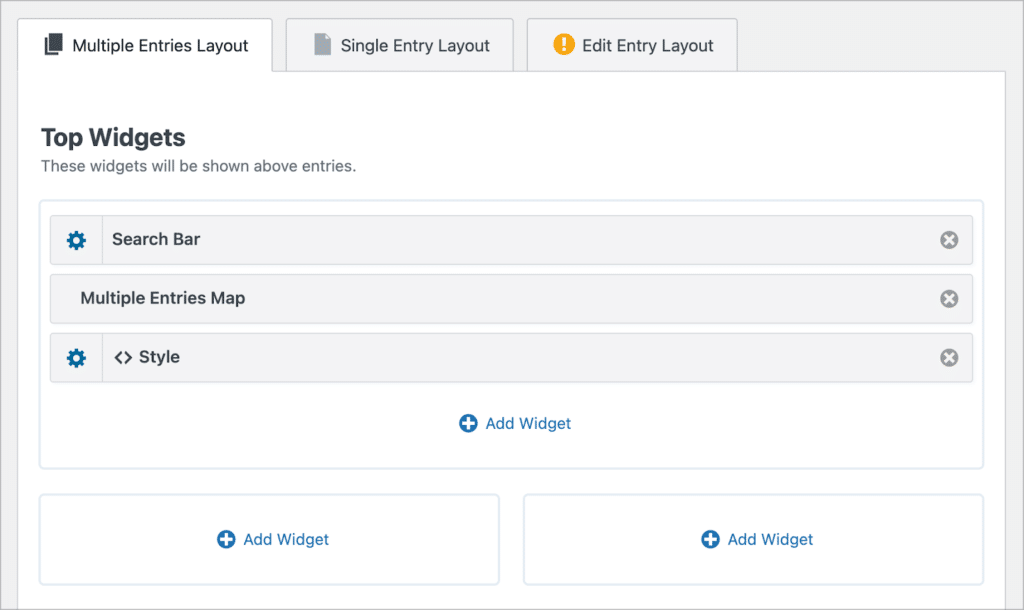
Now we can start constructing our property directory using GravityView’s drag-and-drop builder. We’ll focus on the Multiple Entries Layout first, as this will be our main directory page where users can view and search for property listings.
GravityView allows us to add both fields and widgets to a View. Fields represent the data we want to display, while widgets are tools for navigating a View (such as search bars or maps).
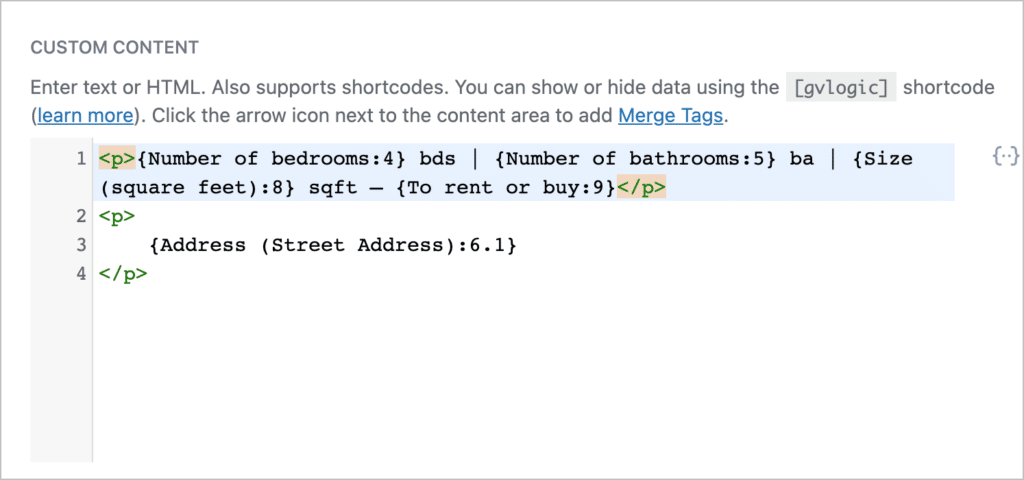
Let’s start by adding the fields we want to display. On the main directory page, we’re going to show the price of the property, the number of bedrooms, number of bathrooms, size, and address (just like they do on the Zillow website!).
We’ll go ahead and add the “Featured image” field to the “Entries Fields” section, followed by the “Price” field.
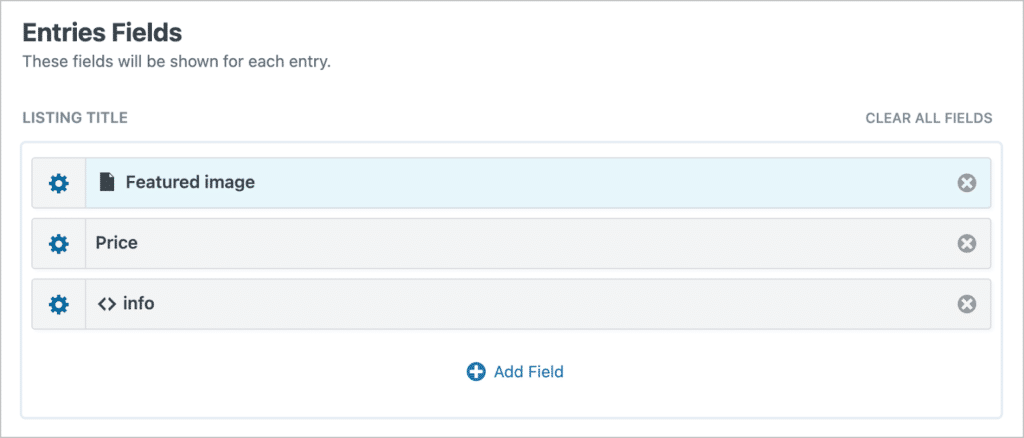
We’ll add the remaining fields inside a “Custom Content” field so that we have finer control over the layout. The GravityView Custom Content field includes a text editor where we can add custom HTML, shortcodes, text, and Gravity Forms merge tags!
That’s it for fields. Now let’s add some widgets.
We’ll start by adding a “Search Bar” widget (this will allow users to search for properties using different parameters). Next, we’ll add a “Multiple Entries Map” widget to display property listings on a Google Map. Finally, we’ll add a “Custom Content” widget with some custom styles to create a grid layout for our directory.
Here are the styles we added to turn the regular list View into a responsive grid layout:
Here’s what the Multiple Entries Layout looks like on the front end:
Pro tipAdd a geolocation radius search field to allow users to search for properties near them or in a specified location.
Configuring the single entry layout
Next, we’ll need to configure the Single Entry Layout. This is where users can go to view more information about a particular property.
To configure the Single Entry Layout, we’ll click on the “Single Entry Layout” tab at the top of the View editor. Here we’ll add the featured image, basic information about the property, and the detailed information, such as the description, amenities and property type.
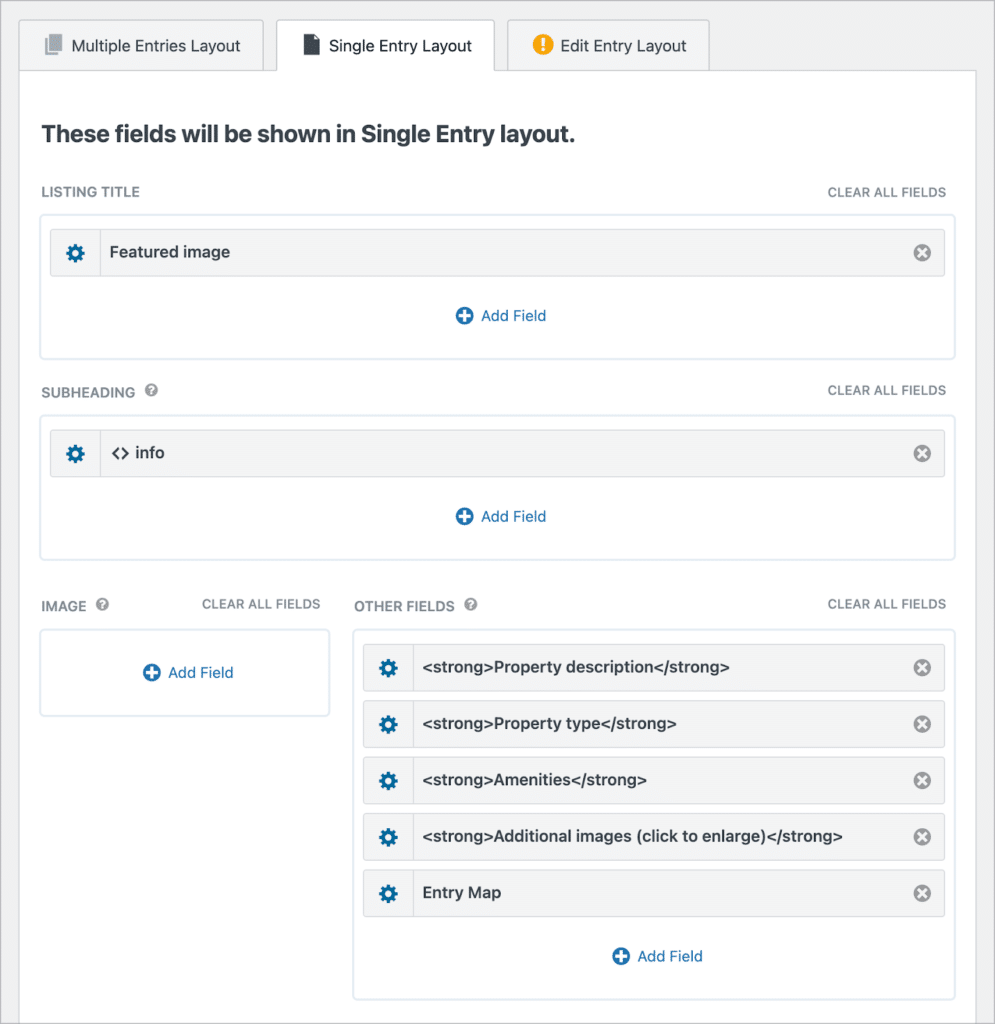
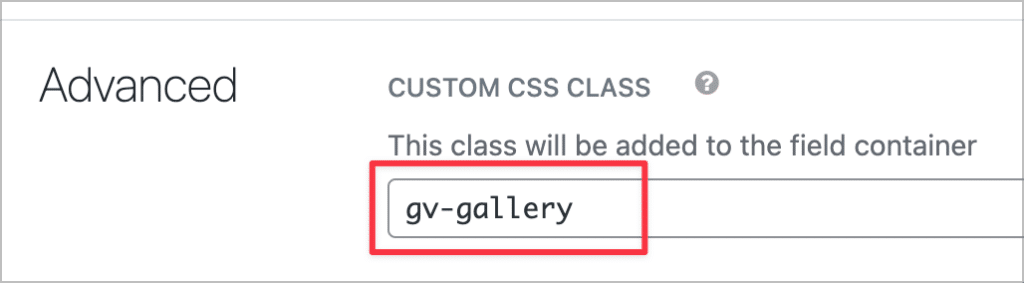
If you’ll recall, our property listing form includes a field allowing agents to upload additional images of the property. We’re going to add these images here, creating an image gallery.
To do this, we’ll add the “Additional images” field, click on the gear icon to open the field settings, and add a custom CSS class called “gv-gallery”.
That’s it! Now let’s take a look at the single entry page on the front end:

After configuring the View, the last step is to embed it on a page or post.
Bonus: building a mortgage calculator
Zillow also includes a handy mortgage calculator, allowing users to see what their monthly mortgage payments would be for different properties. If you want to replicate this functionality, you can follow our guide to build a mortgage calculator using Gravity Forms and GravityMath.
Start building your Zillow clone using GravityView!
Building a Zillow clone on WordPress using Gravity Forms and GravityView can empower you to create a powerful and feature-rich real estate website!
By harnessing the flexibility of WordPress and the functionality of Gravity Forms and GravityView, you can create custom forms, display interactive property listings, and provide a user-friendly experience for your visitors.
With the step-by-step guide provided in this article, you now have the tools and knowledge to build the best WordPress Zillow clone! If you found this post helpful, check out more tutorials on our blog.

Helpful tips right in your inbox.
Subscribe to get the latest articles, information on releases and helpful Gravity Forms tips!
More articles

Launch Log: Distance sorting for radius searches, DataTables search improvements, and import reliability fixes
The latest GravityKit releases add distance sorting to map searches, bring built-in search to DataTables, and fix GravityCharts and GravityImport edge cases.

WordPress page builder market share 2026: Elementor leads at 32.67%
Elementor reaches 32.7% of WordPress sites. WordPress Block Editor 20.6%, wpBakery 8.5%, Divi 5.7%. Latest HTTP Archive crawl, share-of-WordPress basis throughout.

Launch Log: GravityView 3.0, plus upgrades to Block MCP and GravityKit MCP
GravityView 3.0 lands with the new Vantage theme, frontend bulk actions, and AI-assisted View creation. This launch log also covers updates to GravityKit MCP, Block MCP, and Dashboard Views.