Published
•
Updated
Populating fields dynamically in Gravity Forms (the ultimate guide)
Pre-populate Gravity Forms fields dynamically using shortcodes, URL parameters, the Gutenberg block, or custom hooks. Complete guide with use cases and real-world examples.

Dynamic population is one of the standout features of Gravity Forms. It’s something that more people should be using, and in this post, I’m going to show you exactly how it works.
So why should you care about dynamic population? Well, not only is it helpful for personalizing and streamlining the form-filling process, in my opinion, it also unlocks a range of powerful use-cases!
In this post, I’m going to walk you through four ways to pre-populate form fields in Gravity Forms:
- Using a shortcode
- Using URL query string parameters
- The Gutenberg block method
- Using a hook and custom code
I’ll also cover some common use-cases for dynamic population, and answer some frequently asked questions about this powerful feature.
Let’s get started!
What is dynamic population?
Dynamic population in Gravity Forms refers to a feature that allows you to pre-fill fields in a form, or pre-select values in a multi-select field (like a Drop Down). This applies to regular fields and Admin/hidden fields!
Gravity Forms dynamic population example
On our demo site, we have a donation form. By clicking either of the below links, the “Donation amount” field will pre-populate based on the amount you choose. Go ahead and try it out. (Don’t worry, it’s not a real donation!).
This simple demo should give you a good idea of how dynamic field population works in practice.
Why pre-populate fields in your form?
I’ve found pre-populating field values in a form useful for a number of reasons: Firstly, it makes life easier for the user by reducing the effort required on their part. Secondly, it enables you to use the same form to collect information for different things, thereby streamlining your workflow.
For example, let’s say you’re using the same sign-up form on multiple landing pages and you need a way to check which page the user came from. You could pre-fill a hidden form field with the name of the page and include this in the user’s submission!
To see another practical example of dynamic population, read my tutorial on how to build a support ticketing system using Gravity Forms.
How to enable dynamic field population
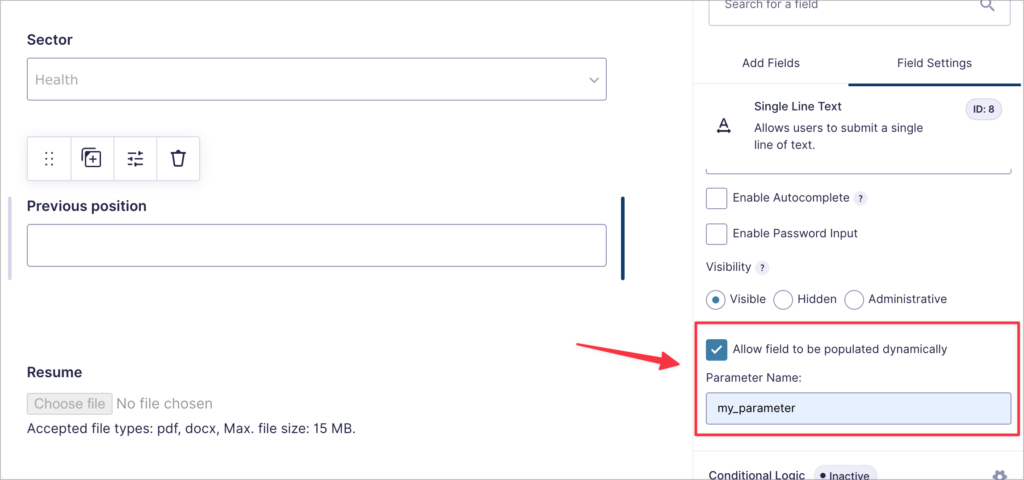
Although there are several different methods for dynamically populating fields in Gravity forms, the first step is always the same, and that’s to enable dynamic field population on the field itself!
Here are the steps:
- Edit the form where you want to use dynamic population
- Click on the specific field that you want to pre-fill
- Open the “Advanced” tab in the field settings panel
- Check the box labeled “Allow fields to be populated dynamically”
- Enter a parameter name in the box and save your form
The parameter name is simply a way to refer to a field when you want to change its value using dynamic population. You can set this to anything you like, but it’s generally best not to include any spaces. In the below example, I set it to my_parameter, but in practice I often use the field name in all lowercase, with hyphens or underscores between words.
Note that if a field does not have an associated parameter, you cannot populate it dynamically!
Now that you’ve enabled dynamic population on your chosen field, you can use one of the methods below to pre-populate your form field. Let’s go through each method, one by one.
1. Dynamic population using URL query string parameters
In my experience, the most useful way to populate fields dynamically in Gravity Forms is to use URL parameters. To do this, append the field’s parameter name along with the value as a key/value pair to the end of the URL, like this:
https://example.com/event-registration/?event_name=Charity%20fun%20runIn this example, the field with the event_name parameter will be populated with “Charity fun run”. Note that we’re using ‘%20’ to denote a space as internet browsers don’t accept spaces in URLs. In fact, all special characters (such as exclamation marks) need proper encoding. If you’re not sure how to do this, check out this free online tool.
To add multiple parameters in the URL, simply use an ampersand (‘&’). Here’s an example:
https://example.com/event-registration/?event_name=Charity%20fun%20run&event_type=familyWhen to use this method
Let’s say you own a retail business with multiple store locations and each location has a link to a contact form. Instead of creating a separate form for each store, you could use query parameters to pre-populate a field on a single contact form with the store name so you know which store the user wants to contact.
I tend to use this method the most because it enables me to create a button that links directly to a prefilled form!
2. Dynamically populate form fields using a shortcode
The Gravity Forms shortcode enables you to display forms anywhere on your website. The shortcode also accepts a number of configurable parameters for enabling ajax, displaying the title/description, and populating fields dynamically.
In this case, the parameter we’re interested in is the field_values parameter. We can use this to dynamically populate any form field that an associated parameter name. Here’s an example:
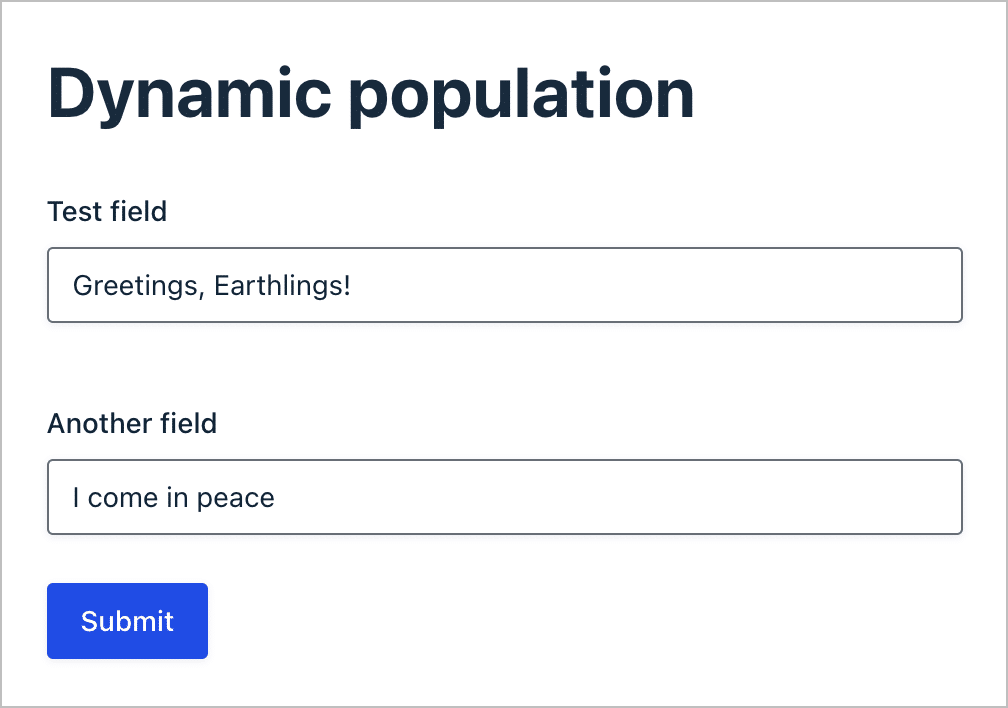
[gravityforms id=“21” field_values=“test_field=Greetings, Earthlings!”]As you can see, the field_values parameter is followed by the parameter name we gave to our field and then the value we want to populate the field with. If you want to populate multiple fields, you can do this by using an ‘&’ to add multiple field values. Here’s how that would look.
[gravityforms id=“21” field_values=“test_field=Greetings, Earthlings!&another_field=I come in peace”] And here’s what the output would look like:
It’s important to note that the id parameter is always required. You can find your form ID on the “Forms” page in the column to the right.
When to use the shortcode method
The shortcode method is useful if you want to display the same form on different pages but you require a custom value based on which page the form is on. This method is also useful if you prefer to embed forms using a shortcode rather than a block.
Personally, I don’t use the Gravity Forms shortcode much as I prefer the block. However, if you’re using a page builder that isn’t Gutenberg, using the shortcode is the only option!
3. Using the Gravity Forms block
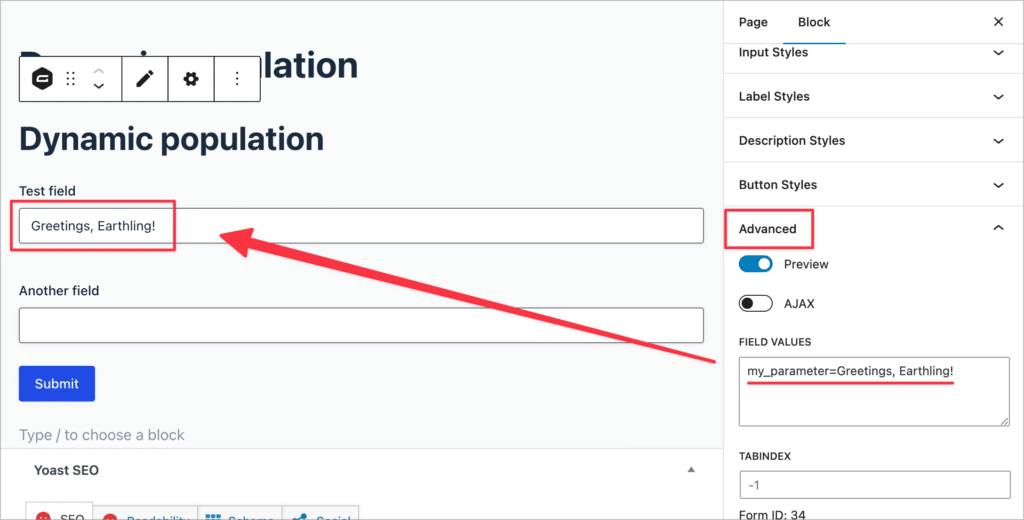
The Gravity Forms Gutenberg block also allows you to pre-populate field values. To start you’ll need to add the block to your page or post by opening the WordPress block editor and searching for the Gravity Forms block.
Next, select your form from the dropdown menu. After that, you should see a preview of your form load inside the editor.
To configure dynamic field population, open the block settings on the right, scroll down to “Advanced”, and enter the field parameter name followed by the value you want to populate it with inside the “Field Values” text box. Your form preview should now update inside the editor, showing the value inside the field.
When to use this method
If you prefer to display Gravity Forms using the WordPress block instead of the [[gravityforms]] shortcode, this method offers a simple way to pre-populate field values.
4. Using a hook (for developers)
If you want full control over the value, you can use the gform_field_value_$parameter_name filter in PHP. This lets you populate a field with any value you want—from a database query, a user meta field, a cookie, or any custom logic.
Here’s an example. Say you’re tracking UTM campaigns with a cookie and want to populate a hidden field (with the parameter name utm_campaign) with that value:
add_filter( 'gform_field_value_utm_campaign', 'populate_utm_campaign' );
function populate_utm_campaign( $value ) {
    GFCommon::log_debug( 'Value from cookie => ' . $_COOKIE['utm_campaign'] );
    return $_COOKIE['utm_campaign'];
}
Add this code to your theme’s functions.php file, a custom plugin, or a code snippets plugin. Just make sure the parameter name in the filter (gform_field_value_utm_campaign) matches the one you set in the field’s Advanced settings.
For more examples and advanced usage, see the official documentation for the gform_field_value filter.
Dynamically populating a hidden field in Gravity Forms
You can also populate hidden fields dynamically using the same methods outlined in this article! A hidden field is a field that’s contained within your form, but is hidden from the user.
So why would you want to dynamically populate a hidden field anyway? There are several reasons. Here are some examples of when you might want to do this:
- You have a contact form on your site for logged-in users. You could prepopulate a hidden field with the user’s email address and use that as the “Reply to” address in the email notification.
- You want to track where your form fills are coming from, so you dynamically populate a hidden field with information about where the user came from.
- You have an event registration form on your site where users can register for different events. You could prepopulate a hidden field with the event information based on the landing page the user was on, or the link that they clicked. This would let you know which event they are interested in without the user needing to specify.
Pre-selecting options in a Drop Down or Checkbox field
So far, I’ve shown you how to pre-populate text fields in Gravity Forms but what if you need to pre-select options in a Drop Down, Checkbox, or Radio Buttons field? Well, that’s also possible, and it’s easier than you think!
When you’ve added the field to your form, open the “Advanced” tab, check the box that says “Allow field to be populated dynamically”, and set a parameter name.
Now, open the “General” tab in the Field Settings, click “Edit Choices”, check the box that says “Show values”, and set a value for each option in your field. The value is what you’ll need to use to auto populate the field.
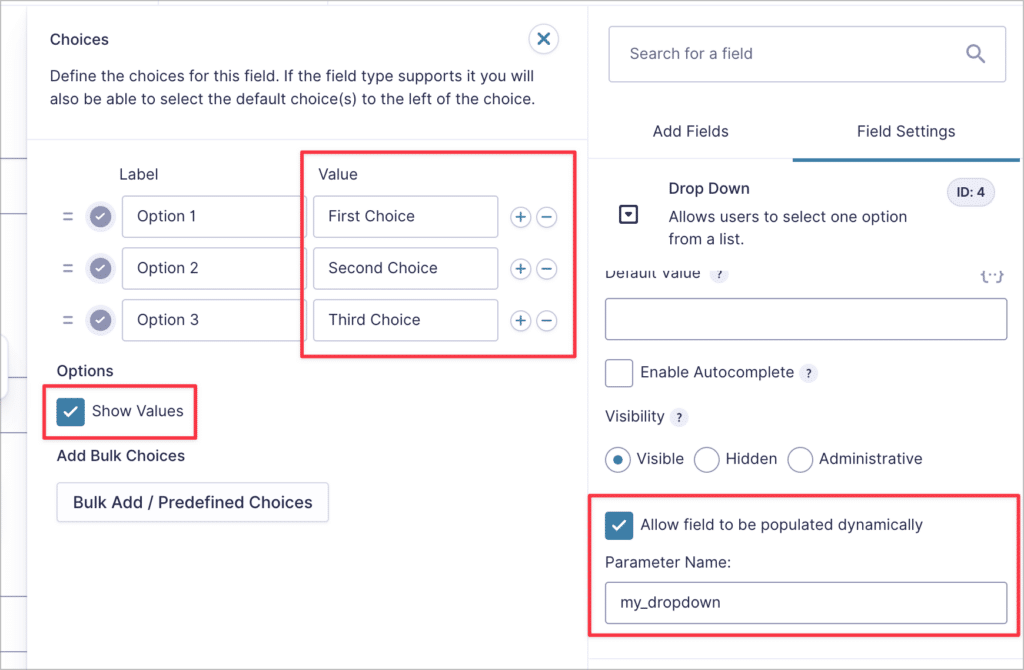
For example, if you wanted to pre-select the first option, “Option 1”, you would use the field parameter name and pass the value pertaining to that option, in this case, “First Choice”. Here’s an example:
[gravityforms id="21" field_values="my_dropdown=First Choice"]As you can see, this is almost identical to how we pre-populated text fields, we’re just using the value of the field option to do it.
Bonus: Dynamically populating field choices
So far we’ve covered how to dynamically populate field values in Gravity Forms, but what if you want to dynamically populate choices in a Drop Down, Radio Buttons, or Checkboxes field?
You can do this using our free Dynamic Lookup add-on! This powerful add-on enables you to dynamically populate field choices with data from other form entries, posts, or WordPress users! Download it free to start building dynamic forms with relational data structures.
Gravity Forms dynamic population: Final thoughts
The ability to auto populate field values is a powerful feature of Gravity Forms. There are four different methods for dynamically populating a field in Gravity Forms: 1) by using a shortcode; 2) using URL query parameters; 3) adding custom code to your site; and 4) using the Gravity Forms block.
I often use this feature, and I have to say, it’s something that helps set Gravity Forms apart from other form solutions. I’m particularly impressed by how dynamic population works for almost any field type!
If you want to learn more about content content in general, read our guide to dynamic content in WordPress next!

Helpful tips right in your inbox.
Subscribe to get the latest articles, information on releases and helpful Gravity Forms tips!
More articles

Launch Log: GravityView 3.0, plus upgrades to Block MCP and GravityKit MCP
GravityView 3.0 lands with the new Vantage theme, frontend bulk actions, and AI-assisted View creation. This launch log also covers updates to GravityKit MCP, Block MCP, and Dashboard Views.

Announcing GravityView 3.0: a fresh new look, AI View creation, and native page builder support
GravityView 3.0 is here: restyle Views with the new Vantage theme, build them with AI, embed them in any page builder, and run bulk actions on the front end.

Launch Log: GravitySearch arrives, plus AI spam review and GravityView fixes
This week, releases are anchored by a brand-new product! GravitySearch joins the GravityKit suite with cross-form entry search for Gravity Forms. Alongside it, Gravity Forms Zero Spam picks up an AI-powered review step, and GravityView sees fixes for Enhanced Security, Edit Entry, and Entry…