Published
•
Updated
How to create custom confirmation messages in Gravity Forms (with examples)
Customize Gravity Forms confirmations to boost conversions and user trust. Learn to create personalized messages, conditional logic responses, and dynamic post-submission redirects.

When someone submits a form on your website, what happens next?
If you’re using Gravity Forms to generate leads, confirmations are a crucial but often overlooked piece of the experience. Customizing the message, or better yet, the entire next step, improves user engagement, builds trust, and boosts your conversions.
In this guide, I’ll show you:
- The different Gravity Forms confirmation types
- How to customize and personalize post-submission messages
- How to use conditional logic for smart confirmations
- How to pass data between forms or pages
- How to redirect users dynamically after form submission
Let’s jump in!
What are Gravity Forms Confirmations?
Confirmations in Gravity Forms let you define what happens after a user submits a form. The default is a simple message, but you’re not limited to that.
There are three confirmation types:
- Text – Show a custom message on the same page.
- Page – Redirect users to a specific page on your site.
- Redirect – Send the user to any URL you like.
Each type supports conditional logic, allowing different actions depending on what the user submits.
Compare the three confirmation types
| Type | When to use | How to set up | Common gotchas |
|---|---|---|---|
| Text | Show a styled message on the same page after submission. Best for thanks messages, next-step instructions, or echoing submitted data back to the user. | Open the form, go to Settings > Confirmations > Add new, set Type to Text, and compose your message. Use the merge-tag icon to insert field values. | The form disappears once it’s submitted, so include any next steps in the message itself. The default confirmation is type Text, and you can edit it but not delete it. |
| Page | Send users to another published page on your WordPress site, such as a thank-you page, upsell, or related resource. | Settings > Confirmations > Add new, set Type to Page, then pick the destination page from the dropdown. | Only published WordPress pages appear in the dropdown. To pass entry data to that page, use Redirect with merge-tag query strings instead. |
| Redirect | Send users to any URL, internal or external, and optionally pass entry data via query parameters. | Settings > Confirmations > Add new, set Type to Redirect, paste the destination URL, and optionally append merge tags as query strings. | For pre-populating a second form, the receiving form’s fields need “Allow field to be populated dynamically” enabled with matching parameter names. |
About conditional logic: it isn’t a fourth confirmation type. It’s a checkbox at the bottom of any non-default confirmation editor that lets the same form fire different responses based on what the user submitted. See section 5 below for examples.
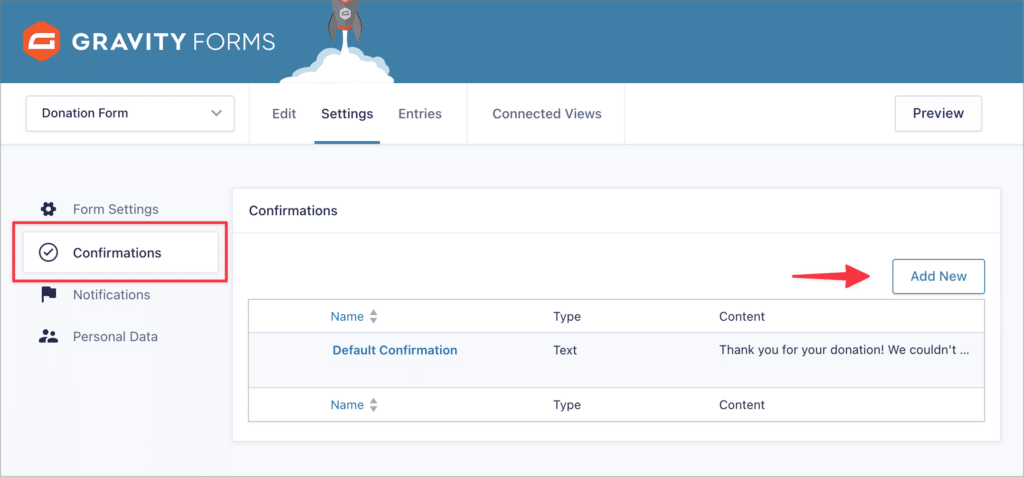
How to set up a custom confirmation
For any new form you create, Gravity Forms adds a default confirmation message, but you can easily remove this or replace it with your own. In fact, Gravity Forms allows you to create multiple confirmations for a singe form.
Here’s how to configure confirmations in Gravity Forms:
- Go to “Forms”, select your form and click on “Settings”
- Click the “Confirmations” tab
- Click “Add New”
From there, choose your confirmation type and customize it.
Writing better confirmation messages
Generic “Thank you” messages aren’t always enough. A thoughtful, personalized confirmation:
- Provides the user with next steps
- Reduces confusion or form re-submissions
- Keeps visitors engaged on your site longer
- Improves SEO through lower bounce rates
For instance, if a visitor to your site fills our a quote request form and selects “Web Design Services,” you can direct them to a landing page or resource tailored to that interest.
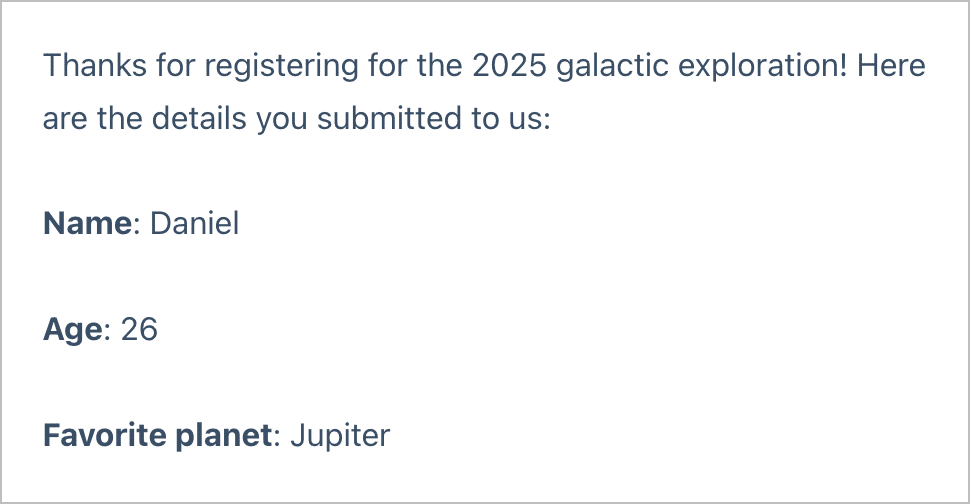
1. Displaying user entries in the confirmation message
Did you know that you can display user-submitted data inside confirmation messages? This type of confirmation shows the user exactly what information was captured when they clicked “Submit”. It’s a helpful reminder that confirms their submission was successfully sent.
To show user-submitted content in the confirmation message, select “Text” as the Confirmation Type and add the merge tags corresponding to the fields you want to display inside the text editor.
To do this:
- Choose the Text confirmation type
- Use the merge tag menu above the editor (next to “Add Media”)
- Add relevant fields
Thanks, {Name (First)}!

We received your submission:
Email: {Email}
Interest: {What are you interested in?}
You can use the {all_fields} merge tag to show the entire entry in a styled format.
To add merge tags to your confirmation message, click on the icon to the right-hand side of the “Add Media” button. In the below example, we’re displaying user registration information for our upcoming Galactic Exploration event.

Here’s what our confirmation message looks like on the front end.
To add all fields using a single merge tag, open the merge tag list and select the top one titled “All Submitted Fields”.
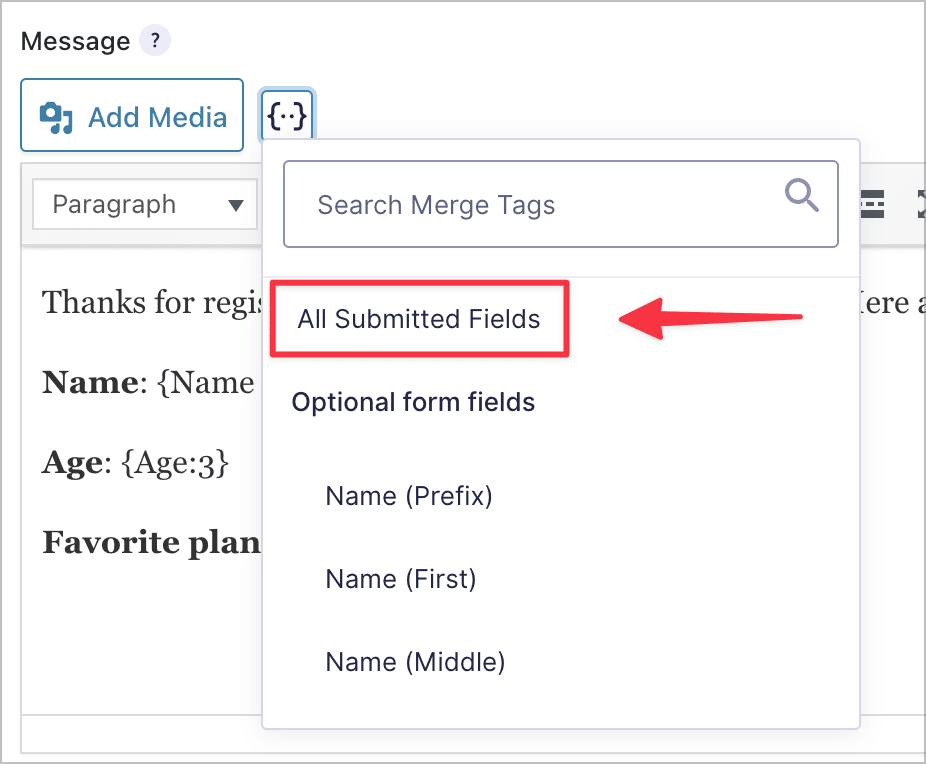
This merge tag displays the user’s submission in a neat-looking format that’s pre-styled.
Pro tipMerge tags in Gravity Forms allow you to display data about a form, an entry, or a specific field. Learn more about merge tags.
2. Redirect users after a form submission
Instead of showing a message, you may want to redirect users to a “Thank You” or confirmation page.
To create a redirect:
- Set the confirmation type to Redirect
- Type in your destination URL
- Optionally, append dynamic values using merge tags
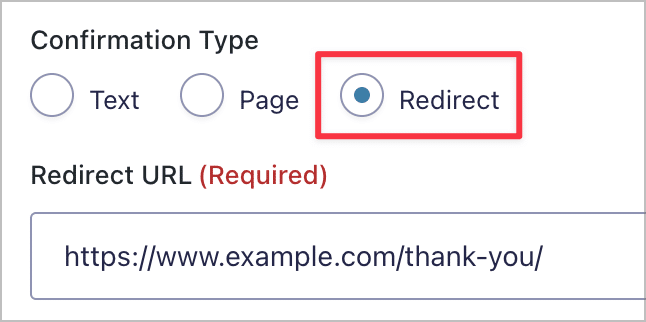
In this example, we’re sending the user to the “Thank You” page on our website. If you have coding skills and want to personalize the page content, you could pass data dynamically inside the URL:
https://yourdomain.com/thank-you/?name={First Name:1}3. Embedding submitted data on another page
Want to display entries on a thank-you page or let users edit them later? Use GravityView, a Gravity Forms add-on that displays entries on the front end.
To set this up:
- Create a new View in GravityView
- Choose your form as the data source
- Configure how you want the data displayed (table, list, etc)
- Copy your View url
- Paste your View URL and use the
{entry_id}merge tag in the redirect URL to send users to the page where their entry is embedded
This shows users their specific submission and even allows editing if configured.
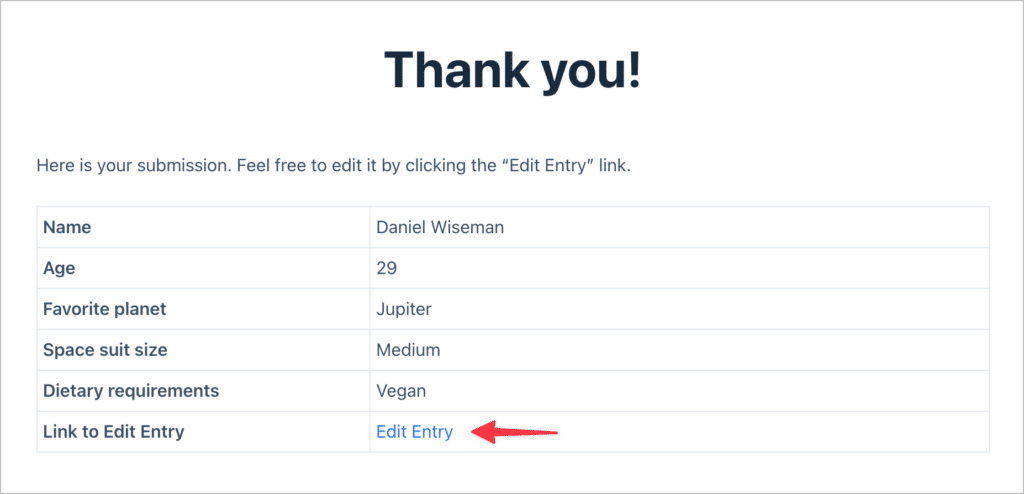
To create the redirect URL: Paste your View URL. Next, to ensure that users get sent to the correct entry, you’ll need to add the entry ID merge tag to the URL, like this:
https://example.com/view/galactic-exploration/entry/{entry_id}/This will update the URL dynamically, ensuring that users get redirected to the correct page!
Pro tipTo see what’s possible with GravityView, check out our build it guides.
4. Pre-populate a second form with confirmation redirects
Here’s a powerful flow that you can set up using confirmations:
- User submits Form A
- They’re redirected to a page with Form B
- Form B is pre-filled with values from Form A
Here’s how to achieve this:
- Set the confirmation type to Redirect
- In the redirect URL pass merge tags as query parameters
- In Form B, enable “Allow field to be populated dynamically”
- Use matching parameter names (e.g.,
email,name) for each field you want to be pre-populated
Pro tipFor a complete guide on how to do this, check out the Gravity Forms documentation.
5. Use conditional logic to personalize confirmations
Conditional logic lets you show different confirmations based on what the user submits. This helps you provide relevant, impactful messages tailored to what the user needs.
To do this:
- Scroll to the bottom of the confirmation editor
- Check the box: “Enable Conditional Logic”
- Set up your condition. Example:
- Field: “Favorite Planet”
- Operator: is
- Value: Jupiter
Now only users who select “Jupiter” will see this confirmation!
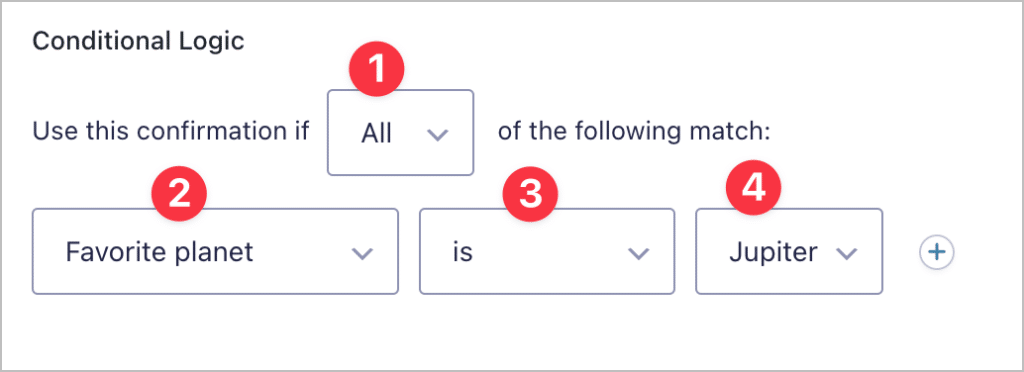
- Choose whether to use ANY or AND logic
If set to “all”, then all conditions must match. If set to “any” then only one of the conditions has to match.
- Field
The field in your form.
- Parameter
Accepted parameters include:is, is not, contains, greater than, less than, starts with,andends with.
- Value
The value to compare the field against.
More conditional logic examples
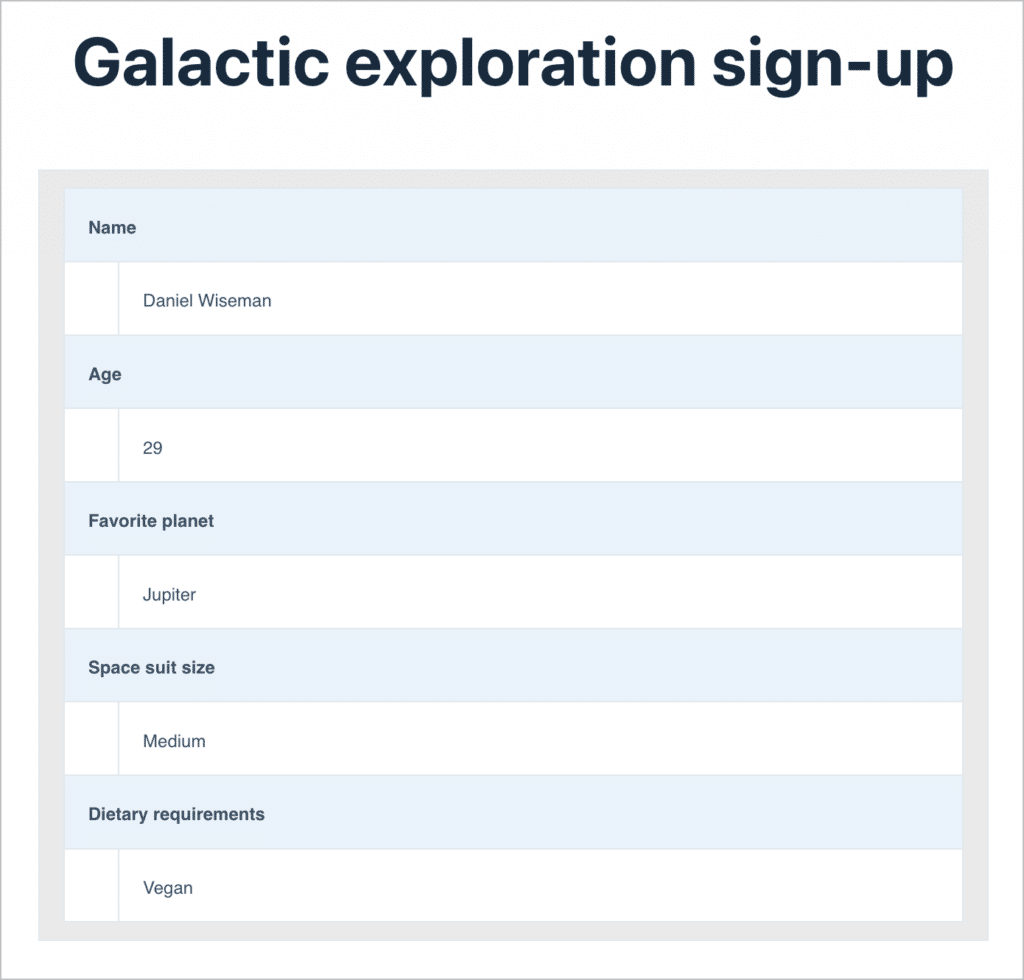
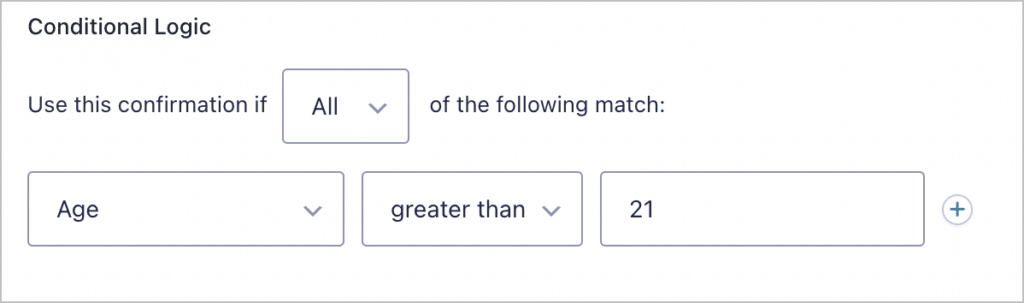
In this example, we’re using the greater than parameter to only display the confirmation message if the user’s age is greater than 21.
Here’s an example where we’re using the contains parameter to only display the confirmation message if the “Dietary requirements” field contains the word “vegan”. In other words, as long as the word “vegan” appears in the field, the confirmation message will be displayed.

Customizing Gravity Forms confirmations: Final thoughts
Creating customized confirmations in Gravity Forms isn’t just a nice-to-have, it’s an easy win for improving UX and conversions. Use them to:
- Display dynamic messages
- Redirect users to tailored content
- Pass information between steps
- Create powerful, logic-based workflows
If you’re looking to streamline what happens after submission, start here. And for more advanced use cases, explore GravityView and other GravityKit tools.
Subscribe to our newsletter and get Gravity Forms tips, product updates, and more straight to your inbox!
Frequently asked questions
Three: Text, Page, and Redirect. Use Text for an on-page thank-you message (best for short confirmations and echoing submitted data back), Page to send users to an existing WordPress page (best for static thank-you pages), and Redirect to send them to any URL with optional query-string parameters (best for cross-site redirects or pre-populating another form). Conditional logic and merge tags are features that work across all three types, not separate types.
Every new form ships with a default confirmation of type Text that reads “Thanks for contacting us! We will get in touch with you shortly.” You can edit the default but you can’t delete or deactivate it — instead, add a new confirmation (or several with conditional logic), and Gravity Forms uses the first matching one, falling back to the default only when no other confirmation matches.
If the form submits but no confirmation appears (or the page goes blank), the usual culprits are AJAX script issues, jQuery loaded in the footer instead of the page head, or a plugin/theme conflict blocking the confirmation render. Try removing the ajax=“true" parameter from the embed shortcode to isolate the issue, then verify jQuery is loaded in the head (not deferred or footer-loaded). If the confirmation still doesn’t fire, run a conflict test by disabling everything except Gravity Forms and a default theme, then re-enabling one plugin at a time. Gravity Forms’ Common Form Issues doc has a fuller checklist.
Three things to check. First, confirm your new confirmation is active on the Confirmations list page — the toggle has to be on. Second, if your new confirmation uses Conditional Logic, the rules need to match the submission; otherwise Gravity Forms falls back to the default. Third, some spam-protection add-ons (including the official Zero Spam add-on) intentionally swap suspected spam submissions back to the default message, which can look like the wrong confirmation is firing for legitimate users.
Yes. Add a new confirmation, scroll to the bottom of the editor, check “Enable Conditional Logic,” and define your rules. You can stack as many conditional confirmations as you need — Gravity Forms picks the first one whose conditions match the submission, falling back to the default if none match. The same conditional logic works on Text, Page, and Redirect confirmation types, so you can also branch users to different pages or URLs based on their input.
Yes. Use merge tags like {Name (First)} for individual fields or {all_fields} to display the entire entry in a styled format. Merge tags work inside Text confirmations and inside Redirect URLs as query parameters. Page-type confirmations don’t render merge tags directly on the destination page — for that, use a Redirect confirmation with merge-tag query strings and have the receiving page read them, or use GravityView for a no-code single-entry display.
If you have GravityView, pair a Redirect confirmation with a single-entry View URL using the {entry_id} merge tag, for example https://yoursite.com/view/applications/entry/{entry_id}/. Without GravityView, you can still pass field values as query parameters in the redirect URL (e.g., ?name={Name (First)}&order_id={Entry ID}) and have the receiving thank-you page read them with a small bit of code or a shortcode.
Set the first form’s confirmation to Redirect, then append merge tags to the destination URL as query parameters: https://yoursite.com/form-2/?email={Email:3}&name={Name:1}. On the second form, open each field that should auto-fill, go to Advanced, check “Allow field to be populated dynamically,” and set the parameter name to match the URL key (e.g., email, name). If the second form’s fields stay empty after the redirect, check that the parameter names match exactly and that you’re testing on the same domain — some browsers strip query strings from cross-domain redirects. See our guide to dynamic field population or the Gravity Forms documentation for a deeper walkthrough.
By default, Gravity Forms replaces the form with the confirmation message after a successful submit, and there’s no native “keep form visible” toggle. The simplest workaround: set the confirmation type to Text, and inside the message, embed the form’s own shortcode again (e.g., [gravityform id="3" title="false"]). The confirmation text shows your message and a fresh copy of the form below it. This requires AJAX off on the embed. For a more robust solution that resets the form in place after submission, the gform_pre_submission_filter PHP hook lets you re-insert the form programmatically.
Gravity Forms doesn’t render confirmations in a popup natively. You have two practical paths. The cleanest is the GP Popups perk from Gravity Perks (Gravity Wiz), which displays the form and its confirmation inside a popup with multiple trigger options (button click, scroll depth, exit intent, hash). Alternatively, use a Redirect confirmation that sends the user to a page wrapped in a lightbox plugin. For a DIY approach, Gravity Forms’ displaying form within modal/popup/lightbox doc walks through a custom JS/CSS pattern.

Helpful tips right in your inbox.
Subscribe to get the latest articles, information on releases and helpful Gravity Forms tips!
More articles

Announcing GravityView 3.0: a fresh new look, AI View creation, and native page builder support
GravityView 3.0 is here: restyle Views with the new Vantage theme, build them with AI, embed them in any page builder, and run bulk actions on the front end.

Launch Log: GravitySearch arrives, plus AI spam review and GravityView fixes
This week, releases are anchored by a brand-new product! GravitySearch joins the GravityKit suite with cross-form entry search for Gravity Forms. Alongside it, Gravity Forms Zero Spam picks up an AI-powered review step, and GravityView sees fixes for Enhanced Security, Edit Entry, and Entry…

Meet GravitySearch: advanced global search for Gravity Forms
GravitySearch adds cross-form search to Gravity Forms: find any entry from one screen, build advanced filters, and preview results without leaving the page.