Published
•
Updated
How to create a dynamic careers page on WordPress using GravityKit
In this tutorial, you’ll learn how to build a fully functional and user-friendly careers page using Gravity Forms and GravityView. We’ll walk through creating job listings, application forms, and admin views so visitors can browse open positions and apply directly, while hiring teams can manage applications from the front end. This approach works well for…
In this tutorial, you’ll learn how to build a fully functional and user-friendly careers page using Gravity Forms and GravityView. We’ll walk through creating job listings, application forms, and admin views so visitors can browse open positions and apply directly, while hiring teams can manage applications from the front end.
This approach works well for agencies, startups, and internal HR teams that want a flexible, scalable hiring system built entirely on WordPress.
Let’s dive in!
Sneak peek
Here’s a look at the finished careers page. As you can see, job listings are displayed one after the other in a modern-looking list format. There is a search bar at the top, enabling visitors to filter job listings by keyword, employment type, and city.
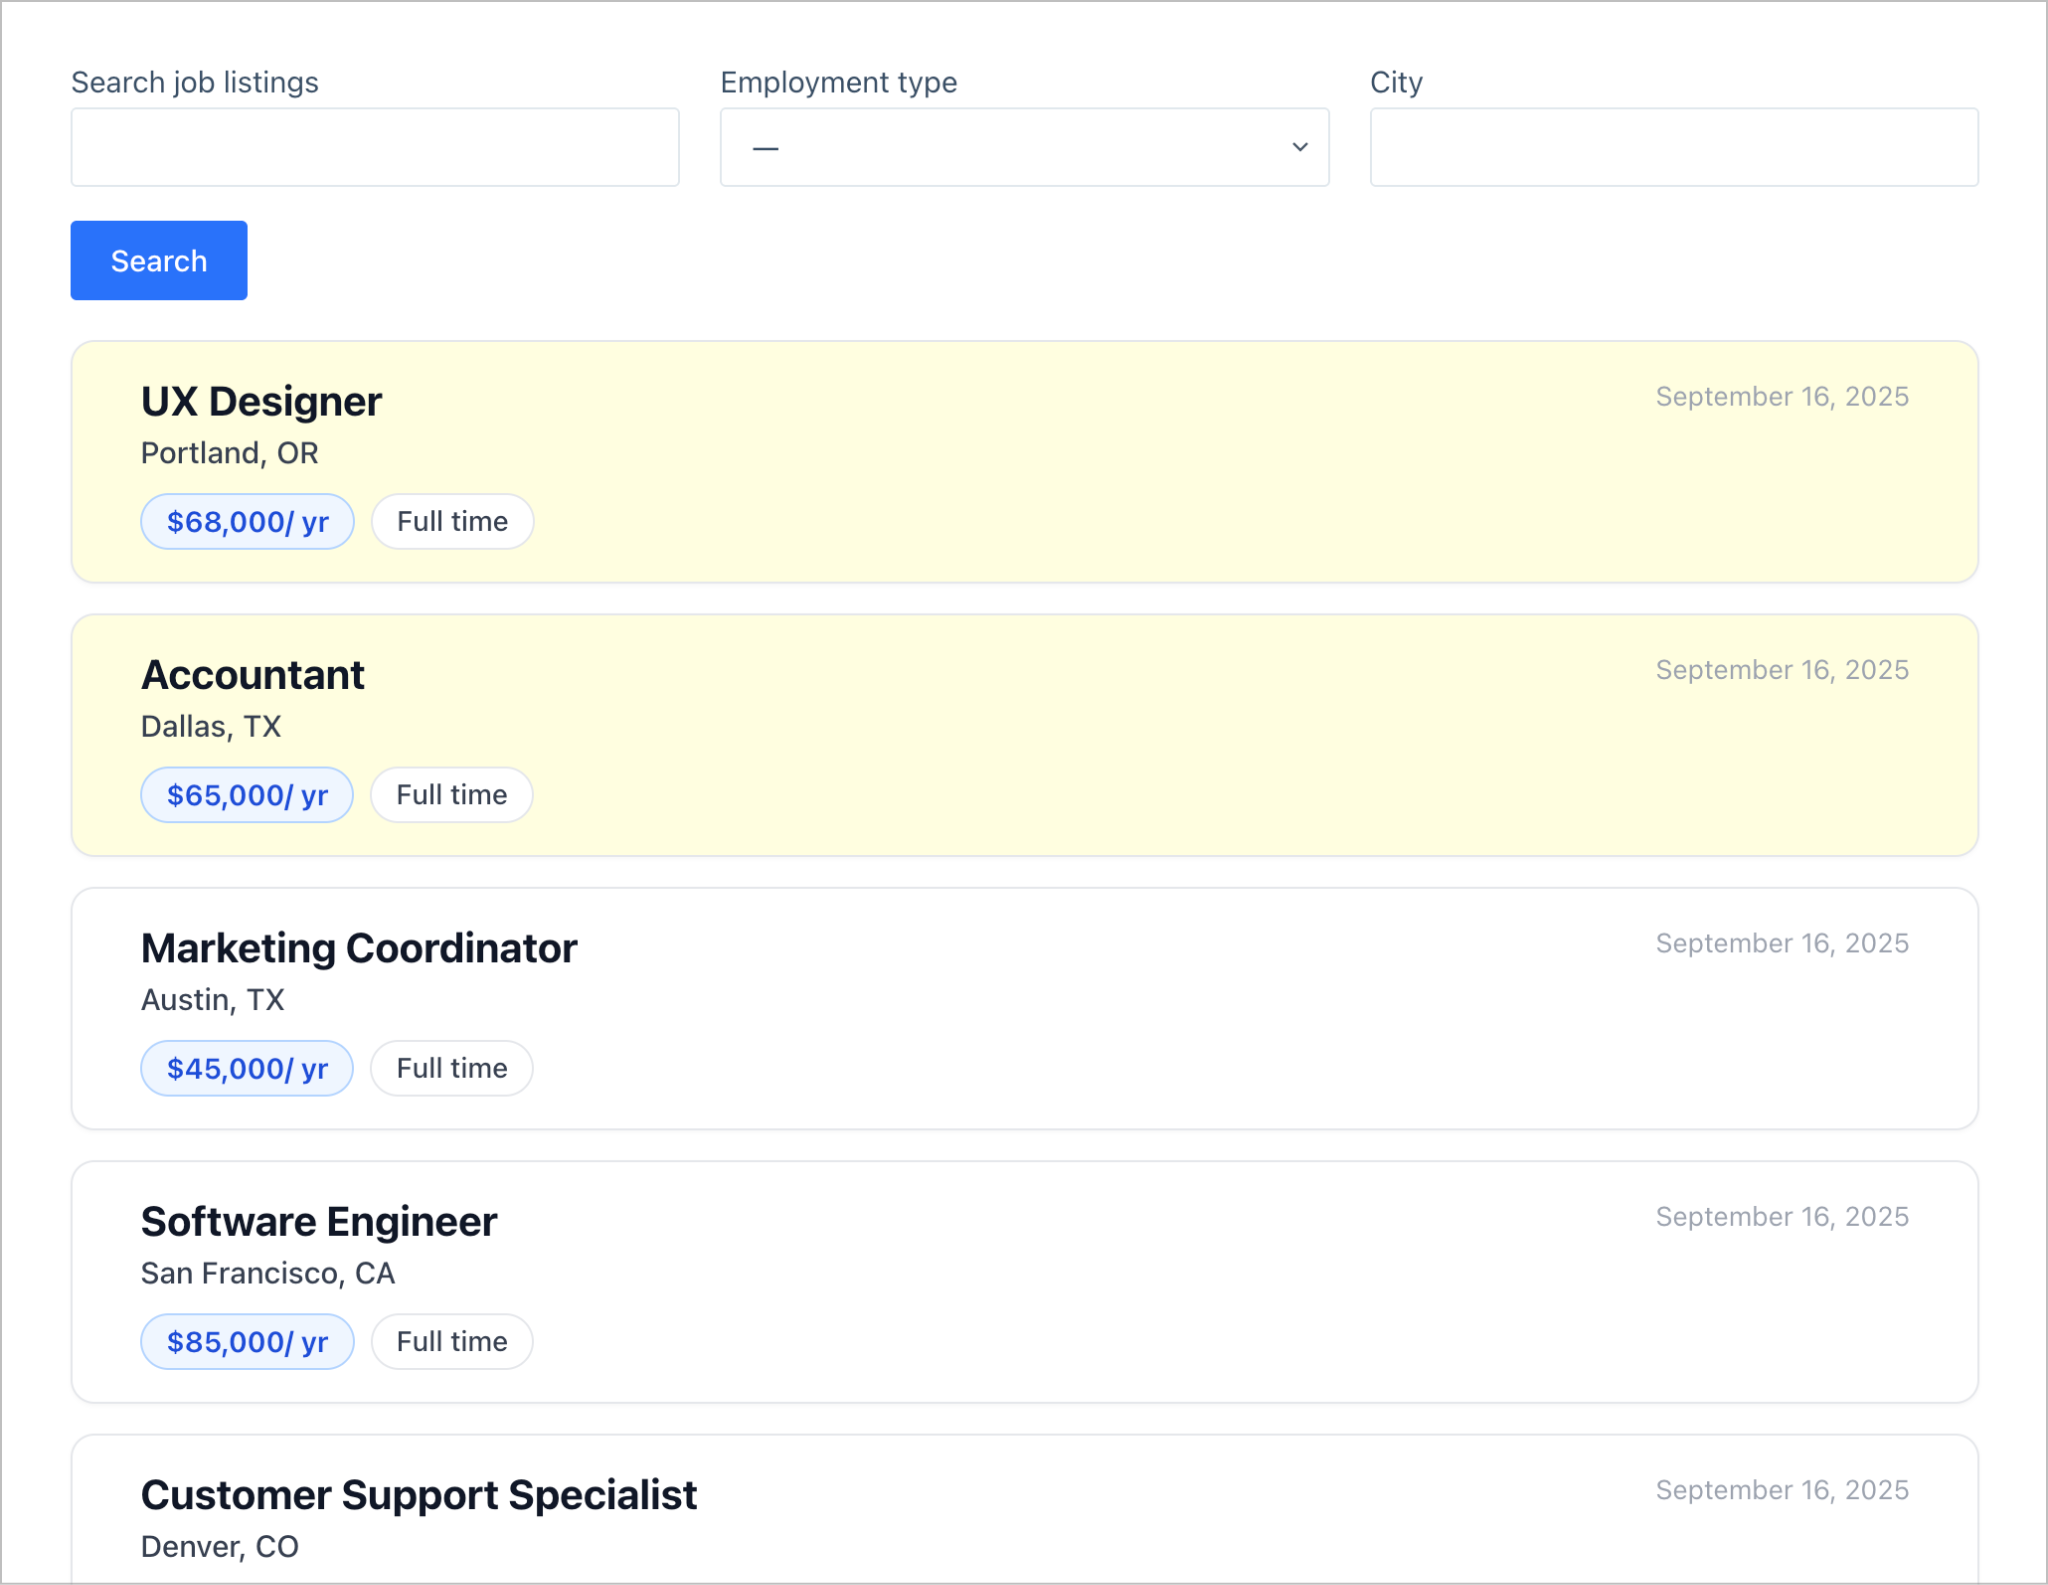
Clicking on a specific job title takes the visitor to the Single Entry page where they can view the full job description.
Further down the page is an application form where the user can apply to the job directly.

All submitted job applications are collated and displayed on a restricted dashboard. This enables hiring managers to browse applications, review resumes, and update the application status.

As you can see, this isn’t just a simple careers page; it’s a complete job posting and application management system.
Wanna try it?
Spin up a demo
See a live job board built with GravityView — explore the demo.

Overview
We’ll build this system using two forms and two Views:
- Form 1: Job posting form (used by admins/HR)
- Form 2: Job application form (used by applicants)
- View 1: Job listings (front-end careers page)
- View 2: Application management dashboard (internal)
What you’ll need
Here are the plugins you’ll need to build a careers page like the one in this tutorial:
- Gravity Forms (any license level)
- GravityView Pro
- GravityPDF (optional) – to generate downloadable PDFs of applications
- GravityExport (optional) – for application delivery and reports
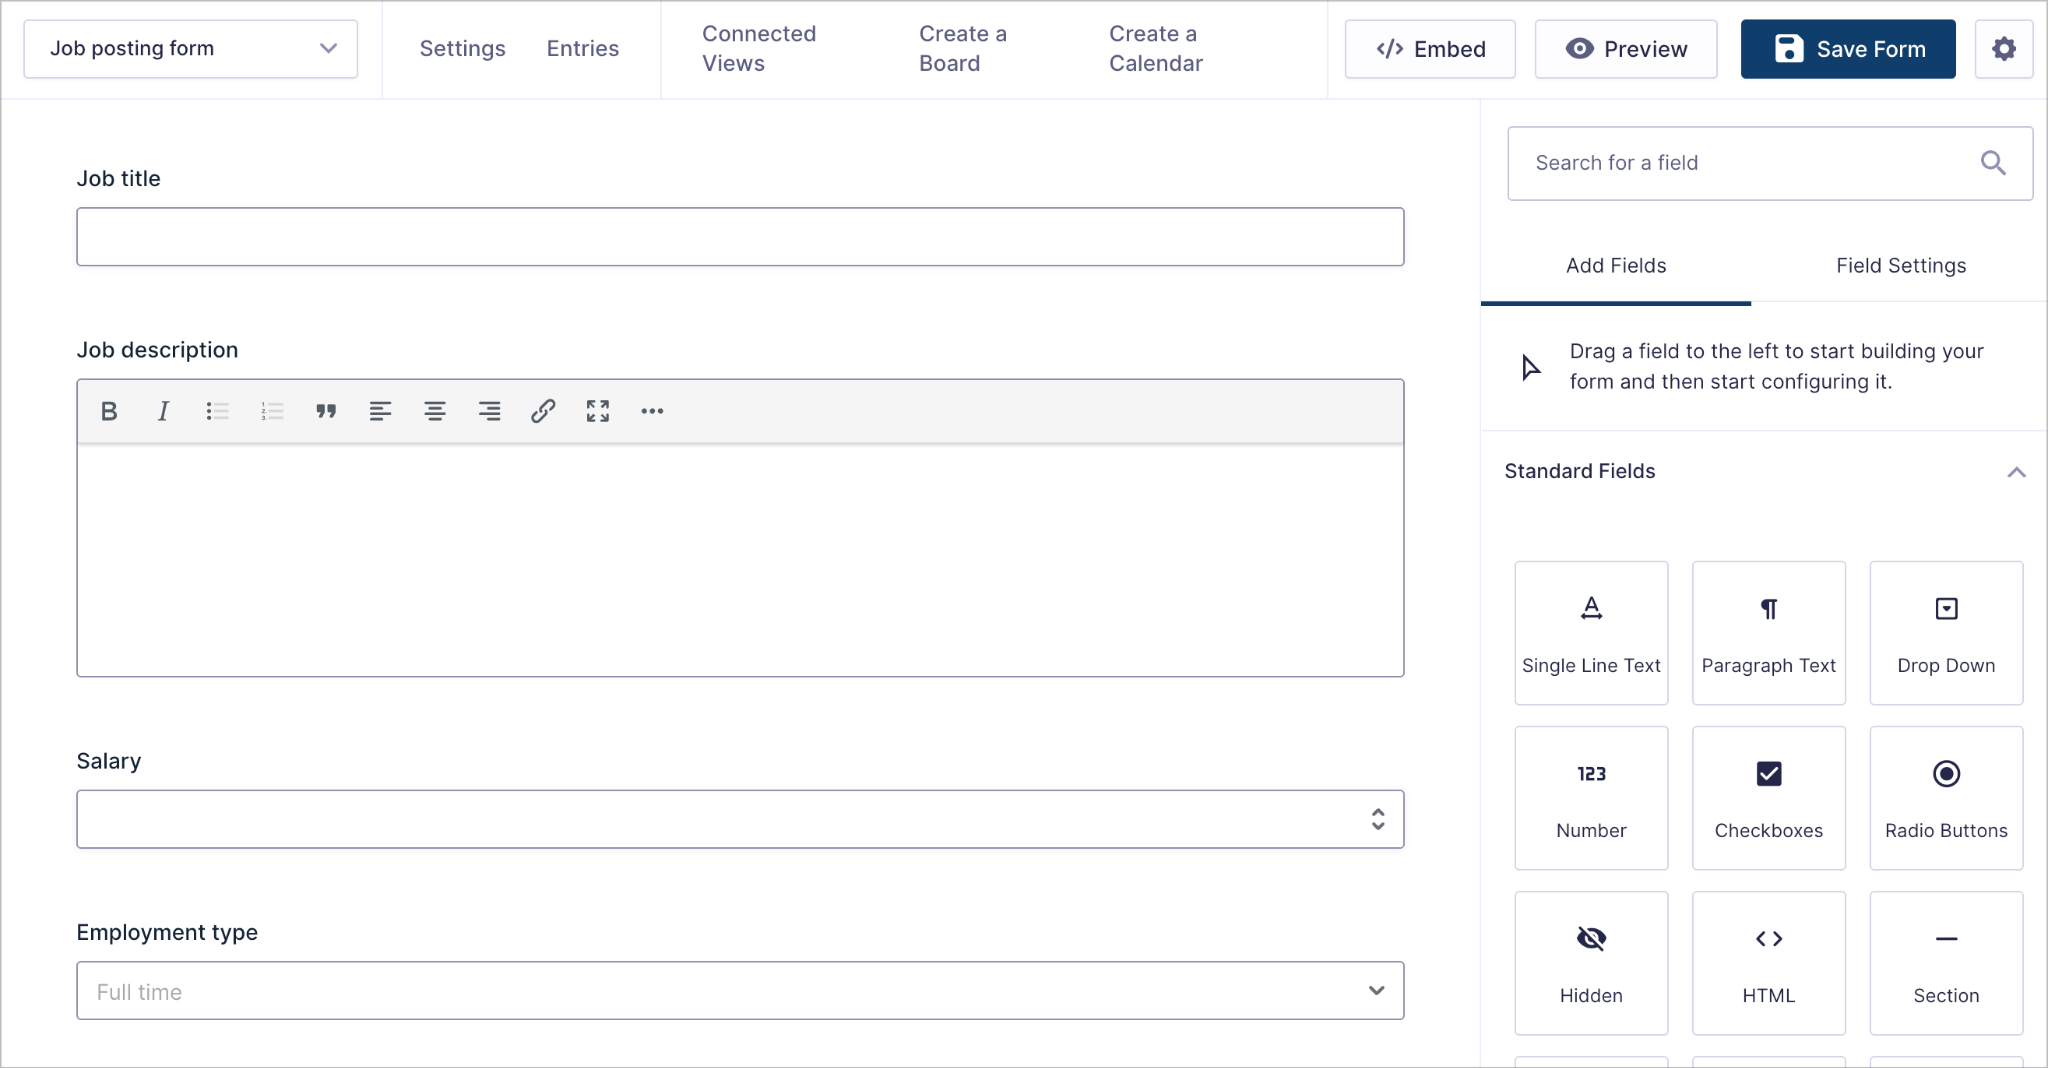
Step 1: Creating the job posting form
We’ll start by creating a new blank form allowing admins to submit new jobs to the Careers page. For this tutorial, we’ll keep things simple by adding the following fields:
- Job title (Single Line Text field)
- Job description (Paragraph Text field)
- Salary (Number field)
- Employment type (Drop Down field)
- Location (Address field)

Pro Tip
Ensure that you enable the Rich Text Editor on the Job description field. This enables you to use headings and other formatting when crafting job descriptions.
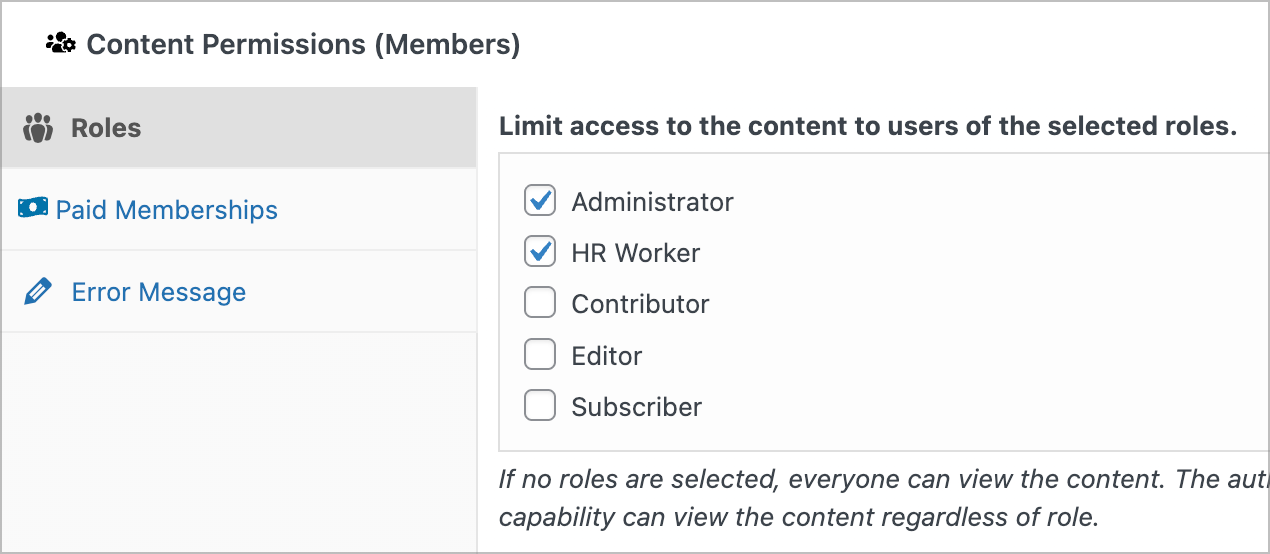
After creating our job posting form, we’ll use the Gravity Forms block to embed it on a page. Because we only want certain users to be able to post new job listings (e.g., admins or HR workers), we’ll use the free Members plugin to restrict page access by user role.
Step 2: Creating the job application form
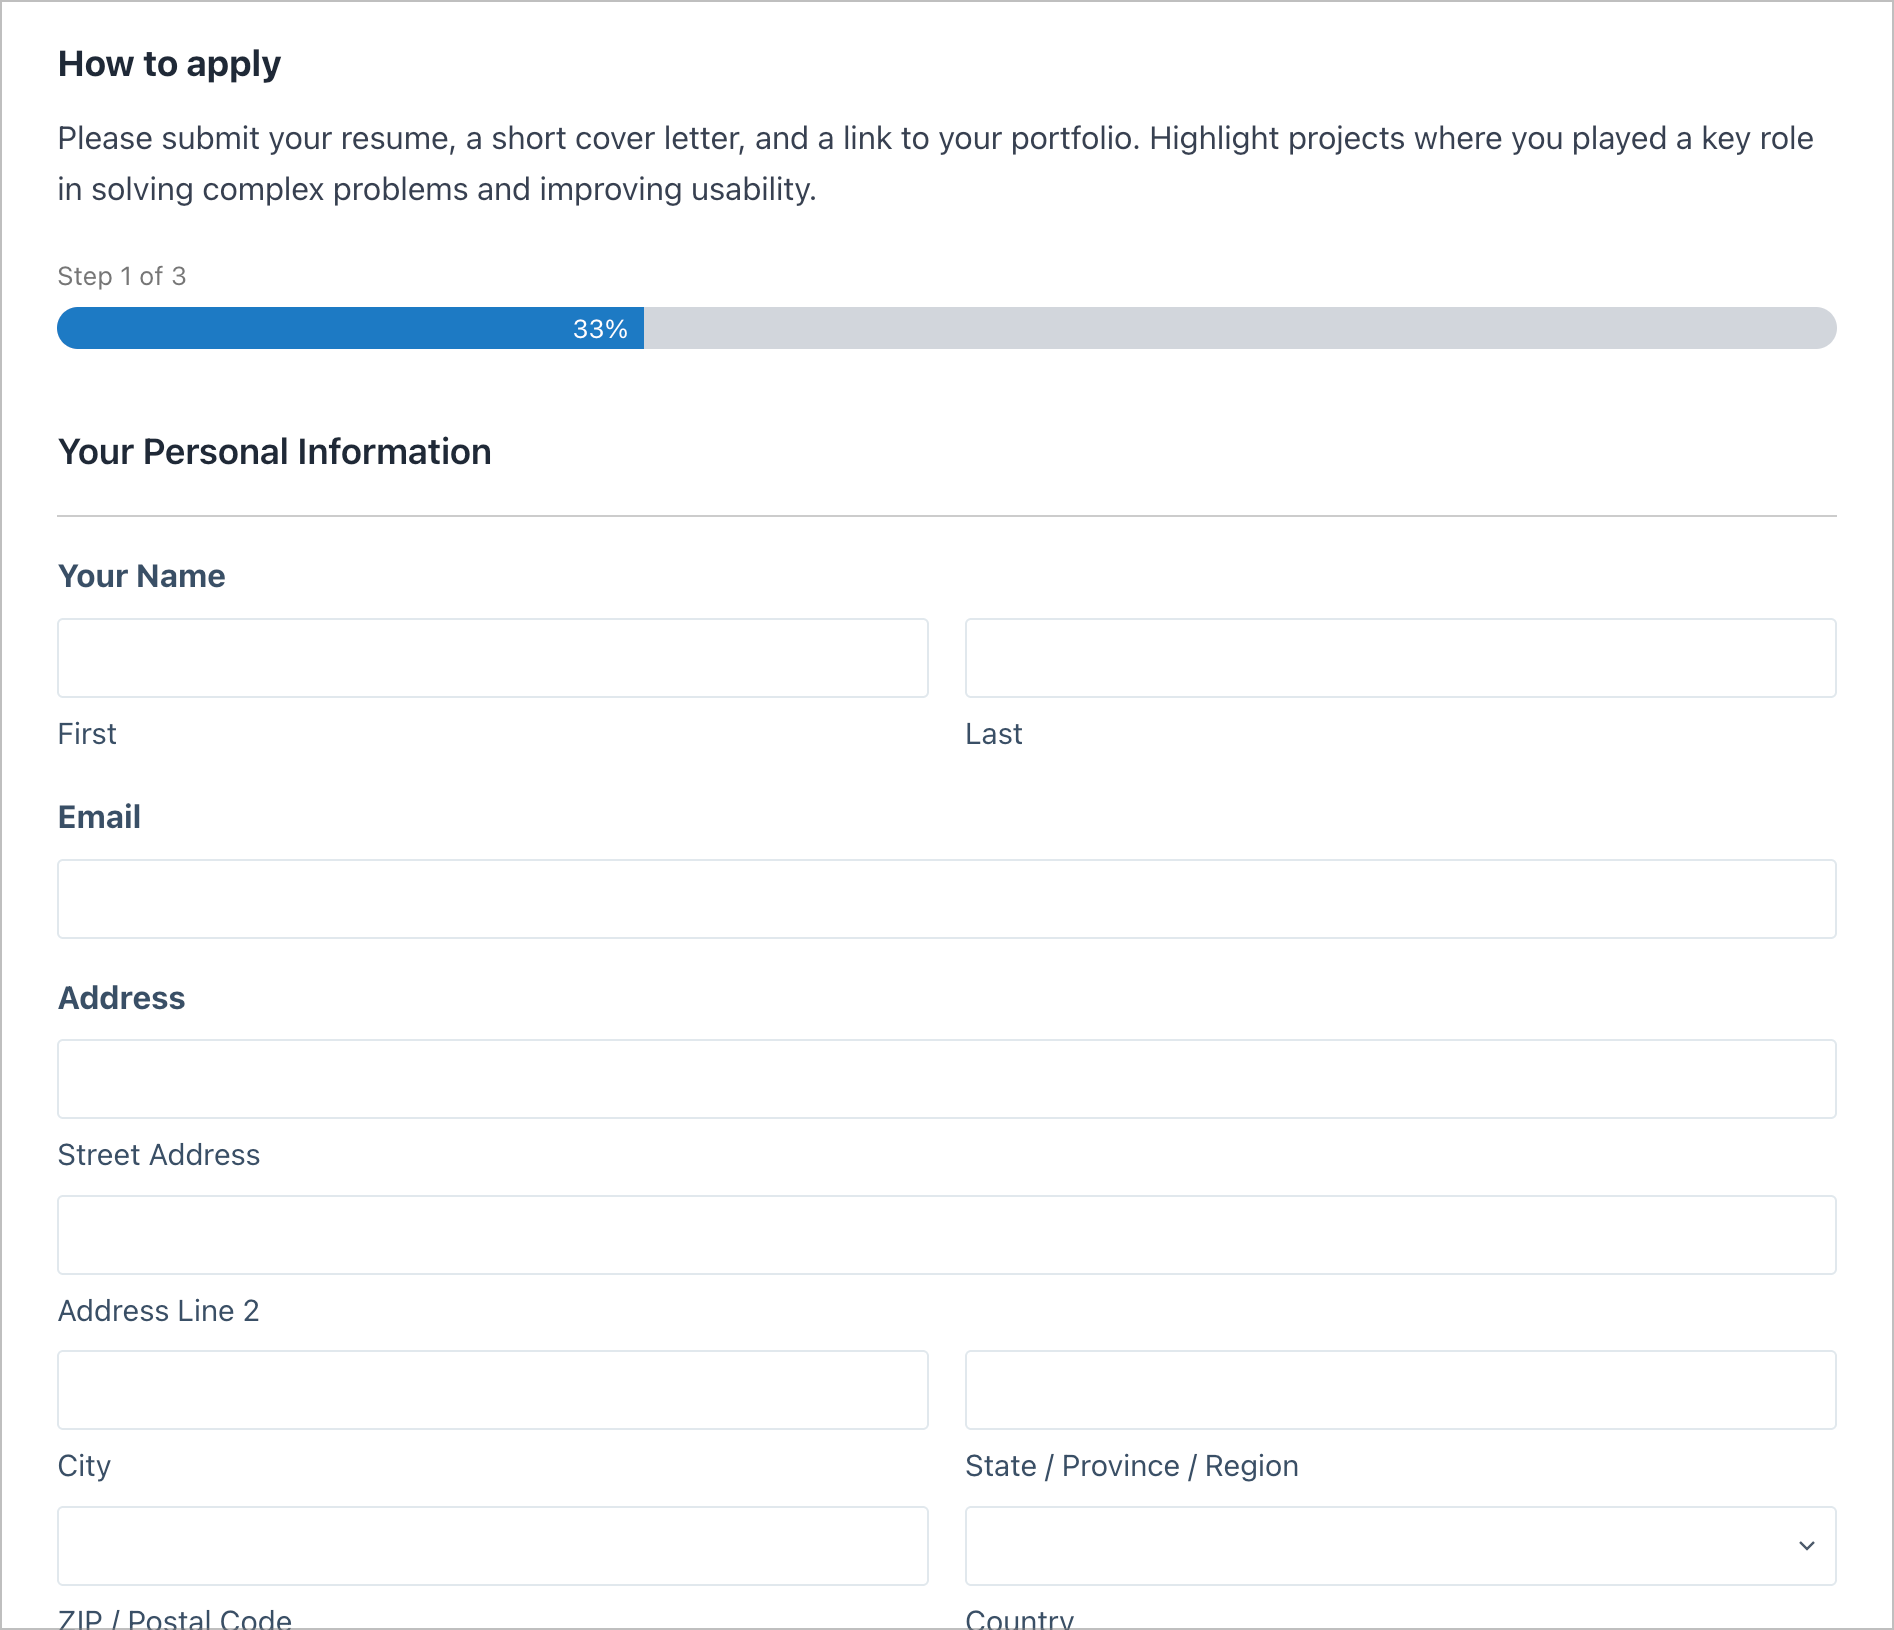
The next step is to create a second form that site visitors can use to apply for specific jobs. As there is a lot of information we need to collect here (such as personal details, employment history, resume), we’ll use a multi-page form.
Page 1: Personal information
- Name (Name field)
- Email (Email field)
- Address (Address field)
- Phone (Phone field)
- Best time to call (Drop Down field)
Page 2: Previous employment
- Work history (List field)
Page 3: More about you
- Tell us about you (Paragraph Text field)
- Upload your resume (File Upload field)
- Application status (administrative Drop Down field)
- Position (administrative Single Line Text field)

The final two form fields, Application status and Position, are administrative fields, meaning they are not visible to users. Rather, they serve functional purposes in our application management system.
- Application status – Used to control the status of an application. This field is editable by admins and hiring managers who have the authorization to review and update the status of submitted applications.
- Position – This field is populated dynamically with the name of the job the visitor applied to. This allows us to pass information from the job listing into the application form automatically.
To use dynamic population in Gravity Forms, click on a field in the form editor and check the box that says “Allow field to be populated dynamically”, and enter a parameter name (e.g., “position”).

Step 3: Create a View to display job listings dynamically
Now that we have our forms set up, we can turn our attention to the front end of our careers page by creating a View to display submitted job listings.
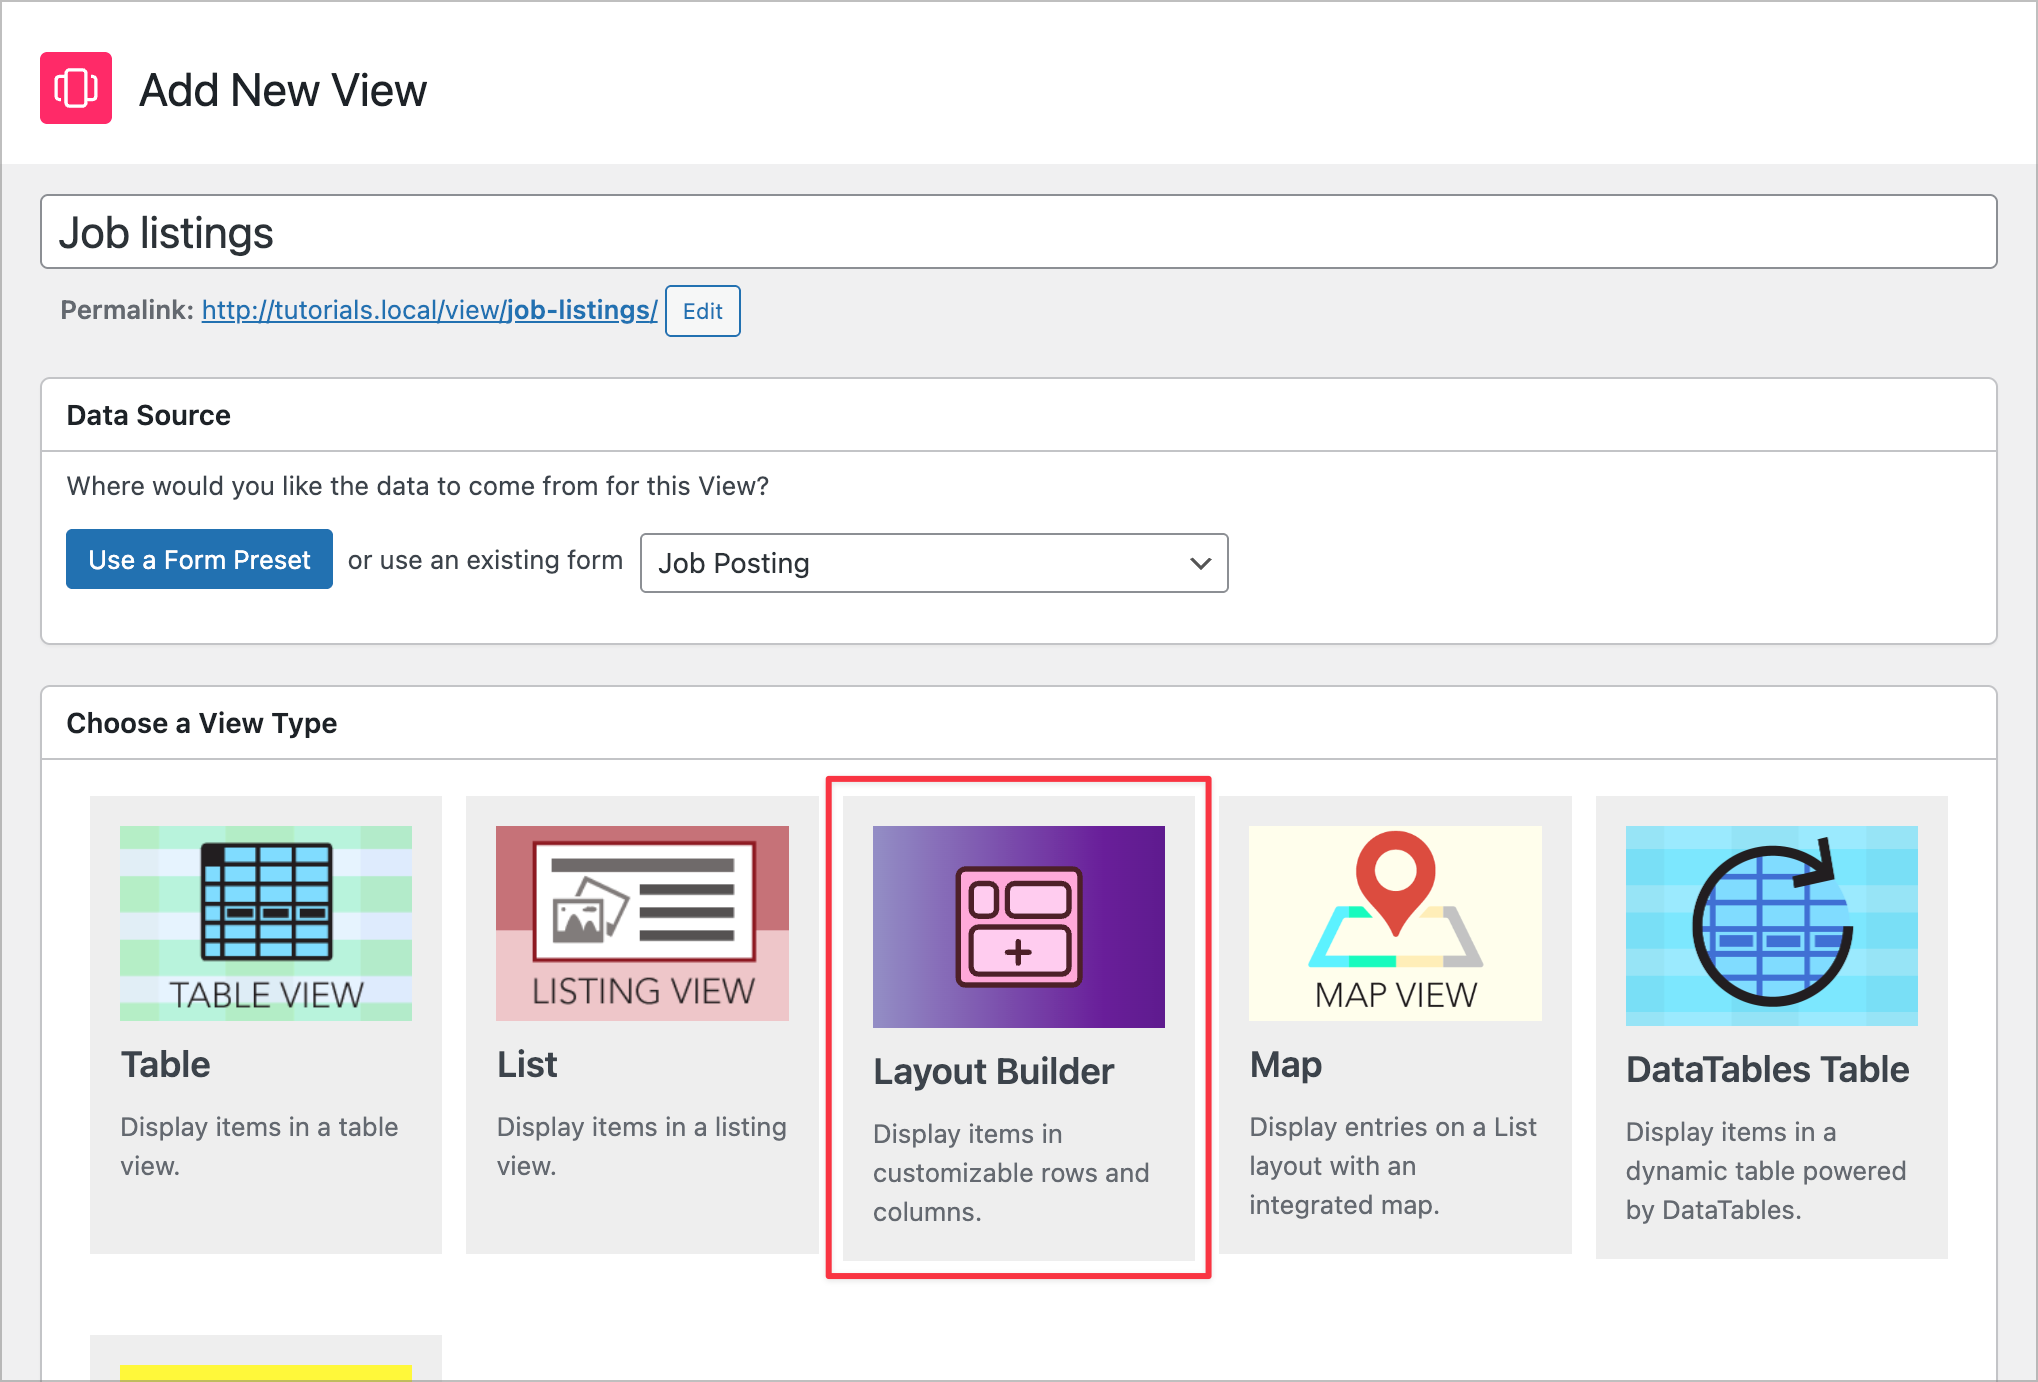
To do this, we’ll hover over GravityKit and click New View. After giving our View a name, we’ll connect it to our Job Posting form and select Layout Builder as our View Type.
Now we can start building our dynamic job listing interface using the GravityView visual builder.
Add a search bar
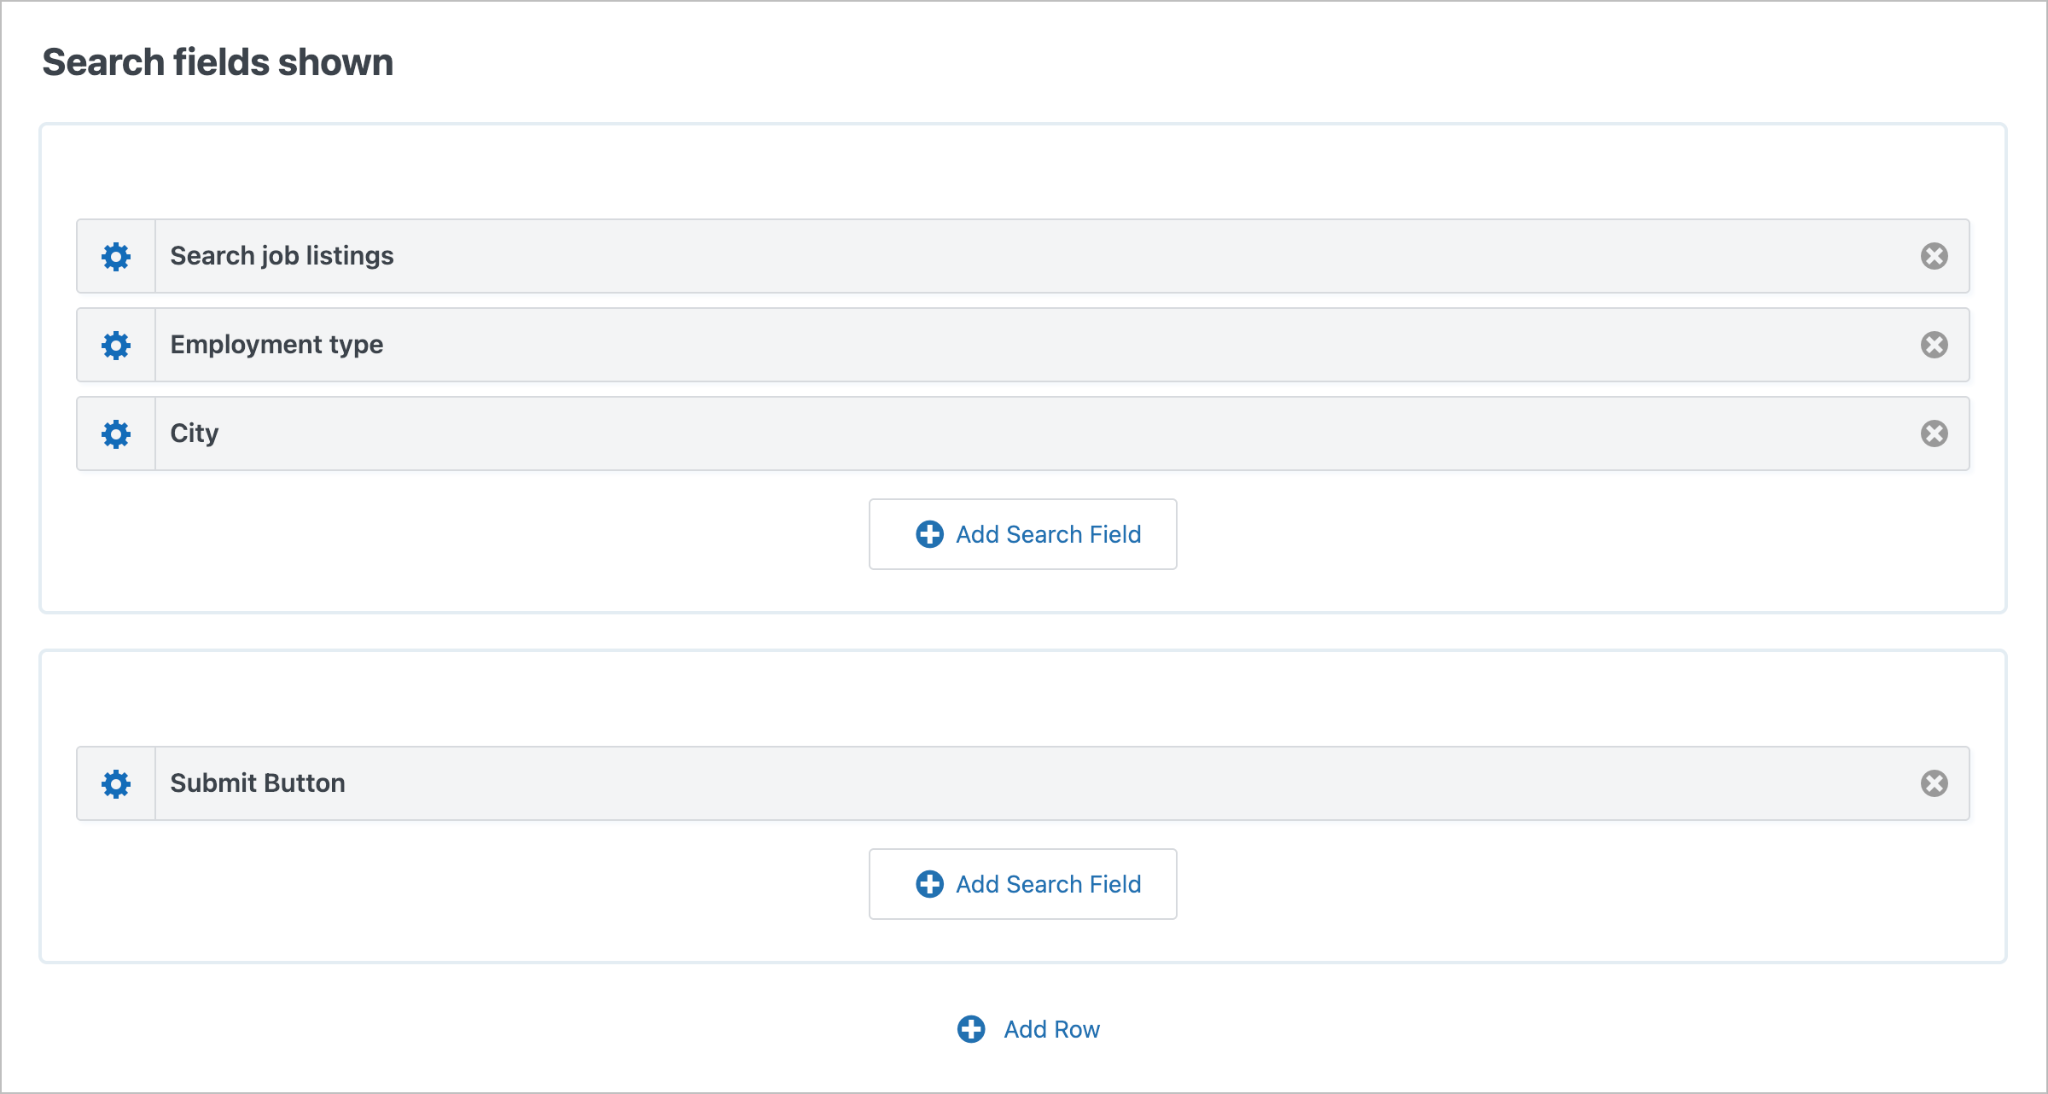
We’ll start by adding a Search Bar widget to the Top Widgets area. This will allow site visitors to filter job listings based on specific field values.

To configure the search bar, we’ll click on the gear icon to open the search settings. Next, we’ll click Add Search Field to add additional search input fields, such as Employment type and City (for Address fields, you can target specific subfields like City or State).
Add fields to the Multiple Entries Layout
Next, we’ll scroll down to the Entries Fields section of the View and add the fields we want to display. For the job listing design, we’re looking to create something minimalist, modern, and easy to scan:

To achieve this look, we’ll need to create the structure in the View editor first. We’ll then add a small amount of optional CSS (provided below) to polish the design. This styling isn’t required for functionality, but it helps match the clean, modern look used in this tutorial.
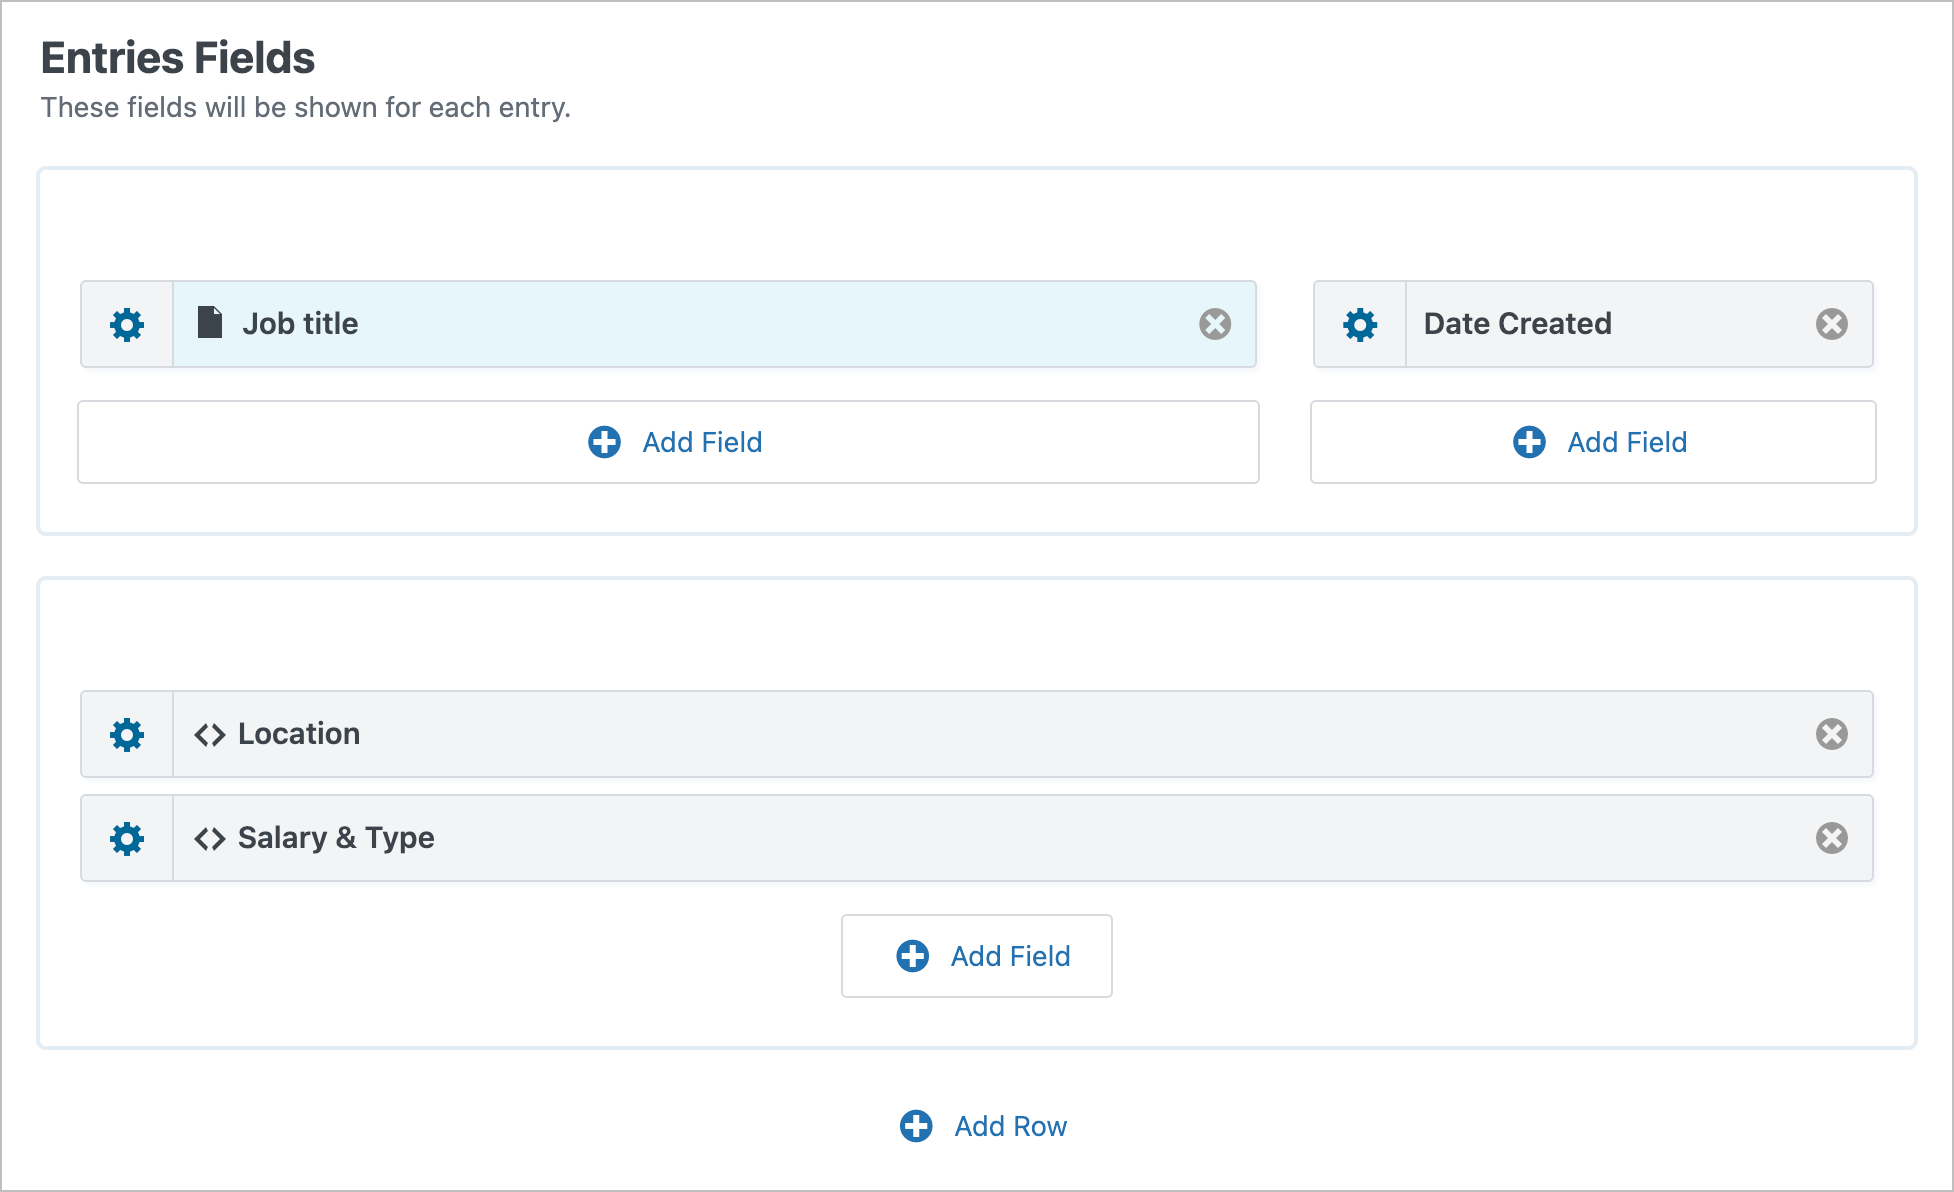
As you can see, the layout consists of two rows. The top row has two columns (two thirds/one third). Here, we’ve added the Job title and Date Created fields. If you want the job title to link through to the Single Entry layout (more about this below), open the field settings and check the box labeled “Link to single entry”.
The bottom row has a single column. Here, we’ve added two Custom Content fields—these let us combine merge tags with custom HTML for more control over layout.
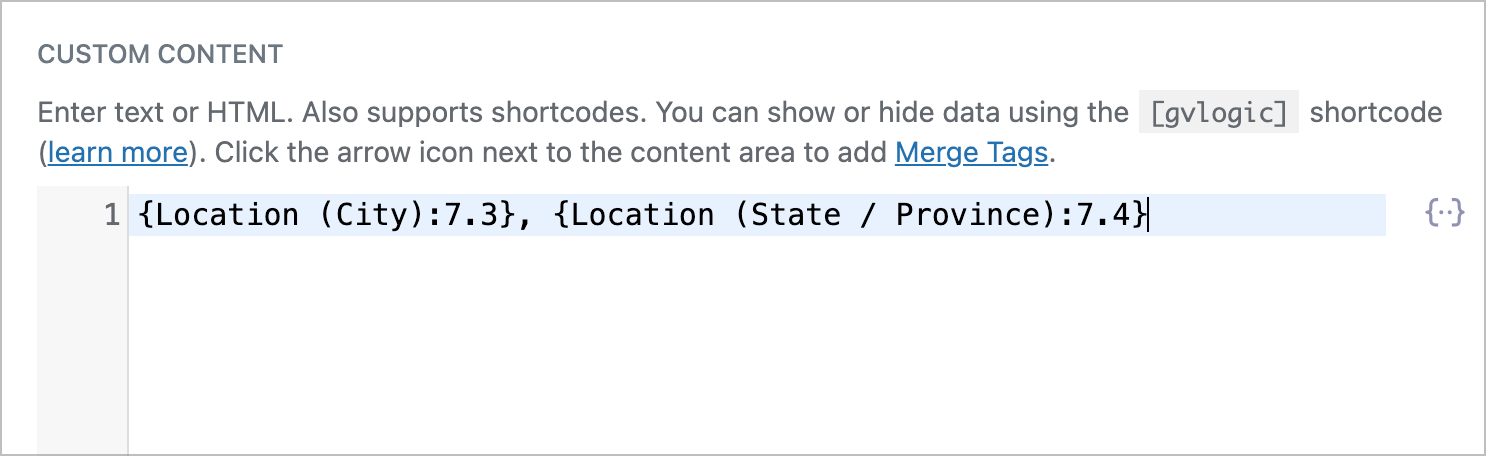
Inside the first Custom Content field, we’ve added the City and State subfields.
Inside the second Custom Content field, we’ve added some simple HTML together with the Salary and Employment type fields.
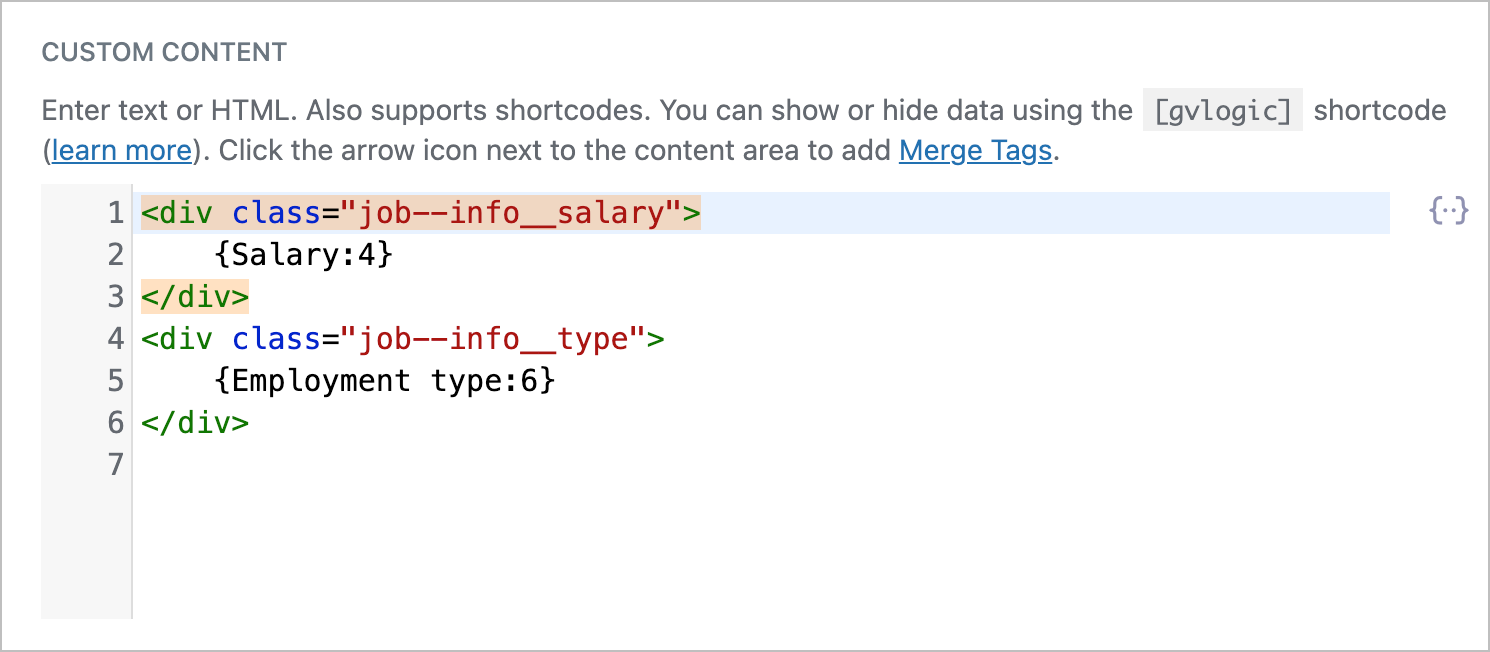
<div class="job--info__salary">
    {Salary:4}
</div>
<div class="job--info__type">
    {Employment type:6}
</div>
If you’d like your careers page to match the exact look and feel shown here, you can copy and paste this CSS code into the Custom Code box in the View settings
Configure the Single Entry Layout
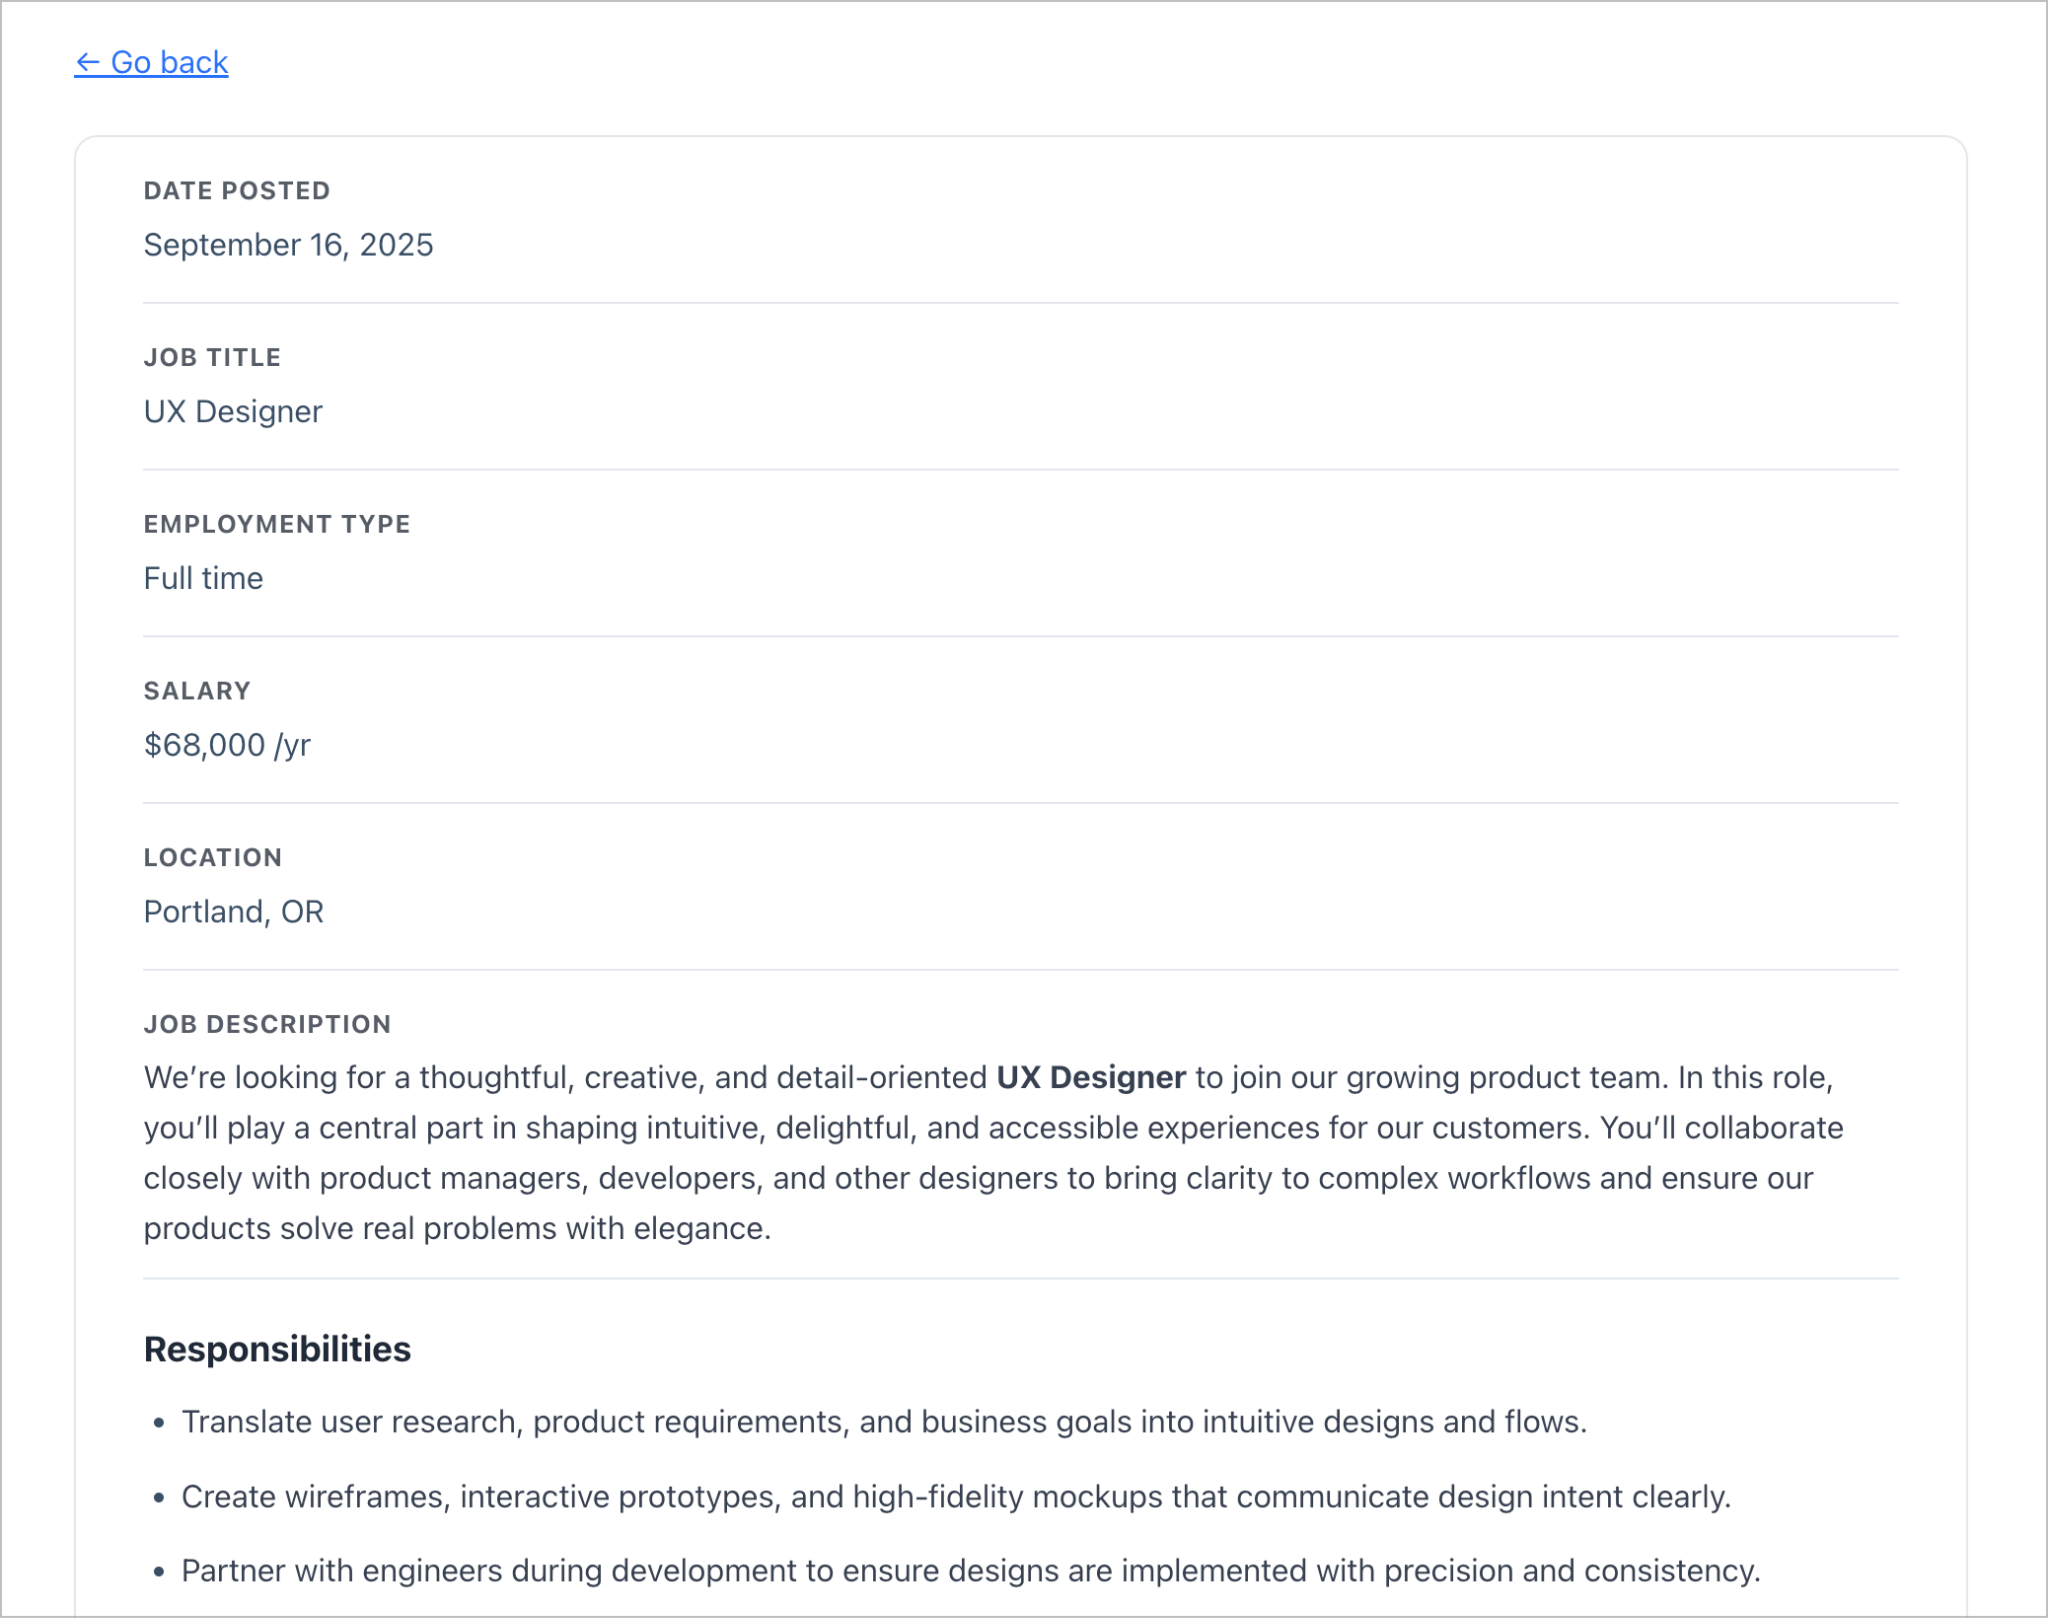
The Single Entry Layout is the page visitors see when they click a job title. Here, we’re going to add all relevant fields, including the full job description.
We’re also going to embed our job application form here. To do this, add a Gravity Forms field.

After adding the field, we’ll open the field settings and select our Job application form from the dropdown field.
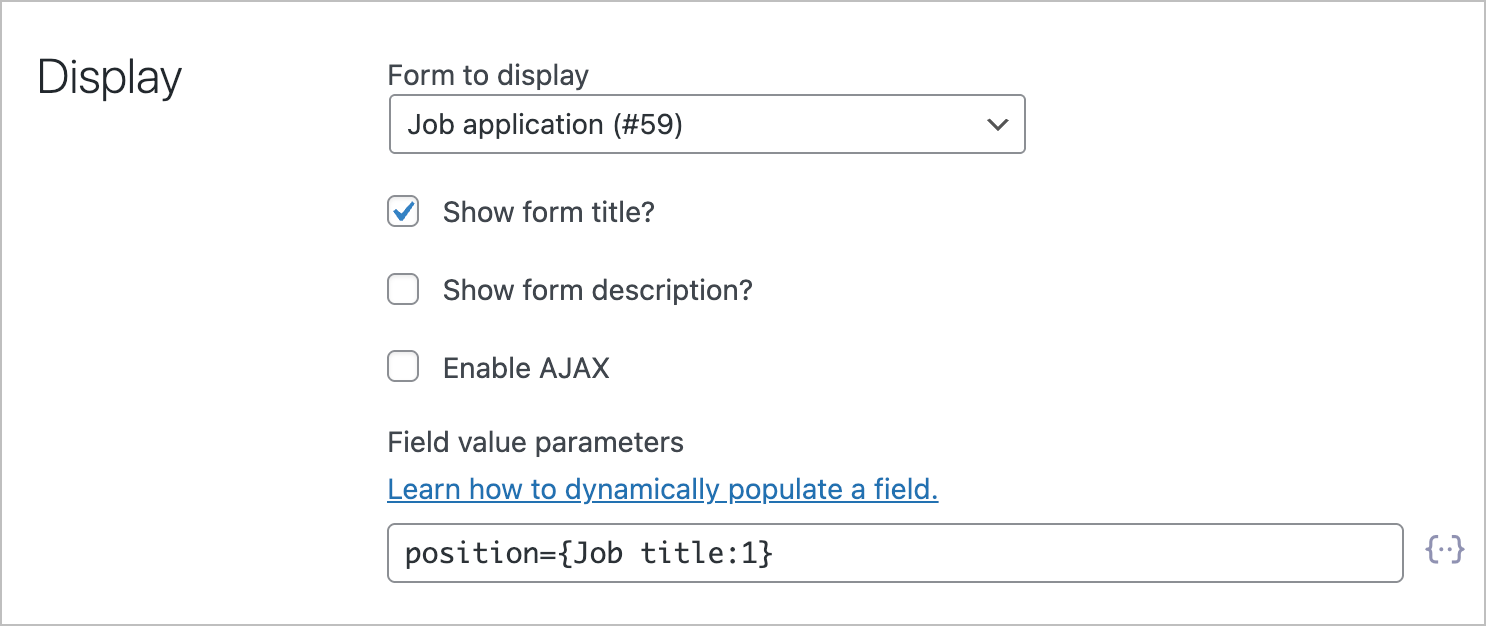
Remember the administrative Position field we added to our form earlier? We can dynamically populate this field with the name of the current job position by referencing the parameter name (use the same parameter name you defined earlier) and setting it equal to the job title merge tag.
This ensures that the name of the job listing gets passed along with the user’s application so HR knows which applications are for which jobs.
Pro Tip
Dynamic field population is one of the most powerful features in Gravity Forms. You can learn more about it by reading this guide.
Marking job listings as “Featured”
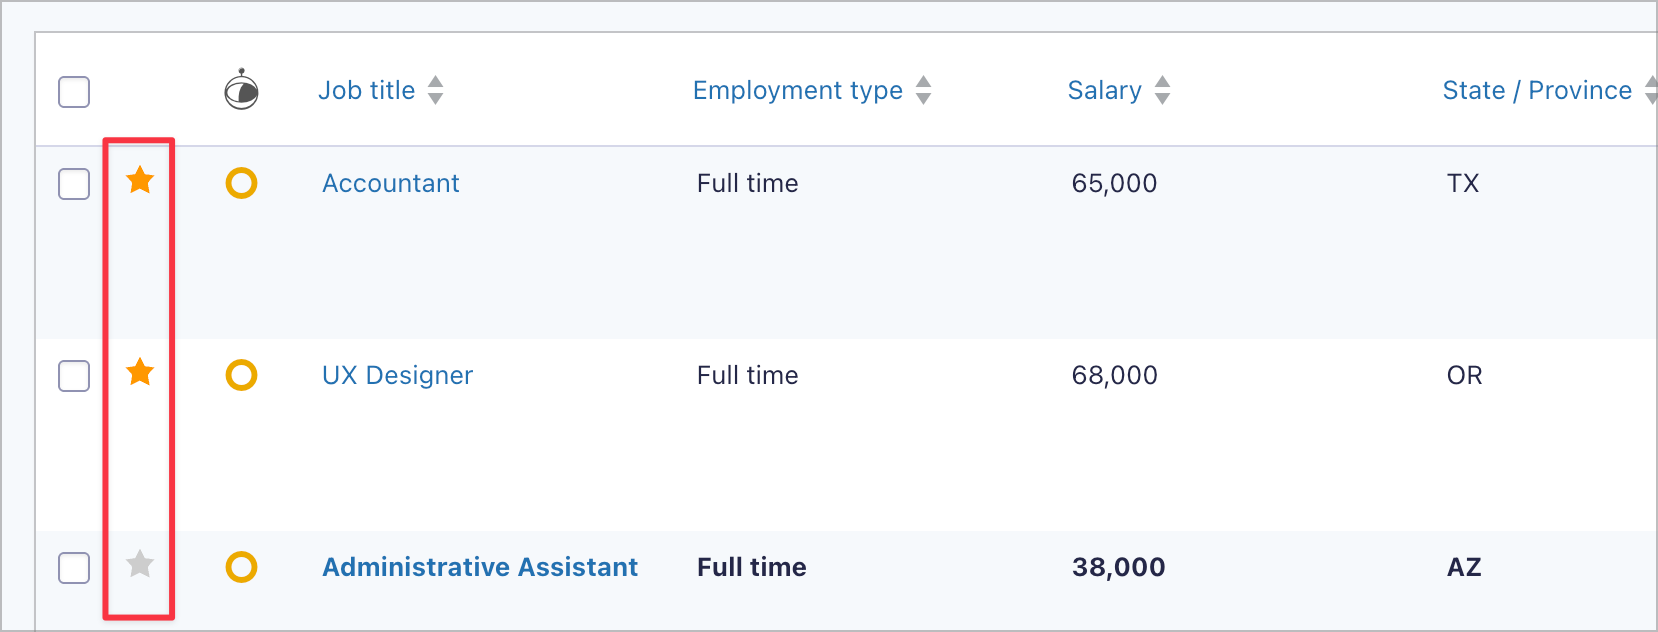
Using the GravityView – Featured Entries Extension, we can mark certain job listings as “Featured” by starring them in the Gravity Forms Entries page. This will highlight them and move them to the top of the job board.
After constructing our job listings View, we can embed it on a page using a block or shortcode. This will become our Careers page where site visitors can browse and apply for open positions. Any new job submitted through the Job Posting form will automatically show up here.
Here’s what our View looks like on the front end:

Clicking on a specific job title takes the visitor to the Single Entry page where they can view the full job description.

Further down the page is an application form where the user can apply for the job directly.
Step 4: Create a View to manage applications
Now that we have a way to submit new jobs and showcase them on the front end, we can turn our attention to building an application management system for hiring managers to review applications and update their status.
For this, we’ll create another View, connect it to our Job Application form and choose DataTables Table as the View Type.

Once we’re inside the View editor, we’ll start by adding a Search Bar to the Top Widgets area. This will allow hiring managers to filter applications by various criteria.
Next, we’ll add various fields to the Entries Fields section. All fields added here will be columns in our table.
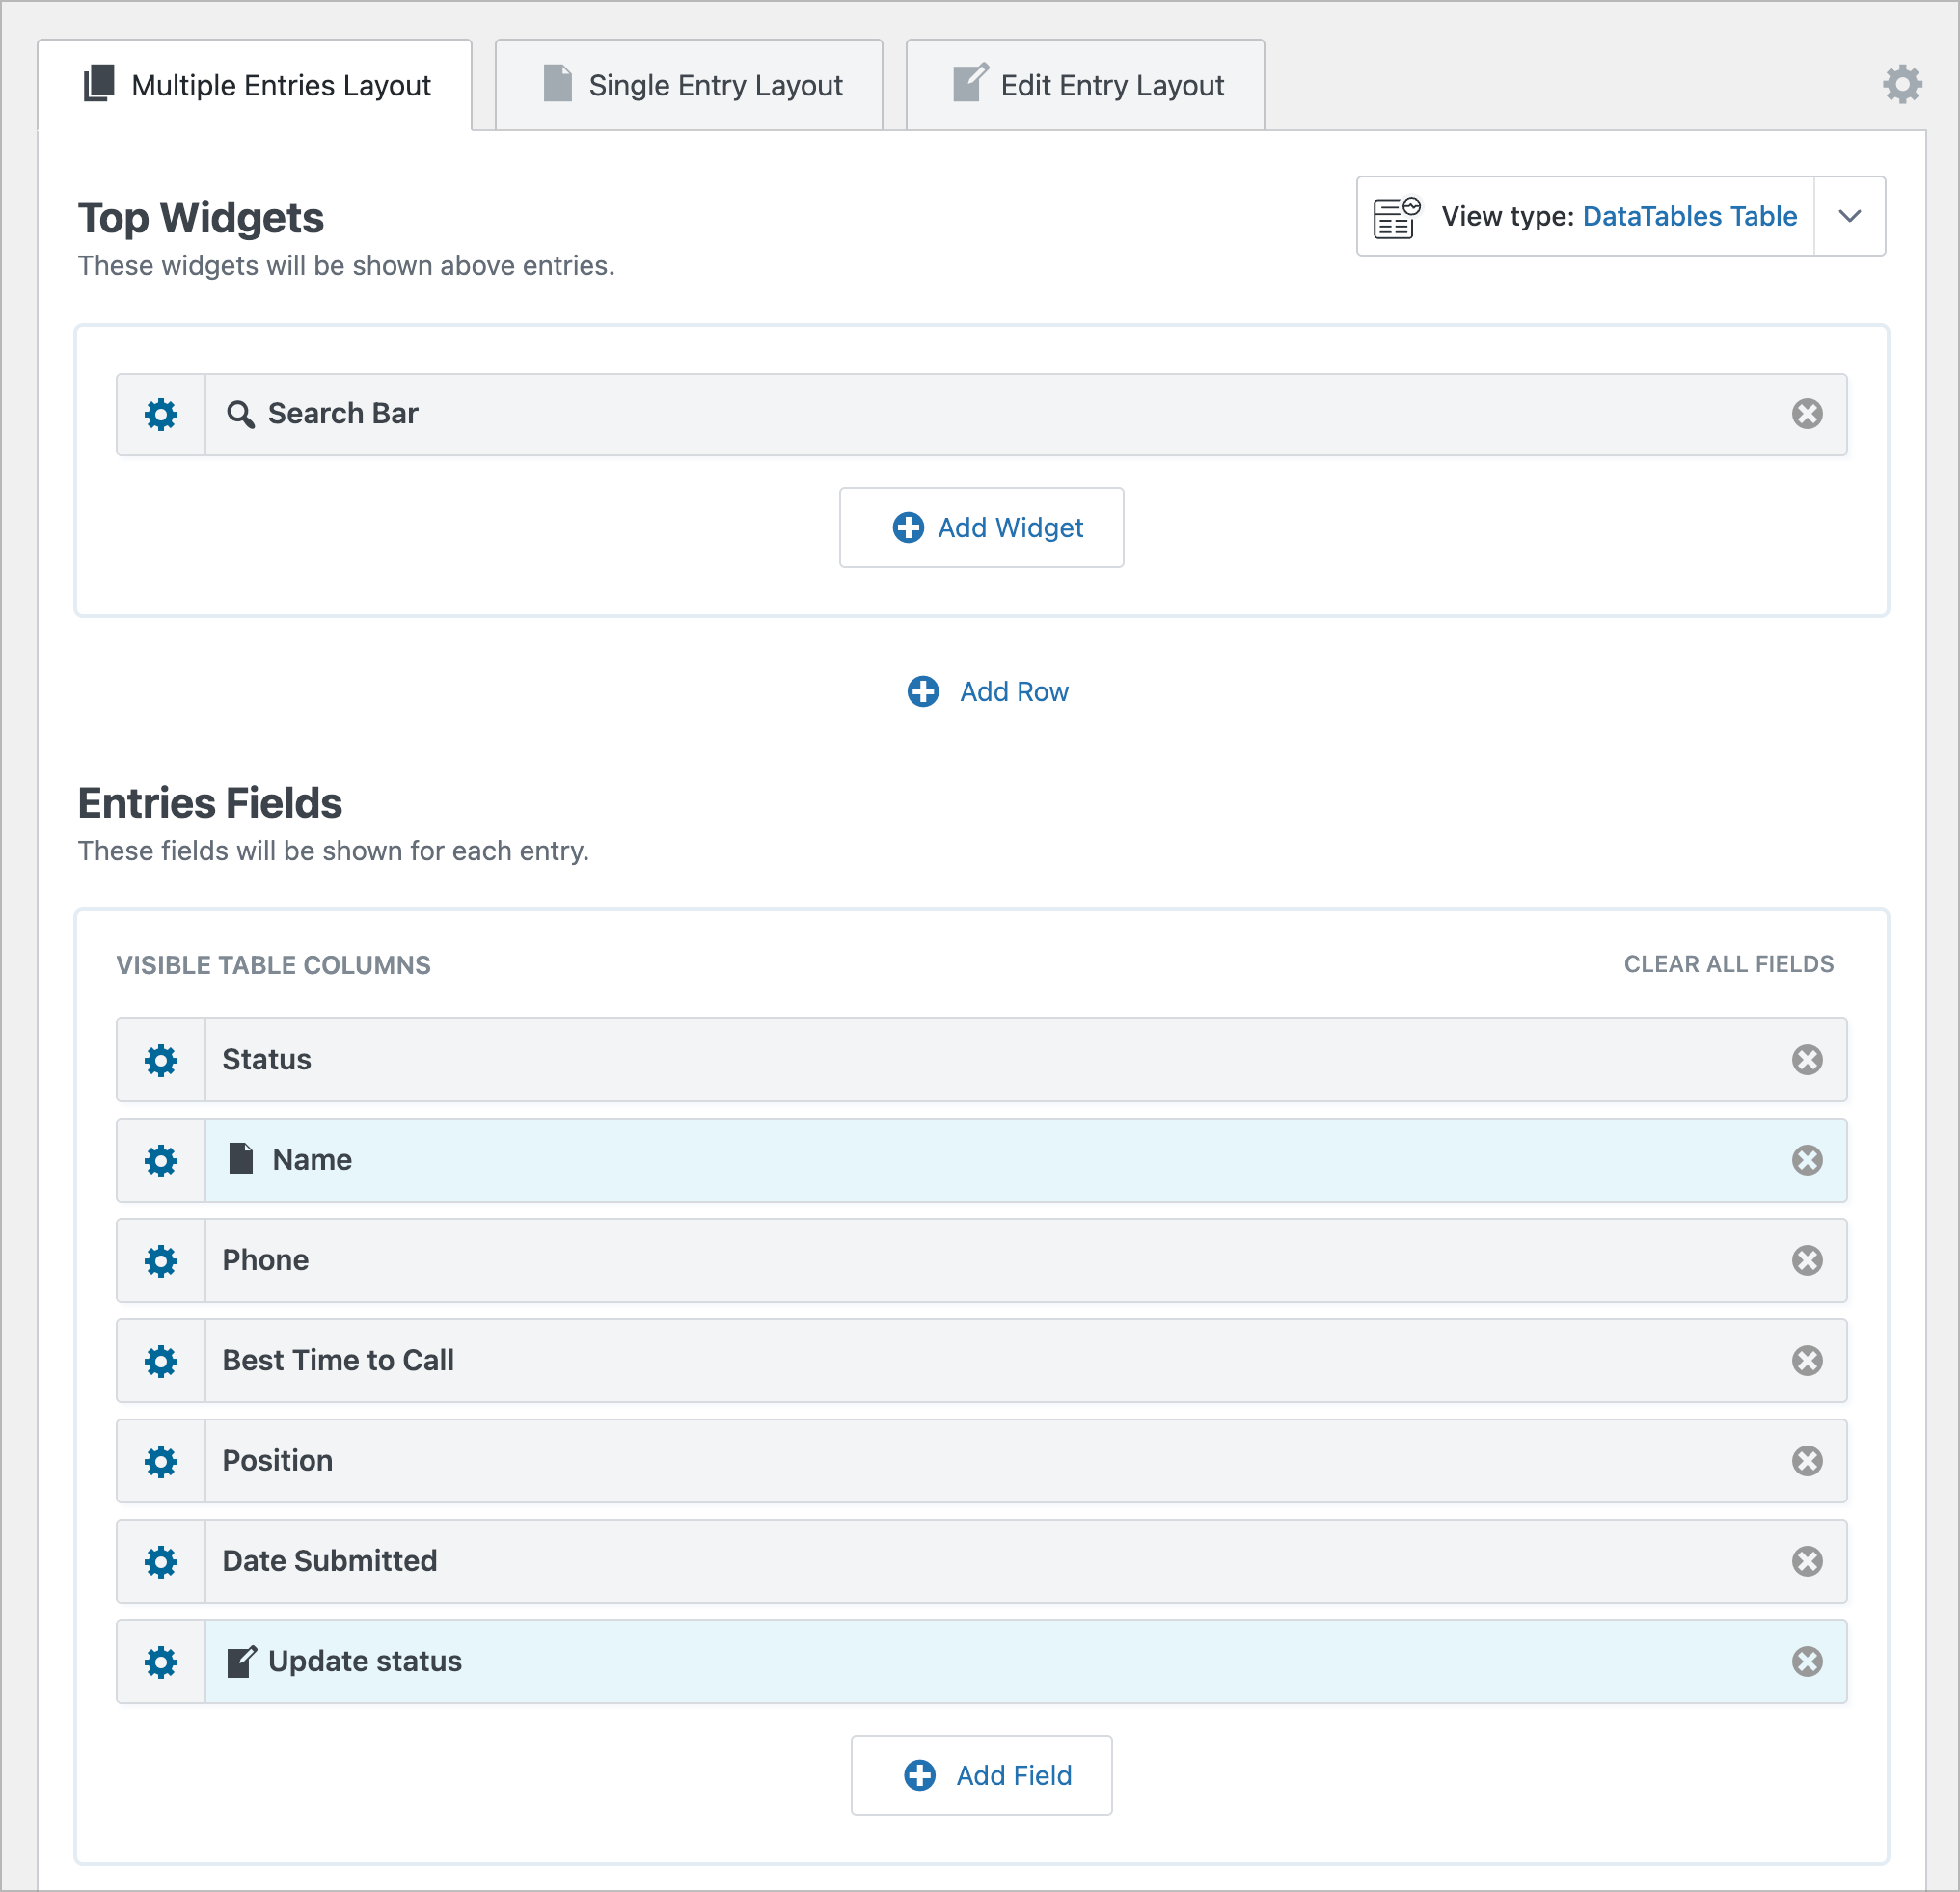
Next, we’ll make the Name field a link to the Single Entry Layout. Then, we’ll click the Single Entry Layout tab and add the remaining fields there.
Finally, we’ll make applications editable from the front end.
Making applications editable
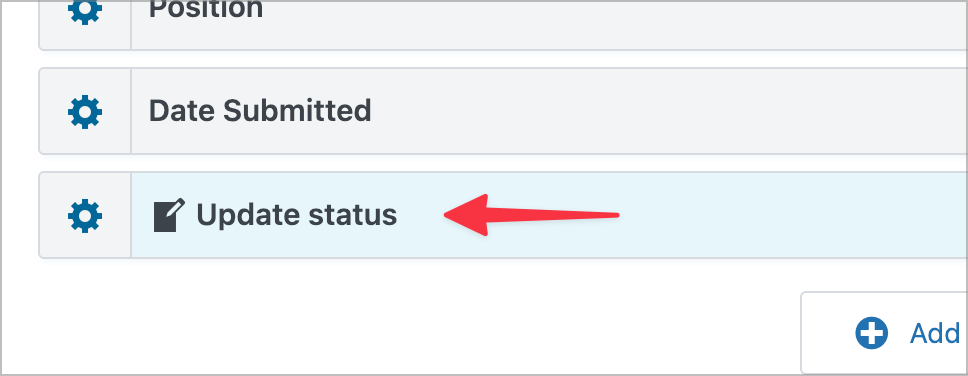
To give admins and hiring managers the ability to update an application’s status, we’ll start by adding a Link to Edit Entry field to our View (renamed to “Update status”).
Next, we’ll click on the Edit Entry Layout tab and add the Application status field here to make it editable from the front end.

Now let’s take a look at our application management View on the front end! The main dashboard page has a search bar with a table below showing all the applications that have been received for various positions.
Pro Tip
To group entries in a table by a common field value, enable the RowGroup option in the DataTables settings.
Clicking on the name of an applicant opens the Single Entry page which shows the full application, including a link to download the applicant’s resume.
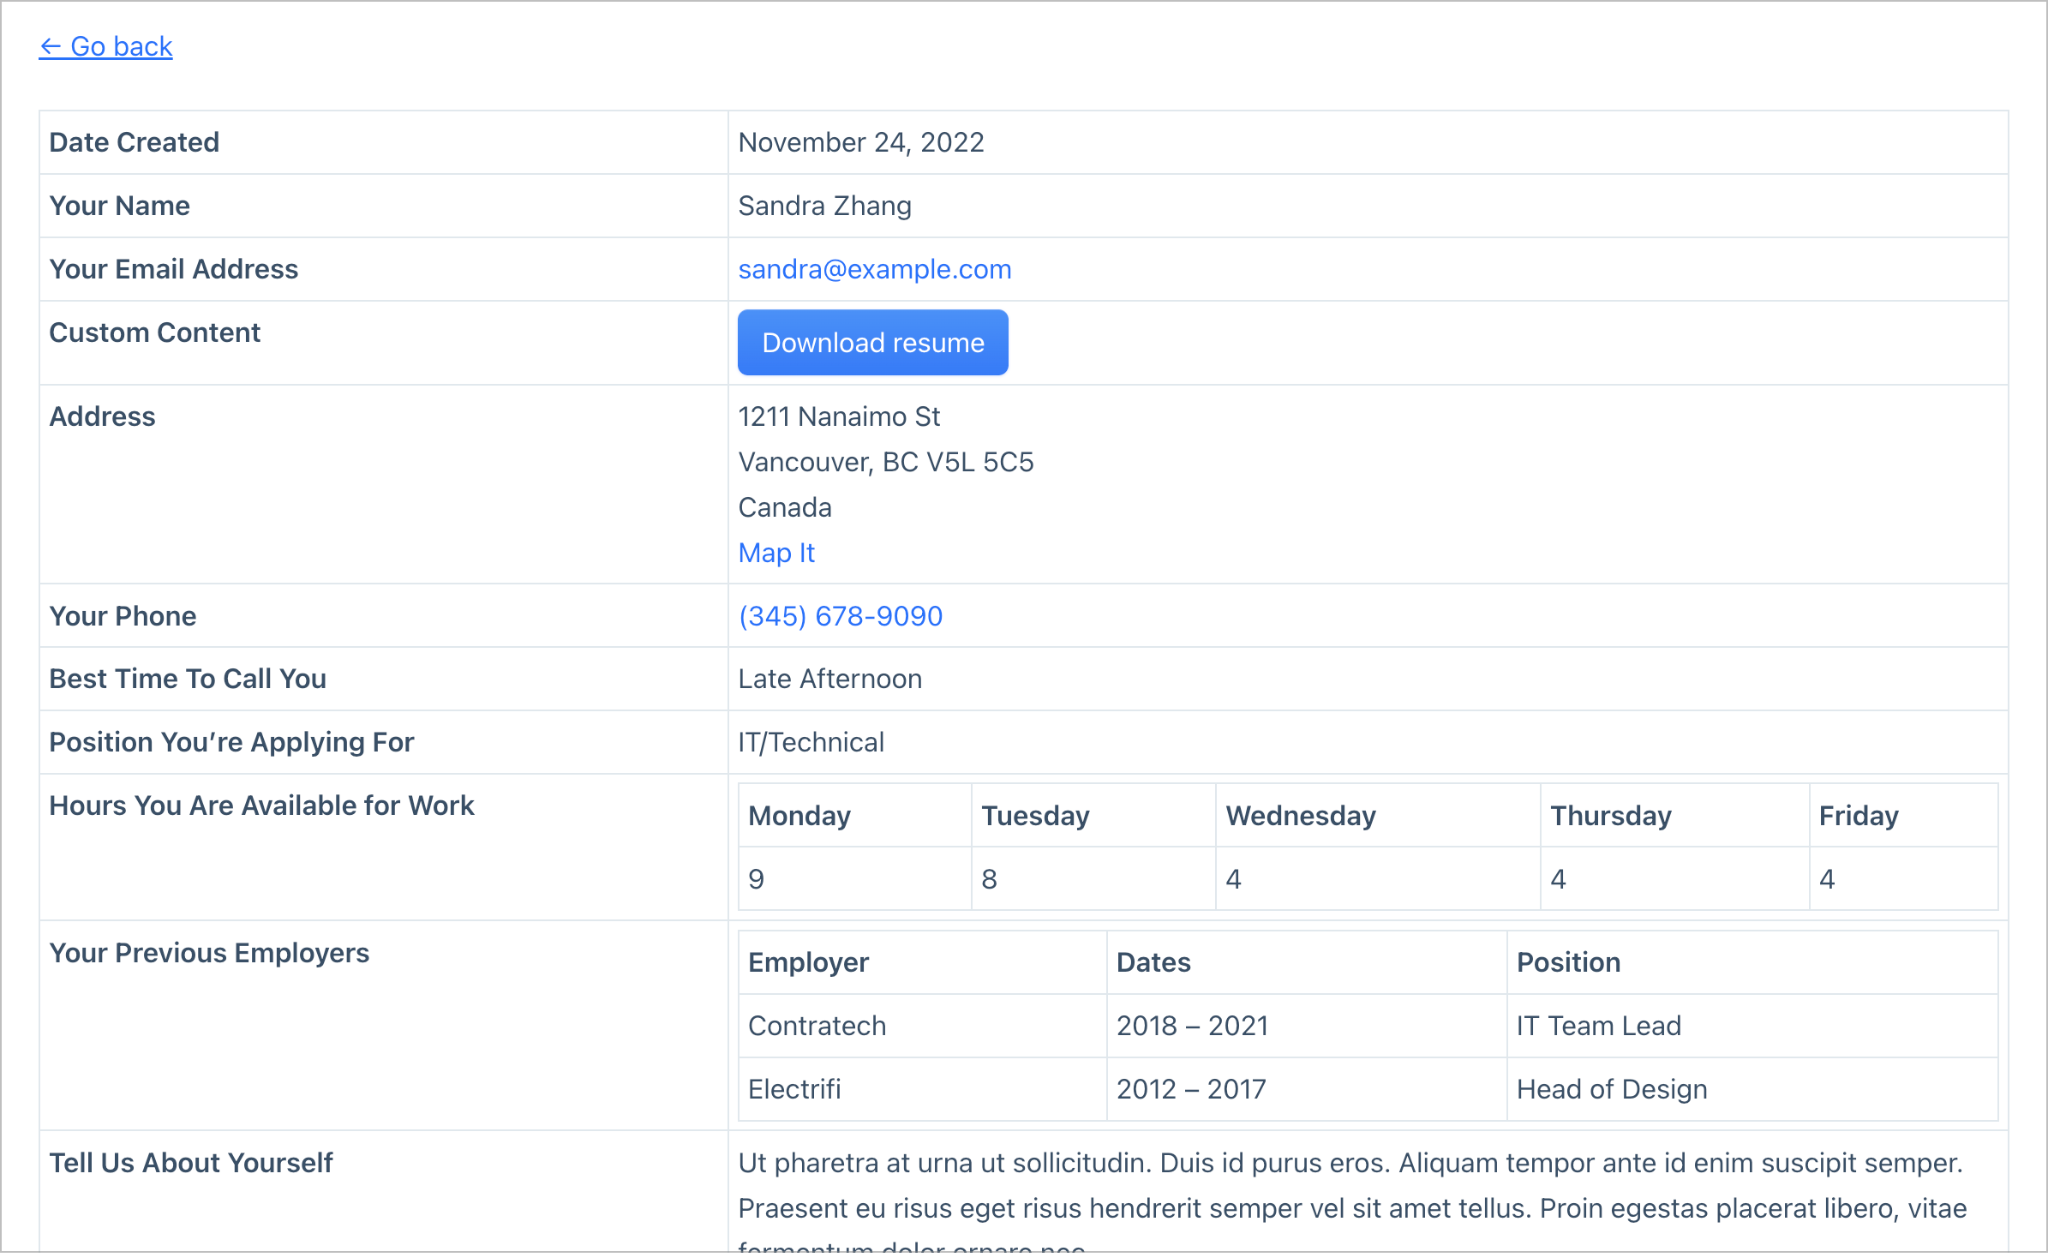
Clicking the “Update” link opens the Edit Entry page where the admin or hiring manager can change the application’s status—directly from the front end.

Step 5: Configure email notifications
Gravity Forms supports a robust notification system, enabling you to set up automatic email notifications that send when certain events occur (such as submitting a form entry).
To keep everyone informed, we can set up notifications that are sent to hiring managers and applicants at key points in the application process.
- New job is posted: Users who are subscribed receive an automatic notification to let them know a new job has been posted.
- Application submitted: Hiring managers receive a notification to let them know a new application has been submitted for an open position.
- Application status updated: Applicants receive a notification when their application status changes.
To create a new notification in Gravity Forms, simply go to the form settings and click Notifications. Notification messages support dynamic content via merge tags. This lets you personalize emails with job titles, applicant names, and status updates

That’s it! Once your core system is in place, you have the option to extend it further with additional GravityKit add-ons.
Bonus: Optional enhancements
GravityKit plugins are designed to work seamlessly together, giving you an integrated toolkit you can use to design and extend interfaces and web applications. Here are some examples:
- GravityCharts – Add charts and visualizations (e.g., number of new applications over time).
- GravityExport – Create reports, including PDF exports of applications and job listings.
- GravityBoard – Build a Kanban view of job applications and visually move them through distinct stages.
Build your Careers page today
You now have a fully dynamic, styled, and functional Careers page with job listings, application forms, and admin views, built entirely with Gravity Forms and GravityView! This setup is scalable, secure, and easy for non-technical teams to manage as your hiring needs grow.
From here, you can extend this system further using other GravityKit tools, or adapt the forms and Views to match your own workflows and design requirements.

Helpful tips right in your inbox.
Subscribe to get the latest articles, information on releases and helpful Gravity Forms tips!
More articles

Launch Log: theme template editing in Block MCP, Shield silentCAPTCHA for Zero Spam, and GravityView fixes
Block MCP adds safe theme template editing, Gravity Forms Zero Spam gains Shield silentCAPTCHA support, and GravityView fixes lightbox and notice bugs.

GravityKit turns 12: a year in review, and 30% off Lifetime All Access
GravityKit turns 12. A look back at a year of GravityView 3.0, GravitySearch, and AI-assisted building, plus a birthday sale on the Lifetime All Access Pass.

Launch Log: Row headers for screen readers, smarter conditional logic, and multi-View fixes
GravityView 3.1 adds row headers for screen readers, plus smarter conditional logic in GravityCalendar and fixes for DataTables, Maps, and Dynamic Lookup.
