Published
•
Updated
How to create an insurance quote calculator for WordPress
Build an insurance quote calculator for WordPress using Gravity Forms. Collect pricing data, email quotes as PDFs, and manage leads without writing a single line of code.

Are you looking to build an insurance calculator for your WordPress website?
In this guide, we show you, step-by-step, how to build a simple yet effective insurance quote calculator using Gravity Forms. We also show you how to email quotes as PDFs, effectively manage your data, and more.
Using this approach, you can provide quick, accurate insurance estimates, enhancing user engagement and providing valuable insights into potential costs! Let’s get started.
Download the free insurance calculator form template now!
Import the template into Gravity Forms and customize as necessary.
Wanna try it?
Spin up a demo
See GravityMath in action on its live demo site.

What is an insurance quote calculator?
An insurance quote calculator is an online tool designed to estimate the cost of insurance policies based on user-provided data.
These calculators can cater to various types of insurance, such as auto, health, home, and life insurance, each with its own set of variables affecting the cost. Calculating insurance costs can be complex due to the number of factors that influence premiums, such as age, health history, property value, and risk assessments.

Adding a quote calculator to your insurance website not only provides a valuable resource for potential customers to obtain cost estimations, but also serves as an effective way to gather leads!
After using the calculator, users can be prompted to contact the company for more detailed information. You can also proactively reach out to prospects that enter their information.
Building a simple WordPress insurance calculator form
Let’s start by building a simple insurance quote calculator form that you can add to your WordPress website! Using Gravity Forms, we’ll create a insurance calculator for a fictional car insurance company.
This will give you an idea of how to go about building the kind of calculator you need! Simply follow this approach and tweak it depending on your needs.
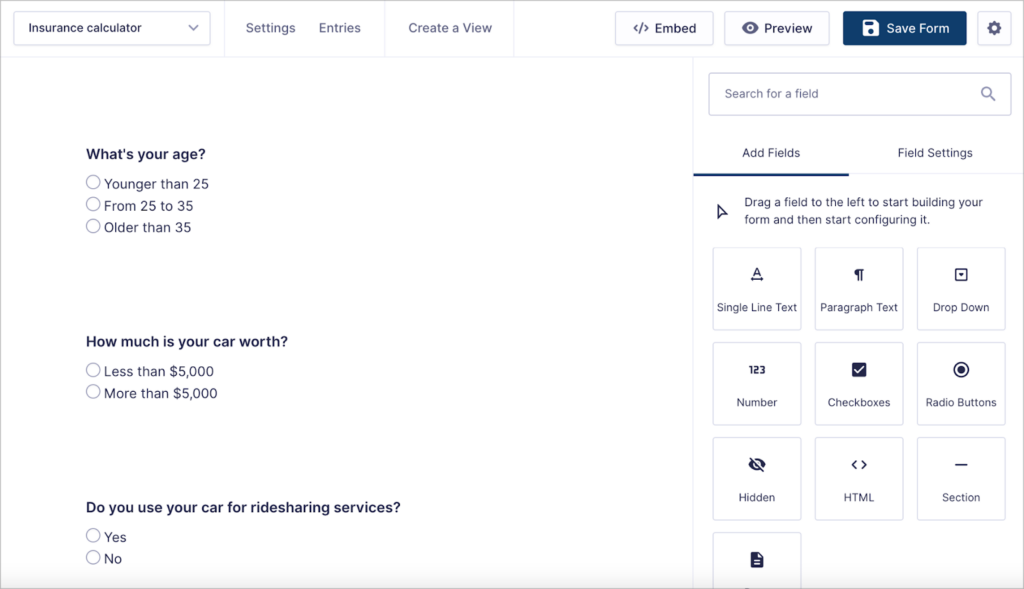
Okay, the first thing we need to do is create a new form in Gravity Forms. To do this, we’ll hover over “Forms” and click “New Form”. Let’s start with a blank form and name it “Insurance Calculator”.
Now we can start adding fields to our form using the Gravity Forms drag-and-drop builder.
Adding fields
We’ll start by adding several Radio Buttons fields to our form asking users different questions. Based on the answers to these questions, we’ll be able to calculate a personalized insurance quote for them.
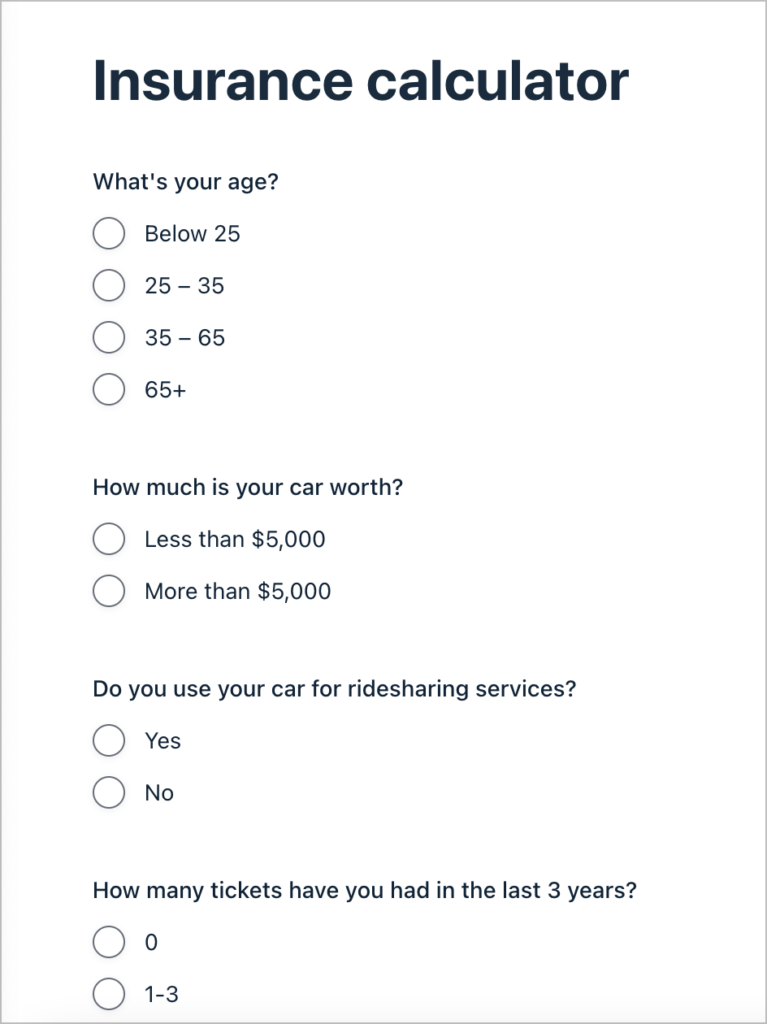
Here are the questions we’re going to ask. Each one has several possible answers.
- What’s your age?
- How much is your car worth?
- Do you use your car for ridesharing services?
- How many tickets have you had in the last 3 years?
To do this, we’ll click on a field to open the field settings and then click “Edit Choices”. Here we can add multiple possible answers to the question. For example, for the question “What’s your age?” There are 3 possible answers: Younger than 25, from 25 to 35, and older than 35.
Now we’re going to associate a numerical value to each possible answer. This will enable us to calculate a coverage rate. To do this, we’ll click “Show Values”. This enables us to associate a value with each of the answers. In this case, the value is a dollar amount that will affect the cost of insurance coverage.
As you can see, for younger drivers and drivers over the age of 65, the cost of insurance increases.
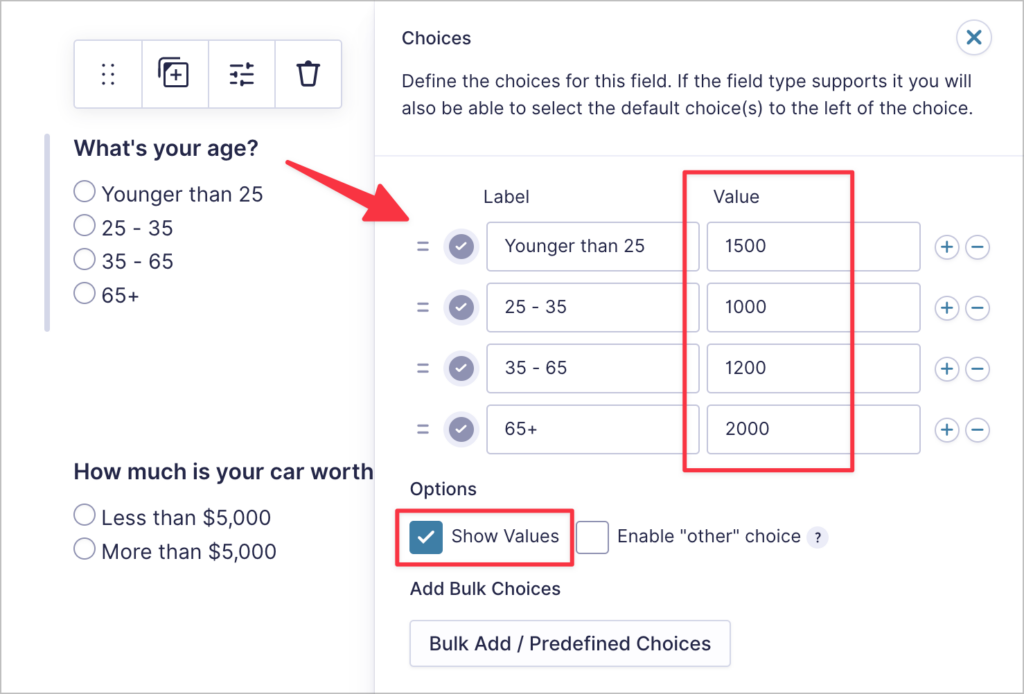
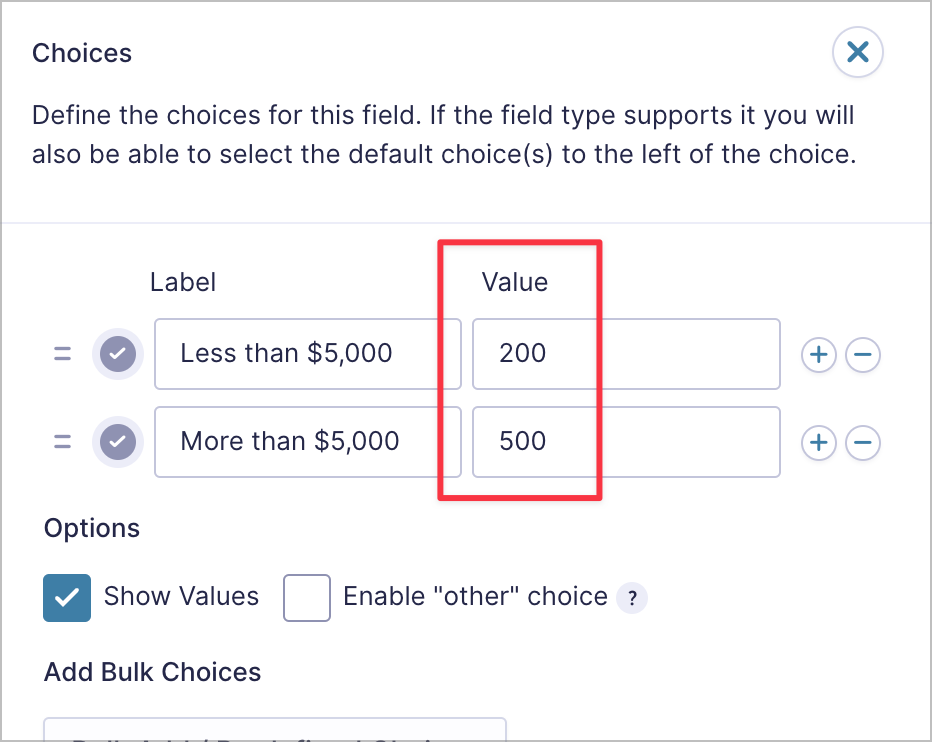
But age is not the only factor that contributes to the cost of coverage! So, let’s go ahead and repeat this process for each of our fields. Here we’ve done the same for the field asking how much the user’s car is worth.
After attaching a dollar value to each choice, the next step is to write a formula to dynamically calculate the cost of insurance.
Calculating the cost of coverage
After repeating this for all fields, we need a way to calculate the total amount. For this, we’ll use a custom Gravity Forms calculation and a hidden “Number” field to output the amount.
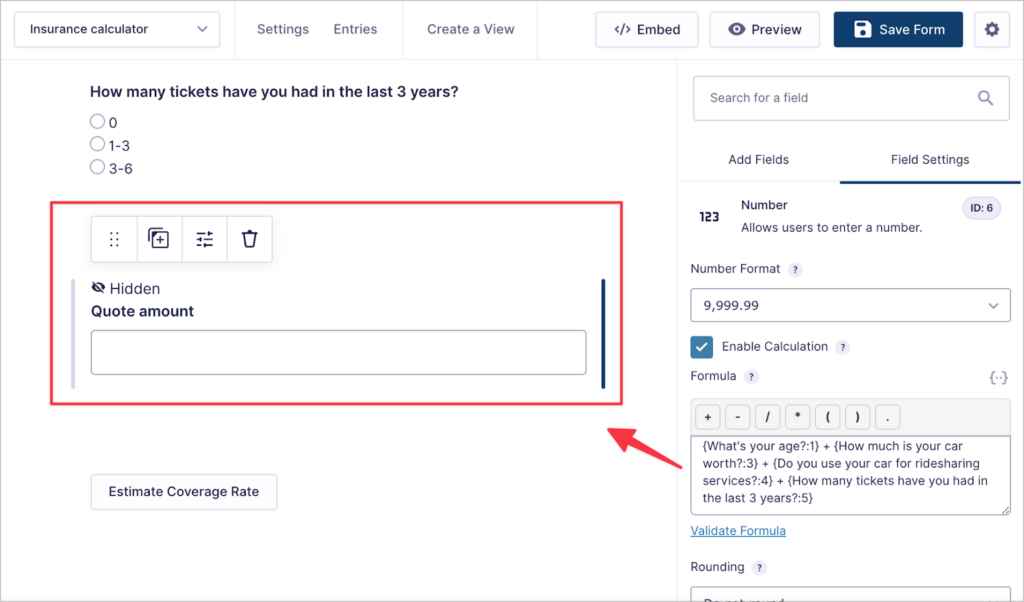
To add a Number field to our form, we’ll simply drag and drop it from the “Standard Fields” on the right. After that, we’ll open the advanced settings and set the visibility to “Hidden”.

Next, we’ll open the general settings and check the box labeled “Enable Calculation”. Now we can write a custom calculation in the box to calculate the final insurance coverage estimate!
All we need to do is add up all the values of each choice the user made. To do this, we can use field merge tags. Here’s what our final calculation looks like:
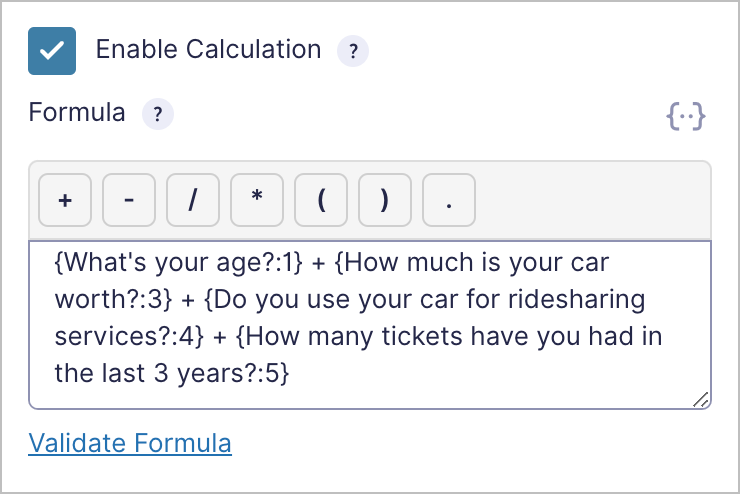
Pro tipBefore saving your form, click “Validate Formula” to ensure that your formula is written correctly.
That’s it! Now that our form is complete, we can save it and preview it to ensure it’s working as expected.
Previewing the form
Gravity Forms allows us to preview forms before embedding them on a page or post. We can preview our form by clicking the “Preview” button at the top right of the form editor.
Take a look at the “Quote amount” field in the example below and see how it changes depending on which answers the user selects to the various questions.
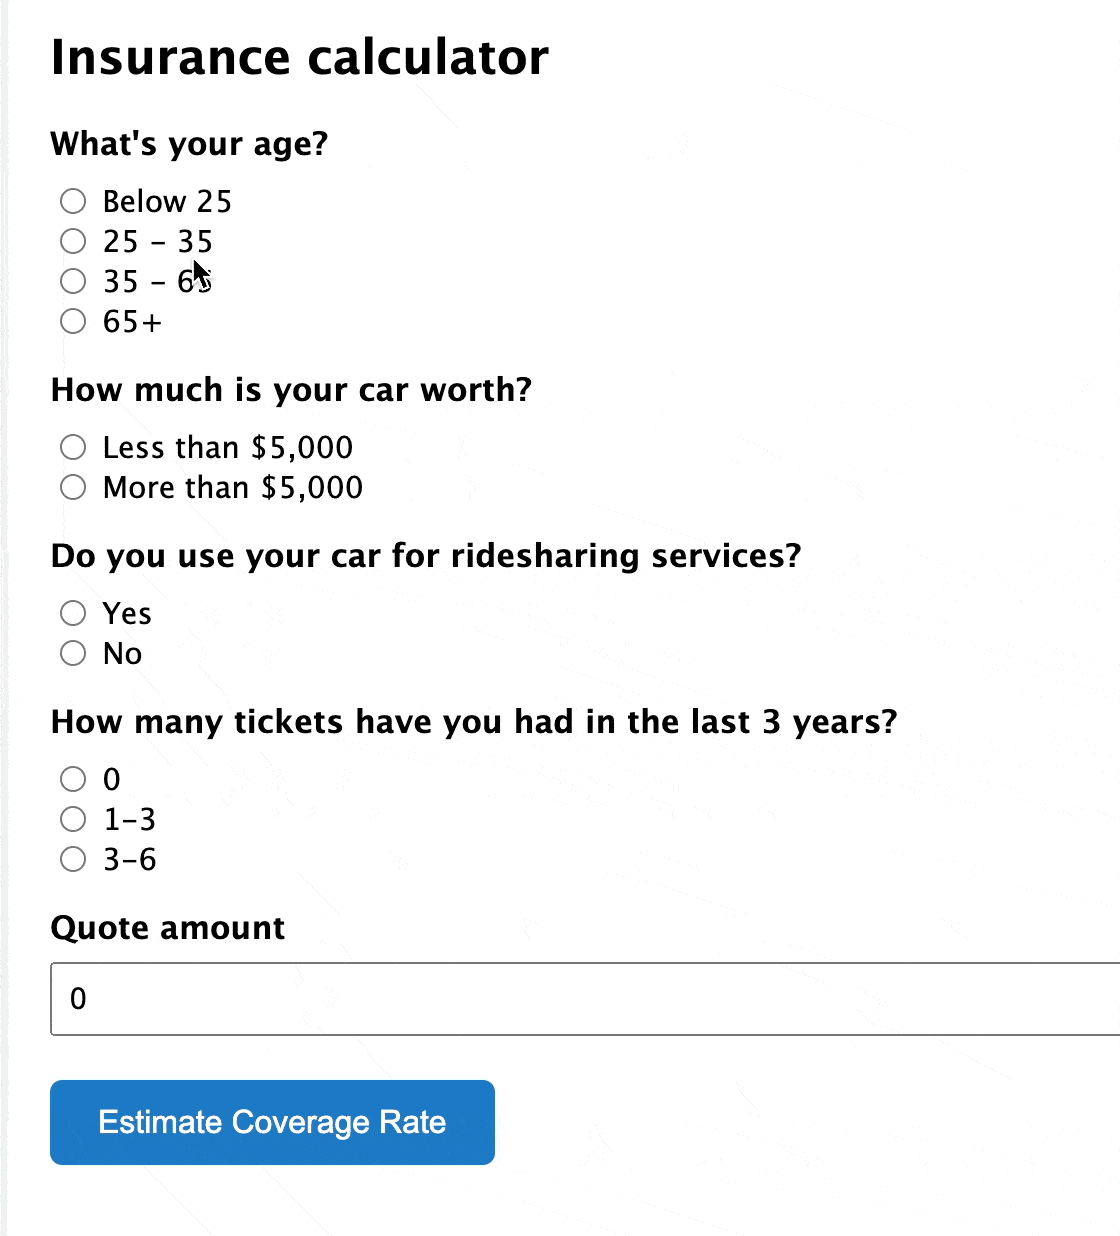
Awesome! Everything is set up and our form is calculating the coverage amount automatically. However, we don’t want the user to see the amount until after they have submitted the form.
To ensure the user only gets their quote after submitting the form, we’re going to create a custom confirmation that includes the final estimated quote.
Adding a custom confirmation
A confirmation is a message that the user sees after submitting a form. With Gravity Forms, we can create custom confirmation messages containing data from the user’s submission!
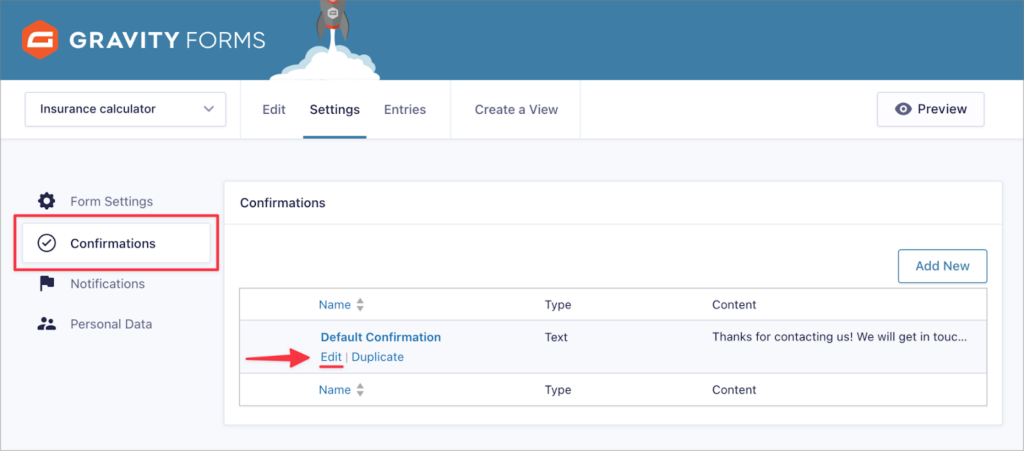
To create a new confirmation, we’ll hover over “Settings” and click “Confirmations”.
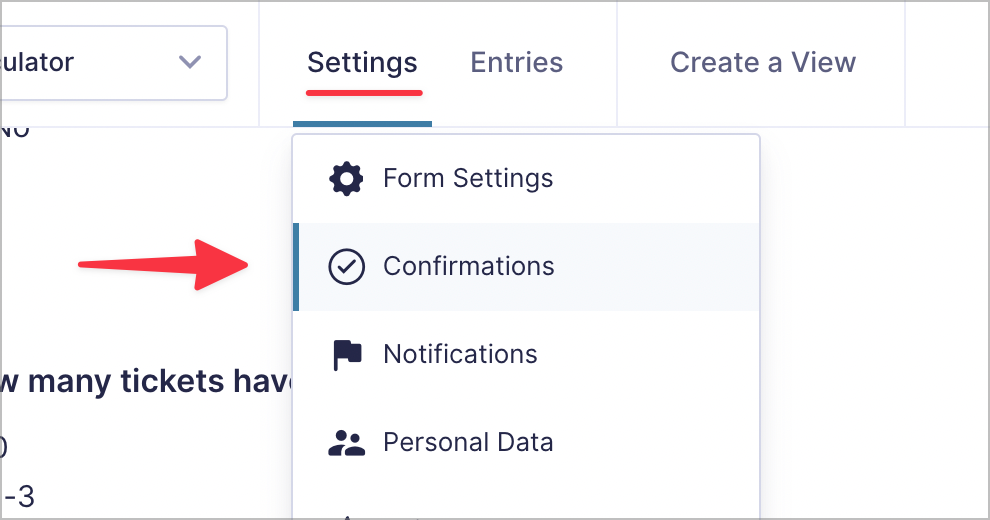
Gravity Forms automatically adds a default confirmation message for new forms. We can edit it by hovering over it and clicking the “Edit” link.
Now we can edit the confirmation message and include the estimated quote amount using a Gravity Forms merge tag.
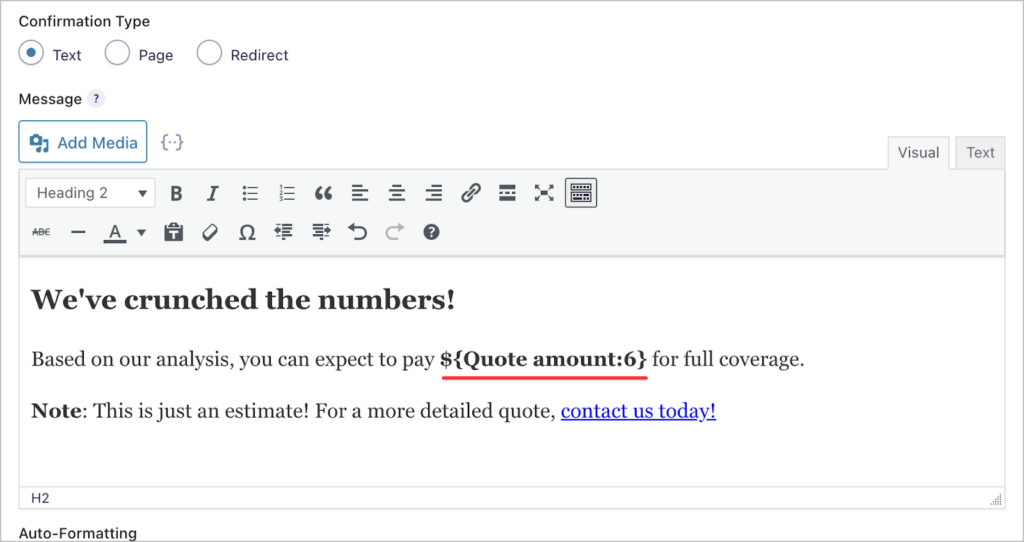
Here’s what the confirmation message looks like on the front end:

That’s it! We successfully created an insurance quote calculator for a car insurance website that estimates total cost of coverage. Using the same principles, you can adapt this example to fit your unique use-case.
Taking things further
While our simple insurance calculator may work well for certain use-cases, you may want to take things further with lead generation, or more sophisticated quote templates. All of this is possible using GravityKit!
Emailing quotes as PDF attachments
If you want your quote calculator to have a more professional feel, why not send your estimated quotes as PDF email attachments?
You can do this using the powerful GravityExport add-on for Gravity Forms. GravityExport enables you to create custom reports, send data to remote storage and much more!
Here how we could set up an email to send to new prospects with their quote attached as a PDF document.
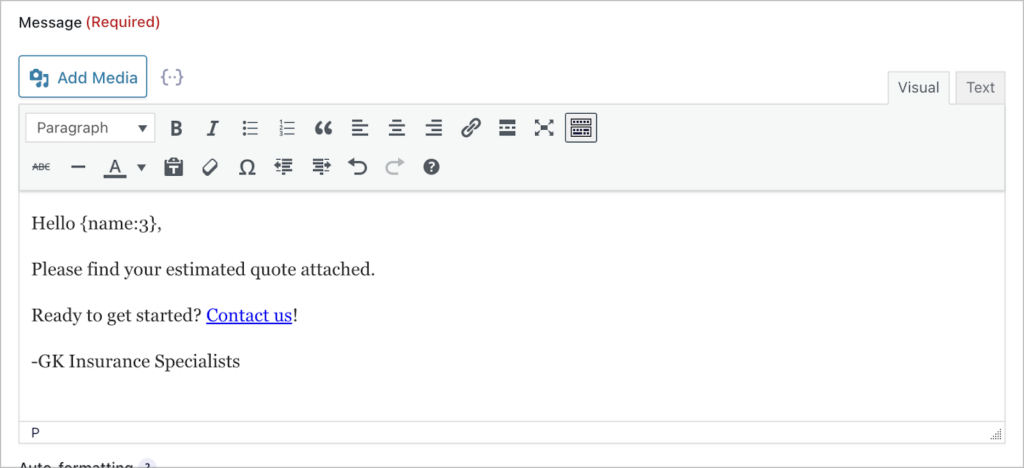
First, we need to create a new Gravity Forms Notification. We can do that by going to the form settings and clicking on the “Notification” tab. Here we can add a new notification email.
First, we’ll add the prospect’s email address as the “Sent-To” address. Next, we’ll customize the email message.
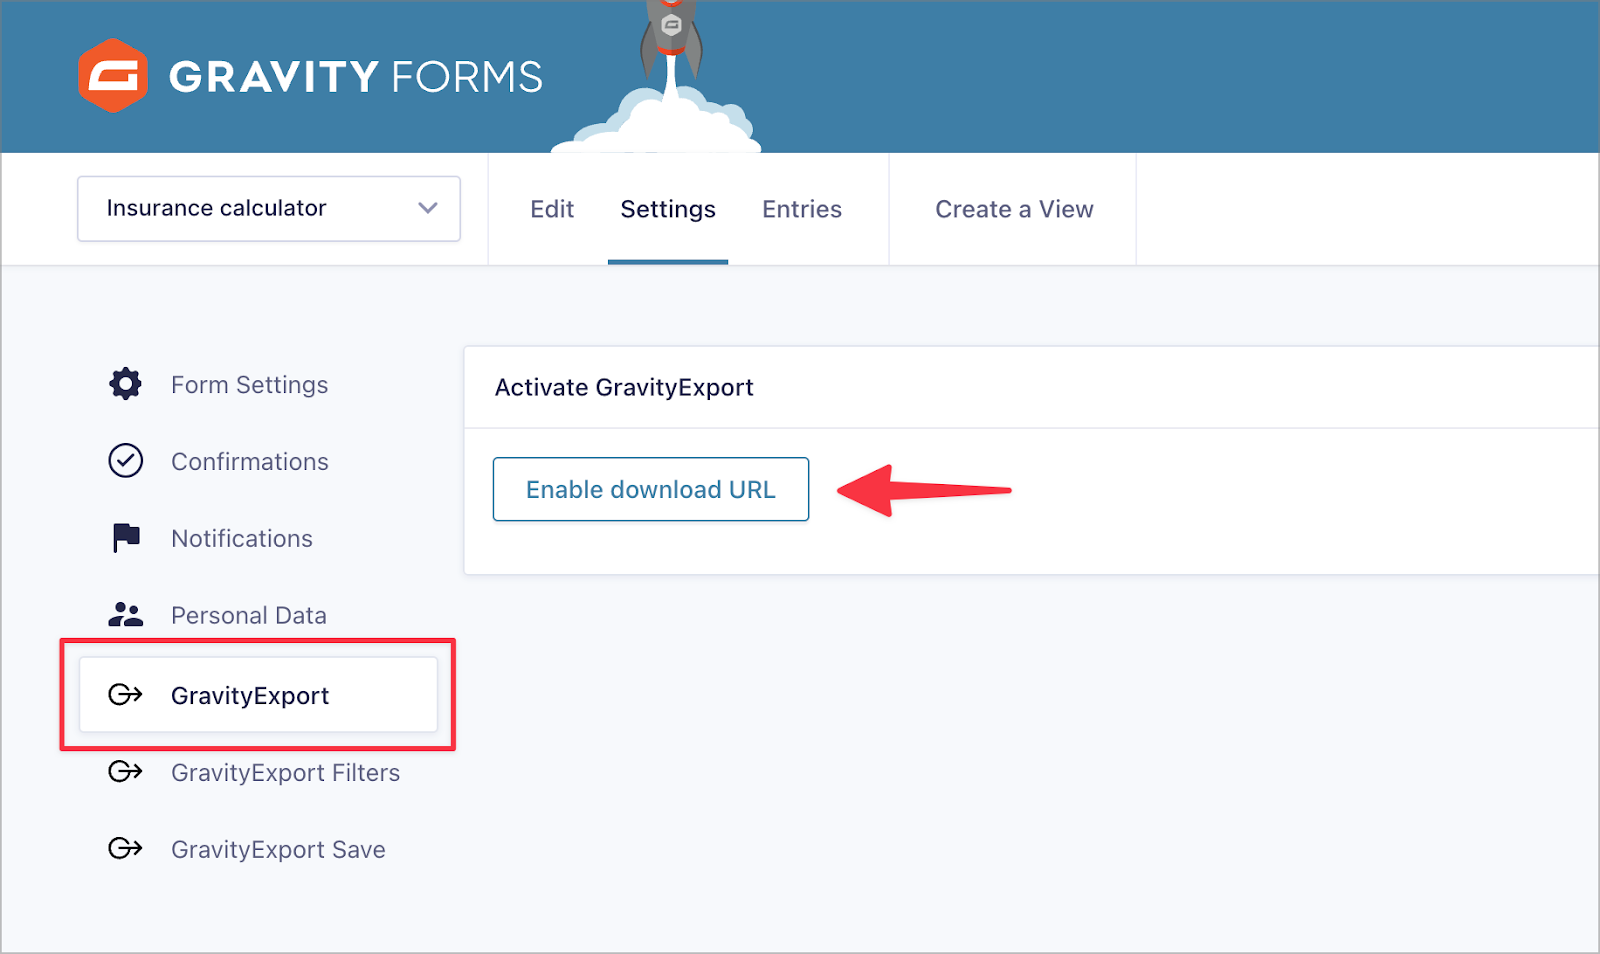
Now that we have the notification set up, we need to configure a new PDF report using GravityExport. We’ll start by enabling the download URL. We can do this from the GravityExport feed page.
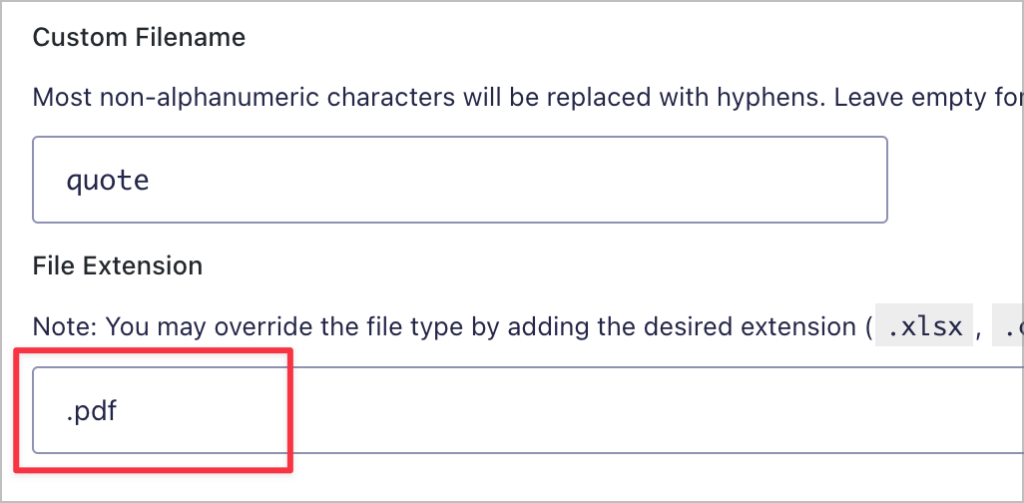
Now we can start customizing our report. First we’ll choose a filename and a file extension (in this case, we’ll select PDF).
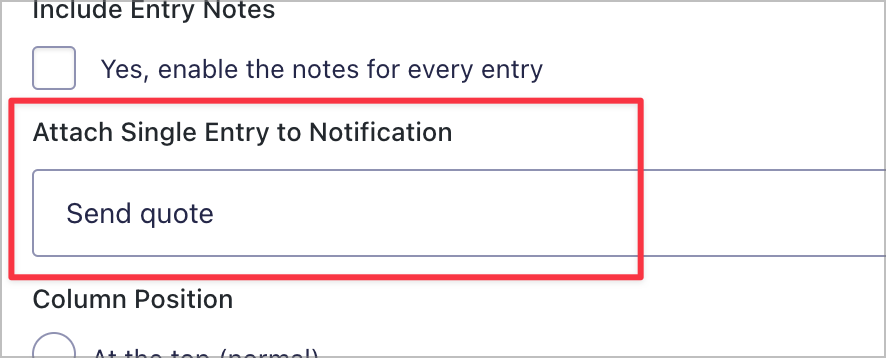
Next, we’ll choose to attach PDF reports to notification emails. We can do that by selecting an existing notification email from the dropdown menu. Here we’ll select the notification we configured previously.
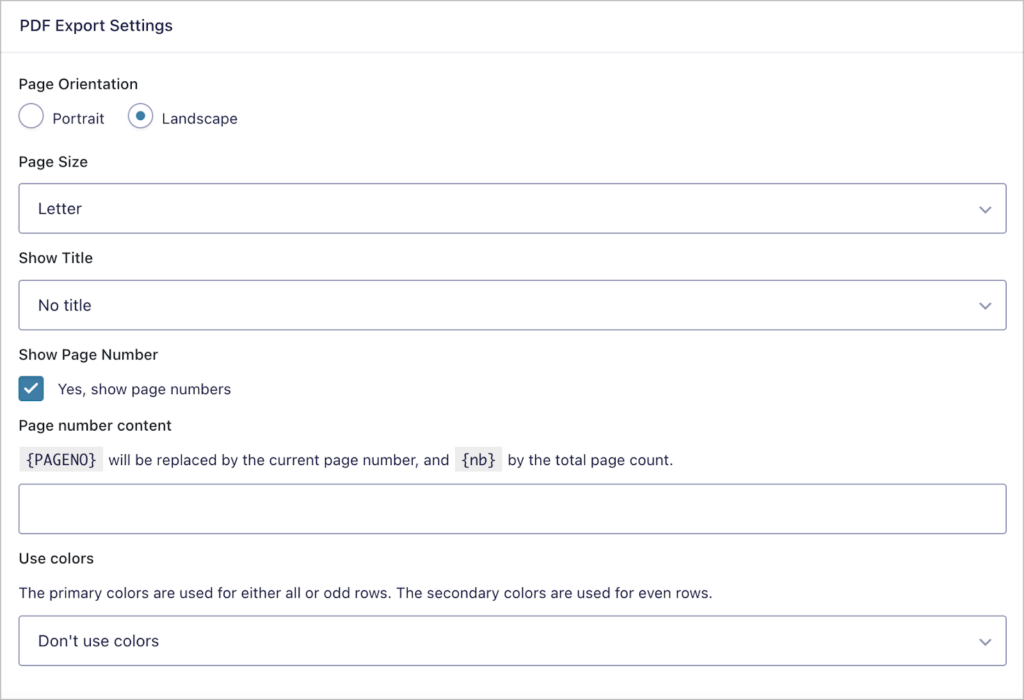
Next, we’ll scroll down to the “PDF Export Settings” where we can customize the PDF document, including styling!
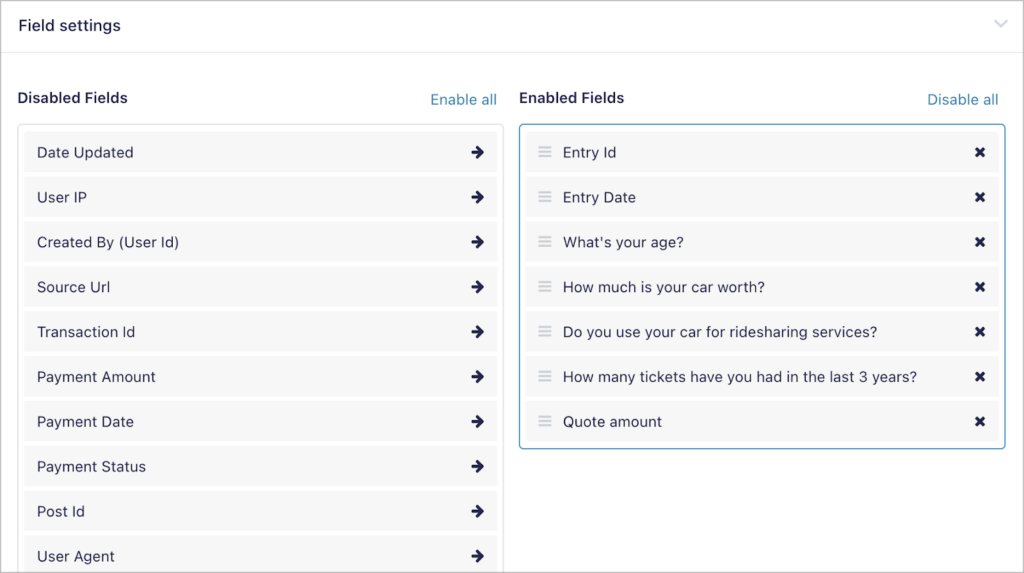
Finally, we can select which fields to include in our report by adding them to the “Enabled Filed” column.
That’s it! Prospects will now receive an email when they fill out our quote calculator form containing a quote estimate in PDF format.
Lead management
The GravityView plugin for Gravity Forms enables you to display form entry data on the front end of your website and construct dynamic interfaces for easy data management.
Here’s an example: Let’s say you’re using your calculator form to generate leads. In this case, you may add additional form fields for email address, phone number, and possibly other information.
Now, you might need a way to organize new leads and easily follow up with them to see if they require your services.
Let’s build a simple table using GravityView, allowing our marketing team to view new leads, and reach out to them as needed.
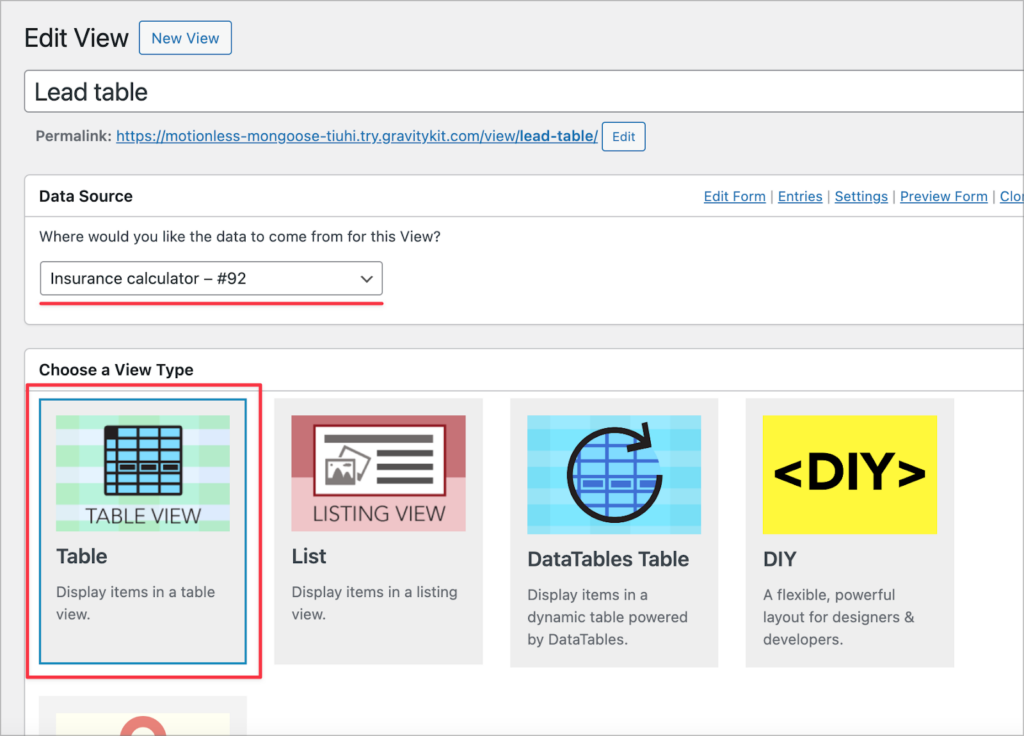
First, we’ll create a new View and choose “Table” as our View Type.
Next, we’ll use GravityView’s simple drag-and-drop editor to add columns to our table.

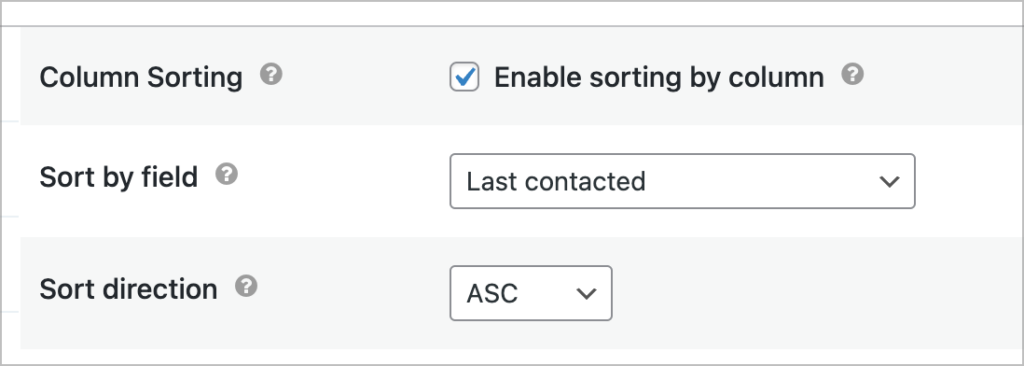
After adding our fields, we’ll configure the search bar. Here we’ll add various search inputs, enabling our marketing team to filter by email address, date last contacted, and more.
Finally, we’ll sort entries by the “Last contacted” date.
That’s it! Here’s our table on the front end.
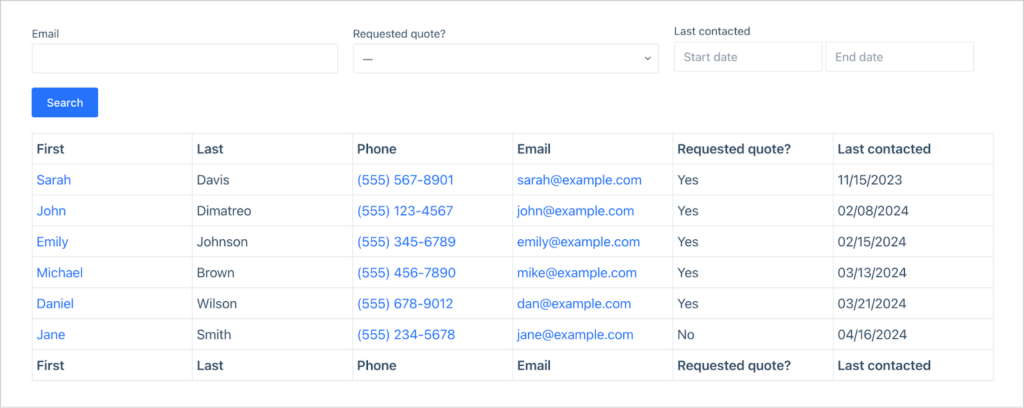
As you can see, this is a helpful table of leads that our marketing team can refer to when reaching out to interested prospects. The phone and email fields are clickable as well!
This is a simple example of how you can use GravityView for lead management when you’re collecting leads through Gravity Forms.
Create a Gravity Forms insurance calculator for your WordPress website
Creating an insurance quote calculator for your WordPress site doesn’t have to be complicated. By following the steps outlined in this guide, you can build a powerful insurance calculator using Gravity Forms!
Furthermore, by leveraging additional tools like GravityExport and GravityView for lead management, you can enhance your site’s functionality and user experience! If you found this post helpful, read more Gravity Forms tutorials on our blog.

Helpful tips right in your inbox.
Subscribe to get the latest articles, information on releases and helpful Gravity Forms tips!
More articles

WordPress page builder market share 2026: Elementor leads at 32.67%
Elementor reaches 32.7% of WordPress sites. WordPress Block Editor 20.6%, wpBakery 8.5%, Divi 5.7%. Latest HTTP Archive crawl, share-of-WordPress basis throughout.

Launch Log: GravityView 3.0, plus upgrades to Block MCP and GravityKit MCP
GravityView 3.0 lands with the new Vantage theme, frontend bulk actions, and AI-assisted View creation. This launch log also covers updates to GravityKit MCP, Block MCP, and Dashboard Views.

Announcing GravityView 3.0: a fresh new look, AI View creation, and native page builder support
GravityView 3.0 is here: restyle Views with the new Vantage theme, build them with AI, embed them in any page builder, and run bulk actions on the front end.