Published
•
Updated
How to build a content publishing pipeline using GravityView and Gravity Flow
Build a content publishing pipeline on WordPress using Gravity Forms, Gravity Flow, and GravityView. Includes submission form, multi-step review workflow, and a status dashboard.
Gravity Flow is a powerful tool for creating workflows and business processes using Gravity Forms. Did you know that GravityView integrates with Gravity Flow, allowing you to filter entries in a View based on their workflow status?
In this tutorial, we’ll show you how to build a content publishing pipeline using the Gravity Forms Advanced Post Creation add-on, Gravity Flow, and GravityView.
First, we’ll create a submission form, allowing users to submit blog articles. Next, we’ll build a workflow that sends articles through multiple review steps before being approved and published on the site. Finally, we’ll create a View to display all submitted posts, so content managers can see which step of the workflow they’re in and their current status.
Let’s get started!
Sneak peek
Here’s a sneak peek at what our content publishing pipeline looks like on the front end:
Wanna try it?
Spin up a demo
See what you can build with GravityView — explore the live demo.

What you’ll need
Here are the plugins/add-ons you’ll need if you want to follow along with this tutorial:
Creating the article submission form
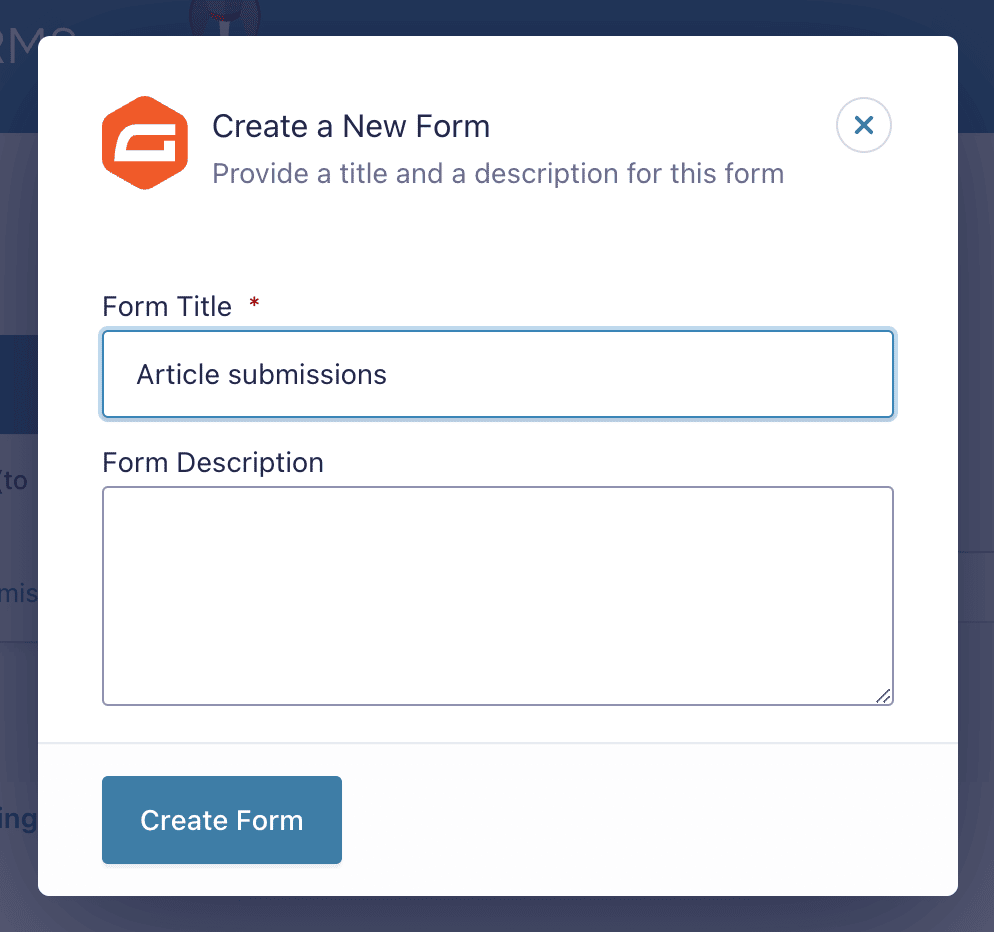
We’ll start by creating a new Gravity Form that allows users to submit blog articles. We’ll title the form something like “Article submissions”.
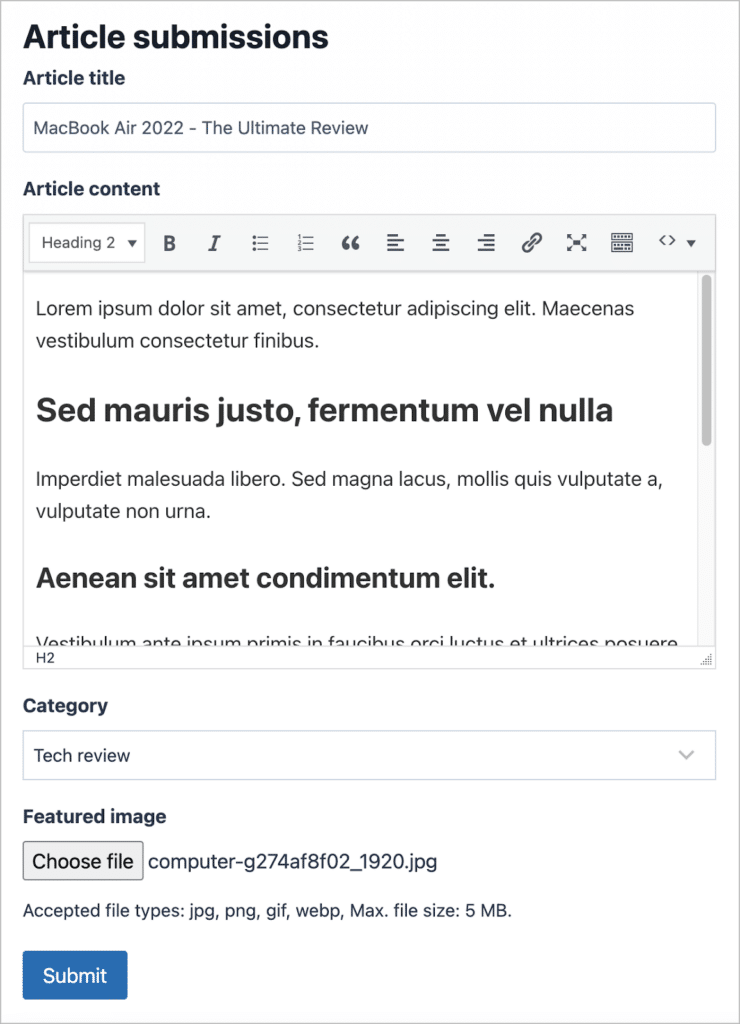
Now we can start adding fields using the Gravity Forms drag and drop form editor. Feel free to add any fields you feel are necessary. We’ll keep things simple by adding the following fields:
- Article title (Single Line Text field)
- Article content (Paragraph field)
- Category (Drop Down field)
- Featured image (File Upload field)
After adding the paragraph field, ensure that you open the field settings, click on the “Advanced” tab and check the box that says “Use the Rich Text Editor”. This will allow users to add basic HTML formatting to their text.

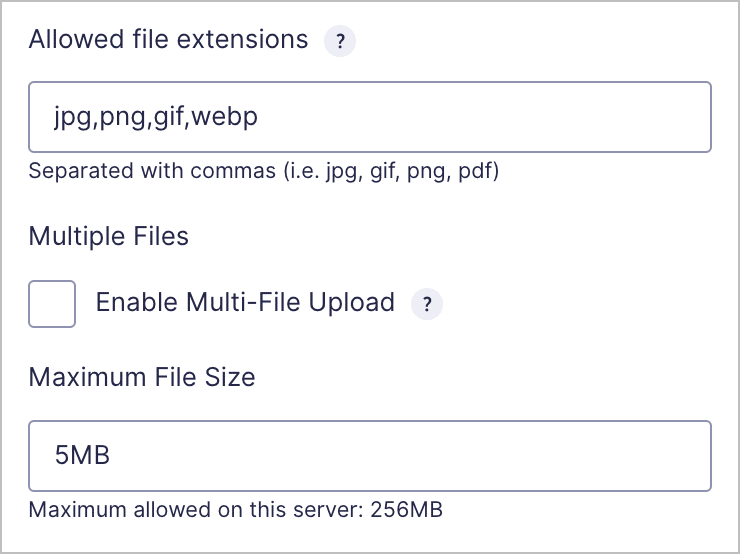
You may also want to limit the allowed file types on the File Upload field and set a limit on the maximum upload size.
When you’re done, save your form and embed it on your website. Here’s what our article submission form looks like on the front end:
💡 Pro tip: Add a “Website” field for the post permalink.
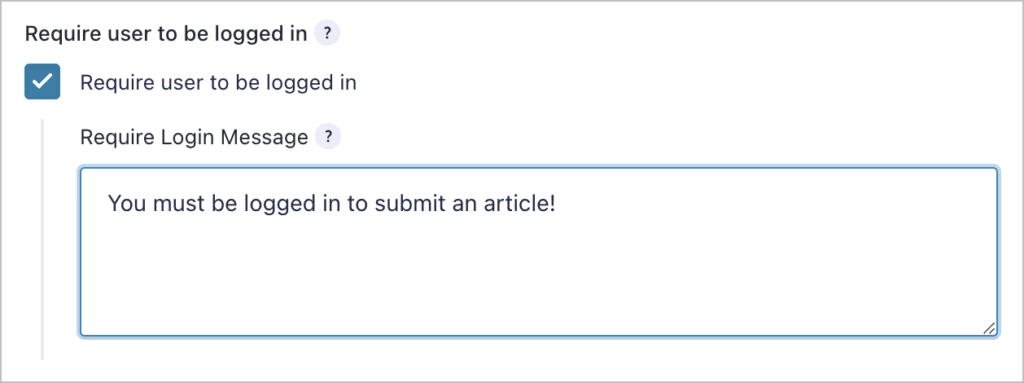
There’s just one more thing we need to do before we can move on. In our publishing workflow, we’re going to have a step where the editor can send the article back to the user for updates. However, this step will only work if the user is logged-in when they submit their article.
To ensure users are logged in when submitting articles, we’ll enable the “Require user to be logged in” option in the form settings.
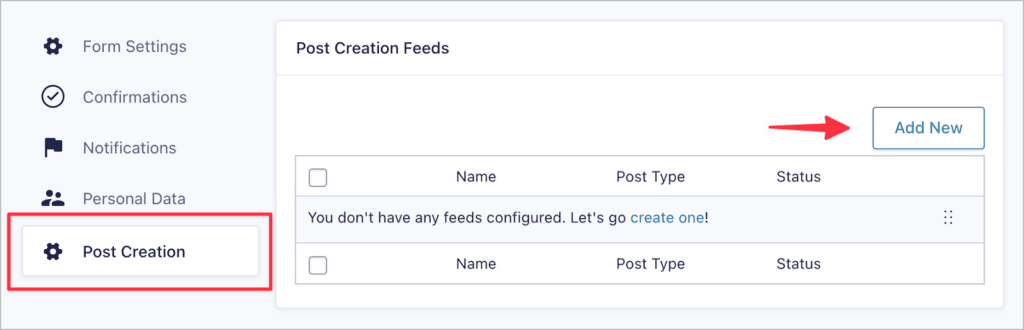
Now that we have our form set up, the next step is to configure the Post Creation feed.
Creating the Advanced Post Creation feed
Before we can add the Post Creation step to the content publishing workflow, we’ll first need to create a feed. We can do this by going to the form settings, selecting “Post Creation” on the left, and then clicking “Add New” to add a new feed.
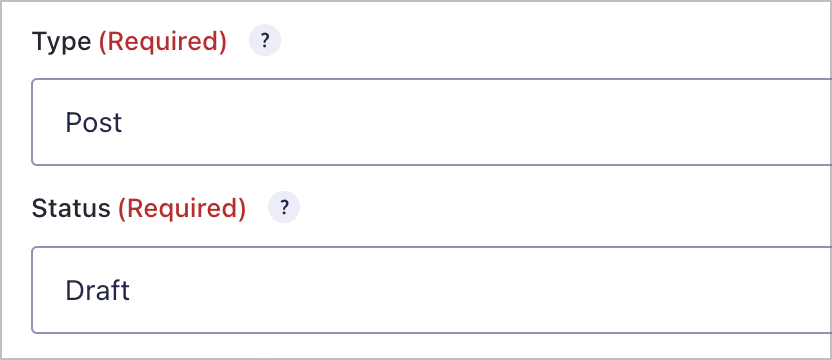
Now we can start configuring the post settings. The first thing we’ll need to do is select the post type and default post status when a new submission is created.
You can choose whether you want to set the status to “Draft” or “Published”, as this feed will only run at the end of the publishing workflow, after the article has been through the necessary review and editing steps.
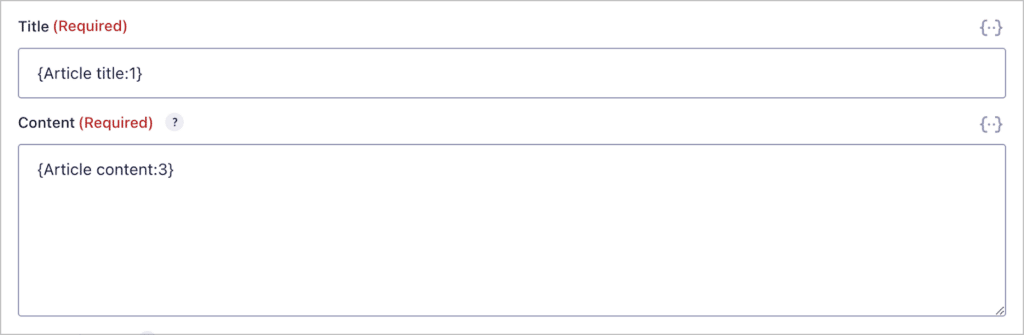
Now we’ll scroll down to “Post Content”. Here, we need to map the fields in our form to the different elements of a WordPress post. To ensure the post title and content are added dynamically from the form submission, we can populate these fields using Gravity Forms merge tags.
When you’re finished configuring the Post Creation feed, remember to click “Save Settings” at the bottom of the page.
Now we can start configuring the content publishing process using Gravity Flow!
An overview of the content publishing pipeline
There are several ways to structure your content publishing pipeline using Gravity Flow. For example, you can add as many approval steps as you wish before the post is finally published.
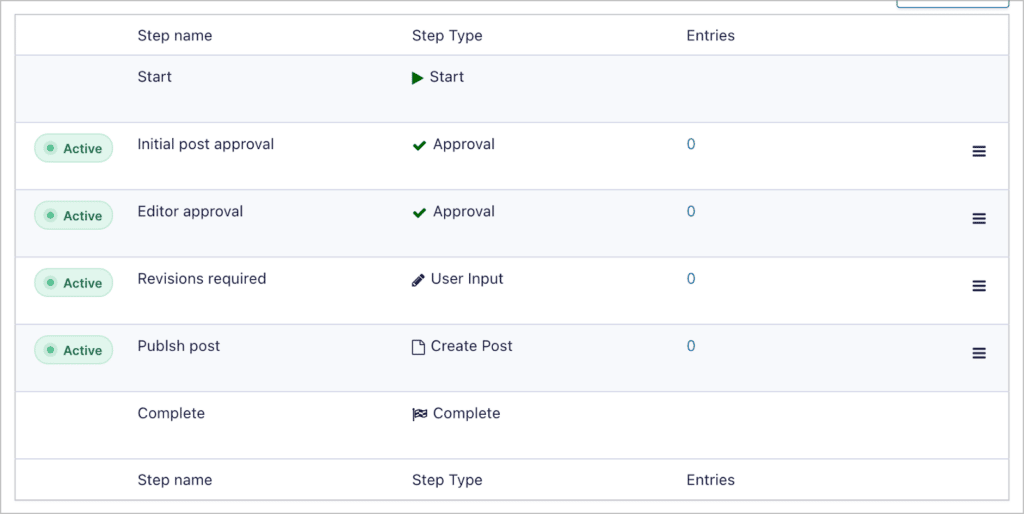
As you can see, our workflow has four steps—”Initial post approval”, “Editor approval”, “Revisions required”, and “Publish post”. Here’s how it works:
- The post is submitted by the logged-in user and sent to the site owner for initial approval.
- After the site owner approves the post, it is sent to the editor for more in-depth scrutinizing. If the editor requires the post to be updated, they can revert it back to the user for edits.
- This review loop continues until the editor is happy with the post, at which point they can approve it for publishing.
- After the editor approves the post, the Post Creation feed runs, either publishing the post or saving it on the site in draft.
Now let’s start creating the workflow, one step at a time.
Creating the content publishing workflow
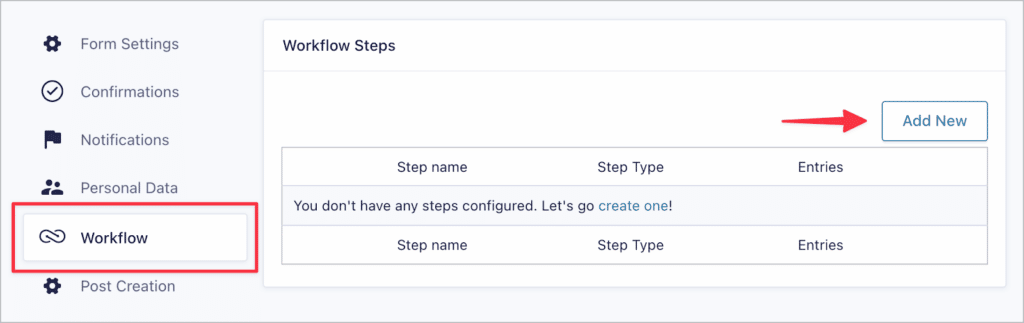
When building workflows with Gravity Flow, we’ll need to add each step separately. To add a new workflow step, click on the “Workflow” tab and then click “Add New”.
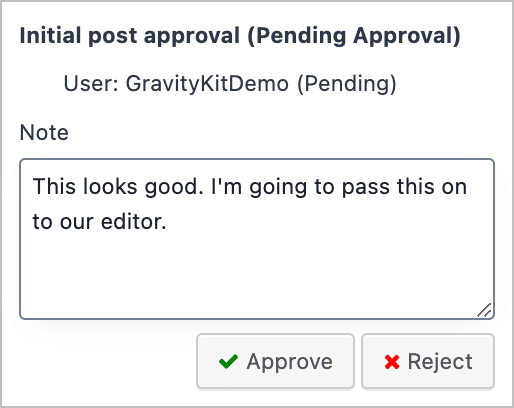
The first step we need to add is the initial approval step.
Configuring the initial approval step
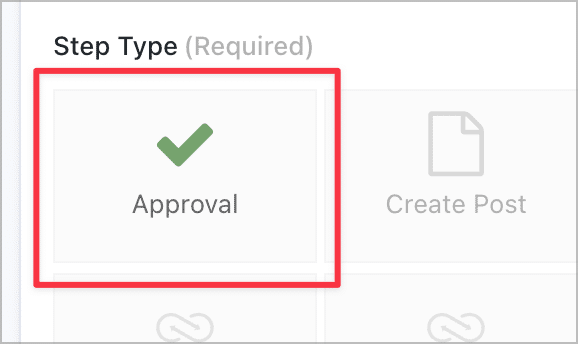
The first thing to do is select “Approval” as the step type.
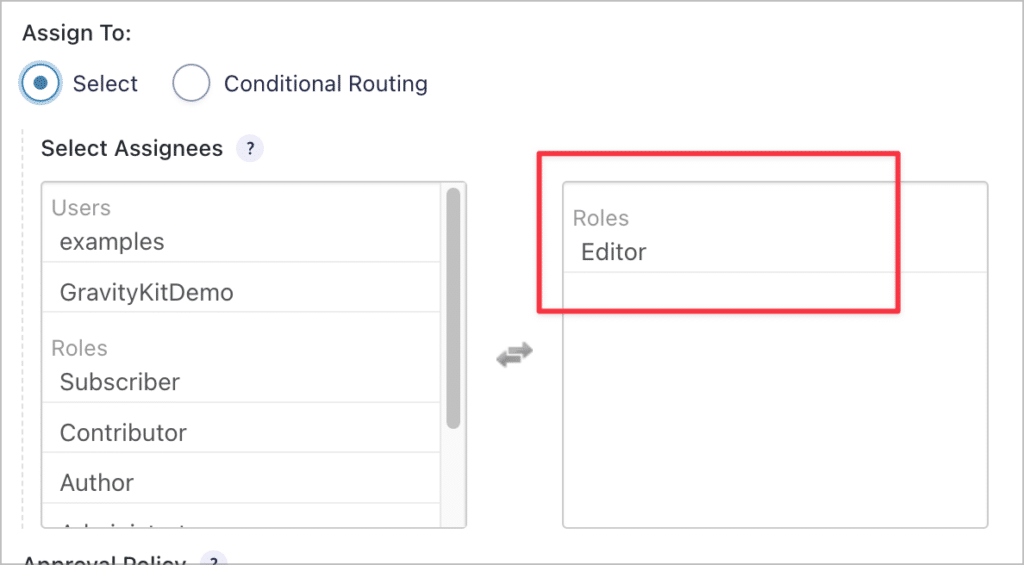
Next, we’ll scroll down and select the assignee for this step. This can either be a specific user or a user role.
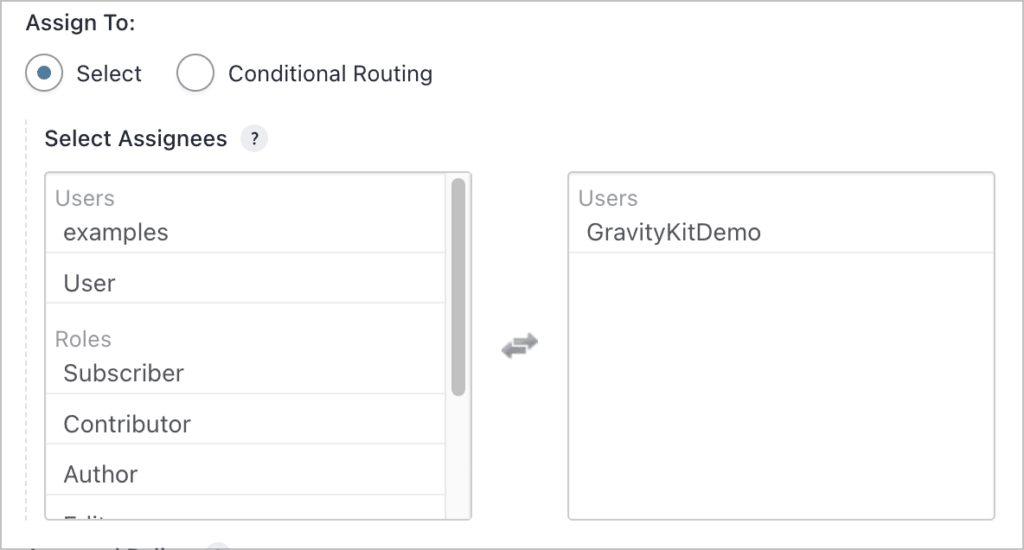
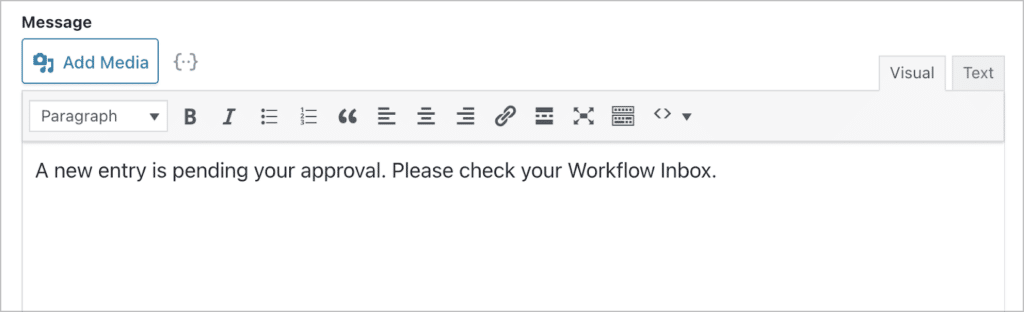
Gravity Flow also gives you the option to send an email to the assignee with a custom message.
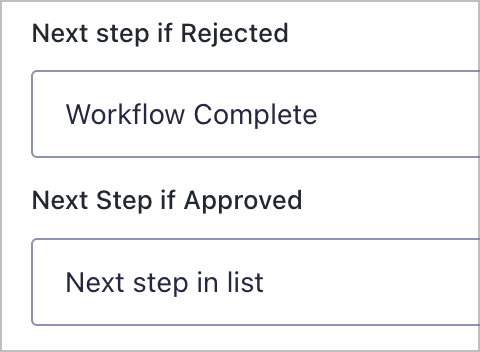
After configuring the remaining options, we’ll need to select the next step if the workflow is rejected or approved. If rejected, we want the workflow to end so we’ll select “Workflow Complete”. However, if approved, we want to move to the next step in the workflow.
That’s it! Now we can start configuring the next step in the workflow – the editor review process.
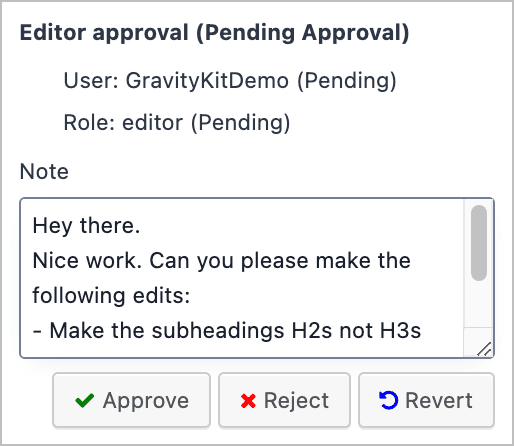
Adding an editor review step
After initial approval, we want to send the article to an editor to check whether any updates are required. We’ll set the step type to “Approval” once again and assign it to the Editor user role.
When an editor is reviewing the article, we want them to be able to send the submission back to the user for updates if necessary. The only way to achieve this is by enabling the “Revert to user input step” option. However, we can’t enable this until after we create the user input step, which is what we’re going to do next.
Creating the user input step
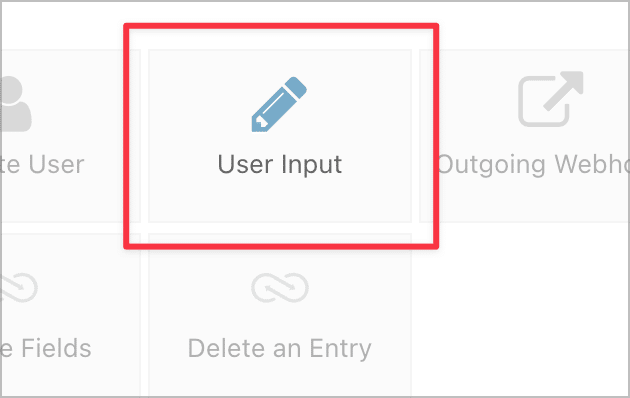
After adding a new step to our workflow we’ll select “User Input” as the step type. A user input step allows a user to edit their own submission.
We’re going to assign this step to the user who submitted the article. To do this, we’ll select “User (Created by)” as the assignee and then select the fields we want to make editable (in this case, all of them!).
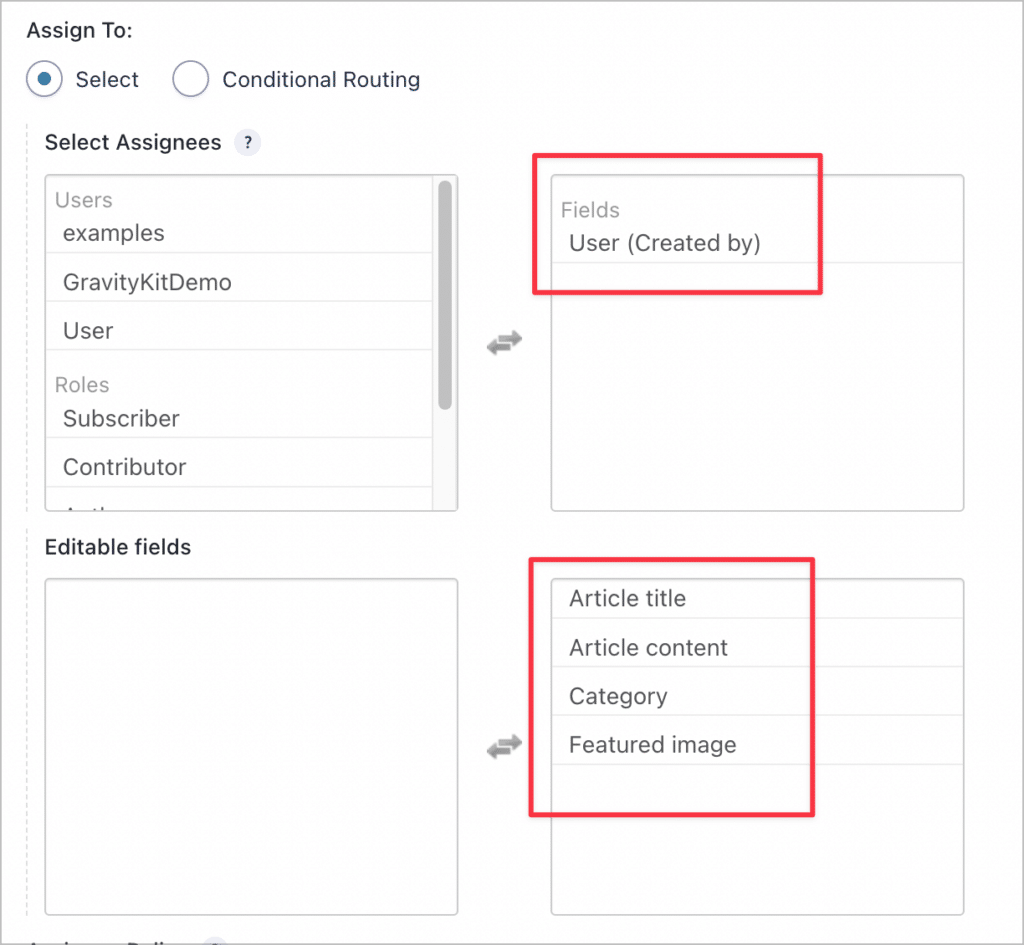
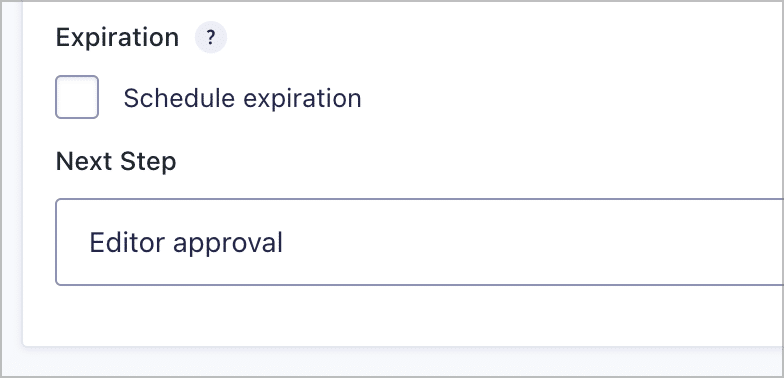
After configuring the remaining options (including adding optional email notifications), we’ll set the next step to “Editor approval” which is actually the previous step in the workflow!
Finally, after saving this step, we need to go back to the previous editor review step and enable the “Revert to User Input step” option.
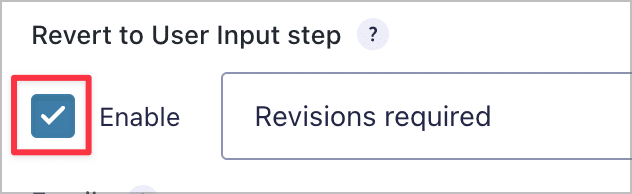
This creates a loop, allowing editors to revert article submissions until users have made the required edits. All we need to do now is configure the post creation step.
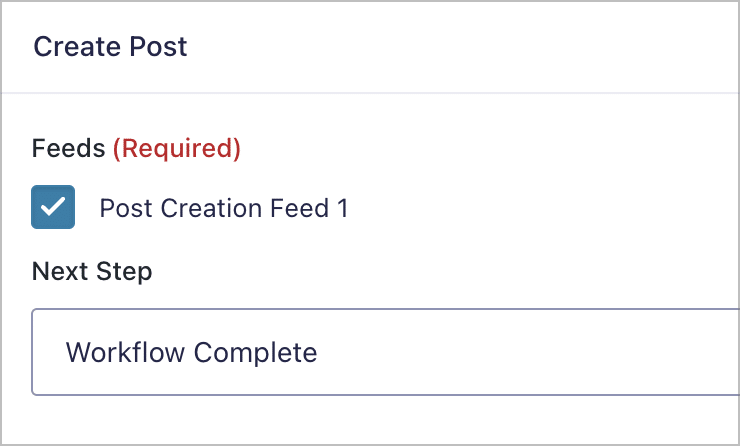
Configuring the post creation step
When the editor is happy with the article and decides to approve it, we want to ensure that the article is published, or at least saved as a draft for publishing later. To do this, we’ll add a new workflow step and set the step type to “Create Post”.
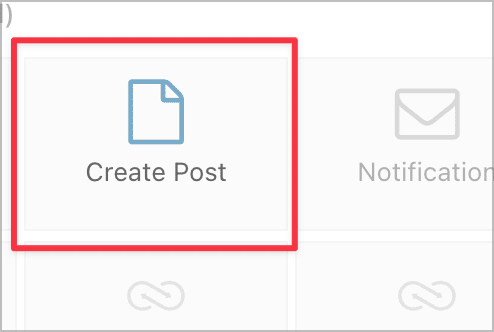
After that, we’ll need to select the Post Creation feed that we want to run (we created this earlier) and set the “next step” to “Workflow Complete”.
That’s it!
Content publishing workflow demo
Here’s a quick demo of the content publishing process.
First, the article is sent to the site owner for initial approval. They can choose to either approve the article or reject it.
If approved, the article is sent on to an editor for more careful reading. They can then revert the article back to the original author for edits.
Once the user has made the required changes, the article is sent back to the editor for approval. This continues until the article has been approved.
In the final part of this tutorial, we’re going to use GravityView to visualize the content publishing process by adding all articles to a searchable database. This will allow site Admins and content managers to filter articles by workflow status, keep track of new posts, and review older posts.
Displaying the content pipeline for content managers using GravityView
So far, we’ve built a content publishing pipeline using Gravity Forms’ Advanced Post Creation add-on and Gravity Flow. Now we’re going to use GravityView to create a searchable database of posts, allowing content managers and editors to easily find articles based on their workflow status!
We’ll start by hovering over Views and clicking New View. Now, we’ll give our View a name and select a View type. For this example, we’ll use the Table layout, but the DataTables layout would work just as well.
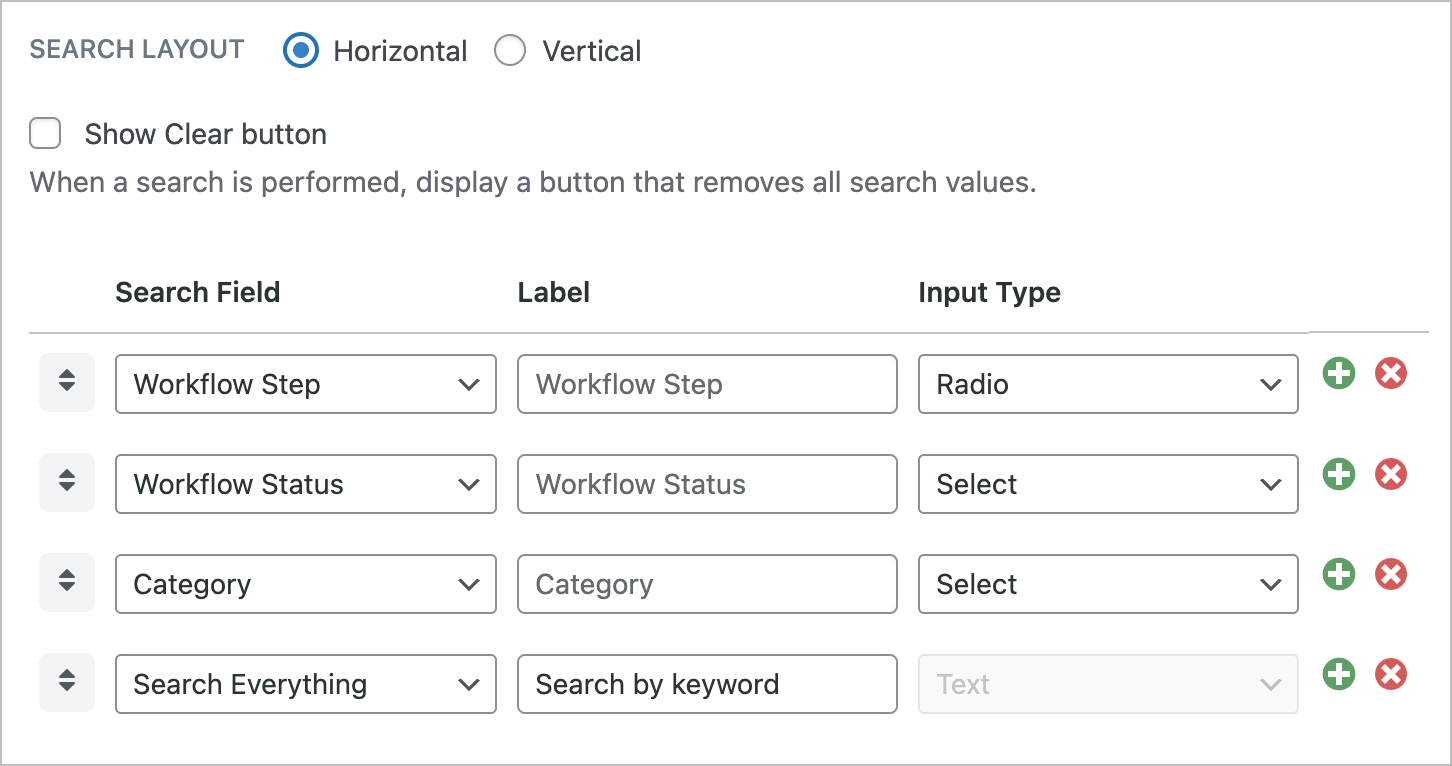
The first thing we’ll do is configure the search bar. Here we’re going to add search inputs that allow users to filter posts by Workflow step and status.
Next, we’ll add the fields that we want to display on the Multiple Entries Layout, including a link to the Single Entry.
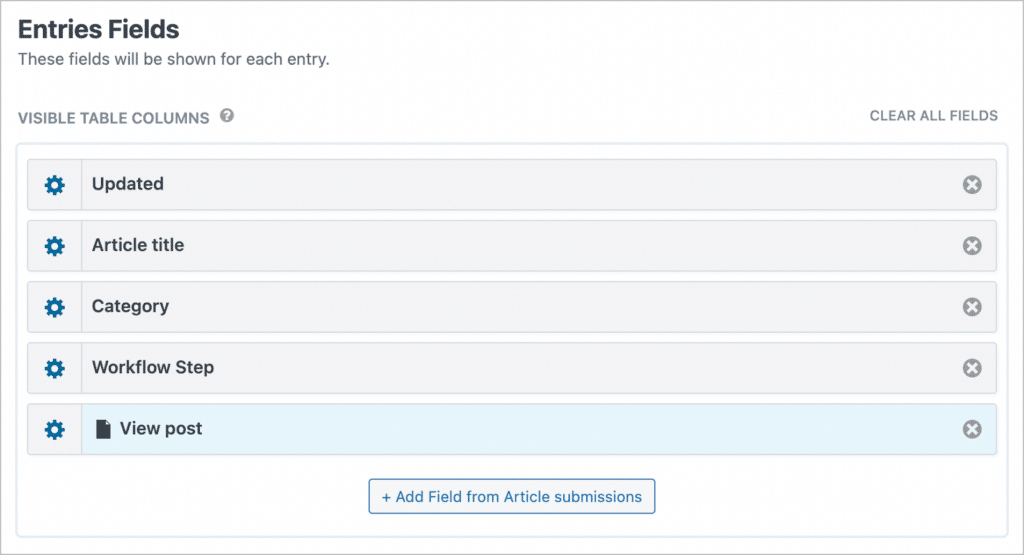
To configure the Single Entry Layout, we’ll click on the Single Entry Layout tab at the top and add fields by clicking on the “Add Field” button.
Here’s what our View looks like on the front end:
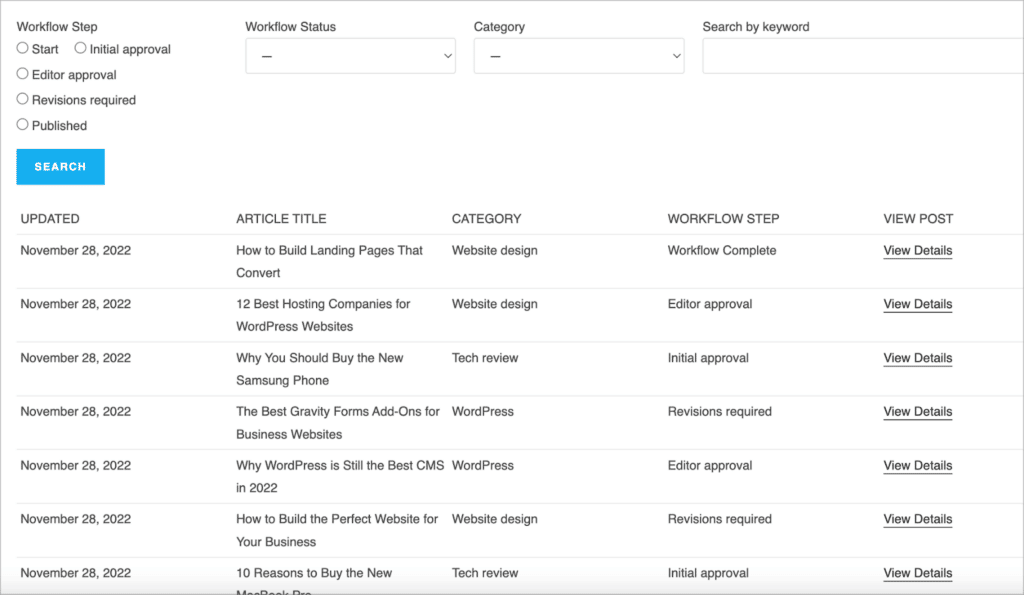
As you can see, it’s a database of all submitted articles. There is a search feature at the top allowing users to search for posts by workflow step, status, category or keyword.
Here’s a video demonstrating the search feature in action:
Having a central database of posts allows content managers to keep track of the publishing process and filter articles by workflow status!
💡 Pro tip: You could also create separate Views for each step of the workflow by using the Advanced Filtering extension.
Create your own content publishing pipeline on WordPress
Gravity Flow is an add-on for Gravity Forms that allows you to build workflows with multiple steps. GravityView also integrates with Gravity Flow, allowing you to search and filter entries based on their workflow status.
In this tutorial, we created a content publishing pipeline using the Gravity Forms Advanced Post Creation add-on, Gravity Flow, and GravityView! If you enjoyed this tutorial, check out other ways that GravityView integrates with Gravity Flow.

Helpful tips right in your inbox.
Subscribe to our weekly newsletter for tips, special offers, and more!
Helpful tips right in your inbox.
Subscribe to our weekly newsletter for tips, special offers, and more!

Helpful tips right in your inbox.
Subscribe to get the latest articles, information on releases and helpful Gravity Forms tips!
More articles

Launch Log: GravitySearch arrives, plus AI spam review and GravityView fixes
This week, releases are anchored by a brand-new product! GravitySearch joins the GravityKit suite with cross-form entry search for Gravity Forms. Alongside it, Gravity Forms Zero Spam picks up an AI-powered review step, and GravityView sees fixes for Enhanced Security, Edit Entry, and Entry…

Meet GravitySearch: advanced global search for Gravity Forms
GravitySearch adds cross-form search to Gravity Forms: find any entry from one screen, build advanced filters, and preview results without leaving the page.
Block MCP is now a free WordPress plugin (and it sets itself up)
Block MCP is now a free WordPress plugin. Connect Claude or any MCP client to your site in minutes and let AI edit your content without breaking blocks.