Complete guide
Last updated:
Importing entries to Gravity Forms: A complete guide
Whether you’re migrating from another form plugin, uploading data from a spreadsheet, or moving your Gravity Forms site to a new host, importing entries is one of the most common tasks you’ll face. This guide covers every method for getting data into Gravity Forms from external files, plugins, or apps.
Table of contents
- Getting started with GravityImport
- How to import CSV data into Gravity Forms
- Importing into an existing form vs. creating a new form
- Advanced import features
- Migrating from other form plugins to Gravity Forms
- Migrating Gravity Forms data between websites
- After the import: managing your entries
- Native vs. paid import methods
- Importing WordPress users and WooCommerce products
- Importing form templates (JSON)
- Frequently asked questions
Getting started with GravityImport
The fastest way to import entries is with GravityImport, a Gravity Forms Certified plugin that lets you upload a CSV file, map your columns to form fields, and import everything in minutes, with no row limits.
GravityImport is a WordPress plugin built specifically for importing entries into Gravity Forms. It’s Gravity Forms Certified, which means it meets the Gravity Forms team’s standards for code quality and reliability. There are no limits on the number of rows you can import, and the plugin handles field mapping, data type detection, and validation automatically.
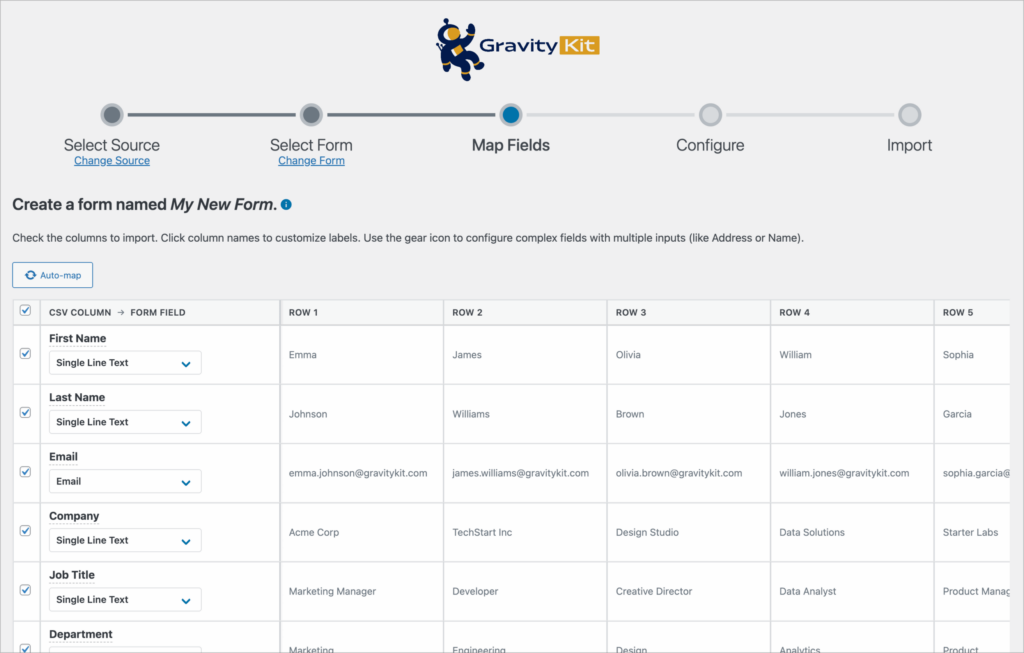
The import process works in three steps: upload your CSV file, map your columns to form fields, and run the import. GravityImport walks you through each step with a visual interface directly inside the Gravity Forms admin area.
Learn more: Browse all GravityImport documentation
How to import CSV data into Gravity Forms
CSV is the most common format for importing entries. Most spreadsheet applications (Excel, Google Sheets, Apple Numbers, LibreOffice) can export data as CSV, and GravityImport is designed to handle these files natively. Upload your file, and GravityImport will parse the columns and let you map each one to a corresponding Gravity Forms field.
If your data includes dates, phone numbers, or other structured fields, GravityImport will attempt to detect the correct field type automatically. You can always override the detection by manually selecting a field type.
Go deeper: How to import Gravity Forms entries from a CSV file
How to import Excel files into Gravity Forms
If your data lives in an Excel spreadsheet (.xlsx), you can still import it into Gravity Forms. The simplest approach is to export your Excel file as a CSV before uploading it to GravityImport. This ensures clean, consistent formatting and avoids issues with Excel-specific features like formulas or merged cells.
Go deeper: How to import Gravity Forms entries from an Excel file
Importing into an existing form vs. creating a new form
When you upload a CSV file, GravityImport gives you two options: import entries into an existing form or create a brand new form from your data.
Importing into an existing form is the right choice when you already have a form set up and want to add entries to it. You’ll map each CSV column to an existing field in your form. This is common when migrating entries from another site or uploading historical data.
Creating a new form makes sense when you don’t have a matching form yet. GravityImport will automatically create form fields based on your CSV columns and attempt to detect the correct field type for each one. You can rename fields, change field types, or remove columns you don’t need before running the import.
Advanced import features
GravityImport goes beyond basic CSV uploads. Here are some of the more powerful features available for managing complex imports.
Using conditional logic to filter imported rows
You don’t have to import every row in your CSV. GravityImport supports conditional logic, which lets you set rules to filter which rows get imported. For example, you could import only entries where the “Status” column equals “Active” or where the “Date” field falls within a specific range.
Go deeper: Import entries from a CSV using conditional logic
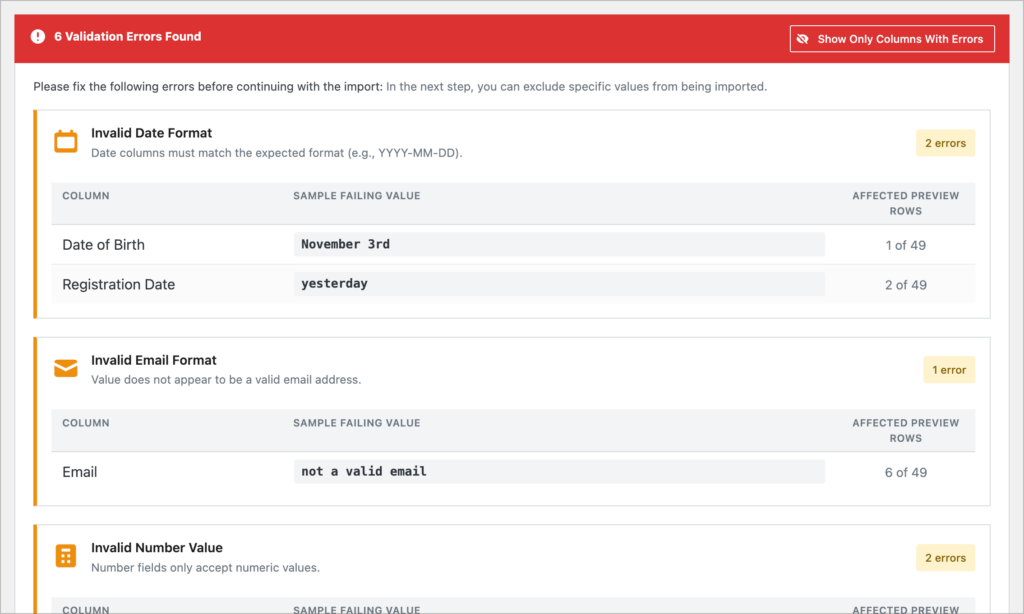
Pre-import validation and error handling
The GravityImport plugin validates your data before committing the import. This catches issues like mismatched field types, missing required values, and formatting problems before they create incomplete or broken entries in your forms.
Go deeper: Announcing GravityImport 2.8.0
Preparing your CSV file for import
A little preparation goes a long way toward a smooth import. Here are some best practices:
- Use UTF-8 encoding to avoid character corruption, especially with accented or special characters.
- Format dates consistently across all rows (e.g.,
YYYY-MM-DD). - Use a header row with clear column names that match your form field labels where possible.
- Remove merged cells, formulas, and formatting if exporting from Excel.
- Check for empty rows at the end of your file, which can cause unexpected blank entries.
Migrating from other form plugins to Gravity Forms
Switching from another WordPress form plugin? The general workflow is the same: export your entries from the old plugin as a CSV file, then import them into Gravity Forms using GravityImport. We have dedicated migration guides for the most popular form plugins:
- How to migrate from WPForms to Gravity Forms
- How to migrate from Ninja Forms to Gravity Forms
- How to migrate from Formidable Forms to Gravity Forms
- How to migrate from Caldera Forms to Gravity Forms
- How to import Contact Form 7 entries to Gravity Forms
- How to migrate from Fluent Forms to Gravity Forms
- How to migrate from Formstack to Gravity Forms
- How to migrate from Kali Forms to Gravity Forms
- Why Gravity Forms is the best Typeform alternative
If you’re migrating from a SaaS form tool like Google Forms or Jotform, the process is similar. Export your responses as a CSV from the SaaS platform and then import them into Gravity Forms using GravityImport. The migration guides above can serve as a general reference for the workflow.
Migrating Gravity Forms data between websites
Sometimes the challenge isn’t importing from another plugin—it’s moving your Gravity Forms data from one WordPress site to another. Whether you’re changing hosts, setting up a staging environment, or consolidating multiple sites, there are a few different approaches depending on what you need to move.
For a full migration that includes forms, entries, settings, and add-on configurations, GravityMigrate handles everything in one step. See the Getting started with GravityMigrate guide for a complete walkthrough. If you only need to move specific pieces, these guides cover the individual workflows:
- How to migrate your Gravity Forms entries to a new website
- How to migrate your Gravity Forms forms AND entry data to a new site
- How to move your Gravity Forms add-on data and settings to another site
- How to copy a Gravity Form from one website to another
After the import: managing your entries
Once your data is in Gravity Forms, you’ll likely need to review, correct, or work with it further. GravityKit offers several tools for post-import entry management.
- Bulk update entries – Need to change a field value across dozens of entries at once? Learn how to bulk update entries in Gravity Forms.
- Correct errors in submissions – If your imported data contains mistakes, you can fix them in bulk. How to bulk correct errors in Gravity Forms submissions.
- Edit entries inline – GravityEdit lets you edit entry data directly from the front end of your site, which is useful for ongoing data maintenance.
- Export your data – Need to get data back out of Gravity Forms? See our complete guide to exporting data from Gravity Forms.
Native vs. paid import methods
Gravity Forms includes some built-in import and export features, but they’re limited in scope. Here’s how the native options compare to GravityImport:
| Gravity Forms (built-in) | GravityImport | |
|---|---|---|
| Import form structures (JSON) | Yes | No (entries only) |
| Export entries to CSV | Yes | No (see GravityExport) |
| Import entries from CSV | No | Yes |
| Automatic field mapping | N/A | Yes |
| Data type detection | N/A | Yes |
| Conditional logic filtering | N/A | Yes |
| Pre-import validation | N/A | Yes |
| Row limits | N/A | None |
| Create new form from CSV | No | Yes |
| Auto run feeds upon import | N/A | Yes |
If you only need to move form structures between sites, the native JSON import/export may be sufficient. But if you need to import entry data (like from spreadsheets, other plugins, or external systems), GravityImport is the tool for the job.
Importing WordPress users and WooCommerce products
GravityImport isn’t limited to traditional form entries. You can also use it to bring in other types of WordPress data.
- WordPress users – Import user data as Gravity Forms entries, which is useful for building member directories or displaying user profiles with GravityView. How to import WordPress users as Gravity Forms entries.
- WooCommerce products – Import product data into Gravity Forms for custom catalogs, comparison tables, or reporting. How to import WooCommerce products to Gravity Forms.
Importing form templates (JSON)
Gravity Forms natively supports importing form structures (not entries) using JSON files. This is useful when you want to replicate a form from another site or start with a pre-built template. You can find downloadable templates in the Gravity Forms template library and import them directly from the Import/Export page in your WordPress admin.
Keep in mind that importing a JSON form template only imports the form structure, it does not include any entries. To import entries, you’ll need to use GravityImport separately.
For more downloadable form templates, see: Free Gravity Forms templates for download.
Related guides
This guide is part of a series covering the most important Gravity Forms topics in depth. Explore the other guides in this set:
- How to use Gravity Forms: A complete guide
- Editing entries in Gravity Forms: A complete guide
- Exporting data from Gravity Forms: A complete guide
- Displaying Gravity Forms entries: A complete guide
- Gravity Forms conditional logic: A complete guide
- Gravity Forms calculations: A complete guide
Frequently asked questions
No. Gravity Forms can export entries to CSV but has no built-in feature for importing them back. You can import form structures (JSON) through Forms > Import/Export, but not entry data. To import entries, you need a plugin. GravityImport handles CSV imports with a visual field mapper, and WP All Import supports CSV and XML. There’s also a CLI option using the wp gf entry import command if you’re comfortable with the command line (you will need the free Gravity Forms CLI add-on).
This is usually a CSV formatting issue, not a plugin bug. The most common causes are: incorrect line endings (files edited in some programs use line breaks the importer can’t parse), non-UTF-8 encoding (special characters cause rows to be skipped), and wrong delimiters (semicolons instead of commas, common in European Excel exports). Try re-saving your CSV as UTF-8 with comma delimiters. Also check whether your file has an “ID” column—if you’re creating new entries (not updating existing ones), an ID column with values that don’t match existing entries will cause errors. Remove it and re-import.
Yes, but it’s a two-step process. First, export your entries from the other plugin as a CSV file. Then import that CSV into Gravity Forms using an import plugin. The field types won’t always match perfectly—for example, checkbox fields from WPForms may need to be reformatted to match Gravity Forms’ expected format. GravityKit has dedicated migration guides for WPForms, Fluent Forms, and Formidable Forms that walk through the process step by step.
Standard field types (text, number, dropdown, email) import reliably. But special field types need extra attention. If you’re using GravityImport, File Upload fields require the files to exist at the URL referenced in your CSV. The importer retrieves the file from the URL and re-uploads it. List fields are also supported. Nested Forms fields, however, are not currently supported by most import tools. Test with a small batch before running a full import.
It depends on the tool. GravityImport can automatically create a new form based on the columns in your CSV file. It detects field types and builds the form for you during import. Other import methods (WP All Import, CLI) require an existing form that you map your CSV columns to. If you’re starting from scratch with external data (a spreadsheet, a database export, data from another platform), GravityImport’s auto-create option saves significant setup time.
Large imports can exceed your server’s PHP execution time or memory limits, especially on managed WordPress hosts like Flywheel, WP Engine, or Kinsta that have strict resource caps. Try these fixes: increase max_execution_time and memory_limit in your PHP settings (or ask your host), temporarily disable caching plugins and server-side caching during import, and break large CSV files into smaller batches. If you’re migrating an entire site’s forms and entries, GravityMigrate handles the transfer in a way designed to work within hosting limits.