Complete guide
Last updated:
Gravity Forms calculations: A complete guide
Gravity Forms includes a built-in calculation engine that lets you add math formulas to your forms. Certified add-ons enhance this—Whether you need dynamic pricing, a quote calculator, or aggregated reports across hundreds of entries, calculations can handle it. This guide covers everything from basic formulas to advanced techniques using plugins like GravityMath, with links to deeper tutorials for each topic.
Table of contents
- How calculations work in Gravity Forms
- Supported operators and functions in Gravity Forms
- How to use product and pricing calculations
- Conditional logic and calculations
- Advanced calculations with GravityMath
- How to do date and time calculations in Gravity Forms
- Displaying and visualizing calculated data
- Building form calculators
- Native calculations vs. GravityMath: When to use each
- Troubleshooting common calculation issues
- Related guides
- Frequently asked questions
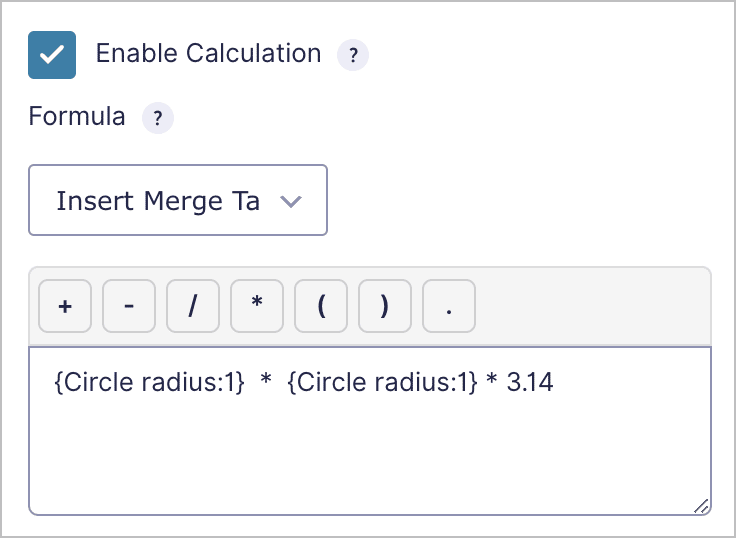
How calculations work in Gravity Forms
Gravity Forms calculations are powered by the Number field. When you enable the “Enable Calculation” checkbox on a Number field, a formula editor appears where you can write math expressions that reference other fields in your form. As users fill out the form, calculated fields update in real time.
Formulas reference other fields using merge tags—placeholders that follow the format {Field Name:ID}. For example, if you have a “Width” field with an ID of 3 and a “Height” field with an ID of 5, you could calculate area with the formula {Width:3} * {Height:5}. The formula editor includes an insert menu so you don’t need to memorize field IDs.
For a deeper look at how merge tags work across Gravity Forms (not just in calculations), see our complete guide to Gravity Forms merge tags.
Supported operators and functions in Gravity Forms
Gravity Forms supports the standard arithmetic operators you’d expect. Here’s a quick reference:
+Addition-Subtraction*Multiplication/Division
Gravity Forms follows standard order of operations (PEMDAS/BODMAS), so multiplication and division are evaluated before addition and subtraction. You can use parentheses to control evaluation order. For example, ({Price:2} + {Fee:4}) * {Quantity:6} ensures the addition happens first.
Rounding and decimal precision
Rounding is a built in option when you enable calculations for a Number field. Simply select from the dropdown field whether you want the output to be rounded to 0, 1, 2, 3, or 4 decimal places.
How to use product and pricing calculations
Gravity Forms includes a set of dedicated pricing fields (Product, Option, Quantity, Shipping, and Total) that are designed for order forms and payment workflows. You can enable calculations on Product fields to create dynamic pricing that adjusts based on user selections.
Common patterns include tiered pricing (where the per-unit cost decreases as quantity increases), percentage-based discounts, and tax calculations. You can combine pricing fields with conditional logic to show or hide options, swap pricing tiers, or apply different formulas depending on what the user selects.
For a complete walkthrough of pricing field calculations, see our guide to Gravity Forms product calculations.
Conditional logic and calculations
Conditional logic lets you change which formula is applied, or whether a calculated field is visible at all, based on user input. This is useful when a single form needs to handle multiple scenarios, like calculating shipping costs that differ by region or applying different rate structures for different service tiers.
You can set conditional logic rules directly on a calculated Number field to show or hide it. You can also use conditional logic on other fields to change which values feed into your formulas.
Go deeper: Gravity Forms conditional logic: the ultimate guide
Advanced calculations with GravityMath
Native Gravity Forms calculations work great for per-entry math (formulas that compute a result based on a single form submission). But what if you need to aggregate data across entries? That’s where GravityMath comes in.
GravityMath is a plugin by GravityKit that adds the [gravitymath] shortcode. With it, you can sum, average, count, or find the min/max of any numeric field across all entries in a form or View (or a filtered subset). This is useful for dashboards, leaderboards, reporting pages, and anywhere you need to display totals or averages from your form data.
GravityMath also support several scientific functionas, including avg(), abs(), exp(), sin(), and more. The basic shortcode syntax is:
[gravitymath scope="form" id="123"] PI / avg( {revenue:3} ) [/gravitymath]To learn more, see the GravityMath shortcode reference.
Nested calculations for complex formulas
GravityMath supports nested shortcodes, which means you can use the output of one [gravitymath] calculation as the input for another. This lets you build multi-step formulas. For example, calculating a weighted average where the weights themselves are computed values. Our feature highlight on nested calculations walks through several examples.
How to do date and time calculations in Gravity Forms
Performing calculations on Date fields, like calculating durations, ages, deadlines, and schedules, is a common need but isn’t natively supported by the Gravity Forms calculation engine. The built-in formula editor works with numeric values, so dates require a different approach.
The most practical solution is the Date Time Calculator perk from Gravity Wiz, which adds date arithmetic directly to Gravity Forms. With it, you can compute the number of days between two dates, calculate someone’s age from a birthdate, add or subtract days from a date, and even count only business days (excluding weekends and holidays).
Displaying and visualizing calculated data
Calculations don’t have to live inside the form. You can display calculated values on your WordPress site, build summary reports, and create visual charts from your form data.
Showing calculated results on the front end
With GravityMath, you can embed standalone calculations anywhere on your site using the [gravitymath] shortcode, or Summary block. The GravityMath Summary block enables you to analyze data grouped by predefined choices, making it easy to calculate totals, averages, counts, and more across multiple categories.
Here’s an example: Collecting data about company earnings in different industries.

Go deeper: How to display summaries using a block, widget, or shortcode.
Creating smart spreadsheets with GravityView and GravityMath
GravityView lets you display form entries in tables, lists, maps, and other layouts on the front end of your site. Combined with GravityMath, you can add formulas, calculated columns, or footer rows (sums, averages, counts) to any View.
For an example of how to use GravityView and GravityMath to build powerful reporting dashboards, read: How to create a fundraising dashboard on WordPess for your nonprofit or charity.
Creating charts and graphs from form data
GravityCharts turns your Gravity Forms data into bar charts, pie charts, line graphs, and more. This is especially useful when you want to visualize trends in calculated data, like average quote amounts over time or the distribution of scores in a survey.
Go deeper: How to visualize Gravity Forms data with charts and graphs
Building form calculators
The best way to learn Gravity Forms calculations is by building something. Here are step-by-step tutorials for some of the most common calculator types:
- Quote calculator for lead generation – Build a dynamic quote form that calculates pricing based on user selections and captures leads at the same time. Great for service businesses.
- Mortgage calculator – Implement the standard loan payment formula in Gravity Forms, letting users calculate monthly payments based on loan amount, interest rate, and term.
- ROI calculator – Create a return-on-investment calculator that displays the value of your product or service, using their own numbers.
- Insurance quote calculator – Generate estimated insurance quotes based on user inputs like coverage level, deductible, and risk factors.
Native calculations vs. GravityMath: When to use each
Native Gravity Forms calculations and GravityMath serve different purposes. Here’s a quick comparison to help you choose the right tool:
| Native calculations | GravityMath | |
|---|---|---|
| Scope | Single entry (computes a result per submission) | Across entries (aggregates data from many submissions) |
| Where it runs | Inside the form, in real time | Anywhere on your WordPress site via shortcode, block, or widget |
| Best for | Dynamic pricing, per-user results, form logic | Dashboards, reports, totals, averages, leaderboards |
| Functions | Only basic operators supported | Sum, average, count, min, max, custom formulas, nested calculations, scientific functions. |
| Requires a plugin | No (built into Gravity Forms) | Yes (GravityMath) |
Troubleshooting common calculation issues
If your Gravity Forms calculations aren’t working as expected, here are the most common issues and how to fix them. .
- Formula not evaluating – Double-check your field IDs in the merge tags. If you delete and re-add a field, its ID changes. Open the formula editor and re-insert the field from the dropdown to get the correct reference.
- Calculations returning zero or blank – This usually happens when a referenced Number field is empty, hidden by conditional logic, or rendered after the calculated field. Gravity Forms treats empty fields as zero in calculations.
- Currency formatting conflicts – If your site’s currency settings don’t match the format you expect, calculated values may look off. Verify your currency settings in Gravity Forms under Forms > Settings.
- Multi-page form references – You can reference fields from any page of a multi-page form in your calculations. However, the calculated field won’t update until the user has visited the page containing the referenced field.
- Performance with many calculated fields – Forms with dozens of calculated fields can slow down on the front end, since each calculation runs in the browser via JavaScript. If performance is a concern, consider simplifying formulas or splitting complex forms into multiple forms.
- GravityMath shortcode not working – If you’re using GravityMath to perform calculcations, but you’re not getting the correct results, add
debug="true"to the shortcode for detailed error reports.
Related guides
This guide is part of a series covering the most important Gravity Forms topics in depth. Explore the other guides in this set:
- How to use Gravity Forms: A complete guide
- Editing entries in Gravity Forms: A complete guide
- Importing entries to Gravity Forms: A complete guide
- Exporting data from Gravity Forms: A complete guide
- Displaying Gravity Forms entries: A complete guide
- Gravity Forms conditional logic: A complete guide
Frequently asked questions
Gravity Forms’ native calculation engine supports basic arithmetic operators (+, −, ×, ÷) and merge tags but does not include if/else statements or conditional branching. For conditional logic in calculations, you have two options: use Gravity Forms’ built-in conditional logic to show or hide different calculation fields based on user input (effectively switching between formulas), or use the GP Advanced Calculations perk from Gravity Wiz, which adds support for conditionals, advanced math functions, and more complex formula syntax directly inside a calculation field.
Native Gravity Forms calculations only work within a single entry. They can’t aggregate data across submissions. To calculate sums, averages, minimums, or entry counts across all entries (or a filtered subset), you need an add-on. GravityMath uses a [gravitymath] shortcode that lets you run aggregate calculations on any form field and display the result on any page or inside a GravityView. You can also filter which entries are included using the filter parameter.
Yes. For simple scenarios, you can use a Product field set to the “Calculation” type and build a formula using merge tags from other fields. For example, multiplying a quantity by a per-unit rate. For more complex pricing rules (tiered pricing, age-based discounts, early bird rates), the Conditional Pricing perk from Gravity Wiz lets you define multiple pricing levels for a single product field that adjust dynamically based on other field values, without needing separate product fields for each scenario.
Gravity Forms calculations support merge tags from these field types: Text, Number, Drop Down, Checkbox, Radio Button, Hidden, Single Product, Price, Hidden Product, Calculation, and Single Shipping. Notably, the Total field type cannot be used inside a calculation formula. Fields referenced in a formula must also be positioned before the calculation field in the form layout and must not be hidden by conditional logic. If a referenced field is hidden, the calculation will treat its value as zero.
Gravity Forms’ built-in calculations run on the client side in real time as users fill out the form. They don’t recalculate after submission. If you need post-submission calculations (such as running totals across entries or recalculating values when a price changes), GravityMath can calculate aggregate values from stored entries and display them anywhere on your site. For recalculating individual entries after a field or pricing change, you’d need custom code using the Gravity Forms API.
When a field referenced in a calculation is hidden by conditional logic, Gravity Forms treats its value as zero—this is by design, not a bug. This commonly causes unexpected results when you have fields that toggle visibility based on user input. The fix is to structure your form so that calculation fields only reference fields that are always visible, or use separate calculation fields for each conditional branch. The official troubleshooting guide covers additional scenarios like decimal formatting issues and field ordering problems.