Published
•
Updated
How to edit Gravity Forms entries on the frontend using GravityView
Allow site visitors to edit their Gravity Forms submissions from the front end without admin access. Ideal for member profiles, job applications, and registration forms.
Are you looking for a way to allow users or site admins to edit Gravity Forms submissions directly from the front end of your WordPress site, without needing access to the dashboard?
In this guide, you’ll learn how to use the GravityView plugin to set up front-end editing for Gravity Forms. This enables users to update their submissions after clicking “Submit”—perfect for editable member profiles, job applications, or registration forms.
Summary of the steps
Time needed: 10 minutes
Steps to allow front-end editing for Gravity Forms entries:
- Install and activate the GravityView plugin
Download GravityView from your GravityKit account and install it on your WordPress site to unlock front-end editing features.
- (Optional) Install the Advanced Filtering extension
Install this extension to restrict entry visibility and editing based on conditions like user ID or field values.
- Create a new View to display form entries
Set up a View using your chosen form and layout (like Table) to list entries and enable editing via the front end.
- Configure the Edit Entry Layout
Choose which fields should be editable by dragging them into the Edit Entry section of your View layout.
- Enable user editing in View settings
Check the “Allow User Edit” option to let logged-in users edit only the entries they submitted.
- (Optional) Filter submissions by logged-in user
Use advanced filtering to ensure users only see and edit entries they personally submitted.
- Embed and test the front-end View
Place the View on a page using the GravityView block or shortcode, then test editing functionality from a user’s perspective.
Pro tipTest front-end editing yourself: Get your own free trial site preloaded with all GravityKit add-ons!
Step 1: Install GravityView
GravityView is an add-on for Gravity Forms that allows you to harness your form submissions for use in powerful applications. With GravityView you can display form entries and allow users to edit entries that they create—all from the front end of your site!
After installing the plugin, you should now see a new menu item in your WordPress Admin menu called “Views”. All set? Let’s move on to the next step!
Step 2 (optional): Install the Advanced Filtering Extension
If you want users to only see their own entries and not those submitted by others, install and activate the Advanced Filtering extension (available with GravityView Pro). This allows you to filter entries based on criteria like entry creator, user ID or form field values.
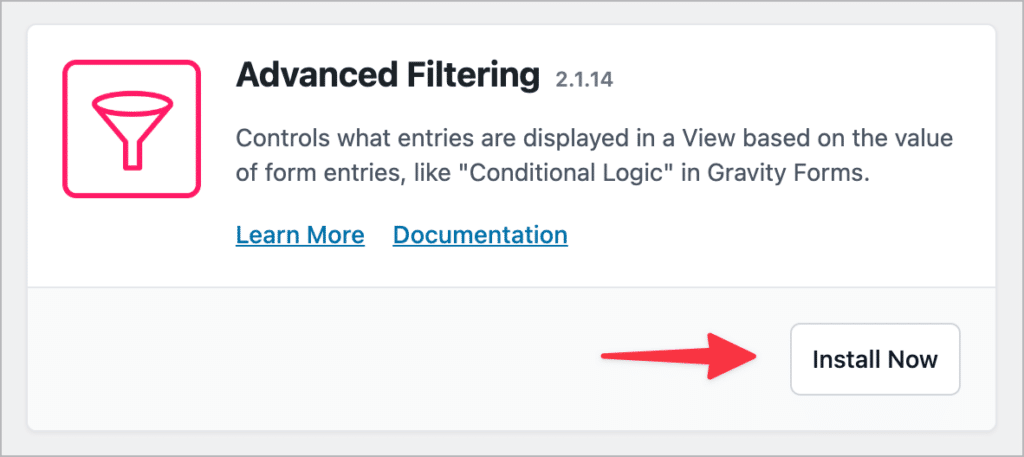
The Advanced Filtering extension is not required for front end editing in Gravity Forms. However, it is a helpful extension for controlling which entries are visible on the front end.
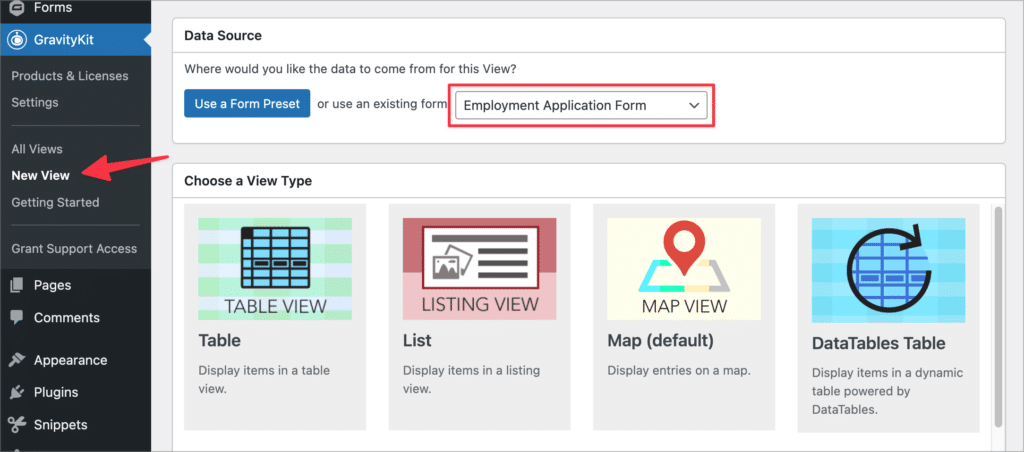
Step 3: Create a View to display entries on the front end
With GravityView, you can create a “View” to display your form data on any page or post. This View is where editing will also take place.
To create a new View, hover over “GravityKit” and click “New View”. Then:
- Give your View a name
- Choose your Gravity Form as the data source (e.g., “Job Applications”)
- Select the “Table” layout or another view type
In this example, we’re using a Gravity Form to collect employment applications. We want to create a View that will allow applicants to update their information after applying. We’ll select the “Employment Applications” form as our Data Source and select “Table” as our View Type.
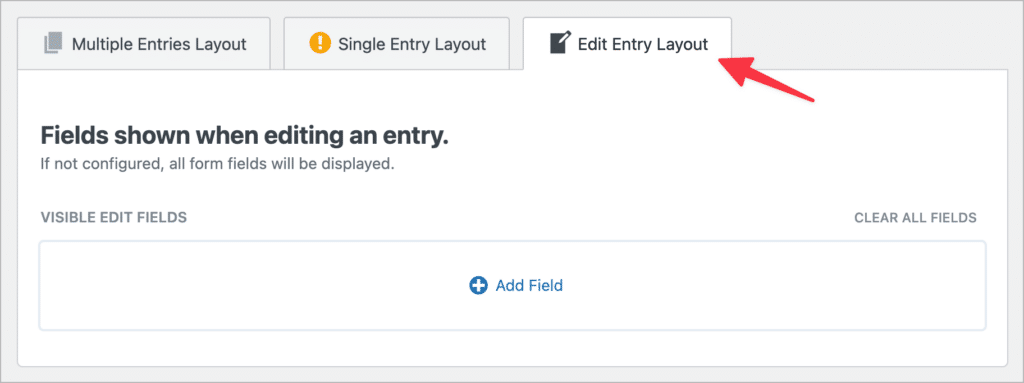
Now we can start constructing the View layout using GravityView’s drag and drop builder. A View has three main sections:
- Multiple Entries Layout: Shows a list of submissions
- Single Entry Layout: Shows one entry’s details
- Edit Entry Layout: Allows front-end editing and defines which fields are editable
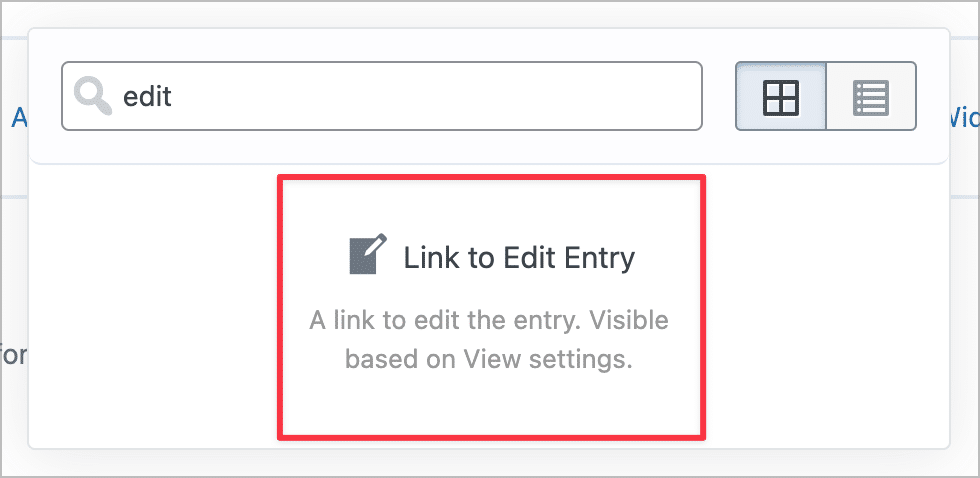
You can drag and drop form fields and widgets into the desired sections.
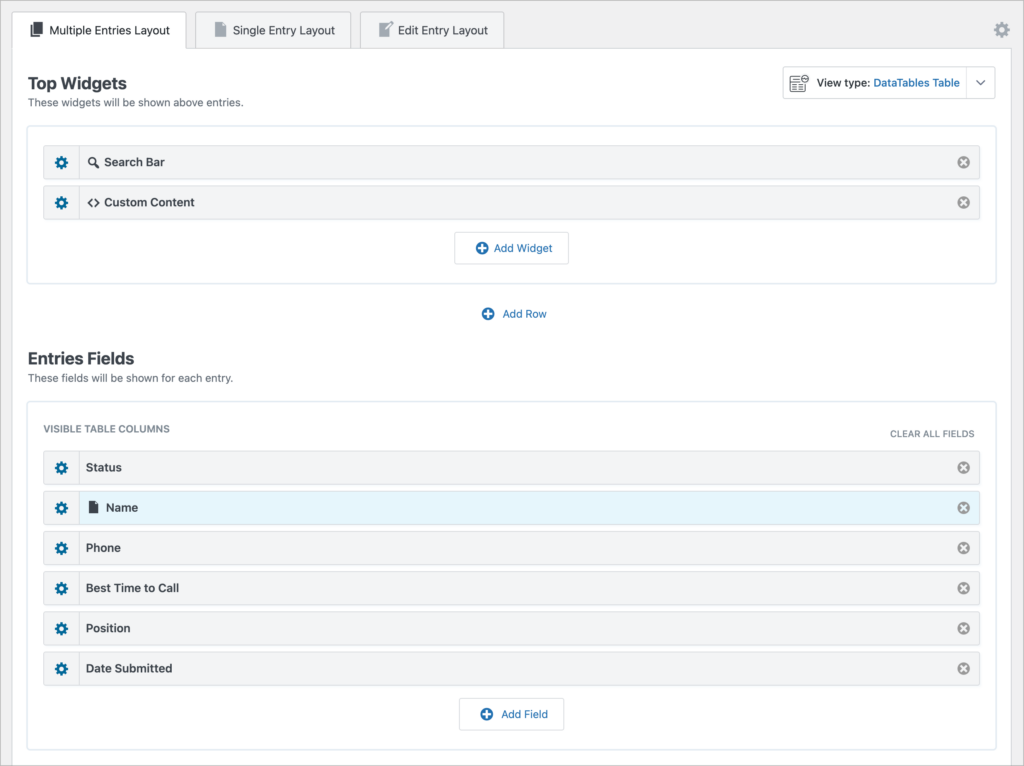
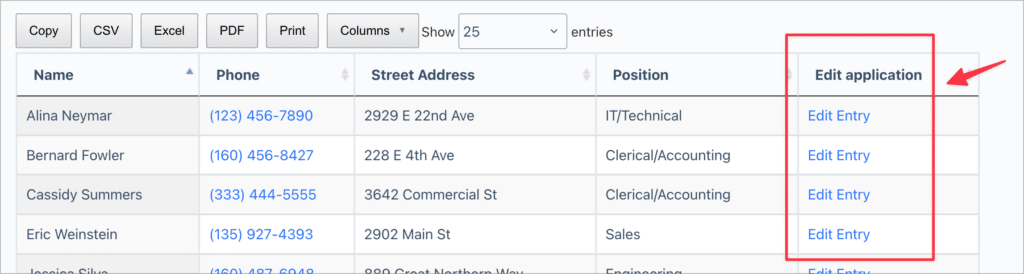
In the Multiple Entries or Single Entry Layout, add the “Link to Edit Entry” field so users can access the Edit screen.
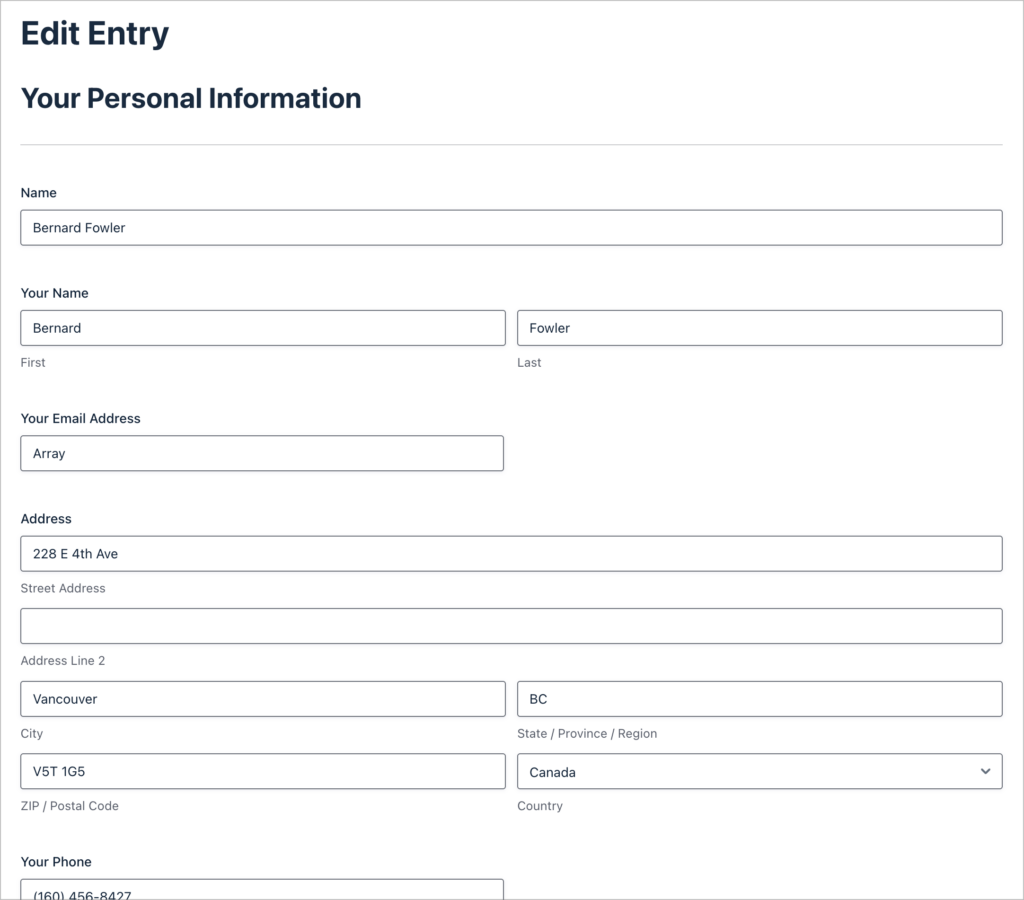
Step 4: Configure the Edit Entry Layout
To specify which form fields users can update:
- Go to the Edit Entry Layout tab
- By default, all fields are editable—leave it blank to allow full entry editing
- Want to limit editable fields? Just drag the specific ones into the layout
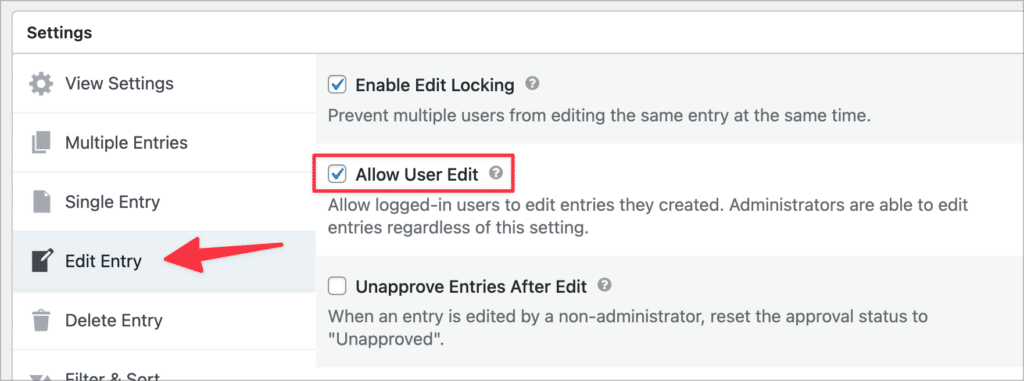
Step 5: Enable front-end editing for users
To give logged-in users the ability to edit their own entries:
- Scroll to the “View Settings” panel under your View
- Go to the “Edit Entry” tab
- Check the box labeled “Allow User Edit”
This allows users to edit entries that they submitted.
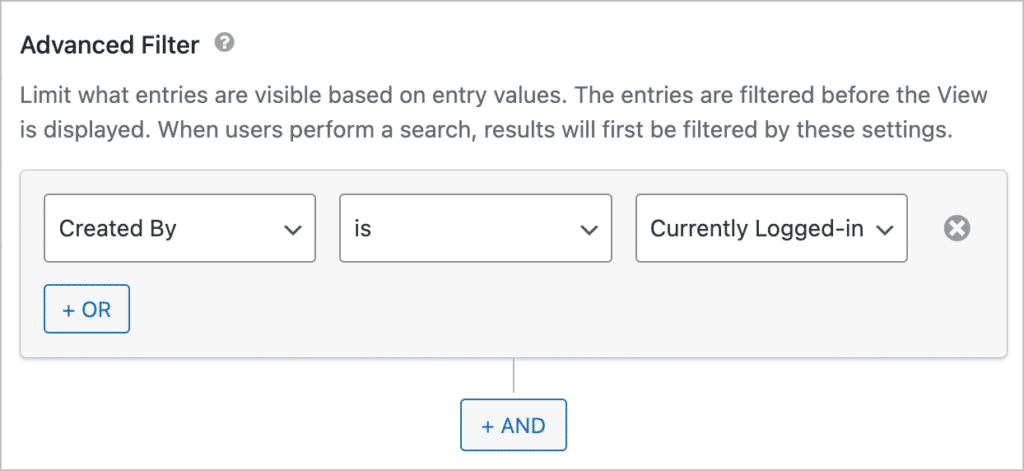
Step 6 (optional): Filter submissions by user
You may want to restrict visibility so users only see entries they created. This is helpful for private user profiles, job applications, or any data that should remain private to the user.
To do this, you’ll need to add an advanced filtering condition:
- Navigate to the “Filter & Sort” tab in View Settings
- Set an Advanced Filtering condition:
- Show entries where “Created By” is “Logged-in User”
Step 7: Test front-end editing
Now that everything’s set up, embed your View on any page using the GravityView block or shortcode. Visiting the View from the front end, users will see:
- A list of their form submissions
- An “Edit Entry” link next to each one
Clicking the link loads a form with prefilled data. After users make changes and click “Update,” edits are saved directly to the entry.
That’s it! Your users can now view and edit their Gravity Forms submission data from the front end of your website.
New in GravityView 3.0: need to manage more than one submission at a time? The Frontend Bulk Actions widget lets approved users edit, delete, export, or approve multiple entries at once from a table View, all without opening the WordPress admin.
Pro tipCheck out our live demos to see what else you can build with GravityView.
Gravity Forms front end editing with GravityView
Front-end entry editing with GravityView improves usability, boosts security, and streamlines site administration. Whether you’re managing job boards, registrations, directories, or profiles, this feature empowers users to take control of their submissions—without giving them backend access.
To get started with front-end editing for Gravity Forms, get GravityView now. If you found this post helpful, subscribe to our newsletter below so we can notify you when we publish new content.

Helpful tips right in your inbox.
Subscribe to get the latest articles, information on releases and helpful Gravity Forms tips!
More articles

How to build a conference website on WordPress (attendee registration + abstract submission)
Build a conference registration and abstract submission site on WordPress with GravityKit, no code: forms, an attendee directory, sessions, and PDF certificates.

How to build a WordPress CRM without code (a contact database you own)
Build a simple WordPress CRM with GravityView. Turn the Gravity Forms entries you already collect into a no-code contact database you own, with no monthly fees.

Launch Log: Distance sorting for radius searches, DataTables search improvements, and import reliability fixes
The latest GravityKit releases add distance sorting to map searches, bring built-in search to DataTables, and fix GravityCharts and GravityImport edge cases.