New in GravityView Pro: Live Filters, Connected Views, and more

A new reveal every day this week, available Thursday, November 12

See What’s New

Skip to content
GravityKit
Buy
Sign in
0 items
  • Plugins

    GravityKit All Access

    Our complete Kit of essential tools for extending and enhancing Gravity Forms—everything you need to build powerful web apps and workflows.

    Learn more
    • GravityView

      GravityView

      Bestseller

      Display Gravity Forms entries on the frontend of your site and build powerful web applications.

    • GravityImport

      GravityImport

      Trending

      Import entries from CSV files into Gravity Forms to transfer data, create new forms, or update existing entries.

    • GravityEdit

      GravityEdit

      Quickly edit Gravity Forms entries inline to save time, reduce clicks, and streamline your workflow.

    • GravityCharts

      GravityCharts

      Trending

      Turn Gravity Forms entries into interactive charts and graphs.

    • GravityActions

      GravityActions

      Update multiple Gravity Forms entries at once, send bulk emails, and streamline your workflow.

    • GravityCalendar

      GravityCalendar

      Turn Gravity Forms entries into dynamic calendars to showcase events, schedules, appointments, and more.

    • GravityExport

      GravityExport

      Export Gravity Forms entries to Excel, CSV, PDF, or Google Sheets, then share them with secure links or deliver them to cloud storage on a schedule.

    • GravityMath

      GravityMath

      Perform advanced calculations on Gravity Forms entries to display totals, averages, or build custom calculators.

    • GravityRevisions

      GravityRevisions

      Track, compare, and restore changes made to Gravity Forms forms and entries with a full version history.

    • GravityMigrate

      GravityMigrate

      Migrate all Gravity Forms data between sites, including forms, entries, settings, Views, feeds, and file uploads, and import forms from other form plugins.

    • GravityBoard

      GravityBoard

      Manage projects with collaborative project management. Coordinate with your team and streamline your workflows.

    • GravitySearch

      GravitySearch

      Search Gravity Forms entries across every form from one screen.

  • Ideal For

    • Nonprofits
    • Web Agencies
    • Education
    • Developers
    • Small Businesses
    • Startups
    Explore All Use Cases

    Case studies

    • Be There Local
    • Killer Shorts
    • West Fork Schools
    • Princeton University
    • BrightLeaf Giving
    • Jacksonville Port Authority
    • National Severe Storms Lab
    • Leadpal
    View All Case Studies
  • Resources

    • Blog
    • Case studies
    • Newsletter
    • GravityKit vs competitors
    • Live Demos
    • Documentation
    • Developer docs
    • GravityKit Academy

    Ultimate guides

    • How to use Gravity Forms
    • Editing Gravity Forms entries
    • Importing Gravity Forms entries
    • Exporting Gravity Forms entries
    • Displaying Gravity Forms entries
    • Gravity Forms conditional logic
    • Gravity Forms calculations
    View More Articles
  • Support
  • Pricing
  • Plugins

    • GravityView

      GravityView

      Bestseller

      Display Gravity Forms entries on the frontend of your site and build powerful web applications.

    • GravityImport

      GravityImport

      Trending

      Import entries from CSV files into Gravity Forms to transfer data, create new forms, or update existing entries.

    • GravityEdit

      GravityEdit

      Quickly edit Gravity Forms entries inline to save time, reduce clicks, and streamline your workflow.

    • GravityCharts

      GravityCharts

      Trending

      Turn Gravity Forms entries into interactive charts and graphs.

    • GravityActions

      GravityActions

      Update multiple Gravity Forms entries at once, send bulk emails, and streamline your workflow.

    • GravityCalendar

      GravityCalendar

      Turn Gravity Forms entries into dynamic calendars to showcase events, schedules, appointments, and more.

    • GravityExport

      GravityExport

      Export Gravity Forms entries to Excel, CSV, PDF, or Google Sheets, then share them with secure links or deliver them to cloud storage on a schedule.

    • GravityMath

      GravityMath

      Perform advanced calculations on Gravity Forms entries to display totals, averages, or build custom calculators.

    • GravityRevisions

      GravityRevisions

      Track, compare, and restore changes made to Gravity Forms forms and entries with a full version history.

    • GravityMigrate

      GravityMigrate

      Migrate all Gravity Forms data between sites, including forms, entries, settings, Views, feeds, and file uploads, and import forms from other form plugins.

    • GravityBoard

      GravityBoard

      Manage projects with collaborative project management. Coordinate with your team and streamline your workflows.

    • GravitySearch

      GravitySearch

      Search Gravity Forms entries across every form from one screen.

    View All Products

    GravityKit All Access

    Our complete Kit of essential tools for extending and enhancing Gravity Forms—everything you need to build powerful web apps and workflows.

    Learn more
  • Ideal For

    • Nonprofits
    • Web Agencies
    • Education
    • Developers
    • Small Businesses
    • Startups
    Explore All Use Cases

    Case studies

    • Be There Local
    • Killer Shorts
    • West Fork Schools
    • Princeton University
    • BrightLeaf Giving
    • Jacksonville Port Authority
    • National Severe Storms Lab
    • Leadpal
    View All Case Studies

    How to build...

    • Client Portal
    • AI-Built Directory
    • Conference Website
    • WordPress CRM
    • Admin Dashboard
    • Inventory Management
    • Vendor Portal
    • Document Library
    View All Guides
  • Resources

    • Blog
    • Case studies
    • Newsletter
    • GravityKit vs competitors
    • Live Demos
    • Documentation
    • Developer docs
    • GravityKit Academy

    ultimate guides

    • How to use Gravity Forms
    • Editing Gravity Forms entries
    • Importing Gravity Forms entries
    • Exporting Gravity Forms entries
    • Displaying Gravity Forms entries
    • Gravity Forms conditional logic
    • Gravity Forms calculations
    View More Articles
  • Support
  • Pricing
0 items

Search

Results appear automatically as you type.
Loading results…

results found matching

    Sign in
    Buy

    Docs

    • Docs Home

    Gravity Forms Add-Ons

    • GravityView
    • GravityActions
    • GravityBoard
    • GravityCalendar
    • GravityCharts
    • GravityEdit
    • GravityExport
    • GravityImport
    • GravityMath
    • GravityRevisions
    • GravitySearch
    • GF Widget for Elementor
    • GF Dynamic Lookup
    • GF Entry Tags
    • GF Event Field
    • GravityExport Lite
    • GF Zero Spam
    • GravityMigrate

    GravityView

    • Getting Started
    • View Setup
    • FAQ
    • Pre-Sale
    • Advanced
    • Common Problems
    • Customizing Your Views
    • Edit Entry
    • Entry Approval
    • Filter and Sort Results
    • Gravity Forms
    • Merge Tags
    • Roles and Capabilities
    • Search
    • Shortcodes
    • View Settings
    • WordPress Posts

    General Help

    • Account, Invoices, and Billing
    • License Related
    • Plugins and Settings
    • Agency accounts
    • Contact
    • Docs Home
    • Gravity Forms Add-Ons

      • GravityView
      • GravityActions
      • GravityBoard
      • GravityCalendar
      • GravityCharts
      • GravityEdit
      • GravityExport
      • GravityImport
      • GravityMath
      • GravityRevisions
      • GravitySearch
      • GF Widget for Elementor
      • GF Dynamic Lookup
      • GF Entry Tags
      • GF Event Field
      • GravityExport Lite
      • GF Zero Spam
      • GravityMigrate
    • GravityView

      • Getting Started
      • View Setup
      • FAQ
      • Pre-Sale
      • Advanced
      • Common Problems
      • Customizing Your Views
      • Edit Entry
      • Entry Approval
      • Filter and Sort Results
      • Gravity Forms
      • Merge Tags
      • Roles and Capabilities
      • Search
      • Shortcodes
      • View Settings
      • WordPress Posts
    • General Help

      • Account, Invoices, and Billing
      • License Related
      • Plugins and Settings
      • Agency accounts
    • Contact

    GravityView Pro

      • Selling listings and featured spots that end on their own
      • Showing entries added since a user’s last login
      • Showing only paid entries: filtering a View by payment status
      • (Advanced) What changed from 1.x to 2.0?
      • Advanced Filter shows no entries, or fewer than expected
      • Field Conditional Logic
      • Field Conditional Logic doesn’t hide entries
      • Filtering a View using the Assignee field from Gravity Flow
      • Filtering by entry approval status
      • Filtering by the week of the year
      • Getting started with Advanced Filtering
      • How to show only entries created by the currently logged-in user
      • How to show only entries from the current day, week, month, or year
      • I can’t type in a relative date
      • Showing only entries created by users with a certain role
      • The :disabled_admin merge tag modifier
      • Using Advanced Filtering with Multiple Forms
      • Why can’t I see the Fields dropdown?
      • Change the search parameter from “letter” to something else
      • Configuring the A-Z Filters Widget
      • The “Use this field to filter entries” setting
      • Dashboard Views: Deciding which fields to display
      • Dashboard Views: Display the View title
      • Dashboard Views: How to modify the menu icon
      • Dashboard Views: The included CSS Frameworks
      • Getting started with Dashboard Views
      • Controlling column widths and pinning columns in DataTables
      • Fixing a DataTables View that shows “This table could not load” or stays on “Loading data…”
      • Adding a company logo to DataTables PDF exports
      • Buttons (DataTables Setting)
      • Changing the style of the export buttons in DataTables
      • Customizing DataTables options in GravityView
      • DataTables Data Processing Mode (AJAX or Preloaded)
      • DataTables Field Filters
      • DataTables: is it possible to exclude fields from printing?
      • Displaying a DataTables View from a theme template
      • Enable Auto-Update (DataTables Setting)
      • Getting started with the DataTables Layout
      • Grouping rows by common field values
      • How a DataTables View sorts its entries
      • How to change the separator in DataTables CSV exports
      • How to customize the “Loading data” text
      • How to customize the “No matching records found” text
      • How to customize the Excel export file name
      • How to disable the “Loading data” message
      • How to disable the DataTables search box
      • How to Enable the Responsive Tables mode
      • How to translate the DataTables script
      • Is there a way to style the PDF on DataTables?
      • Known limitations of the Responsive Tables mode of DataTables
      • Making links clickable in DataTables PDF exports
      • Multi-sorting columns in DataTables
      • My column widths aren’t being respected when using Responsive Tables
      • My DataTables View is not sorting properly
      • Removing HTML tags from DataTables Excel exports
      • Removing the striped background from DataTables
      • Responsive (DataTables Setting)
      • Scroller (DataTables Setting)
      • Showing images and URLs in DataTables printouts
      • Showing images in DataTables PDF exports
      • Showing URLs in DataTables Excel exports
      • The Save Table State setting in DataTables
      • The text inside a column is going out of the screen
      • DIY Layout: Remove the “Go back” link
      • DIY Version 2.2 changes to HTML output
      • Getting started with the DIY Layout
      • How do I add additional container tag default options?
      • Showing Before and After Content even when field is empty
      • Getting started with the Advanced Elementor Widget for GravityView
      • Understanding the “Show Debug Output” option
      • How Move Featured Entries to Top works
      • Rank featured listings and sell featured spots
      • Getting started with Featured Entries
      • How do I change the design of a Featured entry?
      • How to always display featured entries, regardless of search results
      • How to feature an entry using PHP
      • How to visually highlight featured entries in the Recent Entries widget
      • Show only featured entries in the Recent Entries widget
      • Allowing users to delete entries when using a Magic Link
      • Fields not appearing in Edit Entry when using Magic Links?
      • Getting started with Magic Links
      • Magic Links filters
      • Preserving Magic Links parameters on password-protected Views
      • The {gv_magic_link} merge tag
      • Enabling 3D maps in the Maps Layout
      • My map won’t zoom in past a certain level
      • Showing distance and sorting by distance in radius search results
      • About custom map icons or markers
      • About GravityView Maps geocoding
      • Adding your Google Maps API Key into Divi
      • Adding your Google Maps API Key into Premium Addons for Elementor
      • Adding your Google Maps API Key into Ultimate Addons for Elementor
      • Associating a custom map pin icon (marker) with a field value
      • Can I use Maps to autocomplete addresses on my form?
      • Configuring info boxes in GravityView Maps
      • Enabling autocomplete for the Gravity Forms Address field
      • Enabling the REST API access
      • Error: Google Maps API warning: NoApiKeys
      • Error: This page can’t load Google Maps correctly
      • Filter the address field: gravityview/maps/marker/address
      • Fixing a conflict with UberMenu plugin
      • Getting started with the Maps Layout
      • Google Maps Javascript API Error “RefererNotAllowedMapError”
      • Granting Google Cloud Access to Support
      • How can I make the marker link to open in a new tab?
      • How can I pull the address from a field type that is not Address?
      • How do I display only the Map? I don’t want to display the entries under the Map.
      • How to enable and configure map marker clustering
      • How to enable radius search
      • How to hide map elements using CSS
      • How to override geocoding coordinates
      • How to show markers from multiple address fields on a map
      • Is it possible to style the map?
      • My map is gray and there are no entry markers
      • Radius Search: Request Location
      • Setting up Google Maps API keys for GravityView Maps
      • Support for OpenStreetMap or other map providers
      • Using a latitude and longitude fields to position the map markers
      • What are “Search as map moves” and “Redo search in map”?
      • Why aren’t some of my entries showing up on the map?
      • [Advanced] How to modify Ratings & Reviews entry comment titles
      • Creating a review/voting system by embedding a form into a single entry (short)
      • Getting started with Ratings & Reviews
      • How to change the description of the Star Rating titles on hover
      • How to disable email notifications for reviews
      • Issue: GravityView Single Entry page only shows “Leave a Reply”
      • Ratings & Reviews Anonymous Reviews
      • Ratings & Reviews Hooks
      • Ratings & Reviews Merge Tags
      • Keeping Views with Prevent Direct Access out of XML sitemaps
      • Getting started with Social Sharing & SEO
      • How to fix Open Graph meta tags for single entry pages when using the WordPress SEO plugin
      • Setting up SEO for Views with Yoast SEO
      • Setting up sharing buttons with JetPack
      • Getting started with PDF for GravityView
      • Using unions in Multiple Forms
      • Getting started with Multiple Forms
      • How to join a Nested Forms parent form to its child form
      • I don’t see the option to join multiple forms
      • Joins and unions in Multiple Forms
      • Known limitations of Multiple Forms
      • Multiple Forms: How the “Strict Entry Match” setting works
      • Multiple Forms: Searching entries
      • Using Advanced Filtering with Multiple Forms
      • Why does my View show the same entry more than once?
      • Adding Live Filters to a View
      • Getting started with Connected Views
      • Using the Connections Map
      • Setting an editing deadline with Edit Window
    • Home
    • Docs
    • GravityView Pro
    • Featured Entries
    • Rank featured listings and sell featured spots

    Rank featured listings and sell featured spots

    Estimated reading: 16 minutes

    Updated on November 12, 2026

    Featured Tiers lets you rank the listings you feature, such as Gold, Silver and Bronze, and give each tier its own badge and row color. A listing gets its tier from a field on the entry, from conditions you set, or from a paid order. A paid spot can end after the number of days you choose, and the listing then goes back to its usual place.

    This article uses a business directory as the example. Listings on the Gold plan paid $49 on an order form and stay featured for 28 days. Silver and Bronze come from the directory form’s Listing plan field. Free listings have no tier.
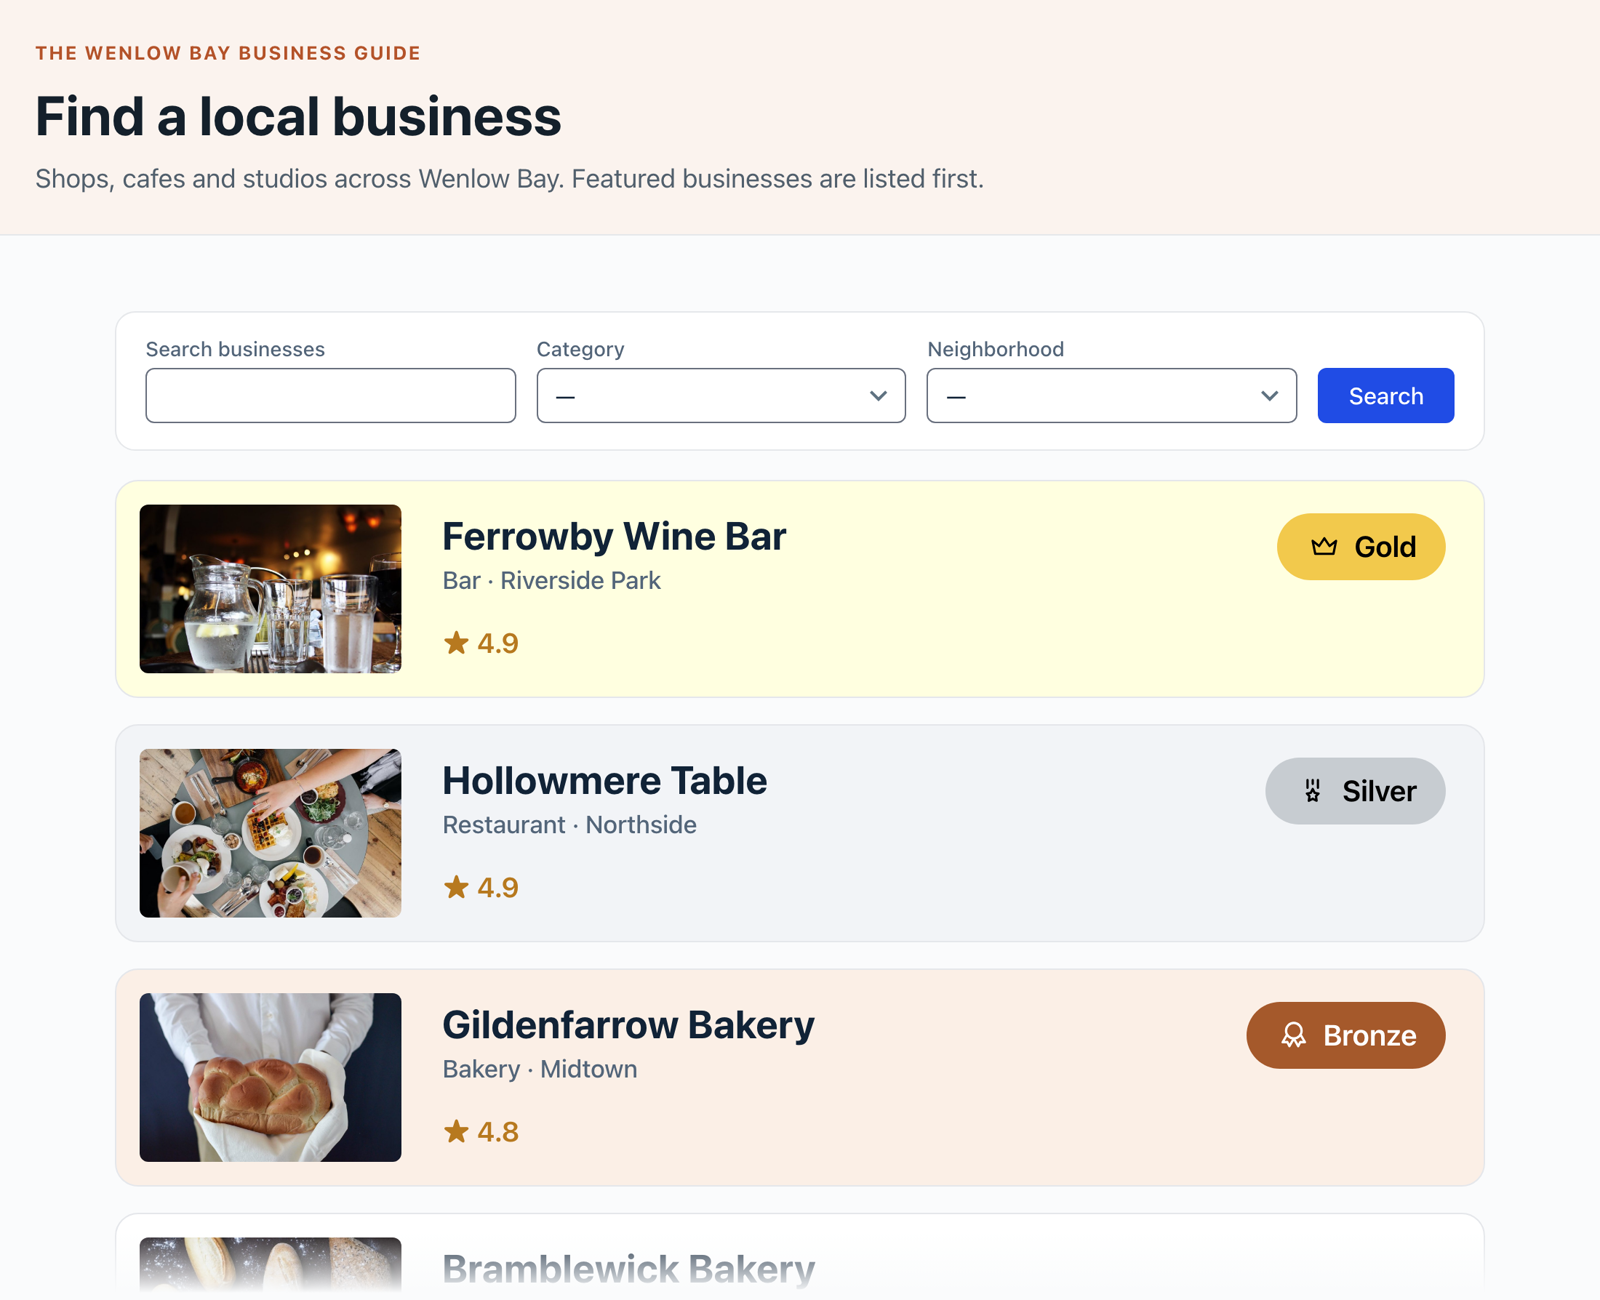
    A business directory page built with GravityView. A Gold listing sits at the top with a crown badge and a pale yellow card, then Silver and Bronze listings with their own badges and card colors, then a free listing.

    Featured Tiers is part of Featured Entries, which is included in GravityView Pro. The All Access Pass includes GravityView Pro. To sell featured spots, you also need a Gravity Forms payment add-on, such as Stripe or PayPal.

    How Featured Tiers works #

    Featured Tiers is set up in two places. You set up the tiers once on the form, then choose in each View which of them to show.

    On the form: which entries each tier features and how its badge looks. In Forms, open your directory form’s Settings, then click Featured Tiers.
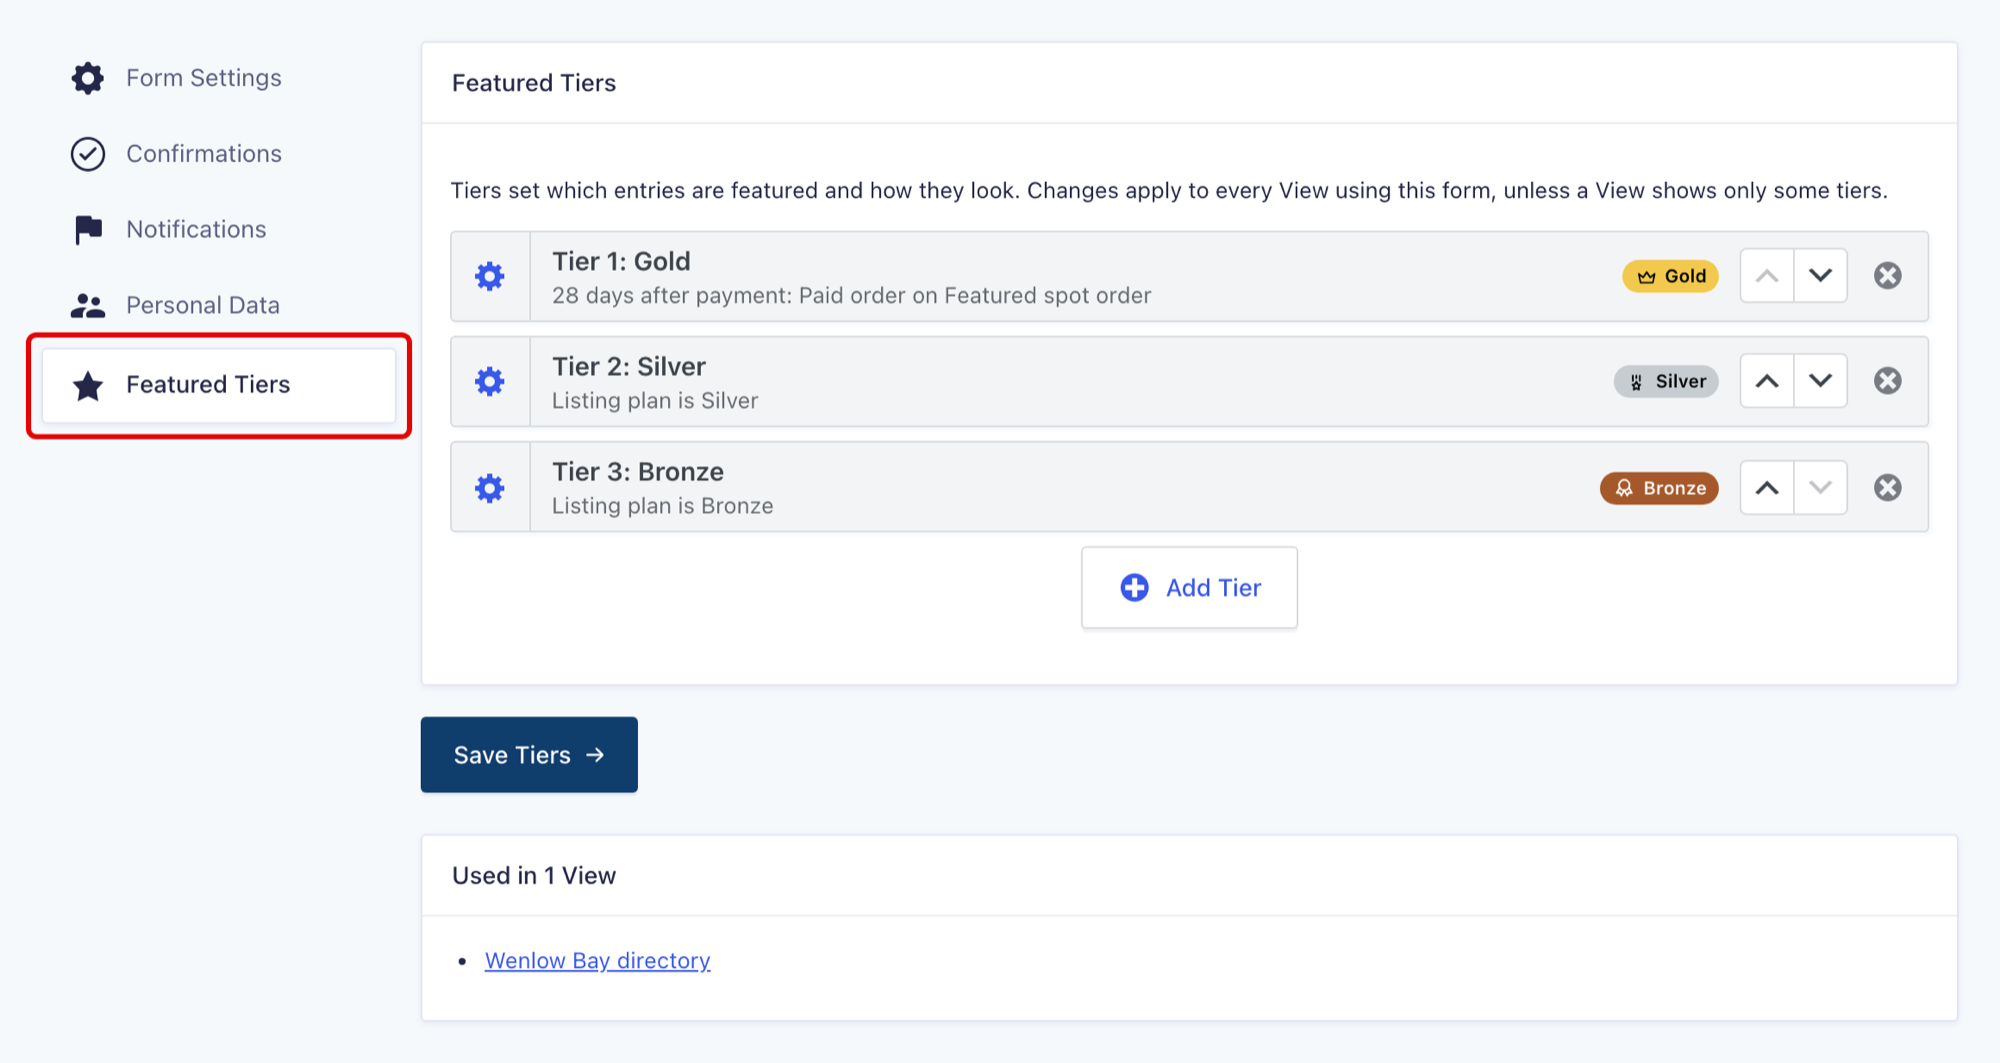
    The Featured Tiers page in a form's settings, outlined in the settings menu, with three tiers: Tier 1 Gold, 28 days after payment, paid order on Featured spot order; Tier 2 Silver, Listing plan is Silver; Tier 3 Bronze, Listing plan is Bronze. Below them are the Save Tiers button and Used in 1 View, listing Wenlow Bay directory.

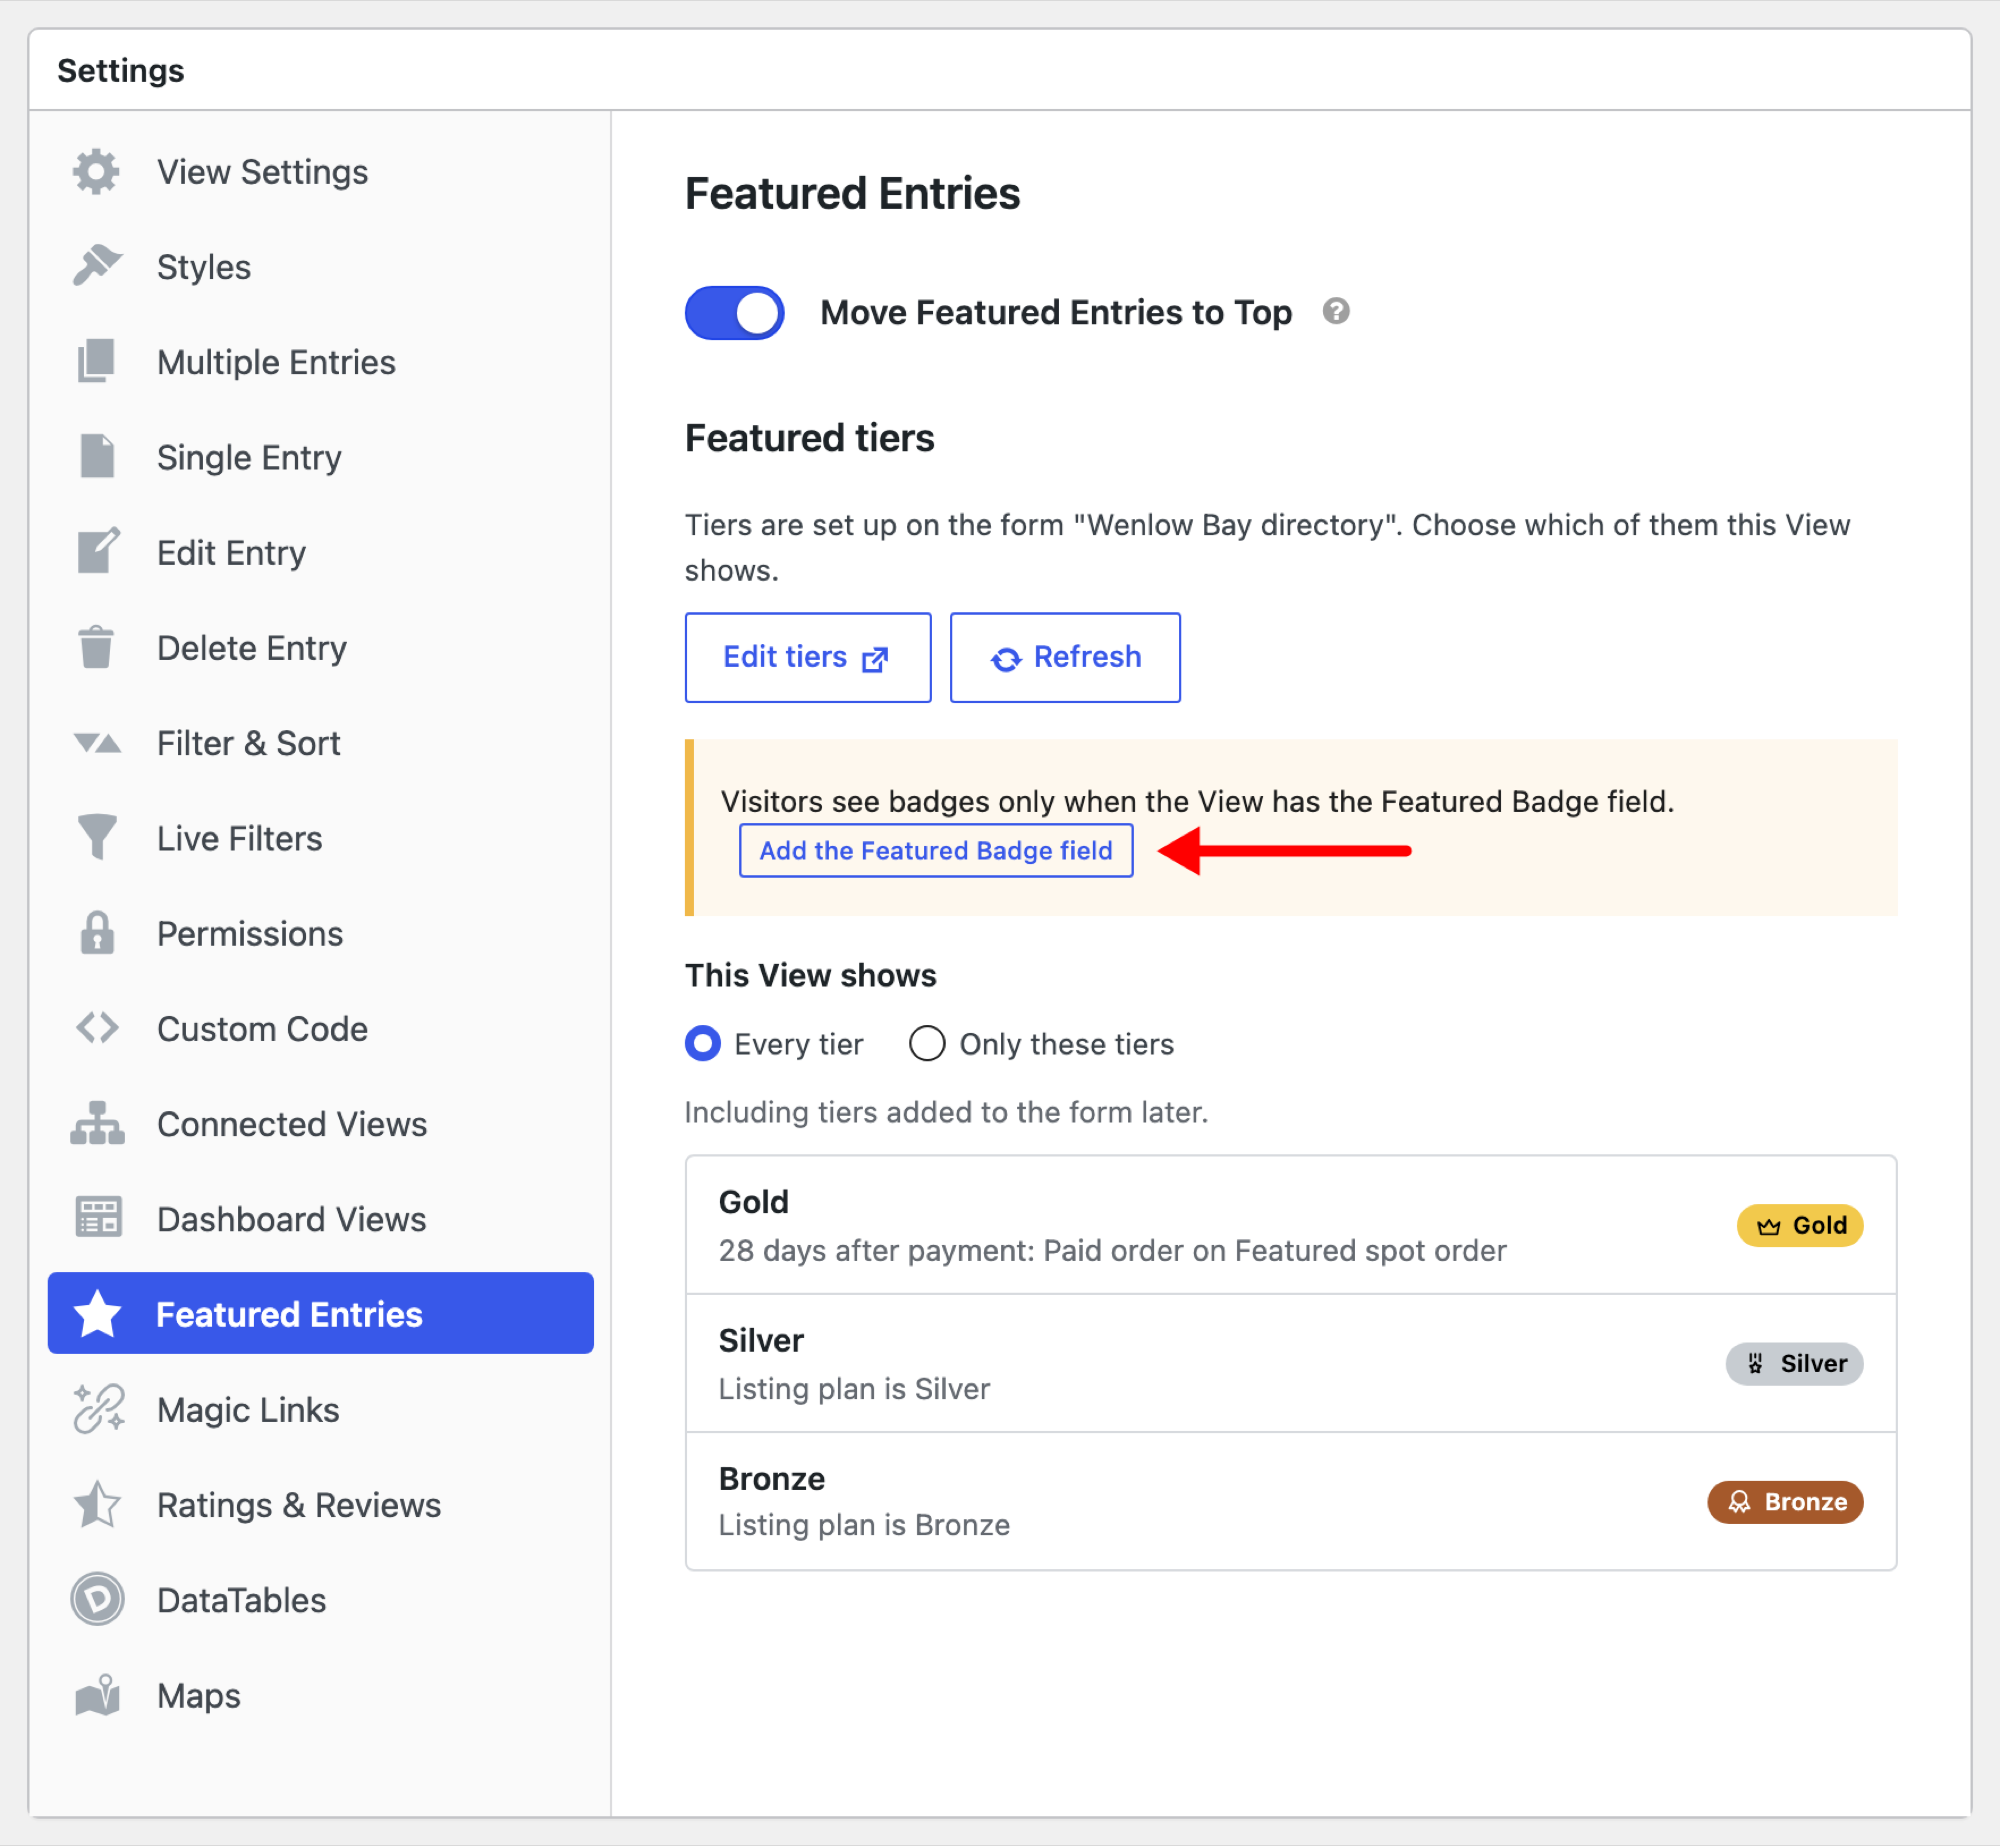
    In each View: you choose which of the form’s tiers to show, and whether featured entries move to the top. Edit the View, and in its Settings box, click the Featured Entries tab.
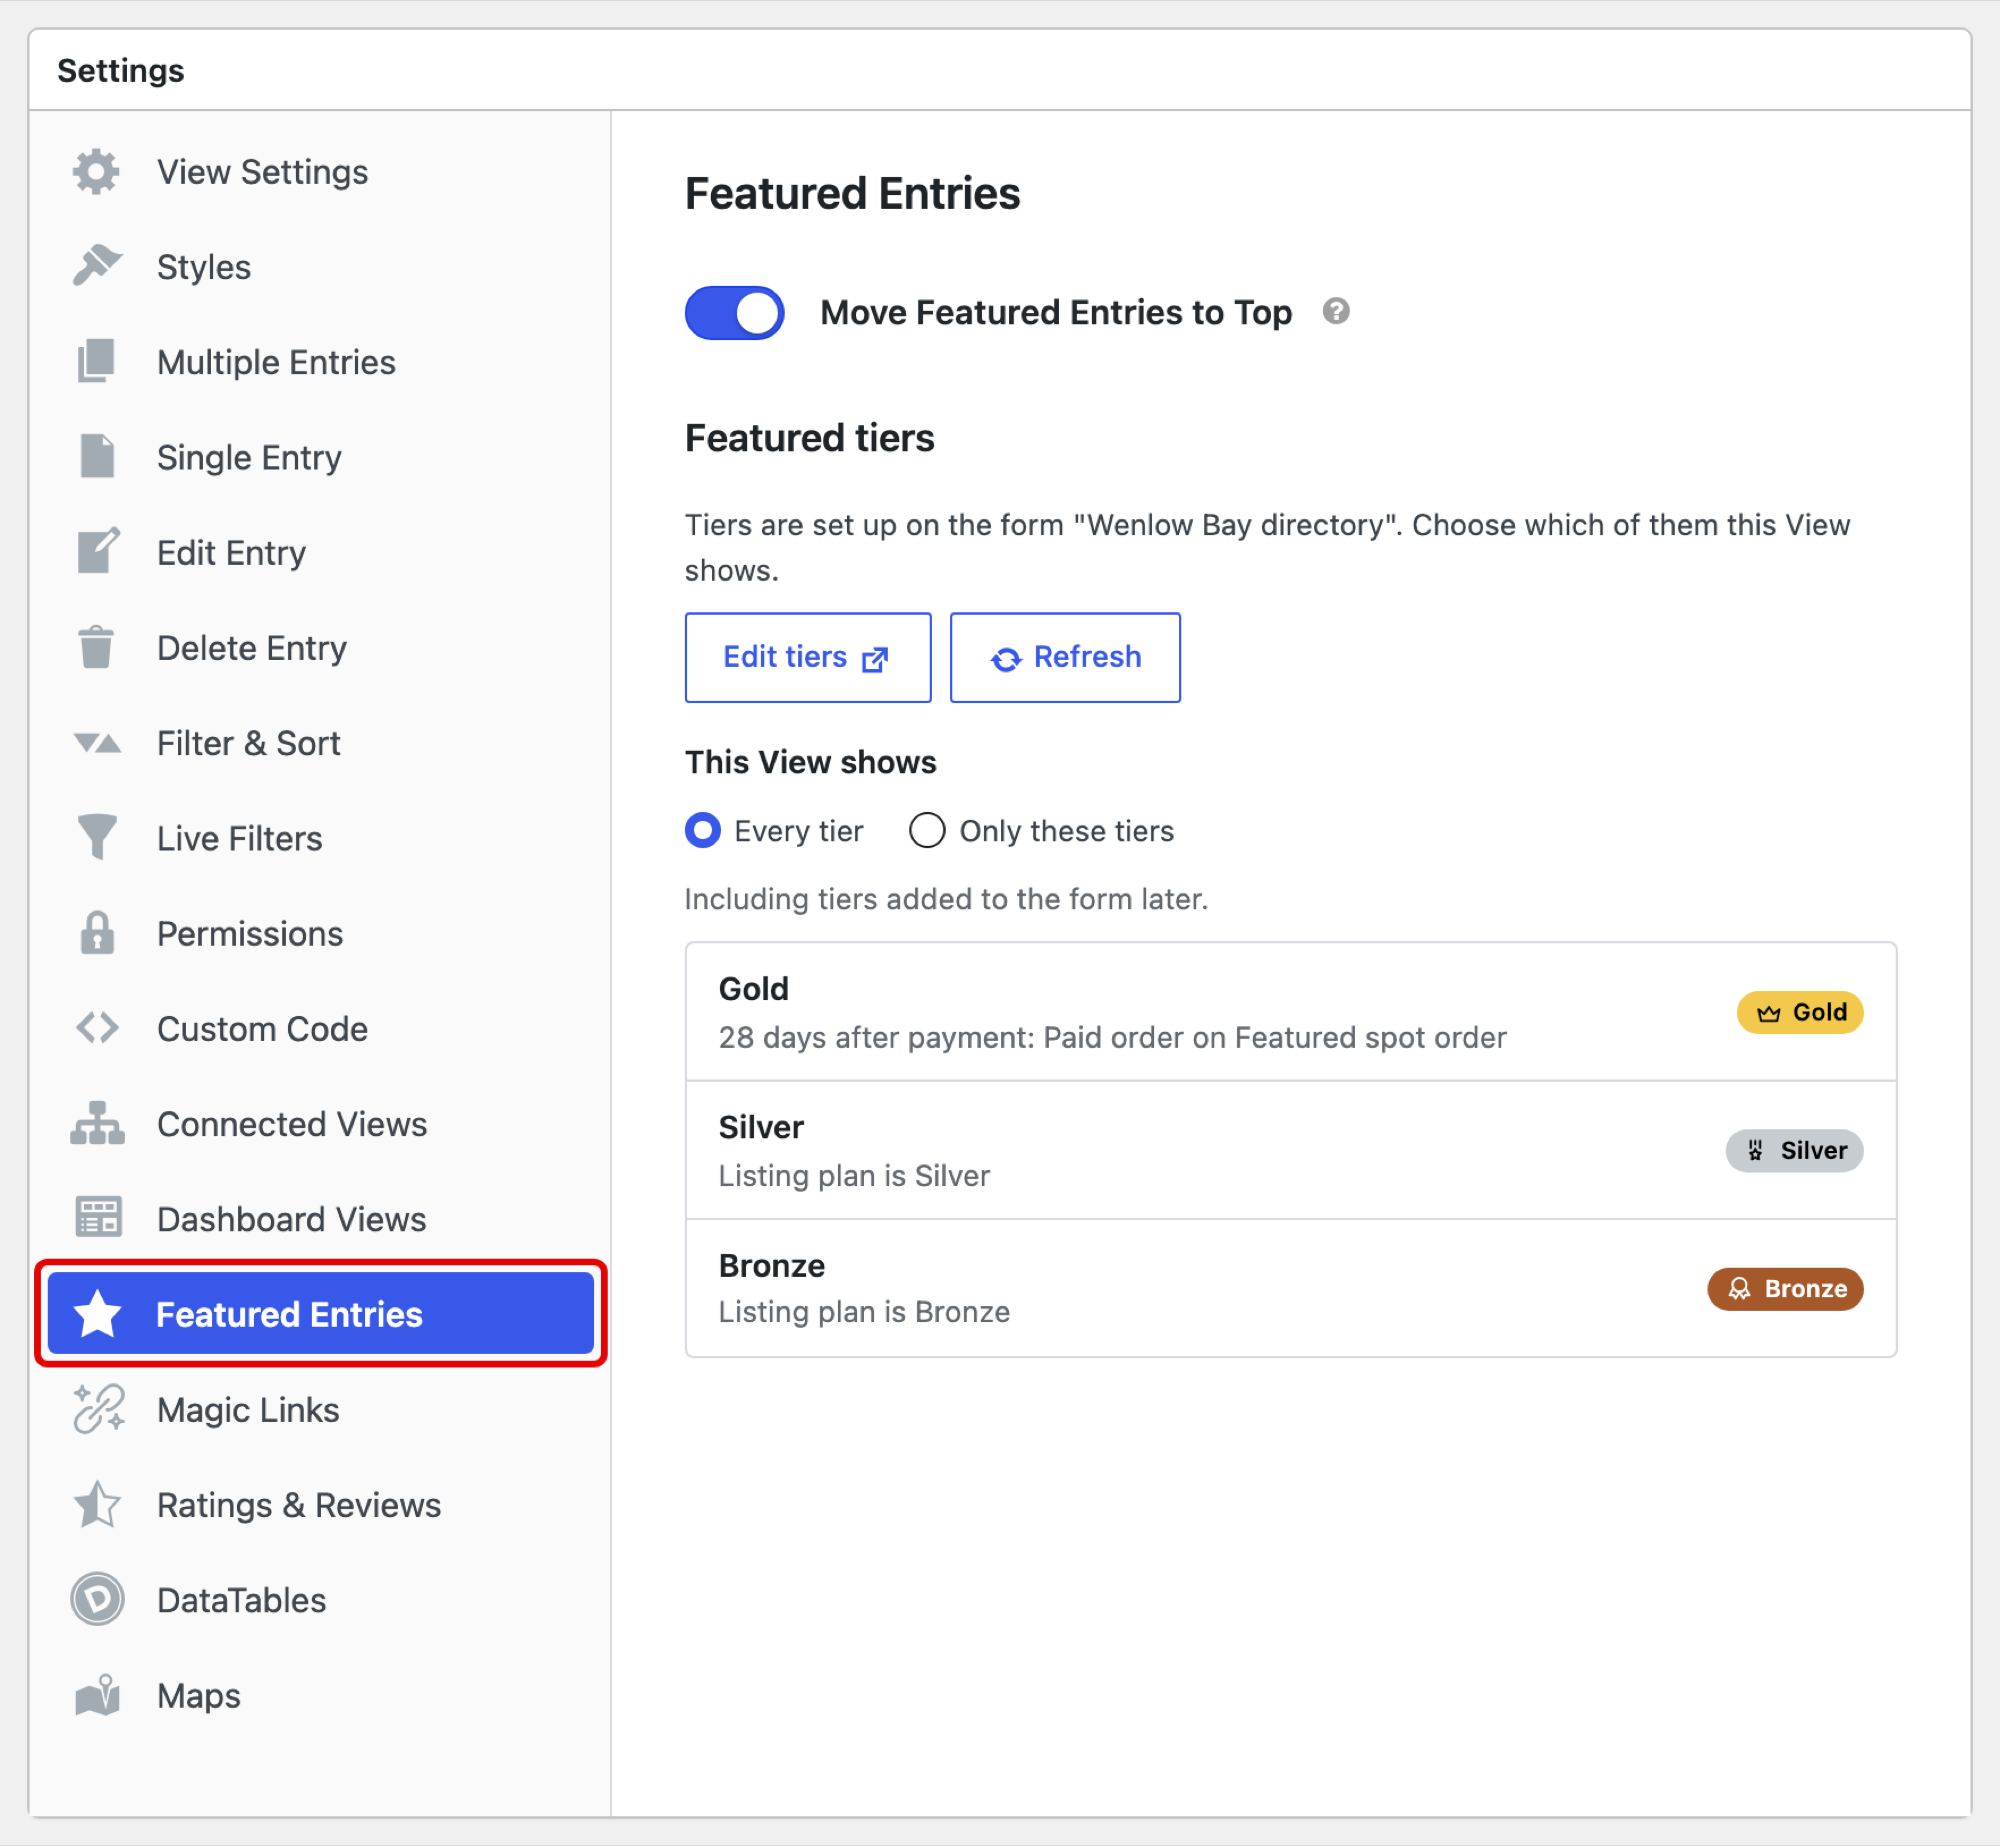
    A View's Settings box with the Featured Entries tab outlined in red. Move Featured Entries to Top is turned on, and under Featured tiers are Edit tiers and Refresh buttons, This View shows set to Every tier, and the Gold, Silver and Bronze tiers from the form.

    Keep these in mind as you set up tiers:

    • All of the form’s tiers appear in every View of it. To show fewer in one View, choose Only these tiers under This View shows.
    • A tier features entries that match conditions, entries with a paid order, or both. When both are checked, an entry must match the conditions and have a paid order.
    • An entry goes in the first tier it matches. Use the arrows next to a tier to move it up or down.
    • With Move Featured Entries to Top turned on, featured entries come first, in tier order.
    • Click Save Tiers to save your changes. Your changes appear right away wherever the tier is shown.

    Step 1: Choose how businesses pay #

    Businesses can pay for a featured spot in two ways. Pick one before you set up your tiers, or use both.

    Pay when adding the listingPay on a separate order form
    SetupA Product field with your plans, such as Listing plan, and a payment feed on the directory formAn order form with a Lookup field, a product and a payment feed
    Spots that end on their ownNo. A one-time payment keeps the listing featured for good, and a subscription keeps it featured while it’s activeYes, after the number of days you set
    Upgrade a listing laterNo. Businesses pay only when they add the listingYes, from an email link or a “My Listings” page

    To take payment when a listing is added, follow Step 2 and turn on Feature entries only while their payment is current (Paid or Active). To sell spots on a separate order form, follow Step 3.

    Step 2: Create tiers from a field #

    If your form already has a field for the listing’s plan, you can create one tier for each of its choices. The field must be a Drop Down or Radio Buttons field.

    No field like this on your form? You can create tiers from conditions instead, as in Feature listings with conditions, or from paid orders, as in Step 3: Sell featured spots.

    1. In Forms, open your directory form’s Settings, then click Featured Tiers.
    2. Click Add Tier, then Tiers from a field.
    3. In Field, choose the field.
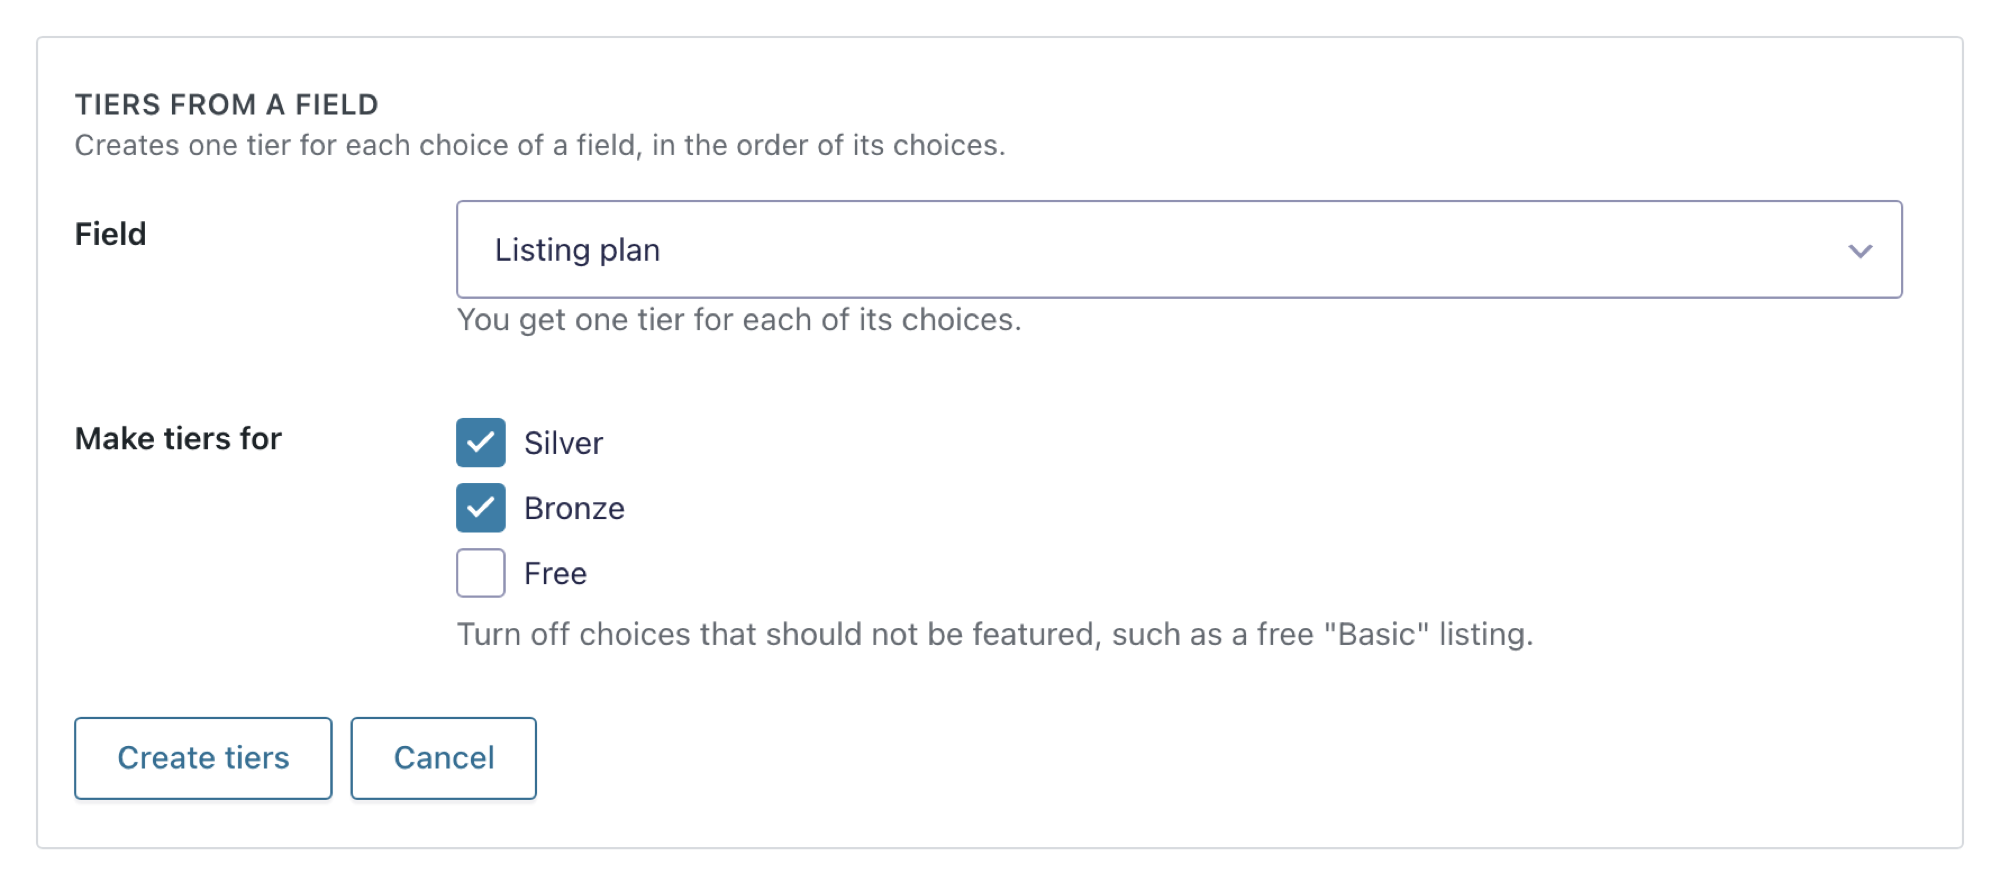
    4. Under Make tiers for, turn off the choices that shouldn’t be featured, such as Free.
    5. If buyers pay for the plan on the same form, turn on Feature entries only while their payment is current (Paid or Active), so a listing that hasn’t paid isn’t featured. This option only shows when the form has a product field.
    6. Click Create tiers, then Save Tiers.
    Tiers from a field, with Listing plan chosen. Under Make tiers for, Silver and Bronze are checked and Free is not.

    You get one tier for each choice, in the order of the field’s choices, and each tier is named after its choice. New tiers go below the tiers you already have. To rank them higher, use the arrows next to a tier.

    If the form has starred entries, you’ll also see Keep featuring starred entries. Leave it on to keep them featured in their own tier, above the new tiers, or turn it off to feature only the new tiers. In this example, turn it off: the new tiers replace the listings you starred by hand.

    Step 3: Sell featured spots #

    A paid tier features a listing when its owner pays on a separate order form. In the example, the Gold tier features a listing for 28 days after payment.

    Before you start, install and activate:

    • The free Gravity Forms Dynamic Lookup add-on, so buyers can pick their listing on the order form
    • A Gravity Forms payment add-on, such as Stripe or PayPal, connected to your payment account (see Take payment below)

    Create the order form

    The order form is a separate form where a business picks its listing and pays. Don’t add these fields to your directory form.

    In Forms, click Add New and create a form, such as “Featured spot order”, with a short description of what businesses are buying, such as “Put your business at the top of the directory for 28 days.” Add:

    • A Lookup field (under Advanced Fields), where buyers pick the listing to feature. Give it a label such as “Your listing”.
    • A Product field with the price, such as a Single Product called “Gold listing (28 days)” for $49. To sell several packages, such as Gold and Silver, set the Product field’s Field Type to Drop Down or Radio Buttons and give each package its own choice. Turn on Disable quantity field too, or the total stays at $0.00 until the buyer types a quantity.
    • An Email field, so the buyer gets a receipt.
    • A Total field.

    You set how many days a spot lasts later, in the tier.

    Set up the Lookup field

    Click the Lookup field to open its settings. Under General:

    • Source Form: your directory form.
    • Source Field: the field buyers recognize, such as Business name.
    • Required (under Rules): turn it on, so every order names a listing.
    • Show only entries created by current user: turn it on only if businesses log in to buy, so each one can pay only for its own listings. Leave it off if businesses follow a link from an email: they aren’t logged in, so their listing wouldn’t be in the list.
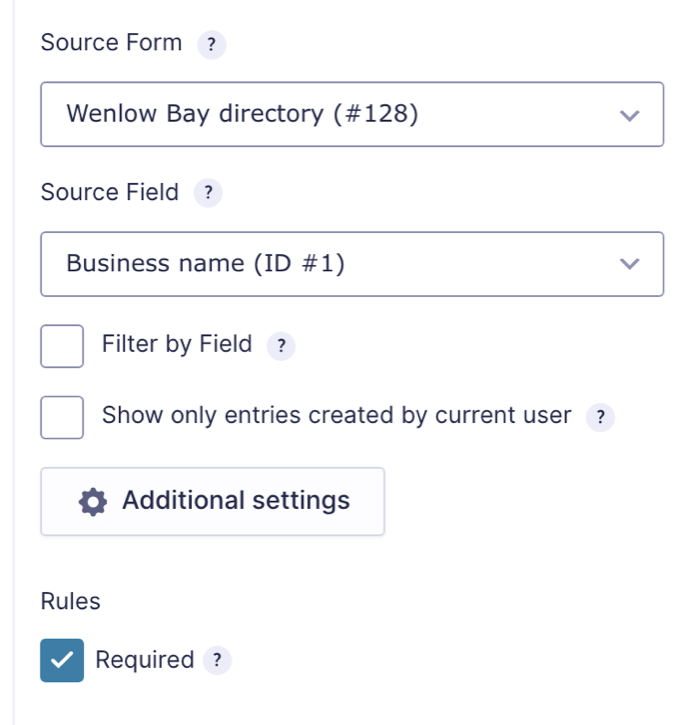
    The Lookup field's General settings: Source Form is Wenlow Bay directory, Source Field is Business name, Show only entries created by current user is off and Required is on.

    Under Appearance, type Choose your listing in Placeholder. Without a placeholder, the list starts on the first listing, and a buyer who doesn’t check could pay for the wrong one.

    Under Advanced:

    • Leave Storage Format on ID (Default) and Enable multiple selections off, so each order names one listing by its ID.
    • Make sure Allow field to be populated dynamically is on, and type listing in Parameter Name. A link that ends in ?listing= and a listing’s entry ID opens the form with that listing already chosen.
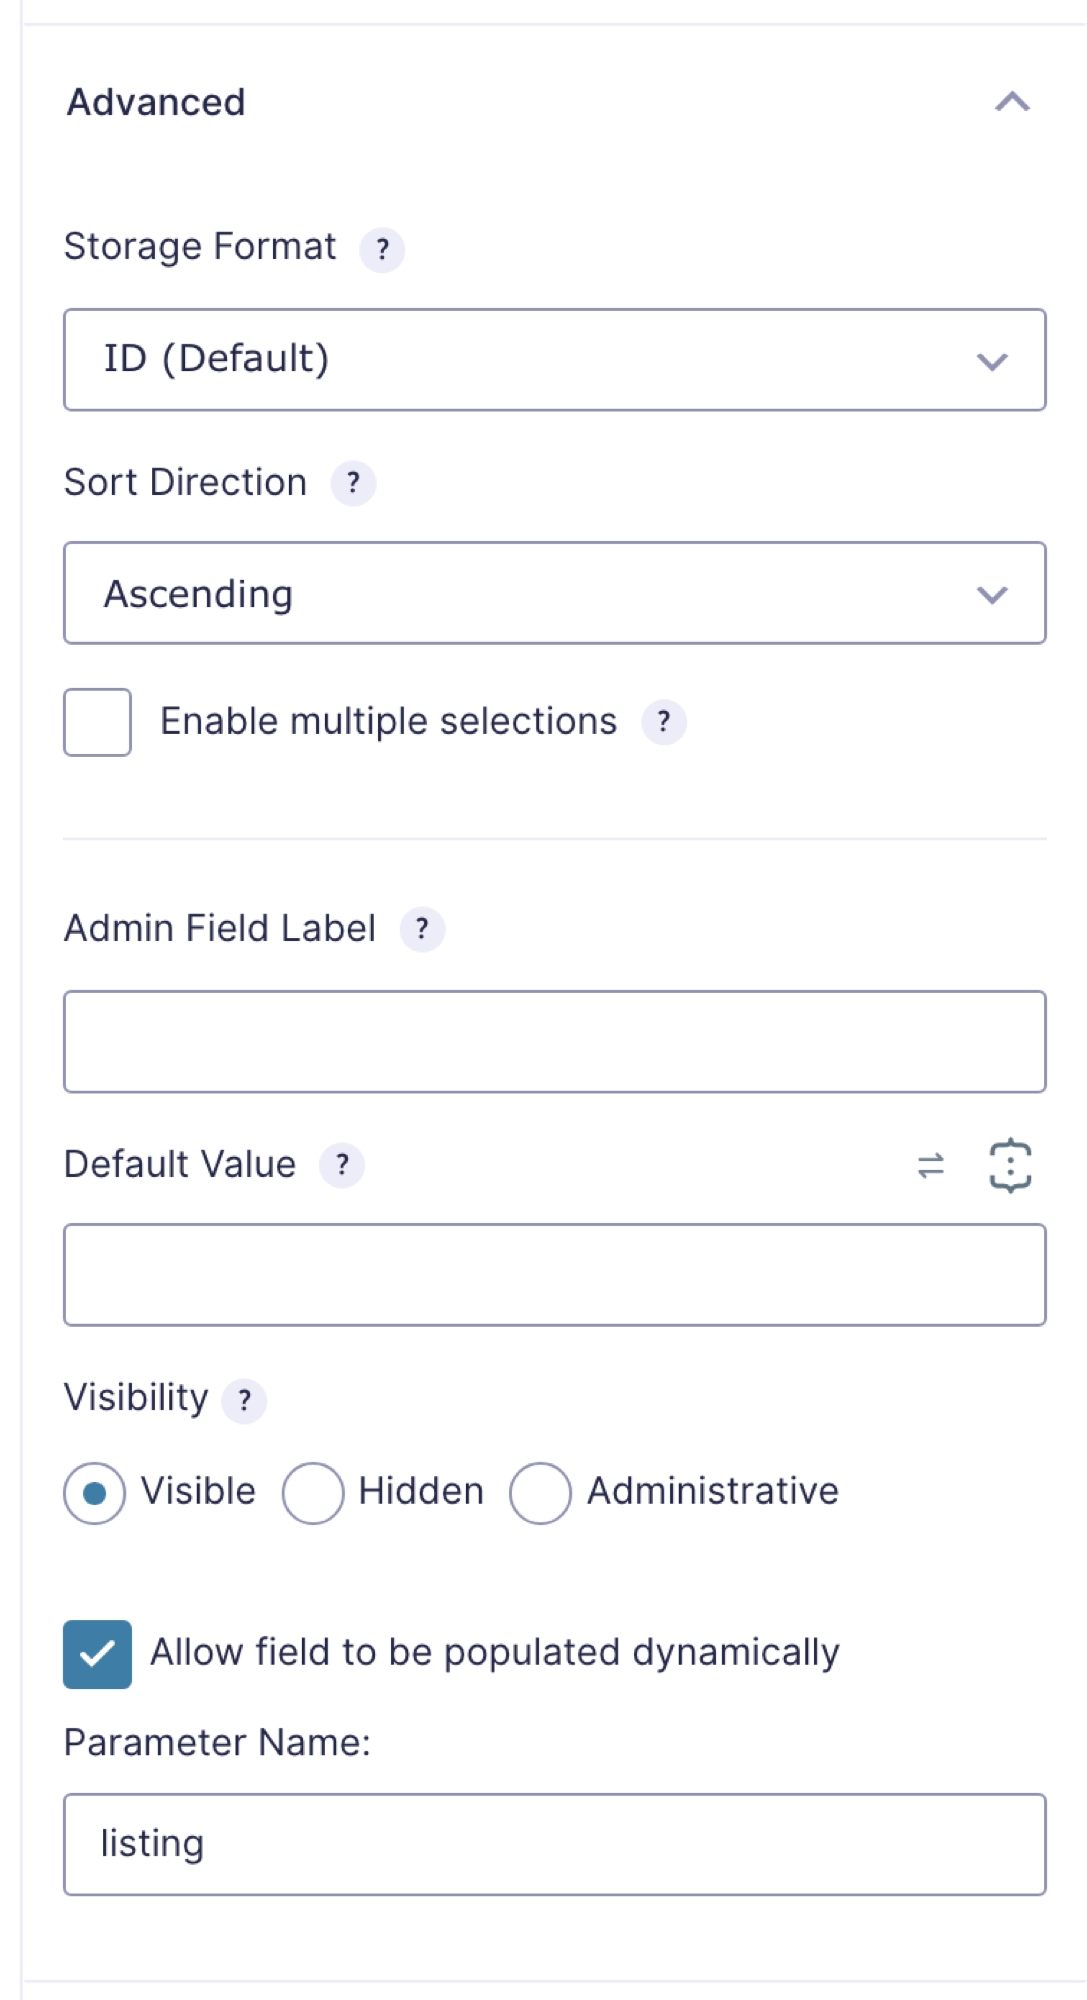
    The Lookup field's Advanced settings: Storage Format is ID (Default), Enable multiple selections is off, and Allow field to be populated dynamically is on with the Parameter Name listing.

    Click Save Form. If the Lookup field is missing a setting, the tier’s settings say so and name the field and the setting to fix.

    Take payment

    A spot is featured once its order is marked Paid, or Active for a subscription. Your payment add-on does that when the buyer pays.

    Connect your payment add-on before you add a feed. Stripe, for example, needs an SSL certificate (an https:// site), your Stripe account connected under Forms, then Settings, then Stripe, and a Stripe field (under Pricing Fields) on the order form. See Setting up the Stripe add-on.

    Open the order form’s Settings, then your payment add-on, such as Stripe, and add a feed. For a one-time payment, choose Products and Services as the Transaction Type. For a monthly spot, choose Subscription: the listing stays featured while the subscription is active.

    If a listing doesn’t move up after its owner pays, open the order in Forms, then Entries, and check that its payment status is Paid. An order taken without a payment feed is never marked Paid, so it doesn’t feature a listing.

    Put the order form on a page

    Add the order form to a page, such as “Feature your business”, with the Gravity Forms Form block, and publish the page. A link to that page with ?listing= and a listing’s entry ID, such as /feature-your-business/?listing=7998, opens the form with that listing chosen.
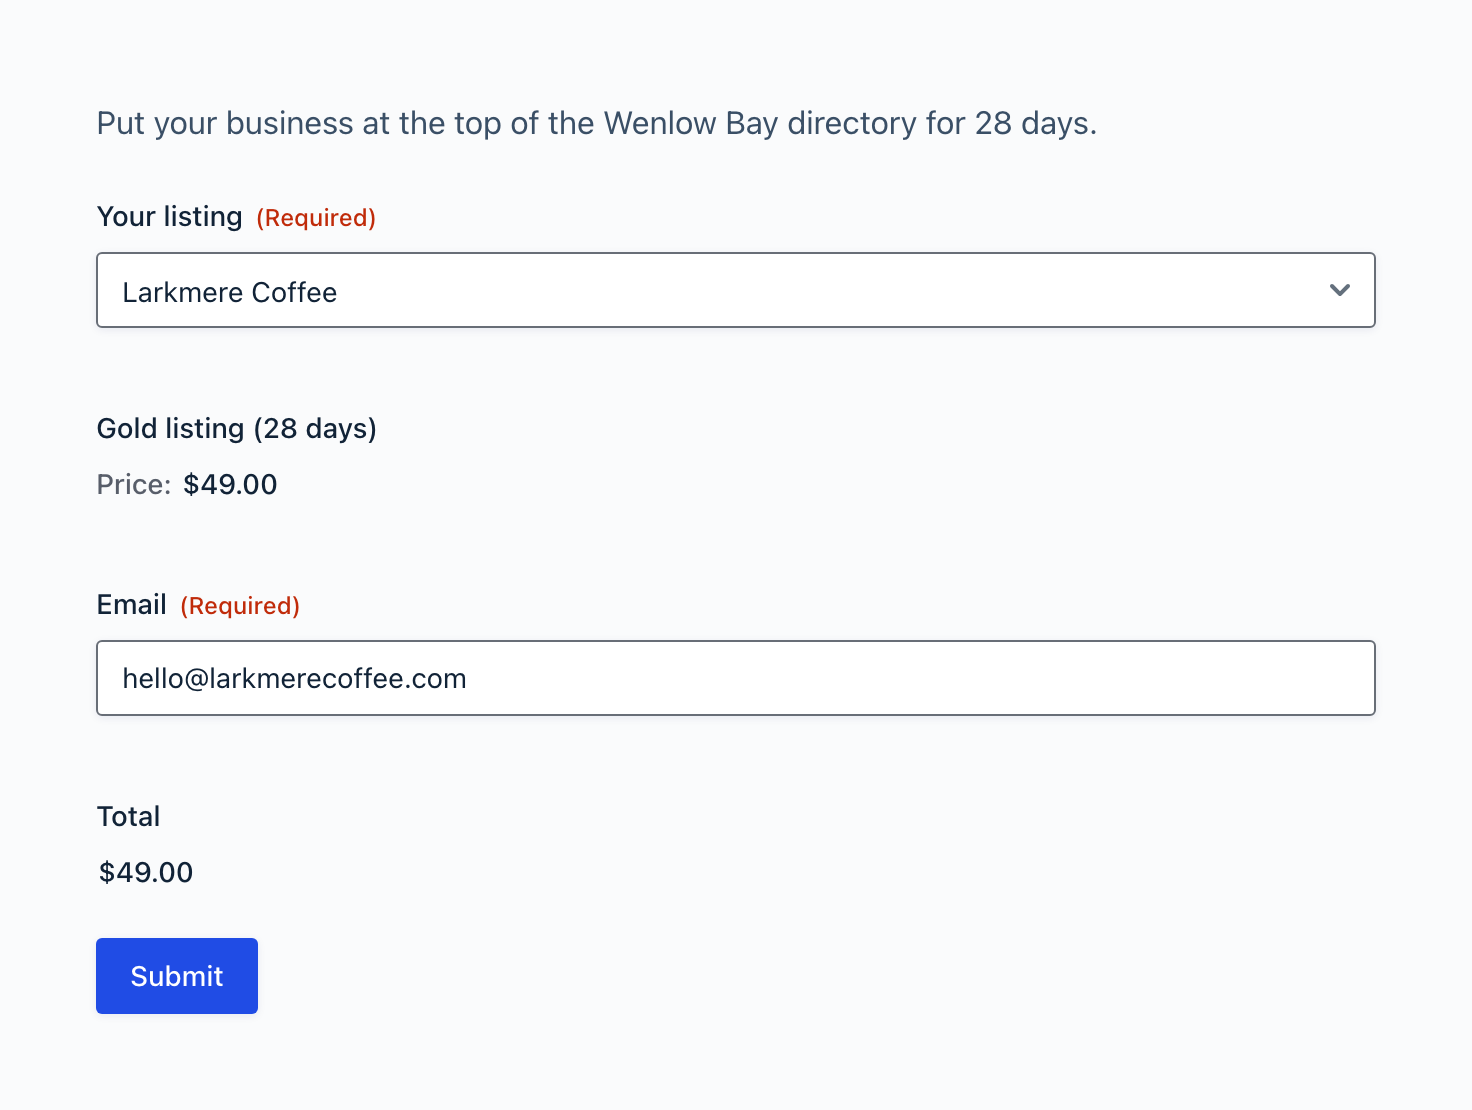
    The order form on the Feature your business page, with Larkmere Coffee already chosen in Your listing, the Gold listing (28 days) product at $49.00, an Email field and the total.

    Create the paid tier

    Next, create the tier that features a listing once its order is paid.

    1. On your directory form’s Featured Tiers page, click Add Tier, then Tiers from an order form.
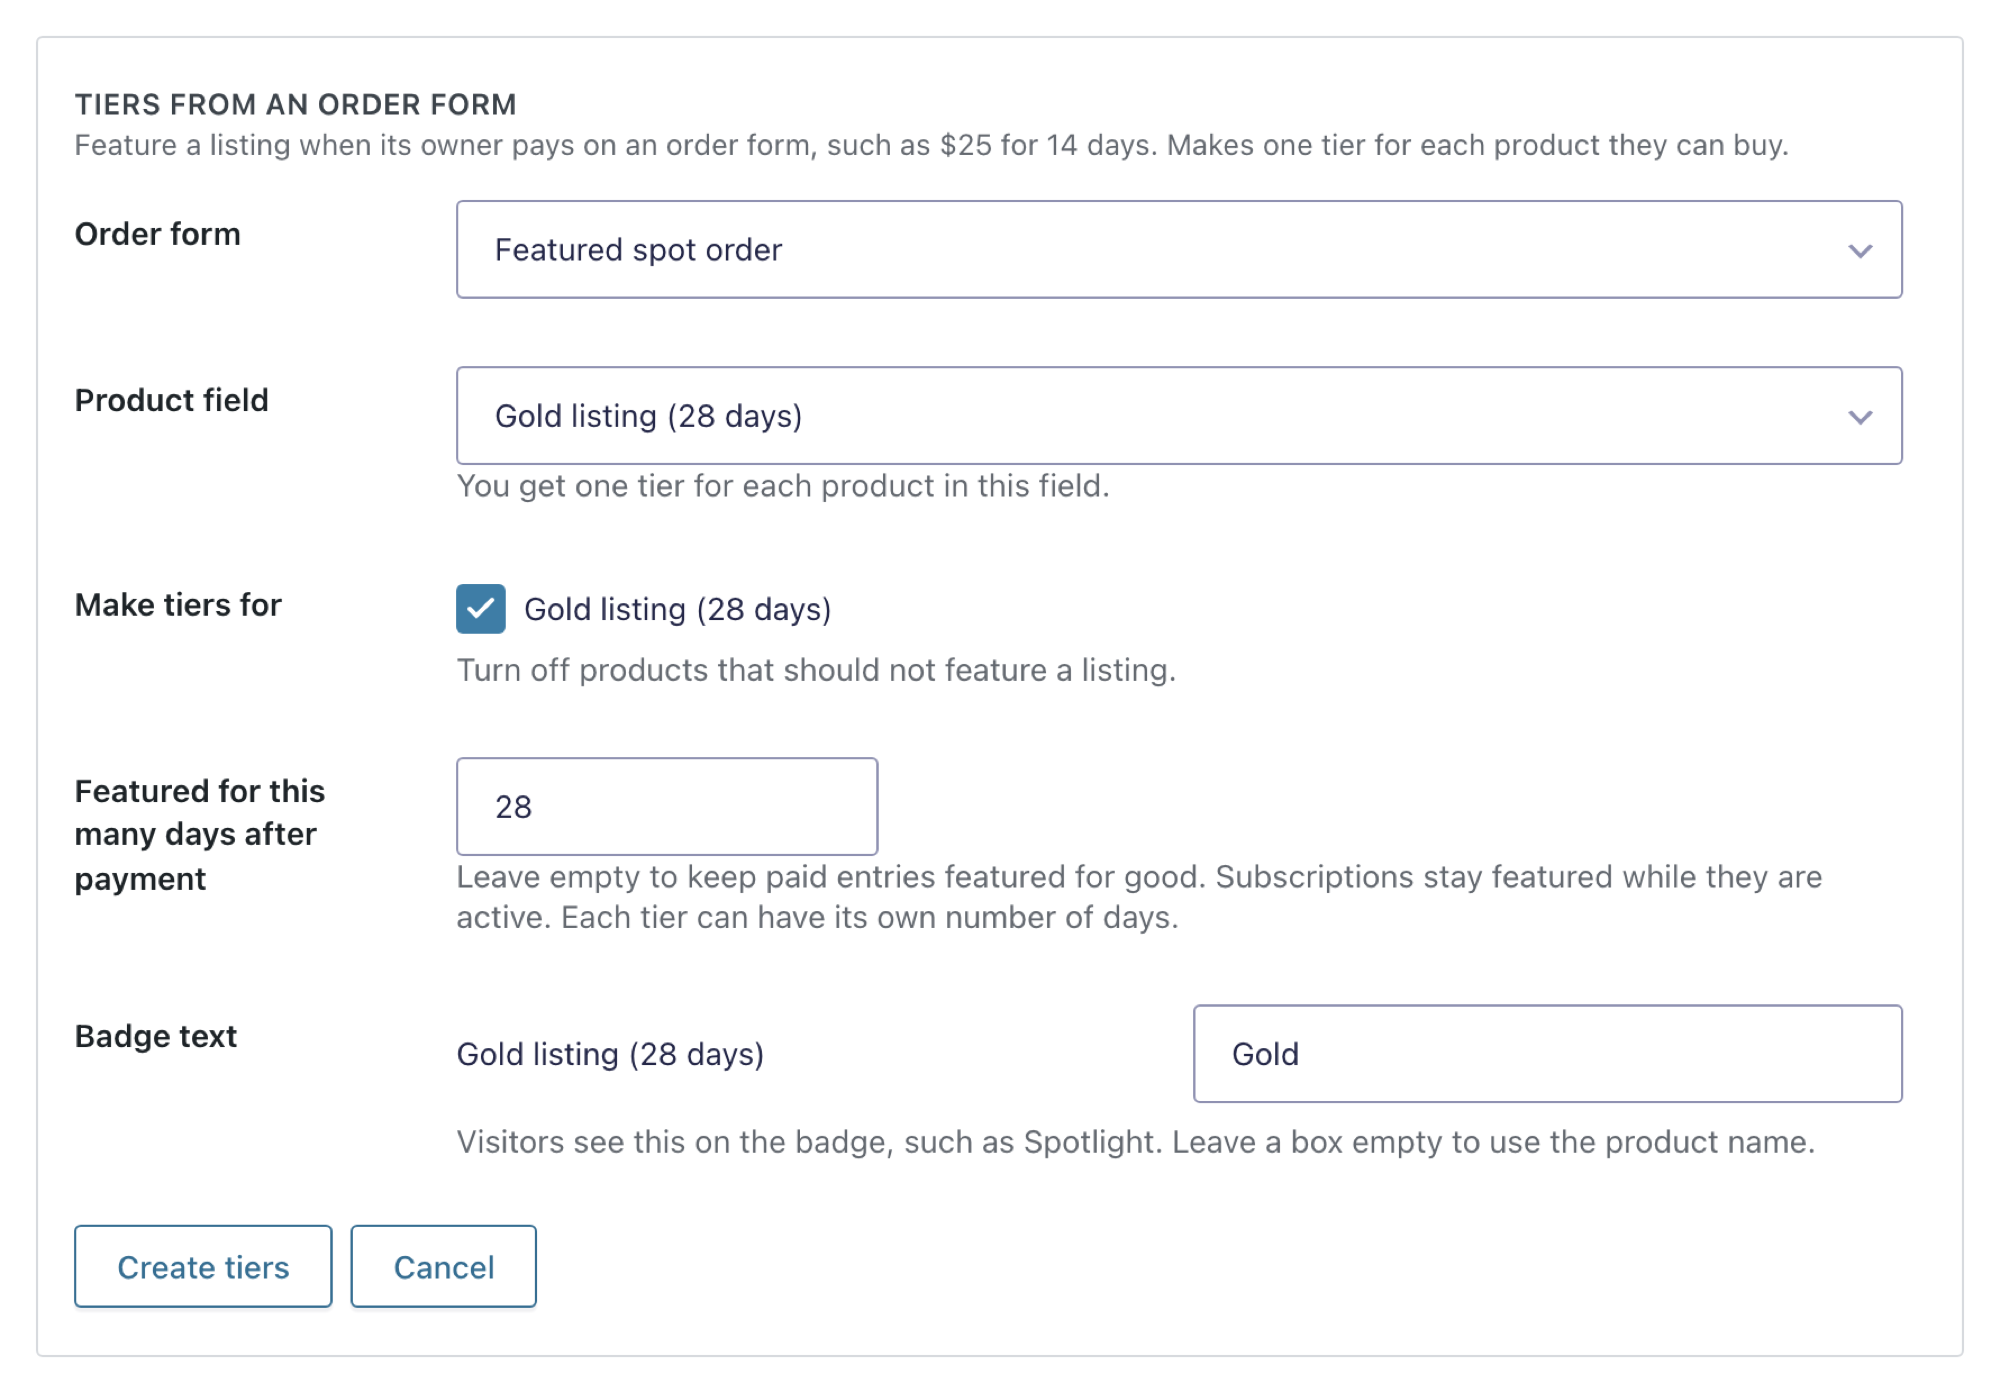
    2. Choose the order form and its Product field. You get one tier for each of its products. Turn off any product that shouldn’t feature a listing.
    3. In Featured for this many days after payment, type the number of days, such as 28. Leave it empty to keep paid listings featured for good.
    4. In Badge text, type the words for the badge, such as Gold. Leave it empty to use the product name.
    5. Click Create tiers. The new tier’s settings open, and the tier is named after the product. In Tier name, type a shorter name such as Gold, then click Done.
    6. Use the arrows to put the paid tier where you want it. In the example, Gold is first.
    7. Click Save Tiers.
    Tiers from an order form, with the Featured spot order form and its Gold listing (28 days) product chosen, Featured for this many days after payment set to 28, and Badge text Gold.

    To connect an order form to a tier you already have, open the tier’s settings, check Entries with a paid order and choose the Order form. Only orders for limits the tier to one product, or leave it on Any product on the order form.
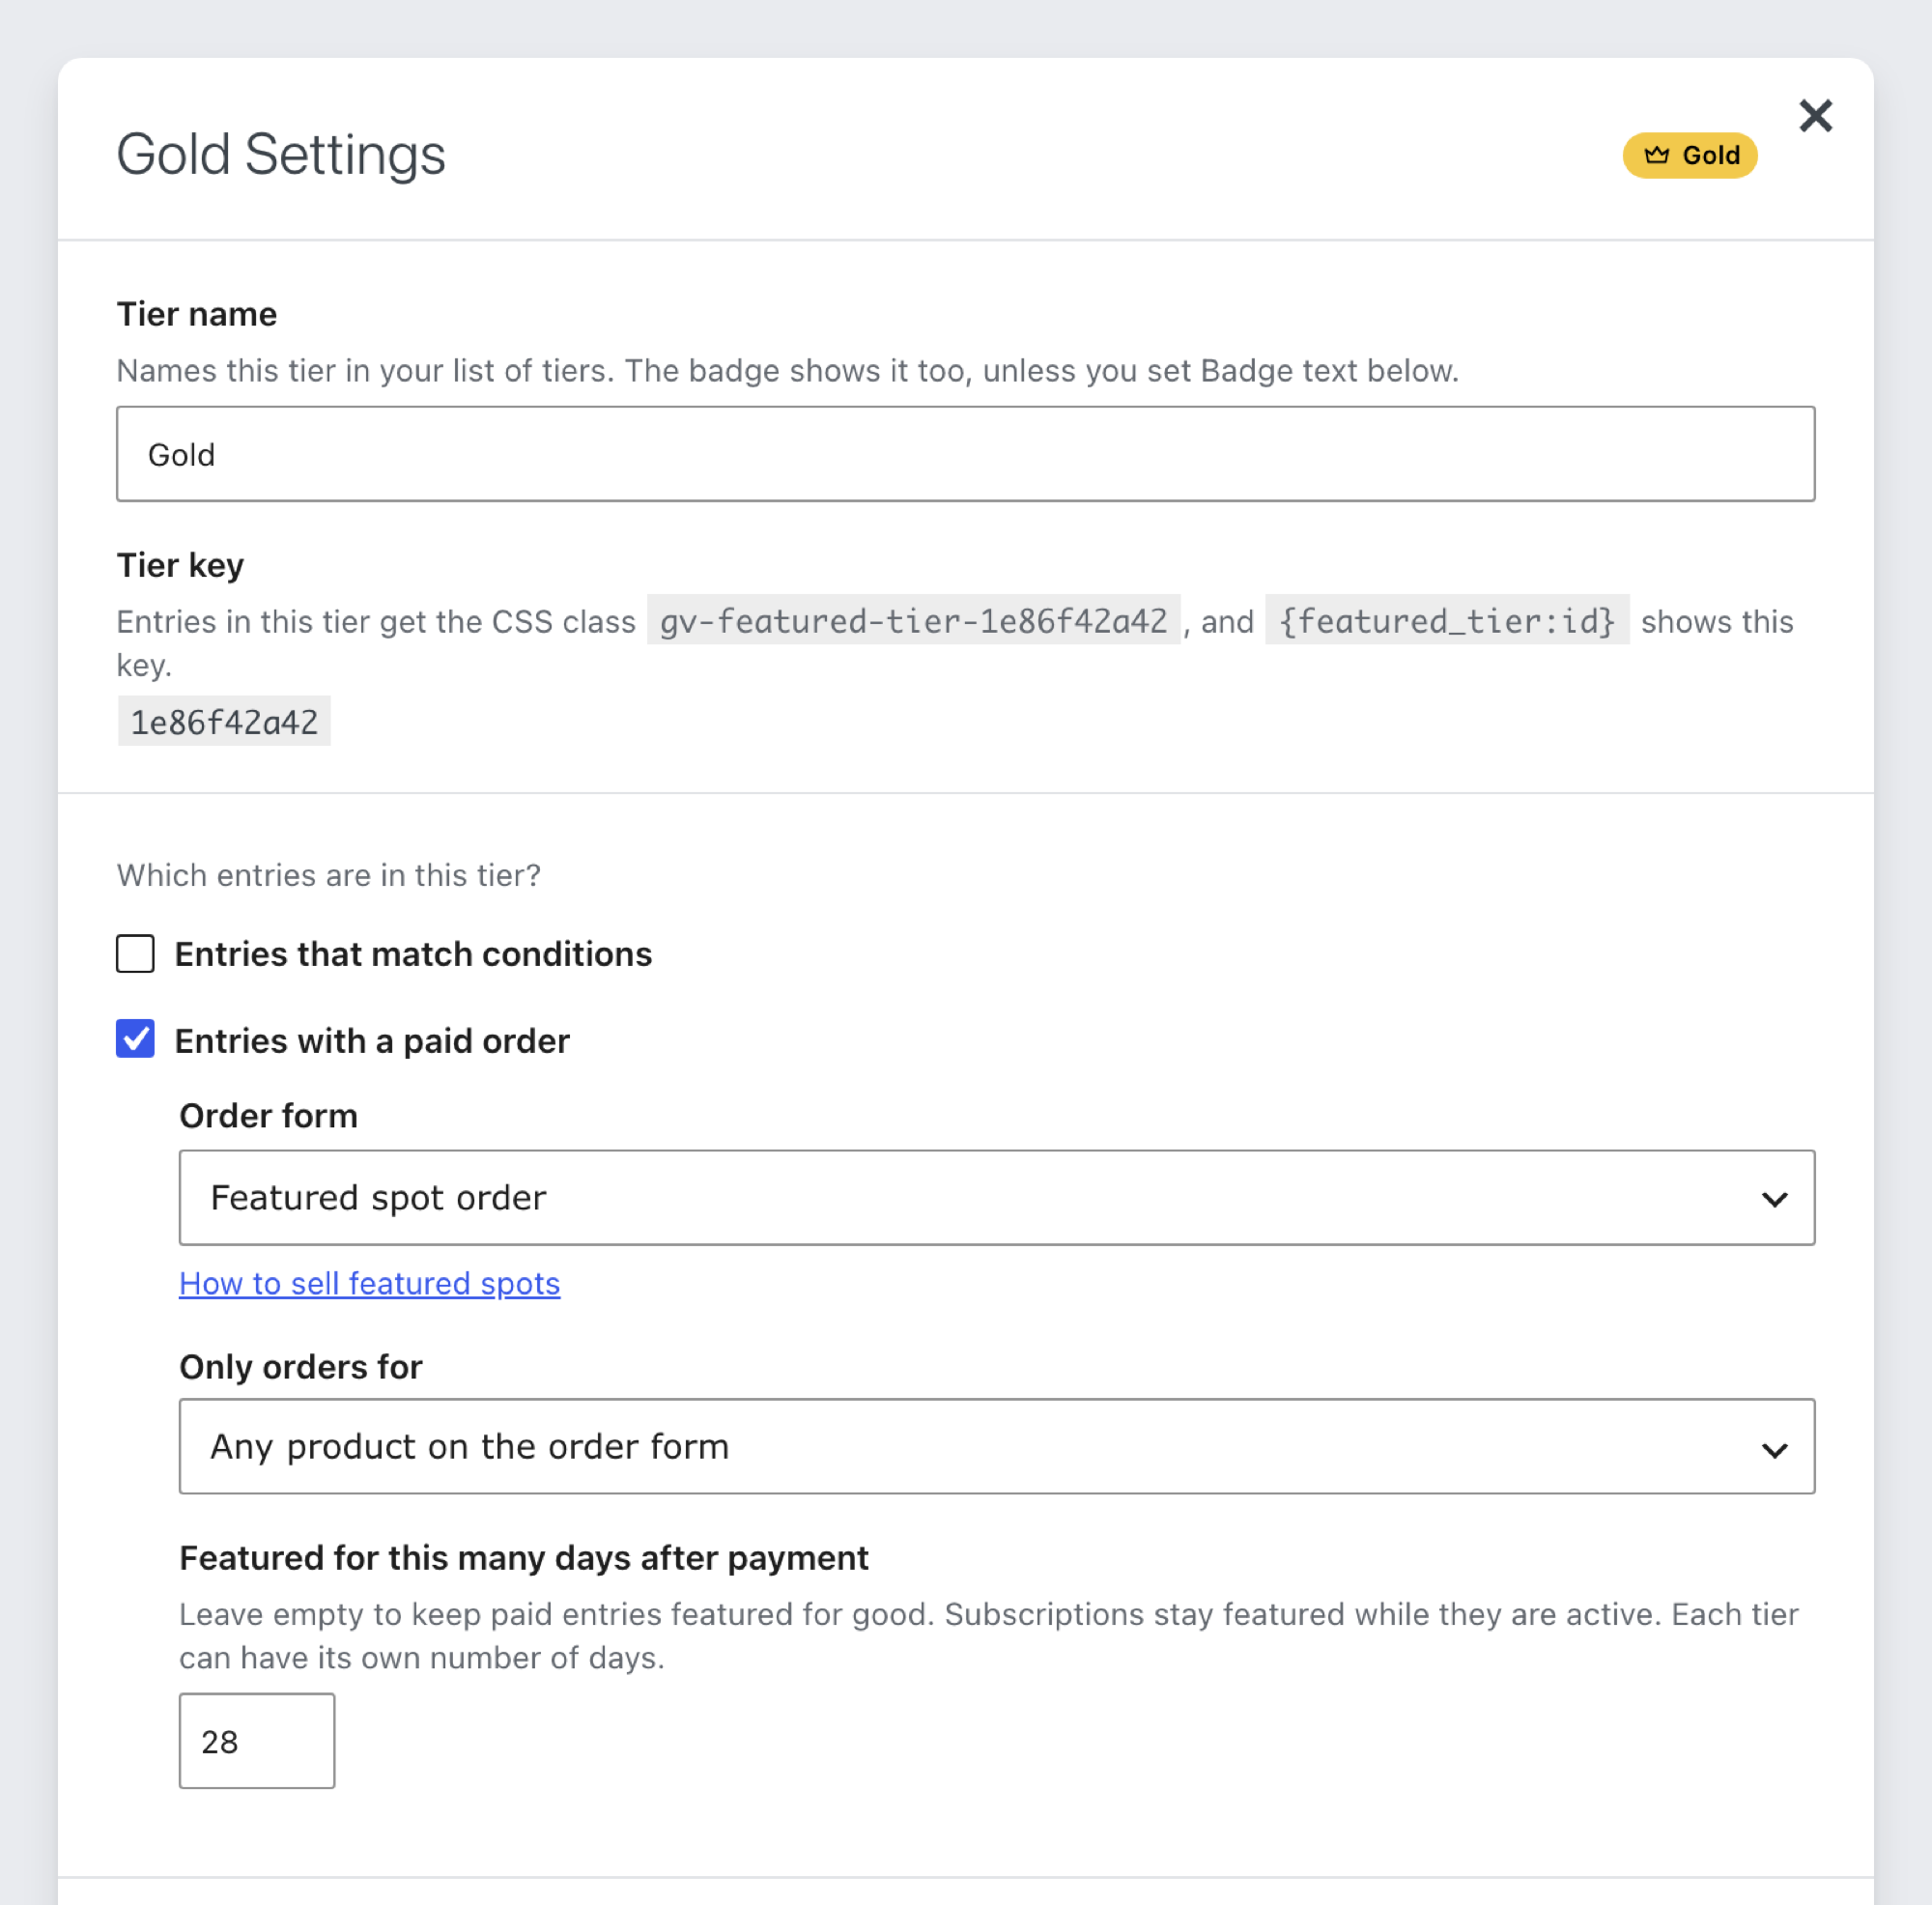
    The Gold tier's settings. Entries with a paid order is checked, Order form is Featured spot order, Only orders for is Any product on the order form, and Featured for this many days after payment is 28.

    How paid spots count:

    • A spot lasts the tier’s number of days from the payment date. Then the listing leaves the tier, with nothing for you to remove.
    • A subscription keeps its spot while it’s Active. A refunded or canceled order stops counting.
    • When a listing has several paid orders, the one that lasts longest counts.
    • The order form only accepts listings that exist in your directory. With Show only entries created by current user on, it also refuses listings the buyer didn’t create.

    Step 4: Send businesses to the order form #

    Businesses can reach the order form in two ways. You can offer both.

    From an email

    Add the order link to the email a business gets when it adds a listing:

    1. In Forms, edit the directory form, then open Settings and Notifications.
    2. Click Add New, or edit a notification that already goes to the business. Set Send To to Select a Field, then choose the listing’s Email field.
    3. In Message, click the Code tab and add a link to the order page. Gravity Forms replaces {entry_id} with the listing’s entry ID:
    <a href="https://example.com/feature-your-business/?listing={entry_id}">Feature my listing</a>
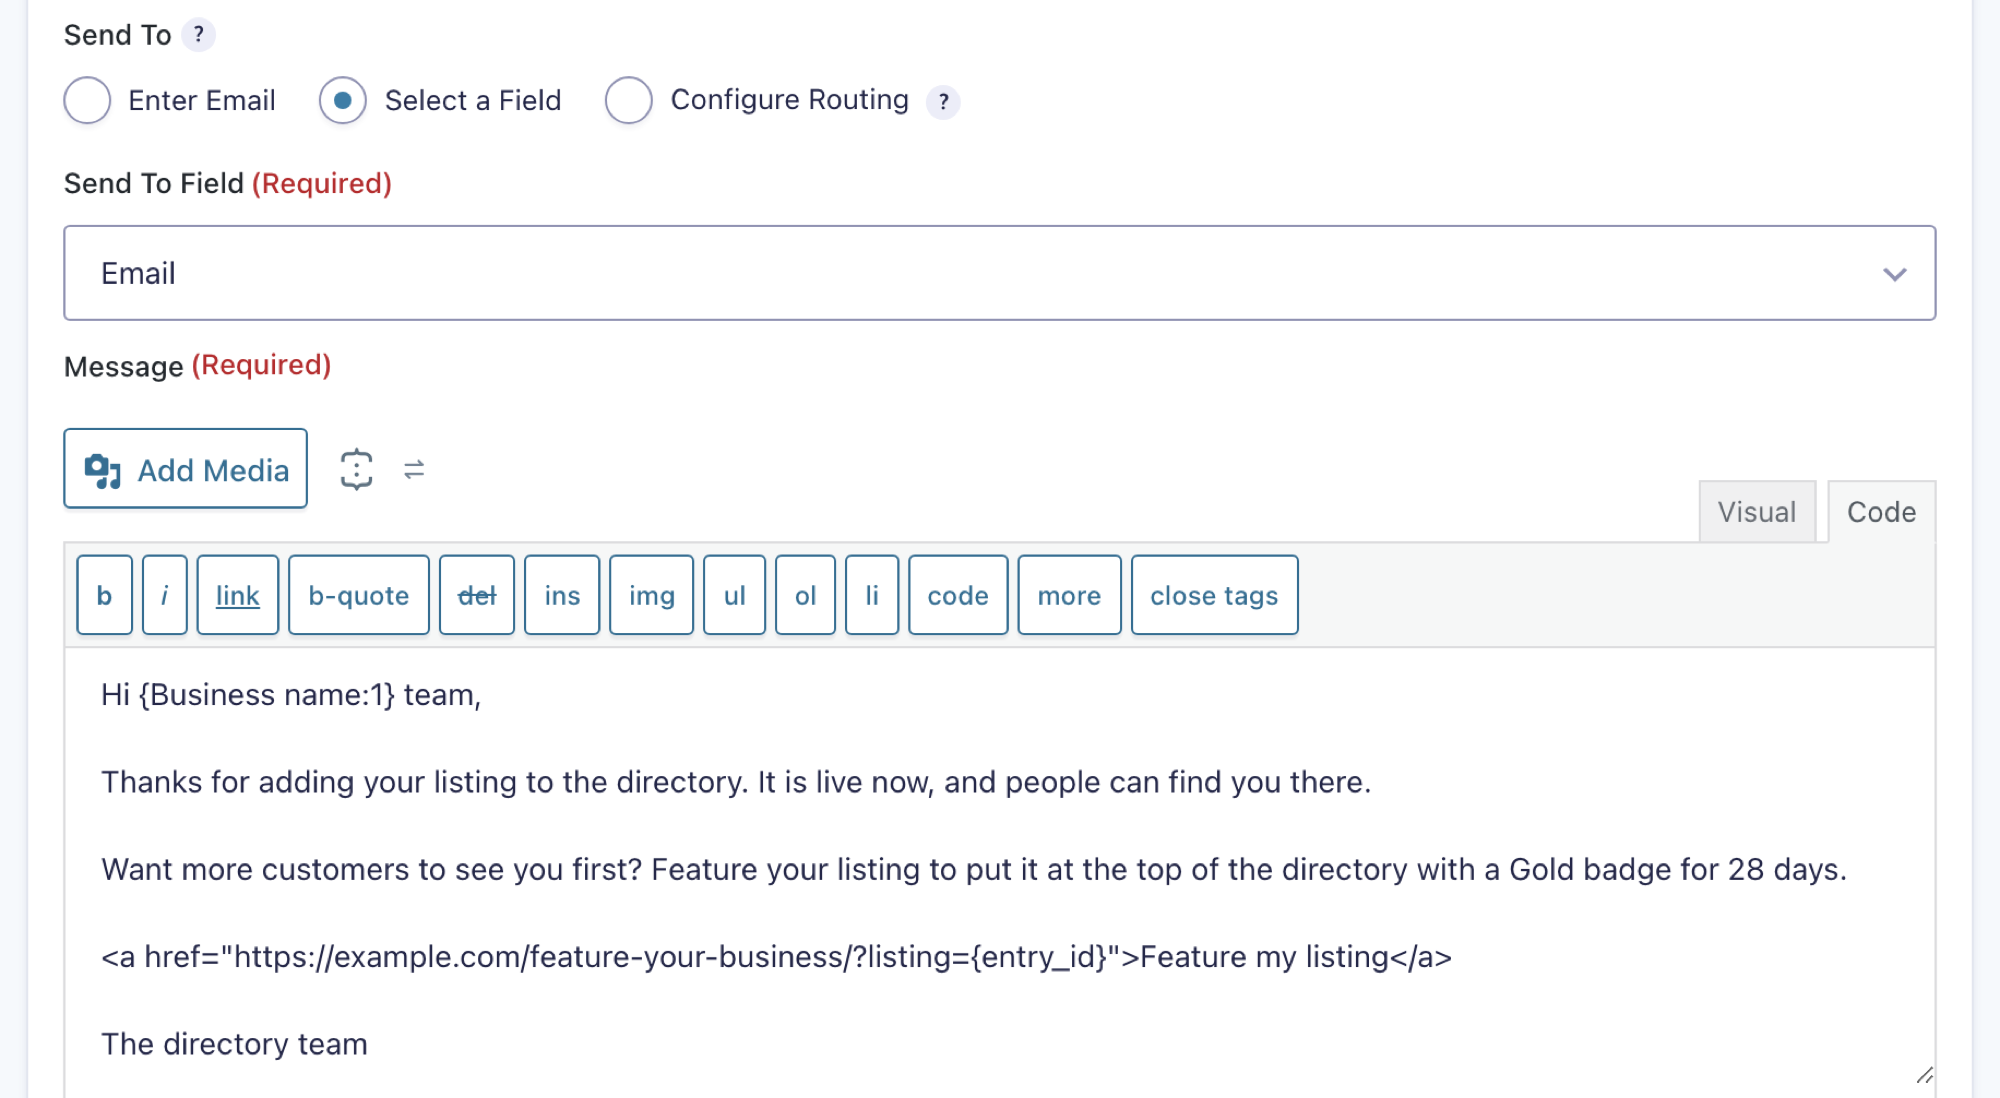
    A notification with Send To set to Select a Field and the Email field chosen. On the Code tab, the message greets the business, invites it to feature its listing, and links to the order page with ?listing={entry_id}.

    After you paste the link, check that the editor didn’t add a second </a>.

    The link keeps working, so a business can come back to it later. With Magic Links, the same email can also let the business update its listing without an account. See The {gv_magic_link} merge tag.

    From a “My Listings” page

    Show each logged-in business its own listings, with a link for each to feature it:

    1. Create a second View of the directory form, such as “My Listings”, using the same layout as your directory, with the fields a business needs to tell its listings apart, and the Featured Badge field.
    2. Add a Custom Content field with the link below, and give it a Custom Label such as Feature.
    <a href="/feature-your-business/?listing={entry_id}">Feature this listing</a>

    Then, in the View’s View Settings tab, turn on Show only entries created by the currently logged-in user, click Update, and add the View to a page with the GravityView block.
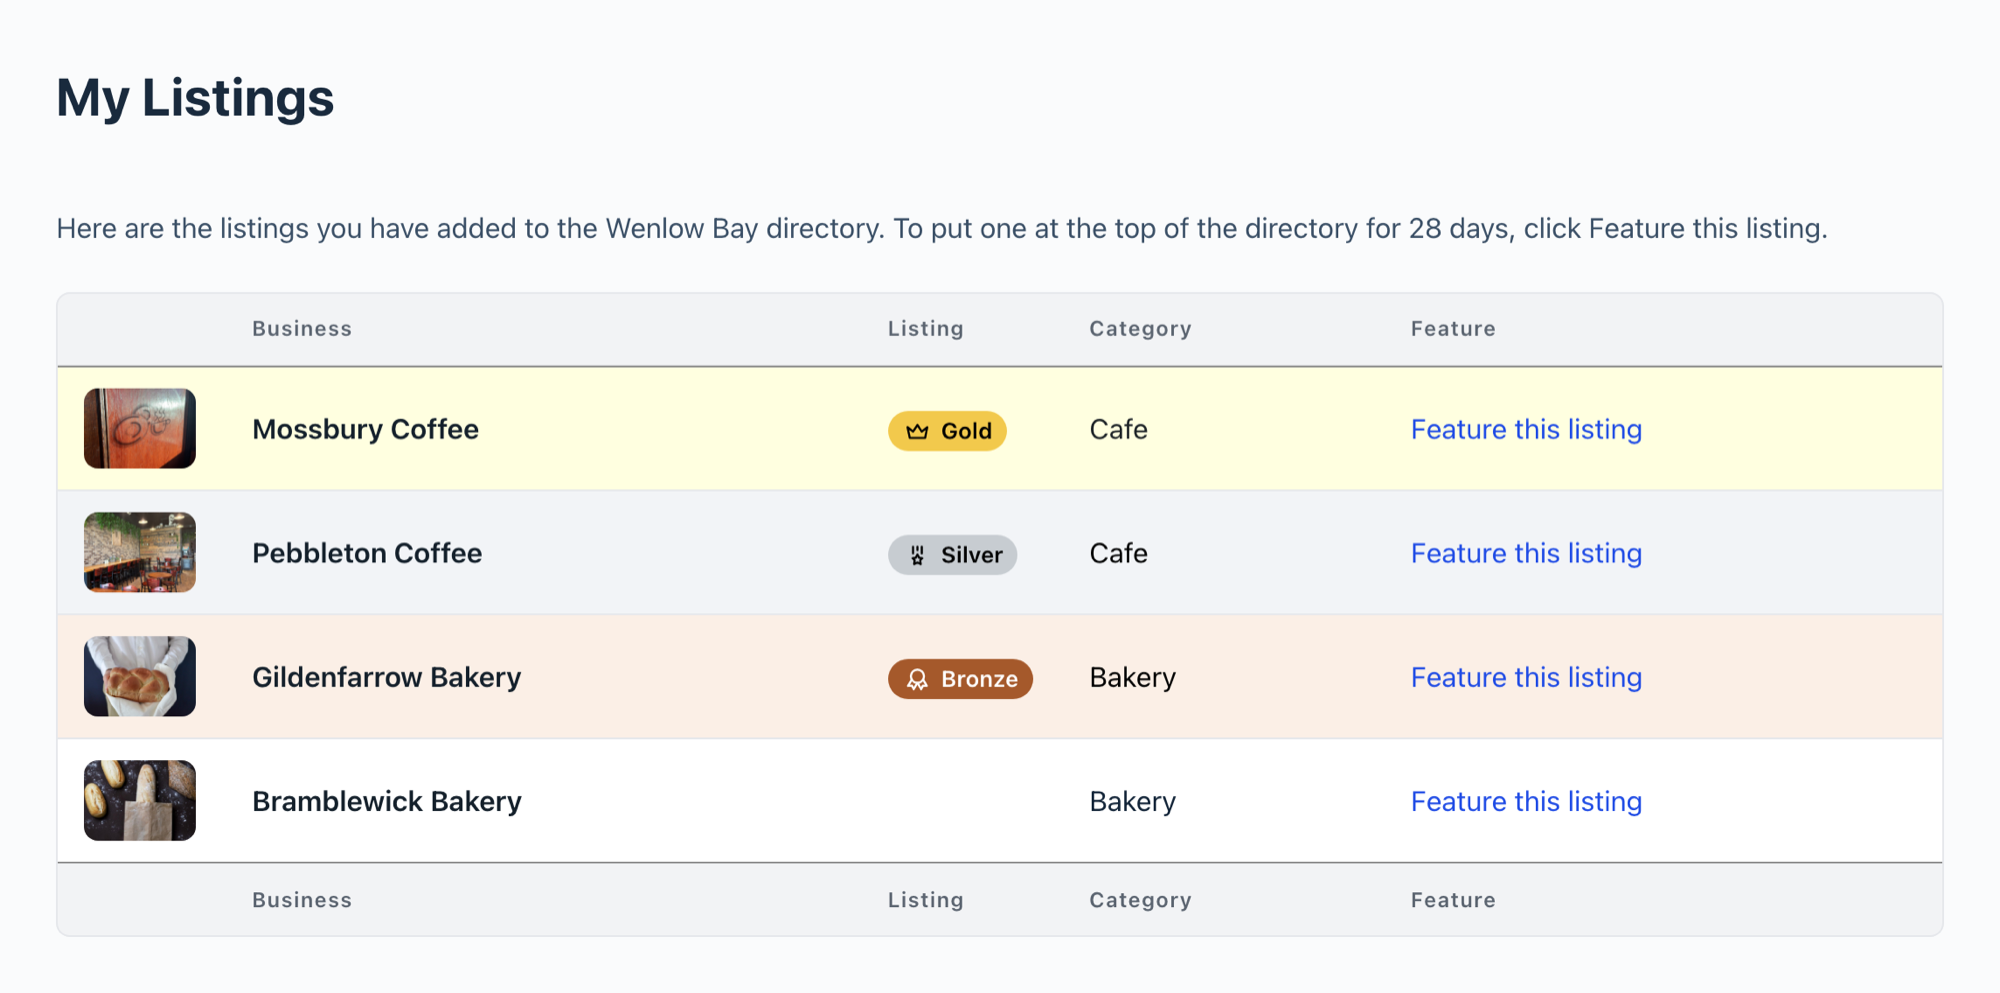
    A My Listings page as a logged-in business sees it: a short intro, then four listings, three with Gold, Silver and Bronze badges and one free, each with a Feature this listing link.

    If the page shows no listings, check Show only approved entries in the View’s View Settings tab. New Views have it turned on, so listings you haven’t approved don’t show.

    Visitors who aren’t logged in see no listings. A listing belongs to the user who was logged in when it was added. See How an entry gets associated with a user.

    Step 5: Style each tier’s badge #

    On your form’s Featured Tiers page, click the gear next to a tier to open its settings. The Preview shows the badge as you change it.

    • Badge icon: click it to search the icons, or click Upload to use your own image.
    • Badge text: the words on the badge. Leave it empty to use the tier name.
    • Badge color: pick a swatch, or click Custom for any color. If your theme has a color palette, the swatches come from it, so their names depend on your theme.
    • Row or card color: the background of the tier’s rows or cards. Choose the default pale yellow, no color, or Custom. Every new tier starts on pale yellow, so give each tier its own color if you want visitors to tell them apart.
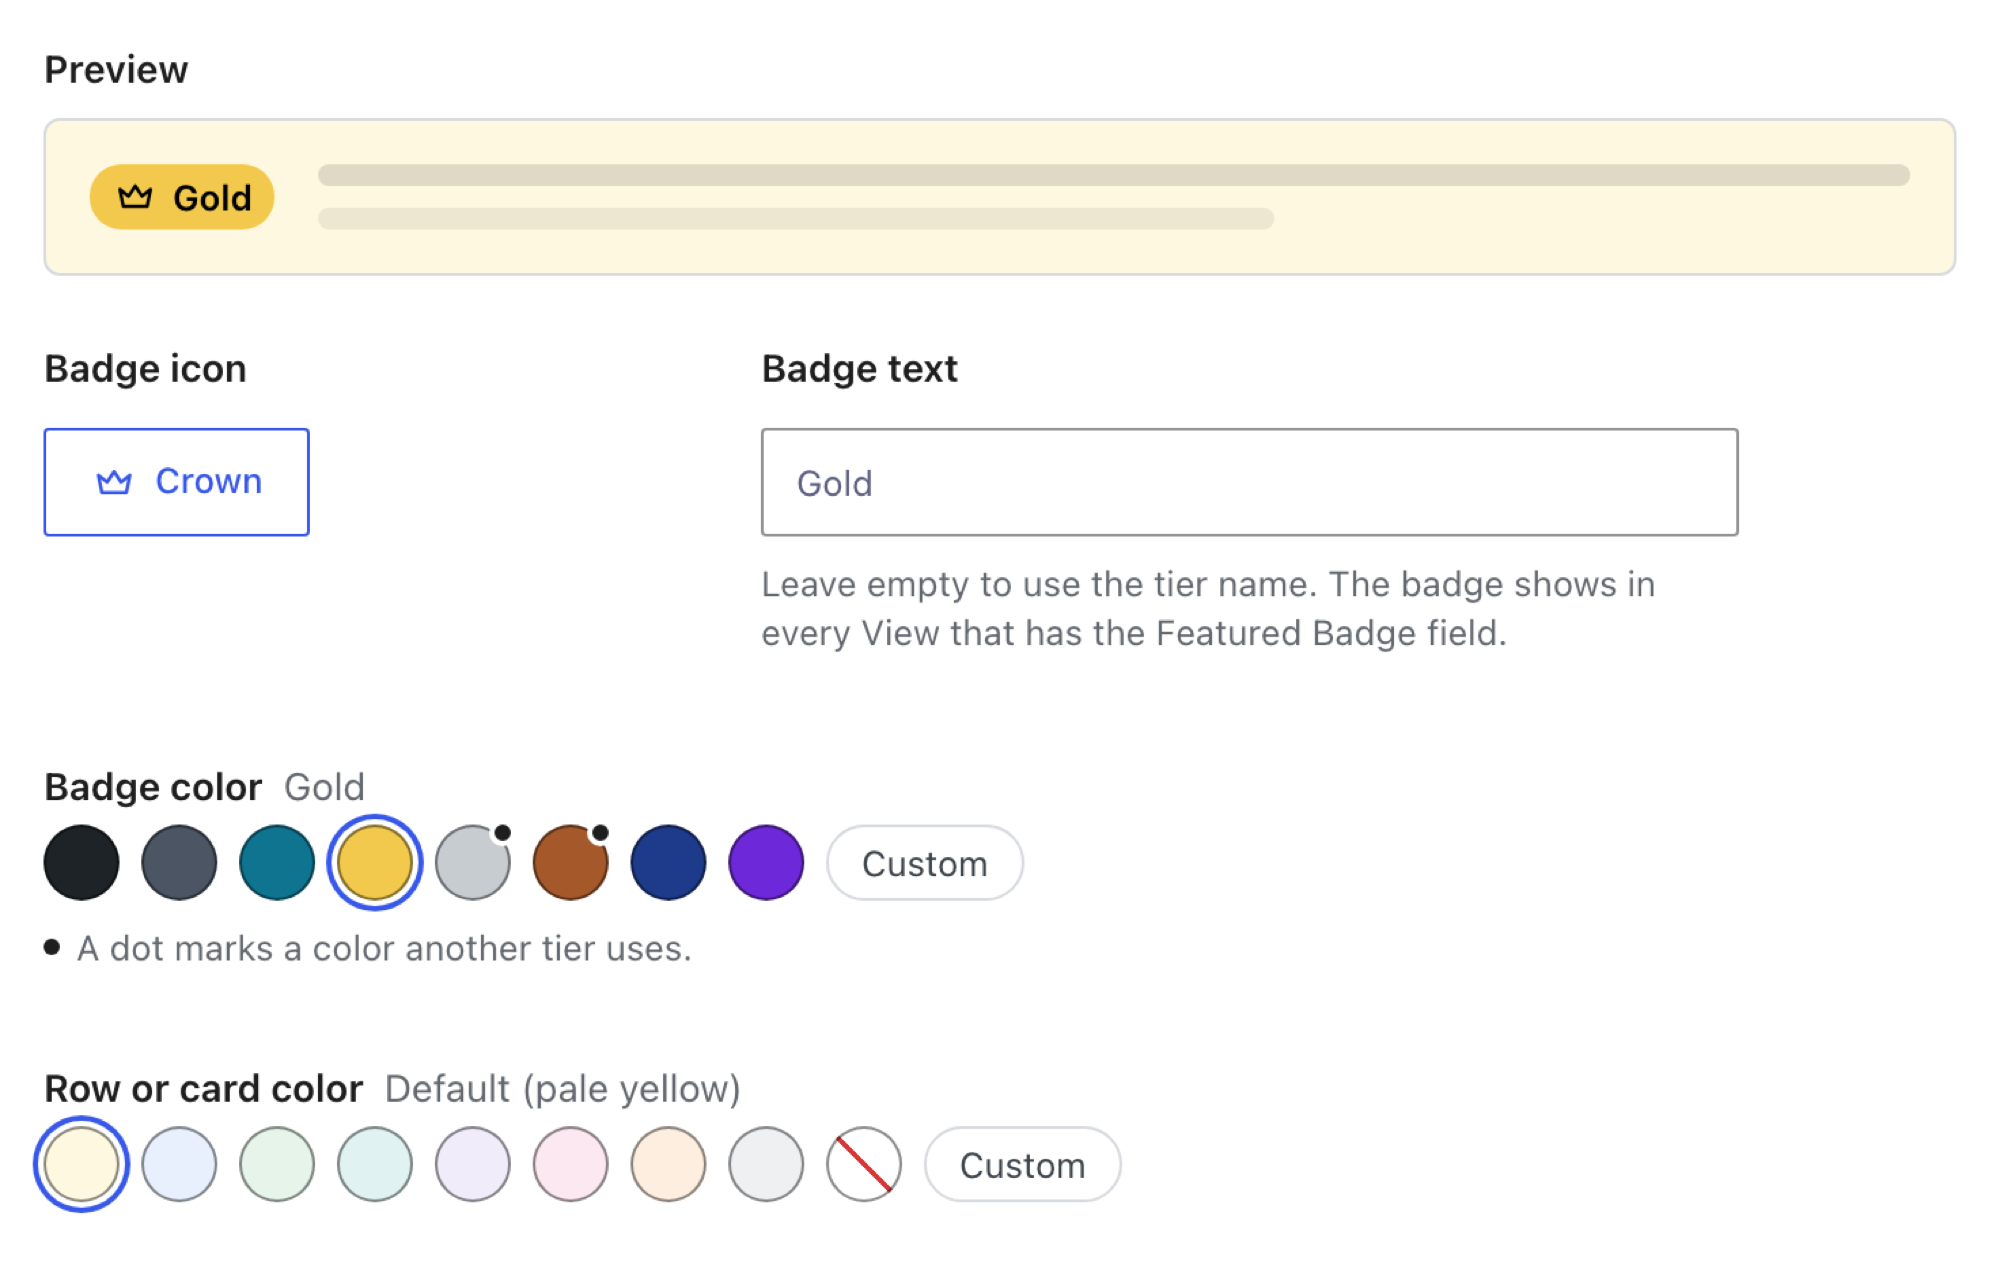
    The badge settings of the Gold tier: a preview of the gold badge with a crown on a pale yellow row, Badge icon set to Crown, Badge text Gold, a gold color chosen under Badge color, and Row or card color on Default (pale yellow).

    Click Done, then Save Tiers. The new badge appears wherever the tier is shown.

    Step 6: Show the badges and move featured listings to the top #

    This step happens in the View, not on the form. You turn on Move Featured Entries to Top and add the badge field in the View editor.

    1. Edit your View, and in the Settings box, click the Featured Entries tab. Turn on Move Featured Entries to Top. It’s off by default. Without it, featured listings get their badge and color but stay in place.
    2. Add the Featured Badge field to your layout, so each featured listing shows its badge. If the View doesn’t have it yet, the Featured Entries tab has an Add the Featured Badge field button that adds it for you. In the field’s settings, Show as can be Badge or Text. Without the field, featured listings stand out by color alone, which some visitors can’t see and screen readers don’t announce.
    3. Click Update.
    The Featured Entries tab of a View that doesn't have the Featured Badge field yet. A note reads: Visitors see badges only when the View has the Featured Badge field, and a red arrow points to the Add the Featured Badge field button. Move Featured Entries to Top is turned on.

    Check that it works #

    Before you tell businesses about featured spots, check each part the way a visitor or a business would see it.

    • Open your directory. Featured listings show their badges and, with Move Featured Entries to Top on, sit above the rest in tier order.
    • Open your order page with ?listing= and a listing’s entry ID. The order form opens with that listing chosen.
    • Place a test order, for example in your payment add-on’s test mode. Once the order is marked Paid, the listing moves into the paid tier. If it doesn’t, see Take payment.
    • Log in as a business and open your My Listings page. You see only that business’s listings, each with a link to feature it.

    Feature listings with conditions #

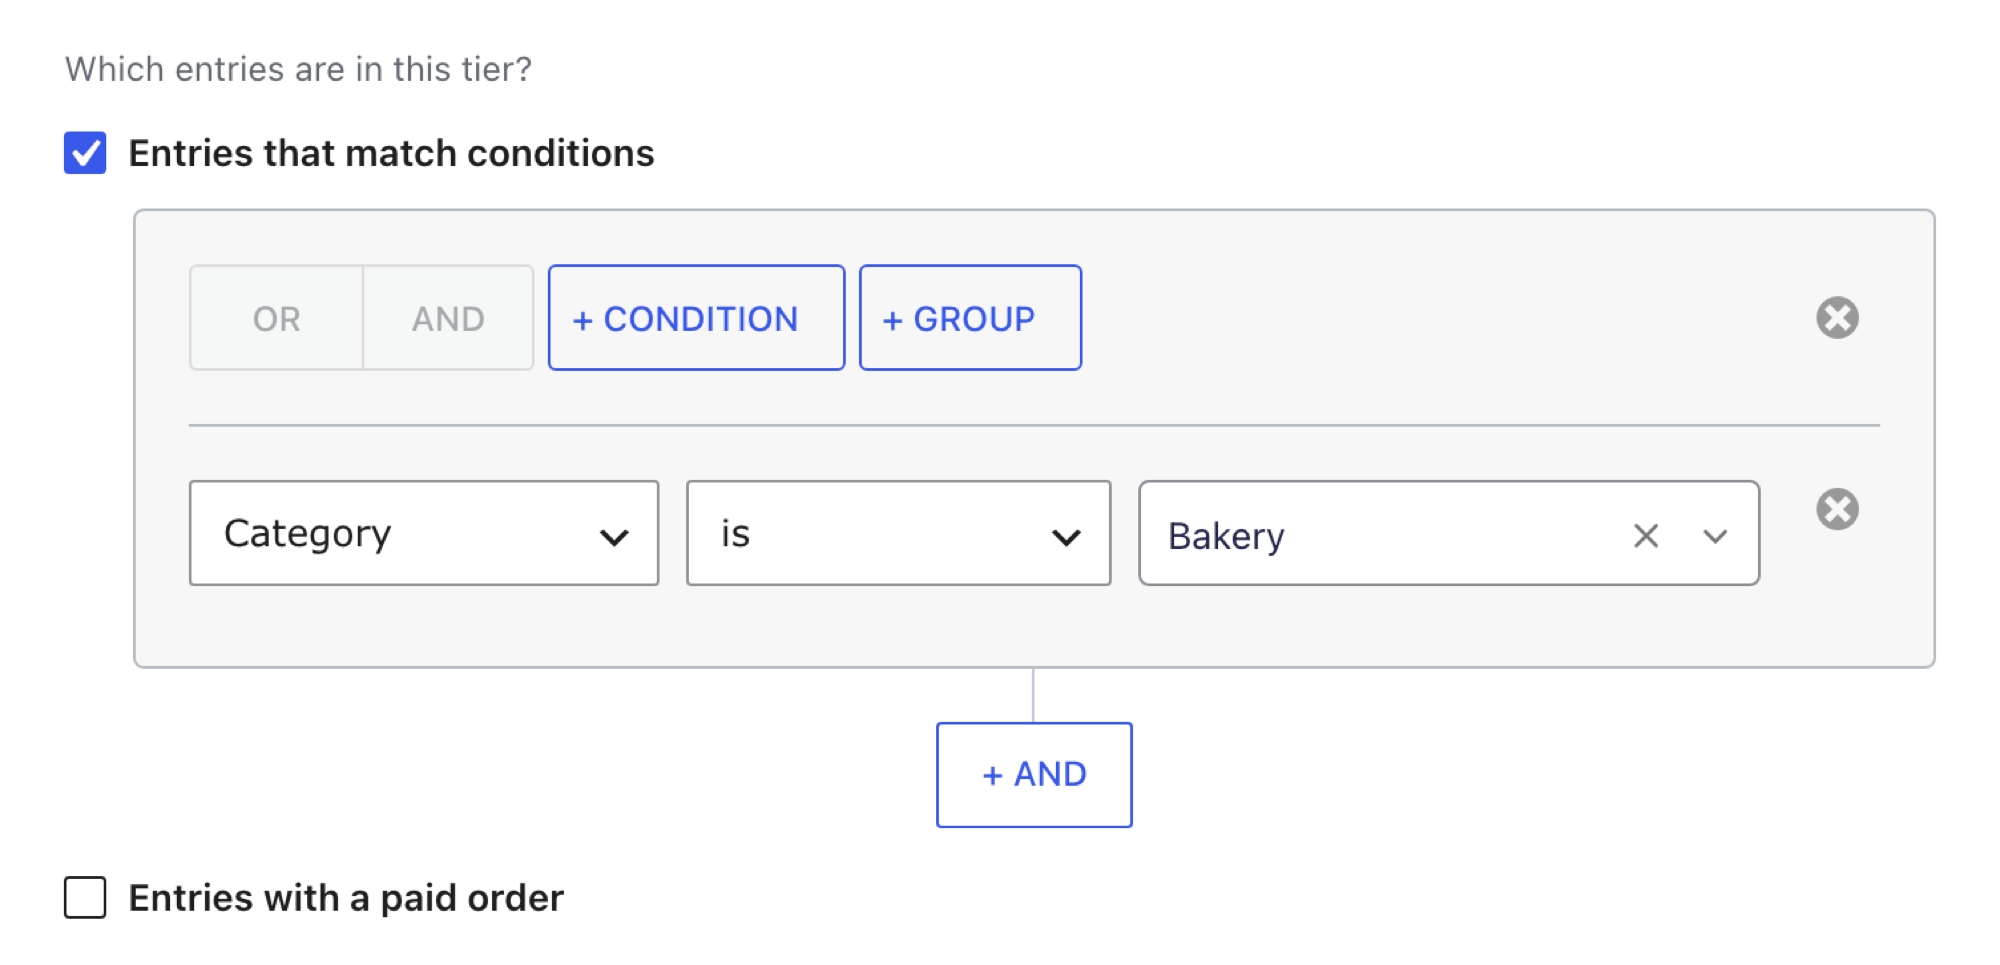
    A tier can also feature entries that match conditions, with no payment:

    1. On your form’s Featured Tiers page, click Add Tier, then Blank tier, and open its settings.
    2. Check Entries that match conditions and add your conditions, such as Category is Bakery.
    3. Click Done, then Save Tiers.
    A tier's settings with Entries that match conditions checked and one condition: Category is Bakery.

    The Starred is Yes condition features the entries you star in Gravity Forms. Every form starts with a tier named Featured that uses it. To star an entry, click the star next to it in Forms, then Entries.

    Show the tier in your own content #

    The {featured_tier} merge tag shows the entry’s badge text, or the tier name when the badge has no text. It shows nothing when the entry isn’t featured. Add a detail after a colon to show something else:

    Merge tagShows
    {featured_tier:id}The tier key, for comparing in [gvlogic]
    {featured_tier:rank}The tier's rank, 1 for the top tier
    {featured_tier:until}The date a paid spot ends. Empty for spots that don't end, subscriptions, and tiers that use only conditions
    {featured_tier:badge}The badge
    {featured_tier:color}The badge color
    {featured_tier:class}The tier's CSS class

    Each featured entry also gets the CSS class gv-featured-tier- followed by its tier key, which you'll find in the tier's settings. In a CSV export, the Featured Badge field shows the tier name.

    Good to know #

    These details cover who can change tiers, Views you already have, and Views that use more than one form.

    • Who can change tiers: only people who can edit forms. Anyone who can edit a View can choose which tiers appear in it.
    • Updating from starred entries: a form keeps featuring its starred entries until you save tiers on its Featured Tiers page. The page starts with one tier, Featured, for starred entries, so they stay featured unless you remove that tier.
    • Joined forms: in a View that joins forms, tiers give entries their badges and colors but don't move them. Move Featured Entries to Top moves starred entries, as before.
    • Combined forms: in a View that combines forms, each entry uses the tiers of its own form. Move Featured Entries to Top puts the first tier of every form on top, then the second tier of every form, and so on.
    • Two tiers with the same conditions: the lower one features no entries, and its settings say so.
    • Exporting forms: Gravity Forms exports and imports a form's tiers with the form.

    Questions #

    What happens when a paid spot runs out?

    The listing leaves the tier and goes back to its usual place in the View. You don't need to remove anything.

    Can I charge a monthly fee instead?

    Yes. In the order form's payment feed, choose Subscription as the Transaction Type, and leave Featured for this many days after payment empty in the tier. The listing stays featured while the subscription is active.

    Can I sell 1-month, 3-month and 6-month spots?

    Yes. Give the order form's Product field one choice per offer, then click Add Tier and Tiers from an order form. You get one tier for each choice. Open each tier's settings to set its days, such as 30, 90 and 180, and its badge.

    What happens if I refund a payment?

    The listing stops being featured. Only orders marked Paid, or Active for a subscription, feature a listing.

    Can a listing be in two tiers?

    A listing shows in the first tier it matches. A Silver listing with a paid Gold order shows as Gold, because Gold comes first.

    Can I still pick listings to feature myself?

    Yes. Star the entries you want in Gravity Forms. Every form starts with a Featured tier for starred entries, and you can keep it alongside your other tiers, so free and paid tiers sit in the same View.

    Related articles #

    These articles cover the rest of Featured Entries and the Dynamic Lookup add-on.

    • Getting started with the Featured Entries Extension
    • How to always display featured entries, regardless of search results
    • Getting Started with Dynamic Lookup
    Still stuck? How can we help?

    How can we help?

    "*" indicates required fields

    This field is for validation purposes and should be left unchanged.
    Replies will go to this email.
    How can we help?*
    My pre-sale question is related to...*
    My WordPress skills are....*
    My Gravity Forms skills are...*
    You will be shown articles from our documentation.
    Vous pouvez nous écrire dans votre langue maternelle si c’est plus facile pour vous—nous nous occuperons de la traduction!
    Puedes escribirnos en tu idioma nativo si te resulta más fácil; ¡nosotros nos encargamos de la traducción!
    Sie können uns in Ihrer Muttersprache schreiben, wenn das für Sie einfacher ist – wir kümmern uns um die Übersetzung!
    U kunt ons in uw moedertaal schrijven als dat gemakkelijker voor u is — wij zorgen voor de vertaling!
    Du kan skrive til oss på ditt morsmål hvis det er enklere for deg — vi tar oss av oversettelsen!
    Du kan skriva till oss på ditt modersmål om det är lättare för dig — vi tar hand om översättningen!
    Você pode nos escrever em seu idioma nativo se for mais fácil para você — nós cuidaremos da tradução!
    Puoi scriverci nella tua lingua madre se ti è più facile — penseremo noi alla traduzione!
    Please provide as much detail as you're able; this helps us provide you with faster support.
    Drop files here or
    Accepted file types: jpg, jpeg, gif, png, tiff, pdf, bmp, zip, json, csv, xls, xlsx, Max. file size: 256 MB.
      Get better at Gravity Forms every Friday

      Was this page helpful?

      Table Of Contents
      • How Featured Tiers works
      • Step 1: Choose how businesses pay
      • Step 2: Create tiers from a field
      • Step 3: Sell featured spots
      • Step 4: Send businesses to the order form
      • Step 5: Style each tier’s badge
      • Step 6: Show the badges and move featured listings to the top
      • Check that it works
      • Feature listings with conditions
      • Show the tier in your own content
      • Good to know
      • Questions
      • Related articles
      GravityKit
      • How to Build It
      • GravityKit vs competitors
      • Pricing
      • Products
      • Our Team
      • Our Values
      • Work With Us
      • Partner Directory
      • Coupons
      Support
      • Support
      • Contact
      • Documentation
      • Scope of Support
      • Brand Guidelines
      • Brand Kit
      • Privacy Policy
      • Terms of Service (“Terms”)
      I am a...
      • Nonprofit
      • Web agency
      • Small business owner
      • Web developer
      • Educational institution
      • WordPress freelancer
      • Startup founder
      • One-person agency
      Get notified of updates.

      We’re constantly improving GravityKit. Fill out your email below and we’ll notify you anytime major updates drop.

      See past editions
      • Facebook
      • Twitter
      • Mastodon
      GravityKit is a Gravity Forms Certified Developer.

      Copyright © 2026, Katz Web Services, Inc.

      GravityKit and GravityView are registered trademarks of Katz Web Services, Inc.