
Published
•
Updated
How to build a WordPress client portal with Gravity Forms
Build a client portal on WordPress where each client logs in to see their profile, their requests, and the documents they've shared, using Gravity Forms and GravityView.

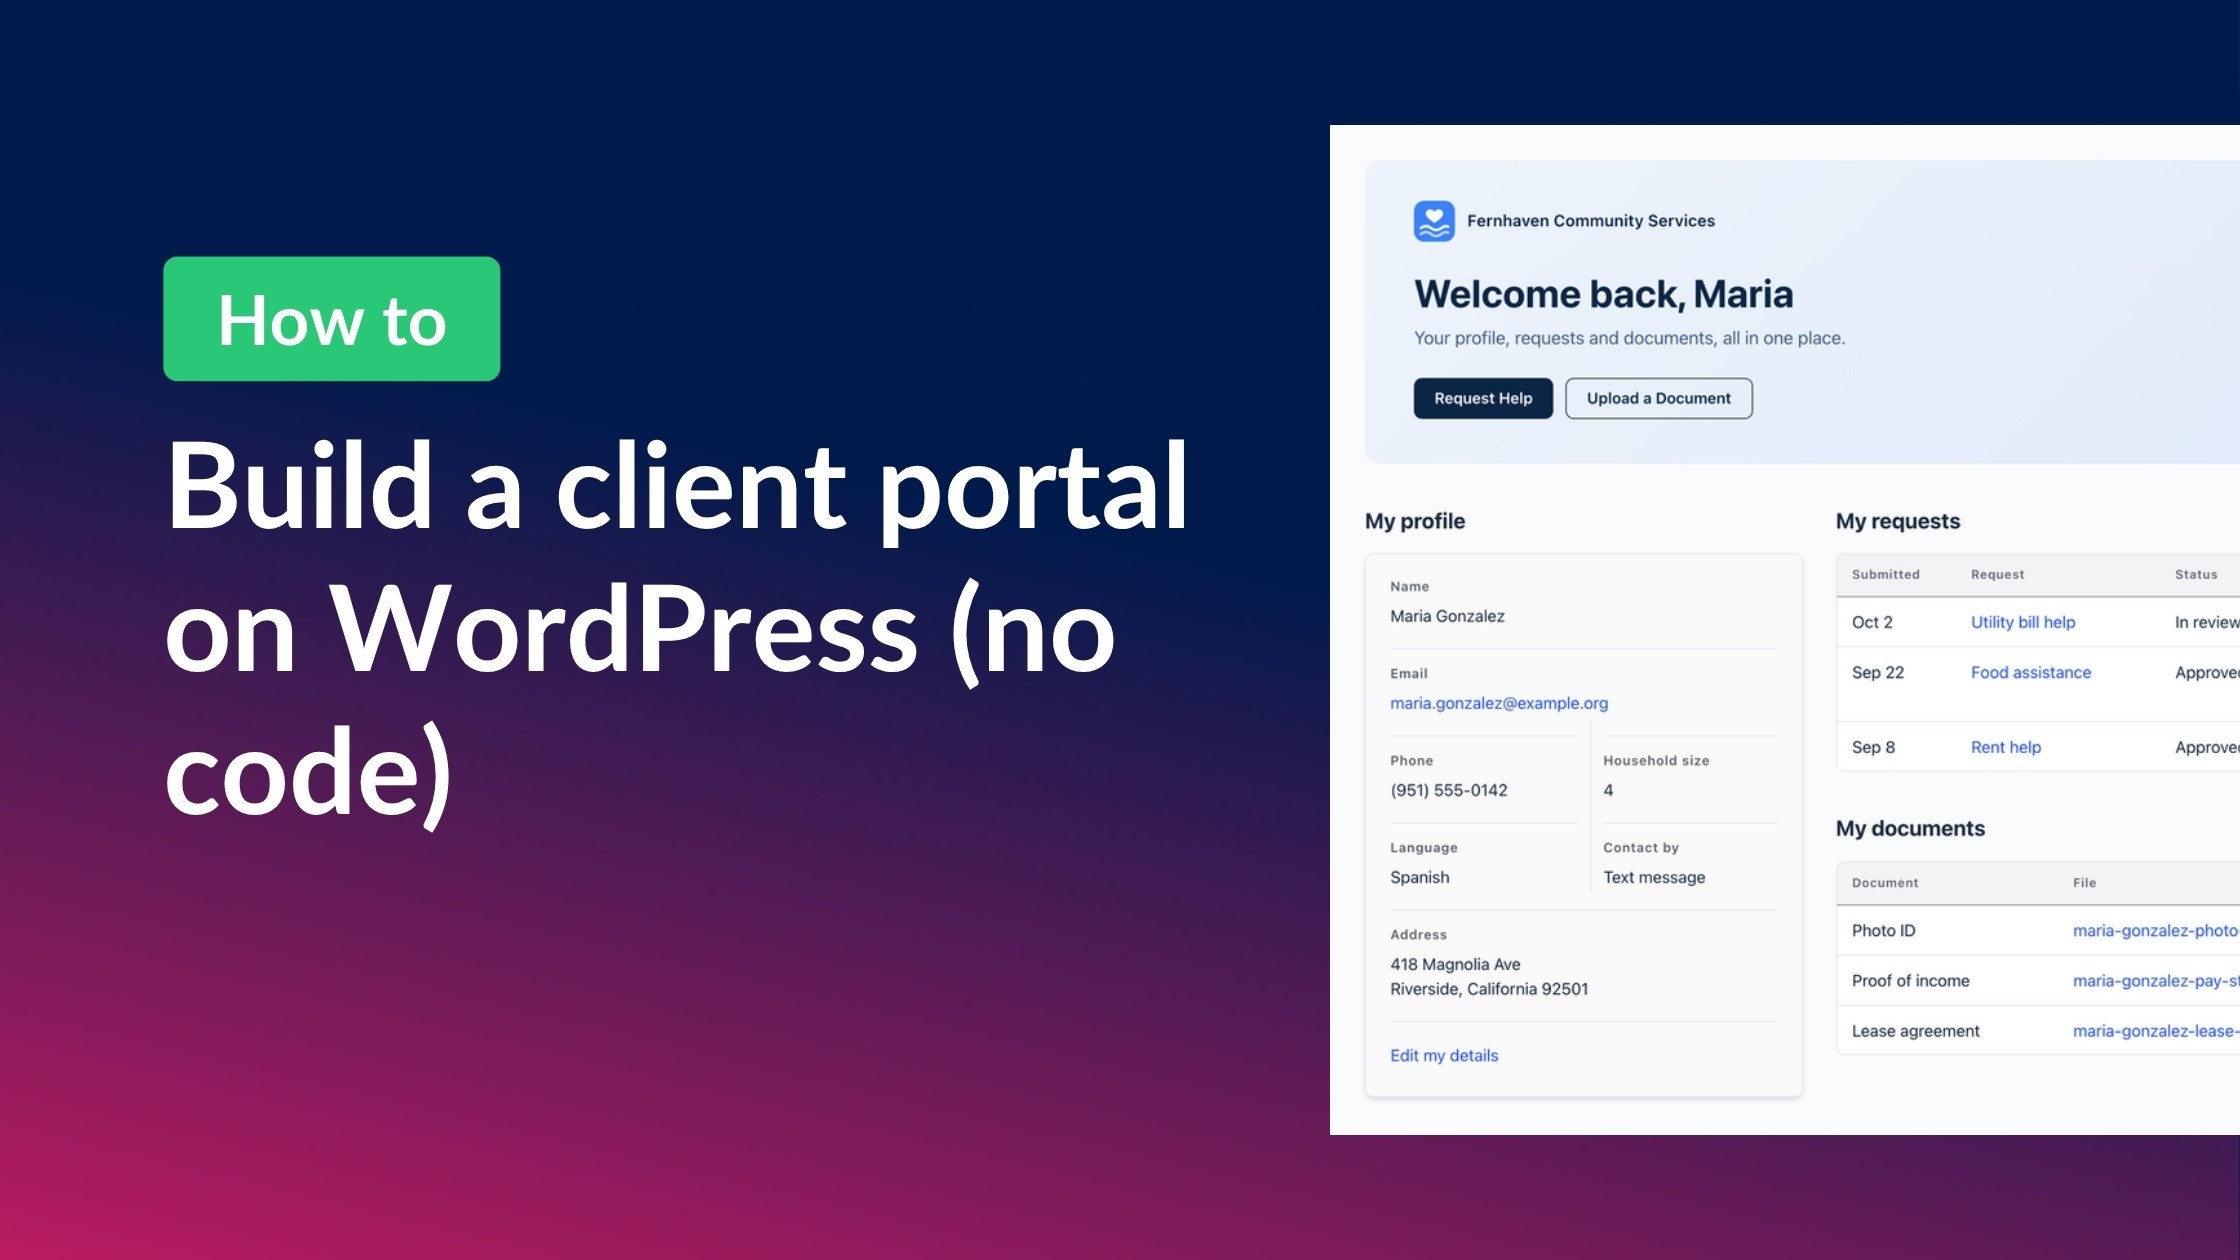
A client portal gives the people you work with one place to log in and see everything you have on file for them. Clients don’t have to email documents back and forth or call to ask whether there’s news on their request.
In this tutorial, we’ll build a WordPress client portal for a fictional nonprofit, Fernhaven Community Services, using Gravity Forms and GravityView. Clients create an account, ask for help, follow the status of each request, and upload the documents a case worker asks for. Each client sees only their own information, and staff manage every request from a dashboard of their own. Let’s dive in!
Sneak peek
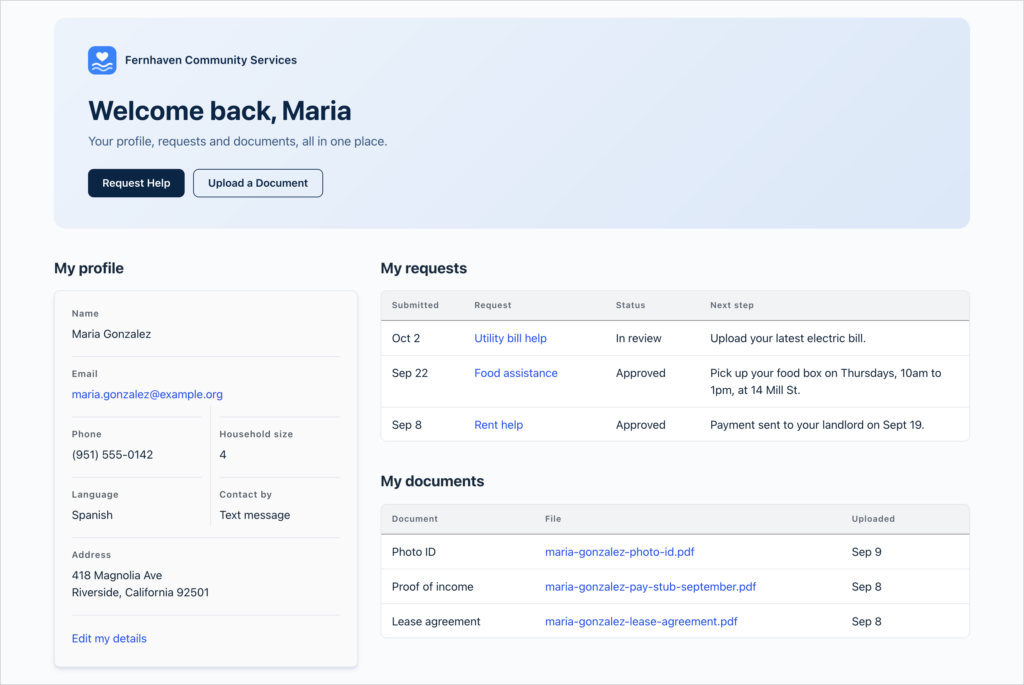
Here’s the finished portal. When Maria logs in, she sees her profile, her help requests, and the documents she’s uploaded:
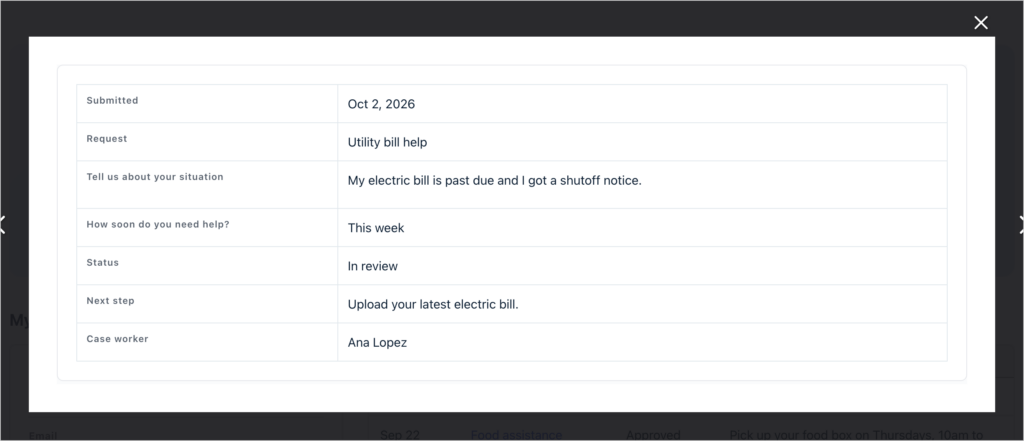
Clicking a request opens its full details in a lightbox:
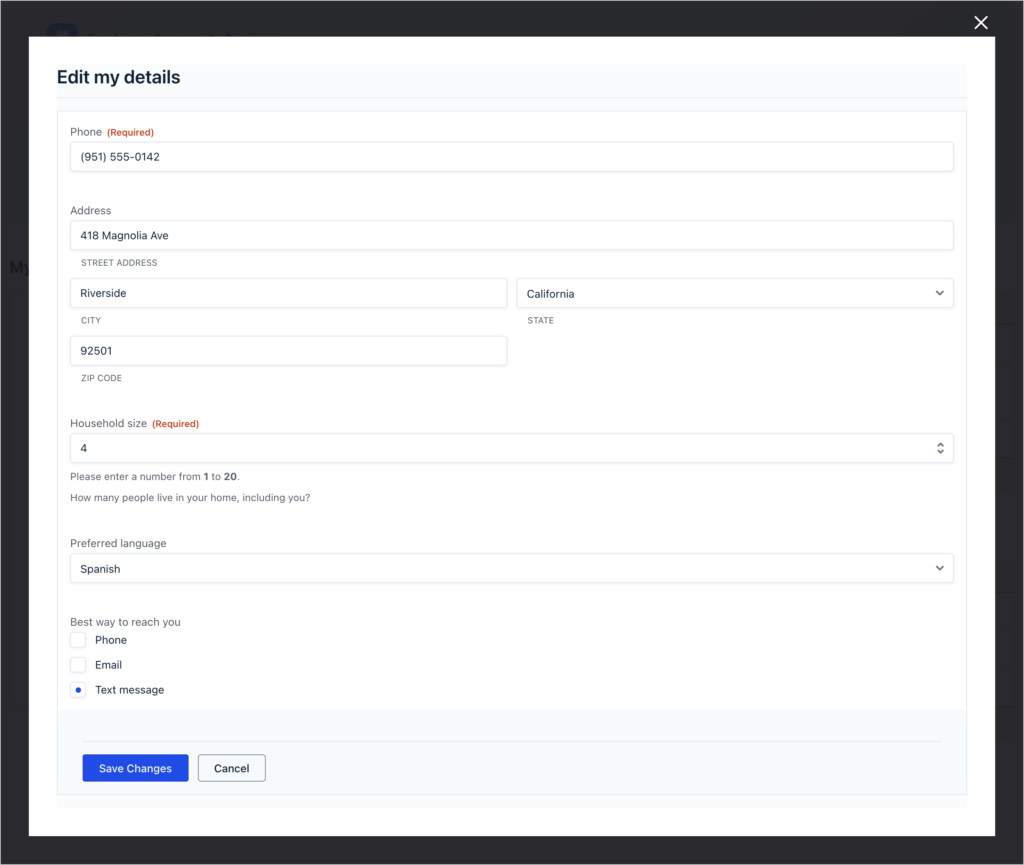
And clicking Edit my details opens a form where she can update her profile:
Behind the scenes, case workers update each request from a staff dashboard, which we’ll build in step 7.
Wanna try it?
Spin up a demo
See live applications built with GravityView or spin up your own to test out the plugin in full.
What you’ll need
Here are the plugins you’ll need to follow along with this tutorial:
- Gravity Forms – the forms clients use to sign up, ask for help, and upload documents.
- Gravity Forms User Registration Add-On – creates a WordPress account for each client when they sign up. It comes with a Gravity Forms Elite or Nonprofit license.
- GravityView Pro – shows the form entries on the front end. Pro includes the Advanced Filtering extension, which enables you to keep each client’s information private.
- Members (free, optional) – restricts the account page to logged-in clients.
What is a client portal?
A client portal is a private area of a website where each client logs in and sees information that belongs to them. Agencies use portals to share files and invoices with clients. Nonprofits use them to manage services and applications, and online stores use them for orders and support.
In our portal, every section is a Gravity Forms form plus a View that displays its entries. To add a section later, you add one more form and one more View.
Step 1: Create the sign-up form
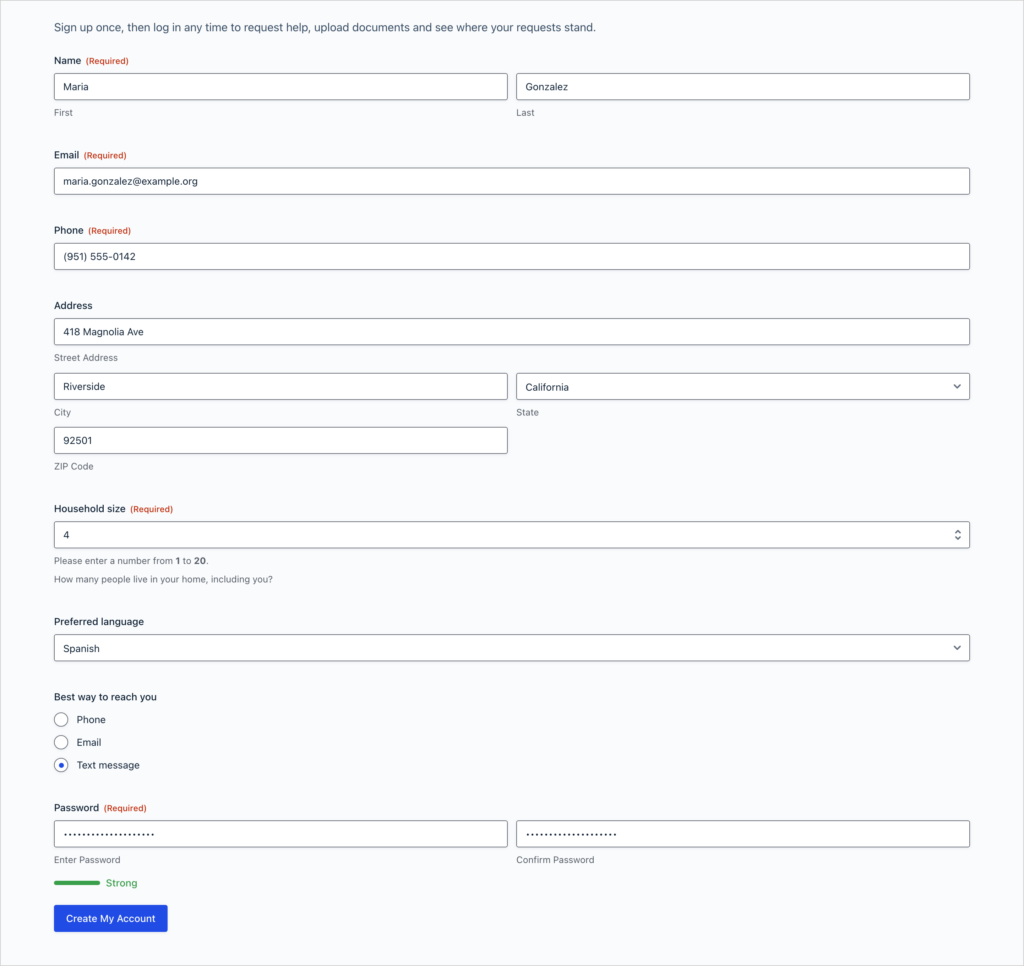
First, clients need a way to create an account. Hover over Forms and click New Form. We named ours “Client sign-up” and added these fields:
- Name
- Phone
- Address
- Household size (Number field)
- Preferred language (Drop Down field)
- Best way to reach you (Radio Buttons field)
- Password
Household size and preferred language are details a nonprofit might need before it can help someone. Swap in whatever your organization asks for. Here’s the form on the front end:
Creating an account for each client
Next, we’ll connect the form to the User Registration Add-On, so each submission creates a WordPress account.
- In the form editor, click Settings, then User Registration.
- Click Add New and give the feed a name.
- Under Action, choose Create User.
- Map the form fields to the account. We used Email for both Username and Email Address, the first and last name from the Name field, and Password for the password.
- Set Role to Subscriber and click Save Settings.
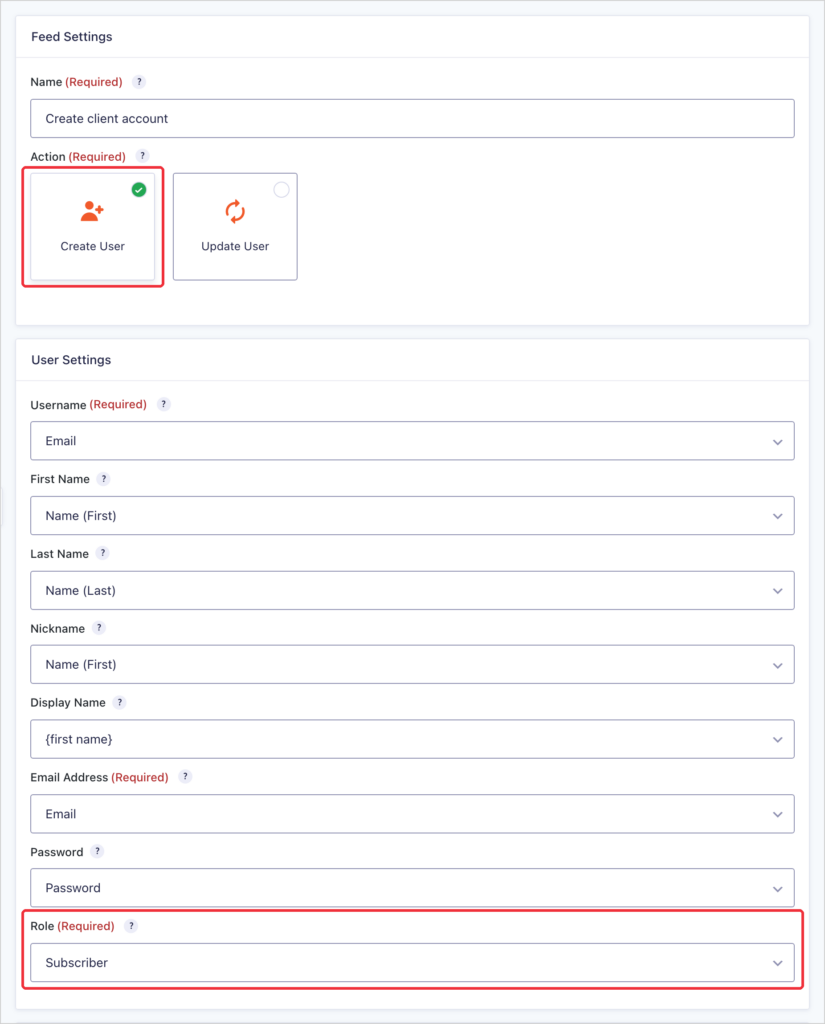
When the add-on creates the account, it also records the new user as the creator of their sign-up entry. We’ll use that in step 4 to show each client only their own profile.
Step 2: Create the help request and document forms
Our portal has two more forms:
- Help requests – what the client needs help with (Radio Buttons), their situation (Paragraph Text), and how soon they need help (Drop Down).
- Client documents – the type of document (Drop Down) and the file itself (File Upload).
The Help requests form also has three fields that only staff fill in: Status, Next step, and Case worker. Add them like any other field. Then click each one, open the Advanced settings, and set Visibility to Administrative.
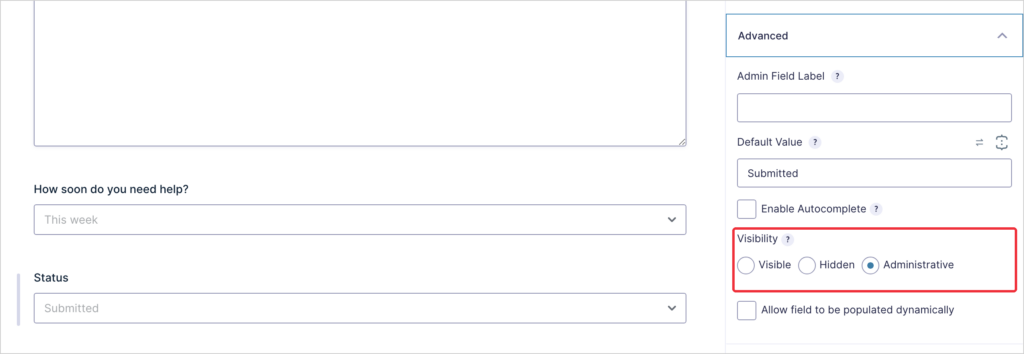
Administrative fields don’t appear on the form, so clients never see them, but staff can fill them in from the entry in the WordPress dashboard. We also gave Status a Default Value of “Submitted”, so every new request starts there.
Save each form, then click Embed at the top of the form editor to add it to a new page. We called ours “Request help” and “Upload a document”. Clients are logged in when they submit these forms, so Gravity Forms records each client as the creator of their entries.
Pro tipYou can also set up the forms and Views in this tutorial by describing them to an AI assistant like Claude. The free GravityKit MCP connects the assistant to your site, so a prompt like “Create a Help requests form with a request type, a description, and an admin-only Status field” builds the form for you. We used it to set up this demo, then checked each setting in the editor.
Step 3: Build the My profile View
Now we’ll show each client their details. Hover over GravityKit and click New View. Give the View a name, select the Client sign-up form as the data source, and choose the Layout Builder View type.
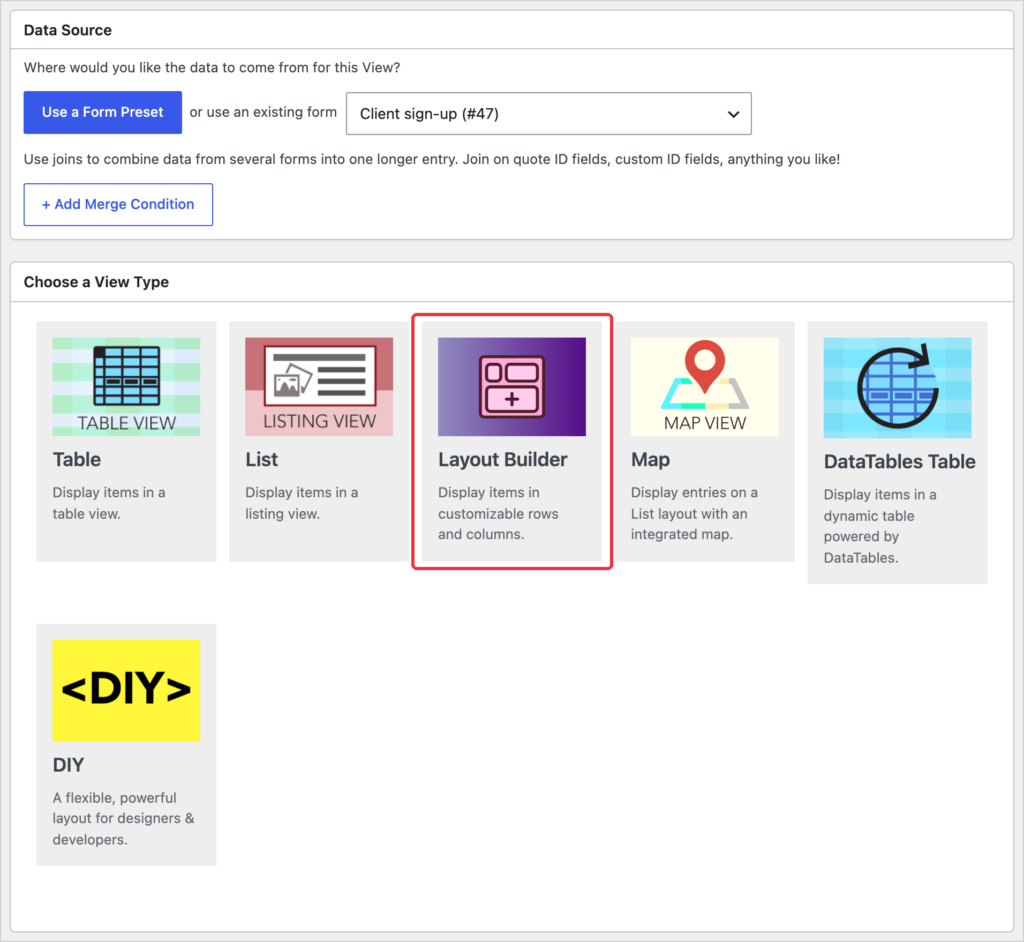
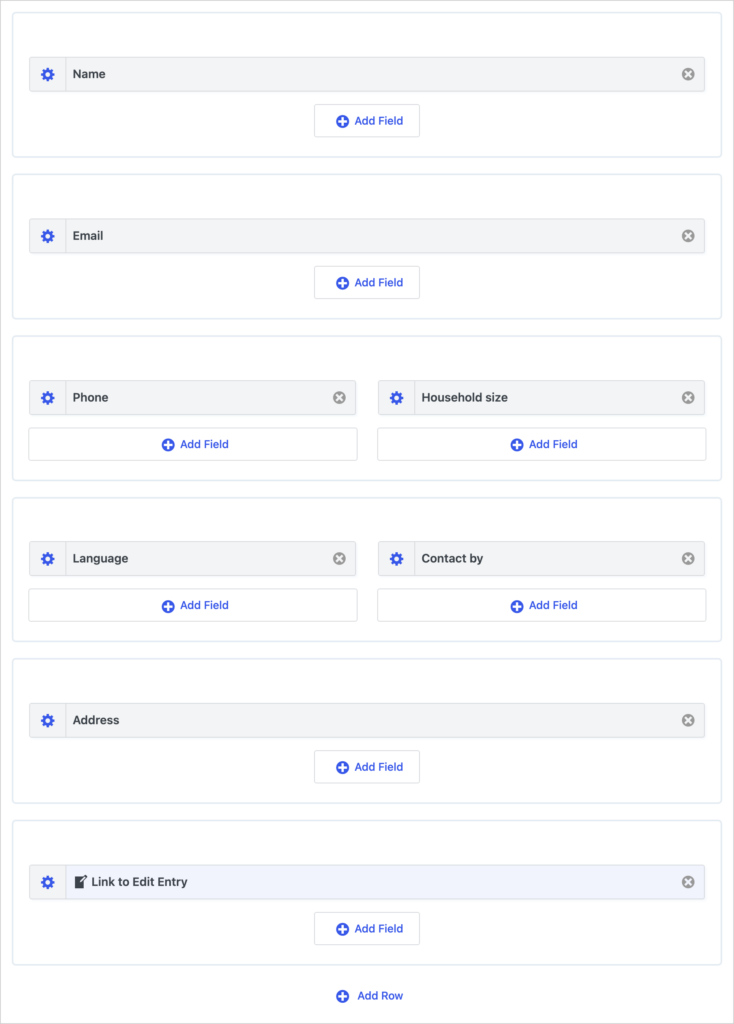
The Layout Builder arranges fields in rows, and each row can have up to four columns. In the Multiple Entries Layout tab, click Add Row to build the profile card one row at a time. We used six rows:
- Name
- Phone and Household size, in a two-column row
- Preferred language and Best way to reach you, in a two-column row (we relabeled them “Language” and “Contact by” so they fit)
- Address
- Link to Edit Entry
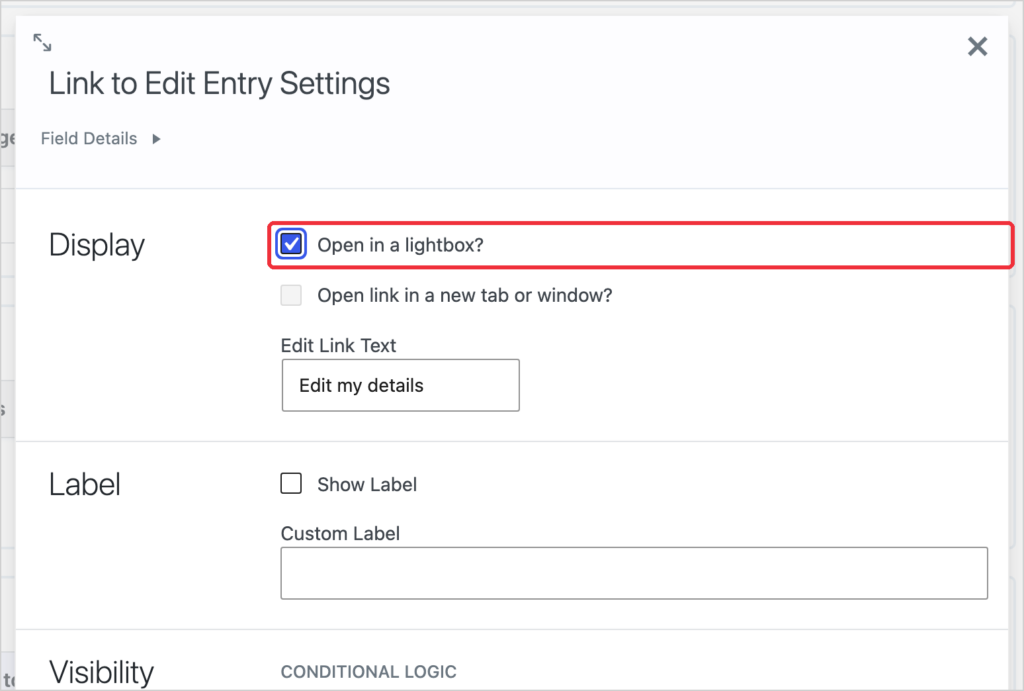
Letting clients edit their details
The Link to Edit Entry field opens a form where clients can update their profile. Click the gear icon on the field, check Open in a lightbox?, and change the Edit Link Text to “Edit my details”.
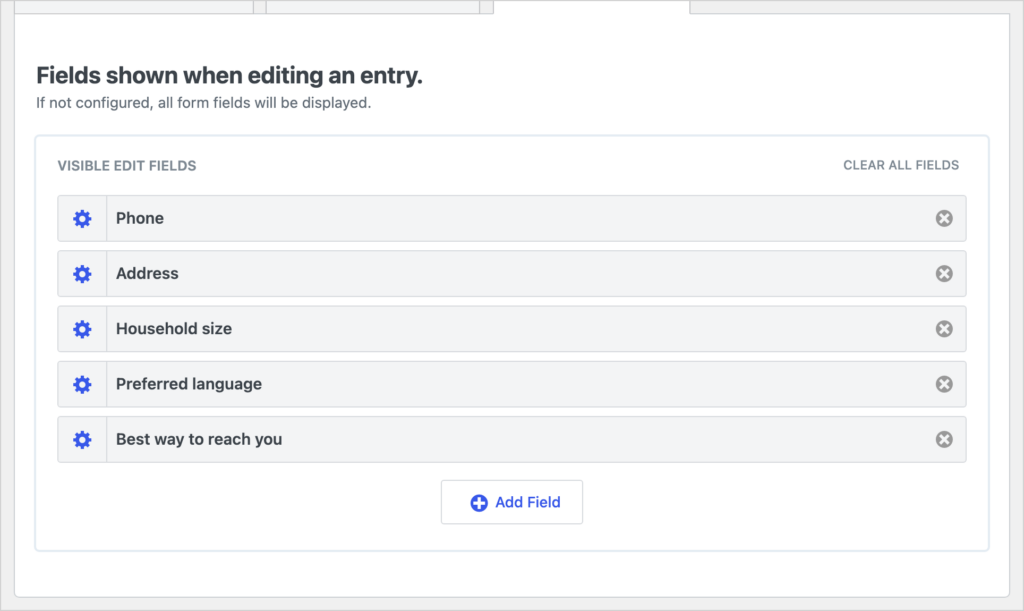
Then open the Edit Entry Layout tab and add the fields clients can change. We left out Name and Email, because the email address is also the client’s username.
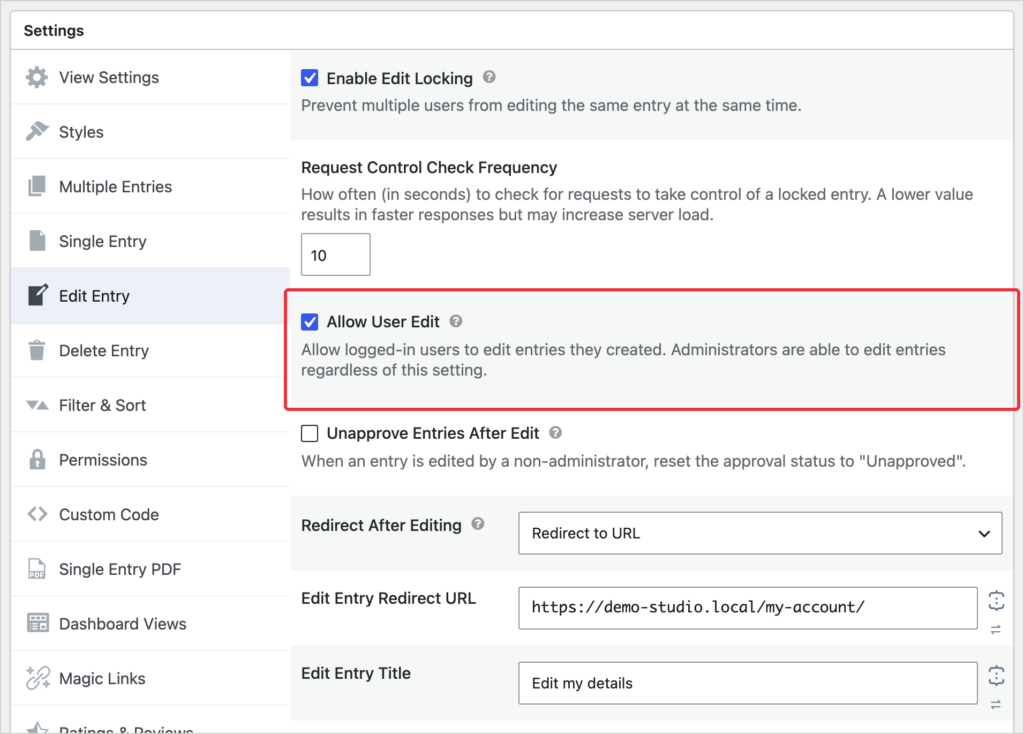
Finally, scroll down to Settings, open the Edit Entry tab, and check Allow User Edit. This lets logged-in users edit entries they created. We also set Redirect After Editing to send clients back to the account page, and changed the Edit Entry Title to “Edit my details”.
Step 4: Show each client only their own entries
Right now, the View shows every client’s profile to anyone who can see it. To fix that, open the View Settings tab and check Show only entries created by the currently logged-in user.
In the same tab, uncheck Show only approved entries. GravityView turns on entry approval for new Views, and nobody approves client sign-ups by hand, so new clients would see an empty profile until you did.
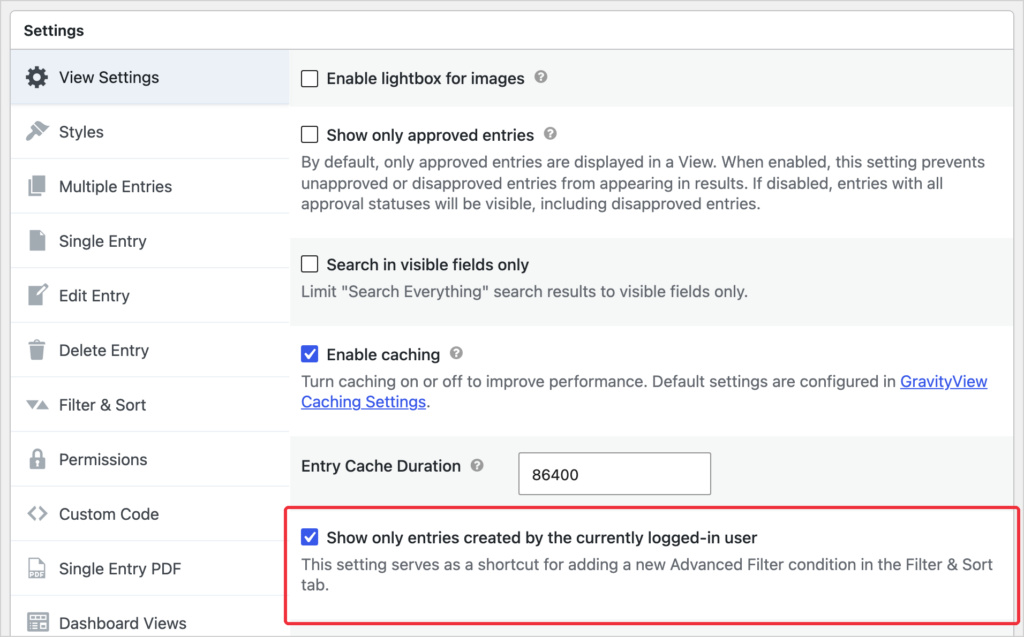
The checkbox is a shortcut from the Advanced Filtering extension in GravityView Pro. It adds a condition to the Advanced Filter on the Filter & Sort tab: Created By is Currently Logged-in User.
That condition applies to everyone, including you. To let staff see every client’s entries, open the Filter & Sort tab and change the value to Currently Logged-in User (Disabled for Administrators). Administrators, and other users who can view entries in Gravity Forms, then see every entry, while each client still sees only their own.
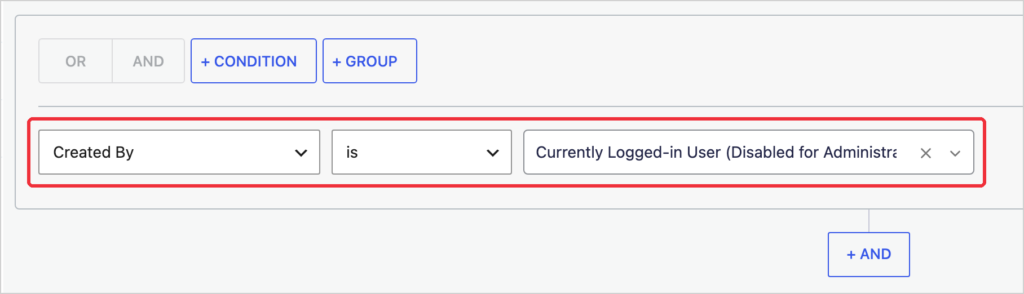
Logged-out visitors don’t match the condition, so they see nothing. Click Update to save the View. Our guide to showing only the current user’s entries covers the other options.
Step 5: Build the My requests and My documents Views
The other two Views follow the same pattern, with the Table View type. In both, use the same filter settings as in step 4.
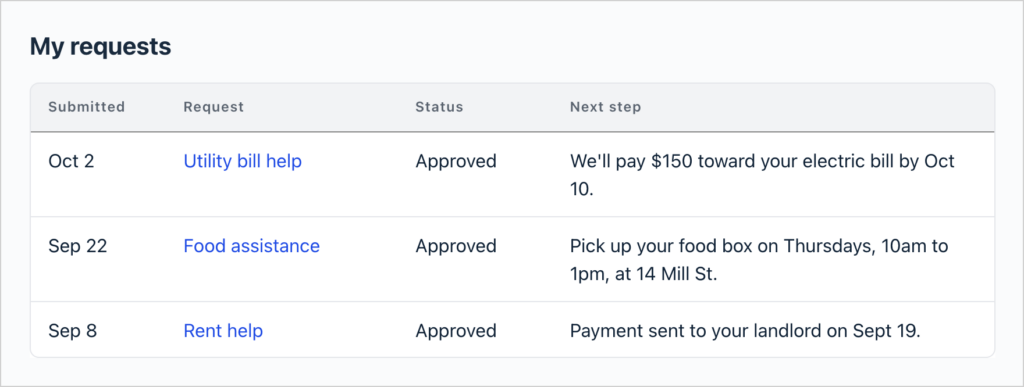
For My requests, we added Date Created (relabeled “Submitted”), What do you need help with? (relabeled “Request”), Status, and Next step. We also set a Percent Width on each column, so the table fits next to the profile card.
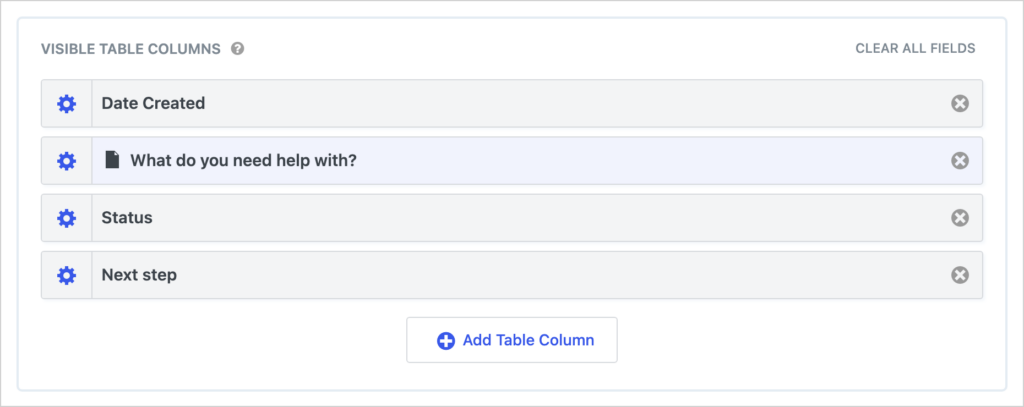
To let clients open the full details of a request, click the gear icon on the Request column and check Link to single entry and Open in a lightbox?. Then open the Single Entry Layout tab and add every field, including Case worker. (See our guide to opening entries in a lightbox for the other options.)
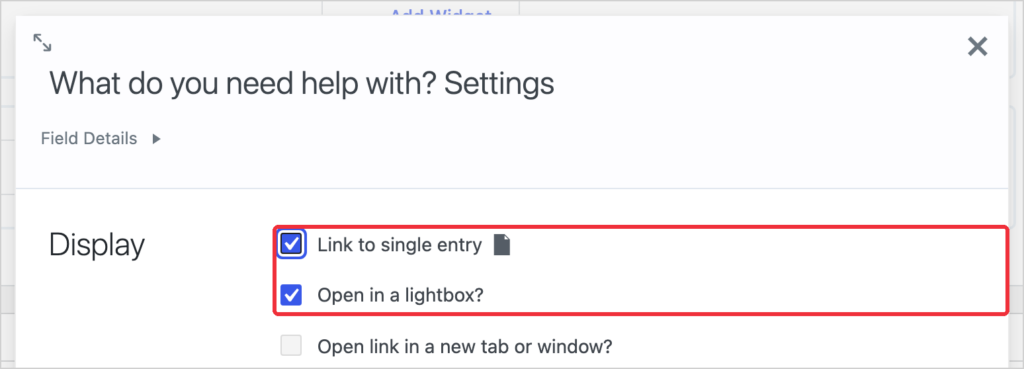
For My documents, we added Document type, File, and Date Created (relabeled “Uploaded”). The File column links to each uploaded file.
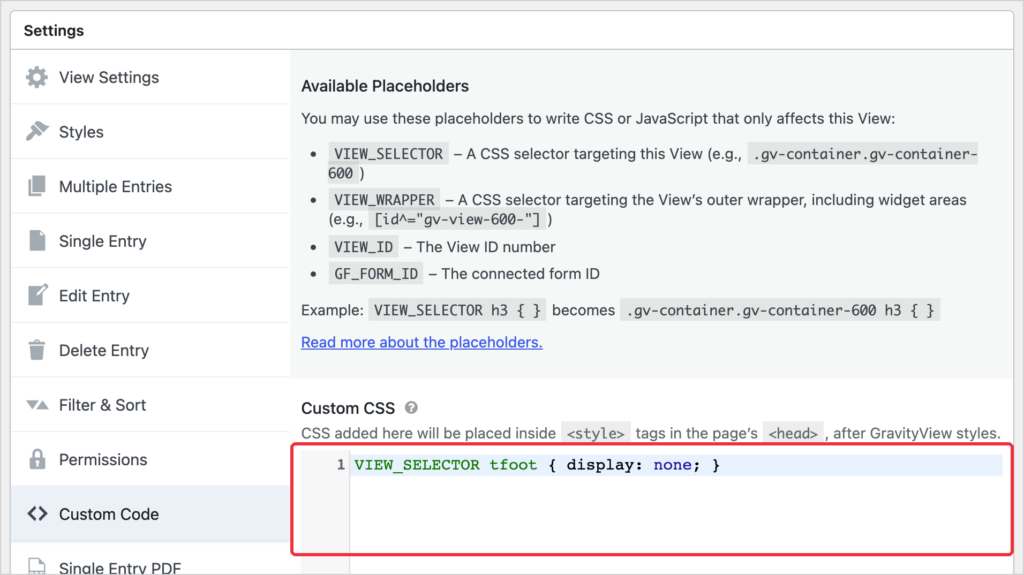
Table Views repeat the column names at the bottom of the table, which can look busy on a table with only a few rows. To hide them, open the Custom Code tab in the View’s settings and add this CSS snippet to Custom CSS:
VIEW_SELECTOR tfoot { display: none; } GravityView swaps VIEW_SELECTOR for this View’s own selector, so the change doesn’t affect other Views. We did this on both tables.
Choosing a theme
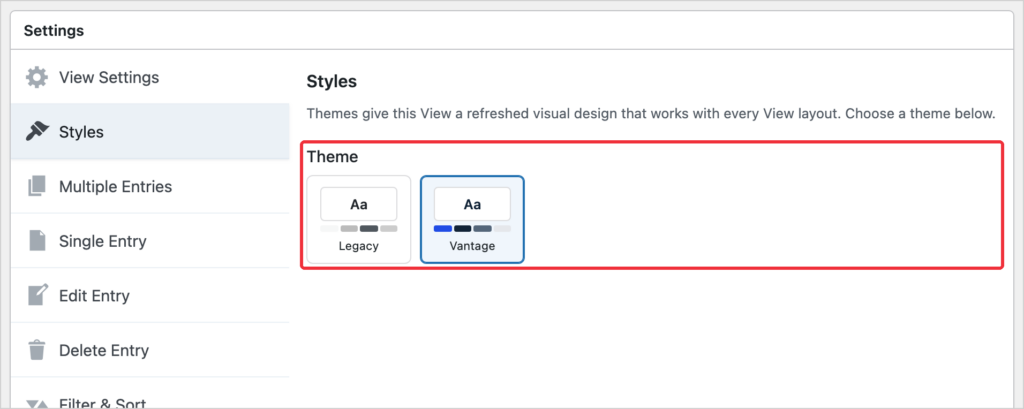
By default, a View uses your WordPress theme’s styles. Since GravityView 3.0, you can also give each View a theme of its own. Open the Styles tab and choose Vantage. That’s the look in these screenshots. We used it on all three Views.
Step 6: Put the portal on one page
Create a new page called “My account” and add a GravityView View block for each View. We put My profile and the two tables side by side with a Columns block.
Above them, we added a Group block with the organization’s logo, a heading, and two buttons that link to the Request help and Upload a document pages. The heading greets each client by name with a shortcode from the User Registration Add-On, which prints a detail from the logged-in user’s account:
Welcome back, [gravityform action="user" key="first_name"]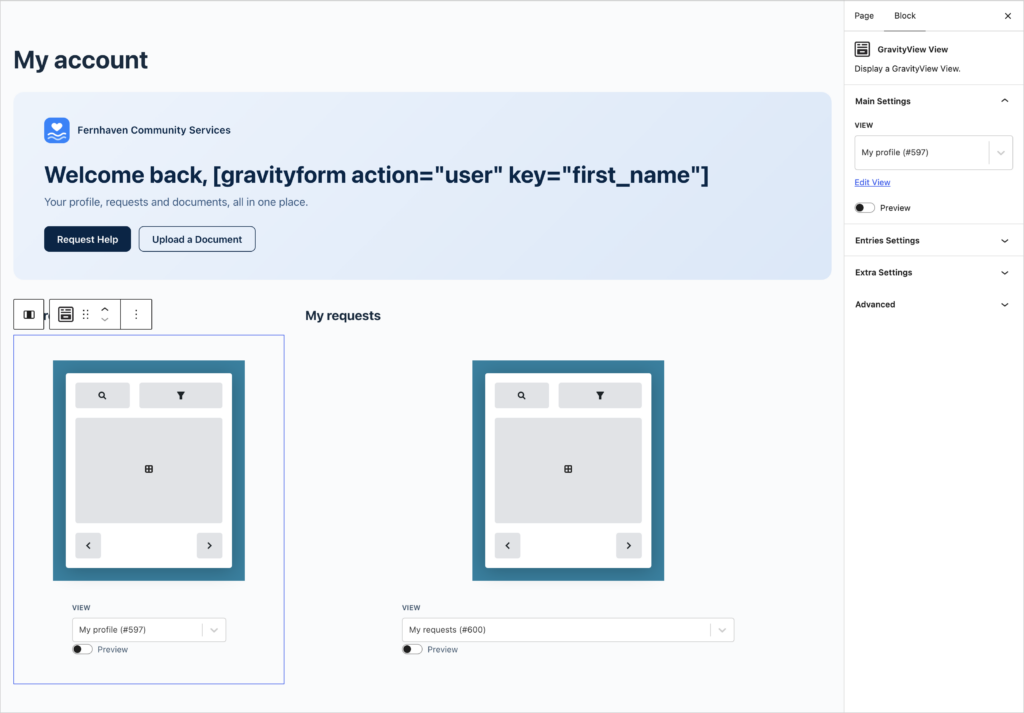
Making the page members-only
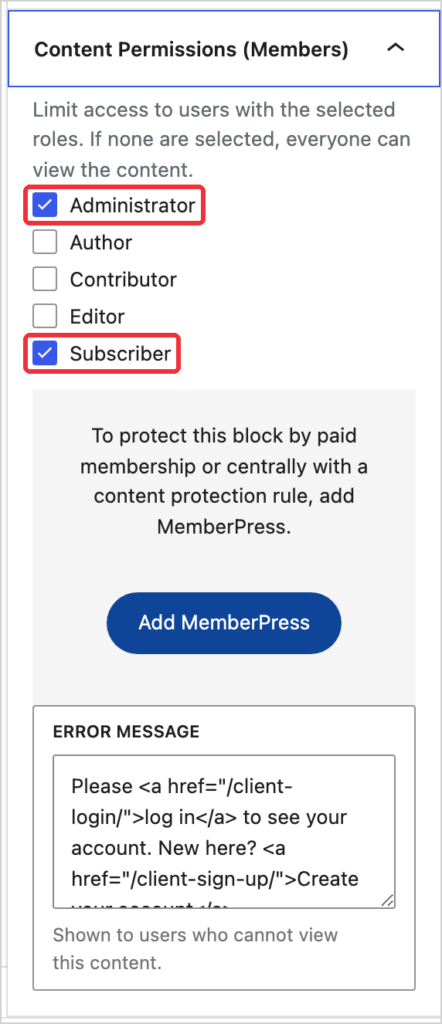
Logged-out visitors already see no entries, but they’d still see the page itself. The free Members plugin can hide the whole page instead:
- Open the My account page in the editor.
- In the Page sidebar, open Content Permissions (Members).
- Check Administrator and Subscriber.
- Under Error Message, add a message with links to your login and sign-up pages.
Adding a login page
Clients also need a way back in. The User Registration Add-On includes a login form you can add with a shortcode. We put this on a “Log in” page:
[gravityform action="login" login_redirect="/my-account/" registration_link_display="false"]The login_redirect attribute sends clients straight to their account page after they log in. That’s it! Your client portal is ready.
Step 7: Build a dashboard for staff
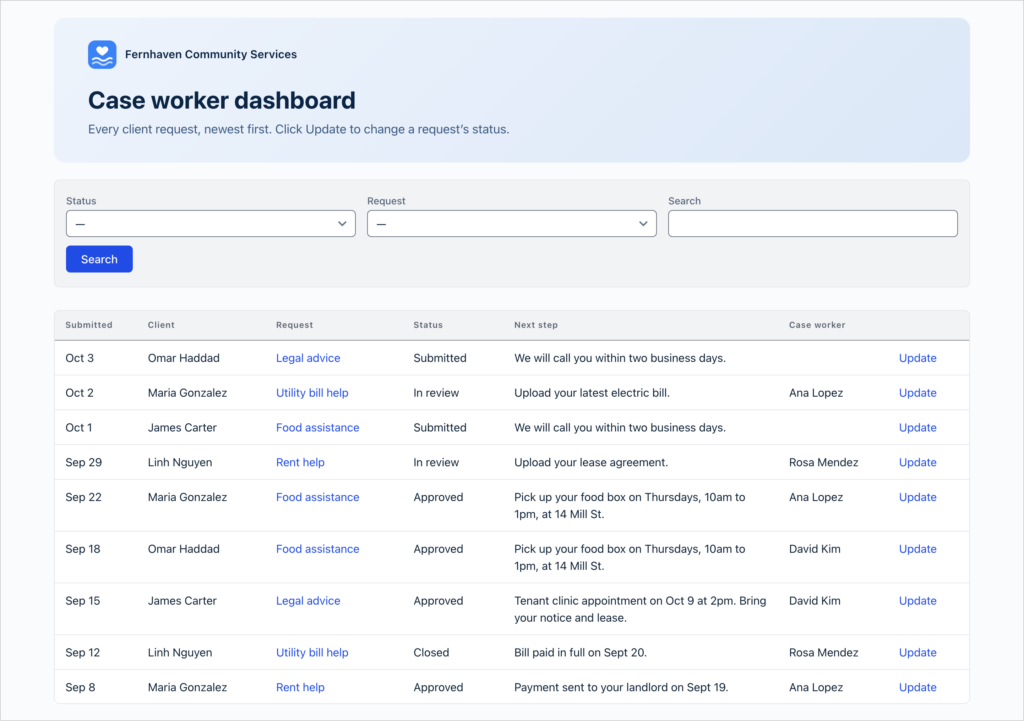
Create one more View of the Help requests form for staff, with the Table View type. We called ours “All client requests” and added these columns:
- Date Created, relabeled “Submitted”
- Created By, relabeled “Client”, with User Format set to First and Last Name
- What do you need help with?, relabeled “Request” and linked to the single entry in a lightbox
- Status, Next step, and Case worker
- Link to Edit Entry, with the link text “Update” and Open in a lightbox? checked
Above the table, click Add Widget and choose Search Bar. We added Status and Request dropdowns and a search box in one row, with the Search button in a row below, so a case worker can list every request that’s “In review” in one click.
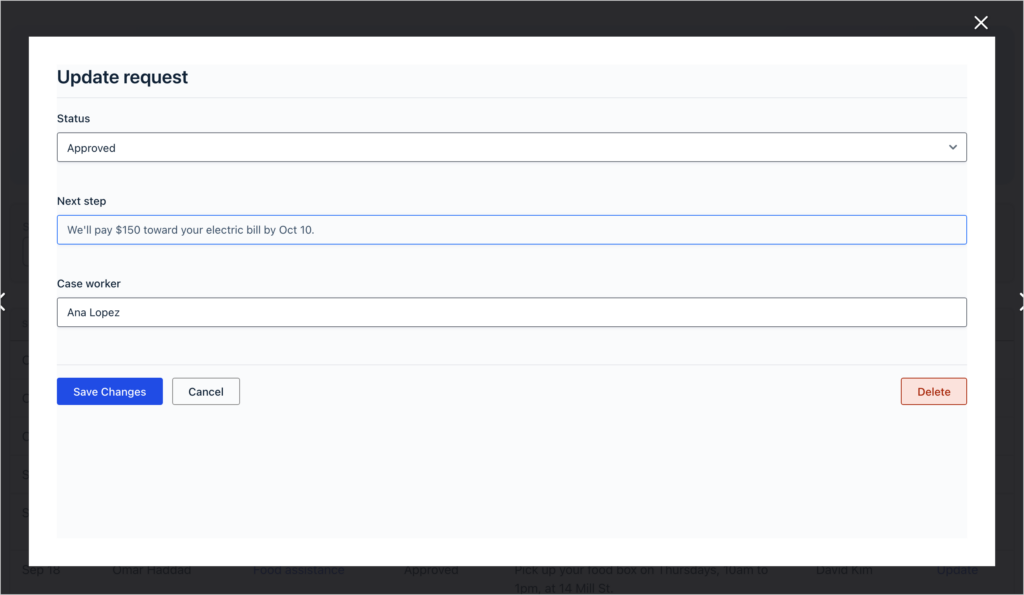
In the Edit Entry Layout tab, add only Status, Next step, and Case worker. Staff can then change those three fields and nothing the client wrote. To edit entries, staff need the Gravity Forms permission to edit entries. Administrators have it, and Members can give it to other roles.
This View should list every client’s requests, so don’t add the logged-in user filter. Keep clients away from it instead. We embedded the View on a new page called “Case worker dashboard” and restricted the page to staff roles with Members, as in step 6. You could also make the page private, or show the View inside the WordPress admin with Dashboard Views, included with GravityView Pro.
We also clicked Edit next to Direct Access in the Publish box and chose Embedded-Only, so nobody can open the View at its own URL. Here’s the result:
When a case worker clicks Update, they change the status and next step in a lightbox:
The client sees the change the next time they open their account page:
Emailing clients when a request changes
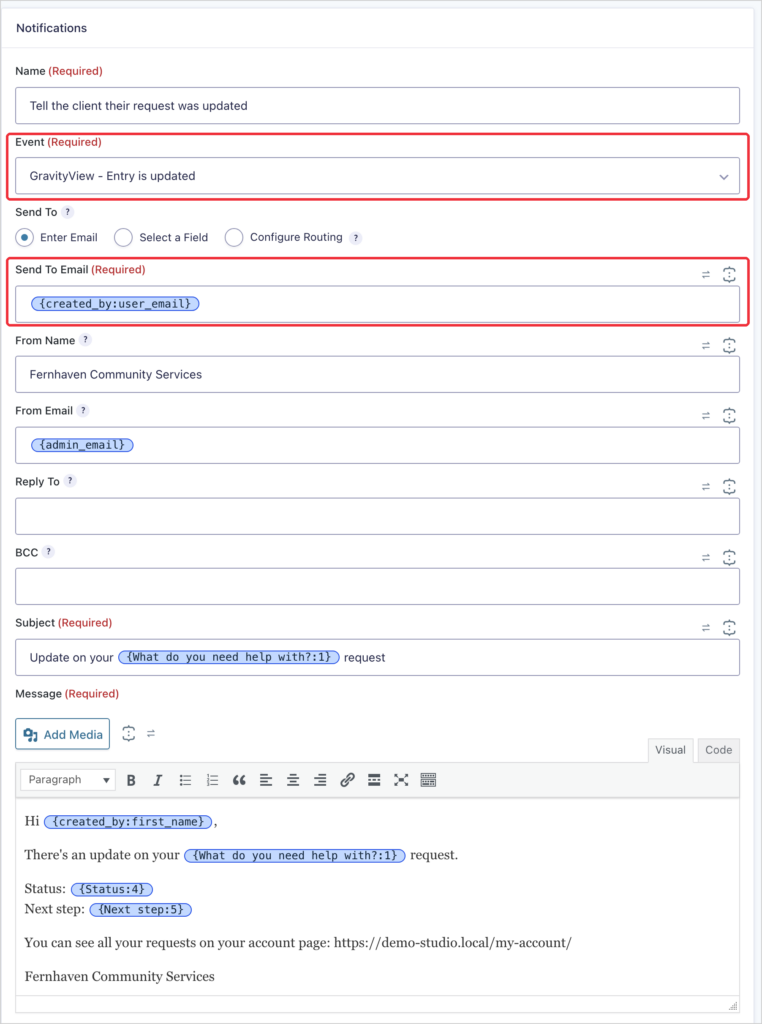
GravityView adds a notification event to Gravity Forms called “GravityView – Entry is updated”. Use it to email the client whenever staff save a change:
- Open the Help requests form, click Settings, then Notifications, and click Add New.
- Set Event to GravityView – Entry is updated.
- Under Send To, choose Enter Email and enter
{created_by:user_email}. This merge tag is the email address of the client who submitted the request. - Add the
{Status:4}and{Next step:5}merge tags to the message, then click Update Notification. Your field IDs may differ, so use the merge tag picker next to the message box.
Pro tipYour staff dashboard doesn’t have to be a table. GravityBoard shows requests as cards in Submitted, In review, and Approved columns, and dragging a card to a new column changes its status. GravityEdit lets staff change a status right in the table.
Other client portals you can build
The same pattern of one form and one View per section works for other kinds of portals:
- Customer portal – customers track and edit their orders. See how to create a customer portal for custom product orders.
- Support desk – clients submit tickets and follow the replies. See our support ticket system tutorial.
- Document library – share files with clients in a searchable table. See how to build a document library.
- Application tracking – applicants check where their application stands. See our application review tutorial.
- Student portal – students see their records and submit work. See how to build a student portal.
Comparing tools before you start? Our roundup of WordPress client portal plugins covers the main options.
Build your client portal with GravityView
Every section of this portal is a Gravity Forms form plus a View that shows each client their own entries, and one more View gives staff the full picture. When you need a new section, like appointments or invoices, add another form and View to the account page.
So what are you waiting for? Get GravityView Pro and start building your client portal.
Get better at Gravity Forms, one email a week
New GravityKit releases, practical Gravity Forms tutorials, and subscriber-only discounts. One short email every week, unsubscribe anytime.
More articles

Launch Log: A range slider for search, AI-managed calendars, and security updates in ten products
GravityView adds a Slider search input, GravityCalendar lets AI assistants manage calendars, and ten GravityKit products get security fixes. Here’s what shipped.
9 nonprofit apps you can build with Gravity Forms and GravityKit
Nine apps nonprofits build on WordPress from Gravity Forms data: volunteer databases, member directories, client portals, donation pages, grant review and more.
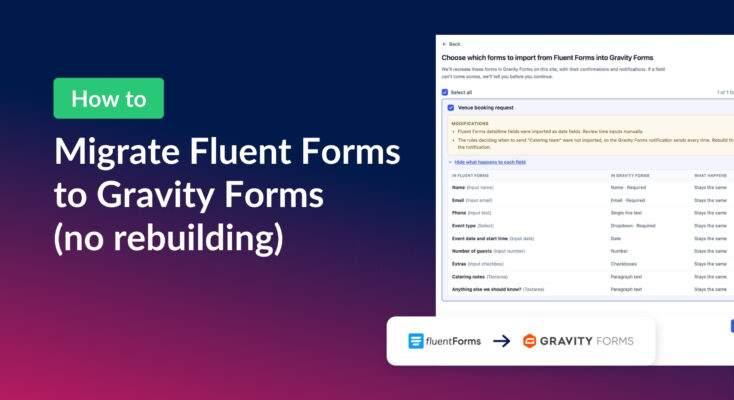
How to migrate from Fluent Forms to Gravity Forms without rebuilding your forms
Move your Fluent Forms forms into Gravity Forms with GravityMigrate, then bring your entries across with GravityImport. Every step was tested on the free version of Fluent Forms.