Published
•
Updated
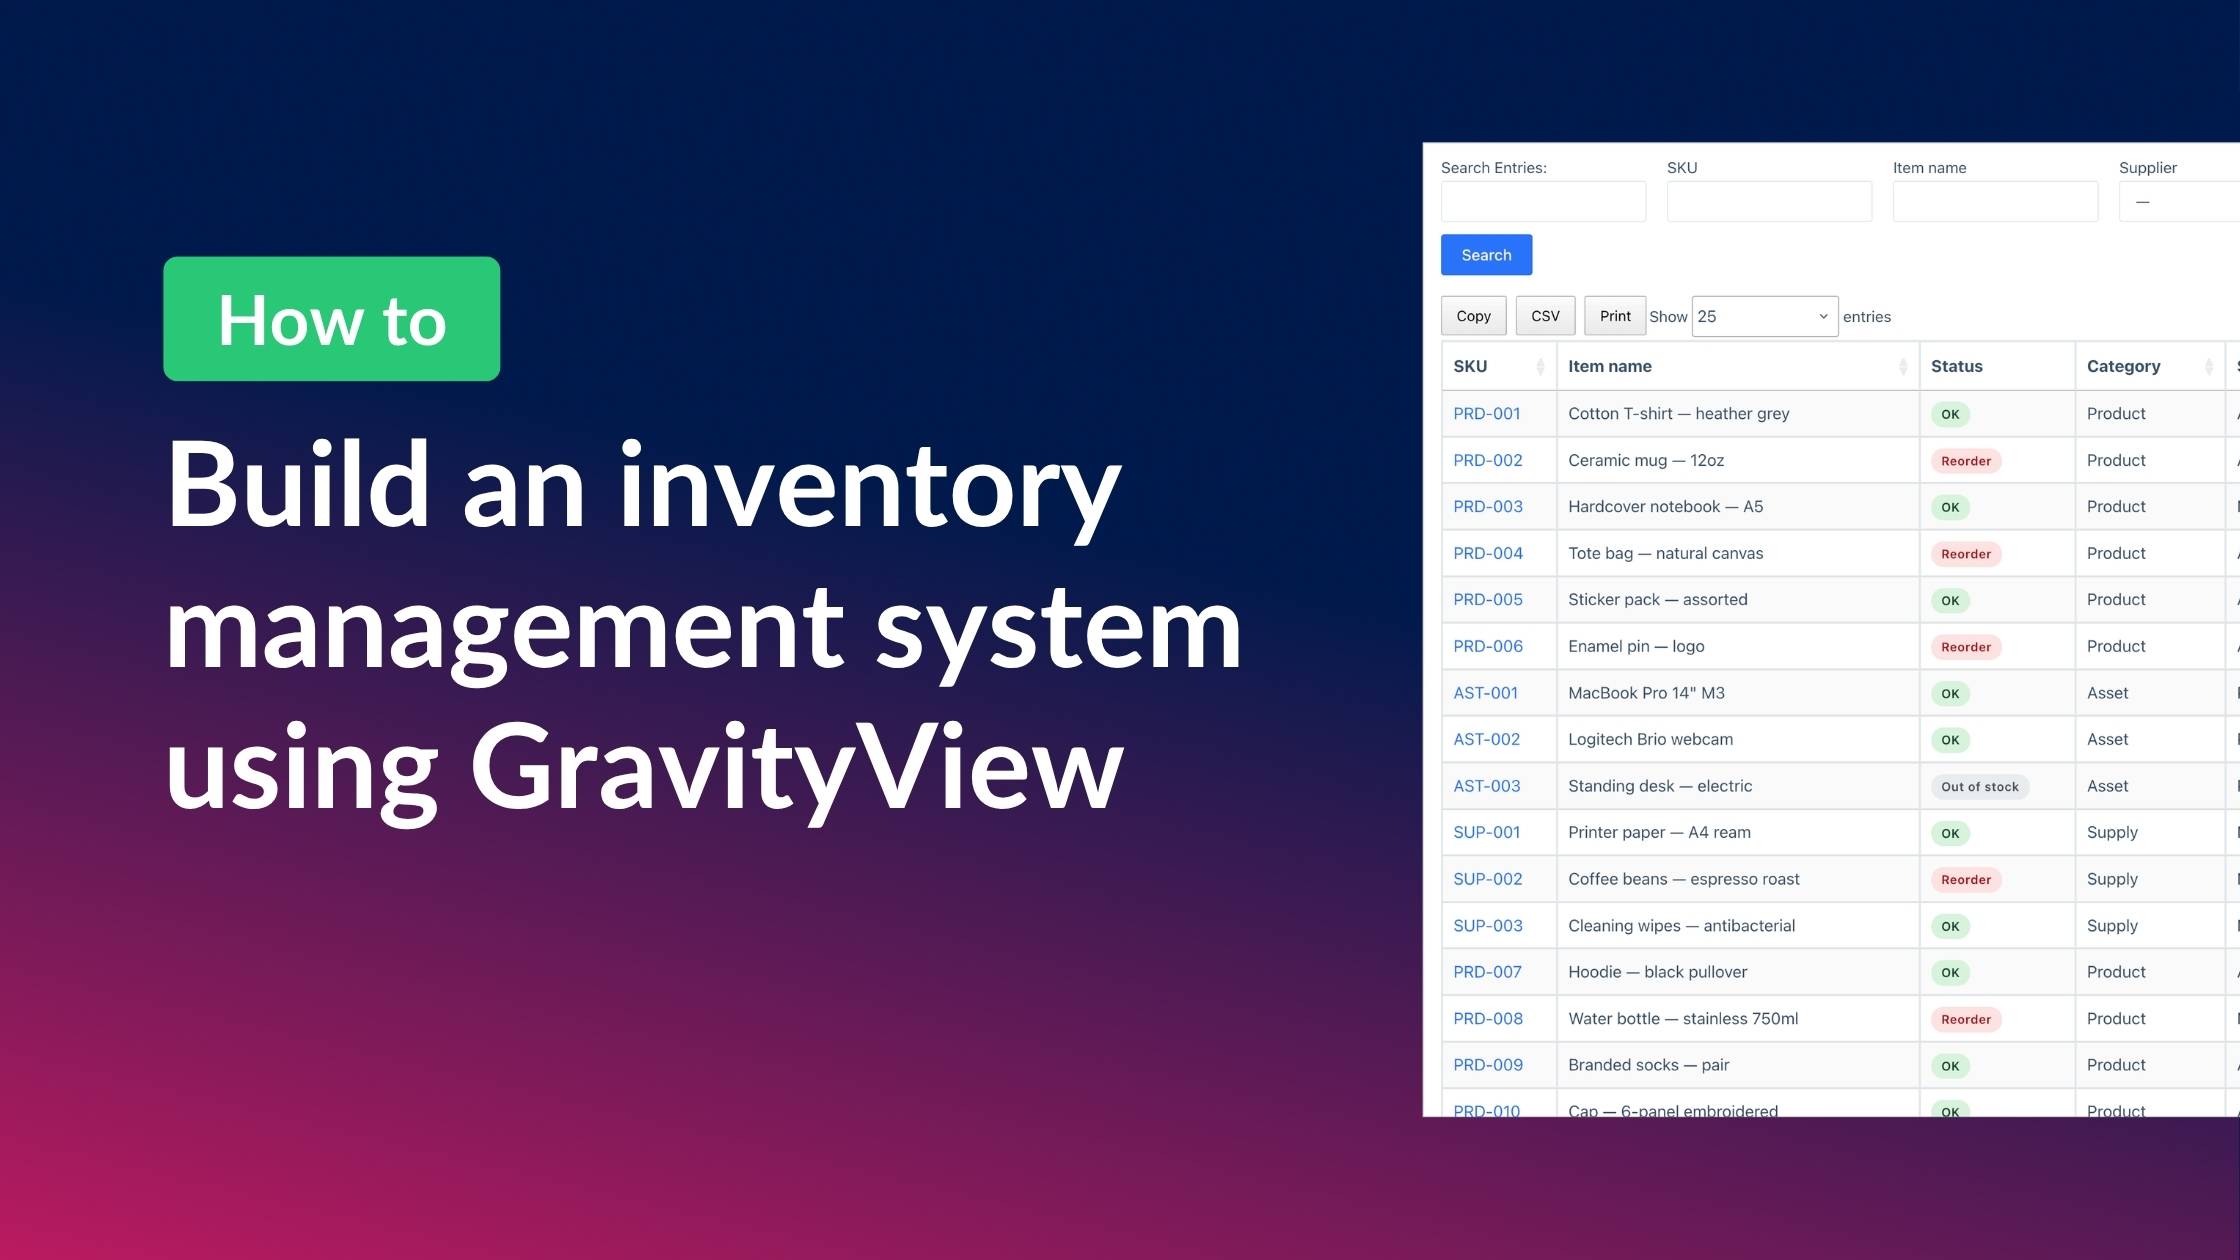
How to build a WordPress inventory management system (without code)
Build a WordPress inventory management system with Gravity Forms and GravityView. Track stock, edit quantities from the front end, and skip the heavy ERP.
Most teams reach for QuickBooks Inventory, Sortly, or an expensive SaaS tool the moment someone says “we need to track stock.” That’s overkill if you don’t sell online and just need an internal record of what you have, where it lives, and when to reorder.
There’s a much lighter way to do this if you’re already on WordPress. Gravity Forms is the data layer. GravityView turns that data into a public, filterable, role-gated table that warehouse staff can update from the front end without ever logging into the WordPress admin. No e-commerce stack. No ERP. No per-seat licensing.
Here’s what we’re going to build in this tutorial: a Gravity Forms intake for new stock, a GravityView app for browsing and filtering, low-stock badges driven by reorder thresholds, and an Edit Entry view that lets staff update quantities.
Let’s dive in!
Sneak peek at the finished system
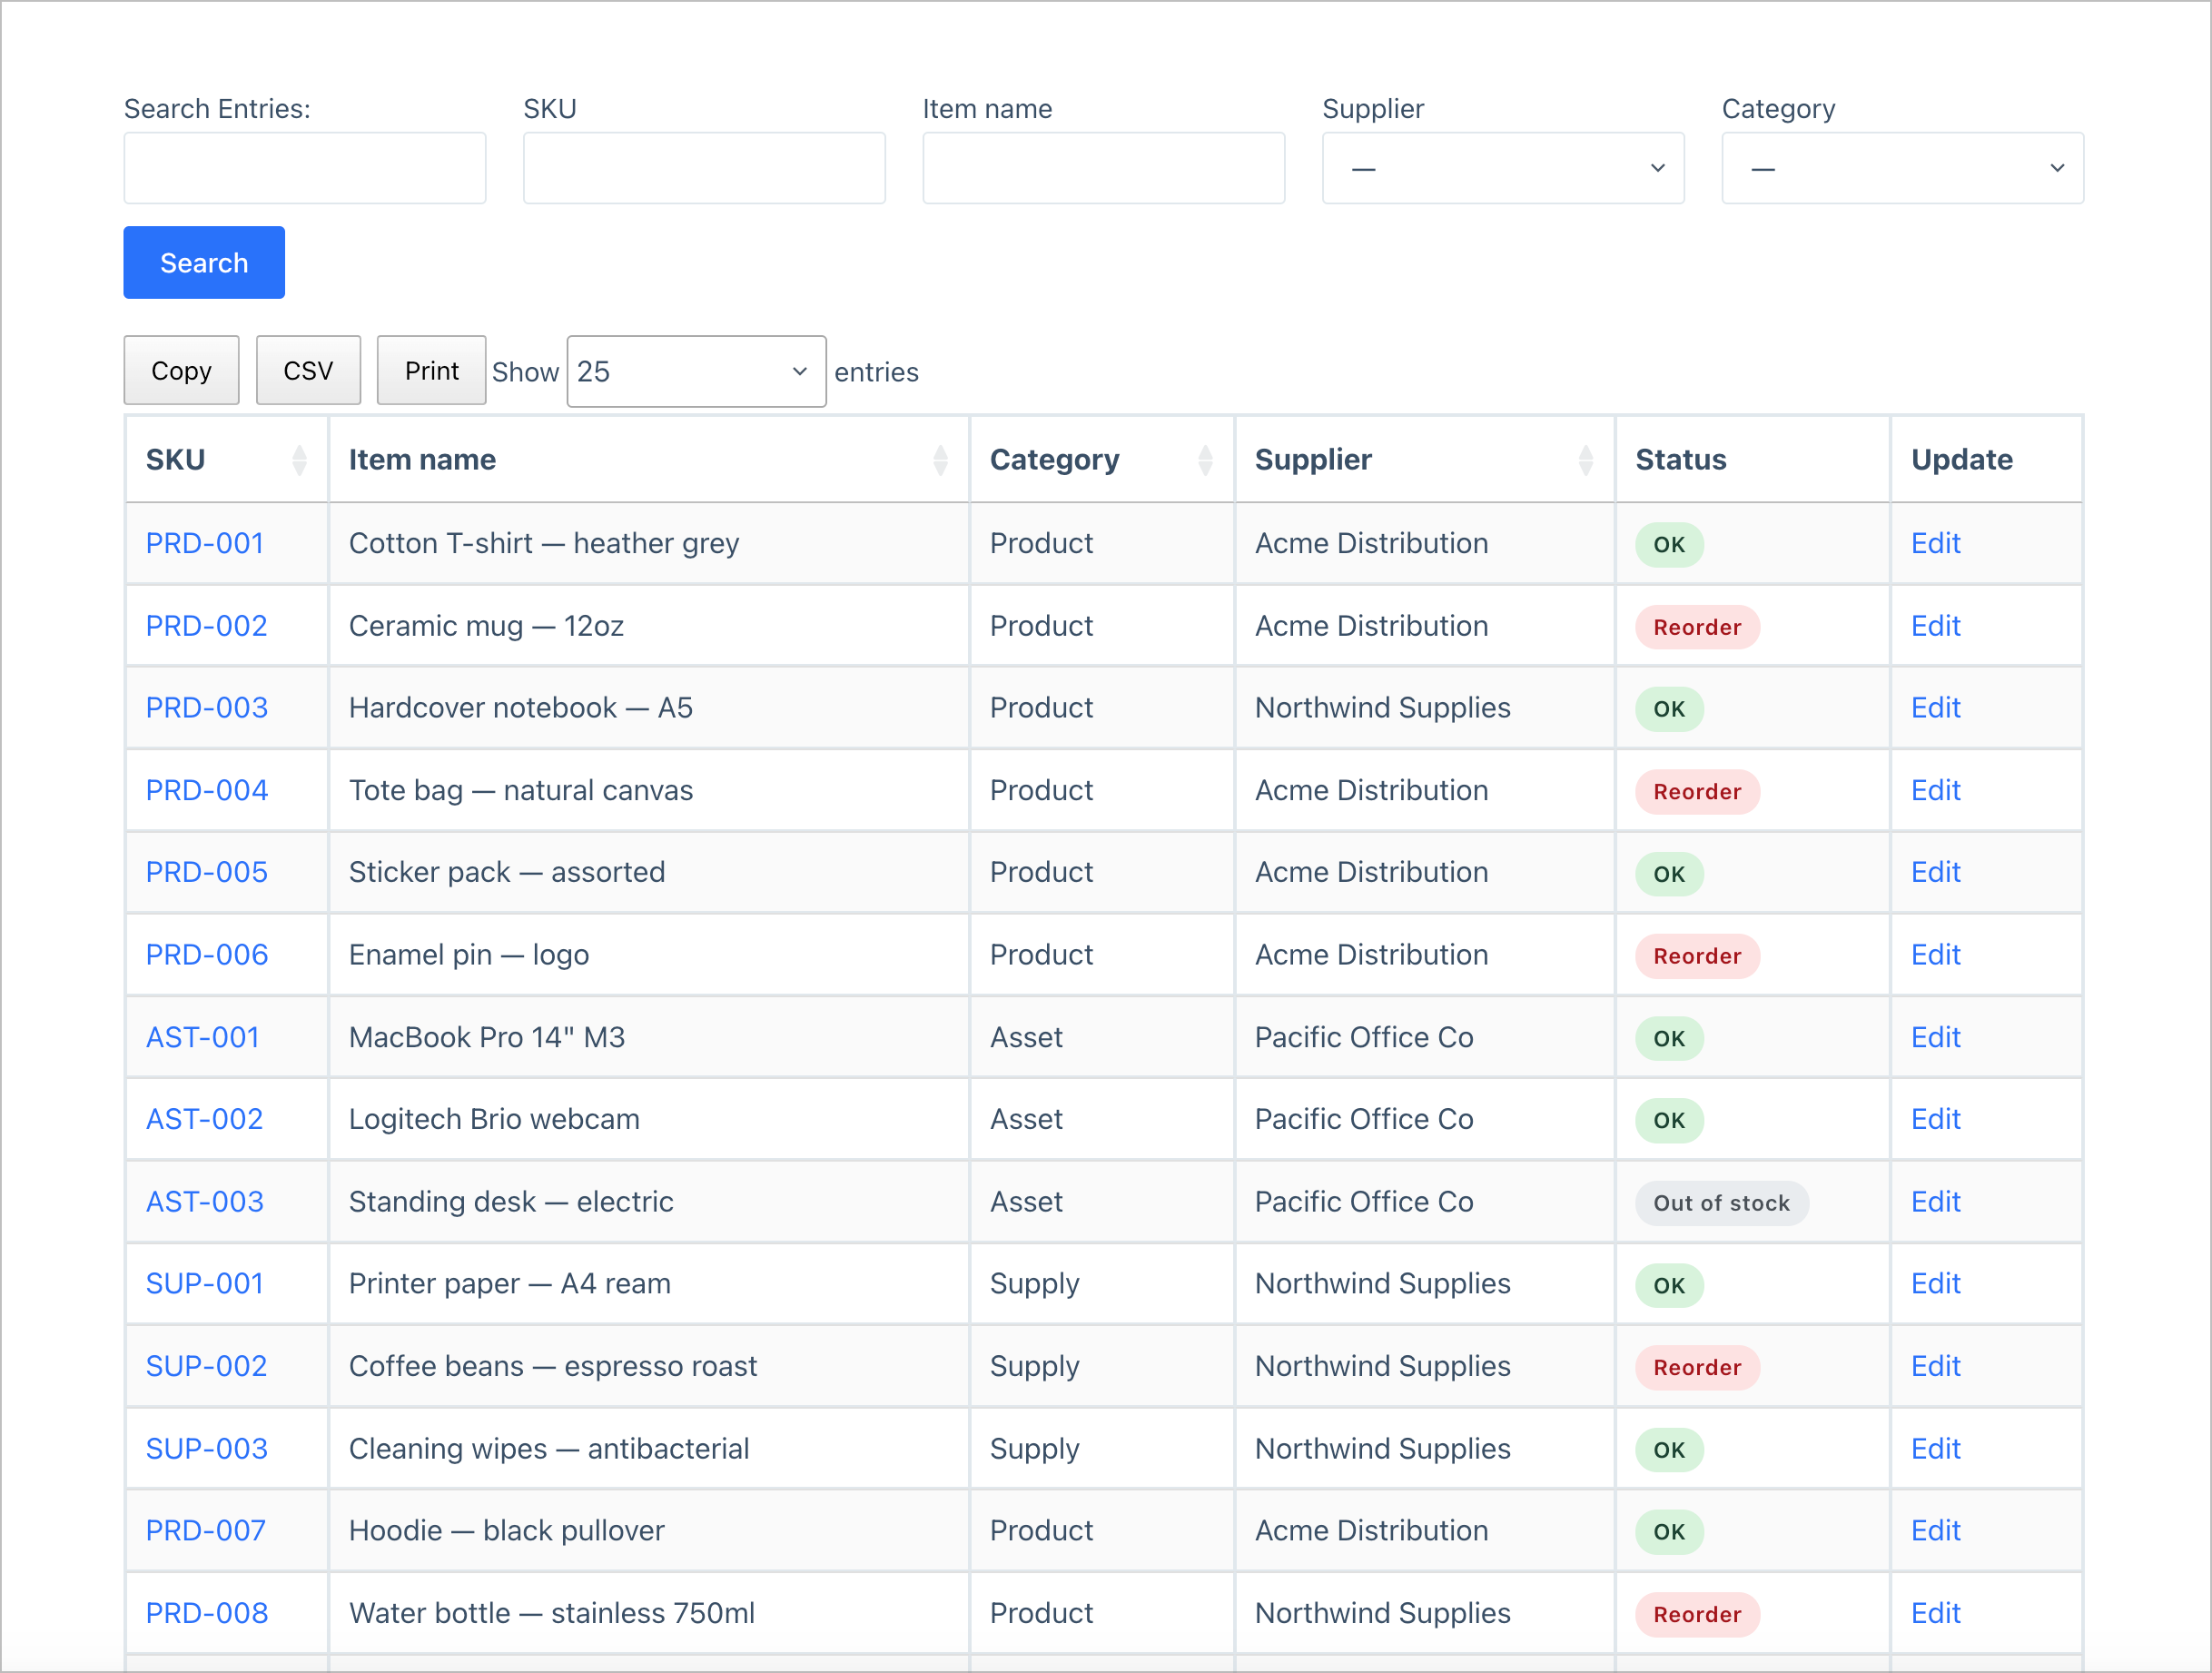
The main inventory list is a filterable table with search, supplier and category dropdowns, a quantity column, and a status badge that flips to red the moment stock dips below the reorder threshold. Each row has an Edit link for users who have permission to update item details.
The Single Entry Layout opens when someone clicks an item’s SKU. It shows the full record (name, supplier, location, last counted date, notes, etc) and a link to edit. This is the read-only detail screen; useful for someone walking the floor with an iPad who just wants to confirm they’re looking at the right item.

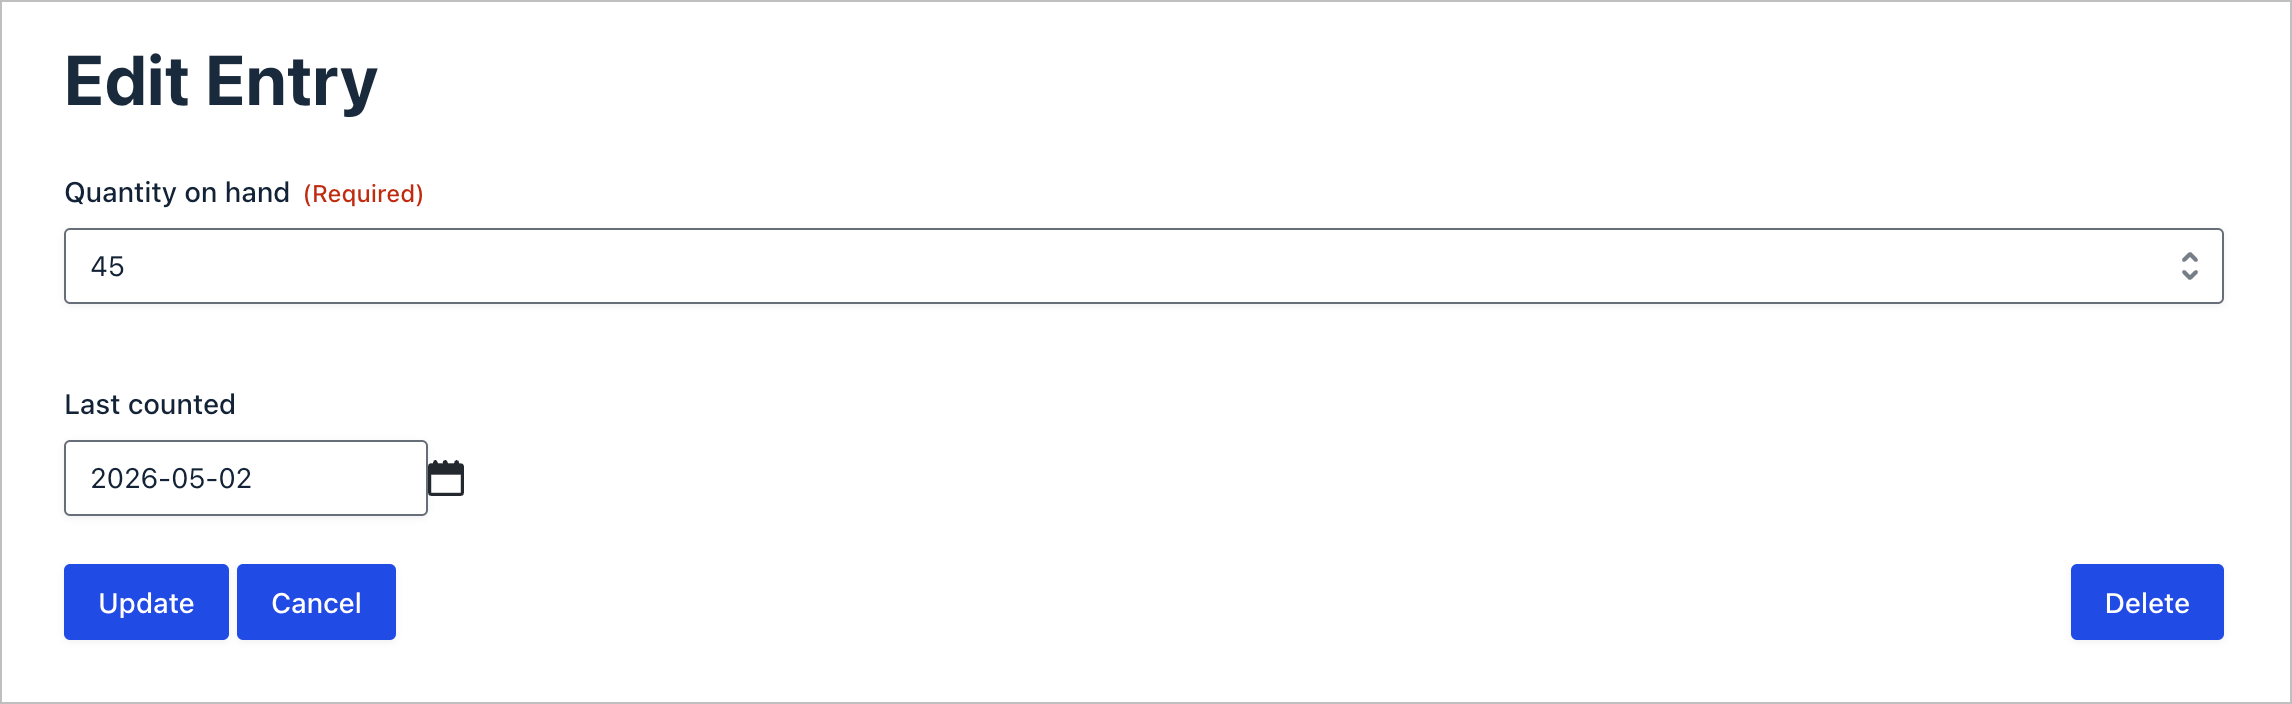
The Edit Entry Layout is where the real magic happens. It exposes only the Quantity on hand and Last counted fields. Everything else (SKU, item name, unit cost, supplier) is locked down and cannot be edited.
Wanna try it?
Spin up a demo
See a live no-code inventory system built with GravityView — explore the demo.

What you’ll need
Here are the plugins you’ll need to create an inventory management system like the one in this tutorial:
- Gravity Forms (Pro or Elite) – the data layer. You’ll build two forms: one for inventory items, one for suppliers.
- GravityView (Pro or higher) – the front-end engine that displays, filters, and edits the entries you collect.
- GravityView Advanced Filter – bundled with GravityView Pro and All Access. You’ll need it for the low-stock-only view.
- Gravity Forms Dynamic Lookup (free) – for creating a bridge between the two forms.
- (Optional but recommended): GravityRevisions – for keeping a detailed log of every update made to every form and entry
If you grab All Access, every GravityKit add-on above is included for one flat license, which works out cheaper than buying all of the add-ons individually.
Step 1: Plan the inventory schema
Before we start building, let’s sketch out the data model. The pattern is two forms:
- Inventory: Items – one entry per SKU. The bulk of the data lives here.
- Inventory: Suppliers – one entry per vendor. Referenced from the Items form.
Splitting suppliers into their own form means you maintain vendor contact info in one place. Update an email address on the supplier record, and every item that references that supplier picks up the change automatically.
Why this beats a single big spreadsheet: every change is logged as a Gravity Forms entry edit (use GravityRevisions to keep an audit trail of every update), conditional logic comes for free, and you can grant front-end access by role. None of that is true in Google Sheets.
Step 2: Build the Items form
In your WordPress admin, create a new form by hovering over Forms and clicking New Form (name it something like Inventory: Items). Next, add the following fields:
| Field | Type | Why |
|---|---|---|
| SKU | Single Line Text (No Duplicates) | Primary identifier. Must be unique. |
| Item name | Single Line Text | Human-readable label. |
| Category | Drop Down | Product, Asset, Supply — whatever buckets you need. |
| Quantity on hand | Number | The stock count. |
| Reorder threshold | Number | The line in the sand for low-stock alerts. |
| Unit cost | Number | Optional. Hide from front-end staff via Admin Only. |
| Supplier | Drop Down (Dynamic Lookup) | Pulled from the Suppliers form. (See below for how to set this up). |
| Location | Single Line Text | “Warehouse A — Bin 12”. |
| Last counted | Date | When stock was last verified. |
| Notes | Paragraph Text | Catch-all. |
| Inventory value | Calculation | Quantity × Unit cost. Useful for reporting. |
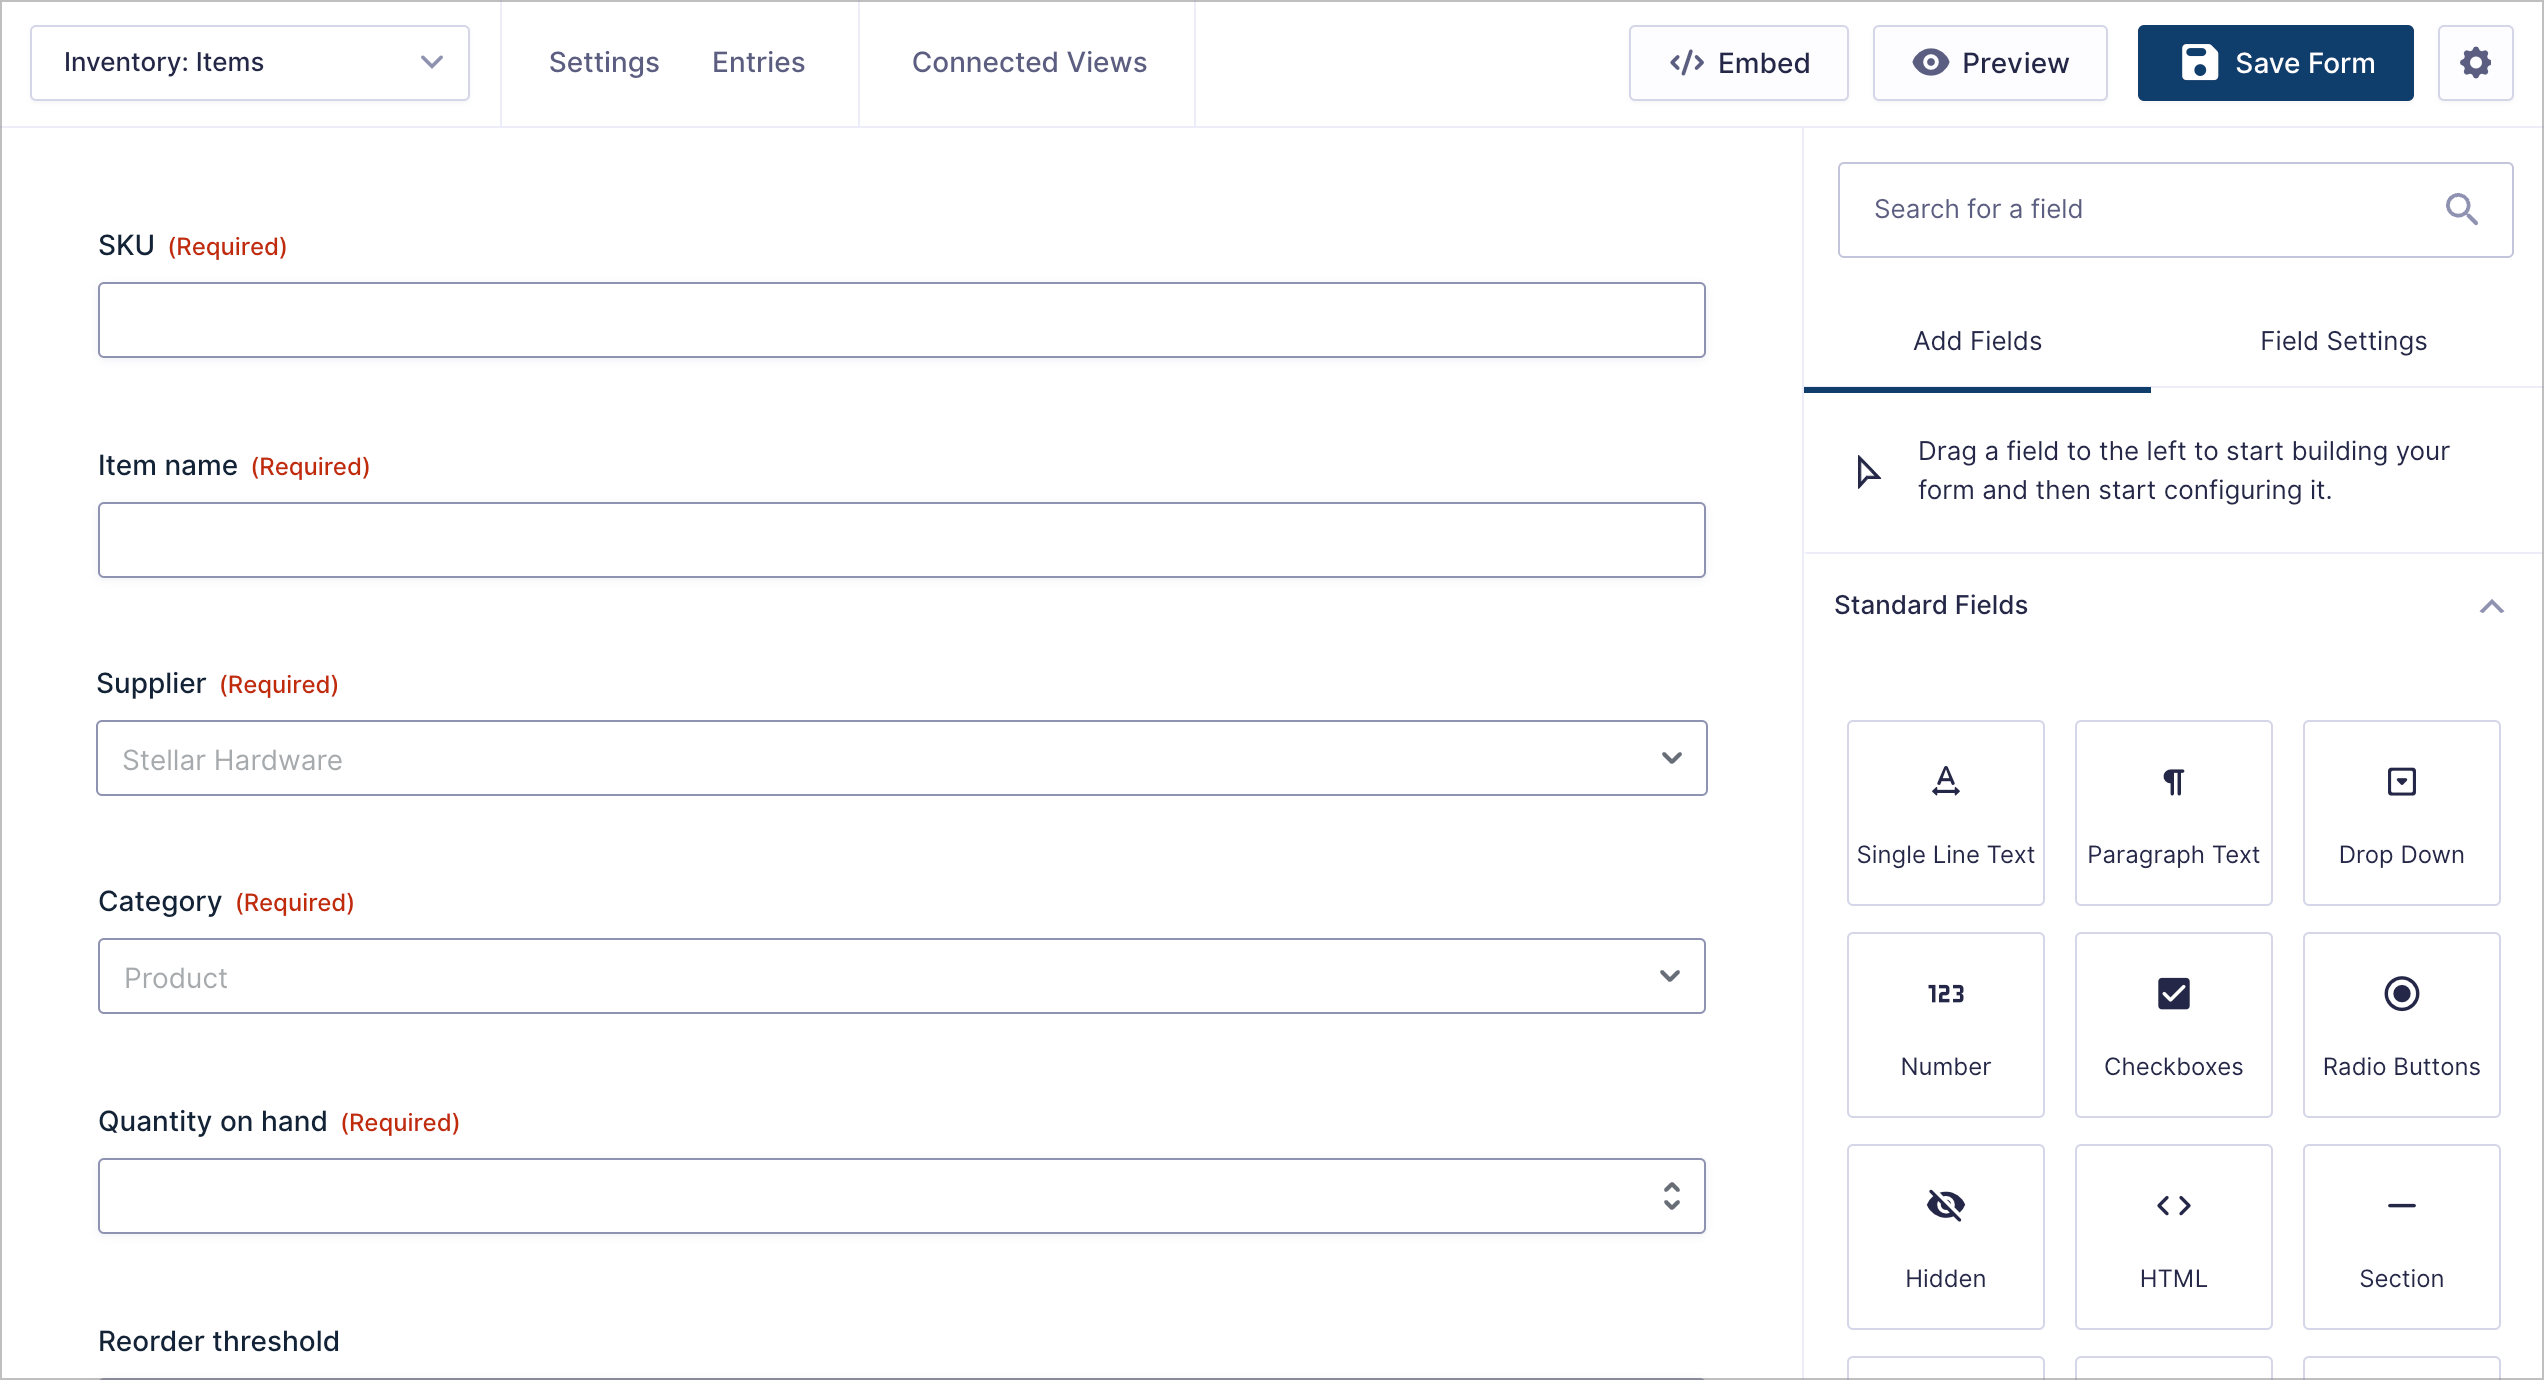
There are a few important field settings to configure here, so let’s go through each of them in detail.
Mark SKU as “No Duplicates”
A stock register only works if SKU is unique. Open the SKU field settings tab, scroll down to Rules, and enable both Required and No Duplicates. Now Gravity Forms will reject any submission that reuses an existing SKU, which is exactly what you want!

Add a calculation field for Inventory value
Add a new Number field called Inventory value. In the field’s settings, scroll down and enable calculations, then insert the below formula using the merge-tag picker so the field IDs are correct.
{Quantity on hand} * {Unit cost}This simple formula multiplies the quantity of the item on hand with the cost so you can see the total value of the inventory.

That value will recompute every time the entry is saved.
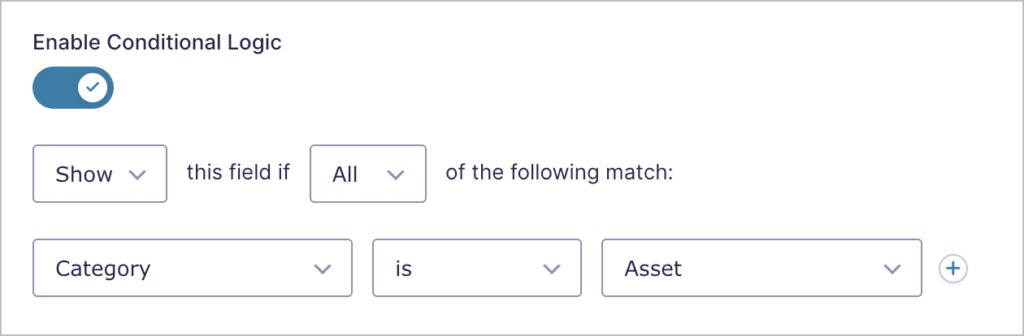
Conditional logic for asset-only fields
If you’re using one form for both consumable products and tracked assets, you may want to only show fields like Serial number when Category is set to “Asset.” To set this up, open the Serial number field, click Conditional Logic, and add a rule: show this field if Category is Asset. Done.
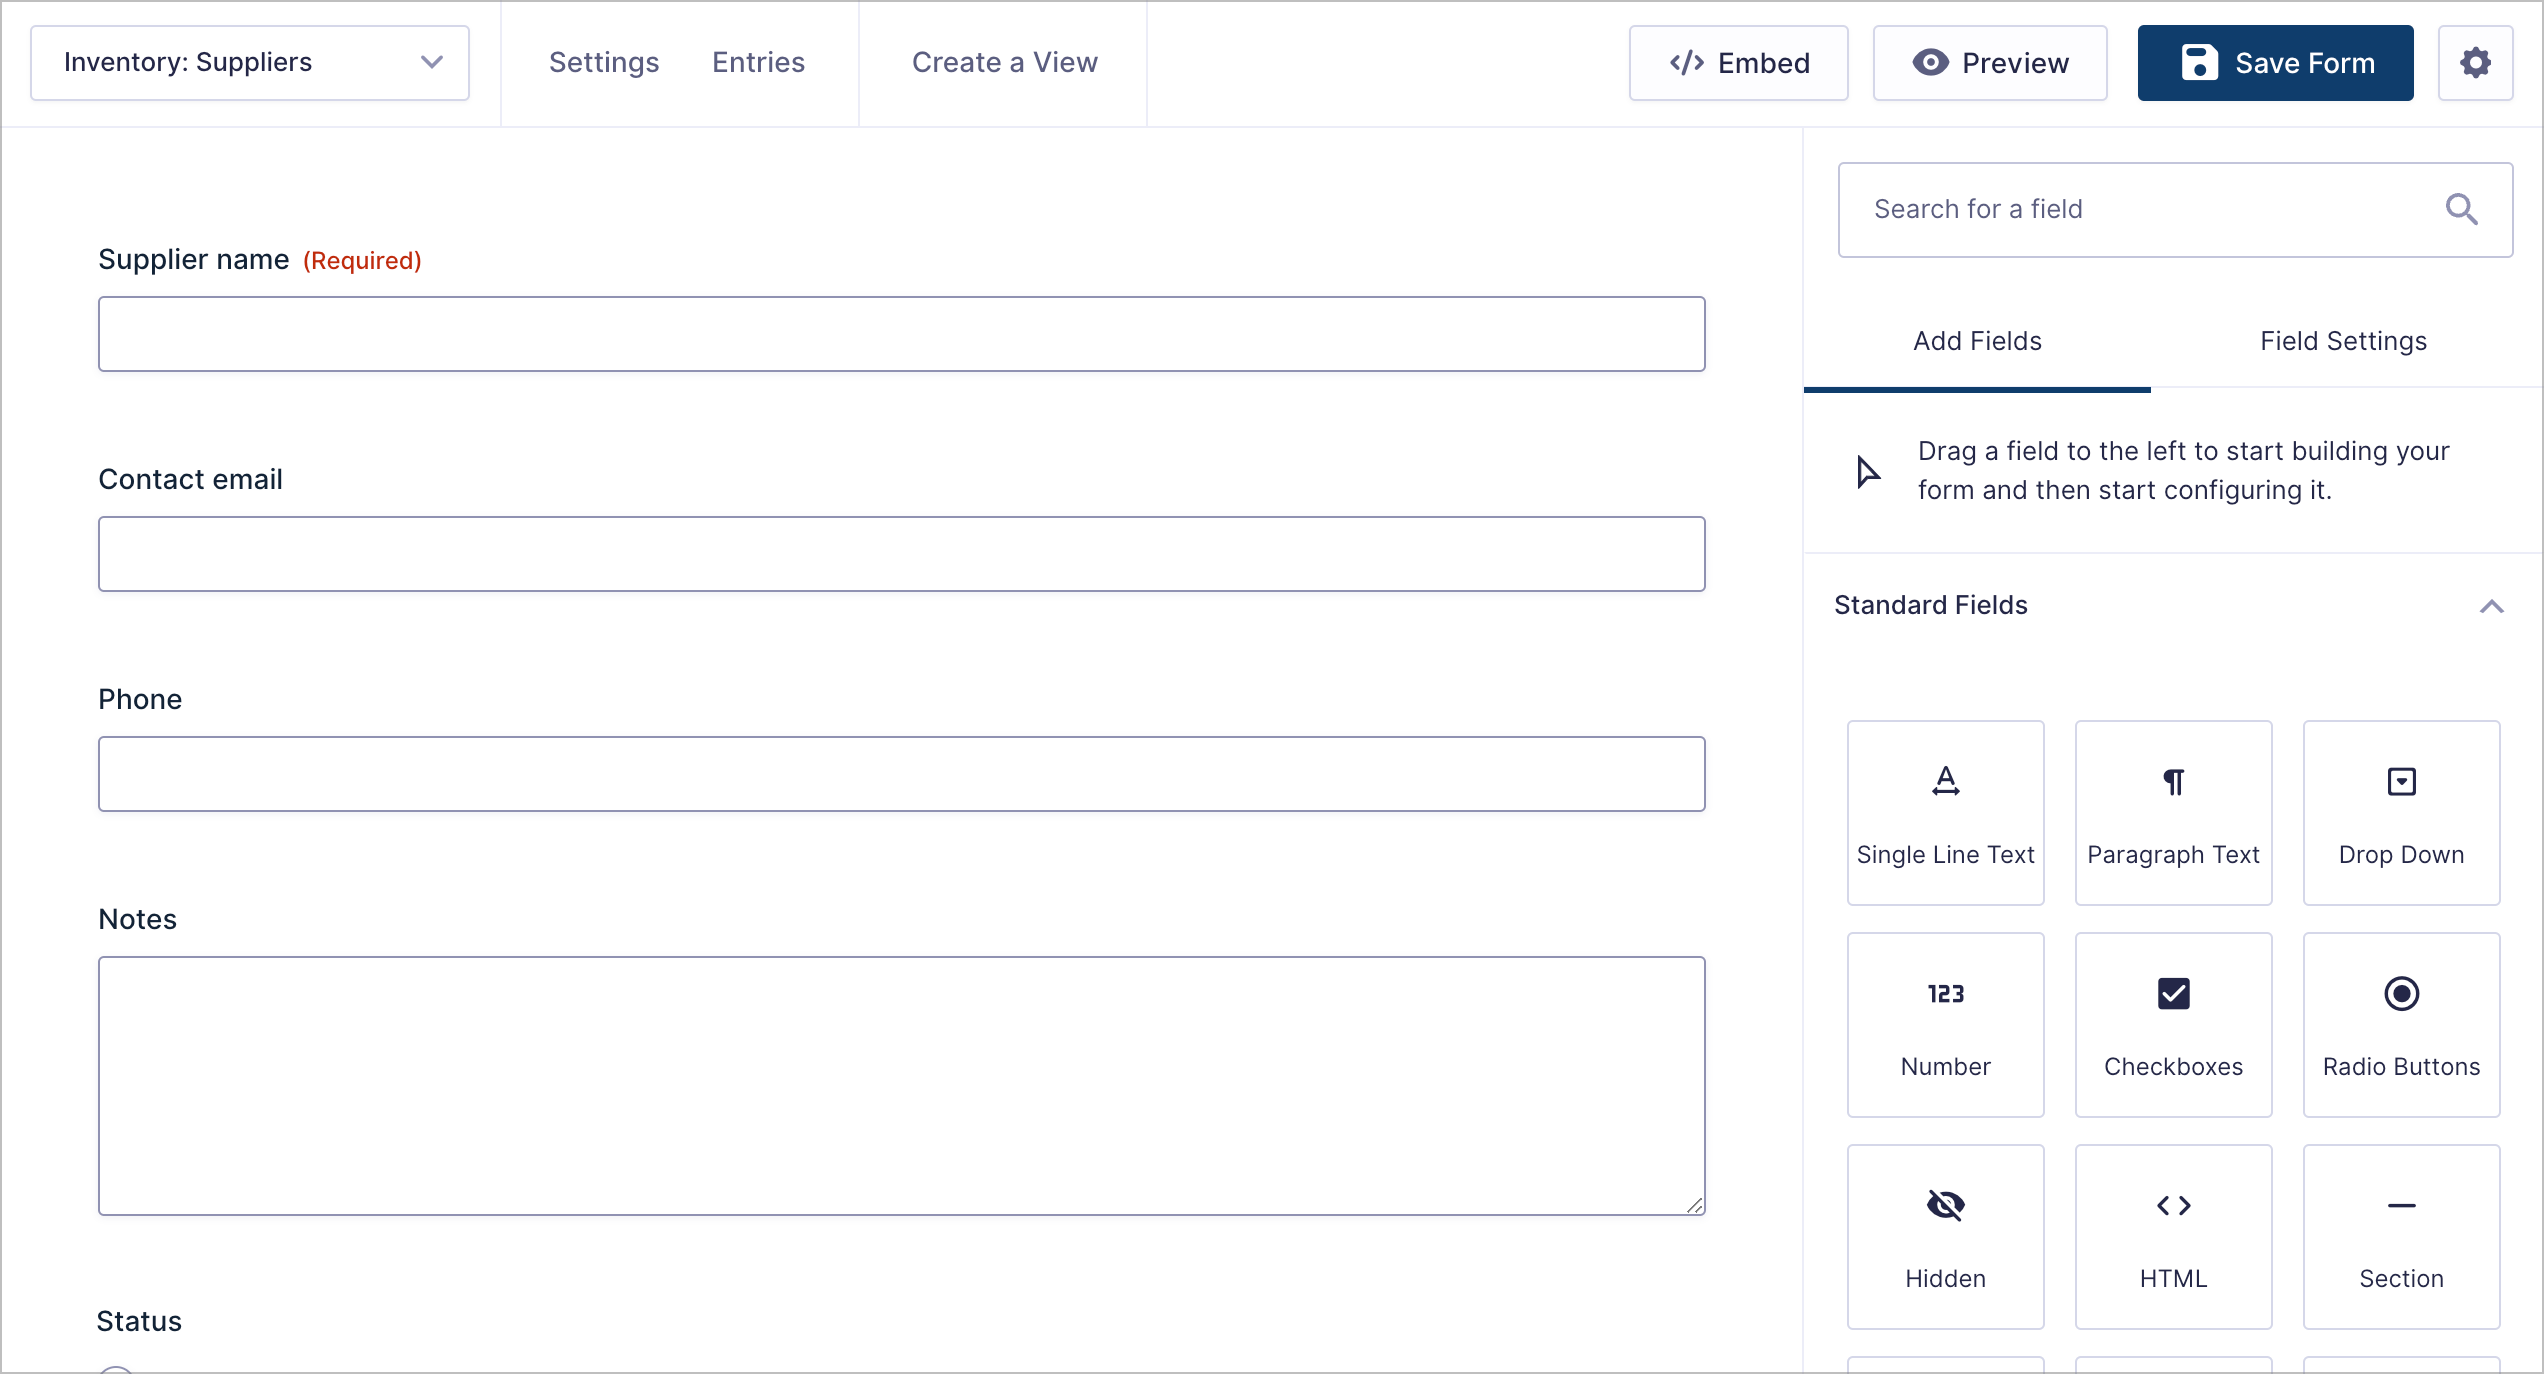
Step 3: Build the Suppliers form
Create a second form (name it something like Inventory: Suppliers) and add the following 5 fields:
- Supplier name (Single Line Text, Required)
- Contact email (Email)
- Phone (Phone)
- Notes (Paragraph Text)
- Status (Radio: Active / Inactive)
Next: Add a few suppliers manually so the Items form has something to reference.
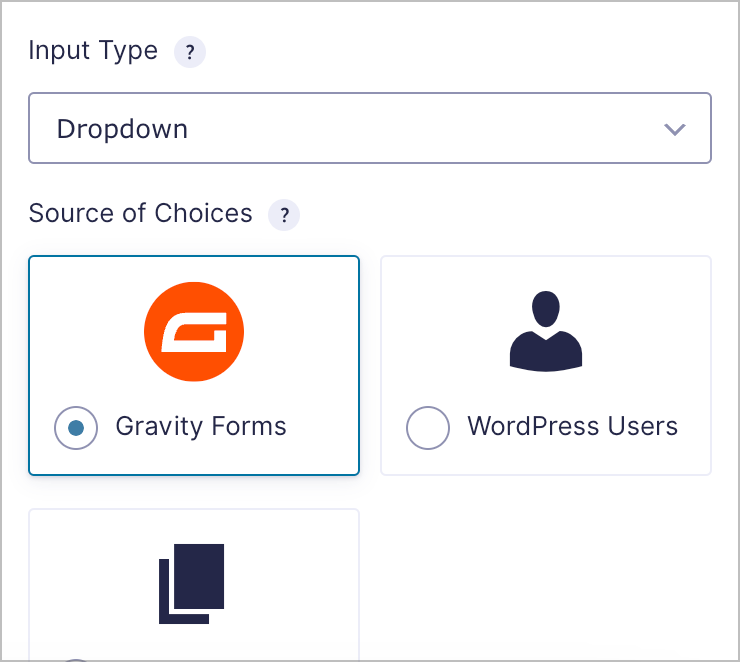
Step 4: Link suppliers to items using Dynamic Lookup
Now connect the two forms. Back in your Items form, edit the Supplier dropdown. With GravityKit’s free Dynamic Lookup add-on installed, the field becomes a live lookup against the Suppliers form rather than a static list you maintain by hand.
After adding the field to your form, open the field settings and set Source Form to your Suppliers form (your form ID will differ) and Source Field to Supplier name.

Under the hood, the field renders as a normal Gravity Forms dropdown—it just pulls choices from the live Suppliers form rather than a static list!
When you add a new supplier in the Suppliers form, the Items form’s Supplier dropdown updates instantly (no field edits required).
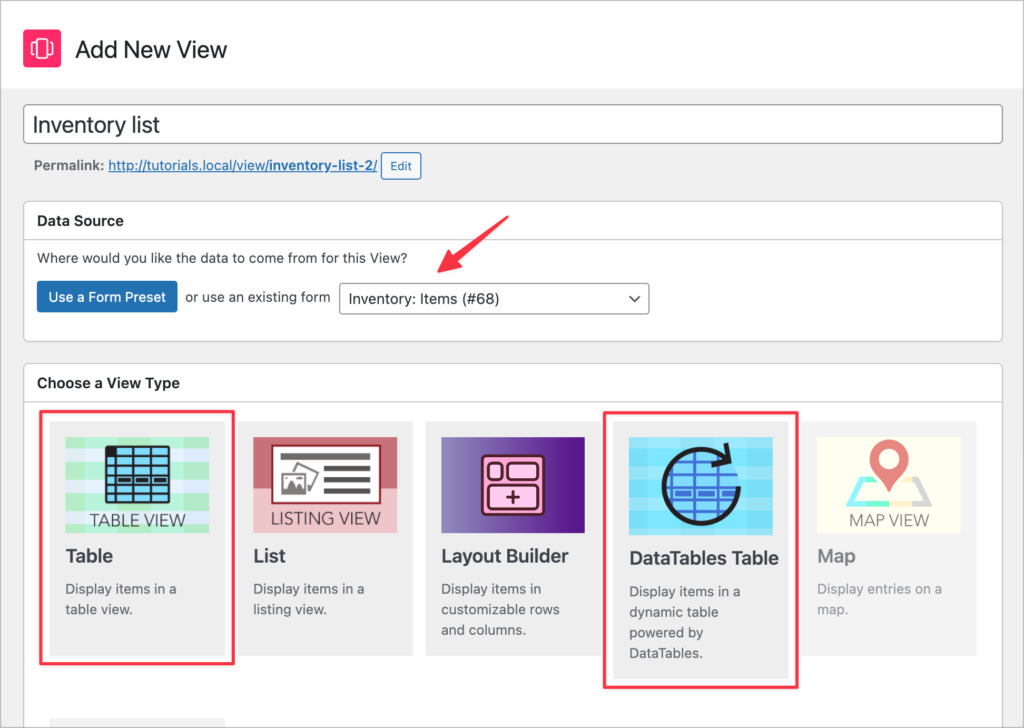
Step 5: Create the public inventory list with GravityView
This is where the data becomes a usable interface. Create a new View by hovering over GravityKit and clicking New View. Now choose your Inventory: Items form as the data source, and select either Table or DataTables as the View Type.
Configure the table columns
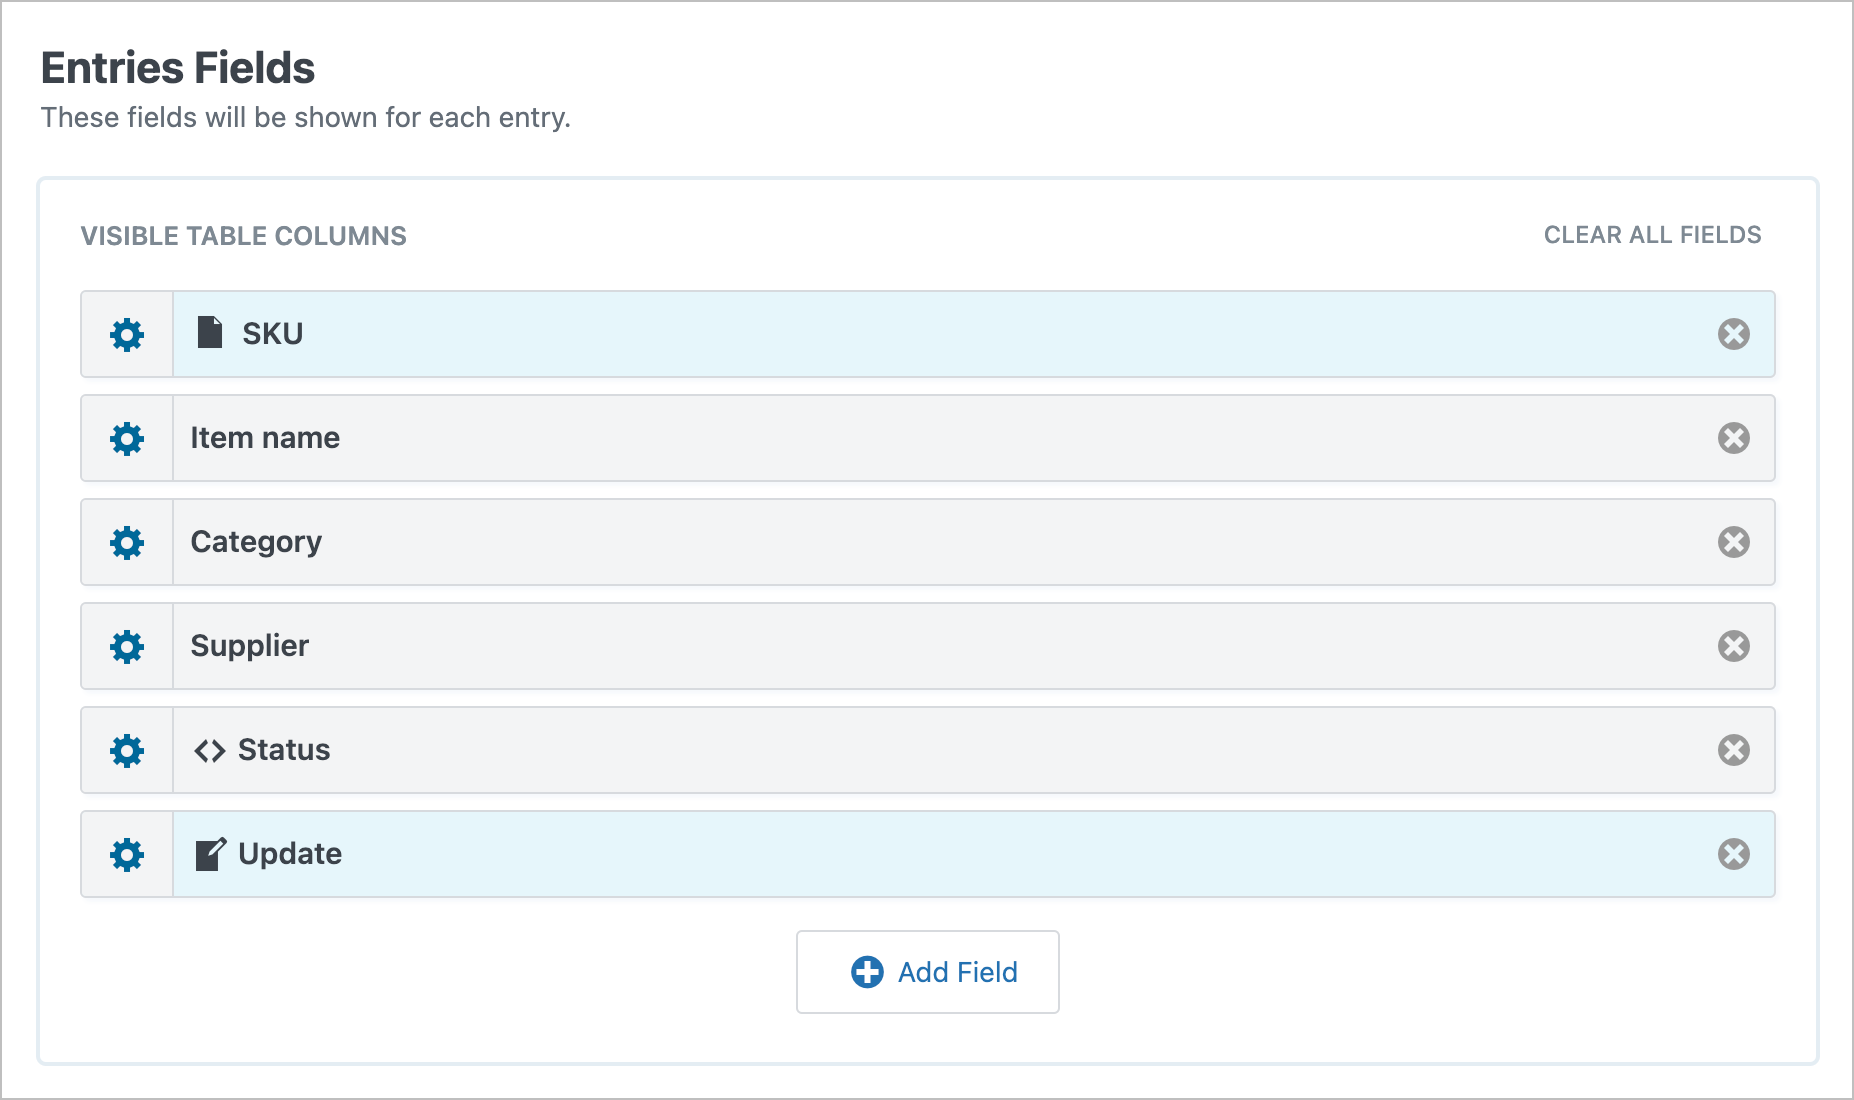
In the Multiple Entries Layout tab, scroll down to the Entries Fields section and drop in the fields you want as visible table columns.

A good default set:
- SKU (linked to single entry, so clicking the SKU opens the detail view)
- Item name
- Category
- Supplier
- Status (this is a Custom Content field. See below for configuration details)
- Update (a Link to Edit Entry field: this is what allows authorized users to update items from the frontend)
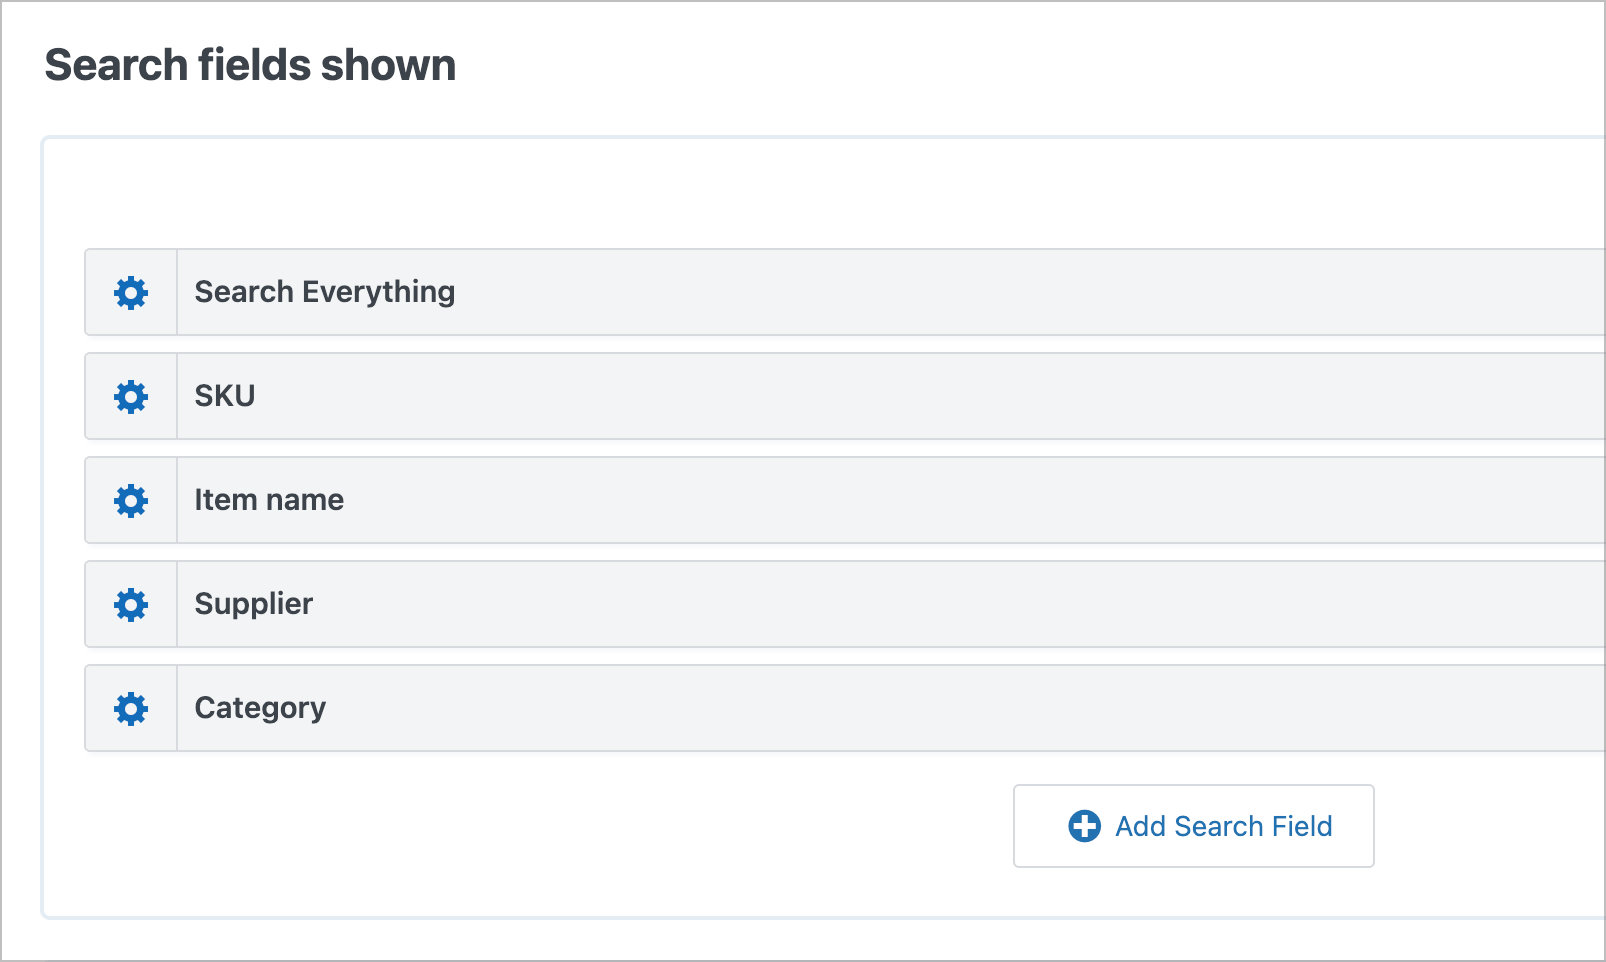
Add a search bar
Add a Search Bar widget to the Top Widgets area. The default search box is a free-text “search everything” field, which is fine—but you’ll want a few targeted filters too. Click the gear icon to open the widget settings and add search inputs for SKU, Item name, Supplier, and Category. The Supplier and Category fields can be set to render as dropdowns in the search bar settings.
Sorting and defaults
Next, scroll down to the View Settings, click on the Sort & Filter tab, set the default sort to Item name, ascending. Enable sortable columns so visitors can click any column header to re-sort. Set page size to 25 (enough to be useful, not enough to scroll forever).
Add a low-stock status badge
The flat table works, but it doesn’t tell you anything at a glance. We can fix that with a Custom Content field that compares each row’s quantity against its threshold and renders a colored badge that says either “OK”, “Reorder”, or “Out of Stock”.
Add a Custom Content field to the Entries Fields section of your View and set its label to Status. Here, we’ll use the [gvlogic] shortcode to output a different status value depending on the inventory level for that item! We’ll also add a few custom styles. Here’s the full snippet (ready to copy/paste).
[gvlogic if="{Quantity on hand:4}" is="0"]
<span class="inv-badge inv-badge--out">Out of stock</span>
[else if="{Quantity on hand:4}" less_than="{Reorder threshold:5}"]
<span class="inv-badge inv-badge--reorder">Reorder</span>
[else]
<span class="inv-badge inv-badge--ok">OK</span>
[/gvlogic]

<style>
.inv-badge {
  display: inline-block;
  padding: 4px 10px;
  border-radius: 12px;
  font-size: 12px;
  font-weight: 600;
  letter-spacing: 0.3px;
  line-height: 1.4;
}
.inv-badge--ok      { background: #d8f3dc; color: #1b4332; }
.inv-badge--reorder { background: #fde2e2; color: #a4161a; }
.inv-badge--out     { background: #e9ecef; color: #495057; }
</style>
The merge-tag IDs (:4 and :5) are field IDs from your form—replace them with the actual IDs of your form’s Quantity on hand and Reorder threshold fields.
The [gvlogic] shortcode ships with GravityView and runs the comparison per-row at render time. Once it’s in place, refresh the inventory page and every row gets a green “OK,” red “Reorder,” or grey “Out of stock” pill. That’s the visual cue that turns a flat table into a dashboard ops managers can scan.
Finally, save the view, and embed it on a page using the GravityView block in the WordPress block editor:

Pro Tip
Learn more about the [gvlogic] shortcode and how you can use it to display custom content in a View based on conditions that you set.
That’s the spine of the system done!
Step 6: Enable front-end editing for warehouse staff
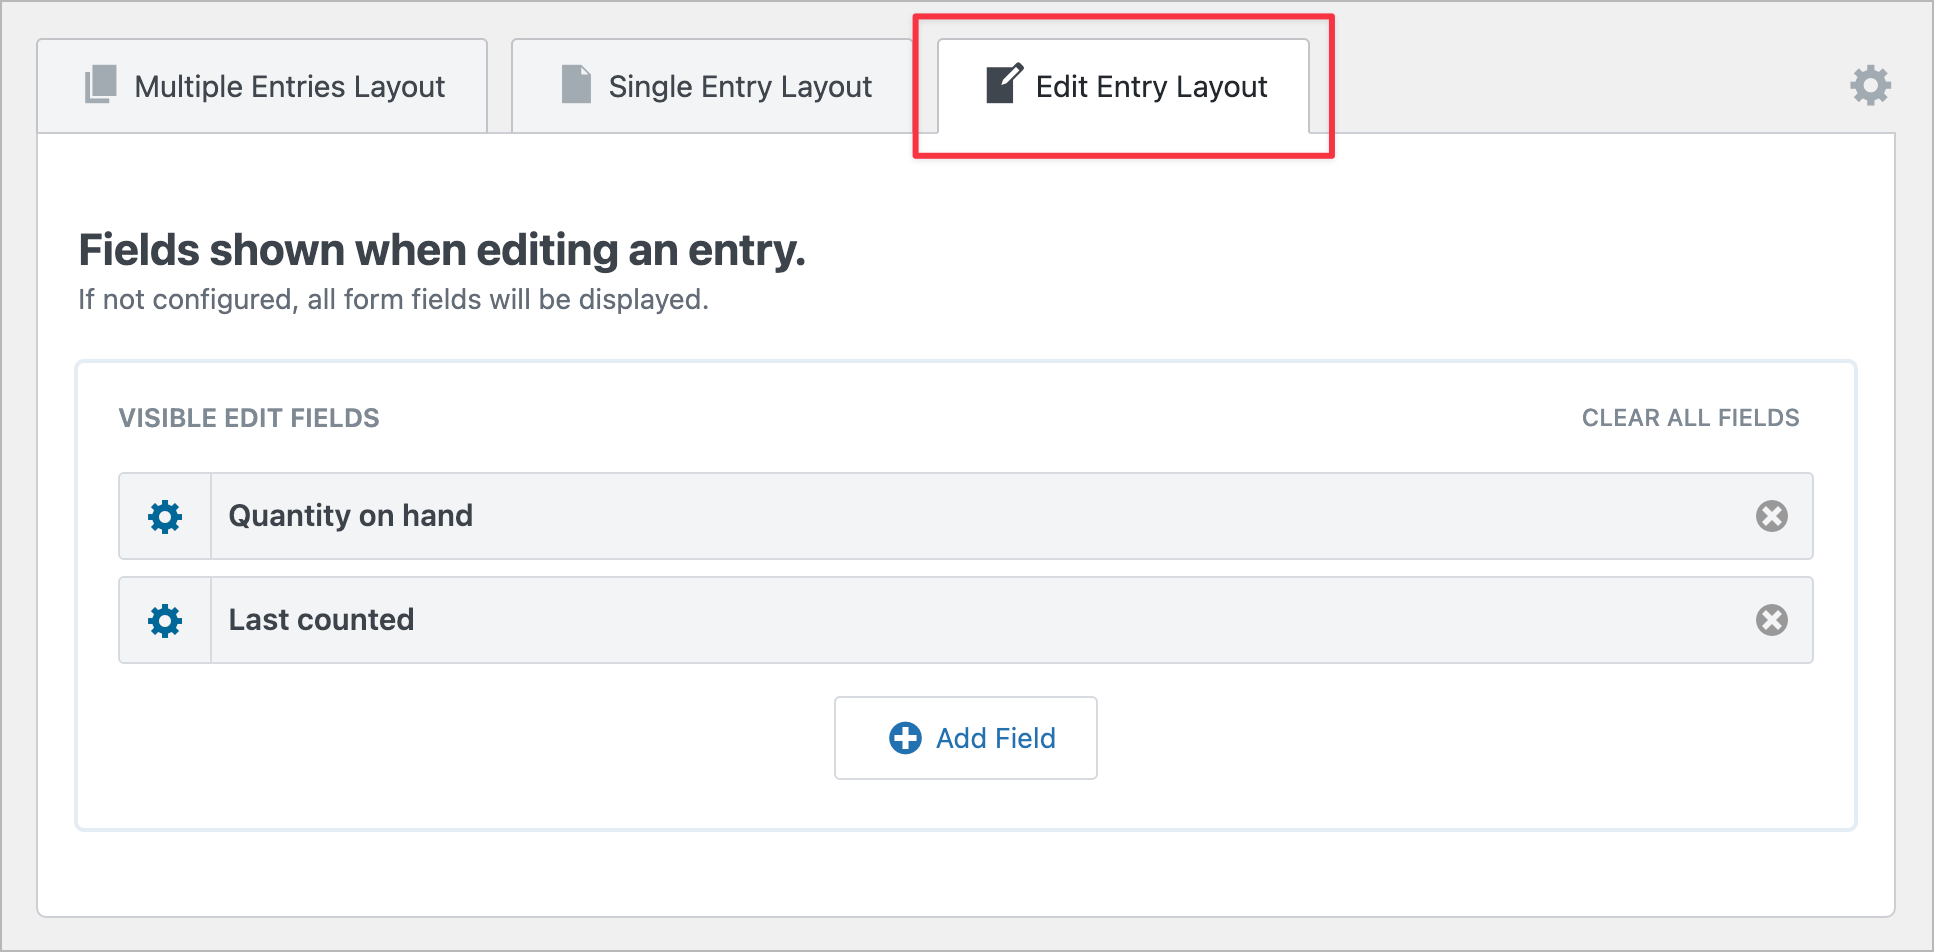
In the View editor, switch from the Multiple Entries Layout tab to the Edit Entry Layout tab. This is the form that renders when a user clicks Edit on a row.
The principle: only add the fields you want users to be able to edit. GravityView’s Edit Entry view is a whitelist, not a blacklist. For this example, we’ll add the following two fields, keeping the rest locked down:
- Quantity on hand
- Last counted
Restrict who can edit
By default, only administrators can edit entries via GravityView. In the View’s Edit Entry Settings, you can also enable User Edit which allows logged-in users to edit entries that they created.
However, if you need more granular control over permissions, install the free Members plugin to create a custom user role and give it the gravityview_edit_others_entries
Step 7 (optional): Build a low-stock-only view
For operations managers who need a quick overview of what items need reordering, we can easily build a second View that only shows items where the Quantity on hand is less than the Reorder threshold. Start by duplicating your main inventory View (GravityView lets you clone with one click), and rename it to something else.
Next, open the View editor, scroll down to the View settings, and click on the Filter & Sort tab. Now find the Advanced Filter section and add the following condition: Quantity on hand is less than {Reorder threshold:5}. (The right-hand value is a merge tag pointing to the Reorder threshold field on each entry).
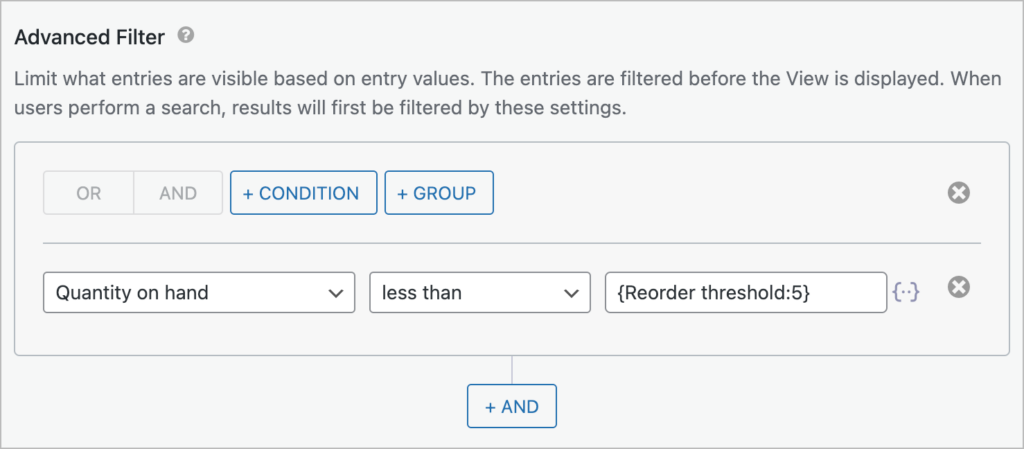
Set the default sort to Quantity on hand, ascending so the most urgent items rise to the top. Embed the new view on a /reorder/ page (or anywhere you like!). Now you have two Views that pull data from the same form: the full list for browsing, and the reorder list for action.
The real-world workflow
Here’s what this looks like for a warehouse worker on a Tuesday afternoon:
- Opens the inventory page on a tablet (or a desktop, or a phone).
- Filters to “Supply” category and searches for “espresso roast.”
- Taps the Edit link on the row.
- The Edit Entry form appears—just two fields: Quantity on hand and Last counted.
- Updates Quantity on hand to 11, Last counted to today.
- Hits Update.
- The page redirects back to the list, the row now shows Quantity 11, the Status badge has flipped from green “OK” to red “Reorder,” and the ops manager’s dashboard picks it up automatically on next refresh.
No WordPress admin access required. No training. No risk of someone fat-fingering a SKU and breaking integrity!
Optional enhancements
Extend the system with additional functionality using other GravityKit add-ons:
- GravityRevisions: Keep a detailed log of changes made to forms and entries. Easily revert changes with a single click.
- GravityEdit: Enable spreadsheet-style inline editing for entries in a View making updates much quicker.
- GravityCharts: Create dynamic charts and graphs to visualize inventory levels.
- GravityExport: Create automated reports on a custom schedule.
- GravityMath: Compute aggregate stats across entries.
Limitations and what this system can’t do
- No native barcode scanning UI. A USB barcode scanner that acts as a keyboard works fine—point it at the SKU search field and scan. But there’s no built-in mobile camera scanner.
- No purchase orders, sales orders, or receiving workflows. This is a register, not an ERP. If you need to issue POs and reconcile receipts against them, you’ll need a different tool.
- No API ingest out of the box. Quantity updates are manual through the UI or via Update Entry feeds. There’s no Shopify-style sync to an external system without a developer wiring it up.
- No automatic depletion on sale. This system won’t know when you sell something—somebody has to update the count. If you want stock to drop automatically when a sale happens, you’re looking at WooCommerce or custom development.
Get started with GravityView today
In this tutorial, we built a lightweight inventory system on top of WordPress: two Gravity Forms forms (Items and Suppliers), two GravityView Views (main list, low-stock list), a status badge driven by reorder thresholds, and role-gated front-end editing for warehouse staff. No e-commerce stack, no ERP, no per-seat licensing!
If you’re looking to build a similar system, try GravityView today! And if you want the optional add-ons (GravityRevisions, GravityEdit, GravityExport, GravityCharts, GravityMath) bundled, the GravityKit All Access Pass offers the best value.

Helpful tips right in your inbox.
Subscribe to get the latest articles, information on releases and helpful Gravity Forms tips!
More articles

WordPress page builder market share 2026: Elementor leads at 32.67%
Elementor reaches 32.7% of WordPress sites. WordPress Block Editor 20.6%, wpBakery 8.5%, Divi 5.7%. Latest HTTP Archive crawl, share-of-WordPress basis throughout.

Launch Log: GravityView 3.0, plus upgrades to Block MCP and GravityKit MCP
GravityView 3.0 lands with the new Vantage theme, frontend bulk actions, and AI-assisted View creation. This launch log also covers updates to GravityKit MCP, Block MCP, and Dashboard Views.

Announcing GravityView 3.0: a fresh new look, AI View creation, and native page builder support
GravityView 3.0 is here: restyle Views with the new Vantage theme, build them with AI, embed them in any page builder, and run bulk actions on the front end.