
Entries show in one column after updating GravityView
If your View showed entries in a grid of two, three, or four columns and now shows every entry stacked in a single column, this article explains why and how to get your columns back. It applies to sites that updated to GravityView 3.5.0 or later and used custom CSS to build the grid.
You may have noticed it as one of these:
- A directory or card layout that “used to be 4 columns and is now stuck at one”
- Custom CSS columns that stopped working, even though the CSS is still in place
- Entries that no longer wrap to the next row
- A grid that looks right in the browser’s developer tools but still shows one column on the page

Why your grid stopped working #
GravityView 3.5.0 improved how screen readers announce a View. To do that, it added a new wrapper around the entries: a <section> element with the class gv-entries. A wrapper is an HTML element that contains other elements, the way a box contains the items packed inside it.
Most grid CSS turns the View’s container into a grid. Before 3.5.0, the container’s children were the entries, so each entry took its own grid cell. Since 3.5.0, the container has one child, the new gv-entries section, and every entry sits inside it. The grid now places that one section in its first cell, and all of your entries stack inside it.
Here is the change for a List View:
<!-- Before GravityView 3.5.0 -->
<div class="gv-list-multiple-container">
    <div class="gv-list-view">…</div>
    <div class="gv-list-view">…</div>
</div>

<!-- GravityView 3.5.0 and later -->
<div class="gv-list-multiple-container">
    <section class="gv-entries">
        <div class="gv-list-view">…</div>
        <div class="gv-list-view">…</div>
    </section>
</div>
This affects the List and Layout Builder layouts. The Maps and DIY layouts don’t have the wrapper yet, and a future release of each adds it. The snippets in How to display GravityView entries in a grid work for every layout, before and after that change.
Note: GravityView 3.6.0 fixed the built-in Columns setting of the Vantage theme, which had the same problem in 3.5.0. It does not change custom CSS that you wrote yourself, including CSS copied from older versions of our grid article.
You have two ways to fix it. Use the Vantage theme’s Columns setting if you want a grid with no code. Update your CSS if you want to keep your current design.
Option 1: Use the Vantage theme’s Columns setting (no code) #
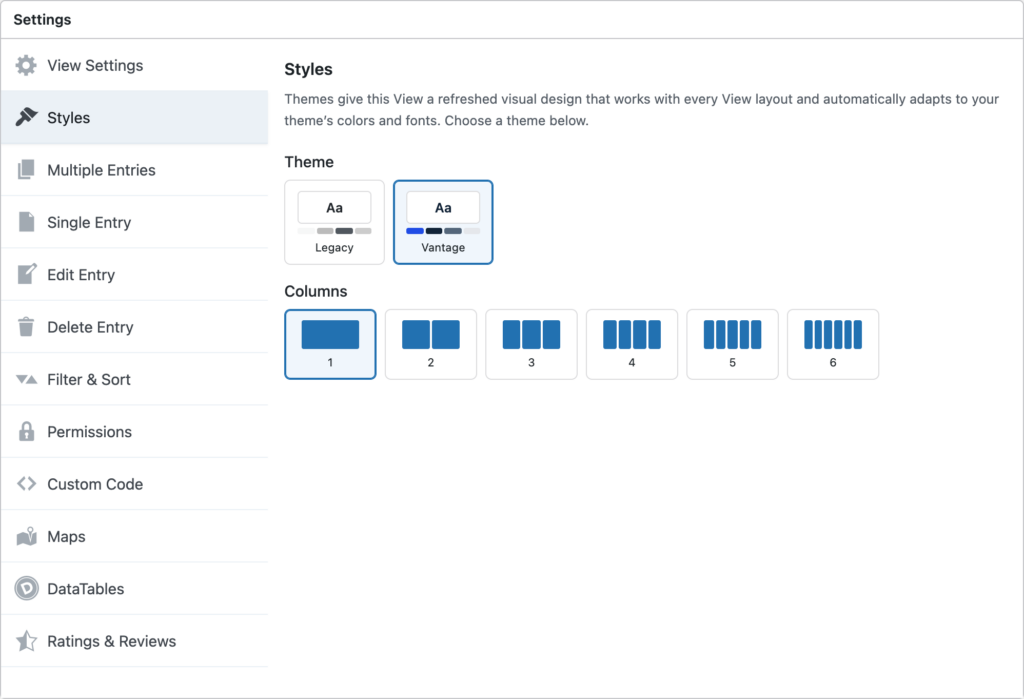
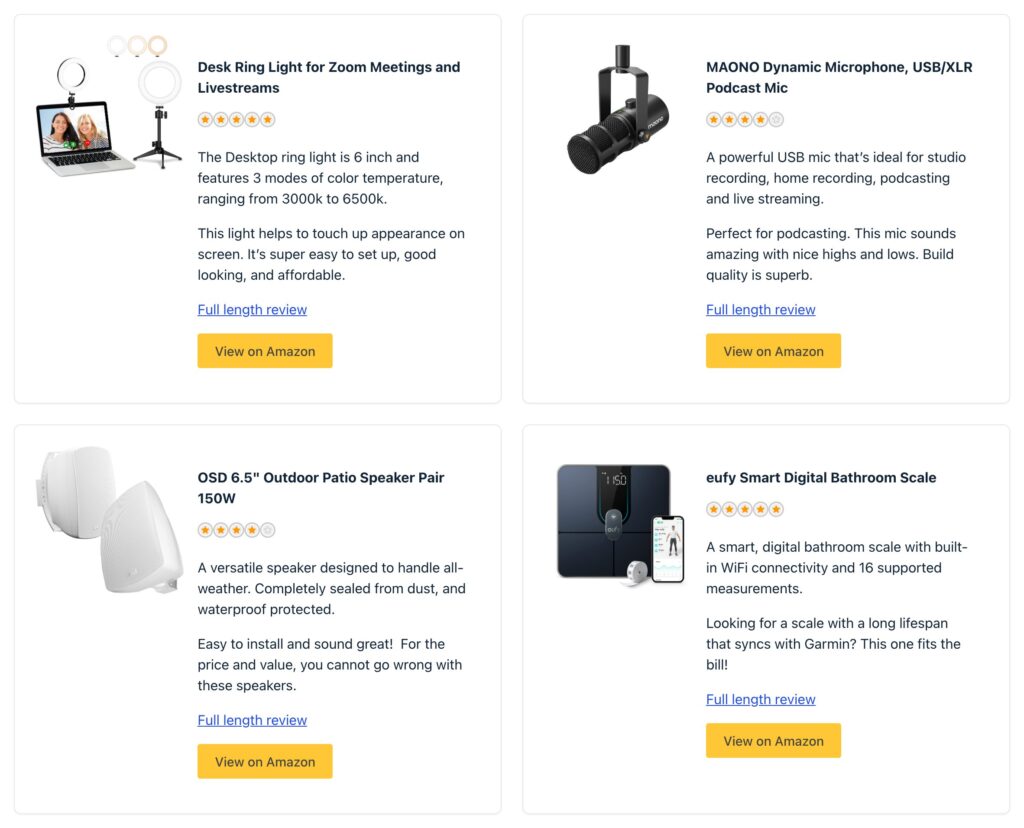
The Vantage theme has a Columns setting that builds the grid for you. This is the fix we recommend, because it does not depend on how the HTML is structured.
Step 1: Update GravityView to 3.6.0 or later
The Columns setting shows one column on GravityView 3.5.0. Version 3.6.0 fixes it.
- In your WordPress dashboard, go to GravityKit, then click Manage Your Kit.
- Find GravityView and click Update if an update is available.
Step 2: Switch the View to Vantage and set the columns
- Go to GravityKit, then All Views, and open the View.
- Scroll to the Settings box below the Layout box, and click the Styles tab.
- Under Theme, click Vantage.
- Under Columns, click the number of columns you want, from 2 to 6.
- Leave Equal Height checked if you want every card in a row to be the same height.
Step 3: Remove your old grid CSS
Your old grid CSS can fight with the Columns setting, so remove it.
- In the same Settings box, click the Custom Code tab.
- In the Custom CSS box, delete the rules that set
display: grid,display: flex,grid-template-columns, or entry widths on the View’s container. - Click Update.
If you added the grid CSS somewhere else, such as your theme’s Additional CSS or a code snippets plugin, remove it there too.
Note: With Vantage, GravityView limits the CSS in the Custom CSS box to that View. Most rules keep working, but a rule that names the View container’s own classes, such as .gv-list-single-container img, no longer matches. Rewrite that kind of rule to start with an element inside the container.
Option 2: Update your custom CSS #
If you want to keep the Legacy theme or your own design, put the grid on the new gv-entries wrapper as well as on the container, and let the wrapper span the container’s whole row. CSS written this way works before and after GravityView 3.5.0, so you can also add it before you update.
For example, change this:
.gv-list-multiple-container {
    display: grid;
    grid-template-columns: repeat(3, 1fr);
}
to this:
.gv-list-multiple-container,
.gv-list-multiple-container > .gv-entries {
    display: grid;
    grid-template-columns: repeat(3, 1fr);
}

.gv-list-multiple-container > .gv-entries {
    grid-column: 1 / -1;
}
Before 3.5.0, there is no gv-entries wrapper, so the rules for it match nothing and the container stays the grid. From 3.5.0, the wrapper takes up the container’s whole row and holds the entries in the same columns.
The same change works for flexbox. If your CSS uses display: flex and flex-wrap: wrap on the container, add the > .gv-entries selector to that rule. In place of grid-column: 1 / -1, give the wrapper flex-basis: 100%. Without it, the wrapper can be narrower than the container, which makes your entries narrower too.
CSS for the List layout
.gv-list-multiple-container,
.gv-list-multiple-container > .gv-entries {
    display: grid;
    grid-template-columns: repeat(3, 1fr); /* Change 3 to the number of columns you want */
    gap: 24px; /* Space between entries */
    align-items: start;
}

/* On GravityView 3.5.0 and later, the entries wrapper spans the whole row */
.gv-list-multiple-container > .gv-entries {
    grid-column: 1 / -1;
}

.gv-list-multiple-container .gv-list-view {
    min-width: 0;
    align-self: stretch; /* Remove this line if you don't want equal heights */
    display: flex;
    flex-direction: column;
}

.gv-list-multiple-container .gv-list-view-content {
    flex-grow: 1;
    display: flex;
}
CSS for the Layout Builder layout
.gv-layout-builder-multiple-container,
.gv-layout-builder-multiple-container > .gv-entries {
    display: grid;
    grid-template-columns: repeat(3, 1fr); /* Change 3 to the number of columns you want */
    gap: 24px; /* Space between entries */
    align-items: start;
}

/* On GravityView 3.5.0 and later, the entries wrapper spans the whole row */
.gv-layout-builder-multiple-container > .gv-entries {
    grid-column: 1 / -1;
}

/* Remove the space GravityView adds between stacked entries */
.gv-layout-builder-multiple-container .gv-layout-builder-view--entry + .gv-layout-builder-view--entry {
    margin-top: 0;
}

.gv-layout-builder-multiple-container .gv-layout-builder-view {
    min-width: 0;
    align-self: stretch; /* Remove this line if you don't want equal heights */
}
The gv-entries section also contains a heading that only screen readers announce. The heading is positioned outside the page’s normal flow, so it does not take a grid cell. Leave it in place, because removing it makes the View harder to use with a screen reader.
To add the CSS to a View:
- Go to GravityKit, then All Views, and open the View.
- In the Settings box, click the Custom Code tab.
- Replace your old grid rules in the Custom CSS box with the CSS above.
- Click Update.
Clear your page cache #
After you fix the View, clear every cache on your site. A caching plugin, such as Hummingbird, WP Rocket, or LiteSpeed Cache, can keep serving a copy of the page saved before the fix. When that happens, the View looks right to you while you’re logged in and still shows one column to visitors.
- Clear the cache in your caching plugin.
- If your host or a service such as Cloudflare has its own cache, clear that too.
- Open the page in a private browser window, where you’re logged out, and check the columns.
Still showing one column? #
Check these in order:
| Check | What to look for |
|---|---|
| GravityView version | GravityKit, then Manage Your Kit shows 3.6.0 or later. The Vantage Columns setting needs 3.6.0. |
| Theme and layout | Columns appears only with the Vantage theme, and only on List, Maps, Layout Builder, and DIY Views. Table and DataTables Views don’t have it. |
| Other CSS | Search your theme’s Additional CSS and any code snippets plugin for the container classes, such as .gv-list-multiple-container. An old rule there can still override the grid. |
| Cache | Load the page in a private window after clearing every cache. |
If the View still shows one column, contact our support team with the page address and the CSS you’re using.

