Frontend bulk actions in GravityView
GravityView turns your Gravity Forms entries into searchable, sortable front-end displays called Views. As of GravityView 3.0, you can also act on those entries in bulk without leaving the front end. The new Bulk Actions widget adds a selection checkbox to each row of a Table View, so logged-in users can select several entries at once and approve, edit, delete, export, and more, all from the page itself instead of the WordPress dashboard.
This article explains how to add the Bulk Actions widget, which actions are available, how to configure each one, and how the feature works for the people using your View.
Before you start #
Make sure you have the following in place:
- GravityView 3.0 or later. Frontend bulk actions are a 3.0 feature, and the widget ships in GravityView core (no extension required).
- A Table layout View. Bulk actions work only with the Table layout. The Bulk Actions widget appears in the widget picker for Table Views only, so you won’t see it on List, Maps, or other layouts.
- Logged-in users. The toolbar is never shown to logged-out visitors. Each action is also gated by the user’s capability (permission), so users only see the actions they’re allowed to run. See the Who can use bulk actions section below.
Add the Bulk Actions widget #
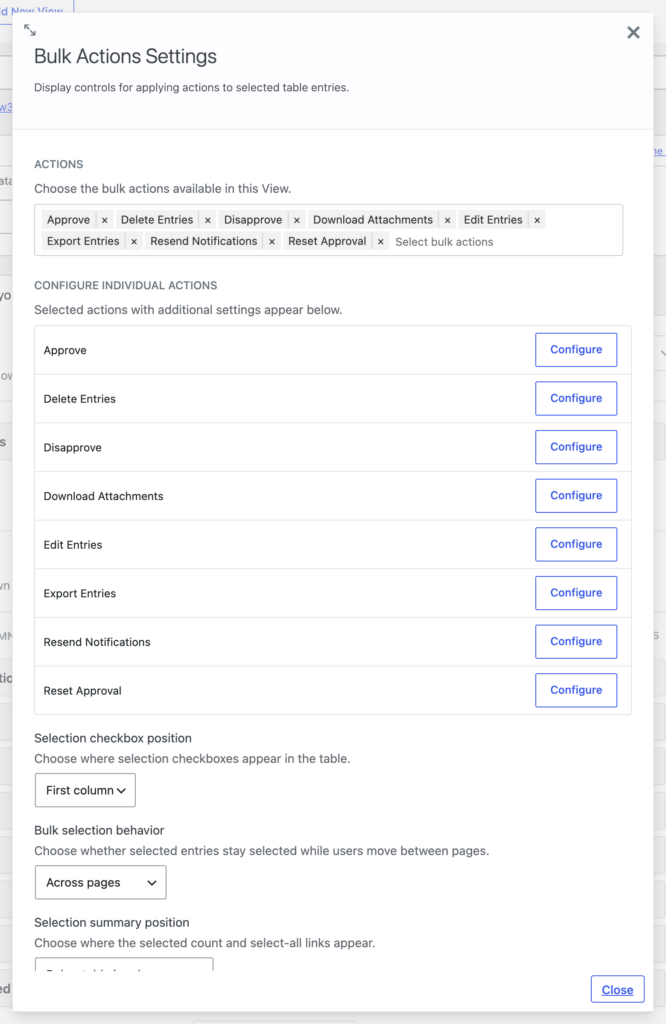
Bulk actions are off until you add the widget to a View. The Bulk Actions widget is one of GravityView’s View widgets, the controls that sit above and below your entries. To turn it on:
- Open the Table View you want to edit in the WordPress editor.
- In a widget area above or below the entries table, click + Add Widget and choose Bulk Actions. The widget can be added only once per View.
- Open the widget’s settings and, under Actions, choose which actions to offer. No actions are selected by default, so this step is required for anything to appear on the front end.
- (Optional) Click Configure next to an action to set its options (see the next section).
- Click Update to save the View.
When the widget is present, GravityView adds a Selection Checkbox row to the Visible Table Columns list. This is a visual placeholder that shows where the checkbox column will appear; it can’t be dragged or removed like a normal field, and clicking it reopens the Bulk Actions widget settings.
Available bulk actions #
GravityView 3.0 ships with eight built-in actions. You decide which ones appear by selecting them in the widget’s Actions setting. On the front end, the Bulk Actions dropdown lists them alphabetically and only shows actions the current user has permission to run.
| Action | What it does | Who can use it | Notes |
|---|---|---|---|
| Approve | Sets the selected entries to Approved. | Users who can moderate entries (gravityview_moderate_entries). | Works even if the approval field isn’t shown in the View. |
| Disapprove | Sets the selected entries to Disapproved. | Same as Approve. | |
| Reset Approval | Clears the approval status back to unapproved. | Same as Approve. | |
| Delete Entries | Deletes or trashes the selected entries, following the View’s delete mode. | Users with a delete capability (Gravity Forms or GravityView delete permissions), or the View’s “users can delete” option plus gravityview_delete_entries. | Shows a confirmation prompt. Permission is re-checked for each entry as it runs. |
| Edit Entries | Updates field values across the selected entries at once. | Users who can edit entries. | Appears only when the View has editable fields. Choose which fields are editable in Configure. |
| Resend Notifications | Resends selected form notifications for the chosen entries. | Users who can edit entries (gravityview_edit_entries). | You must pick which notifications are allowed in Configure. |
| Download Attachments | Bundles uploaded files from the selected entries into a single ZIP download. | Users who can edit entries (gravityview_edit_entries). | Choose which file fields are downloadable in Configure. |
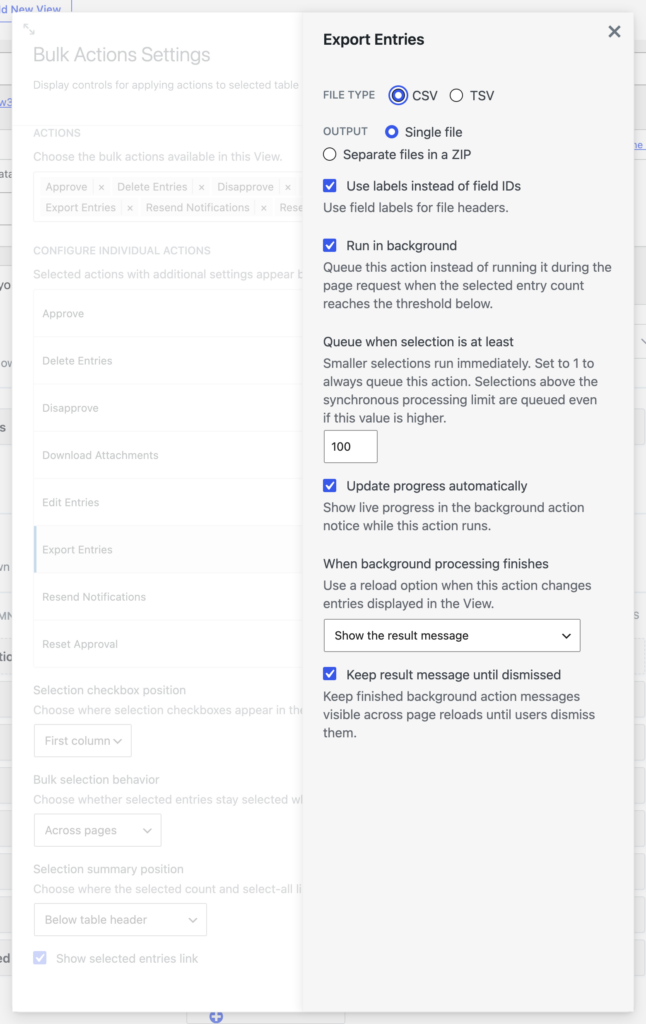
| Export Entries | Exports the selected entries to a CSV or TSV file. | Respects the View’s Allow Export setting. | Can produce a single file or one file per entry inside a ZIP. Returns a secure, time-limited download link. |
Configuring an action’s options #
Some actions have extra options. When you select one of these in the Actions list, it appears with a Configure button that opens a settings panel inside the widget.
- Edit Entries – Choose which fields users can edit: Inherit from Edit Entry layout, Pick specific fields, or All supported fields and entry properties. The inherit option follows the same fields you set up when configuring the Edit Entry screen.
- Resend Notifications – Select which notifications can be sent from the front end. You can also allow users to send to a single override email address instead of the notification’s normal recipients.
- Download Attachments – Pick which File Upload and Post Image fields can be downloaded, and optionally set filename exclusions and size or file-count limits.
- Export Entries – Set the File type (CSV or TSV), the Output (a single file, or separate files in a ZIP), and whether file headers use field labels or field IDs.
Bulk Actions widget settings #
Beyond the action list, the widget controls how selection looks and behaves:
| Setting | What it controls |
|---|---|
| Actions | Which actions appear in the front-end Bulk Actions dropdown. |
| Selection checkbox position | Whether the checkbox column appears as the First column (default) or the Last column. |
| Bulk selection behavior | Across pages (default) keeps selections as users page through results, which enables the Select all [count] workflow. Current page only clears the selection when the page reloads, sorts, filters, or changes. |
| Selection summary position | Where the selected count and select-all links appear: Below table header (default), Next to Bulk Actions menu, or Hidden. |
| Show selected entries link | On by default. Lets users switch the View to show only the entries they have selected, with Show selected and Show all controls. |
Actions that can run in the background also gain their own settings inside the Configure panel, including Run in background, Queue when selection is at least [N], Update progress automatically, When background processing finishes, and Keep result message until dismissed. See the section on running large jobs in the background below.
Using bulk actions on the front end #
Once the widget is set up, here’s what users see and do on the published View:
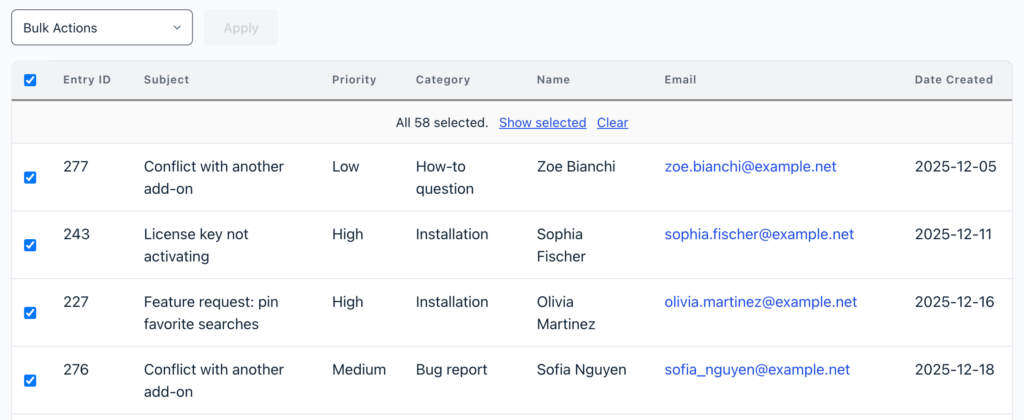
- A checkbox column appears at the start or end of each row, depending on your Selection checkbox position setting.
- Select entries by ticking individual rows, holding Shift and clicking to select a range on the current page, or using the header checkbox to select the whole page.
- With Across pages behavior, a Select all [count] control selects every entry in the current filtered result set. After selecting all, users can still deselect individual entries.
- The selection summary shows how many entries are selected, along with Show selected, Show all, and Clear controls.
- Choose an action from the Bulk Actions dropdown and click Apply.
- Destructive actions, such as Delete Entries, show a confirmation dialog before anything happens.
- When the action finishes, a result message appears. Export Entries and Download Attachments include a secure download link in that message.
Running large jobs in the background #
Acting on hundreds or thousands of entries can take a while, so larger jobs can run in the background instead of holding up the page. When an action queues, users see a progress notice that updates as it runs, then a completion message (with a download link for exports and attachment downloads).
Background processing relies on GravityKit’s background processing being enabled in your GravityKit settings. If it isn’t available, actions still run during the page request instead, subject to a limit on how many entries one request will process at a time. You can tune when each action queues, and how it behaves when it finishes, in that action’s Configure panel.

Who can use bulk actions #
Bulk actions are built around existing GravityView permissions:
- Logged-in users only. The toolbar, its assets, and its processing are all unavailable to logged-out visitors.
- Each action has its own capability. Approval actions need moderation rights, delete needs a delete capability, and edit, resend, and download need entry-edit rights. Users only see the actions they’re allowed to run.
- Permissions are re-checked per entry. Even after an action starts, GravityView confirms the user can act on each individual entry before changing it.
For the full list of GravityView roles and capabilities, see GravityView Capabilities.
Tips and notes #
- The Bulk Actions widget is Table-layout only, and can be added once per View.
- Choose actions deliberately. Each one you add appears for any user who has its capability, so only enable what that View’s audience should be able to do.
- Approval actions don’t require the approval field to be visible in the View; they update the entry’s status directly.
- Use the Across pages behavior when you want users to select large result sets at once, and Current page only when you’d rather keep each page’s selection separate.
Note: Frontend bulk actions are a GravityView 3.0 feature. If you don’t see the Bulk Actions widget, confirm you’re editing a Table View and update GravityView to the latest version.