Creating Views with AI using the GravityKit MCP
GravityView 3.0 lets you build and manage your Views by talking to an AI assistant. This feature is opt-in; no AI connection is enabled by default. Describe the View you want in plain language, like ‘create a table View from my contact form, newest first,’ and the assistant builds it for you. This article explains what that connection is, what you can do with it, and how to set it up.
AI View creation requires GravityKit MCP, a free, open-source MCP server that connects an AI assistant, such as Claude, to your WordPress site. MCP, short for Model Context Protocol, is an open standard introduced by Anthropic for connecting AI applications to external systems.
New in GravityView 3.0, GravityView publishes its View-building capabilities as a set of ‘abilities’ through GravityKit Foundation and the WordPress Abilities API. The GravityKit MCP detects these and presents them to your assistant as GravityView tools, named with a gv_ prefix. They sit alongside the server’s Gravity Forms tools, named with a gf_ prefix, so you can create a form and build a View for it in the same conversation.
Note: Connecting the GravityKit MCP currently involves editing a small configuration file, which takes a few minutes. We know that’s a technical hurdle, and we’re actively working to make this setup much easier. For now, the steps below get you connected.
What you can do #
Once the connection is in place, you can ask your AI assistant to:
- Create a View from a Gravity Forms form and choose its layout (table, list, and more).
- Add, configure, reorder, and remove fields and columns.
- Set up the Search Bar, including its filters and input types.
- Configure widgets and adjust View settings.
- Switch layouts, change themes, or display entries as a card grid.
Everything happens in plain language, and the assistant carries out each change for you. It acts as a WordPress user, so it can only do what its account is allowed to do, and it creates Views you can review before publishing.
Before you start #
Make sure you have the following in place:
- GravityView 3.0 or later, with GravityKit Foundation active. Foundation is what exposes the
gv_View tools. - Gravity Forms 2.5 or later, with the Gravity Forms REST API enabled (Step 1 below covers this).
- Node.js 18 or later installed on your computer. The GravityKit MCP runs locally and starts through
npx. - An MCP-compatible AI assistant. This guide uses Claude Desktop; any MCP-compatible assistant works.
- A WordPress account that can edit Views.
- HTTPS is recommended. Local development URLs (
localhost,*.test, and*.local) also work.
How it works #
GravityView publishes its capabilities as abilities. The GravityKit MCP server, running locally on your computer, reads those abilities from your site and presents them to your assistant as tools. When you ask for something, the assistant calls those tools on your behalf, signed in as your WordPress user. The server stores none of your form data, and communication with your site is encrypted over HTTPS.
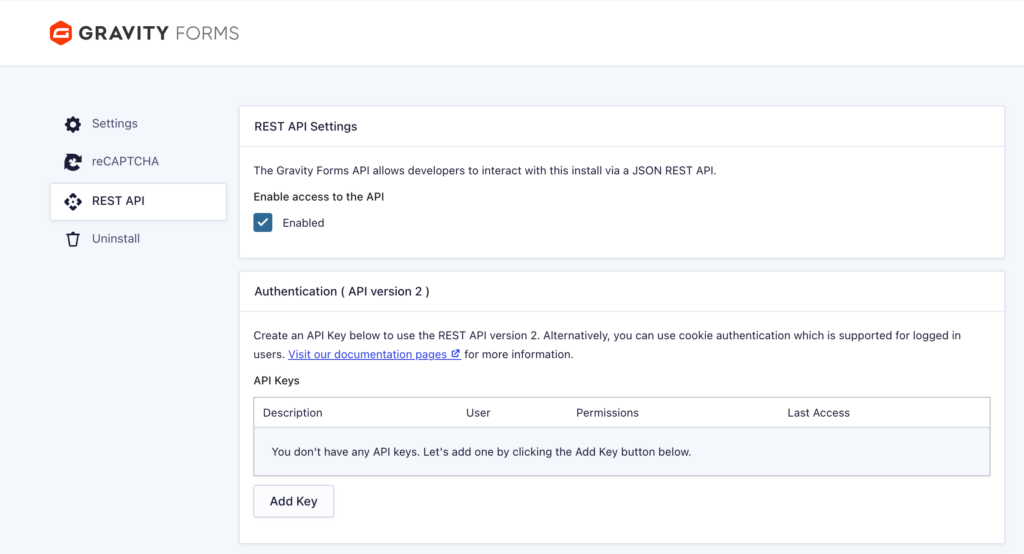
Step 1: Enable the Gravity Forms REST API #
The GravityKit MCP talks to your site through the REST API, which Gravity Forms keeps off until you turn it on.
- In WordPress, go to Forms, then Settings, then REST API.
- Check Enable access to the API, then save.
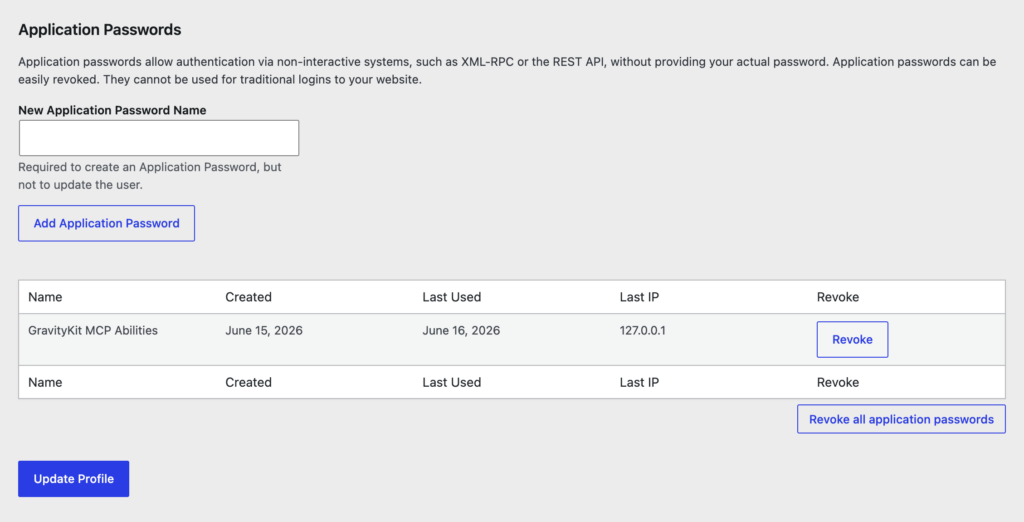
Step 2: Create a WordPress application password #
An application password is a dedicated, revocable password that lets an external app sign in as you without using your main login. The GravityKit MCP uses one to connect.
- Go to Users, then Profile, and scroll to Application Passwords.
- Enter a name, such as
GravityKit MCP, and click Add Application Password. - Copy the generated password and keep it somewhere safe. You won’t be able to see it again.
Your WordPress username plus this password are your credentials, and access follows your WordPress capabilities.
Step 3: Connect the GravityKit MCP to your AI assistant #
For Claude Desktop, the quickest way to find the configuration file is from inside the app: open Settings, then Developer, and click Edit config. This opens the location of claude_desktop_config.json in Finder (by default, ~/Library/Application Support/Claude/). Open that file in a text editor and add the server:
{
  "mcpServers": {
    "gravitykit-mcp": {
      "command": "npx",
      "args": ["-y", "@gravitykit/mcp"],
      "env": {
        "GRAVITY_FORMS_BASE_URL": "https://yoursite.com",
        "GRAVITY_FORMS_CONSUMER_KEY": "wordpress_username",
        "GRAVITY_FORMS_CONSUMER_SECRET": "wordpress_application_password"
      }
    }
  }
}
Fill in the three values:
GRAVITY_FORMS_BASE_URLis your site’s URL.GRAVITY_FORMS_CONSUMER_KEYis your WordPress username (or the username of a new account you created for the AI).GRAVITY_FORMS_CONSUMER_SECRETis the application password from Step 2.
npx downloads and runs @gravitykit/mcp on demand, so there’s nothing to install separately. Save the file and restart your assistant.
Note: If your local site uses a self-signed SSL certificate, add "GRAVITY_FORMS_ALLOW_SELF_SIGNED_CERTS": "true" to the env block. Use this for local development only.
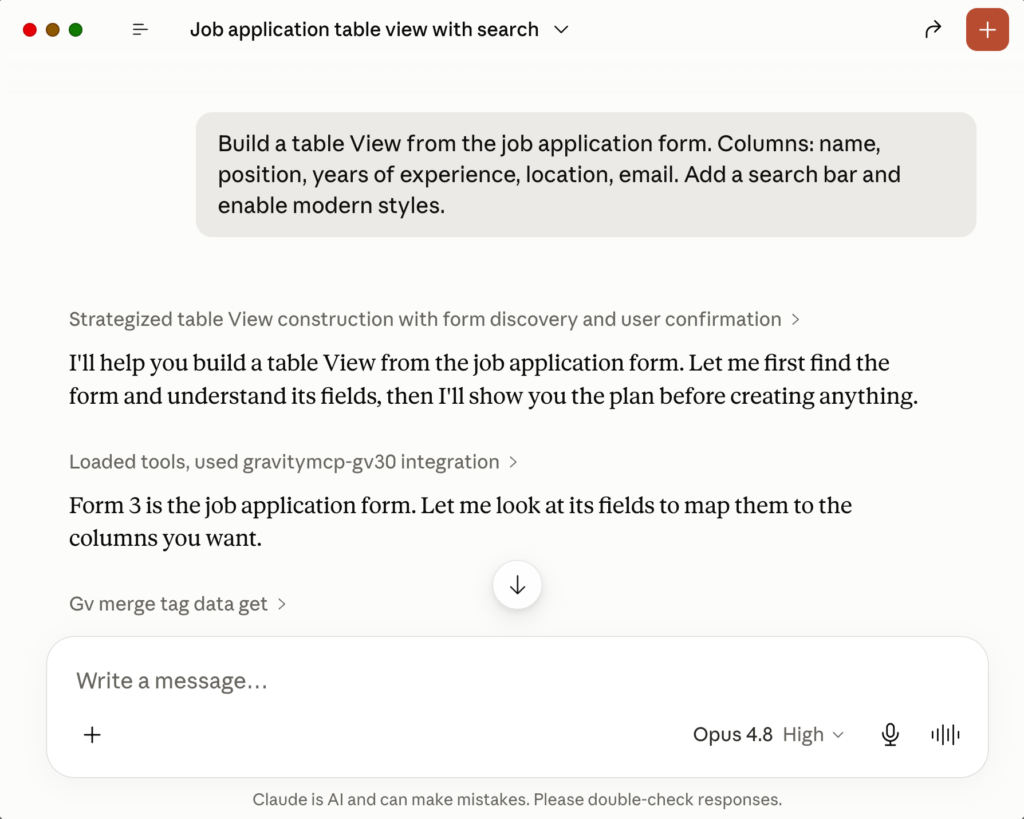
Step 4: Build a View by chatting #
With the connection live, describe what you want and let the assistant do the work. A few examples to get you started:
- ‘Create a View from my Contact Us form as a table, showing name, email, and date, newest first.’
- ‘Add a search bar that filters by status and date.’
- ‘Switch this View to the list layout.’
- ‘Enable the Vantage theme and show entries as a three-column card grid.’
The assistant creates the View as a draft and reports back. Open it in WordPress to review, fine-tune, and publish when you’re happy with it.
Tips and notes #
- The GravityView tools appear only when GravityKit Foundation is active on the connected site. If you don’t see them, confirm GravityView 3.0 is active and restart your assistant.
- Because the Gravity Forms tools (
gf_) and GravityView tools (gv_) are both available, you can create a form and build a View for it in a single conversation. - The assistant works within your WordPress permissions and creates drafts, so it’s safe to experiment. Review each View before publishing.
- Not sure what’s possible? Ask the assistant directly, for example, ‘What GravityView actions can you take?’
Troubleshooting #
- The GravityView tools are missing. Confirm GravityView 3.0 and GravityKit Foundation are active, then restart your assistant.
- You see authentication errors. Re-check the application password and make sure the Gravity Forms REST API is enabled (Step 1).
- Your local site uses a self-signed certificate. Set
GRAVITY_FORMS_ALLOW_SELF_SIGNED_CERTStotruein theenvblock.
Note: The GravityKit MCP is free and open source. Full setup and configuration details live in the GitHub repository.