
How to display GravityView entries in a grid (or columns)
GravityView makes it easy to display your entries in a variety of layouts. To show your entries in a grid or columns, you have two options: apply a Vantage theme and set the number of columns (no code, recommended), or add custom CSS for full control over the grid. This article covers both.
Method 1: Use a Vantage theme (no code) #
GravityView 3.0 introduced built-in themes. The quickest way to show your entries in a grid is to apply the Vantage theme and set how many columns to use, with no CSS required.
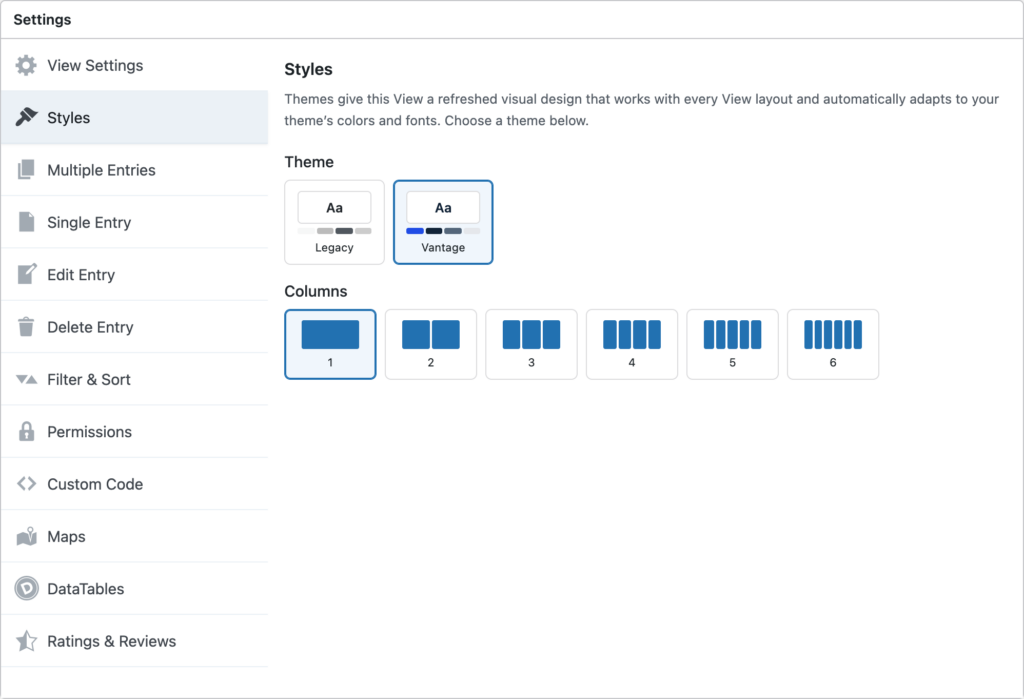
Open the View in the WordPress editor, then in the View Settings panel:
- Click the Styles tab.
- Under Theme, choose Vantage.
- Set Columns to the number of columns you want (2 or more for a grid).
- Click Update to save the View.
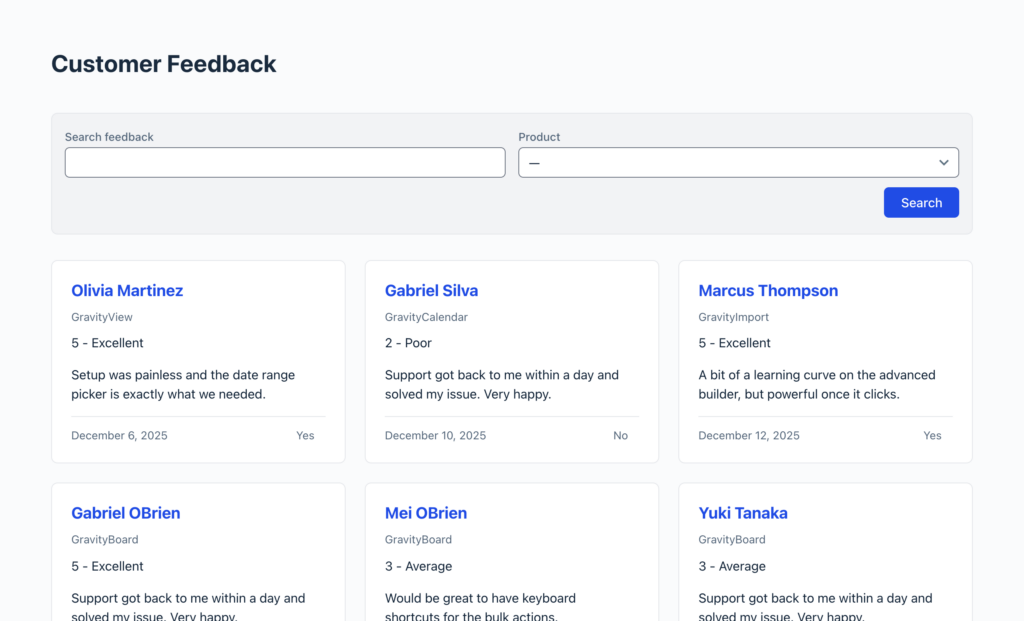
With Columns set to 2 or more, GravityView arranges your entries as a card grid:
For more on themes and column options, see Themes: a fresh new look for your Views.
Method 2: Add custom CSS (advanced) #
Use this CSS on Views that do not use the Vantage theme. If your View uses Vantage, set the number of columns with the Columns setting from Method 1.
Where to add the CSS #
You can add custom CSS directly to your View using the built-in “Custom Code” feature.
- Edit your View in the WordPress admin.
- In the right sidebar, find the Settings metabox.
- Click the Custom Code tab.
- Paste your CSS into the Custom CSS textarea.
- Click Update to save your View.
For more information, read the Custom Code article.
CSS for each layout #
Layouts have different HTML structures, so they require slightly different CSS.
Copied a snippet from this page before GravityView 3.5.0? Replace it with the new one below. GravityView 3.5.0 added a section with the class gv-entries around the entries in the List, Layout Builder, and Table layouts. CSS that turns the View container itself into a grid now finds only that one section, so every entry shows in the first column. The snippets below put the grid on the container and on the .gv-entries section, so they work on any GravityView version. See Entries show in one column after updating GravityView.
Layout Builder layout #
.gv-layout-builder-multiple-container .gv-layout-builder-view--entry +
  .gv-layout-builder-view--entry {
    margin-top: 0;
  }

.gv-layout-builder-multiple-container,
.gv-layout-builder-multiple-container > .gv-entries {
  display: grid;
  grid-template-columns: repeat(3, 1fr); /* Change 3 to the number of columns desired */
  gap: 24px; /* Adjust the gap as needed */
  align-items: start;
}

.gv-layout-builder-multiple-container > .gv-entries {
  grid-column: 1 / -1; /* The entries section spans the full width */
}

.gv-layout-builder-multiple-container .gv-layout-builder-view {
  min-width: 0;
  align-self: stretch; /* Equal height: remove this line if you don't want equal heights */
}
List layout #
.gv-list-multiple-container,
.gv-list-multiple-container > .gv-entries {
  display: grid;
  grid-template-columns: repeat(3, 1fr); /* Change 3 to the number of columns desired */
  gap: 24px; /* Adjust the gap as needed */
  align-items: start;
}

.gv-list-multiple-container > .gv-entries {
  grid-column: 1 / -1; /* The entries section spans the full width */
}

.gv-list-multiple-container .gv-list-view {
  min-width: 0;
  align-self: stretch; /* Equal height: remove this line if you don't want equal heights */
  display: flex;
  flex-direction: column;
}

.gv-list-multiple-container .gv-list-view-content {
  flex-grow: 1; /* Allows content to fill available vertical space */
  display: flex;
}
Maps layout #
The Maps layout puts the map and the entries in separate columns inside the View container. This CSS turns the column that holds the entries into a grid and leaves the map alone, wherever the map sits: above, below, or beside the entries.
/* The column that holds the entries, next to the map */
.gv-map-multiple-container div:has(> .gv-map-view) {
  display: grid;
  grid-template-columns: repeat(3, 1fr); /* Change 3 to the number of columns desired */
  gap: 24px; /* Adjust the gap as needed */
  align-items: start;
}

.gv-map-multiple-container .gv-map-view {
  min-width: 0;
  margin: 0; /* The grid gap replaces the space below each entry */
  align-self: stretch; /* Equal height: remove this line if you don't want equal heights */
}
DIY layout #
.gv-diy-multiple-container,
.gv-diy-multiple-container > .gv-entries {
  display: grid;
  grid-template-columns: repeat(3, 1fr); /* Change 3 to the number of columns desired */
  gap: 24px; /* Adjust the gap as needed */
  align-items: start;
}

.gv-diy-multiple-container > .gv-entries {
  grid-column: 1 / -1; /* The entries section spans the full width */
}

.gv-diy-view {
  min-width: 0;
  display: flex;
  flex-direction: column;
  align-self: stretch; /* Equal height: remove this line if you don't want equal heights */
}
Tips #
- Change the number in
repeat(3, 1fr)to set your desired number of columns. Each snippet has the number in one place. - You can control the space between your grid items by changing the
gapvalue. - If you use multiple layouts, add the CSS for each layout you use.
- To change only one View, add
.gv-container-and the View ID to the container class in each selector, for example.gv-list-multiple-container.gv-container-47.
That’s it! You have columns. #
Your GravityView entries will now display in a grid with the number of columns you have defined in the CSS.

