Published
•
Updated
How to create a beautiful testimonial page using GravityView’s DIY layout
Build a customer testimonial page using GravityView's DIY layout. Testimonials increase landing page conversions by up to 30%, and this tutorial shows you exactly how.

There’s no better way to build trust and prove the effectiveness of your product than with customer testimonials. New users are more likely to buy when they can see your product has worked for others. “Social proof”, as it’s called, is an integral part of the buyer journey.
In fact, including a testimonial on your landing pages can increase conversions by up to 30%!
In this tutorial, we’ll show you how to create a beautiful testimonial page for your website using GravityView’s DIY layout. Let’s get started!
Check out a live demo of the finished testimonial page and get your own free trial site preloaded with all GravityKit add-ons!
Sneak peek
Here’s the testimonial card design we’re going to create in this tutorial. We adapted the design from one we found on CodePen. You can view the original pen here (thanks, Bradley!).
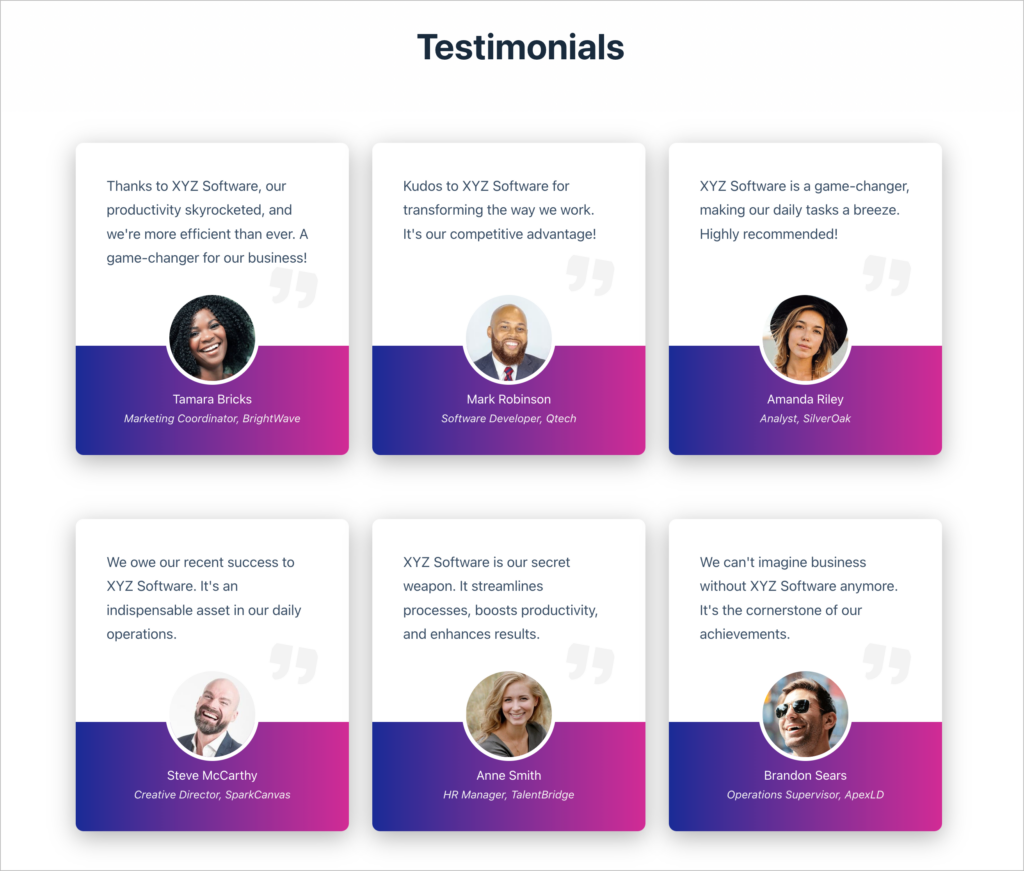
To see it in action, check out our live demo here.
What you’ll need
Here are the plugins you’ll need to build a testimonial page like the one in this tutorial:
Intro to the GravityView DIY layout
In this tutorial, we’re going to be using GravityView’s powerful DIY layout. If you’re not familiar with it, here’s some helpful info.
GravityView includes a range of preset layout options. Most layouts are templates, with a set structure, allowing you to quickly build a range of different applications. However, the DIY layout is a little different.
The GravityView DIY layout allows you to construct your own View layouts using HTML and CSS. In other words, the DIY layout gives you the flexibility to build a View layout from scratch, instead of relying on one of GravityView’s preset templates.
Why use the DIY layout?
If you feel too constrained using GravityView’s preset layout templates, the DIY layout is for you.
Although it may feel overwhelming having to write your own HTML and CSS, the process of building a custom layout isn’t as difficult as you may think. You’ll likely find that the freedom that the DIY layout provides makes up for the extra work required to create the layout.
With the DIY layout, anything is possible!
Creating the testimonial submission form
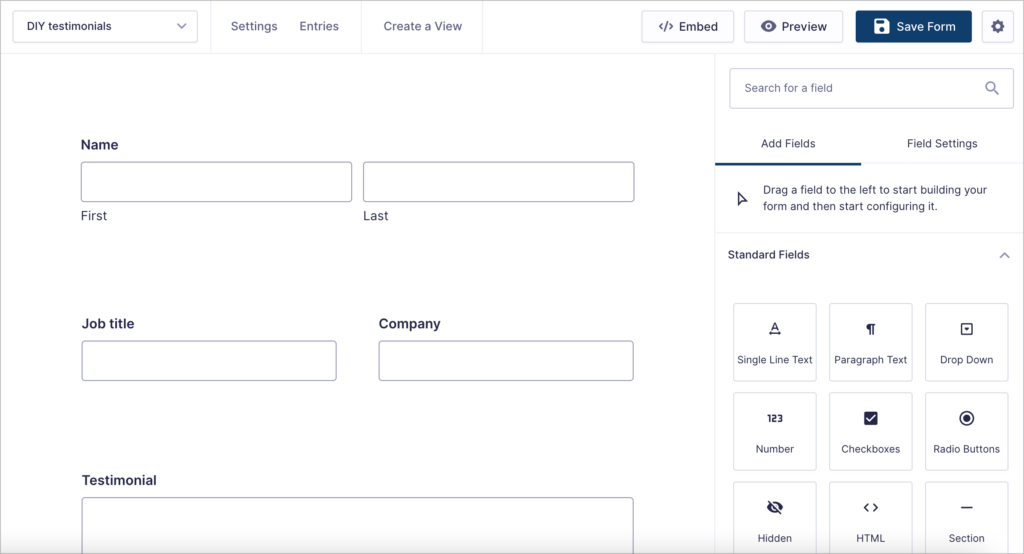
The first step is to create a form that allows your customers to submit testimonials. To do this, hover over “Forms” and click “New Form”. Now you can build your new form using the Gravity Forms visual editor.
Your testimonial submission form should have the following fields:
- Name (“Name” field)
- Job title (“Single Line Text” field)
- Company (“Single Line Text” field)
- Testimonial (“Paragraph Text” field)
- Image (“File Upload” field)
To add a new field, simply drag and drop it into your form from the sidebar.
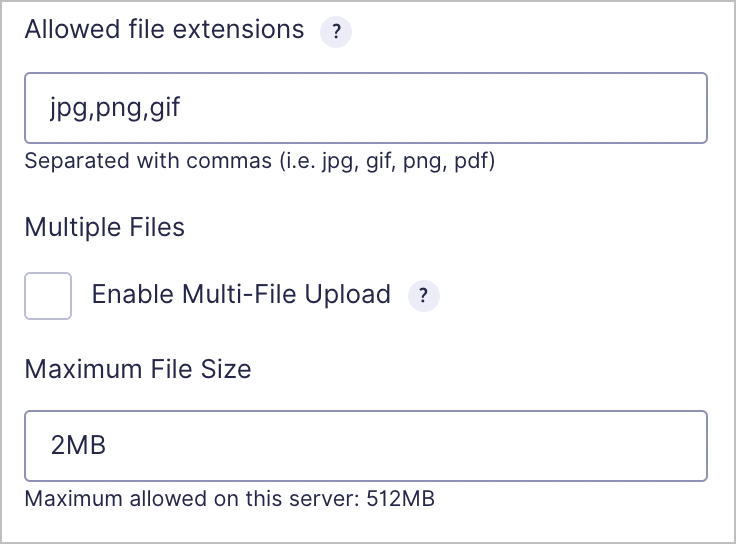
After adding the “File Upload” field, click on the field to open the field settings, scroll down to “Allowed file extensions” and add common image formats (i.e. jpg, png, gif). You may also want to limit the file size.
When you’re done, embed your new form on a page or post. Here’s what our simple testimonial form looks like on the front end:
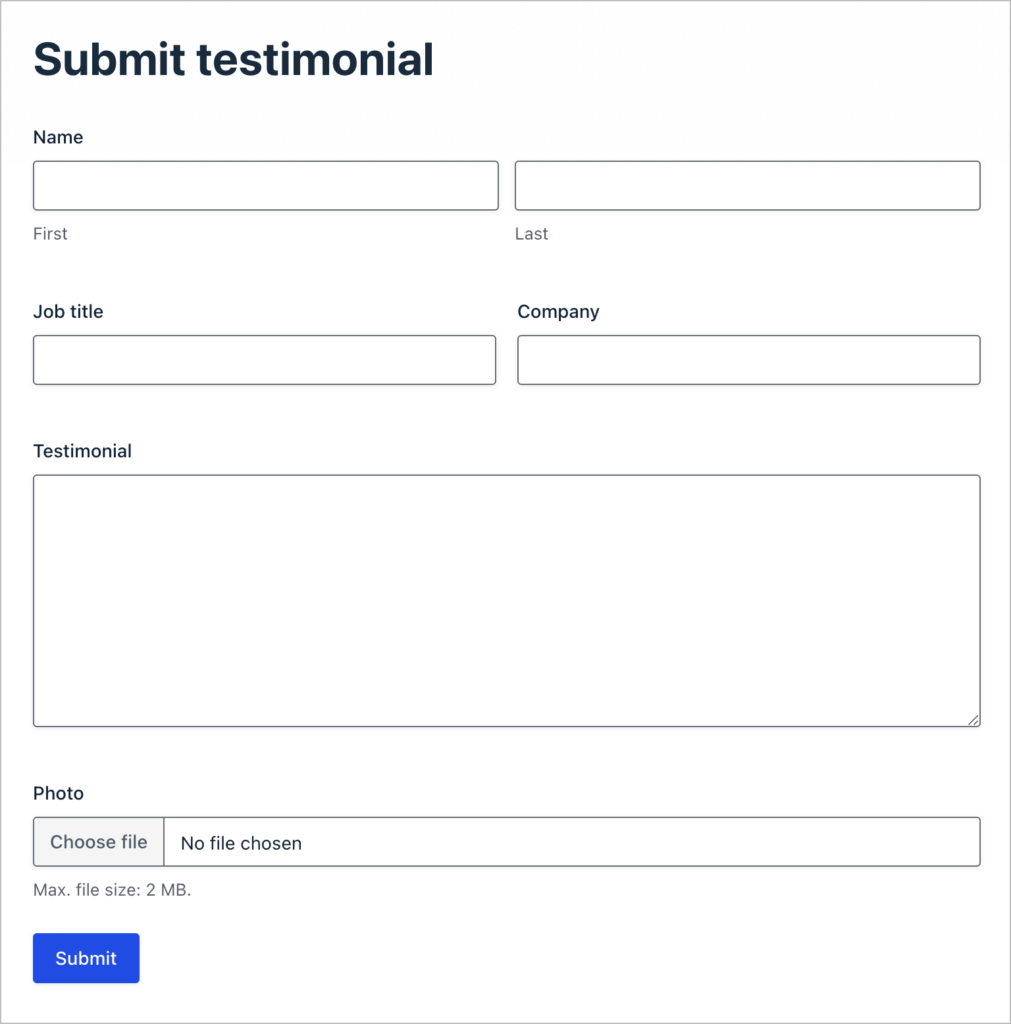
You can then send the page link to your customers when asking them for testimonials.
Create a View to display testimonials on the front
After creating your testimonial form and embedding it on your website, create a new View and link it to your testimonial form.
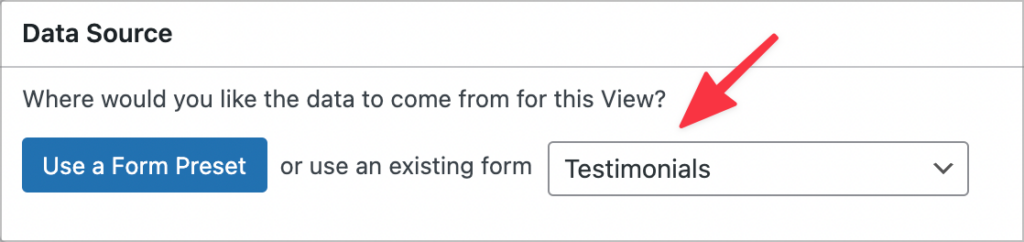
Under “Choose a View Type”, make sure to select the DIY layout.
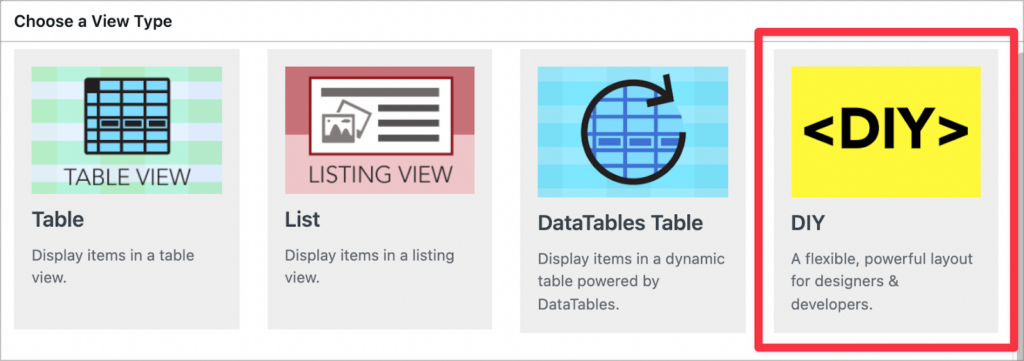
You can now start building your testimonial View using GravityView’s drag and drop editor.
Configuring the DIY View Layout
Before writing any HTML/CSS code, we’ll add all five of our form fields to the View. For the final two fields, we’re going to place them inside a Custom Content field (more on this later).
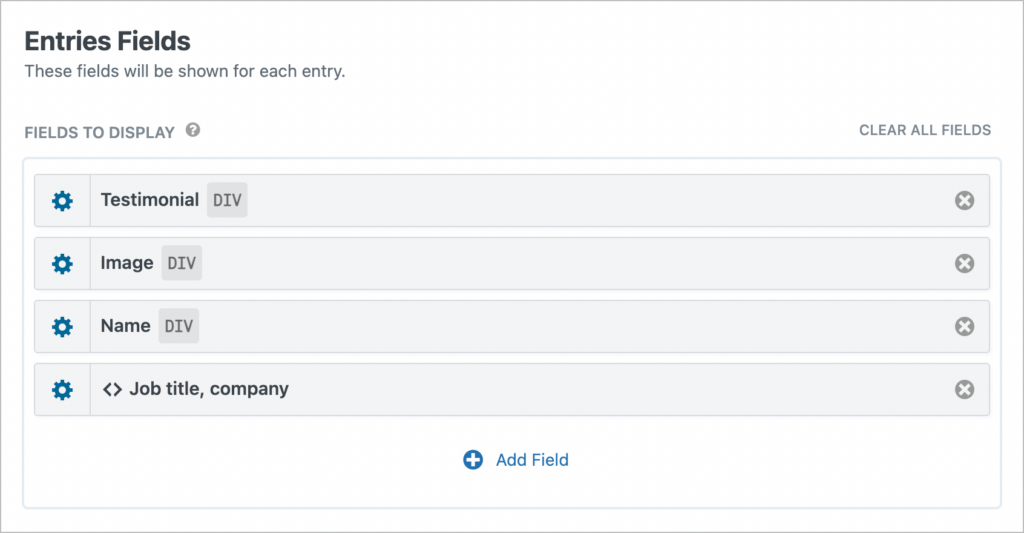
By default, fields are wrapped in a <div> element. We can leave this as is.
Okay, now we’ll open the field settings for the “Testimonial” field. Here there’s a little more work to do. We’re going to add some simple HTML code above and below the field output.
First off, we’ll wrap the entry in a <div> with the class testimonial-card. This will allow us to target each testimonial entry using CSS later on. To do this, simply add the following opening <div> tag before the field output.
<div class=“testimonial-card”>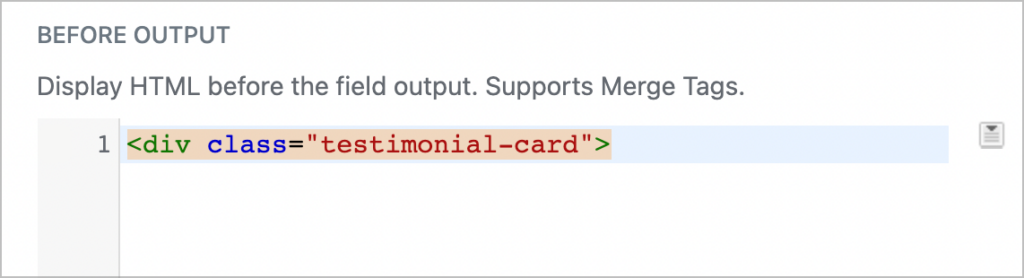
Next, we’re going to add the quote icon that hovers to the right of the image.
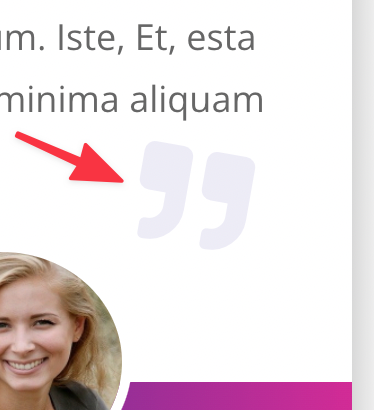
To do this, we’ll scroll down to the “After Output” text box and add the quote icon image:
<img class="quote" src="../images/icons8-quote-100.png" alt="quote icon">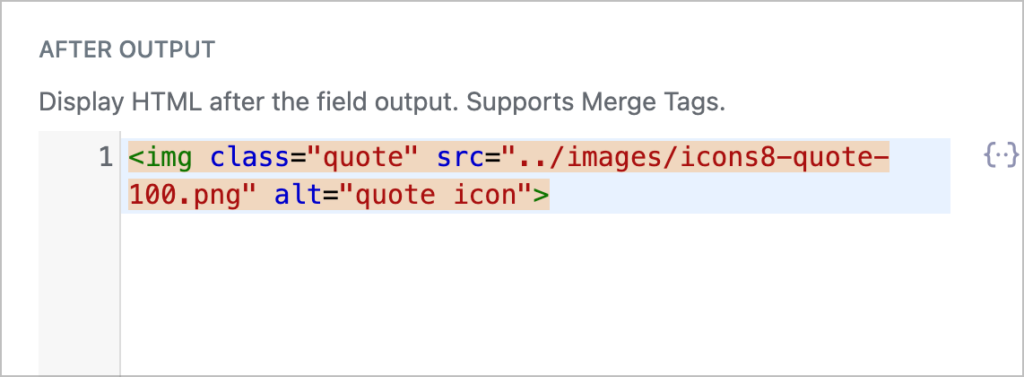
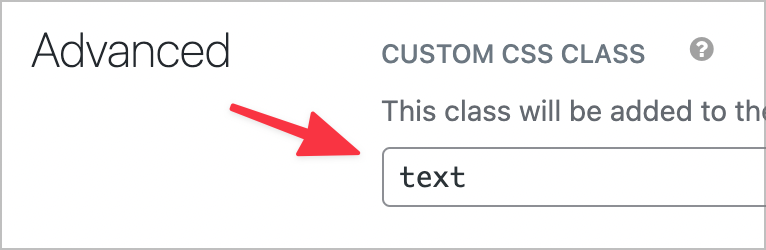
Before moving on, we’ll add a custom CSS class to the Testimonial field called ‘text’.
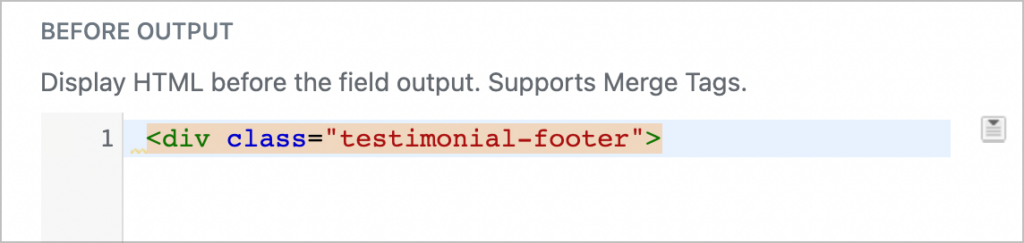
Next, open up the field settings for the “Image” field. This is where the “footer” section of the testimonial card begins, so we’ll add an opening <div> element before the field output with the class testimonial footer.
Finally, scroll down to the advanced settings and give the Image field a custom CSS class called image.

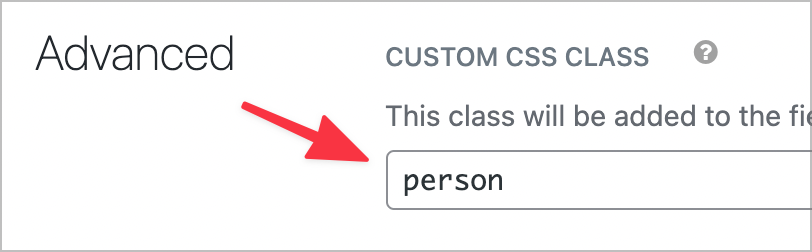
Now let’s turn our attention to the “Name” field. All we need to do here is add a custom CSS class called “person”.
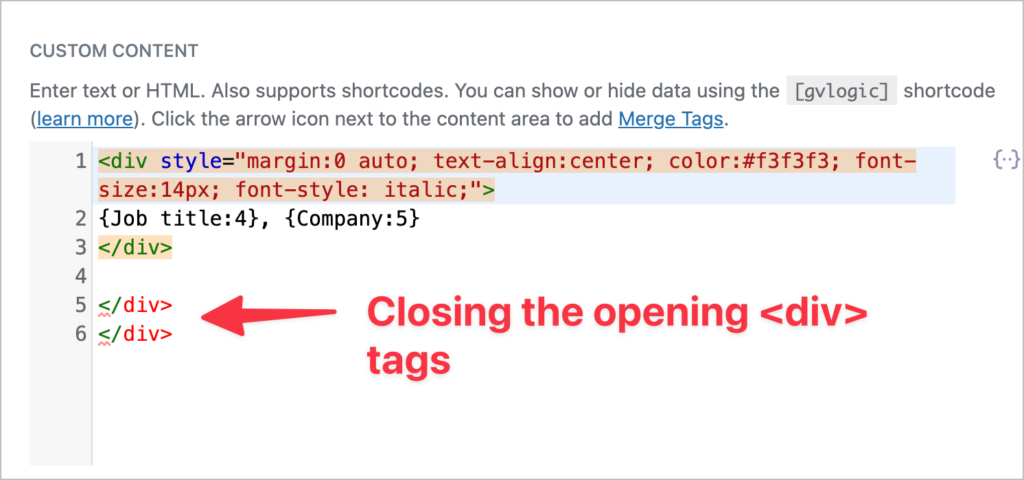
The final field in our View is a Custom Content field. Inside the Custom Content text editor, we’re going to place the merge tags for the “Job title” and “Company” fields, enclosed inside a separate <div> element.
Finally, we’re going to close off the two opening <div> tags that we added previously.
That’s it! Now that we have the structure for our testimonials, we can turn our attention to adding the styles.
Adding CSS styles
If you open up your View on the front end, you’ll see it doesn’t quite fit the description of “beautiful” just yet. That’s because we’ve created the HTML structure, but we haven’t added any styles.
GravityView’s editor includes a special panel for adding custom CSS and JS code. Here, we can add the custom CSS code for our testimonial View.
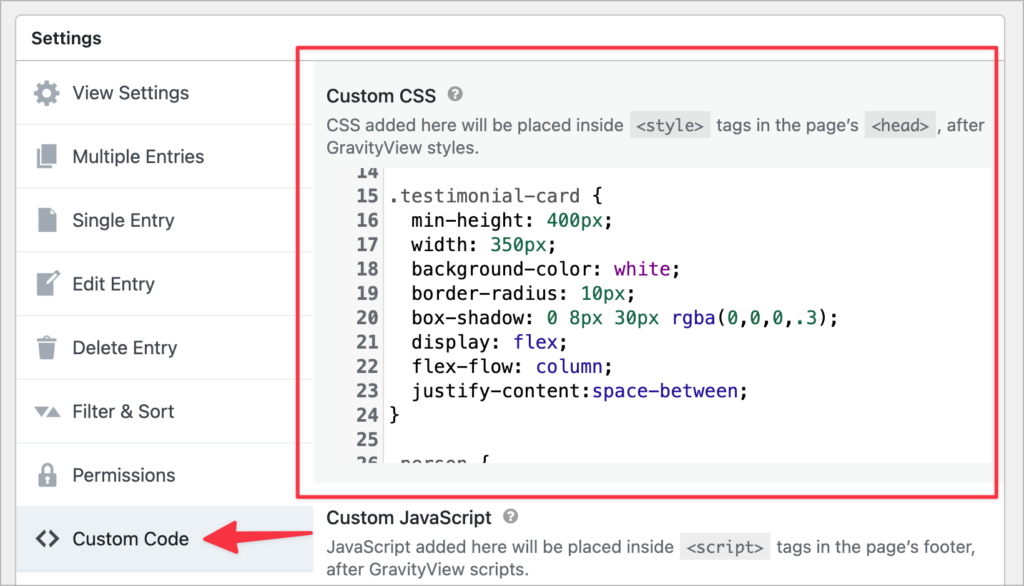
Here is the actual CSS code that we used to achieve this look and feel:
Let’s take a look at our finished View on the front end:
That’s it! All that’s left to do is embed your testimonial View on a page or post on your website.
Create your new testimonial page using GravityView
Customer testimonials are a form of user-generated content that helps build trust and increase social proof. This can lead to higher conversions rates and increased revenue for your business!
In this tutorial, we showed you how to build a beautiful, modern testimonial page using the GravityView DIY layout. Although the DIY layout isn’t as straightforward as the other preset templates, the flexibility is often worth the extra effort. Remember to check out the live demo if you haven’t done so already.
If you enjoyed this tutorial, check out our blog for more helpful content!

Helpful tips right in your inbox.
Subscribe to get the latest articles, information on releases and helpful Gravity Forms tips!
More articles

How to build a WordPress CRM without code (a contact database you own)
Build a simple WordPress CRM with GravityView. Turn the Gravity Forms entries you already collect into a no-code contact database you own, with no monthly fees.

Launch Log: Distance sorting for radius searches, DataTables search improvements, and import reliability fixes
The latest GravityKit releases add distance sorting to map searches, bring built-in search to DataTables, and fix GravityCharts and GravityImport edge cases.

WordPress page builder market share 2026: Elementor leads at 32.67%
Elementor reaches 32.7% of WordPress sites. WordPress Block Editor 20.6%, wpBakery 8.5%, Divi 5.7%. Latest HTTP Archive crawl, share-of-WordPress basis throughout.