Published
•
Updated
How to build a Gravity Forms geolocation directory
Build a geolocation directory with Gravity Forms and GravityView Maps. Collect addresses in a form and display them as interactive map markers with filtering and front-end search.

Are you looking for a way to build geolocation applications using Gravity Forms?
You can collect location information in Gravity Forms using the “Address” field type, but there’s no way to plot those addresses on a map, unless you use an add-on like GravityView.
In this post, we’ll show you how to build a Gravity Forms geolocation directory using the GravityView Maps layout. Keep reading to find out more!
Check out a live demo of the finished geolocation directory and get your own free trial site preloaded with all GravityKit add-ons!
Download the free business location form template now!
Import the template into Gravity Forms and customize as necessary.
Sneak peek
Here’s what our finished Gravity Forms geolocation directory looks like on the front end!
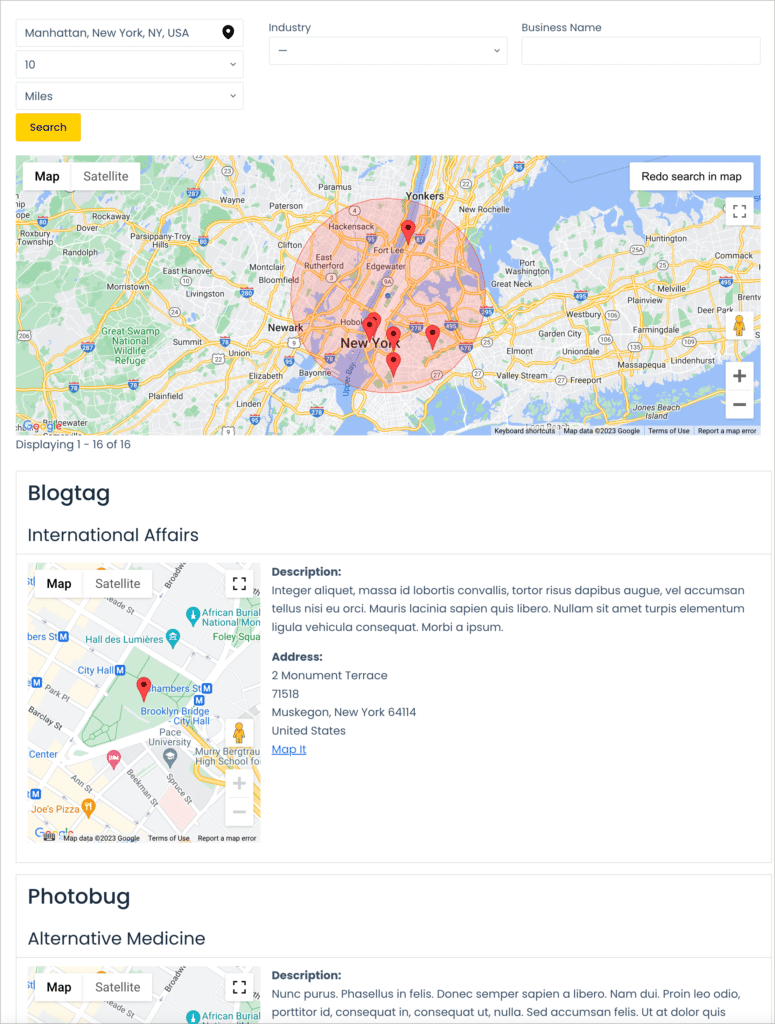
As you can see, it’s a business directory with the ability to search for listings within an area.
What you’ll need
Here are the plugin and extensions you’ll need to build a Gravity Forms geolocation directory
- Gravity Forms
- GravityView
- GravityView Maps Extension (included in the All Access Pass)
What does “geolocation” mean?
The term “geolocation” generally refers to the use of technology for tracking the whereabouts of electronic devices. In a broader sense, geolocation is often used to refer to maps applications that display user/business locations based on their address.
What is a geolocation directory?
A geolocation directory is a web application that displays information about certain people or businesses, as well as their location. Geolocation directories help users find professionals, businesses and services within a certain area.
For example, an online geolocation directory might allow you to…
- Find a nearby ice cream shop
- Find apartments to rent in Manhattan
- Locate a dog park near you
- Find the closest hardware store
Now let’s look at how to build a Gravity Forms geolocation directory using GravityView!
Building a Gravity Forms geolocation directory
Below, we’ll show you how to create a Gravity Forms geolocation directory using the GravityView Maps layout. The Maps layout allows you to display existing form entries as markers on a Google Map.
Here’s how it works…
When a user fills out your form and submits their address, GravityView geocodes that address (i.e. turns it into map coordinates) and then display it as a marker on an interactive Google Map. Google Maps is the most popular navigation app in the US with over 150 million users each month!
Ready to create your own geolocation directory using Gravity Forms? Follow the steps below ????
Install GravityView
First, you’ll need to ensure you have access to the GravityView plugin, so if you don’t have one already, purchase a license from our website.
Pro tipThe Maps layout is only available in our All Access package. However, if you only want GravityView and Maps, contact our support team, and we’ll see what we can do!
Go to your GravityView Account page, click on the “Downloads” tab, scroll down to GravityView and click “Download Plugin”.

Now follow the steps below to install GravityView on your website.
- Log in to your WordPress dashboard, hover over “Plugins” and click “Add New”
- Click “Upload Plugin” and then click “Choose File” and select the GravityView ZIP file
- Click “Install Now”. When GravityView has finished installing, click “Activate Plugin”.
After installing GravityView, you’ll need to install the Maps layout.
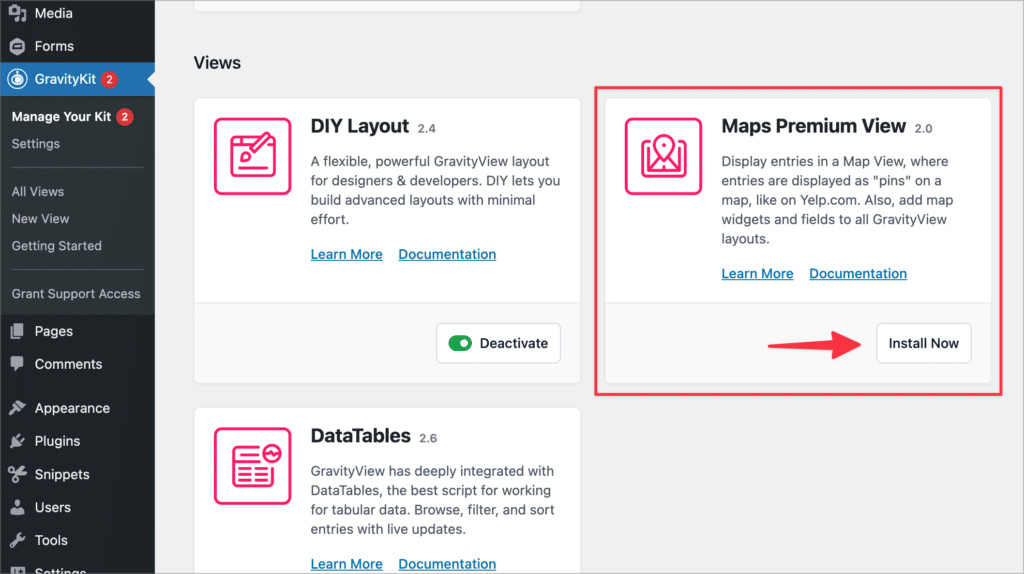
Install the Maps layout
The next step is to install the GravityView Maps layout. To do this, hover over “GravityKit” and click “Manage Your Kit”. Next, locate the “Maps Premium View” and click Install.
After installing Maps, you’ll need to sign up for a Google Maps API key and enter it on the Maps settings screen. For guidance on how to do this, follow this helpful guide on our docs site.
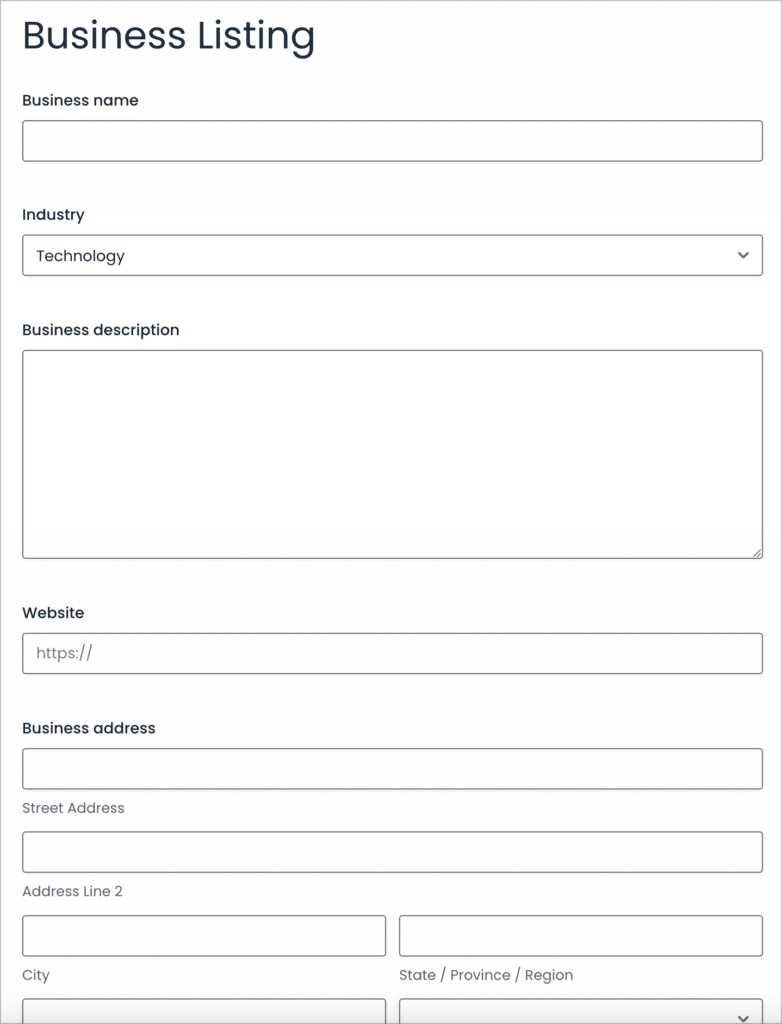
Create a directory listing form
Now that you’ve installed GravityView and Maps, you can start constructing your geolocation directory.
In this example, we’ll be creating a local business directory. We’ll start by creating a sign-up form allowing business owners to add their profile to the directory.
To create a new form, we’ll hover over “Forms” and click “New Form”. After giving our form a name, we can start adding fields to it using the Gravity Forms visual builder.
The one field your form MUST have is an Address field. If you don’t include an Address field, GravityView won’t be able to determine the location of the listing. You’ll find the Address field under the “Advanced Fields” tab on the right.
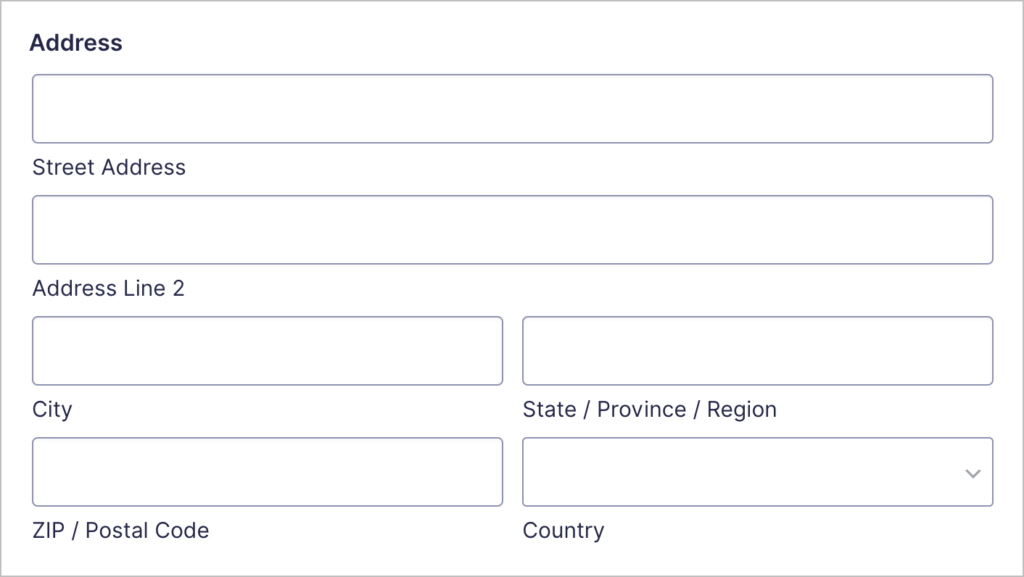
Pro tipEnable autocomplete for the Gravity Forms Address field to offer a better user experience!
Now feel free to add any other fields you feel are necessary. For our local business directory, we’ll include the following form fields:
- Business Name (Single Line Text)
- Business Summary (Single Line Text)
- Business Description (Paragraph)
- Address (Address Field)
- Business Phone (Phone)
- Business Email (Email)
- Web Address (Website)
- Featured Image (File Upload)
When you’re finished building your form, click “Save Form” at the top and embed it on a post or page. You can save time by downloading the free business listing form template now!
Create a View Using the Maps Layout
The next step is to create a View so you can display entries on the front end! A View is a custom post type that you can configure using a drag and drop visual editor. Views allow you to display Gravity Forms submissions on your website.
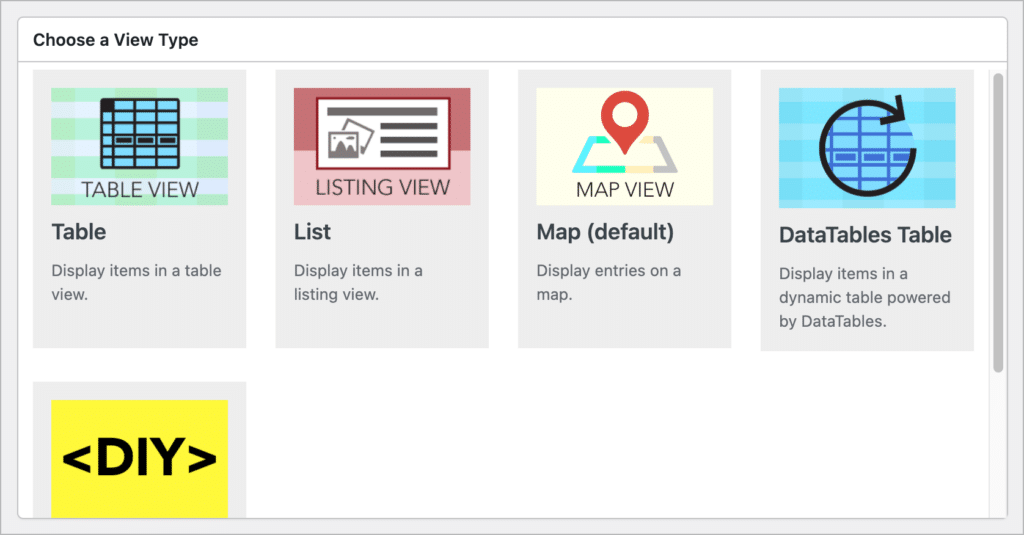
To create a new View, hover “GravityKit” and click “New View”. Now give your View a name, select your new form as the data source, and choose your layout type. You don’t have to select the “Map (default)” View type. You can add a map to any View type using a widget!
For this example, we’ll select the “List” View type.
After choosing a layout, the View editor will appear, allowing you to start configuring your directory. You can customize the layout of your directory by adding fields and widgets to the View editor.
The first step is to add a map. You can do this by clicking “Add Widget” and selecting the “Multiple Entries Map”.
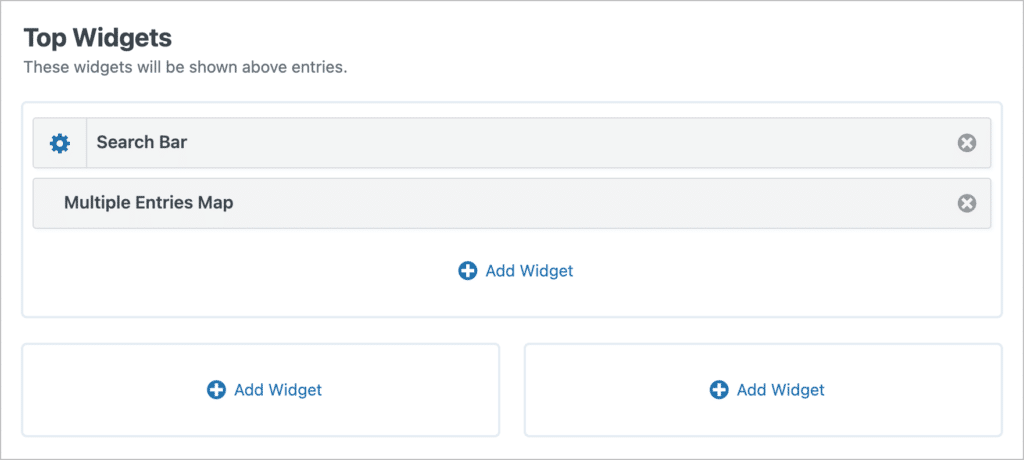
Widgets include search bars, and navigation tools like page links and pagination info. You can only add widgets to the top and bottom widget areas.
Fields, on the other hand, represent user-submitted content. You can add fields to the Entries Fields section of the View editor.
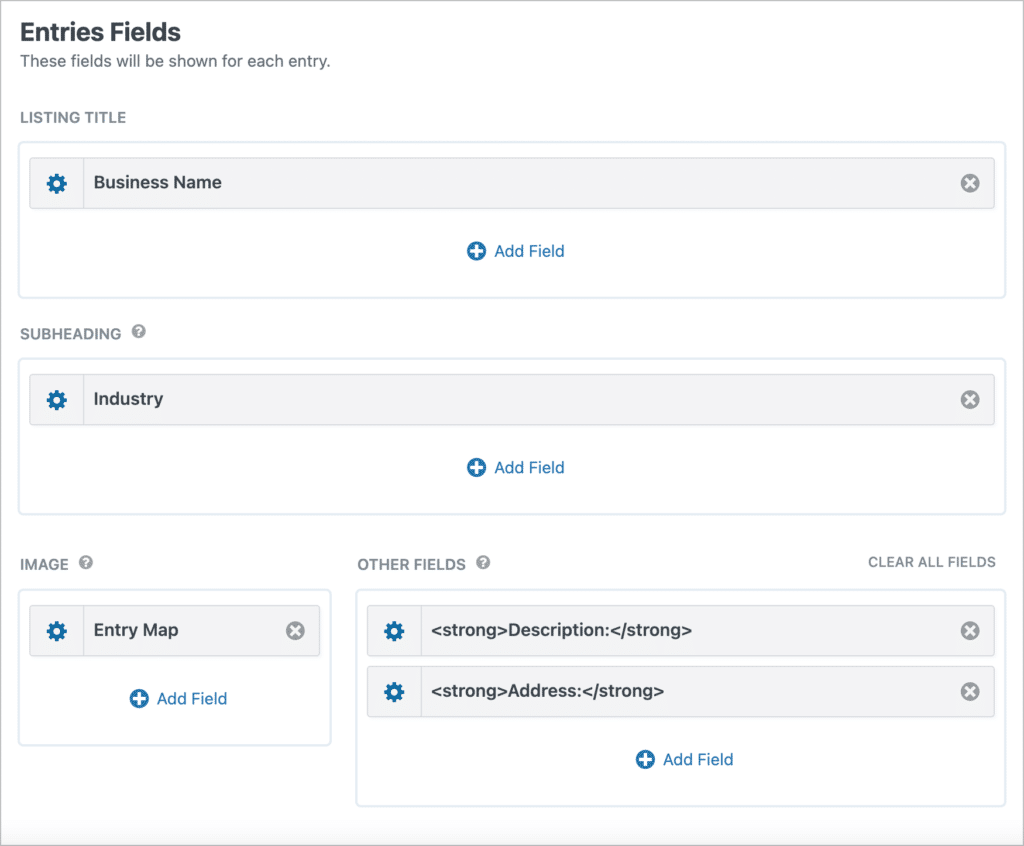
As you can see, under “Entries Fields” there are different sections for different fields – “Image”, “Listing Title” and “Details”. There is also a “Middle Row” and “Footer” section below.
When you’ve finished adding widgets and fields to your View, you’ll need to configure the Map settings.
Add info boxes and configure the map settings
Scroll down to the View Settings meta box and click on the “Map”s tab on the left. Here you’ll find a range of options for customizing the look and feel of your map on the front end.
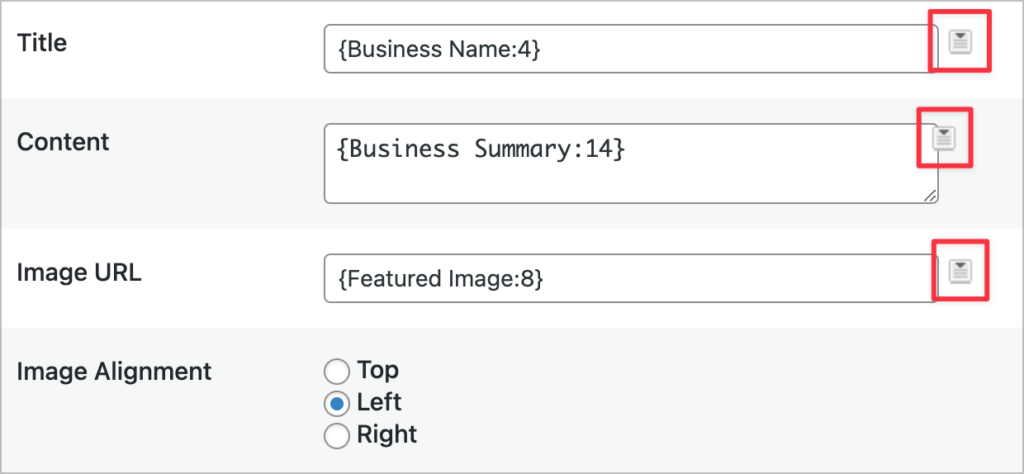
One of the most powerful features of GravityView’s Maps layout is called Info Boxes. By enabling this option, a popup box with additional information about the listing will appear when users hover over a marker on the map.
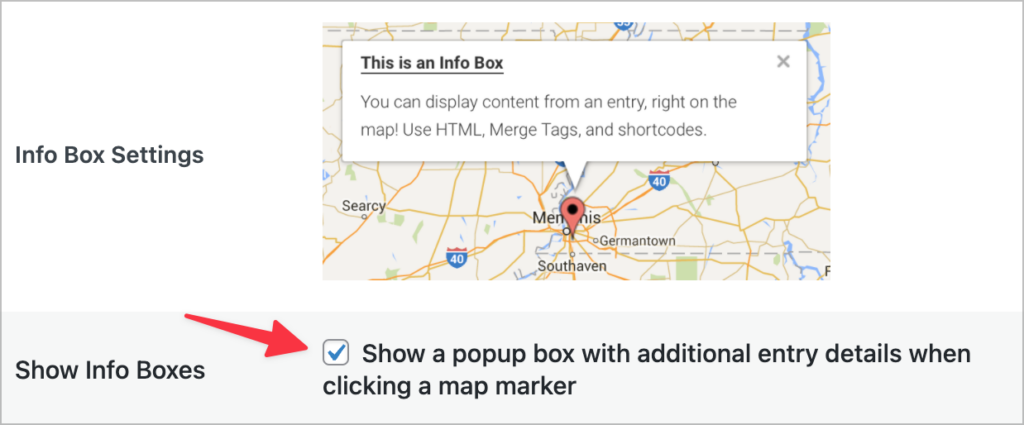
After enabling Info Boxes, you’ll see four other options appear, allowing you to specify what content to include in your info boxes. You can add a title, body content and an image. To display content dynamically for each listing, you can use Gravity Forms field merge tags. (To add merge tags, simply click on the button to the right side of the input box).
When you’re done, scroll down and ensure you configure the remaining options. Map settings allow you to change the look of the map, add custom map styles, enable marker clustering and much more!
When you’re satisfied, publish your View and check it out on the front end.
Get started with Gravity Forms geolocation applications
If you’re looking for a Gravity Forms geolocation directory add-on, the GravityView Maps layout may be just what you need. The Maps layout allows you to display your form entries as markers on a Google Map and build powerful geolocation applications.
In this post, we showed you how to create a Gravity Forms geolocation directory using the GravityView Maps layout. So what are you waiting for? Learn more about the Maps layout today or test it out on your own free demo site.

Helpful tips right in your inbox.
Subscribe to get the latest articles, information on releases and helpful Gravity Forms tips!
More articles

Launch Log: Distance sorting for radius searches, DataTables search improvements, and import reliability fixes
The latest GravityKit releases add distance sorting to map searches, bring built-in search to DataTables, and fix GravityCharts and GravityImport edge cases.

WordPress page builder market share 2026: Elementor leads at 32.67%
Elementor reaches 32.7% of WordPress sites. WordPress Block Editor 20.6%, wpBakery 8.5%, Divi 5.7%. Latest HTTP Archive crawl, share-of-WordPress basis throughout.

Launch Log: GravityView 3.0, plus upgrades to Block MCP and GravityKit MCP
GravityView 3.0 lands with the new Vantage theme, frontend bulk actions, and AI-assisted View creation. This launch log also covers updates to GravityKit MCP, Block MCP, and Dashboard Views.