Published
•
Updated
How to create a customer portal for custom product orders using GravityView
Are you looking for a way to create a customer portal on WordPress that allows users to manage their interactions with your company? Customer portals provide a much-needed link between a brand and its customers. They act as a central hub for accessing information...
Are you looking for a way to create a customer portal on WordPress that allows users to manage their interactions with your company?
Customer portals provide a much-needed link between a brand and its customers. They act as a central hub for accessing information to do with product orders, support requests, and more.
In this tutorial, we’ll show you how to create a powerful customer portal using Gravity Forms and GravityView. Our customer portal will allow users to track and edit their product orders without ever seeing the backend of our site.
Keep reading to learn more.
Download the free custom product order form template now!
Import the template into Gravity Forms and customize as necessary.
Wanna try it?
Spin up a demo
See what you can build with GravityView — explore the live demo.

What is a customer portal?
A customer portal is a broad term that describes on online interface that gives customers total visibility into their interactions with a specific brand.
Customer portals often allow customers to track orders, submit support requests, and access other important information. Having a customer portal helps to strengthen customer relations and provides a hub for communication and collaboration.
Why and when you need a customer portal
Customer portals are becoming more of a requirement for many organizations, rather than something that’s just nice to have. According to Statista, 88% of customers now expect brands to have an online customer service portal!
If your website lacks the ability for customers to log in, manage their orders and request support for issues they’re experiencing, your business may be falling behind the times.
The content available from a customer portal will differ depending on the business. The great thing is that you can tailor your portal to the type of service you offer. Here are some common use-cases for a customer portal:
- Submitting and tracking support requests
- Accessing files and documents
- Managing purchase orders and tracking order deliveries
- Looking up quotes and invoices
- Editing personal information
In this example, we’re going to build a simple customer portal that allows users to track the status of their orders and update order details if needed.
Creating the order form
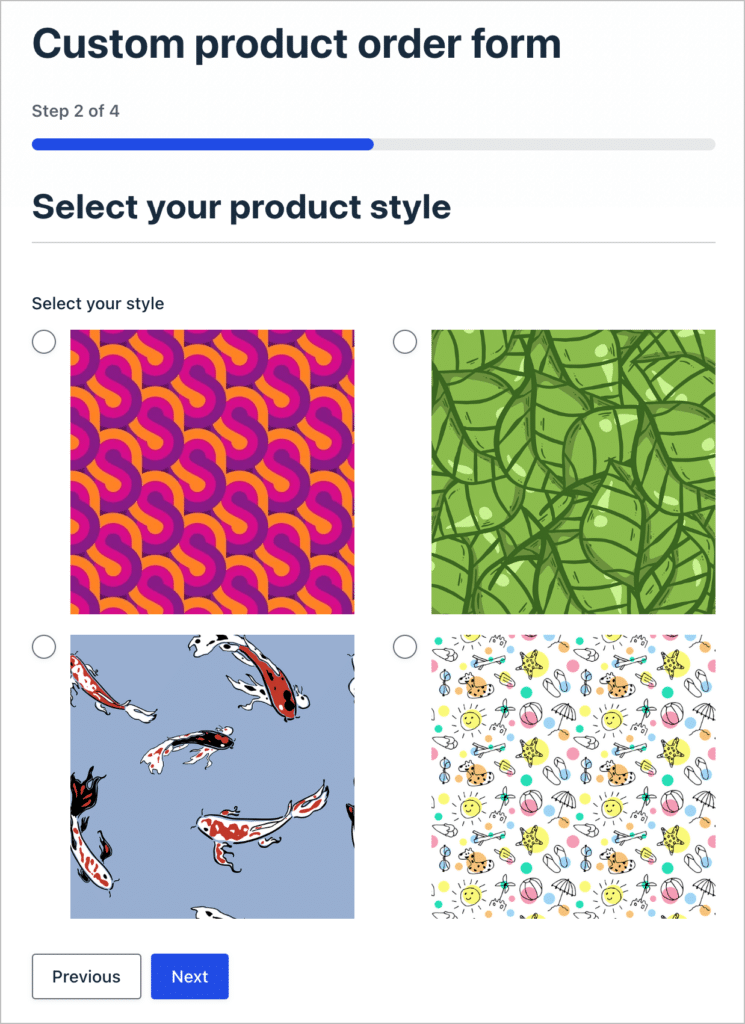
To start things off, we’ll create an order form for a fictitious company that sells custom branded yoga mats. Our order form needs to include sections for the following information:
- Customer details
- Style of mat that they want
- Place to upload their logo and branding
- An “Order Status” field that only staff can update
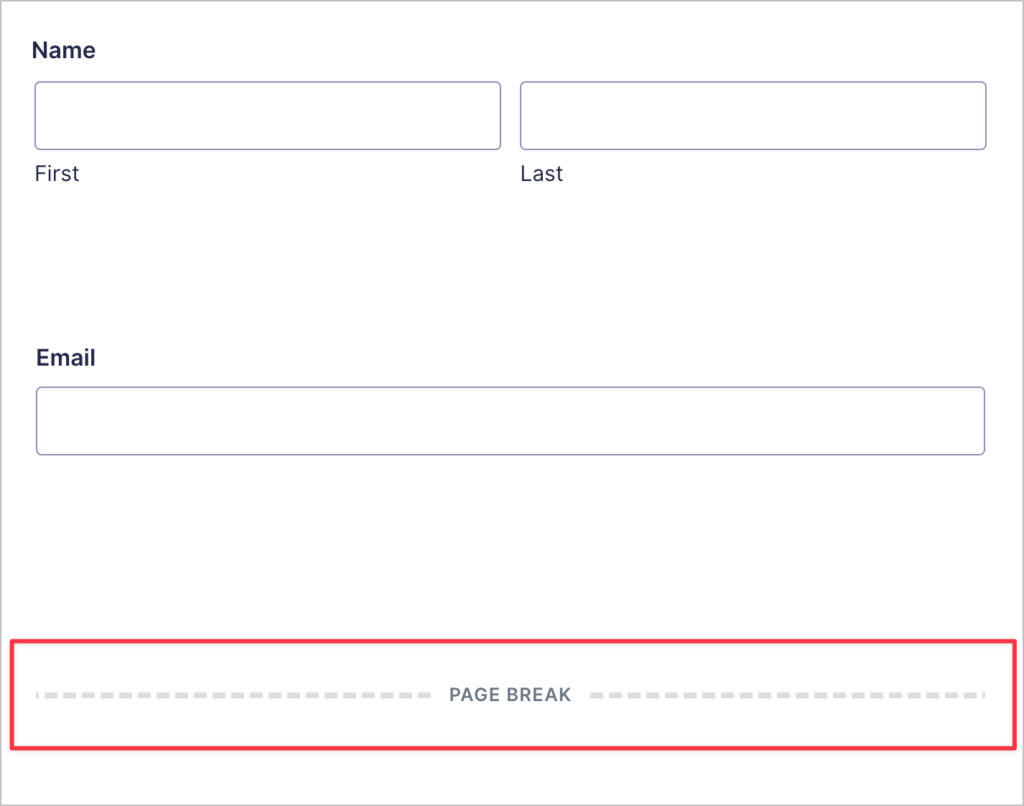
To ensure we’re providing a top-notch user experience, we’ll create a multi-page form, where each section is on a new page. To create multi-page forms in Gravity Forms, simple use the “Page” field to insert a page break where you want one page to end and another to begin.
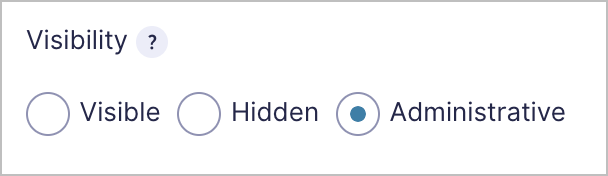
The final field in our form is a Drop Down called “Order Status”. This field will be visible in our customer portal, but we don’t want it to be editable by the user. To ensure only site Admins and edit this field, we’ll set the visibility to “Administrative”.
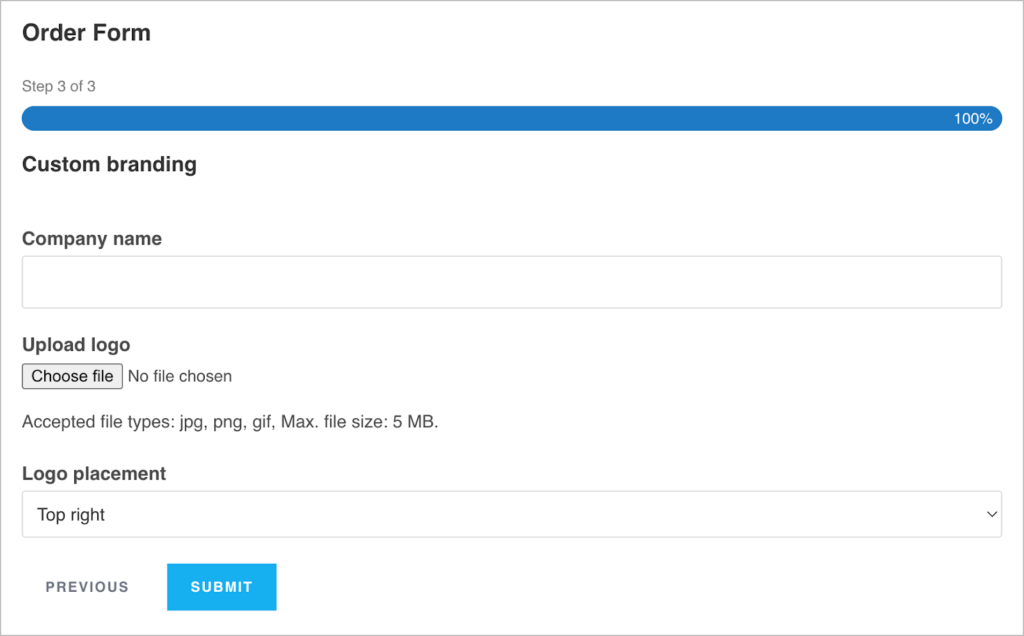
Here’s what our order form looks like on the front end:
Pro tipIf your order form is long and contains a lot of fields, consider using the Gravity Forms Save and Continue feature.
Now that our order form is complete, we can start building out the customer portal itself. But first, we need to consider how we’re going to handle payments.
Handling payments
In case a customer uploads the incorrect logo or misspells their company name, we want them to be able to edit their order details after submitting. This means we’ll need to delay payment until the order has been confirmed. That’s why our form won’t contain a payment section (we’ll handle this elsewhere, after invoicing the customer).
So here’s what our customer journey might look like:
- Customer submits the order form
- Customer can edit their order details
- Customer is sent an invoice based on their order details
- Customer pays for the order
- Customer can log in and track the status of their order
Since we’re focusing on the customer portal aspect in this post, we won’t discuss invoicing or payments. However, both of these things are easy to accomplish using Gravity Forms and some add-ons.
Building the customer portal
Now we’re ready to start building our user portal using GravityView! If you’re not familiar with GravityView, it’s a WordPress plugin that allows you to display Gravity Forms data on the front end of your website.
Creating a new View
To build our customer portal, we’ll need GravityView and the Advanced Filtering extension (available in the Core + Extensions license). So, before we start, make sure you have both of those installed on your website.
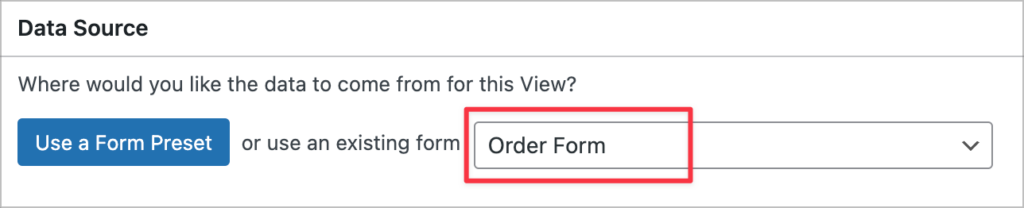
To create a new View, we’ll hover over Views and click New View. Next, we’ll give our View a name (“Customer portal”) and select our order form as the data source.
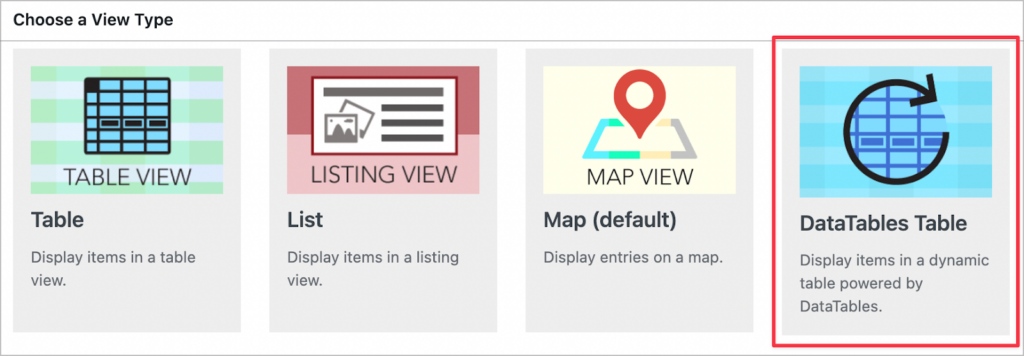
Now we need to select a View Type. If your customers are likely to place multiple orders with you, then either the Table or DataTables layout is ideal. We’ll select the DataTables layout.
After selecting a layout, we can start constructing our customer portal using GravityView’s drag and drop editor.
Setting up the customer portal using drag and drop
Let’s start by configuring the Multiple Entries Layout. This is where each customer will be able to see a list of all their orders, view details about specific orders and track their statuses.
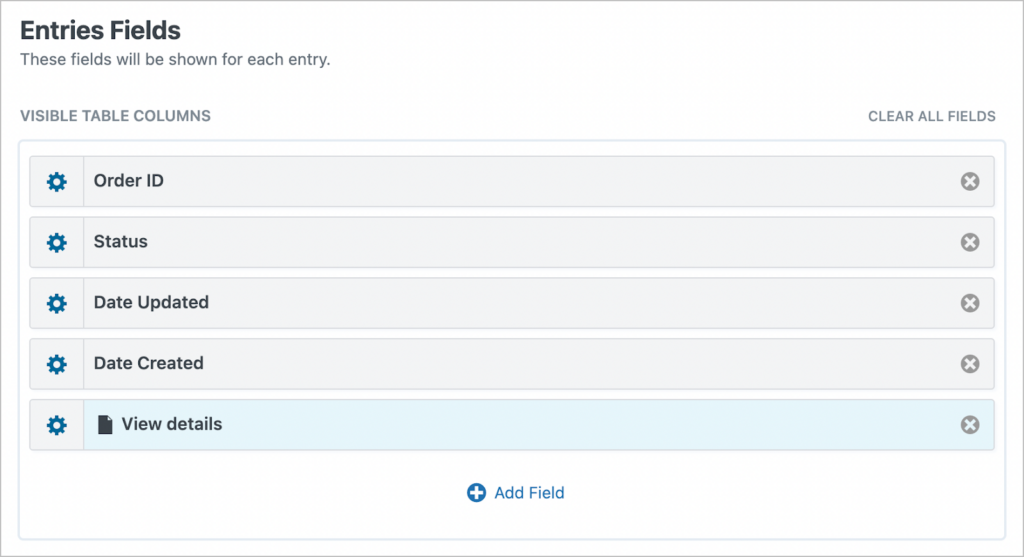
First off, we’ll remove any widgets from the top and bottom widget areas, as these aren’t needed. Next, we’ll add relevant fields to the Entries Fields section. These will be the column names in our table.
We’ll add the following fields:
- Entry ID (we’ve changed the label to call this “Order ID”)
- Status
- Date Updated
- Date Created
- Link to Single Entry (we’ve changed the label to “View details”)
Next, we need to add fields to the Single Entry Layout. This is where users can go to view information about a particular order. To configure the layout, we’ll need to click on the Single Entry Layout tab at the top of the View editor.

Here we want users to see an overview of their order, so we’ll make sure to add every relevant field from our order form (we can add fields by clicking on the Add Field button, just like we did for the Multiple Entries Layout). Finally, we’ll also add a “Link to Edit Entry” field, allowing the user to edit their order details from the front end.
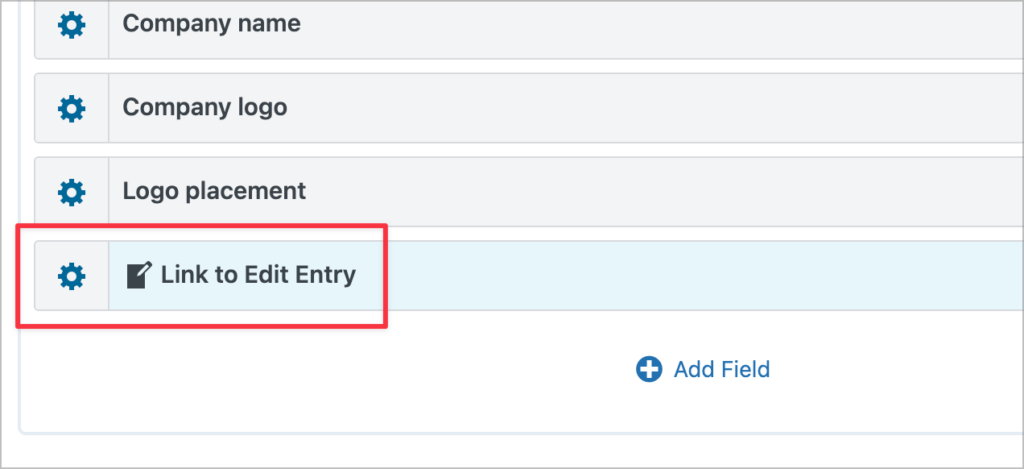
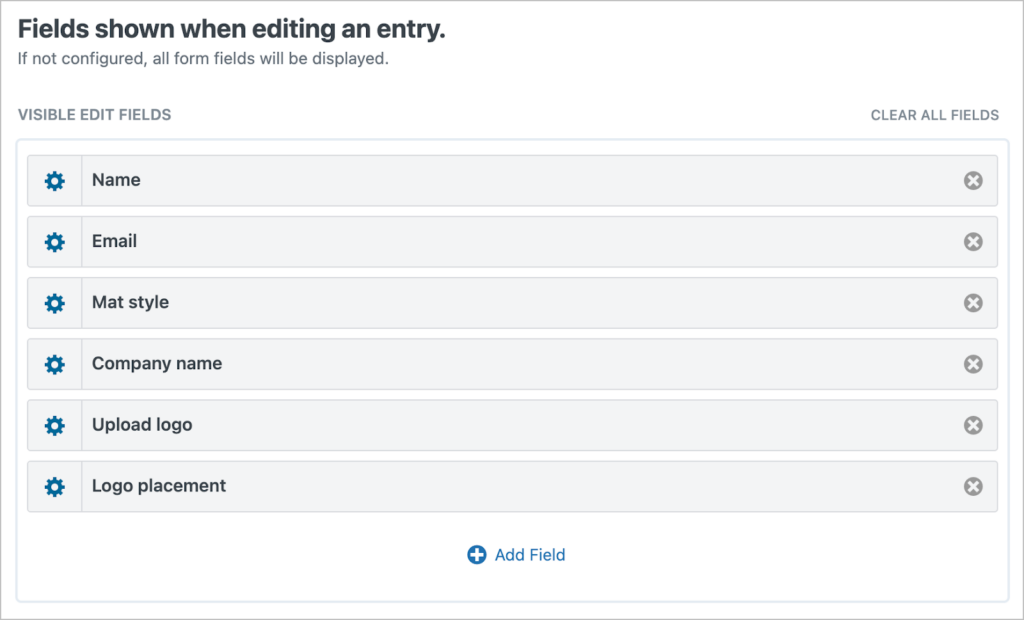
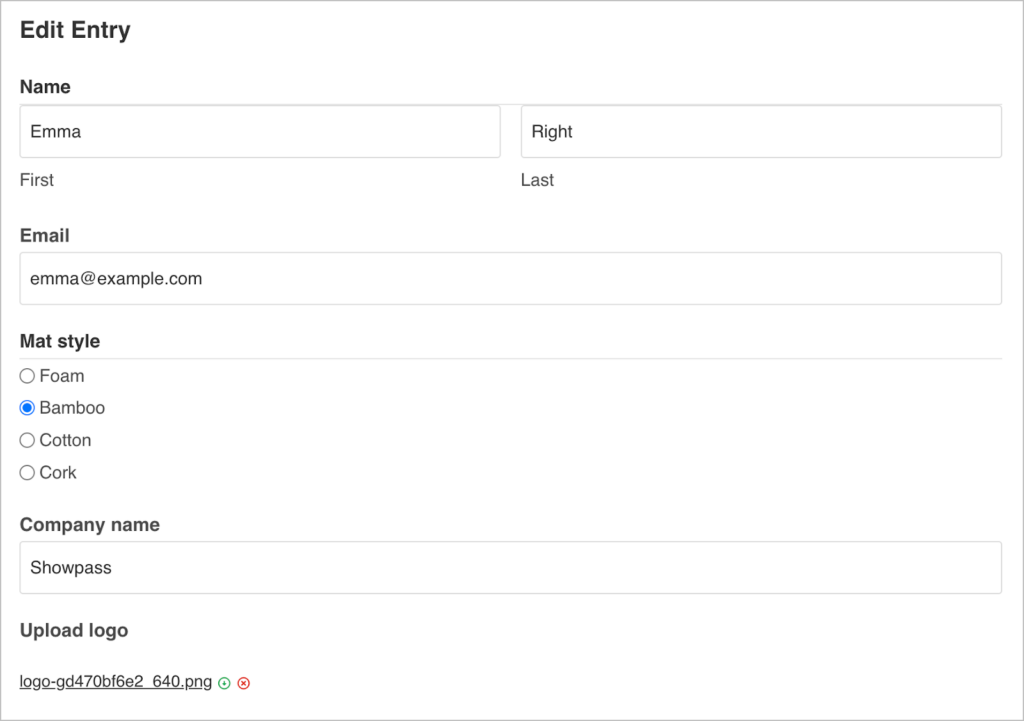
Lastly, we need to add fields to the Edit Entry Layout. Fields we add here will be editable from the front end. We want users to be able to edit all order fields, except the “Status” field (as this should only be updated by staff who are preparing the order).
That’s it! Before we take a look at our customer portal on the front end, we need to ensure that users can only see orders that they have submitted. We can do this by adding an advanced filtering rule to our View.
Using the advanced filter to only show entries submitted by the currently logged-in user
The GravityView Advanced Filtering extensions allows us to filter entries in a View based on conditions that we set. In this case, we want to limit entries to only those created by the currently logged-in user.
To add an advanced filtering condition, we’ll scroll down to the View Settings and click on the Filter & Sort tab. Under Advanced Filter, we’ll click Add Condition and add the following condition:
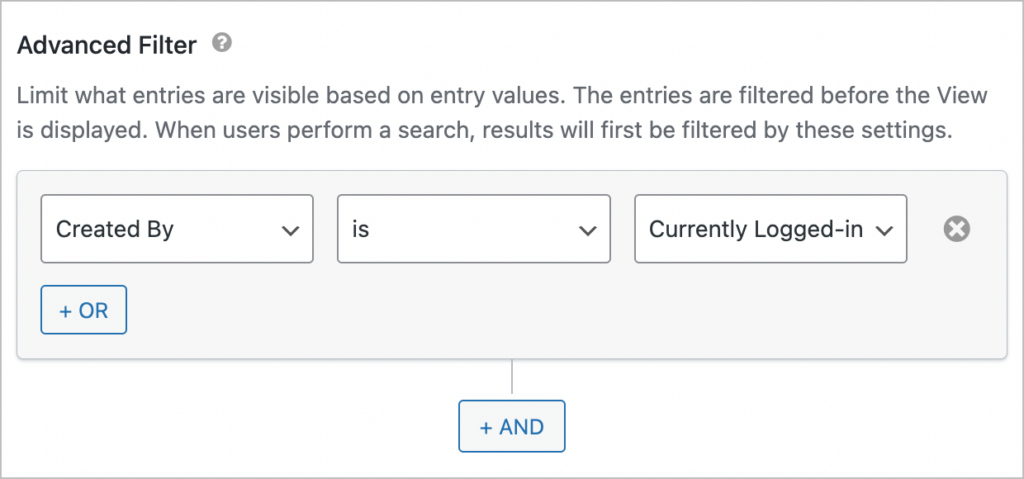
The first dropdown is set to “Created By”, the second “is” and the third “Currently Logged-in User”. That’s it! Now, users will only be able to view orders that they submitted.
This step is very important, because without this filtering rule, users would see all orders (no matter who submitted them) and that would open up all kinds of security/privacy risks.
Checking out our finished customer portal
When users log in, they will first see a list of all their orders, including the status, date updated, date created and a link to view details.
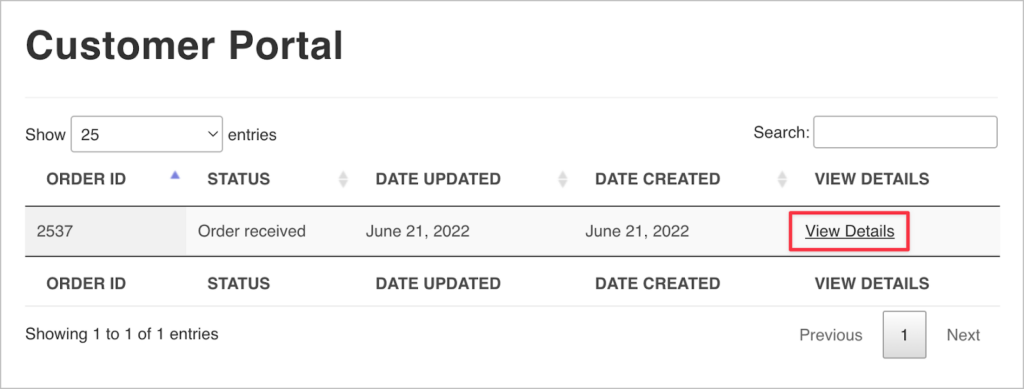
After clicking on the “View Details” link, the user will be taken to a page where they can view their order information, including the logo that they uploaded for custom branding. There’s also a link at the bottom allowing them to edit their order information.
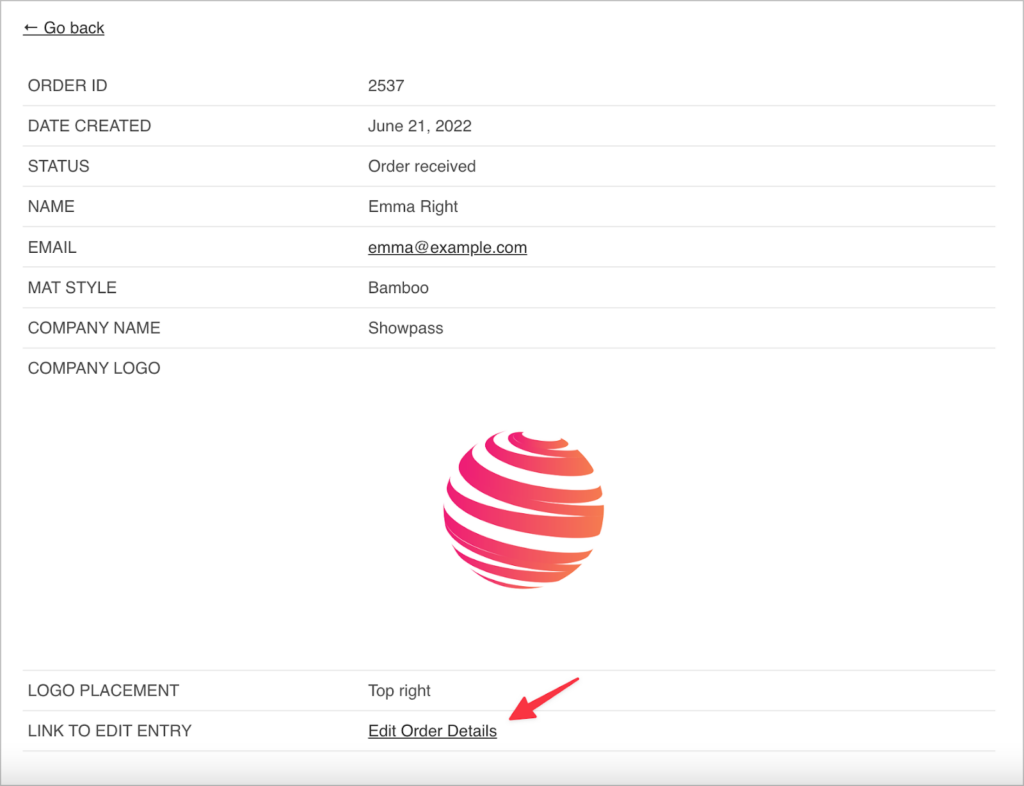
Clicking on the “Edit Order Details” link will take the user through to the Edit Entry page, where they can update their order information from the front end.
As you can see, using GravityView and the Advanced Filtering extension, we’re able to create a powerful customer portal that allows users to view, manage and update their product orders.
Pro tipAre you interested in using GravityView for Product Information Management (PIM)? Check out this case study where we interview Nicolas from Pieroth about why they chose GravityView to power their PIM system.
Create your customer portal using Gravity Forms and GravityView
A customer portal is an interface (usually on the web) that allows customers to monitor their interactions with a specific company or brand. In today’s connected world, most customers expect brands to have an online customer portal facility.
In this post, we showed you how to build a customer portal that allows your users to view, track and edit their product orders, without ever seeing the backend of your site.
If you found this post interesting, check out more of our tutorials to see what else is possible using GravityView. You can also read our tutorial on building a general client portal and user account page.

Helpful tips right in your inbox.
Subscribe to get the latest articles, information on releases and helpful Gravity Forms tips!
More articles

How to build a WordPress CRM without code (a contact database you own)
Build a simple WordPress CRM with GravityView. Turn the Gravity Forms entries you already collect into a no-code contact database you own, with no monthly fees.

Launch Log: Distance sorting for radius searches, DataTables search improvements, and import reliability fixes
The latest GravityKit releases add distance sorting to map searches, bring built-in search to DataTables, and fix GravityCharts and GravityImport edge cases.

WordPress page builder market share 2026: Elementor leads at 32.67%
Elementor reaches 32.7% of WordPress sites. WordPress Block Editor 20.6%, wpBakery 8.5%, Divi 5.7%. Latest HTTP Archive crawl, share-of-WordPress basis throughout.