Published
•
Updated
How to Build a Real Estate Listing Site Using Gravity Forms
This article is outdated. Please see our updated article about building a real-estate directory using Gravity Forms and GravityView. Did you know that the majority of homeowners found their home by looking on the internet? Real estate websites are where potential buyers (or renters) go to look for suitable properties. Real estate listing sites attract…
This article is outdated. Please see our updated article about building a real-estate directory using Gravity Forms and GravityView.
Did you know that the majority of homeowners found their home by looking on the internet?
Real estate websites are where potential buyers (or renters) go to look for suitable properties. Real estate listing sites attract a large number of viewers each month because they add value for both buyers and sellers!
When taking on the task of building a real estate website on WordPress, there are a number of questions you have to ask yourself.
Should you choose a real estate theme or should you add functionality using a WordPress real estate plugin? What if plugin conflicts arise? How do you “future-proof” the site?
By using GravityView as a framework you can build a sophisticated real estate listing site without having to write any code!
In this post, we walk you through the process of creating a Gravity Forms real estate site using GravityView. Keep reading to find out more ????
Download the free real estate listing form template now!
Import the template into Gravity Forms and customize as necessary.
Sneak peek
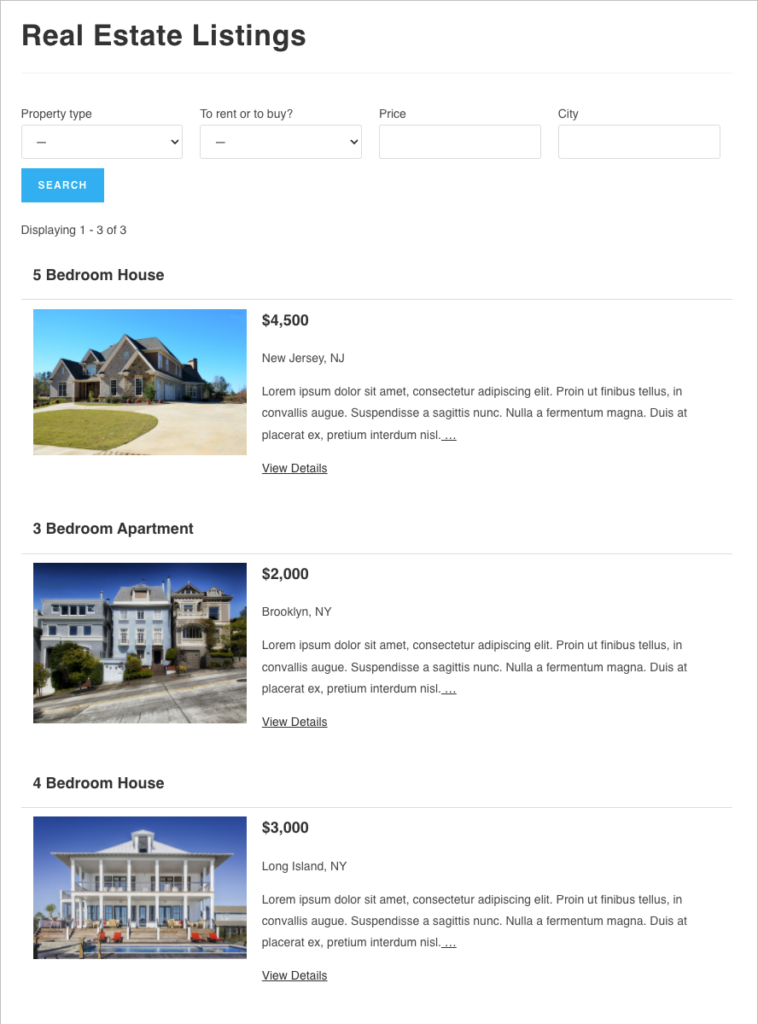
Here’s a sneak peek at what we’re going to build in this tutorial:
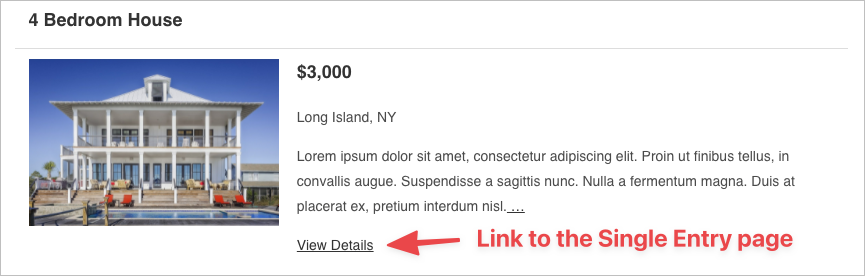
When a user clicks to ‘View Details”, they’ll be taken through to the Single Entry page:
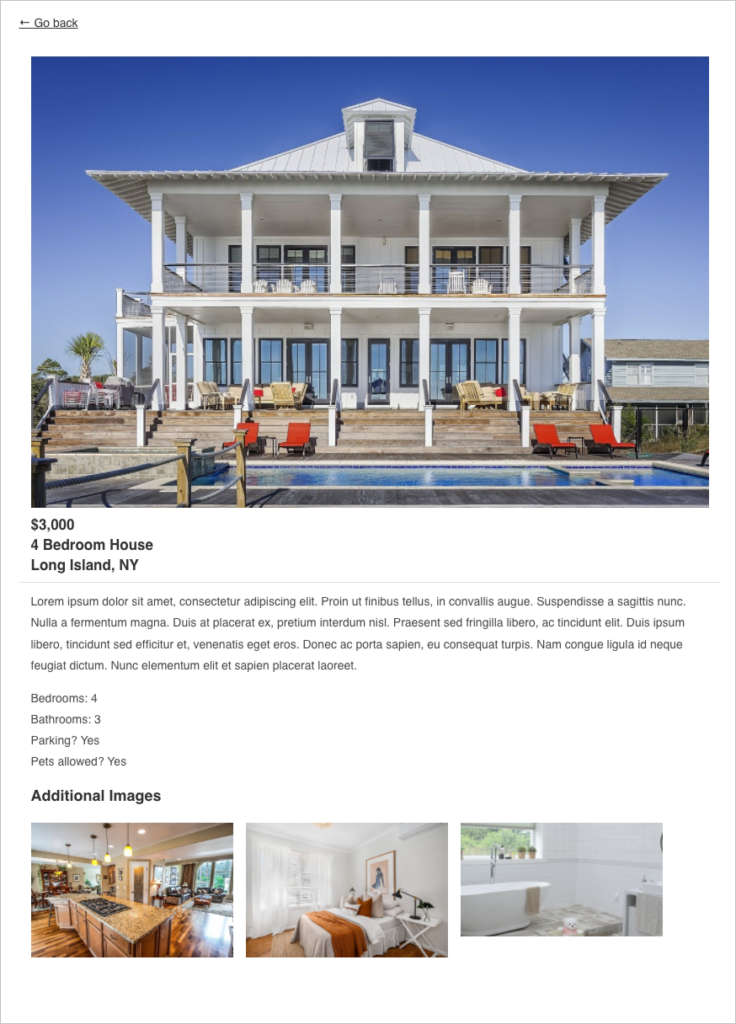
As you can see, clicking on a listing will take the user through to a page displaying additional details about the property (including images). Users can also contact agents directly to request more information!
Wanna try it?
Spin up a demo
See a live real estate listings site built with GravityView — explore the demo.

What you’ll need
Here’s what you’ll need to follow along with this tutorial and build your own, custom real estate website.
| Plugin/Add-On | Free/Paid |
| GravityView (any license level) | Paid |
| Gravity Forms (any license level) | Paid |
| GF Populate Anything (optional) | Paid |
What is a real estate listing site?
A real estate listing site is a website that hosts a directory of properties for sale or for rent within a particular area.
A real estate listing website allows buyers to view hundreds of potential houses from the comfort of their home! It’s also an easy way for sellers to get their homes in front of thousands of potential buyers/renters.
Web designers and developers know that building a real estate website is a complex task. Luckily, GravityView simplifies the process!
Building the listing form
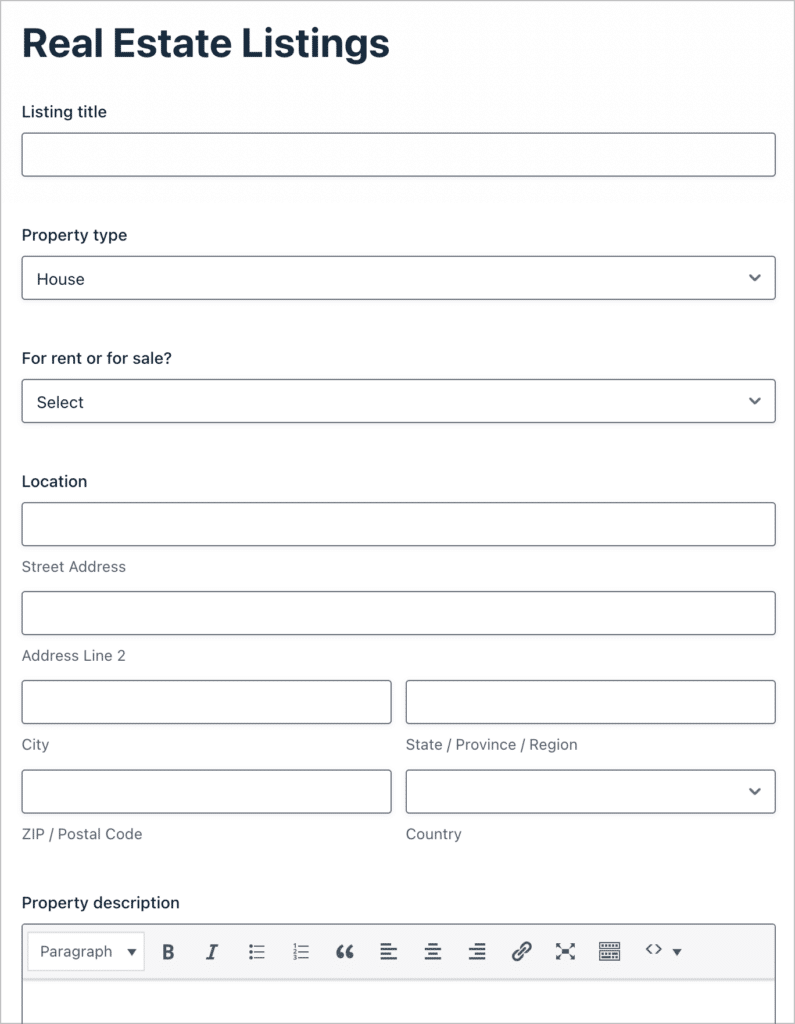
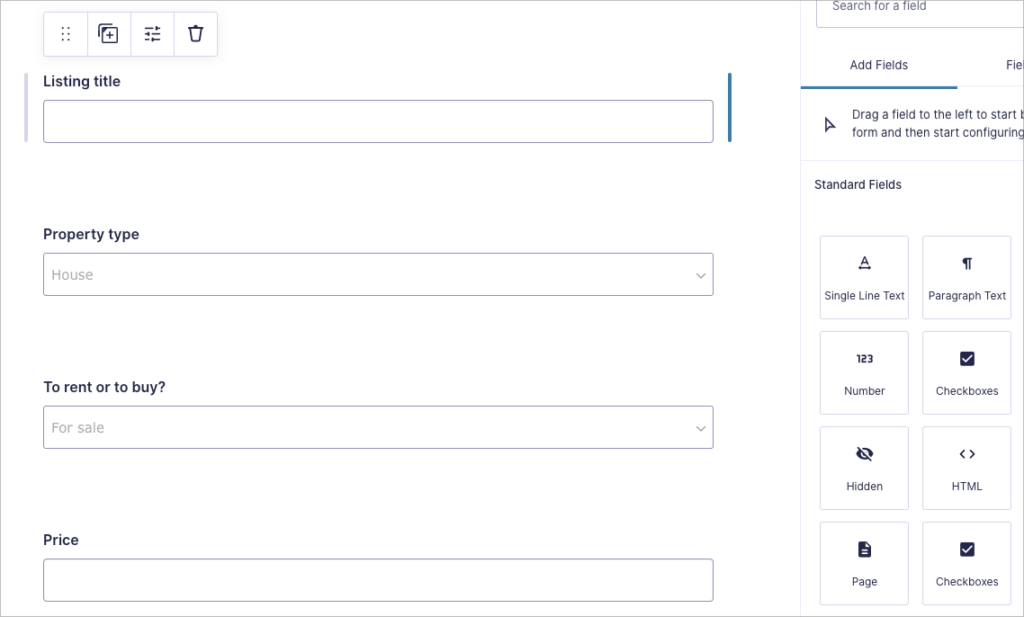
We’ll start by creating the property listing form. This will allow users/agents to submit a property for displaying in the directory.
To create a new form, hover over Forms and click on New Form. Now give your form a name and click Create Form.
When people browse homes on a real estate website, they’re looking to find out as much as they can before contacting the agent. To ensure we’re providing enough information about each property, we’ll add the following fields to our listing form:
- Title
- Type of property (House, Apartment, Townhouse, etc)
- Price
- Location
- Description
- Number of Bedrooms
- Number of Bathrooms
- Pets allowed (Yes/No)
- Parking
- Main image (File Upload field)
- Additional images (File Upload field)
Notice that we’ve added two “File Upload” fields, one for the main image and another for additional images. To allow users to upload multiple images through a single File Upload field, go to the field settings and enable the Multi-File Upload option.

Finally, we’re going to add one more field to specify the listing agent. This will allow users to contact the correct agent if they’re interested in the property. For this we’ll need a plugin called “Populate Anything” by Gravity Wiz.
Using Populate Anything to create a list of agents
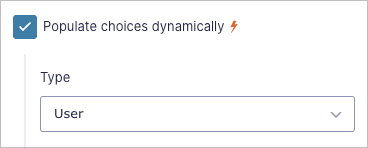
Populate Anything allows us to dynamically populate field choices or values with users, taxonomies and other data. In this case, we’re going to dynamically populate a Drop Down field with WordPress users (“agents”) from our site.
To start off, we’ll add a new Drop Down field to our form. Next, we’ll enable the option that says “Populate choices dynamically” and set the Type to User.
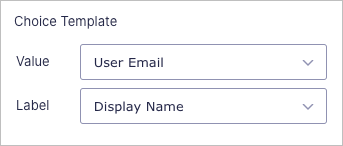
Now, we’ll set the Value to “User Email” and the Label to “Display Name”.
This will allow us to link properties to the correct agent, which will make it easy for users to email real estate agents directly if they want to learn more about a listing or set up a viewing.
Embedding the listing form
Now that we’ve finished building the property listing form, we can embed it on a page or post.
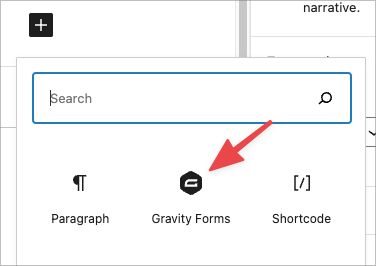
We can do this by adding a Gravity Forms block to our page layout using the Gutenberg block editor.
The next step is to create a “contact agent” form, allowing buyers to contact agents about specific properties.
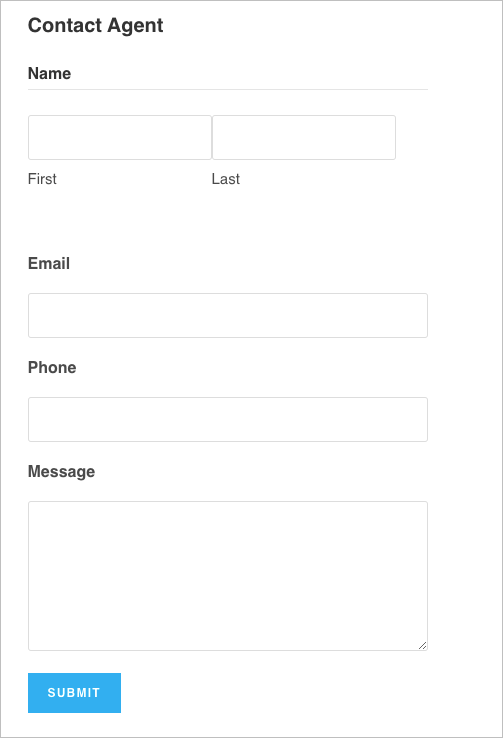
Creating the “Contact Agent” form
When creating our contact form, we’ll keep it simple by adding the following fields:
- Name
- Phone
- Message
- Agent Email (Hidden field)
The last field is the most important! It’s an Email field and we’re hiding it from the user by setting the visibility to “hidden” (You’ll see why we’re doing this a little later on).

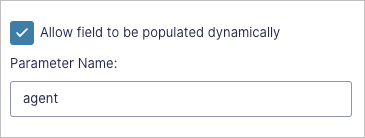
Next, we’ll open the advanced field settings, check the box that says “Allow field to be populated dynamically” and set a parameter name (in this case, “Agent”). This will allow us to capture the email address of the agent who represents the listing so that the user can contact them directly.
Pro tipLearn more about dynamic field population in Gravity Forms.
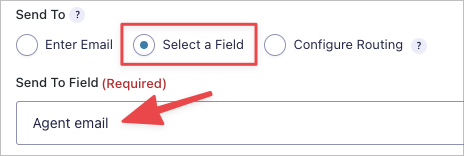
Finally, we need to configure the form notification by adding the agent’s email address to the “Send To” field. This will ensure that contact requests are sent to the correct agent.
So here’s how this will work. When a new property is added to the directory, there will be an agent associated with it. When a user lands on that property, they will have the option to contact the listing agent using a contact form. The “Agent email” field will be dynamically populated with the email address of the agent associated with that property and used as the “Send To” email address for the contact request. Few!
There is still one more step to complete before this will work – We’ll need to embed the contact form into the listing page using the Gravity Forms shortcode but we’ll cover this below.
Okay, now the fun part begins! It’s time to build our real estate listing directory.
Creating a View to display property listings
We’re going to use GravityView to display property listings on the front end in a directory-style layout.
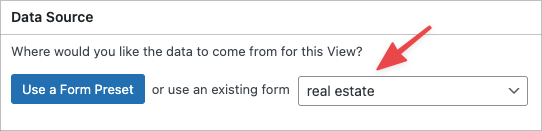
To create a new View, we’ll hover over Views and click New View. After giving our View a name, we’ll need to select a Data Source. We’ll set this to our property listing form that we created above.
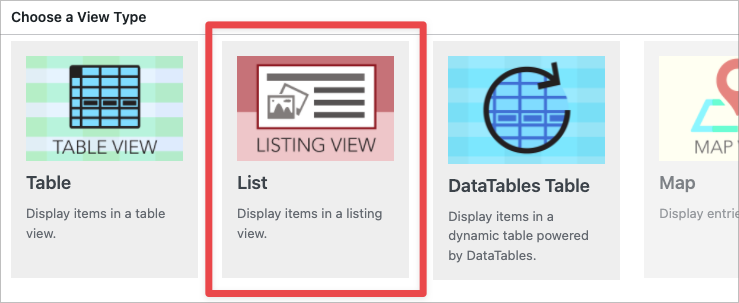
The next step is to select a View layout. GravityView includes a range of different preset layout options for building different types of applications. The best layout option for a real estate directory is the “List” layout.
After selecting a layout, we can start building the View using GravityView’s intuitive drag-and-drop editor.
A View is made up of three separate layouts – the Multiple Entries layout, the Single Entry layout and the Edit Entry layout.

We’ll start by configuring the Multiple Entries Layout.
Configuring the Multiple Entries page
The GravityView Multiple Entries page is the main page of our Gravity Forms real estate listing website. The Multiple Entries layout is where property listings are displayed one after the other.
There are two widget areas at the top and bottom and space for fields in the middle. Widgets are tools for navigating a View (like a search bar or pagination links) while fields are the actual information we’re wanting to display.
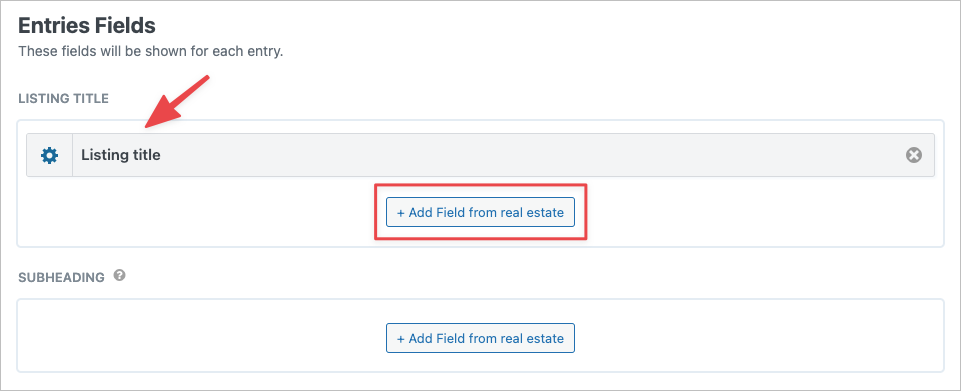
We’ll start by adding fields to the Entries Fields section of our View Layout. To add a field, click on the ‘+ Add Field’ button and select the field you want to add. We’ll add the Listing Title field to the Title section and we’ll leave the Subheading section blank.
Next, we’ll add the “Featured image” to the Image section and then we’ll add the “Price”, “Street Address” and “Description” fields to the Other Fields section.
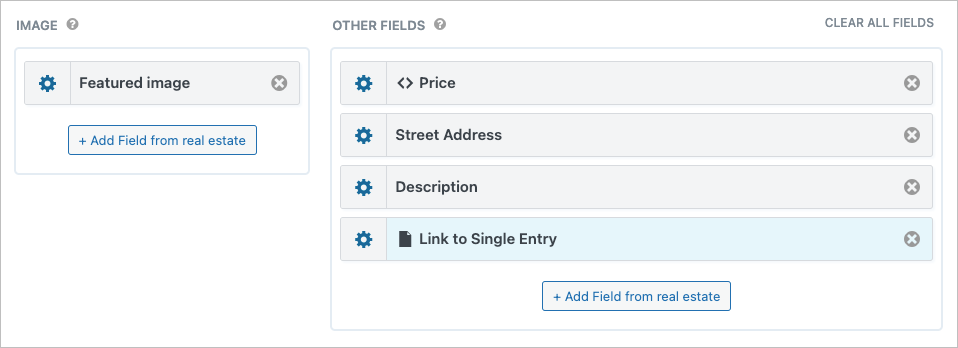
Finally, we’ll add a link to the single entry page. This will allow users to view more detailed information about the listing.
Pro tipTo bring up the field settings, click on the gear icon to the left of the field name. Here you can change the field labels, update the visibility settings and more.
Before we move on to configuring the Single Entry Layout, we need to add a search bar widget so that users can filter and search for properties on the front end.
Adding a Search Bar and Configuring the Search Settings
To add a search bar to our listing directory, we’ll click on the ‘+ Add Widget’ button in the Top Widgets area and select the Search Bar widget.
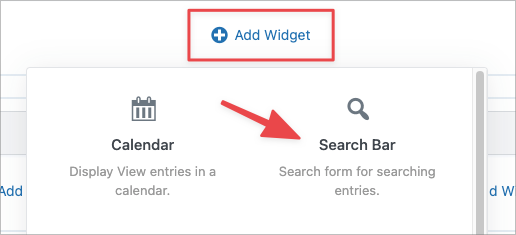
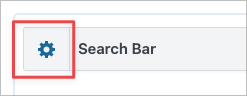
Next, we’ll click on the gear icon to open up the search settings.
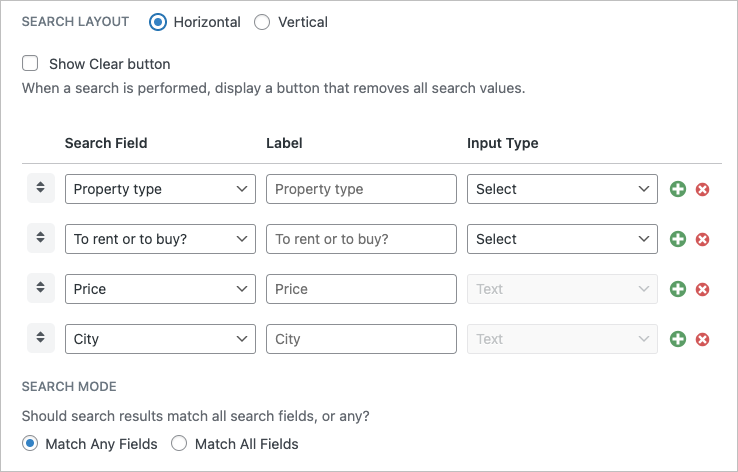
Here we can add search fields, alter the search layout and change the search mode. We’ll add four search fields, so that the user can search for properties based on the property type, whether they want to rent or buy, the price of the property, and the city where the property is located.
Here’s what our search bar looks like on the front end:

Pro tipLearn more about widgets in GravityView.
Now that we’ve configured the Multiple Entries Layout, we can start building out the Single Entry layout!
Configuring the Single Entry page
The Single Entry layout is where we can display additional information about each property.
To start adding fields to the Single Entry Layout, we’ll scroll up and click on the Single Entry Layout tab.
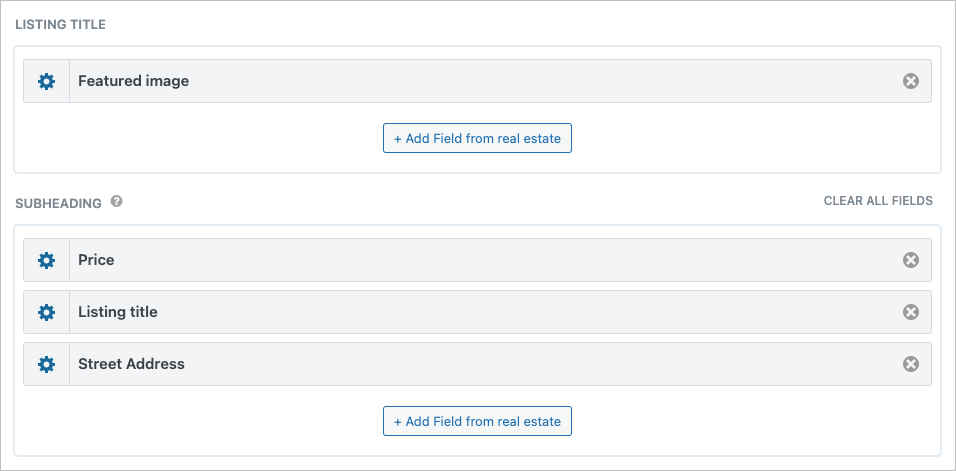
We’ll add the “Featured image” field to the Listing Title block and then we’ll add the “Price”, “Listing tile” and “Street Address” fields to the Subheading block.
Feel free to experiment by adding fields and widgets to different areas!
In the Other Fields block, we’ll add the “Description field”. This will be followed by property details, additional images and finally, a contact form allowing users to contact the property agent.
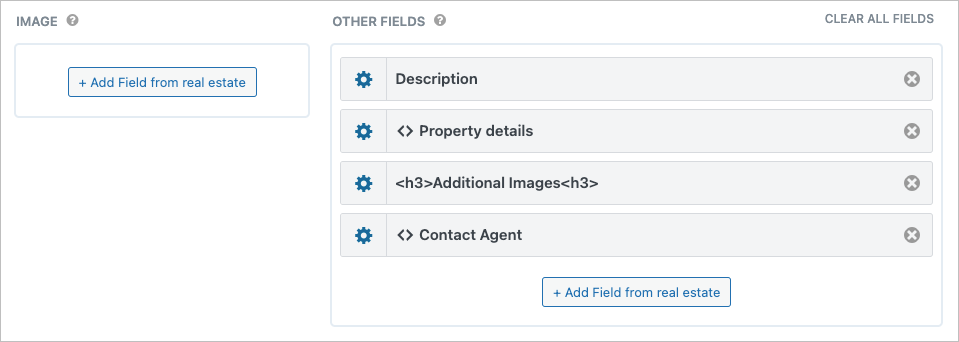
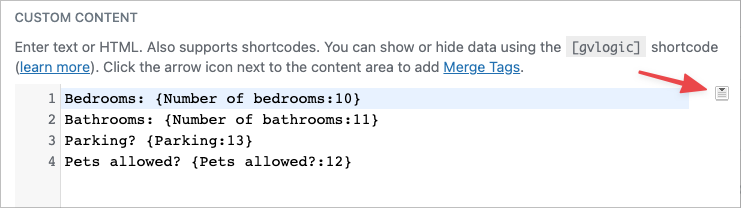
“Property details” will include important details about the property such as the number of bedrooms and bathrooms, whether it includes a parking space and whether or not the property allows pets.
We’ll add these extra details inside a Custom Content field. The Custom Content field allows you to add text, HTML and shortcodes to your View layouts. You can also add fields using Gravity Forms merge tags.
Pro tipLearn more about the Custom Content field.
To add a merge tag, click on the button to the right of the text editor.
We’ll also embed the “Contact Agent” form inside a Custom Content field using the Gravity Forms shortcode.
Adding the “Contact Agent” Form to the Single Entry Layout
The final step in building our Gravity Forms real estate website is to add a contact form to the Single Entry page.
To embed our contact form inside the Single Entry layout, we’ll add a new Custom Content field to our layout, open the text editor and paste in the following shortcode:
[gravityform id="48" field_values="agent={Listing agent:6:value}"]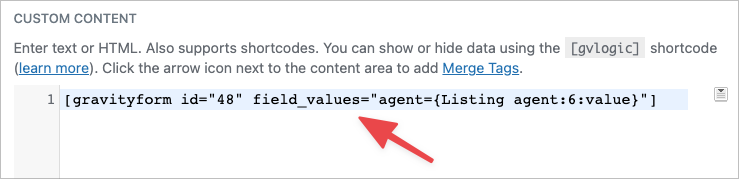
As you can see, the shortcode contains two parameters. The id parameter corresponds to the ID of our “Contact Agent” form and the field_values parameter allows us to prepopulate form fields.
field_values="agent" indicates that we’re targeting the “agent” parameter that we set in the previous step. After “message=” we’ve added the {Listing agent:6} merge tag (with the added :value modifier). This will dynamically display the email address of the agent associated with the listing.
Pro tipIf you’re planning to copy/paste the above shortcode, be sure to replace the id value and merge tag with your own!
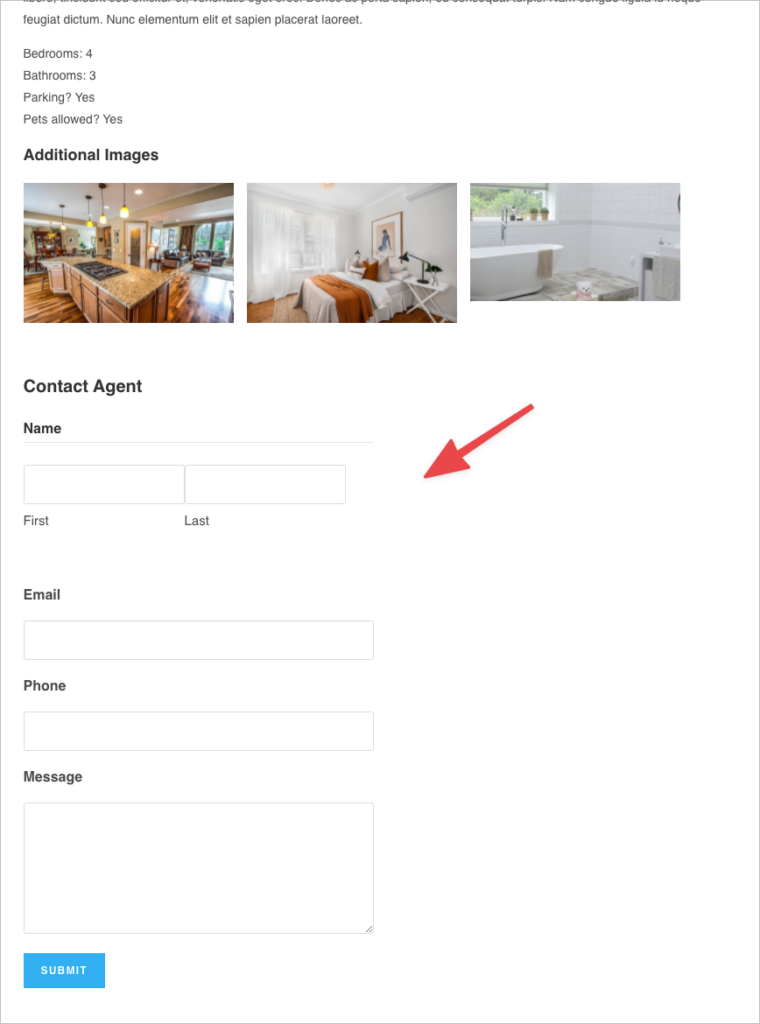
Okay, let’s see what the Single Entry page looks like on the front end.
When a user clicks on an image, it will open in a lightbox.
If a user scrolls down they’ll see a contact form labeled “Contact Agent”. By filling out this form, they will be able to send a message directly to the property agent requesting additional information!
That’s it! We’ve now got a fully functioning real estate website!
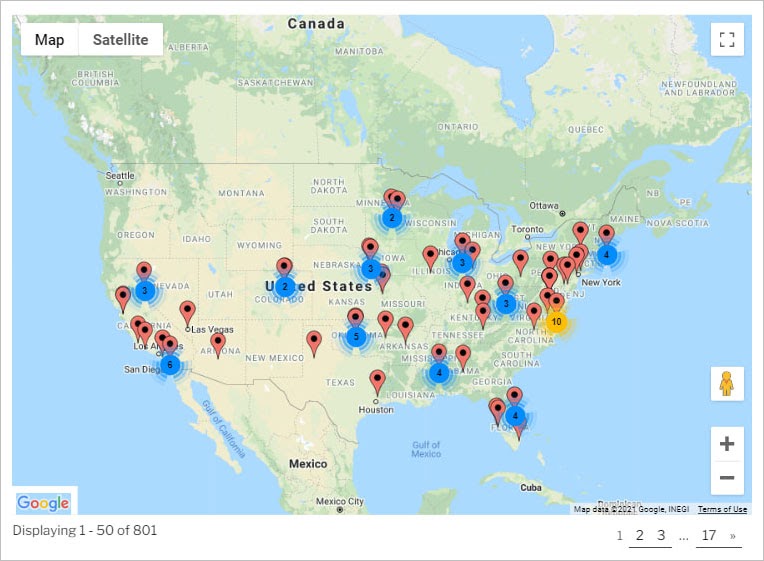
Bonus: Displaying listing locations on a Google Map
The GravityView Maps layout allows you to display listings on a Google Map. This adds a powerful, interactive element to our real estate listing directory.
The Maps layout is included in the GravityView All Access license.
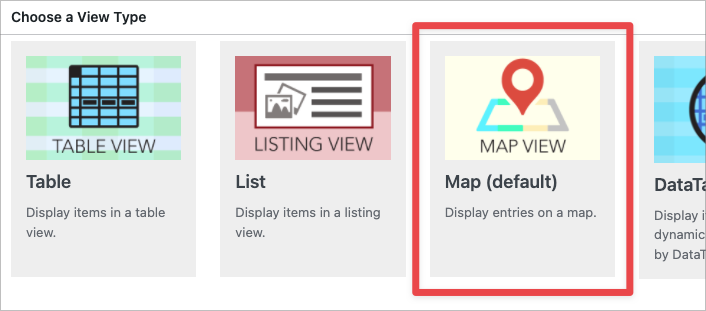
To get started with the maps layout, all we need to do is create a new View and select “Map” as the View Type.
Now we can configure the different page layouts as described above. GravityView will read the “Address” field associated with each entry and display each one as a marker on a Google Map.
Build a Gravity Forms real estate system using GravityView
Real estate websites attract thousands of visitors because they provide value for both home sellers and home buyers!
Without the right tools, building a real estate system on WordPress can be a challenge. GravityView makes it easy to build a custom real estate website without writing any code.
In this article, we walked you through the process of building a real estate website using Gravity Forms and GravityView. If you found this post helpful, subscribe to our newsletter below so we can notify you when we publish new content!

Helpful tips right in your inbox.
Subscribe to get the latest articles, information on releases and helpful Gravity Forms tips!
More articles

10 things you can ask AI to do with Gravity Forms (using the free GravityKit MCP)
See 10 practical things you can ask AI to do with Gravity Forms using the free GravityKit MCP: create forms, manage entries, build Views, and more.

Launch Log: theme template editing in Block MCP, Shield silentCAPTCHA for Zero Spam, and GravityView fixes
Block MCP adds safe theme template editing, Gravity Forms Zero Spam gains Shield silentCAPTCHA support, and GravityView fixes lightbox and notice bugs.

GravityKit turns 12: a year in review, and 30% off Lifetime All Access
GravityKit turns 12. A look back at a year of GravityView 3.0, GravitySearch, and AI-assisted building, plus a birthday sale on the Lifetime All Access Pass.
