Published
•
Updated
How to build a Hacker News clone on WordPress with no code
Build a Hacker News-style community platform on WordPress without code. Users can submit links, vote on posts, and discuss topics using Gravity Forms and GravityView.

Have you ever been fascinated by the popular tech-focused community platform Hacker News? Are you looking to create a similar website that fosters discussions, and allows community members to share insightful articles?
Look no further! In this tutorial, we’ll show you how to build your own Hacker News clone on WordPress using two powerful plugins: Gravity Forms and GravityView.
By leveraging the flexibility of Gravity Forms, the best form builder plugin, and the powerful data display capabilities of GravityView, you can create a platform where users can submit links, vote on submissions, and engage in meaningful discussions.
Let’s get started!
Check out our live demo applications and get your own free trial site preloaded with all GravityKit add-ons!
Download the free forum submission form template now!
Import the template into Gravity Forms and customize as necessary.
Sneak peek
Here’s a preview of the Hacker News clone we’re going to build in this tutorial:

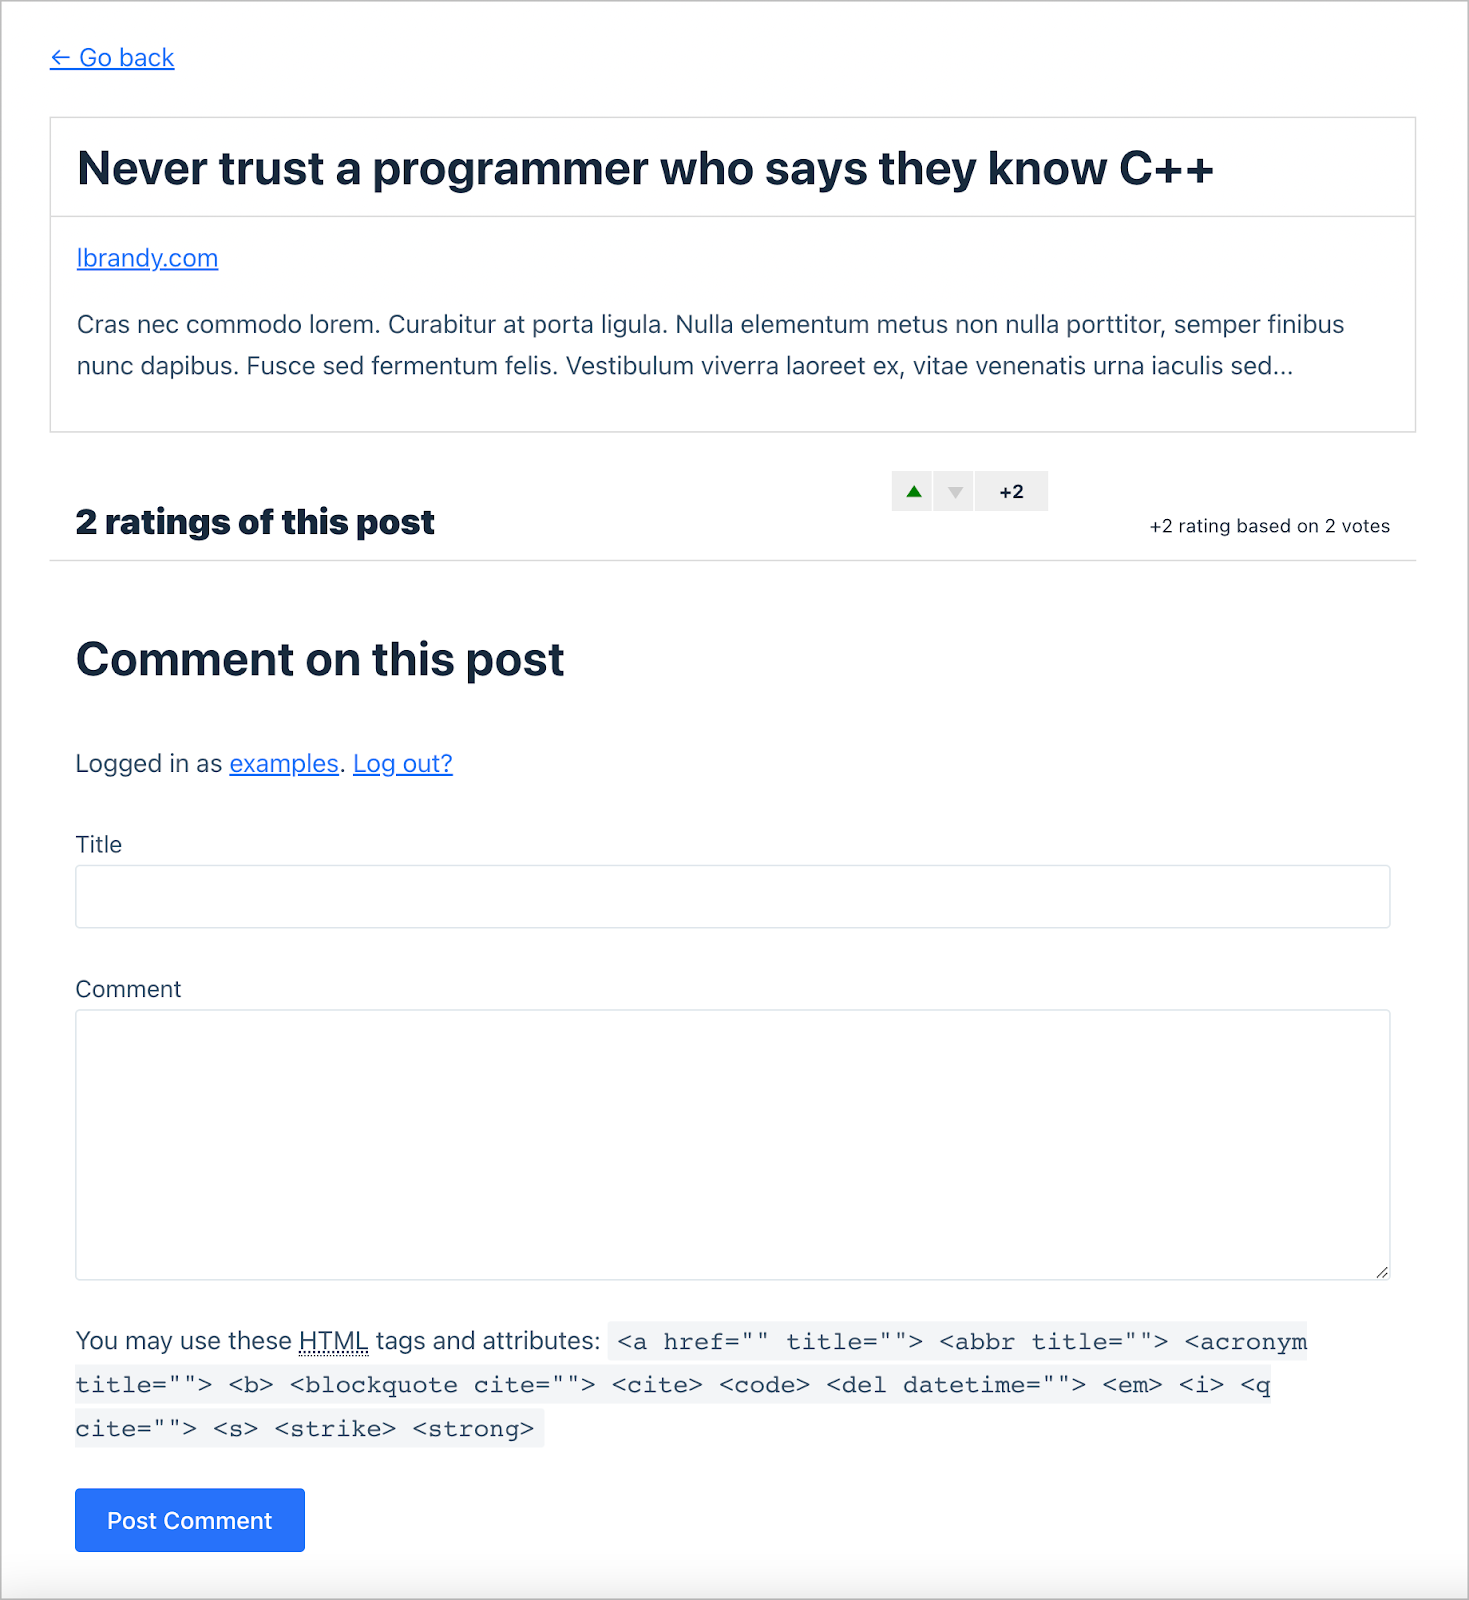
When users click on the “Discuss” link, they are taken through to a page where they can view more information about the post, add a comment, and leave a rating.
What you’ll need
Here are the plugins/extensions you’ll need to build a Hacker News clone:
- Gravity Forms
- GravityView
- Gravity Forms User Registration Add-On (optional)
- GravityView Ratings & Reviews extension
What is Hacker News?
Hacker News is a social news website and online community that focuses on computer science, entrepreneurship, technology, and related topics. It was created in 2007 by Paul Graham, the co-founder of Y Combinator.
Hacker News is known for its engaged community, where registered members can submit links to articles, blog posts, and other online resources.
The community then votes and discusses these submissions, determining their visibility on the site. The content on Hacker News often includes technology news, programming discussions, startup advice, product launches, and insightful articles from various domains.
The website has a reputation for attracting a technically-minded audience, including programmers, engineers, entrepreneurs, and investors. It provides a platform for users to share knowledge, ask questions, and engage in discussions on a wide range of topics.
Hacker News has become a go-to source for many in the tech industry to stay informed about the latest trends, news, and developments.
Why build a Hacker News clone on WordPress?
Creating a Hacker News clone on WordPress offers a multitude of advantages that make it an appealing choice for aspiring website owners and community builders!
Firstly, WordPress provides a user-friendly and familiar interface, making it accessible even for those without extensive technical expertise. With its vast plugin ecosystem, WordPress also makes it easy to customize and extend your site’s functionality.
By leveraging Gravity Forms and GravityView, you can easily create a robust submission and discussion platform tailored to your specific needs. Additionally, WordPress’s scalability ensures that your Hacker News clone can grow alongside your community, accommodating more users as necessary.
Moreover, WordPress’s inherent SEO capabilities can help your site gain visibility and attract relevant traffic. With the power of WordPress and the capabilities of Gravity Forms and GravityView, building a Hacker News clone only takes a few minutes!
Main features of Hacker News
Here are some of the main features of Hacker News that we will replicate with our clone:
- Submission of links: Users can submit links to interesting articles, blog posts, and other online resources. This feature allows the community to discover and share valuable content.
- Voting and ranking: Users can vote on submitted links, influencing their ranking on the site.
- Commenting and discussion: Hacker News fosters discussion and collaboration through its commenting system. Users can leave comments on submissions, and exchange insights with other members of the community.
- User profiles: Hacker News allows users to create profiles. Profiles typically include information such as user bio, profile photo and more.
- Job listings: Hacker News includes a section dedicated to job listings, where companies can post job opportunities specifically targeted towards the tech community. We’re not going to include this feature in our clone, as we have a separate post about building a job board using GravityView.
Now that we know the features we need, we can start building our forum website on WordPress, step by step!
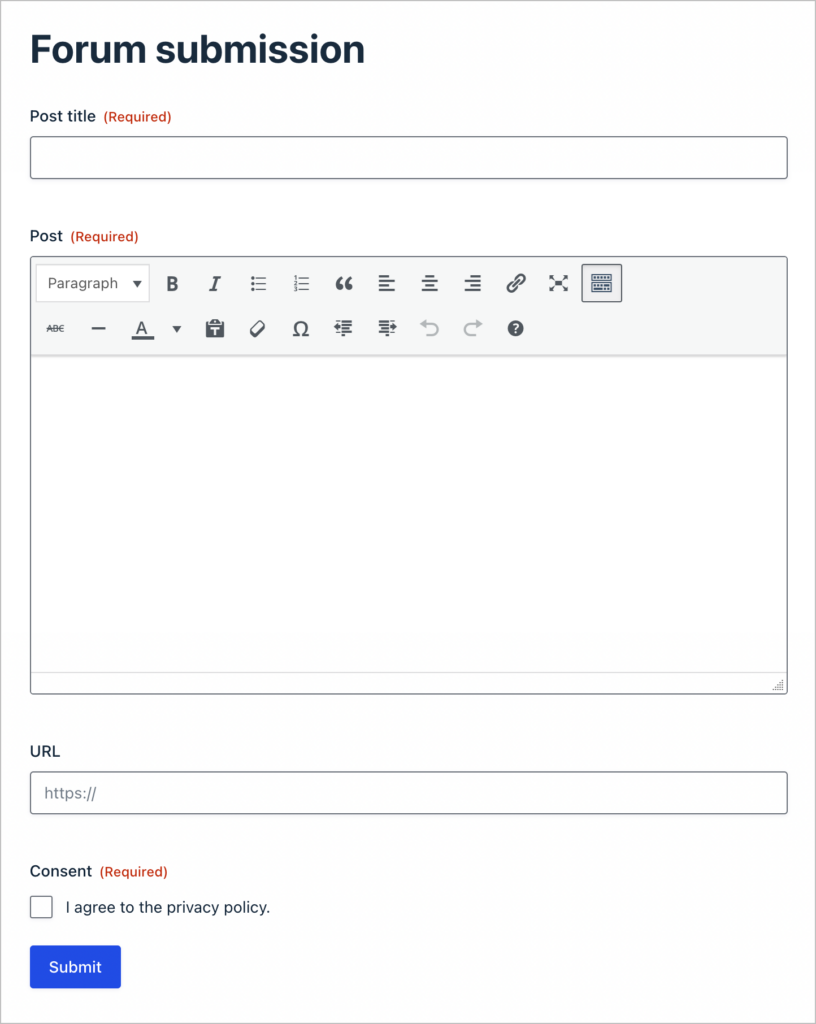
Building the post submission form
The first thing we need to do is create the post submission form to allow users to submit links. To create a new Gravity Form, we’ll hover over “Forms” and click “New Form”.
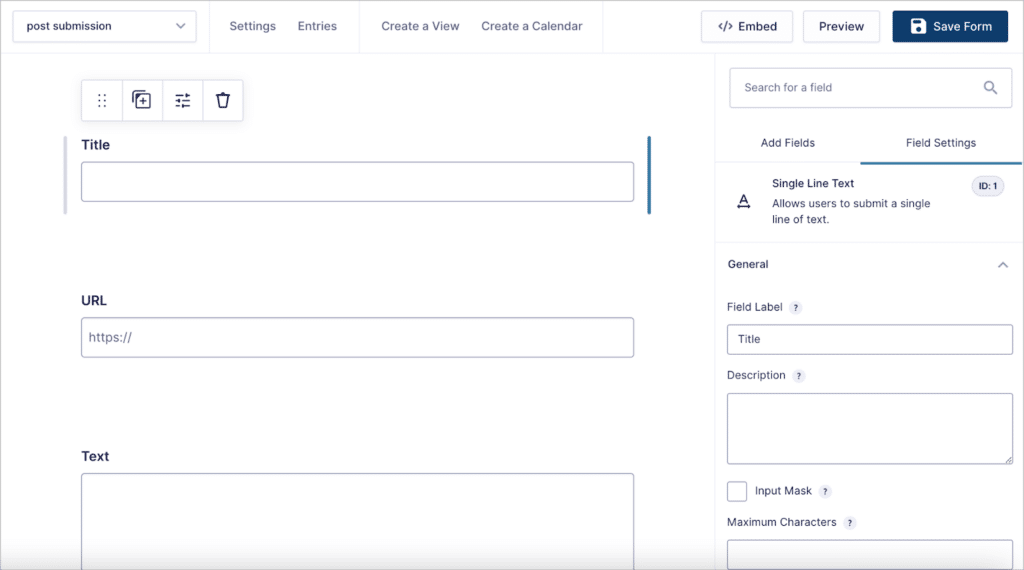
After giving our form a name, we can start adding fields to it using the drag-and-drop builder! We’ll keep things simple by adding the following three fields:
- Title (Single Line Text field)
- URL (Website field)
- Text (Paragraph field)
Save time by downloading our free forum submission form now!
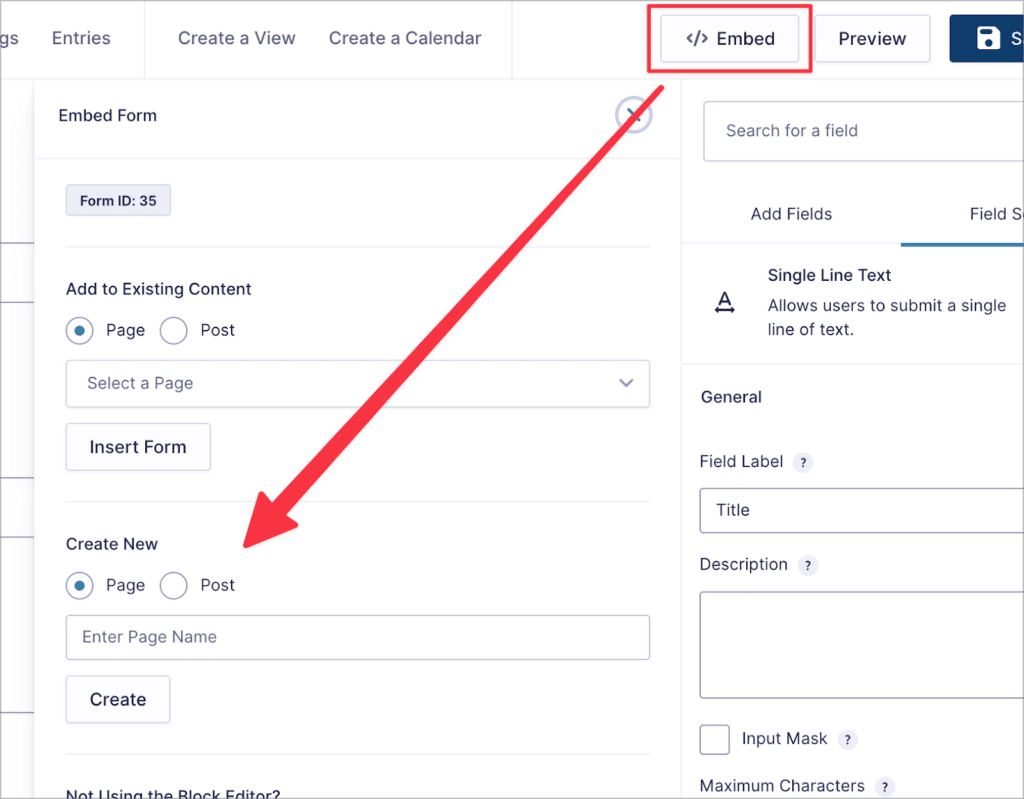
After adding fields, we’ll click “Save Form”. Now we need to embed our form on a page or post. We can do this from inside the form editor by clicking on “</> Embed” and creating a new page.
Here’s what our post submission form looks like on the front end:

Now that we have created the post submission form, it’s time to shift our focus to displaying those posts on the front end.
Creating the user registration form (optional)
You may want to limit posting new links to registered users only. You can do this by requiring users to create an account on your site before posting links or commenting on other posts.
Using Gravity Forms and the User Registration Add-On, it’s easy to build a user registration form. All you need to do is create a new form that includes an “Email” and “Password” field (along with any other fields you feel are necessary).
You can then use GravityView to display these user profiles on the front end. Here’s a full tutorial on how to accomplish this: How to create and edit user profiles in Gravity Forms using GravityView.
Creating the post feed using GravityView
First, make sure you have installed and activated the GravityView Ratings & Reviews extension. You can do this by hovering over “GravityKit” and clicking “Manage Your Kit”. The extension is available in the GravityView + Extensions license and the All Access Pass.
After installing the extension, we’ll create a new View by hovering over “GravityKit” and clicking “New View”. Now we can start configuring the View using GravityView’s drag and drop builder.
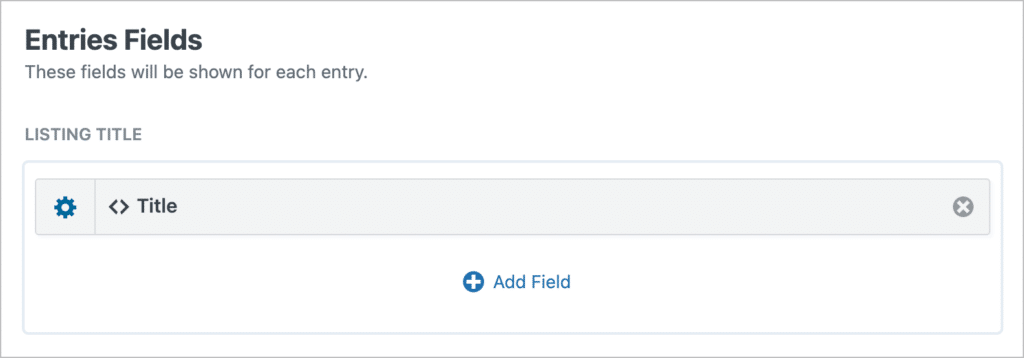
The first thing we’ll do is add the post “Title” field to the “Listing Title” section. We want the title of the post to link through to the URL submitted by the user (just like on Hacker News), so we’ll add the title inside a Custom Content Field.
The Custom Content field allows us to add HTML, shortcodes, merge tags and other content to our View. We’ll go ahead and add the title field merge tag, and then wrap it in an HTML anchor tag that points to the submitted URL. Here’s how that looks:
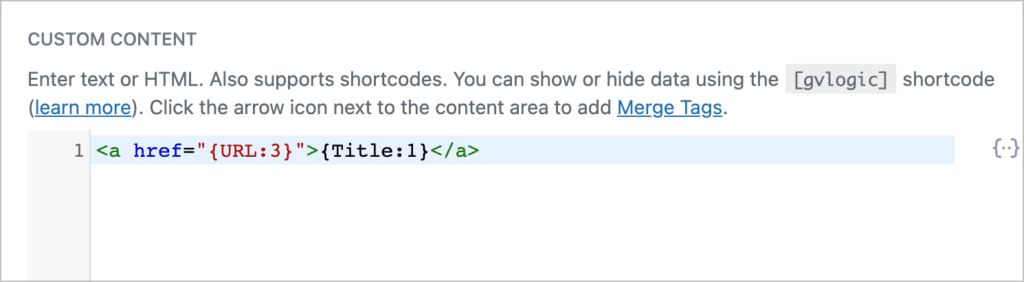
This will make the post title a link that takes users through to the submitted URL!
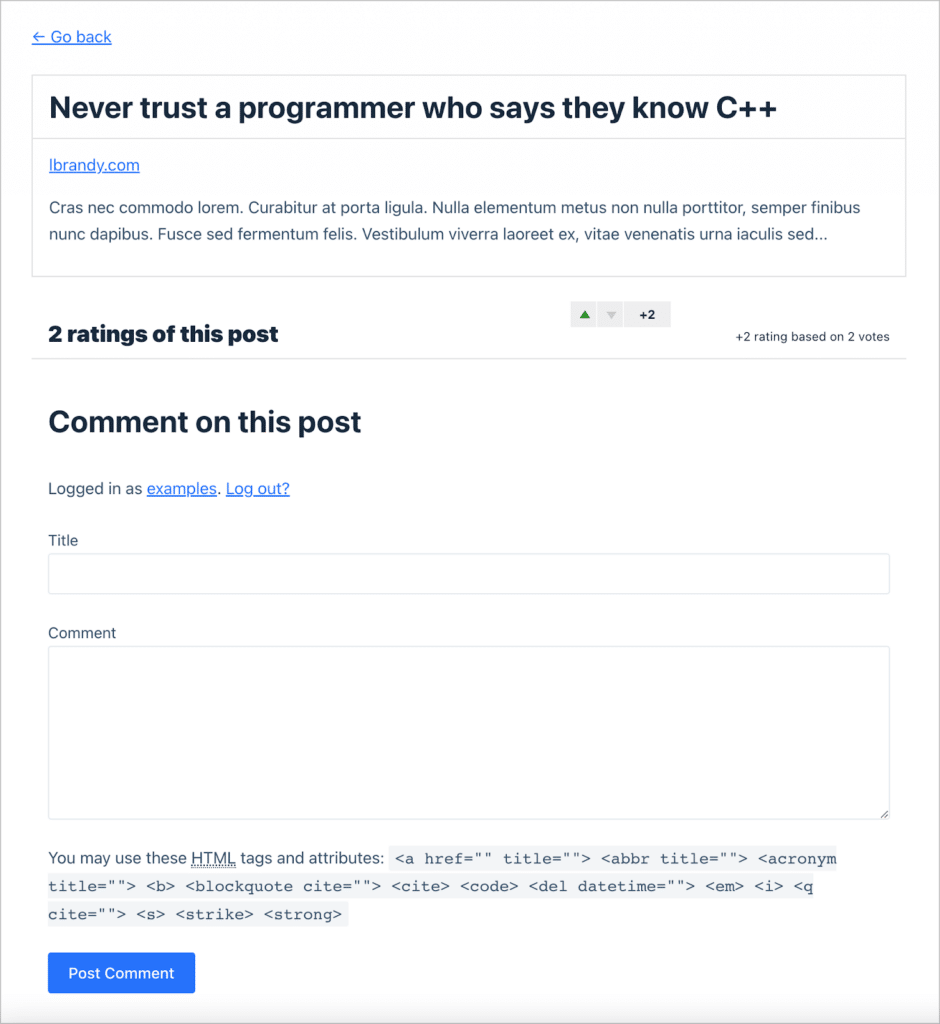
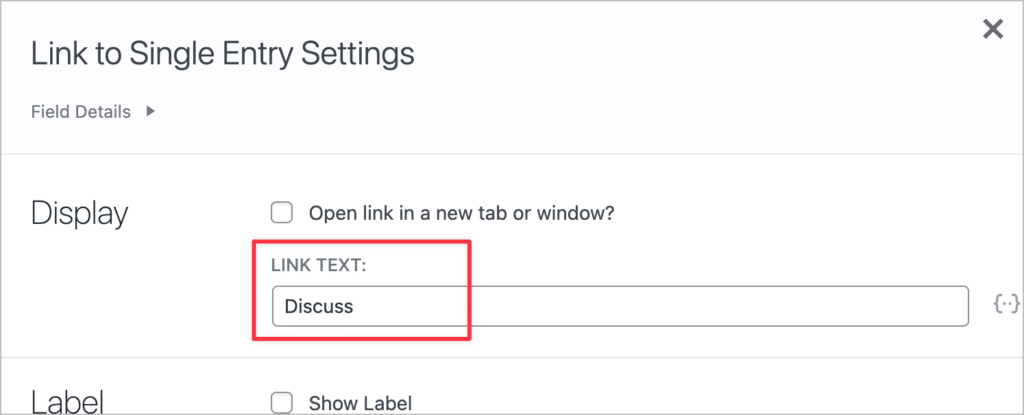
Next, we’ll add a link to the Single Entry page, where users will be able to read the text associated with a post, leave comments and add to the discussion. We can add a link to the single entry by clicking “Add Field” and searching for the “Link to Single Entry” field.
After adding the field to our View, we’ll click on the gear icon to open the field settings and update the link text.
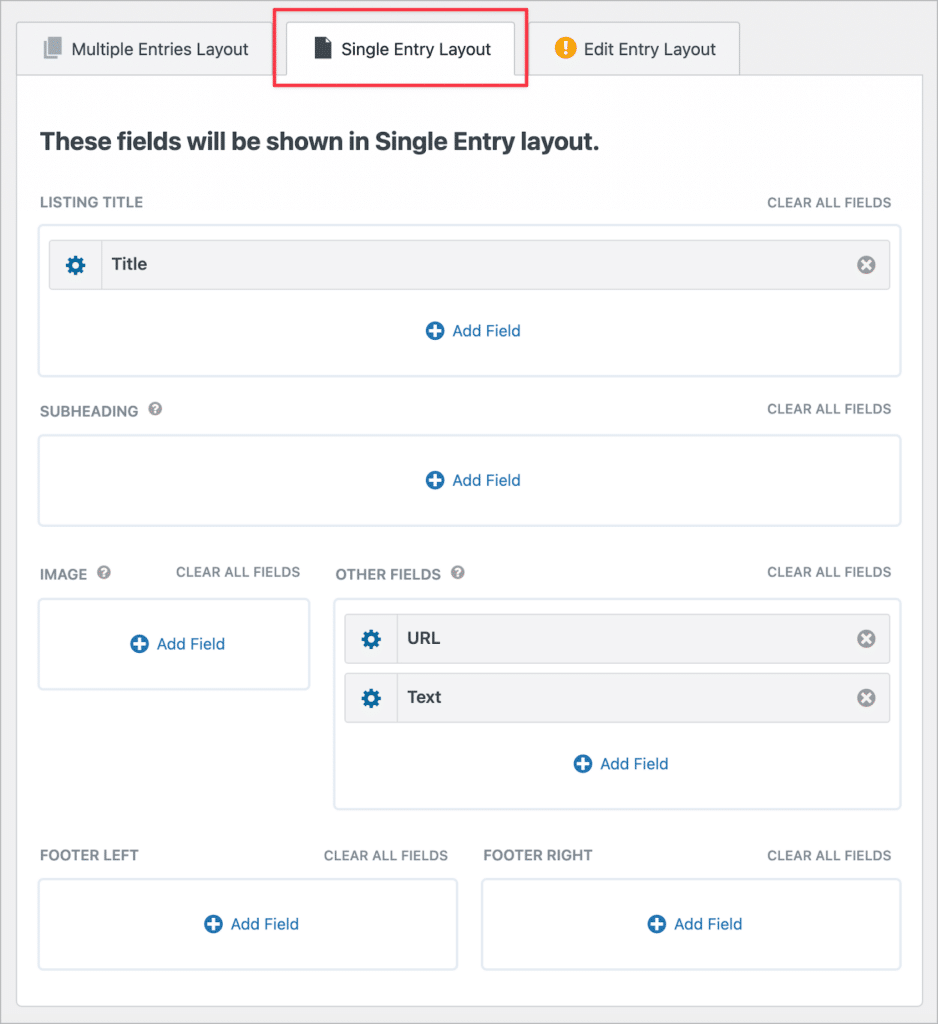
Now let’s add fields to the Single Entry page.
Configuring the Single Entry layout
To configure the layout, we’ll click on the “Single Entry Layout” tab at the top of the View editor. Here we’ll add the “Title”, “URL” and “Text” fields.
That’s it! All that’s left to do is ensure that users have a way to rate and comment on existing posts.
Adding the ability for users to comment on and rate posts
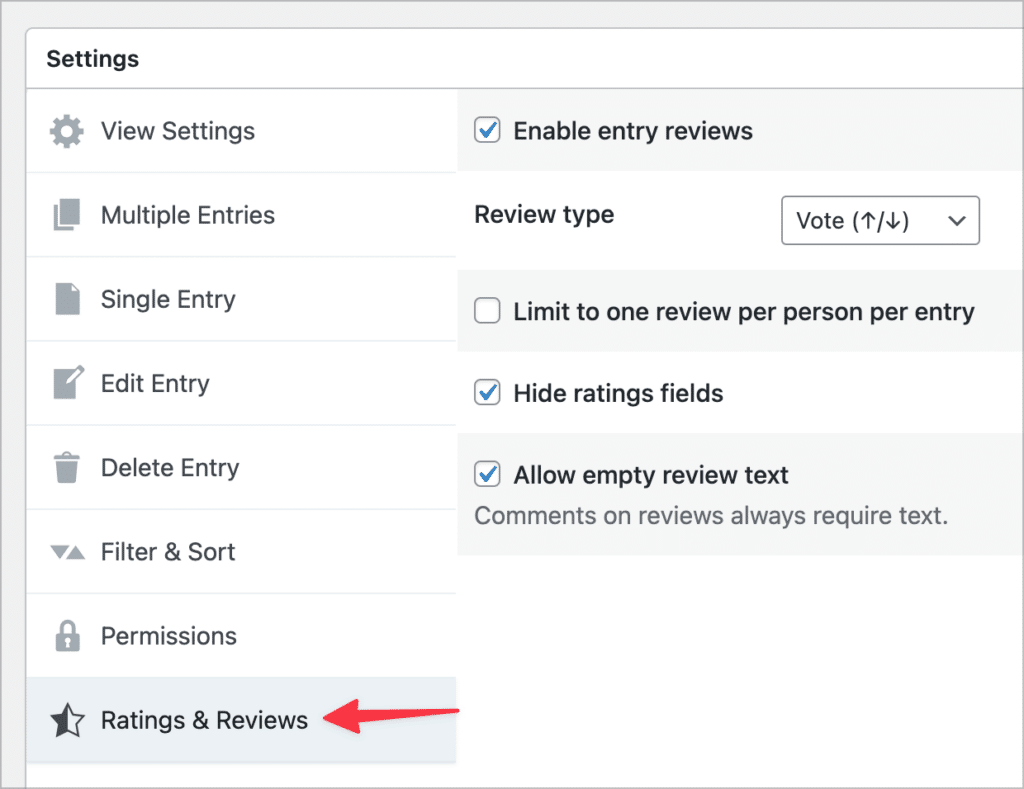
The GravityView Ratings & Reviews extension allows users to leave “reviews” on entries and rate entries using either a star ratings or up/down votes. Reviews work the same as regular WordPress comments, so this is perfect for our use case.
We’re also going to use the up/down voting system, allowing users to easily rate posts. To set this up, we’ll scroll down to the View Settings, click on the “Ratings & Reviews” tab and then check the box labeled “Enable entry reviews”.
Next, we’ll set the review type to “Vote” and configure the remaining options. For example, if you want users to be able to rate posts without leaving a comment, check the box that says “Allow empty review text”.
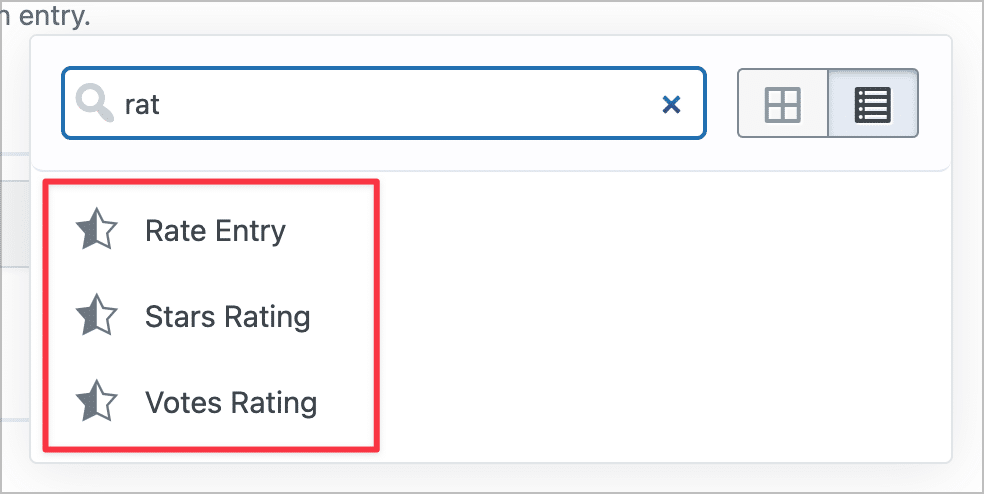
Now we can add ratings field to our View that allow users to rate posts and view post ratings.
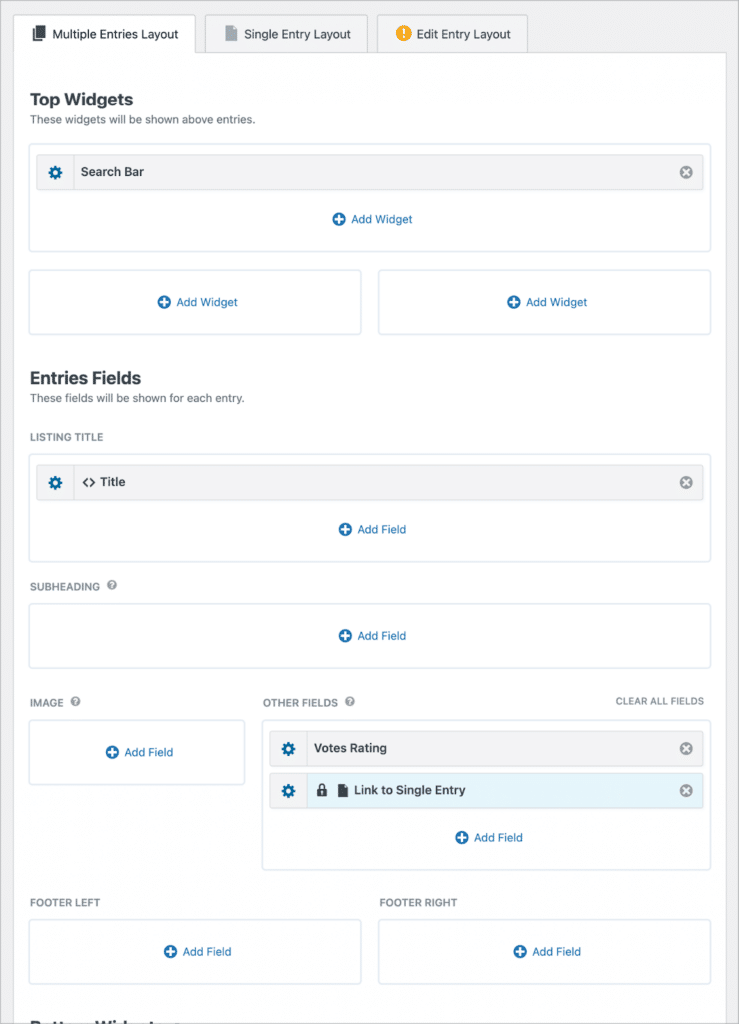
Here’s what our Multiple Entries Layout looks like after adding all the required fields.
We’re almost done! All that’s left to do is add a search bar, allowing users to filter posts by submission date.
Adding a search bar
To add a search bar to our View, we’ll click the “Add Widget” button and select the Search Bar widget.
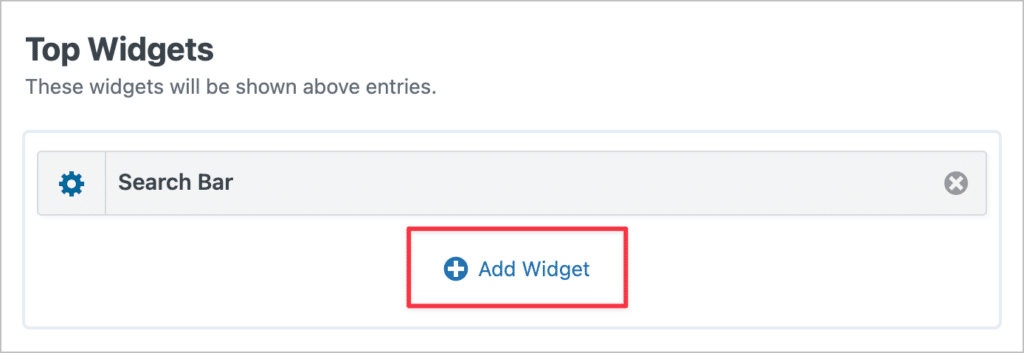
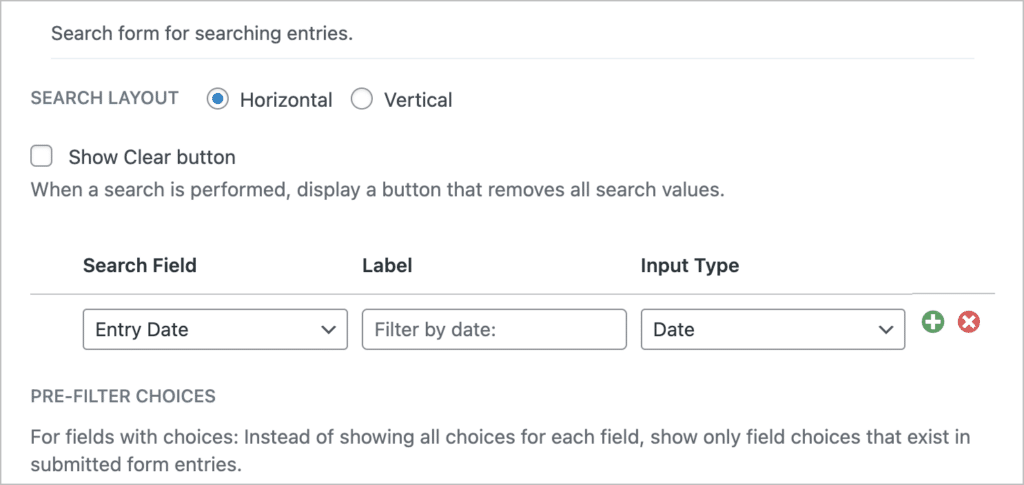
Next, we’ll click on the gear icon to configure the search settings. Here we can modify the search inputs, change the search bar layout, and more. To keep things simple, we’ll just add one search input for the entry date.
That’s it! Now let’s preview our View on the front end:
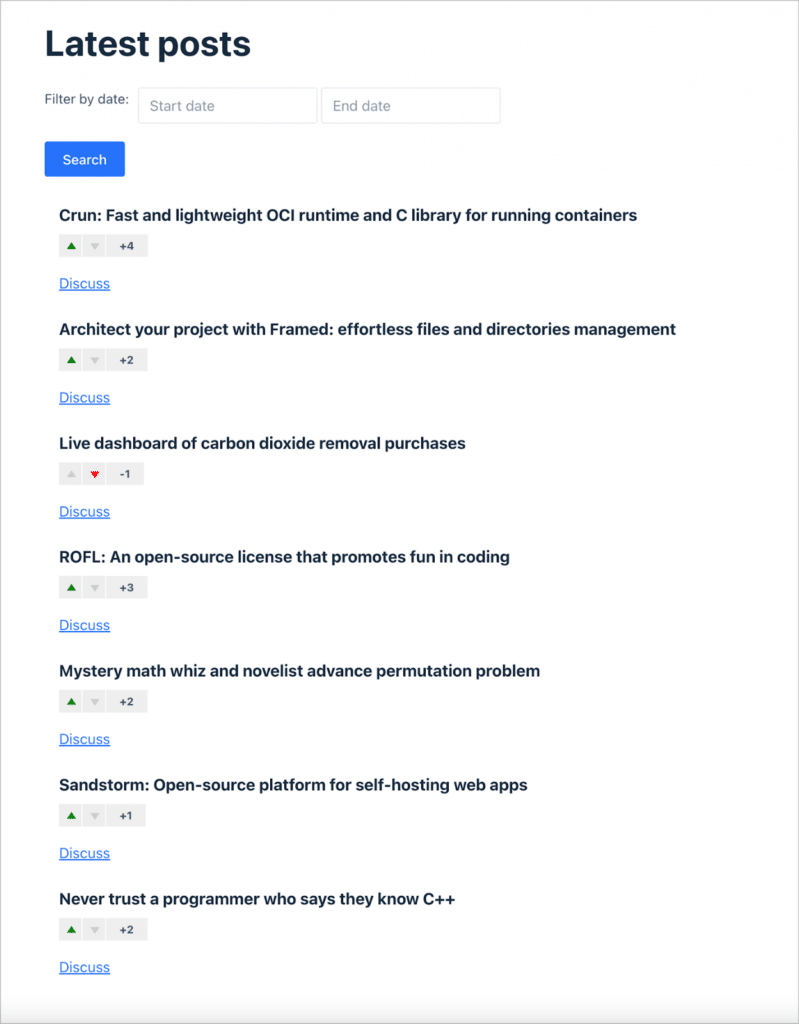
When a user clicks on the “Discuss” link, they are taken to the Single Entry page where they can view more information about the post, add a comment and engage in discussion.
As you can see, using Gravity Forms and GravityView you can easily create a simple forum on WordPress, allowing users to share links, rate posts and leave comments!
Create your own Hacker News clone today
WordPress provides the perfect foundation for building scalable, no-code web apps. And with Gravity Forms and GravityView, you have the power to create an engaging Hacker News clone in minutes!
For more guides on cloning popular sites or to explore other possibilities with GravityView, visit our blog. If you’re ready to start building, get GravityView and take your WordPress site to new heights!

Helpful tips right in your inbox.
Subscribe to get the latest articles, information on releases and helpful Gravity Forms tips!
More articles

Launch Log: theme template editing in Block MCP, Shield silentCAPTCHA for Zero Spam, and GravityView fixes
Block MCP adds safe theme template editing, Gravity Forms Zero Spam gains Shield silentCAPTCHA support, and GravityView fixes lightbox and notice bugs.

GravityKit turns 12: a year in review, and 30% off Lifetime All Access
GravityKit turns 12. A look back at a year of GravityView 3.0, GravitySearch, and AI-assisted building, plus a birthday sale on the Lifetime All Access Pass.

Launch Log: Row headers for screen readers, smarter conditional logic, and multi-View fixes
GravityView 3.1 adds row headers for screen readers, plus smarter conditional logic in GravityCalendar and fixes for DataTables, Maps, and Dynamic Lookup.
