Published
•
Updated
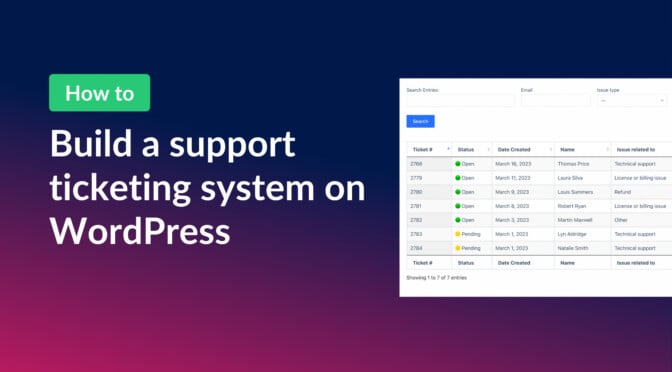
How to build a support ticket system on WordPress without code
Build a support ticketing system on WordPress with no code. Uses Gravity Forms for submissions and GravityView for a customizable front-end management interface with status tracking.
In this tutorial, I’m going to show you how to build a support ticketing system that can be used by a small business to track, manage and answer support requests. No code required!
As usual, my tools of choice are Gravity Forms and GravityView! Using Gravity Forms, users can easily submit support requests, while GravityView enables us to manage those requests using a customizable front-end interface.
Before we begin, a disclaimer is in order: A support ticketing system includes a lot of specialized features. That means this tutorial is longer and more complex than normal. But if you stay until the end, I promise it will be worth your while!
Sneak peek
Here’s a sneak peek at our finished support ticketing system. This is the main support dashboard where tickets come in, sorted by date.
When support staff click “View ticket”, they will be taken to a page where they can see all the details of the ticket, and send replies.
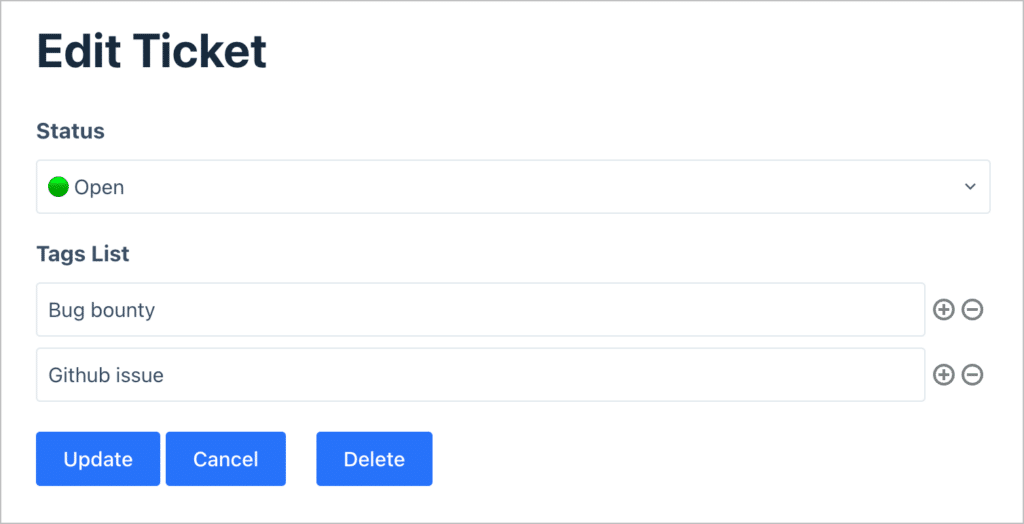
Finally, support staff can update a ticket’s status and add tags to it from the front end.

Are you ready to see how we built it? Keep reading to find out!
Wanna try it?
Spin up a demo
See what you can build with GravityView — explore the live demo.

What you’ll need
Here are the plugins and extensions you’ll need to build a Gravity Forms ticket system like the one in our example:
What is a support ticketing system?
A support ticketing system is a tool used by companies to process and catalog customer support requests. Tickets, also sometimes called cases or issues, need to be properly stored alongside relevant user information. Ticketing systems are user-friendly interfaces that enable support staff to manage and reply to new cases!
Ticketing systems sometimes serve other functions too, like allowing companies to spot bugs in new releases, take feature requests, and answer pre-sales questions. Most companies that sell products or services use ticketing systems to interact with customers who have questions or require support.
How does a support ticketing system work?
A support ticketing system provides support technicians with a centralized dashboard for managing customer requests. When a customer writes in asking for support, their email is sent to the ticketing system where support staff can tag it, categorize it, assign it to other users and reply to the request.
Why build a support ticketing system on WordPress?
While there are several well-known ticketing solutions and WordPress ticket plugins available, not all of them are suitable for every business. On the other hand, building your own ticketing system on WordPress gives you the ability to customize it to match your business needs.
Ability to customize
WordPress is an open-source platform with thousands of free plugins and themes. Creating a ticketing system on WordPress gives you the ability to customize things as you see fit. You won’t get this kind of flexibility with an existing SaaS platform!
Moreover, anything you build on WordPress, is yours. You have full control over the system and the data you collect. With a SaaS solution, you are dependent on them to safeguard your data.
More affordable
Most ticketing solutions charge a recurring fee to use their platform. While this is okay for large companies, many small businesses cannot afford to pay for these kinds of tools. WordPress is a free platform with free and affordable plugins, allowing you to save on costs.
Good for small businesses
Many small businesses have no use for an enterprise platform with all kinds of fancy bells and whistles. Instead, they require something simple and easy to use that’s going to enable them to solve support requests quickly and efficiently; this is where WordPress shines.
Process for building a ticketing system using Gravity Forms and GravityView
GravityView takes the power and versatility of Gravity Forms and adds advanced capabilities, like displaying, filtering and exporting the data. This allows you to build dynamic web apps and business systems on WordPress. All without code!
Let’s go over the process for building a functioning ticketing system using Gravity Forms and GravityView. First, a heads up—this is going to be one of our longer and more complex tutorials to date. Having said that, this is a really powerful use-case, and once you are able to connect all the necessary pieces, you’ll see how powerful GravityView really is!
Instead of the usual form and View set up, we’re going to need two forms and two Views for the support dashboard and another View for the user dashboard (so two forms and three Views in total!). The first form will be for support requests, while the second form will be for replies and follow-up requests.
The support dashboard will require two Views: the first View we’ll build will be for displaying support tickets, while the second View will display the replies and follow-ups to a specific ticket.
- Form #1: support requests (tickets)
- Form #2: replies to support tickets
- View #1: all support tickets
- View #2: replies to support tickets
Once we’ve got our forms and Views set up, we’ll put everything together into a cohesive ticketing system that’s powerful and easy to use.
We’ll also need to make sure that our system includes all the traditional features of a support ticketing platform. After checking out some existing ticketing solutions, it’s clear that our ticketing system will need to have the following features:
- Send email notifications when a new ticket is created
- The ability to update the status of a ticket
- A way for support staff and customers to reply and follow up on requests
- A customer dashboard where users can see their active tickets
- The ability to close tickets, which should also remove the ability to reply
- The ability to tag, search and filter tickets
- The ability to add internal notes to a ticket, only viewable by support staff
- The ability to assign tickets to a specific user
Okay, take a sip of coffee and let’s get started! ☕
Creating the support form
The first step is to create the support form. This is the form that customers will use to submit support requests.
To create a new form, hover over “Forms”, click “New Form”, and select the blank form template. Now you can start adding fields to your form using the Gravity Forms drag-and-drop editor.
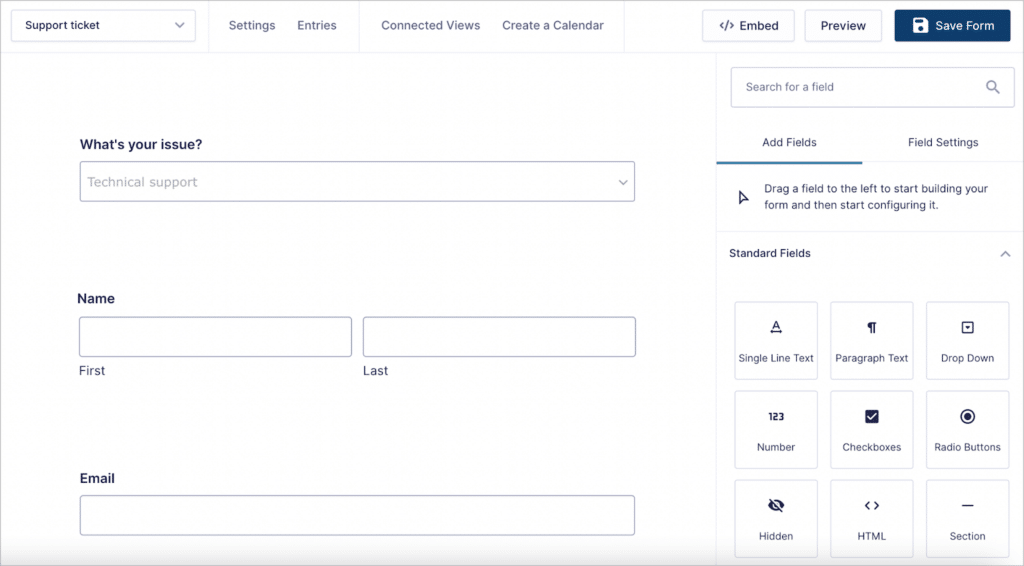
For this example, we’ll add the following fields to our form:
- What’s your issue? (“Drop Down” field)
- Name (“Name” field)
- Email (“Email” field)
- How can we help? (“Paragraph text” field)
- Status (“Drop Down” field)
- Tags (“Entry Tags” field)
The last field, “Tags” is not a native Gravity Forms field. Its added by our free plugin Gravity Forms Entry Tags.
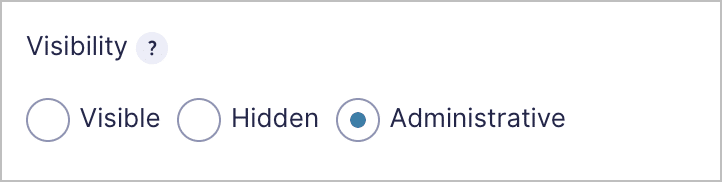
Both the “Status” and “Tags” fields—should not be visible to the user! These should only be visible to support staff who will have the ability to update the status of a ticket or add tags to a ticket.
The way we’ll accomplish this is by changing the field visibility settings. We can do that by clicking on the field to open the field settings, and clicking on the “Advanced tab”. Then we’ll change the visibility from “Visible” to “Administrative”. This will prevent the field from showing up in our form.
Although those fields won’t be visible in our support form, they will be visible to support staff when we create the View. This will allow them to update a ticket’s status and add tags to a ticket when required.
Before we publish our form, there’s one more thing we need to do. When a new ticket arrives, we want the status to be set to “Open” by default. To set this up, we’ll select “Open” as the default value in the “Status” Drop Down field by clicking on the check mark next to the field label.
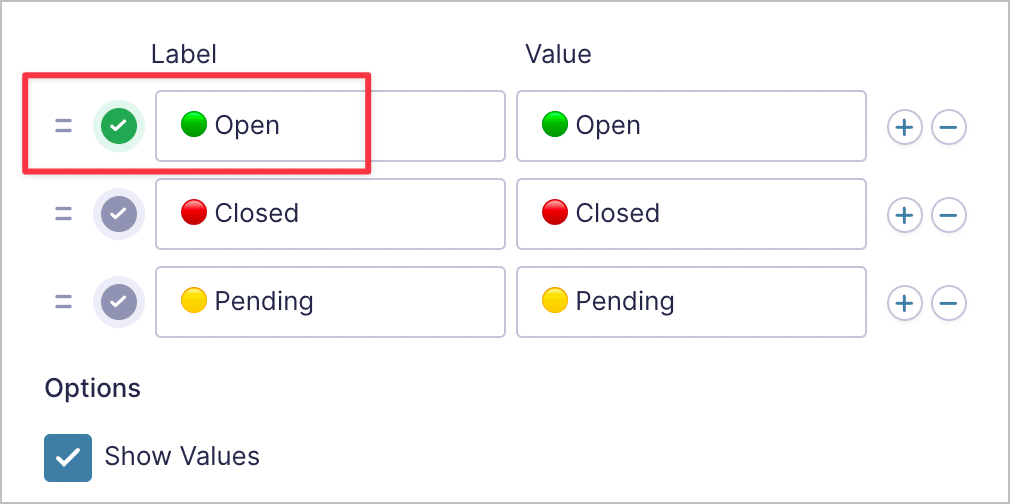
Pro tipWondering how I added those green, yellow, and red dots? I did so using emojis (here they are: ???? ???? ????).
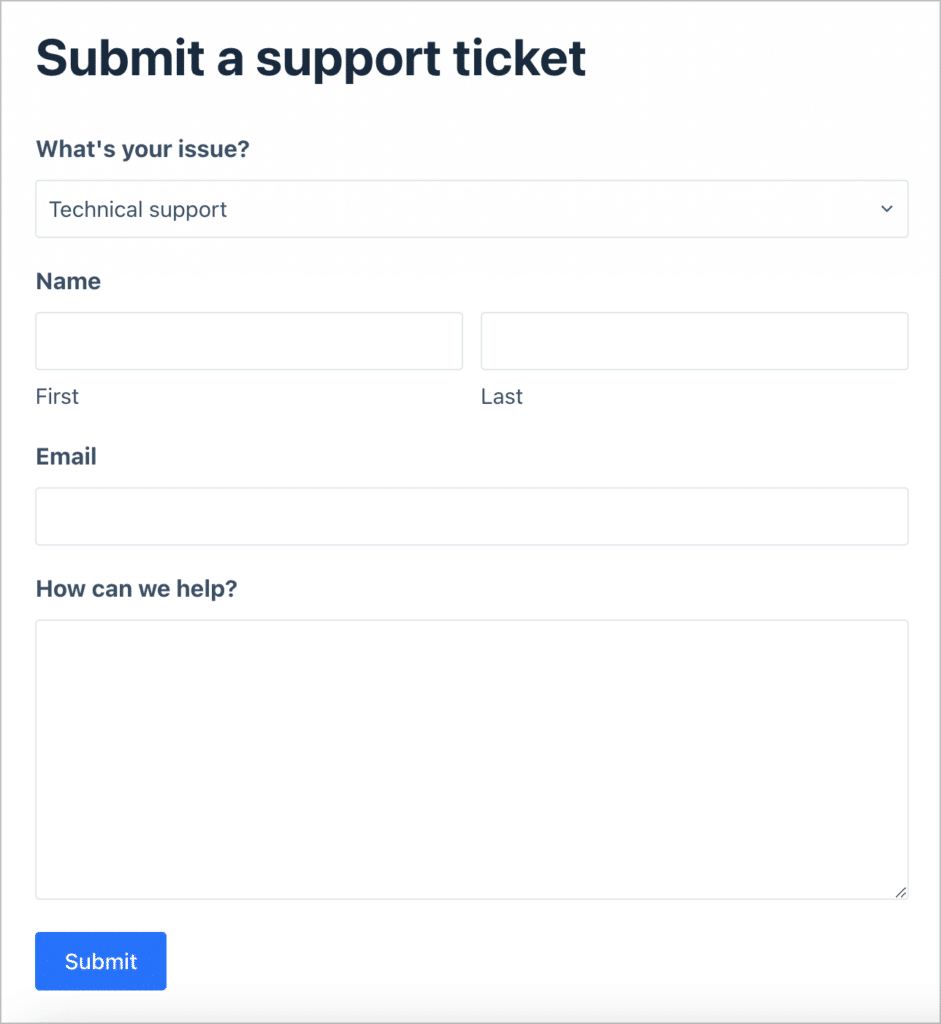
Okay, that’s it. Here’s what our support form looks like on the front end.
Later, we will configure an email notification so that support staff are notified when there’s a new ticket. However, we can only do this once we’ve created the View. First, we need to build our second form.
Creating the follow-up reply form
Now that our main support request form has been created, we need to create another form allowing support staff to reply to tickets and customers to follow-up. This form will have the following 4 fields:
- Follow-up reply (“Paragraph Text” field)
- Attach file (“File Upload” field)
- Ticket ID (hidden “Single Line Text” field)
- User (hidden “Single Line Text” field)
- Customer email (hidden “Email” field)
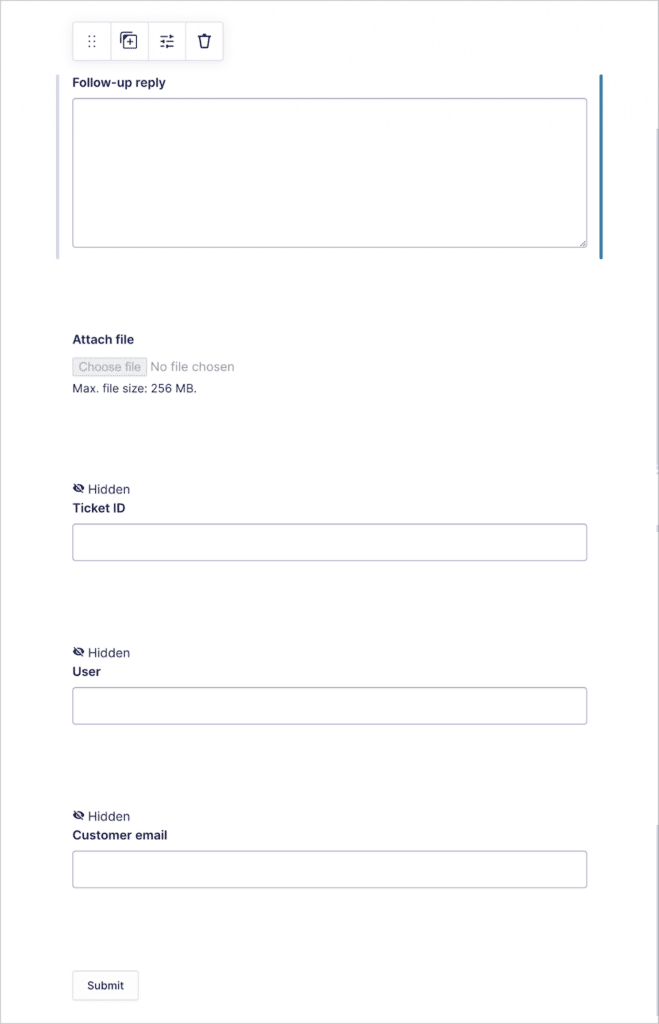
The first two fields will be visible to both customers and support staff and will allow them to exchange messages back and forth until the ticket has been solved. The final three fields will be used to associate replies to a specific ticket (seeing as tickets are created through a separate form!).
We’ll need to use dynamic population to fill these fields with important information (i.e., the ticket ID and the name of the user). The reason for this will become clear later on, so if you’re feeling confused, don’t worry!
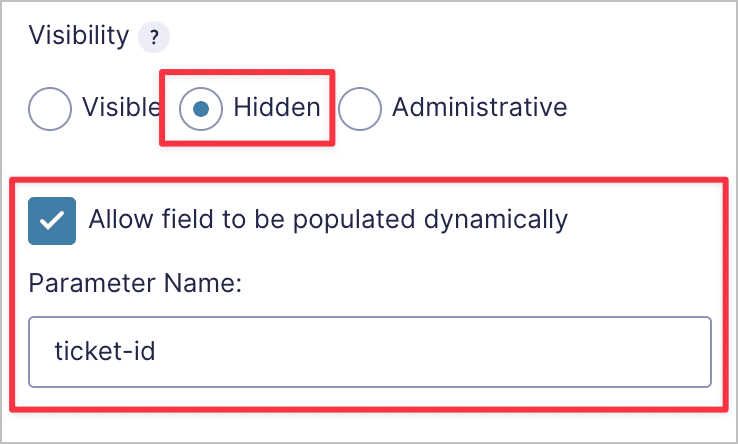
Let’s start with the “Ticket ID” field. Click on the field to open the field settings on the right. Open the “Advanced” tab, set the “Visibility” to “Hidden”, check “Allow field to be populated dynamically” and enter a parameter name (e.g., ticket-id).
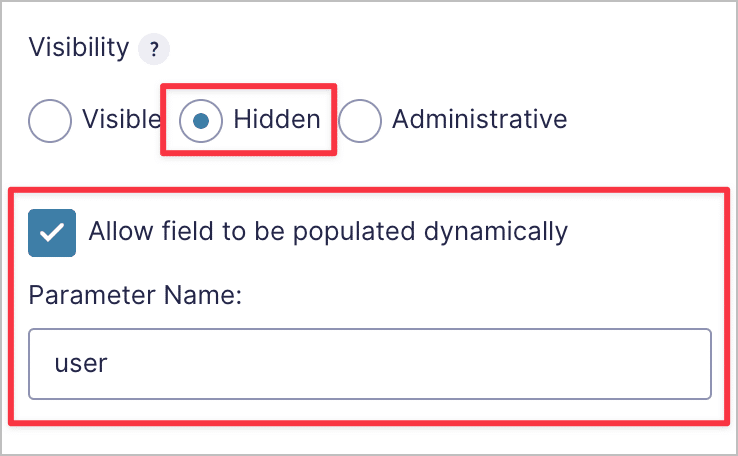
You’ll need to do the same for the “User” field, just be sure to use a different parameter name.
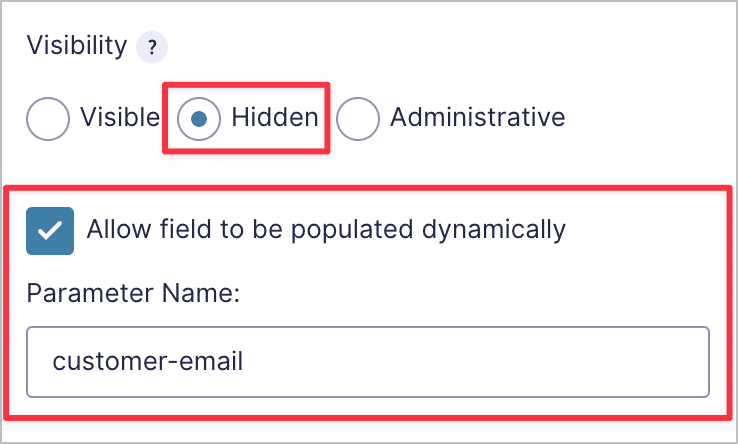
And finally, do the same for the “Customer email” field.
Great! The “Ticket ID” field will allow us to associate replies with a specific ticket, and the “User” field will allow us to display the name of the user above each reply. Finally, the “Customer email” field will allow us to capture the customer’s email, so we can send them notifications when their ticket is updated.
We’re going to populate these fields dynamically using the parameter names—you’ll see how this is done in the next step.
Creating the support ticket dashboard View
The first View we need to create is the main View for displaying support tickets on the front end. We’ll need a separate View for showing replies, but we’ll create that in the next step. This is the dashboard visible to our support team, the customer will have a different View!
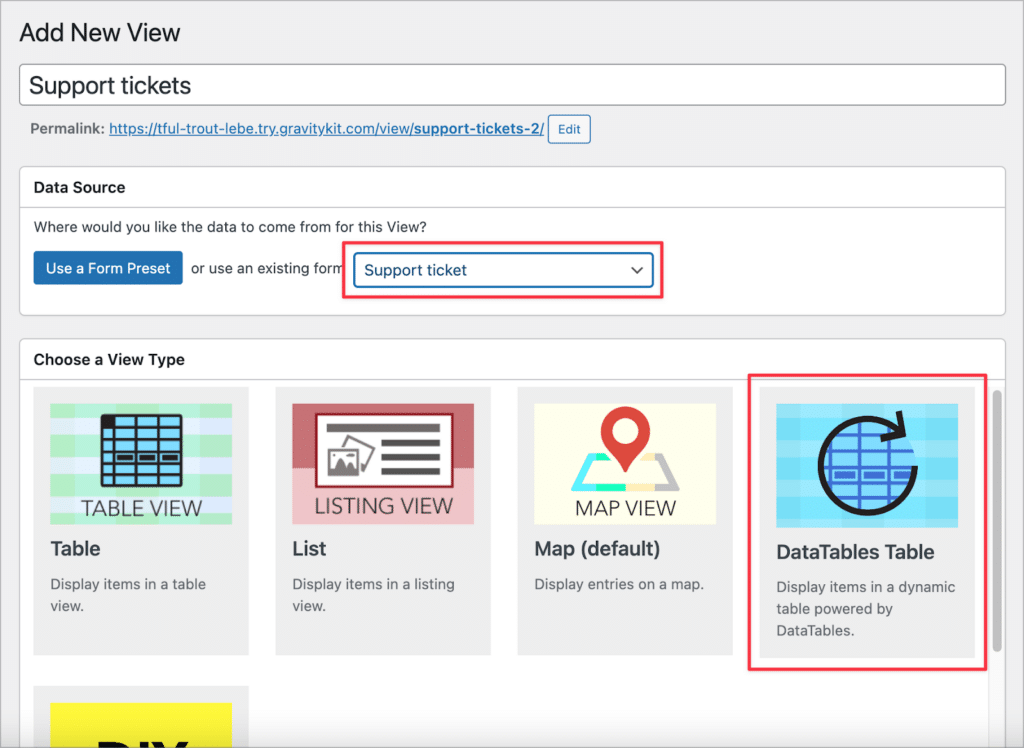
To create a new View, hover over “GravityKit” and click “New View”. Now give your View a name (“Support tickets”) and select your support request form as the data source.
For the View Type, we’re going to select the “DataTables Table” layout.
After selecting a View Type, you can start constructing your View using GravityView’s drag and drop builder. Start by adding fields to the Multiple Entries Layout—this will be the main dashboard page, where support staff will see a snapshot of all the new tickets.
For this example, well add the “Entry ID”, “Status”, “Date Created”, “Name”, and “What’s your issue?” fields. We’ll also add a link to the Single Entry page, titled “View ticket”. This will allow support staff to View a specific ticket in more detail.
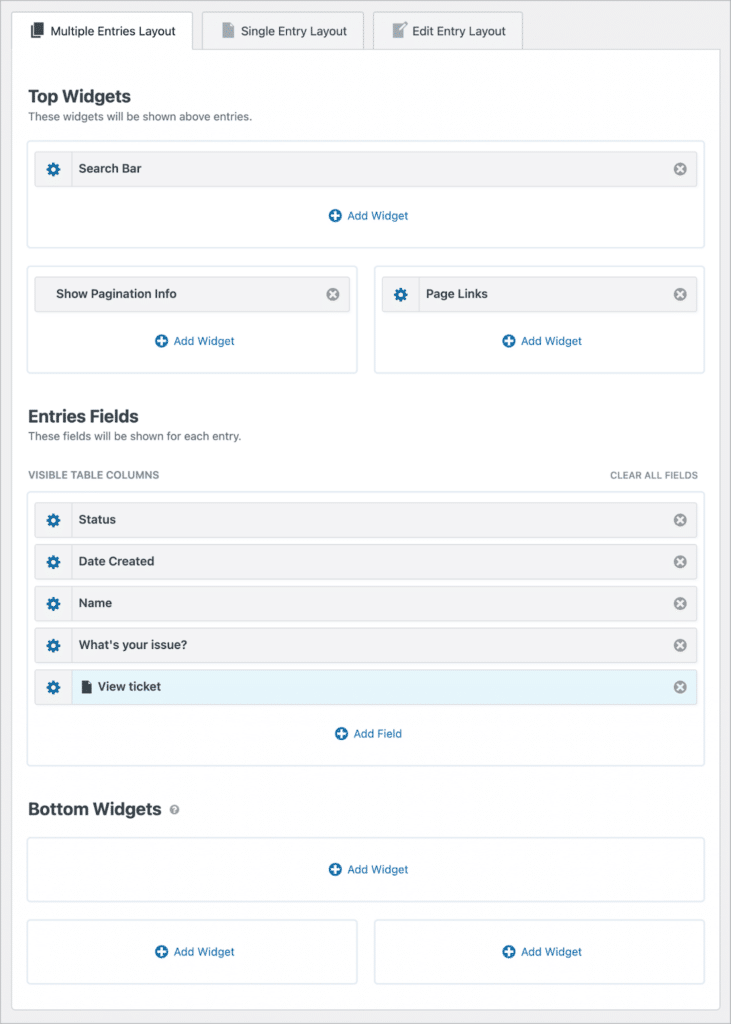
The View also has a Search Bar widget at the top, which is added automatically upon creation. Let’s configure this next.
Configuring the Search Bar widget
The Search Bar widget allows users to search for entries in a View based on fields in the entry. We’ll go ahead and add four search inputs, allowing support staff to search for tickets based on keywords, emails address, issue type and the date it was submitted.
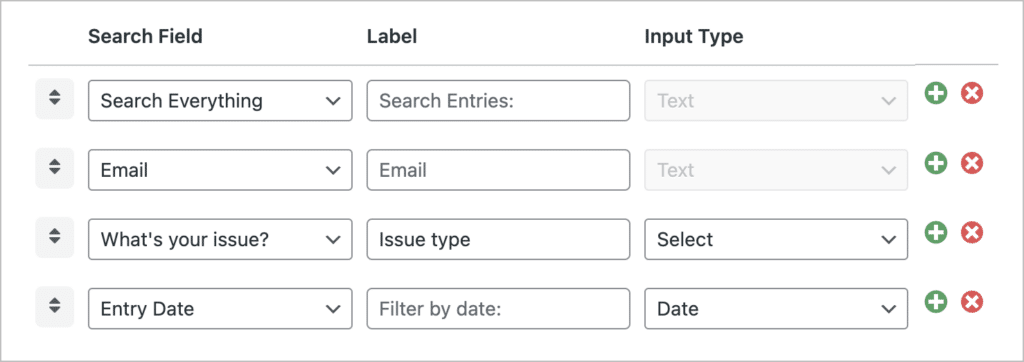
Feel free to add any other search inputs you want here.
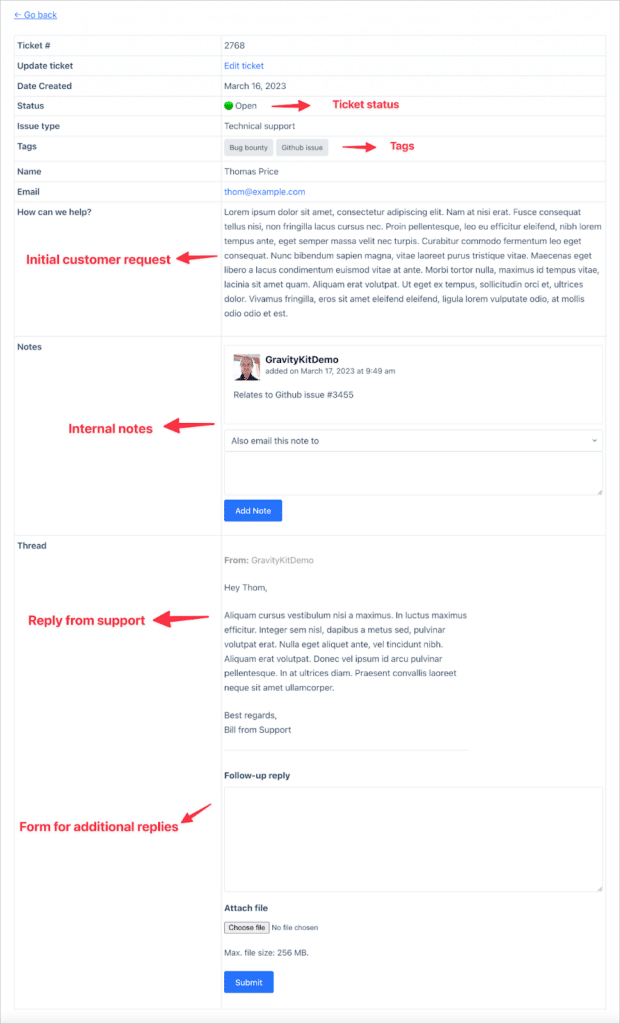
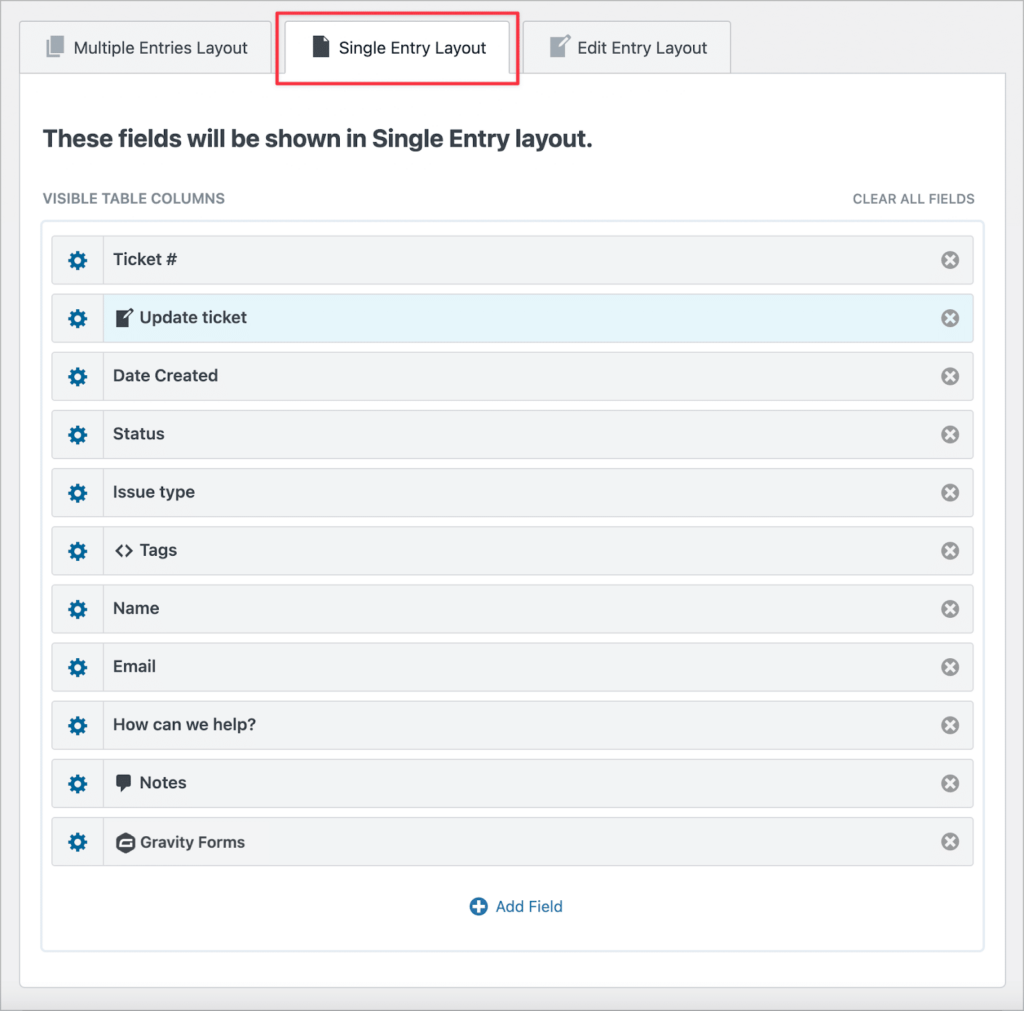
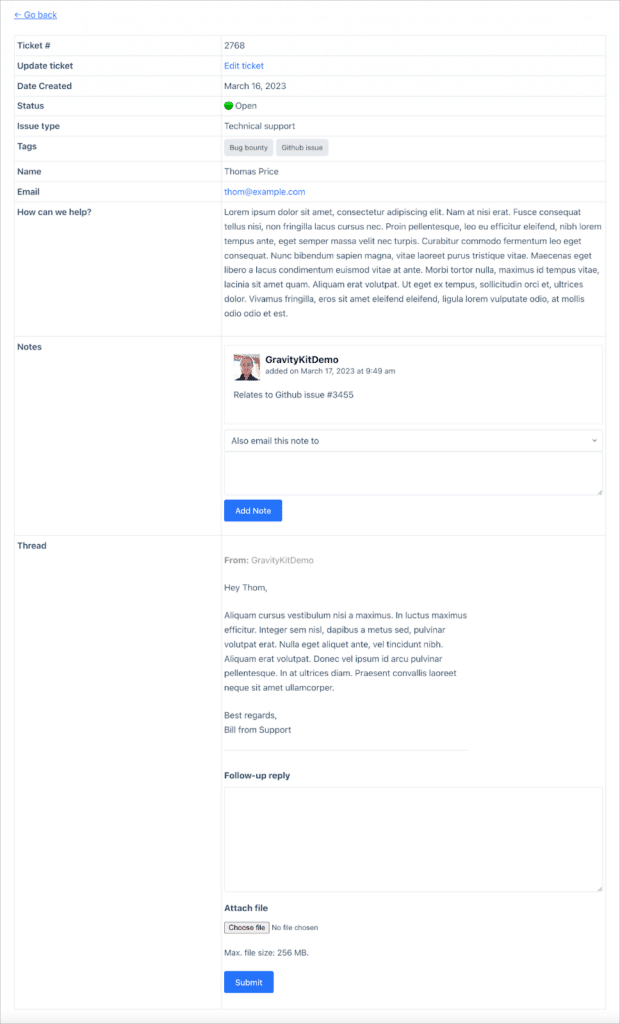
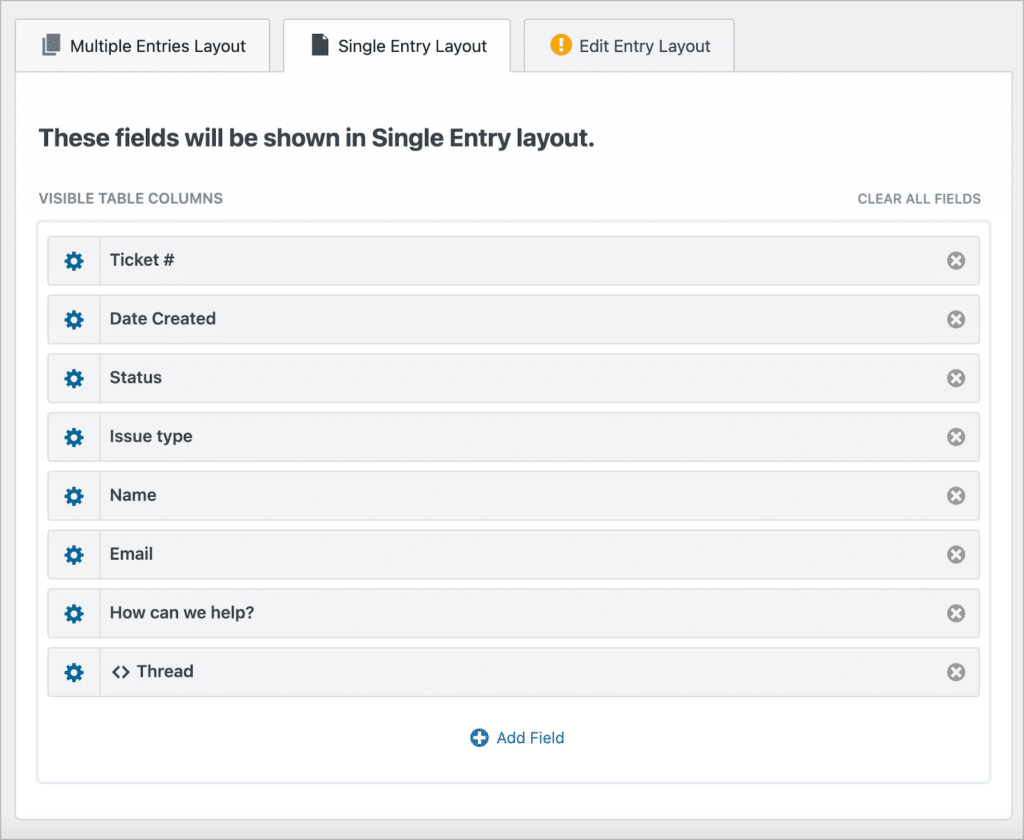
Configuring the Single Entry layout
We’ll start by clicking on the “Single Entry Layout” tab at the top of the View editor. Now we can start adding fields here to display important information about each ticket. Here’s what the Single Entry layout will look like when we’re done:
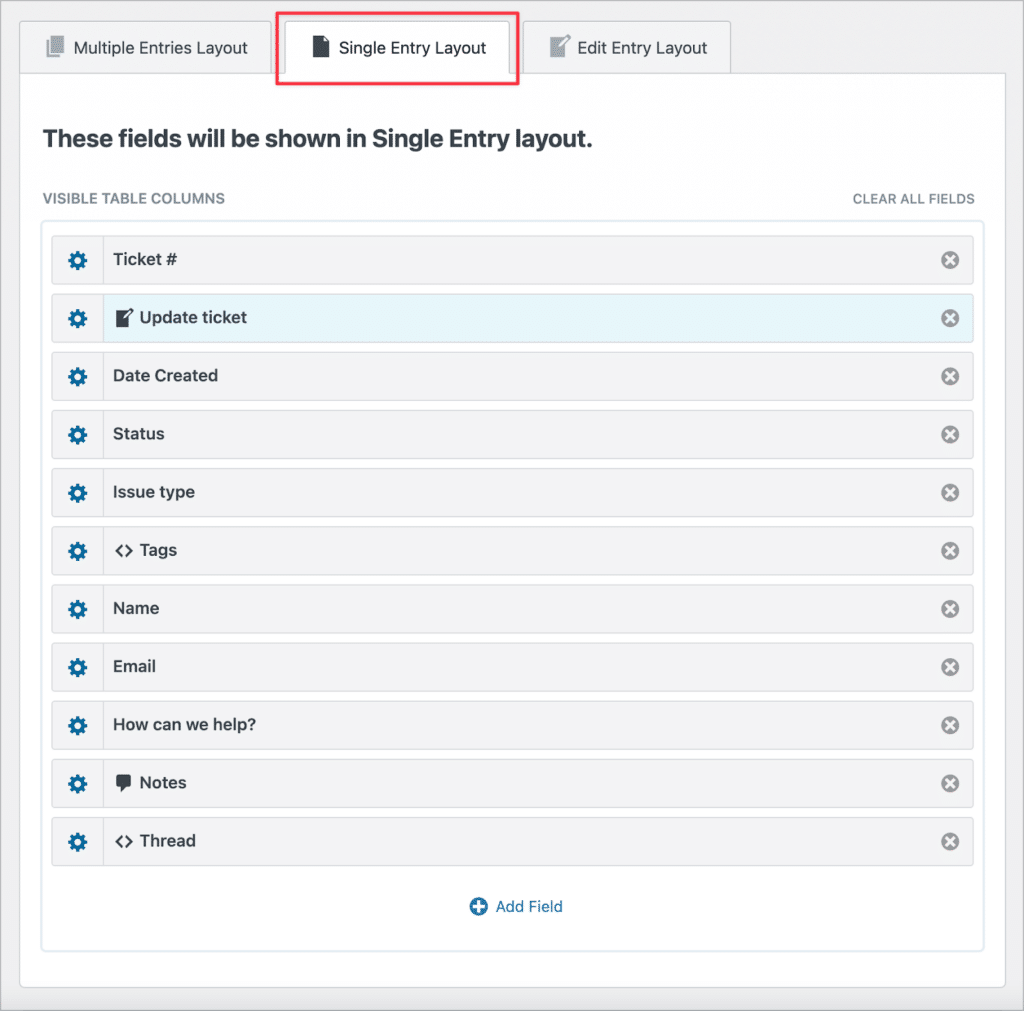
We’ll start by adding the following fields:
- Entry ID (rename this to “Ticket #”)
- Link to Edit entry (rename this to “Update ticket”)
- Date Created
- Status
- Issue type
- Name
- How can we help?
- Tags
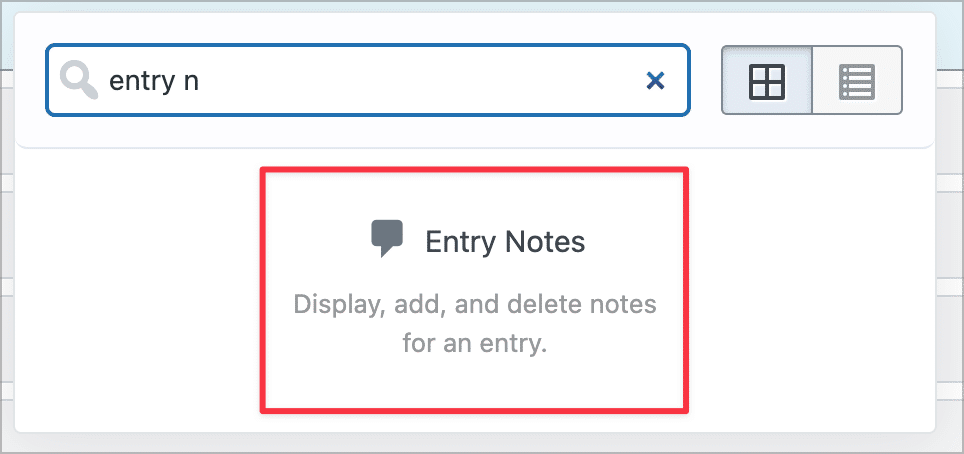
The next fields we need to add to the Single Entry layout is the “Entry Notes” field. This will allow the support team to write comments on tickets that are only visible internally.
Adding the follow-up reply form
After that, the final step is to add the follow-up reply form, allowing support staff and customers to reply to tickets in a thread. We already created this form, so we just need to embed it form using the “Gravity Forms” field type in GravityView!
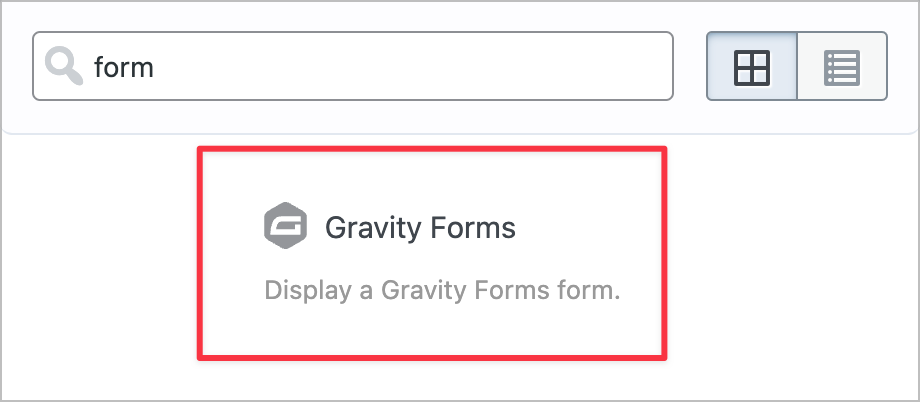
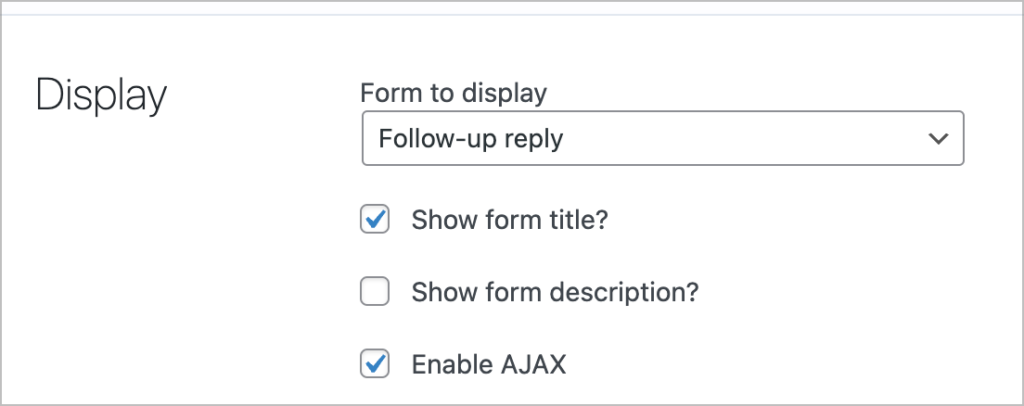
After adding the field, we’ll click on the gear icon to open the field settings. Here, we need to choose which form to embed from the dropdown menu. We’ll select our follow-up reply form.
Next, we’ll use dynamic population to populate our hidden form fields with the required information. To do this, we can add the parameter name and desired value in the “Field value parameters” box. Below is what we need to add (just remember to replace the {email:3} merge tag with your own, and update the parameter names if you used different ones!).
ticket-id={entry_id}&user={user:display_name}&email={email:3}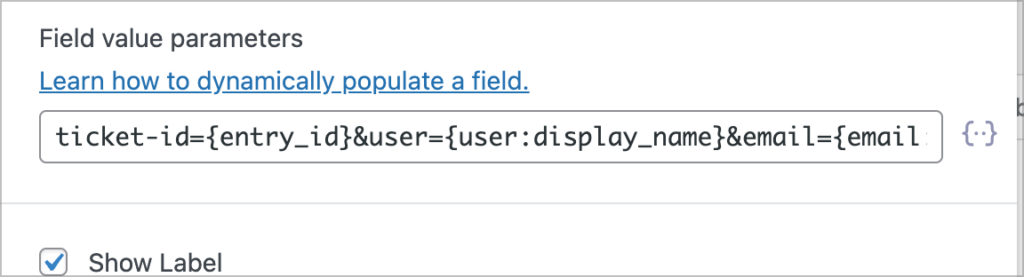
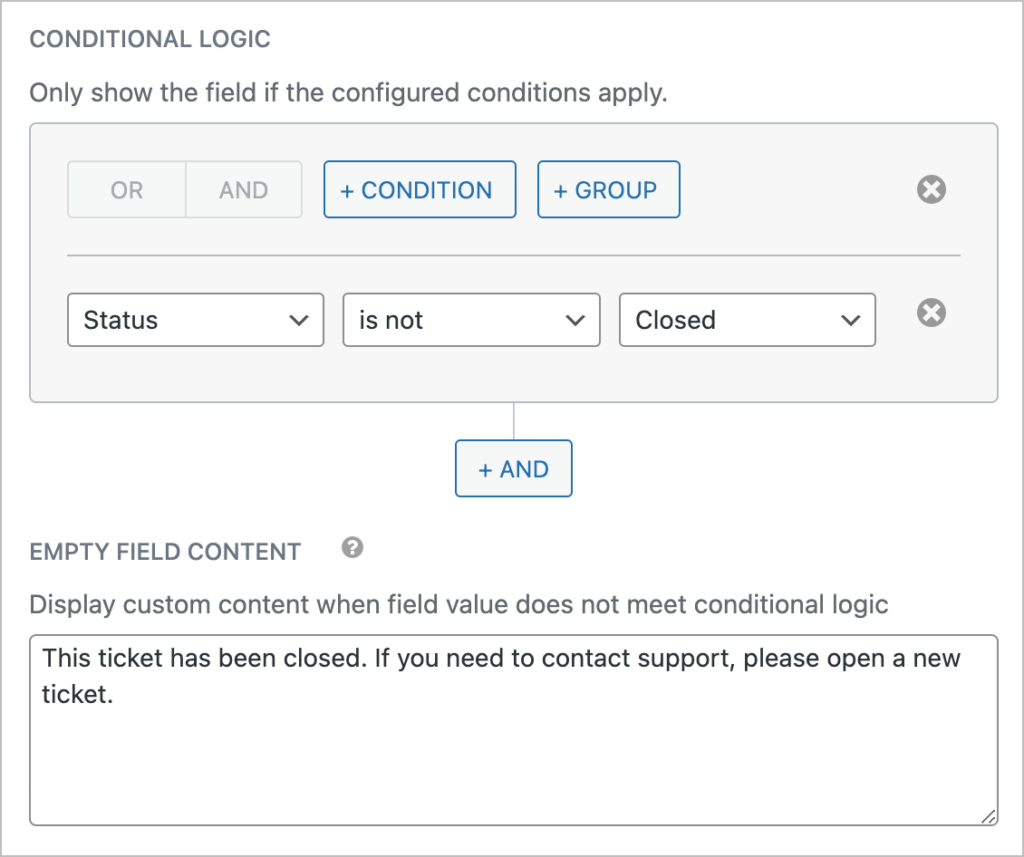
Finally, we’re going to use field conditional logic to ensure that the form is hidden if the ticket status is set to “Closed”. Let’s add a condition by clicking on the “Add Condition” button under “Visibility”.
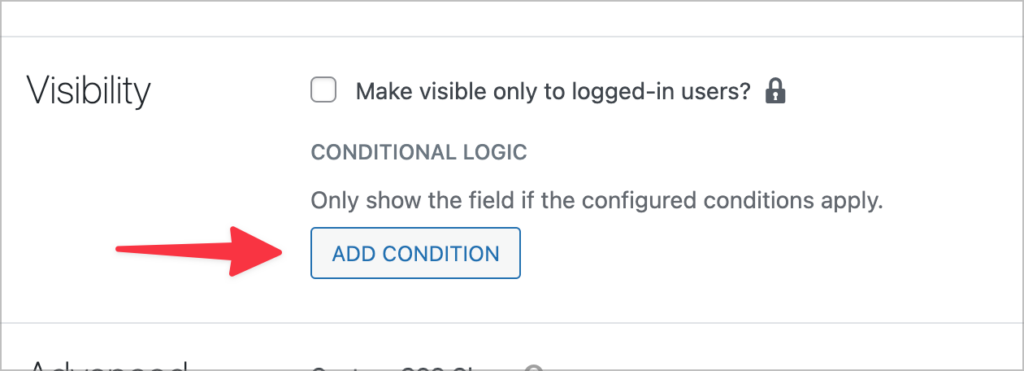
With this condition, the form will be only be displayed if the ticket status is “Open” or “Pending”. If it’s closed, we’ll display a message to the user asking them to open a new ticket if they wish to contact support.
That’s it!
The final step will be for us to display the entire thread of replies to a ticket. However, we can only do this once we’ve created a View to display responses (we’ll do this in the next step!). For now, here is what our Single Entry layout looks like:
When you’re done configuring the Multiple Entries and Single Entry layouts, you can start adding fields to the Edit Entry layout.
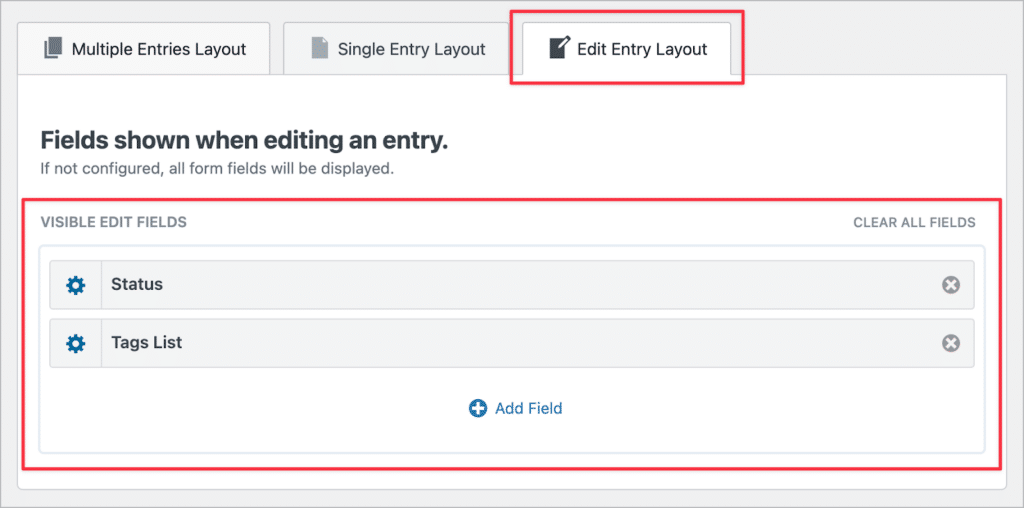
Configuring the Edit Entry layout
The Edit Entry layout will allow support staff to tag tickets and update a ticket’s status. Any fields you add here will be editable from the front end.
The final step is for us to add an advanced filtering condition to exclude closed tickets from the View!
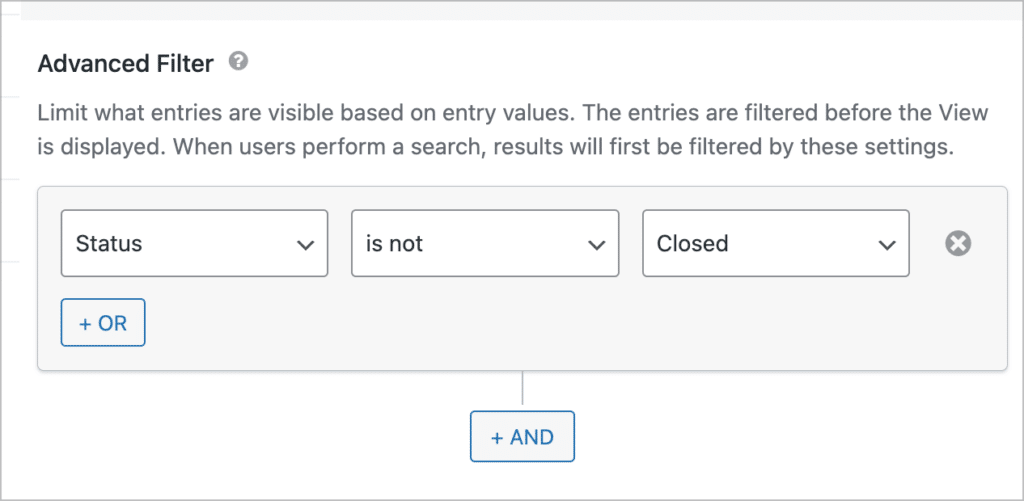
Adding an advanced filtering condition to exclude closed tickets
We don’t want closed tickets to still show up in the support dashboard so we’ll add an advanced filtering condition to exclude them. To do this, scroll down to the View Settings, click on “Filter & Sort” and then “Add Condition”. Now add the following condition:
Pro tipLearn more about advanced filtering in our free Gravity Guide course!
Here’s what our ticket dashboard looks like so far:
Creating a View to display ticket responses
So far we’ve created the two forms that we need as well as the main dashboard View. Now we need to create a new View to display ticket responses in a thread that we can add to the main ticket page.
Create a new View and give it a name (something like “Ticket responses”). Now, select your support follow-up form as the data source and choose the “List” layout as your View Type.
In the “Other Fields” section of the View editor, we’ll add the “Follow up reply” and “Attach file” fields from our form.
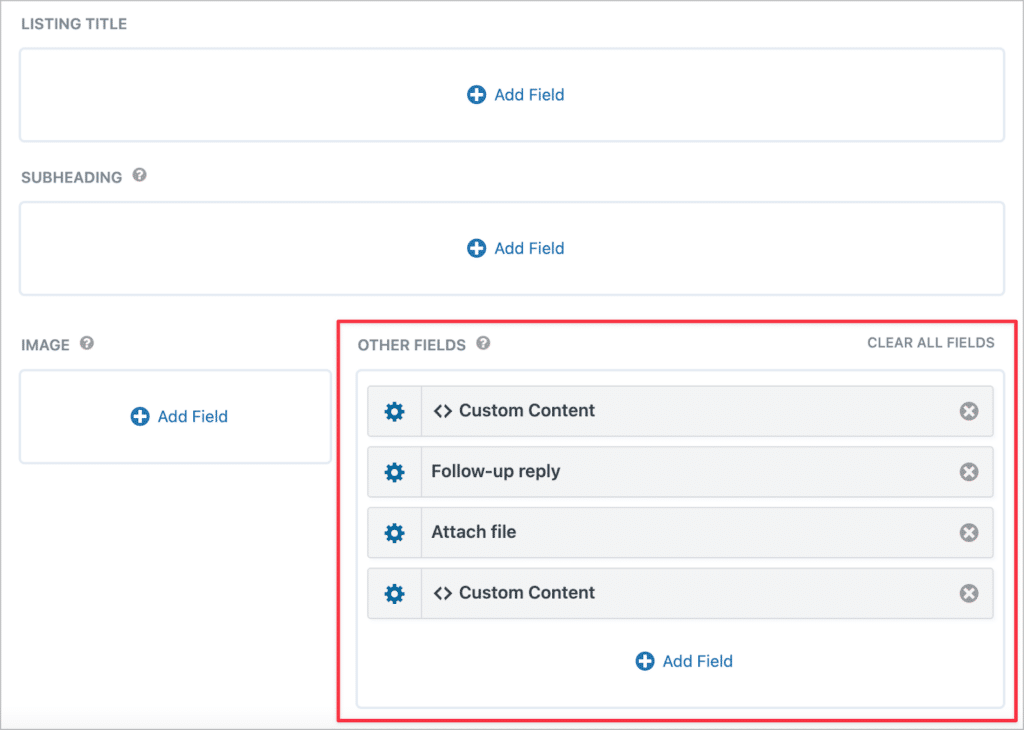
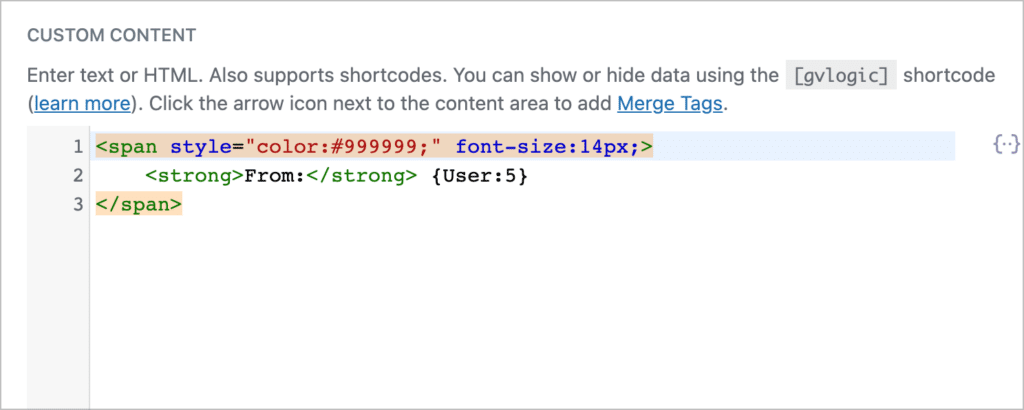
We’ll also add a custom content field at the top to display the username of the user sending the reply. We can do this using the hidden “User” field that we added to our form when we created it. This field is dynamically populated using the {user} merge tag thanks to the shortcode we wrote above.
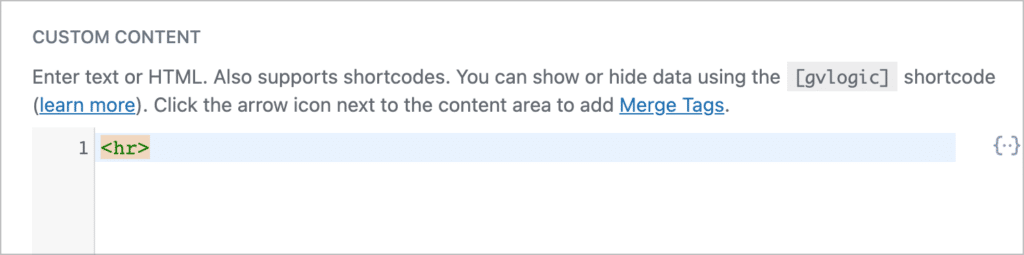
Finally, we’ll add another Custom Content field below all the other fields, containing a separator. This will help make it clear when one reply ends and another begins.
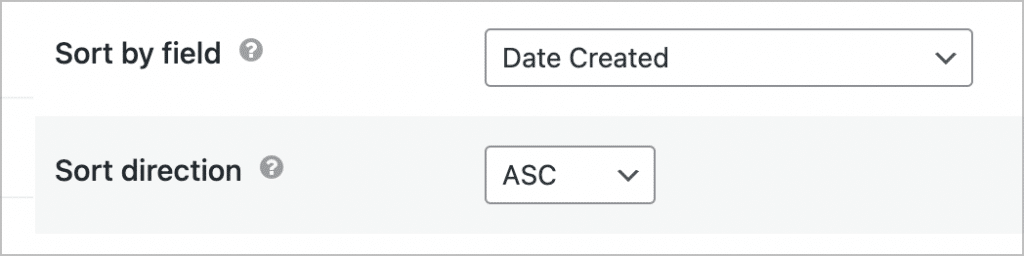
Next, we need to ensure that replies are arranged from oldest to newest. To do this, we’ll sort by the date created, ascending.
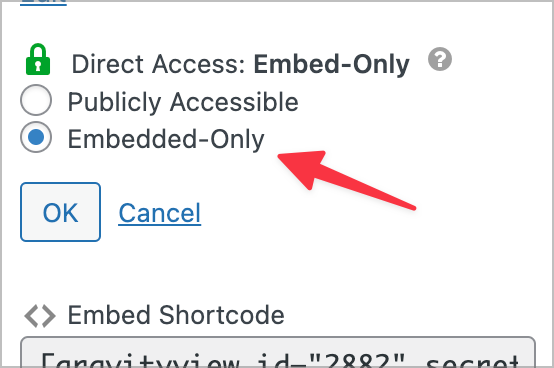
Finally, for enhanced security, we’ll update the View’s access settings to be “Embedded-Only”. This will ensure that the View cannot be accessed directly.
That’s it! Now we need to embed this View inside our main dashboard View in order to show ticket responses.
Showing follow-up replies in the ticket entry
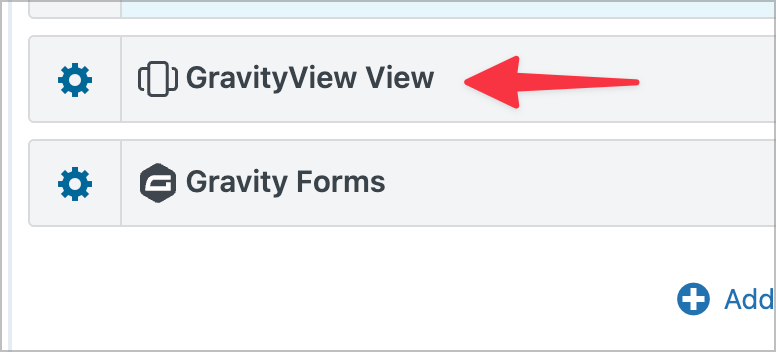
Now, edit your main dashboard View, go the the Single Entry layout, and add a new “GravityView View” field above your follow-up reply form. This field enables us to embed another View inside this View!
After adding the field, click on the gear icon to open the field settings, and select the View you want to display from the dropdown menu (select your ticket responses View that you created in the previous step).
Next, scroll down to the “Advanced” settings. Using filtering parameters, we can filter the View to ensure that it will only display the replies relating to the ticket that the user is looking at. This is very important, because without this filter, it will show all replies to all tickets, which is not what we want!
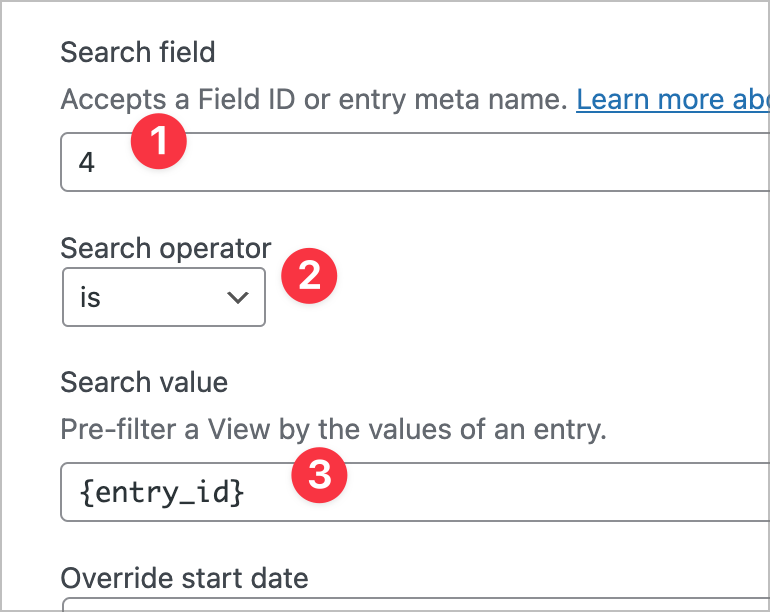
Add the following search filter:
- Search field: Set this equal to the ID of the “Ticket ID” field in your form
- Search operator: Keep this on “
is“ - Search value: Set this equal to the ID of the current ticket using the
{entry_id}merge tag
This will filter the View such that it only displays replies that match the ID of the current ticket.
That’s it!
Putting it all together: finalizing the support ticket dashboard
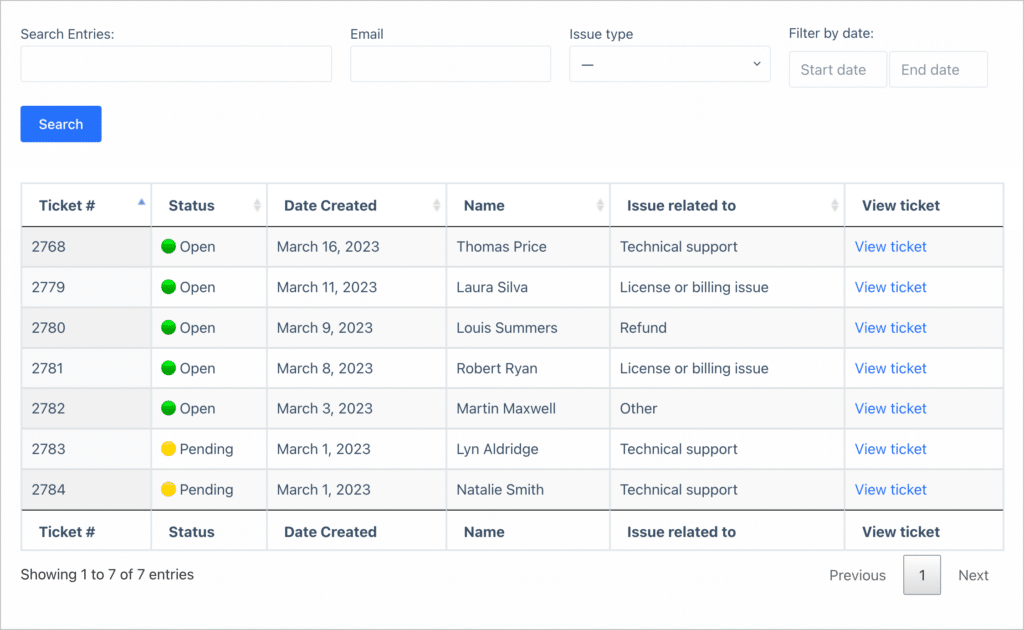
Now we can finalize our support ticket dashboard! You can either embed your main dashboard View on a separate page, or access it directly using the View URL. Here’s what the main dashboard page looks like on the front end:
As you can see, all the “Open” and “Pending” tickets are displayed in a table on the front end. There’s also a search bar at the top allowing support staff to filter tickets by keyword, email, issue type and date.
When support staff click “View ticket”, they are taken to a page where they can View more information about that specific ticket, including the user’s full request. There’s also a “Notes” section for adding internal comments and a reply form for responding to the user.
They can also click “Edit ticket” to update its status or tag it appropriately.
We’ve done all the heavy lifting. All that’s left to do is add the notification emails and create the customer dashboard View.
Creating the customer dashboard View
We’re going to create a separate dashboard for customers, as we don’t want them to see things like tags or internal notes. We also only want them to see the tickets that they have created.
To do this, we’ll clone our current dashboard View and remove the fields that we don’t want customers to see. We’ll also remove the link to the Edit Entry layout, as we don’t want customers to be able to edit tickets after they’ve been created.
Finally, we’ll add an advanced filtering condition to ensure that users only see the tickets that they created. To do this, we’ll scroll down to the View settings, click on the “Filter & Sort” tab and add the following condition.
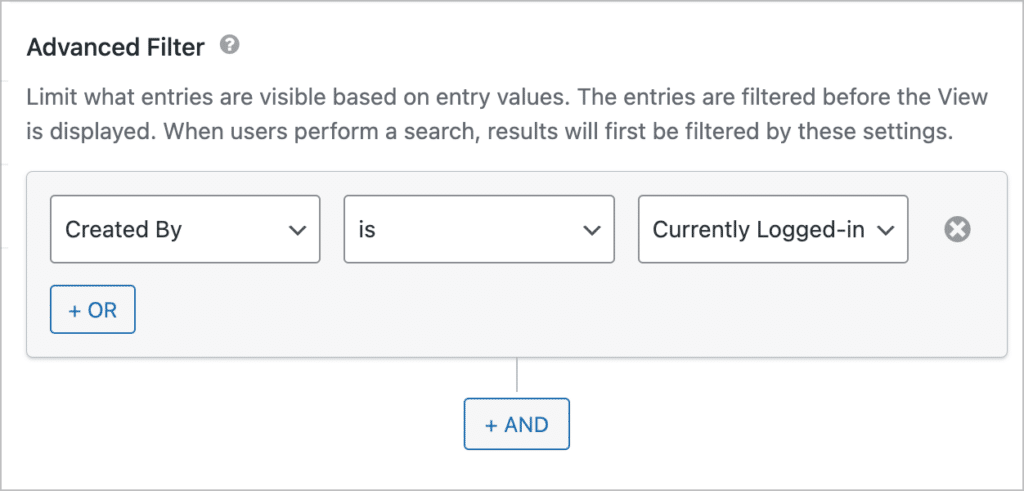
That’s it! Now, customers will be able to View their tickets and follow-up with replies—all from the front end. You may want to embed this View inside the customer account page on your website. This way, customers can create, view and respond to support tickets from their account page.
Adding email notification messages for customers and support staff
It’s probably a good idea to add email notifications so that support staff and customers are notified when a ticket has been updated.
Support notifications
When a new support ticket is created, we want to notify our team via email. We can do this by creating a new “Notification” in Gravity Forms.
To set up a notification, go to the form settings for your “Support request” form, click on “Notifications” and edit the default Admin notification. After entering in the “Send To” email address, scroll down to configure the notification message.
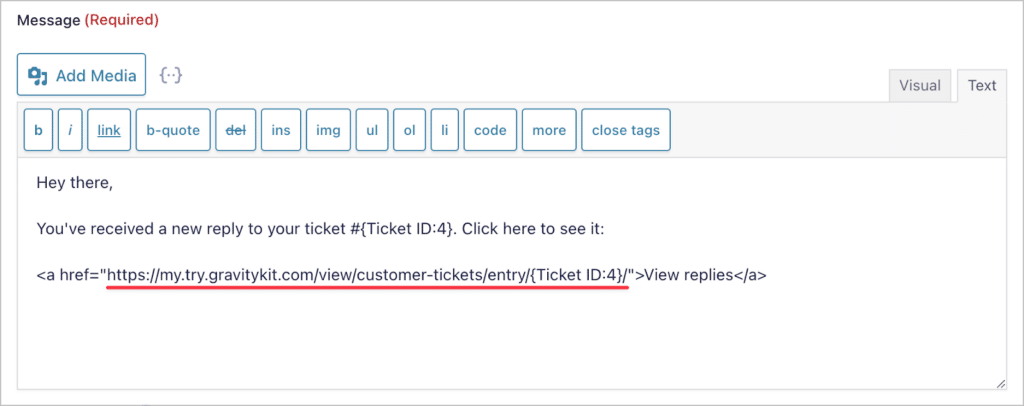
Here, we can use HTML to create a link to the ticket that was just created. All we need to do is use the GravityView URL structure together with the {entry_id} merge tag.
Here’s an example of a URL that links to a single entry in GravityView. The number at the end is the entry ID. To create a link to the most recent ticket, all we need to do is replace the ID with the {entry_id} merge tag. So https://my.try.gravitykit.com/view/support-tickets/entry/1234/ becomes:
https://my.try.gravitykit.com/view/support-tickets/entry/{entry_id}/ 
Customer notifications
We can also configure email notifications that send to the user when their ticket receives a reply. To do this, we’ll add a new Notification to our support reply form. We’ll add the merge tag for the “Customer email” field to the “Send To Email” field. This will ensure that the notification is sent to the customer’s email address.
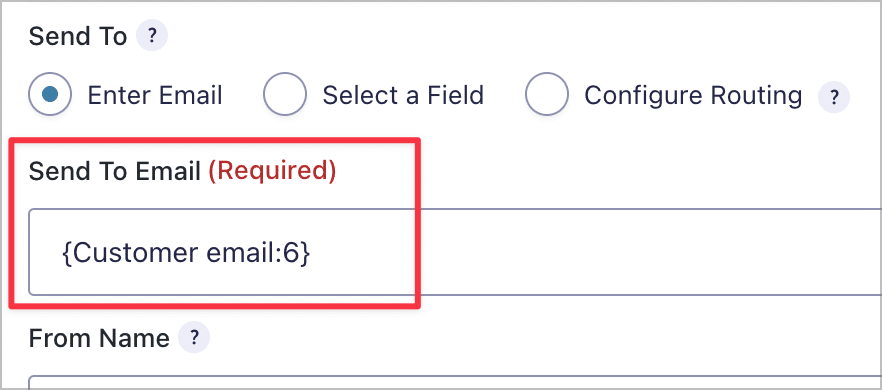
In the message body, we can put a link to the ticket, just as we did with the previous notification!
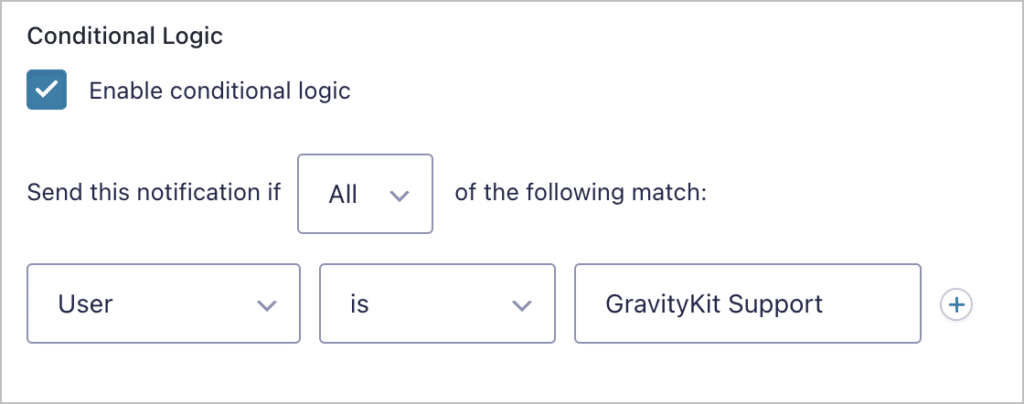
Then, we’ll use conditional logic to ensure it only sends when a new reply is added by a member of the support team.
That’s it. We have successfully built a support ticket system for WordPress using Gravity Forms and GravityView!
The final feature that you may want to implement is the ability to assign tickets to different users.
Enabling customers to reply via email (optional)
One potential downside to the support system we’ve built is that users will need to log in to the site and reply to support tickets from their dashboard page. For many users, it may be easier (and more convenient) for them to reply directly via email. Here’s the good news: this is possible to set up using Zapier!
If you’re not familiar with Zapier, it’s an automation platform that allows you to connect different apps and platform together and automate your business processes. Using “Email by Zapier”, we can create a “reply to” email address, that upon receiving an email, creates a new entry in Gravity Forms.
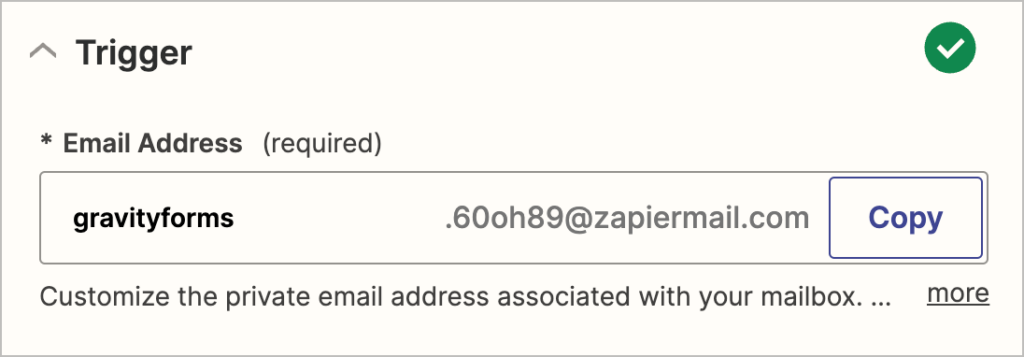
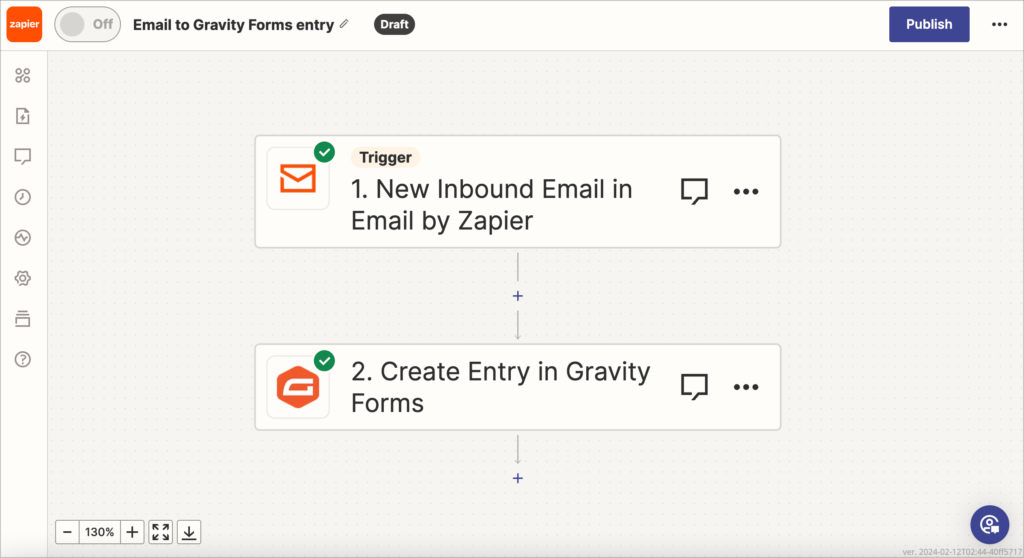
To set this up, create a Zapier account and add a new Zap. The app should be “Email by Zapier” and the trigger event should be “New Inbound Email”. Next, create a new, inbound email address.
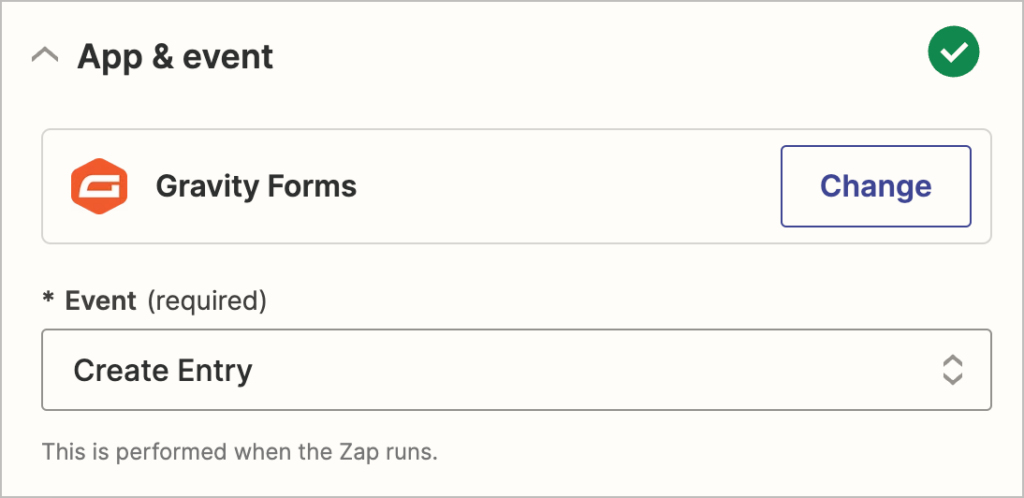
Now, add an action. Search for Gravity Forms and set the event to “Create Entry”.
Next, you’ll need to link your Gravity Forms account with Zapier. To do this, first install the official Gravity Forms Zapier Add-On. After that, follow the instructions in Zapier to create a new API key and select the form you want to link (this should be your follow-up reply form).
After you’ve linked your account, you’ll need to configure the email itself. Simply select which email fields should be sent to which form fields.
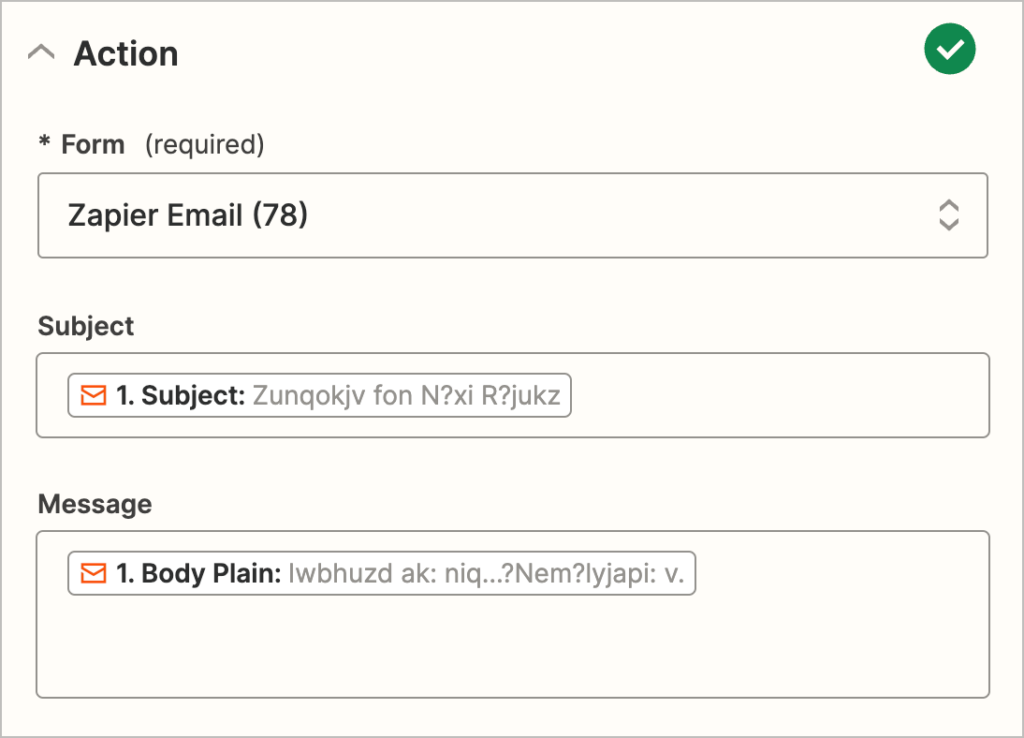
When you’re done, test the integration to ensure it’s all working as expected.
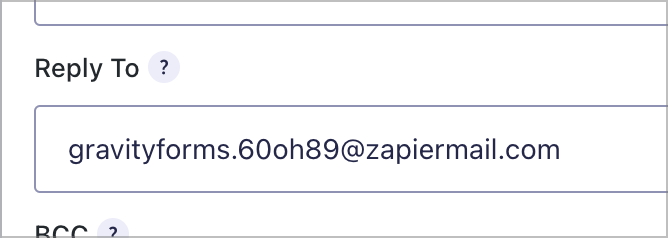
The final step is to reconfigure your customer notification email and add your Zapier inbound email address as the “reply to” address.
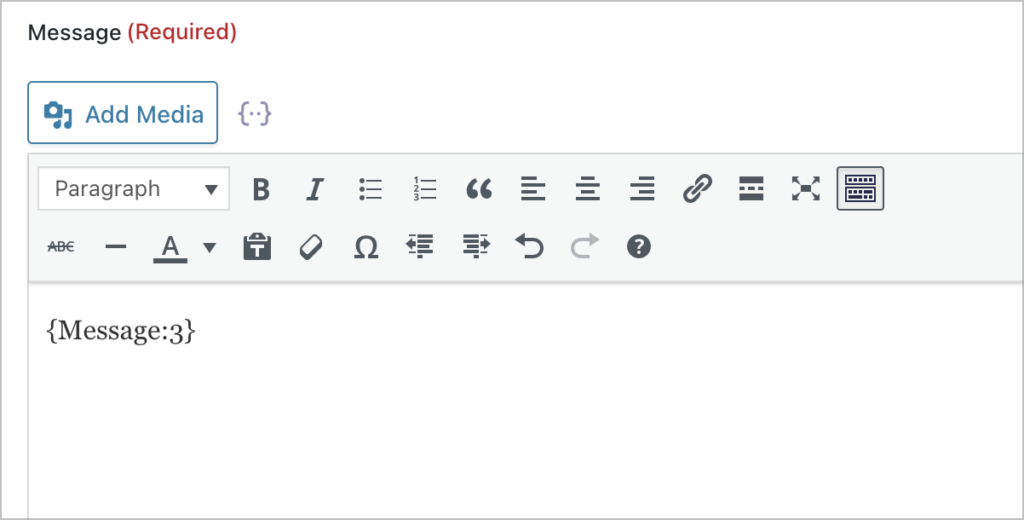
You’ll also need to add the full message in the email notification so that the user can read it and respond from their email client. You can do this using Gravity Forms merge tags.
That’s all! Now when a user receives a notification that a reply has been submitted to their support request, they can read it and respond to it directly from their email client!
Bonus: Assigning tickets to different users
If you have a larger support team, you may need the ability to assign tickets to specific users. For this, you’ll need a hidden dropdown field in your support form with a list of support staff. You can then use the Advanced Filter and the {user} merge tag to filter Views such that support staff only see tickets assigned to themselves.
Pro tipFor more information about listing entries assigned to a specific user, check out this handy article on our docs site.
Start building your Gravity Forms support ticket system
A ticketing system is a tool used by companies to process and catalog customer support requests. Ticketing systems are user-friendly interfaces that enable support staff to manage and reply to new cases!
In this post, we showed you how to build a WordPress support ticket system using Gravity Forms and GravityView. Using the data collection capabilities of Gravity Forms and the data management capabilities of GravityView, you can build a custom ticketing system that suits your business needs.

Helpful tips right in your inbox.
Subscribe to get the latest articles, information on releases and helpful Gravity Forms tips!
More articles
How to build a conference website on WordPress (attendee registration + abstract submission)
Build a conference registration and abstract submission site on WordPress with GravityKit, no code: forms, an attendee directory, sessions, and PDF certificates.

How to build a WordPress CRM without code (a contact database you own)
Build a simple WordPress CRM with GravityView. Turn the Gravity Forms entries you already collect into a no-code contact database you own, with no monthly fees.

Launch Log: Distance sorting for radius searches, DataTables search improvements, and import reliability fixes
The latest GravityKit releases add distance sorting to map searches, bring built-in search to DataTables, and fix GravityCharts and GravityImport edge cases.