Published
•
Updated
How to build a member directory on WordPress without code
Build a searchable, grid-style member directory on WordPress without code using GravityView. Step-by-step tutorial for communities, networks, and professional groups.

Looking for an easy way to create a sleek, searchable member directory for your website? With GravityView, you can turn Gravity Forms entries into a fully functional directory—no coding required!
In this tutorial, I’ll walk you through the entire process of building a dynamic member directory, complete with a clean grid layout. Whether you’re managing a community or professional network, you’ll be able to set up your own directory in no time.
Let’s dive in!
Check out a live demo of the finished member directory and get your own free trial site preloaded with all GravityKit add-ons!
Sneak peek
Here’s a sneak peek at our finished member directory:

Clicking on the “View Profile” link enables you to see more information about a specific member:

Ready to see how I built it? Keep reading.
What you’ll need
Here are the plugins you’ll need to create a member directory like the one in this example:
Creating the member registration form
To start off, we’ll create a new form on our website that enables users to register their profile on our directory.
To create a new form in Gravity Forms, we’ll hover over “Forms” and click “New Form”. After giving our form a name, we can start adding fields to it using the drag-and-drop form builder.
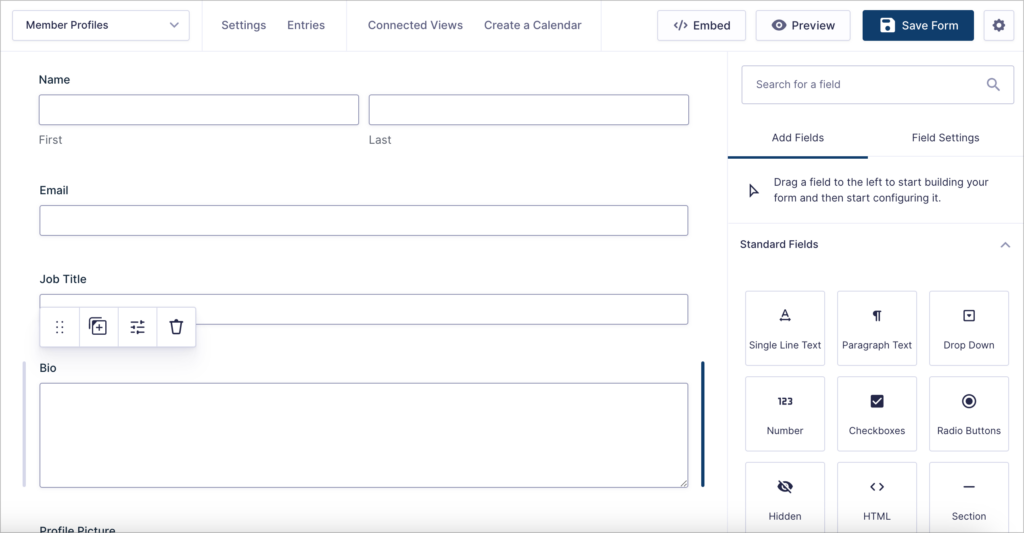
We’ll keep things simple by adding the following fields to our form:
- Name (Name field)
- Email (Email field)
- Job Title (Single Line text field)
- Bio (Paragraph Text field)
- Profile Picture (File Upload field)
- LinkedIn Profile (Website field)
- Facebook Profile (Website field)
- Twitter Profile (Website field)
- Username (Username field)
- Password (Password field)
The “Username” and “Password” fields are special fields added by the User Registration add-on.
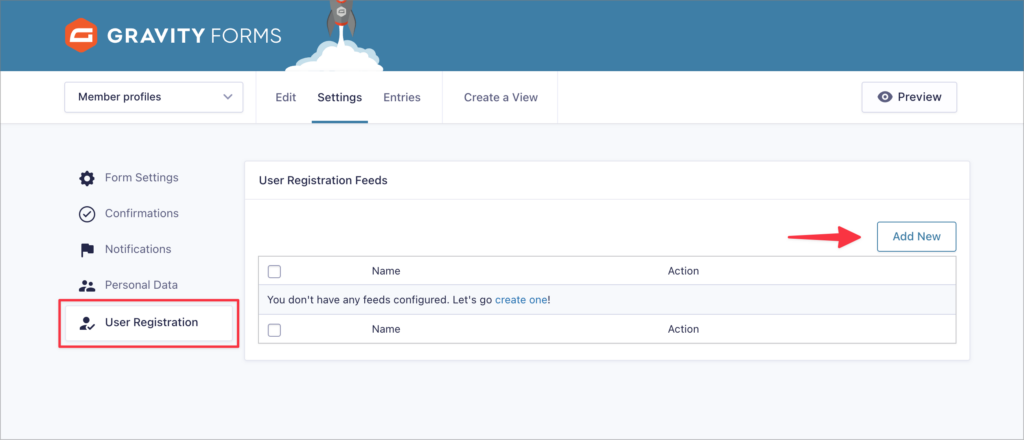
Creating the User Registration feed
The next step is to create a User Registration feed so that we can register a new user on our site when they submit their information for the directory. To do this, we’ll navigate to the form settings page, select “User Registration” on the left and click “Add New”.
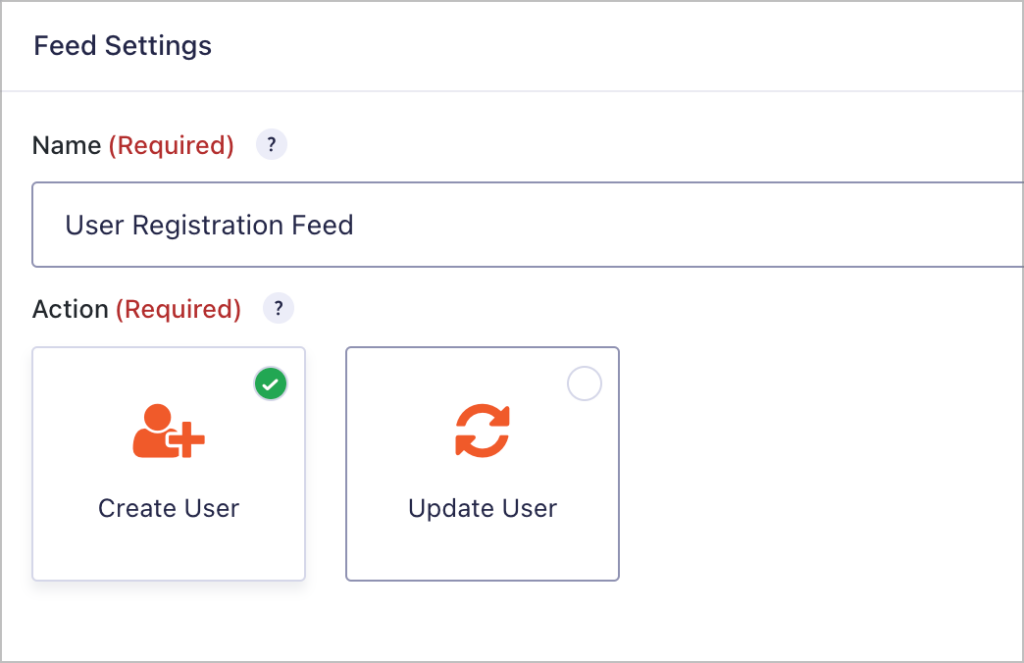
Now we can configure the feed settings. First, we’ll set the action to “Create User”. After that, we’ll need to map the various user meta fields to the relevant fields in our form and select what role the new user will be assigned.
After configuring the User Registration feed and embedding our form on a page or post, we’re ready to move on to the next step—creating the member directory using GravityView!
Pro tipYou can learn more about the Gravity Forms User Registration add-on by reading this helpful doc.
Creating the member directory in GravityView
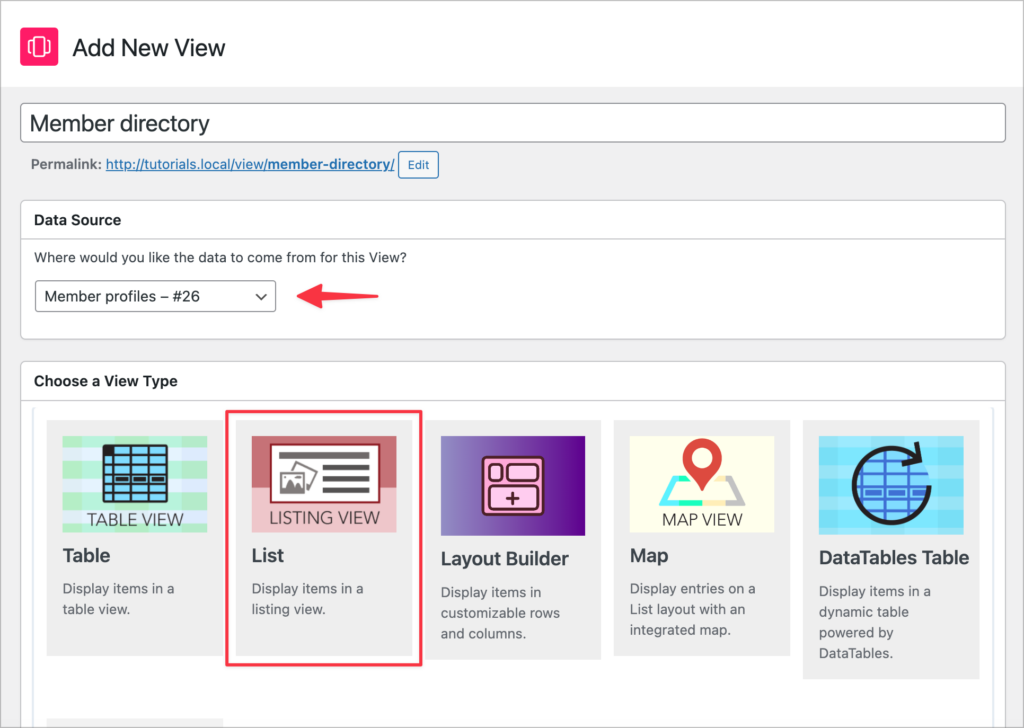
To create a new View in GravityView, we’ll hover over “Views” and click “New View”. Next, we’ll give our View a name (“Member Directory”), choose a data source and select a View Type.
For this example, we’ll select “List” as our View type as it’s well suited to creating directory-style layouts!
Configuring the Multiple Entries Layout
After selecting a View Type, we can start configuring our View using GravityView’s drag and drop builder.
We’ll start by configuring the Multiple Entries Layout. This is our main directory page, so we can add both fields and widgets here. Widgets are tools for navigating a View while fields are the information we want to display.
We’ll start by adding a Search Bar widget to the Top Widgets area. We can do this by clicking the “Add Widget” button and selecting the Search Bar widget.
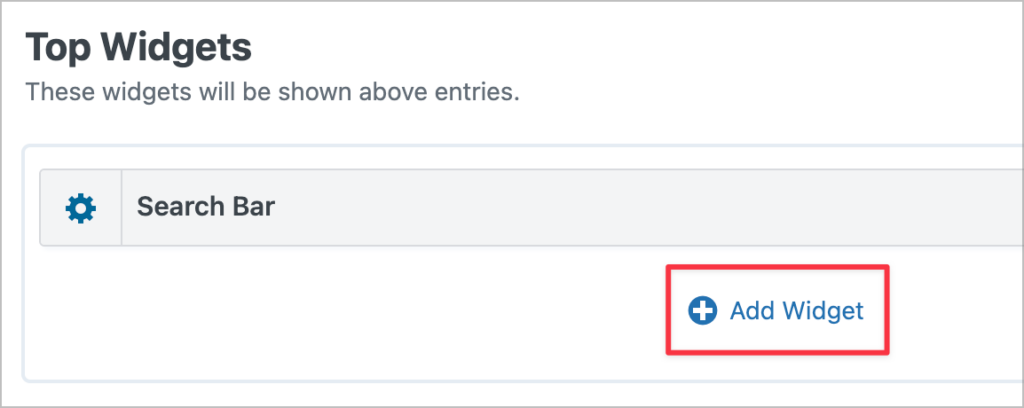
Pro tipClick on the gear icon to configure the search settings. This allows you to add search inputs and modify the search behavior. To learn more about the GravityView Search Bar widget, read Configuring the Search Bar.
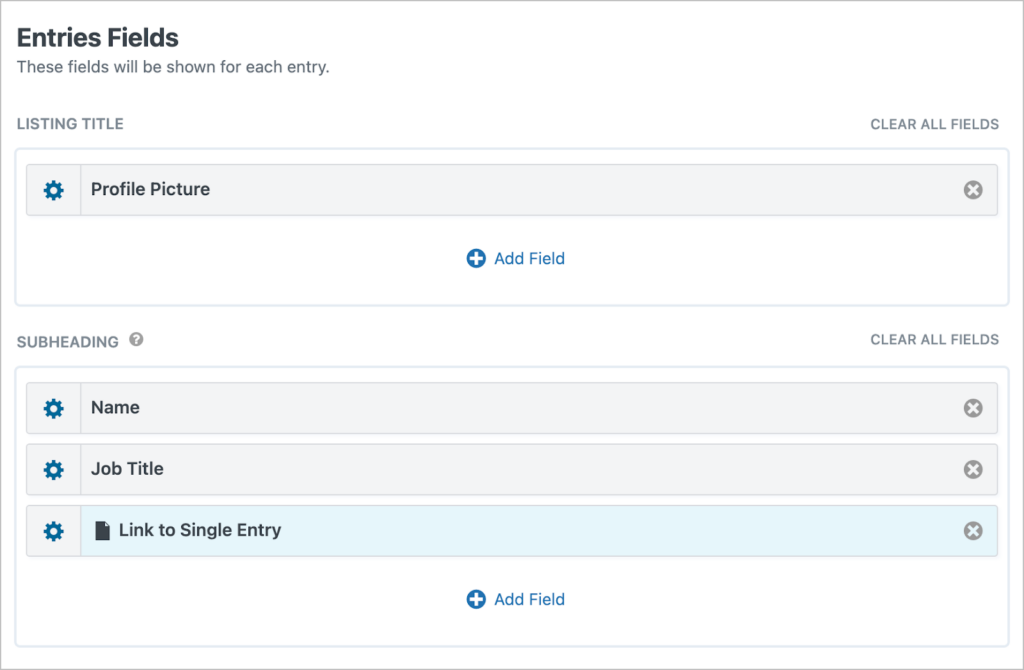
Next, we’ll scroll down and start adding fields to the Entries Fields section. We’ll add the “Profile Picture” field to the Listing Title section, and we’ll add the “Name” and “Job Title” fields to the Subheading section.
Finally, we’ll also add a “Link to Single Entry” field. This will output a link, allowing users to click through to view more information about a particular member.
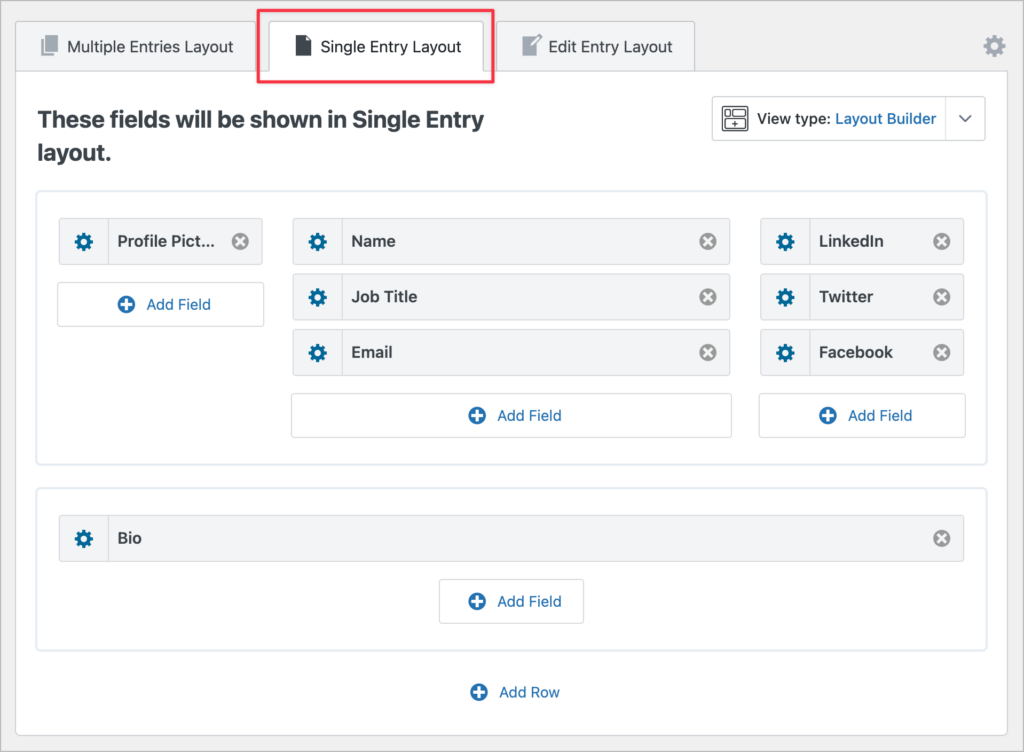
Configuring the Single Entry Layout
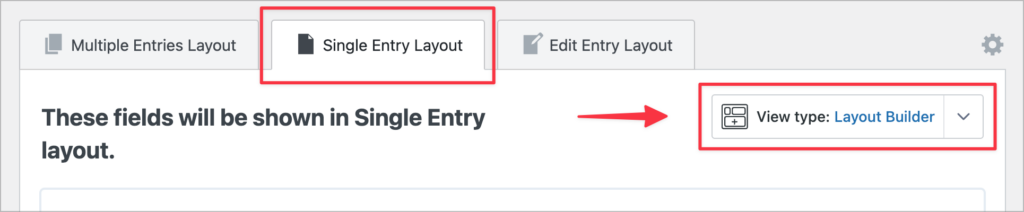
Now let’s turn our attention to the Single Entry layout. This is the layout for individual member profiles. To start, we’re going to change the View type from “List” to “Layout Builder”. This gives us more control, enabling us to create a custom profile layout with rows and columns.
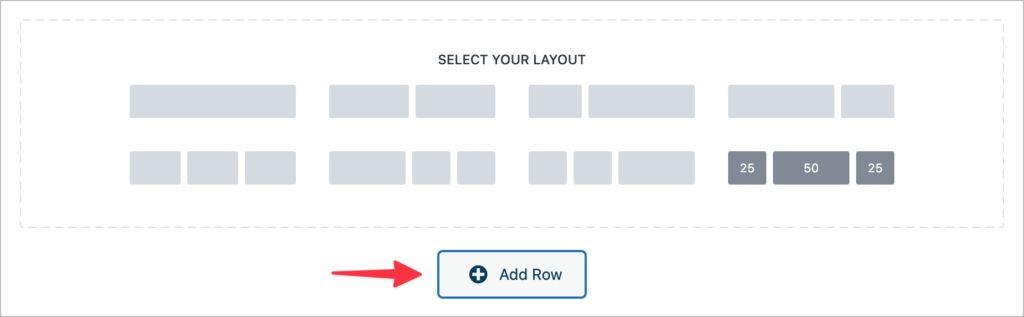
First, we’ll add a new row with three columns (25%, 50% and 25% width respectively). Underneath that, we’ll add a second row with a single column of 100% width.
Now we can construct our profile layout by adding our form fields. I’ll add the “Profile Picture” field to the upper left column, the “Name”, “Job Title” and “Email” fields to the center, and the social links to the right-hand column. Finally, I’ll add the “Bio” field to the bottom row.
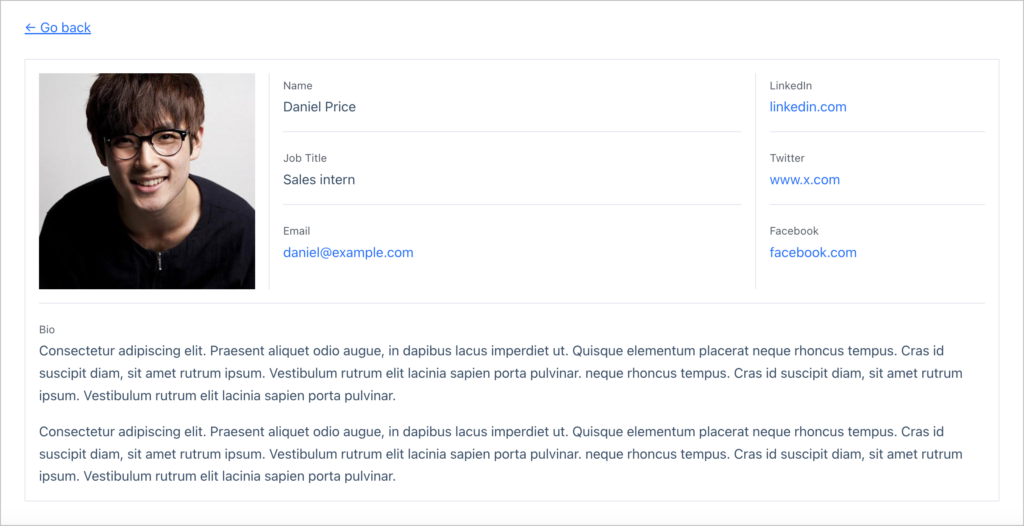
Here’s what the individual profile pages look like on the front end:
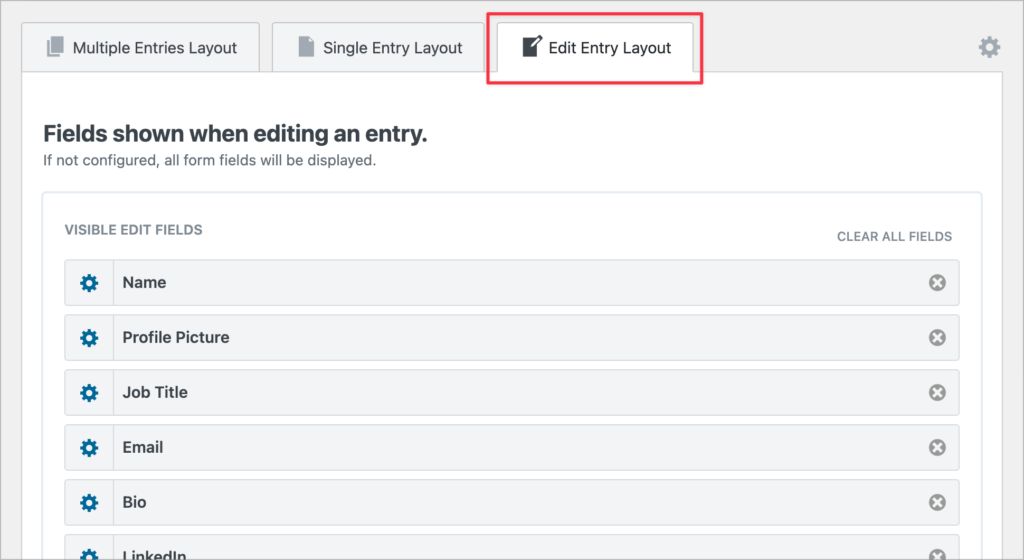
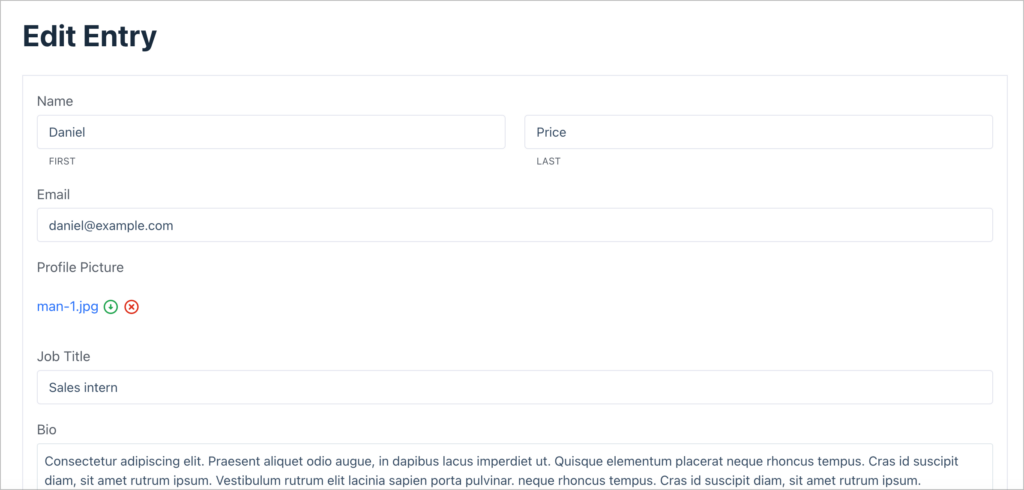
Configuring the Edit Entry Layout
Finally, we’re going to configure the Edit Entry Layout to enable logged-in users to edit their profile pages. First, we’ll add a “Link to Edit Entry” field to the Single Entry page.

Next, we’ll click on the “Edit Entry Layout” tab at the top of the View editor. Here, we can specify which fields are editable from the front-end by adding them to the layout!
Finally, we’ll scroll down to the View settings, click on “Edit Entry” and enable User Edit.

Now, when a user is logged in, they can go to their profile and click “Edit Profile” to update their information.
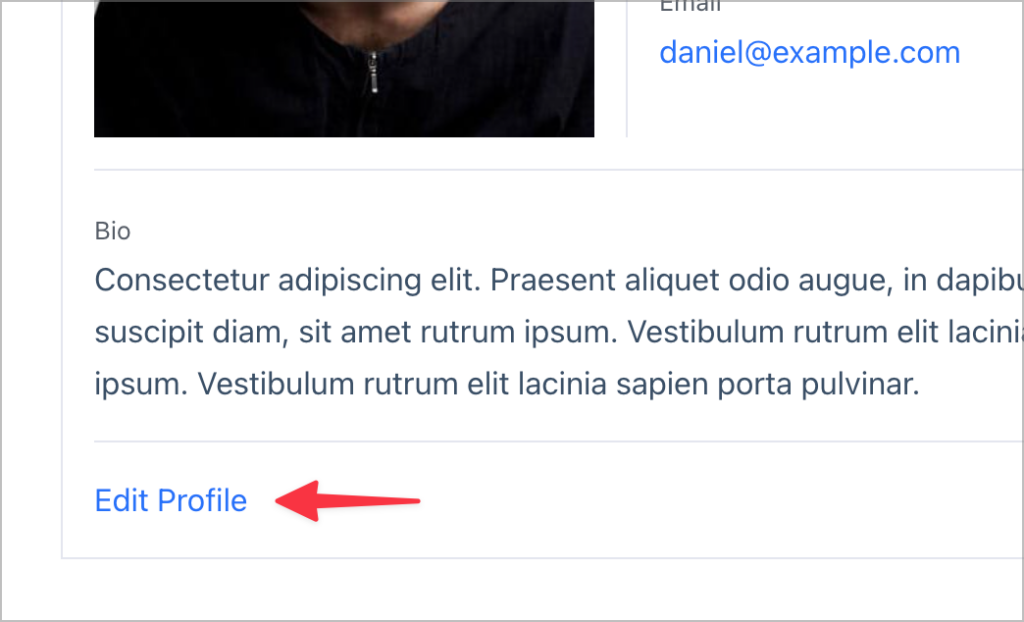
Here’s what the Edit Entry page looks like on the front-end:
We’re almost done! There’s only one thing left to do—change our View from a list to a grid!
Displaying entries in a multi-column grid
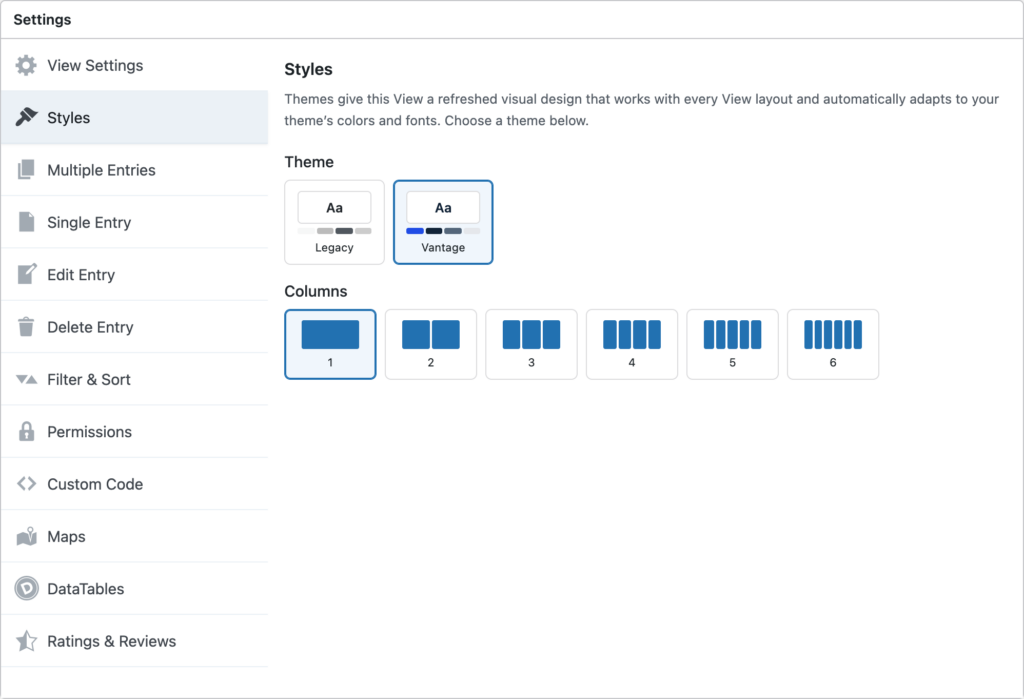
On the Multiple Entries Layout, we’re using the List View type, which displays entries in a single column by default. The quickest way to turn that into a clean, multi-column grid is to apply a theme. Open your View’s settings, switch to the Styles tab, and set the Theme to Vantage, the modern theme added in GravityView 3.0. From the same tab you can choose how many columns the grid uses, so you get a responsive, multi-column directory out of the box, with no custom code to write or maintain.
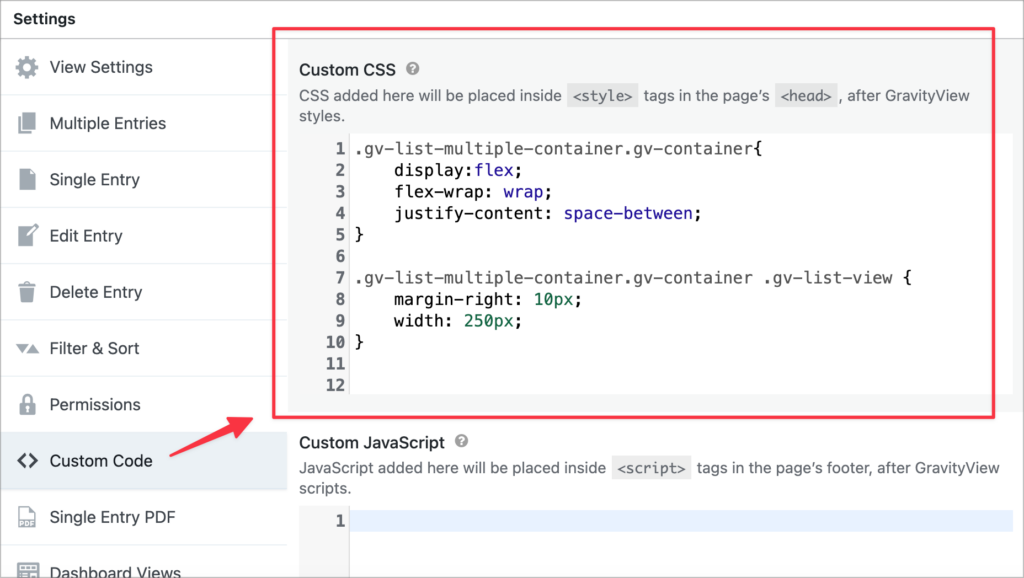
Prefer to build the grid by hand, or want finer control over the column widths and spacing? You can also create it with a short CSS snippet. Copy the code below, replacing THE_VIEW_ID_HERE with your actual View ID:
/** Replace THE_VIEW_ID_HERE with your View ID! */
.gv-list-multiple-container.gv-container-THE_VIEW_ID_HERE {
    display:flex;
    flex-wrap: wrap;
    justify-content: space-evenly;
}

/** Replace THE_VIEW_ID_HERE with your View ID! */
.gv-list-multiple-container.gv-container-THE_VIEW_ID_HERE .gv-list-view {
    margin-right: 10px;
    width: 250px; /* Adjust this width */
}
We can add this code to the “Custom CSS” box in the View settings.
That’s it! Let’s take a look at our member directory on the front end:
Pro tipDo you build membership sites? See how to integrate GravityView with Paid Memberships Pro in this helpful guide.
Create your member directory today!
GravityView is a powerful add-on for Gravity Forms that enables you to display form entry data on the front-end and build powerful web applications! Not only can you create member profiles and directories, you can also build custom layouts for your data using drag and drop.
If you found this post helpful, check out our tutorial on creating an address book with direct email functionality.

Helpful tips right in your inbox.
Subscribe to get the latest articles, information on releases and helpful Gravity Forms tips!
More articles

10 things you can ask AI to do with Gravity Forms (using the free GravityKit MCP)
See 10 practical things you can ask AI to do with Gravity Forms using the free GravityKit MCP: create forms, manage entries, build Views, and more.

Launch Log: theme template editing in Block MCP, Shield silentCAPTCHA for Zero Spam, and GravityView fixes
Block MCP adds safe theme template editing, Gravity Forms Zero Spam gains Shield silentCAPTCHA support, and GravityView fixes lightbox and notice bugs.

GravityKit turns 12: a year in review, and 30% off Lifetime All Access
GravityKit turns 12. A look back at a year of GravityView 3.0, GravitySearch, and AI-assisted building, plus a birthday sale on the Lifetime All Access Pass.
