Published
•
Updated
How to create a CRUD system on WordPress (without code)
Build a complete CRUD app on WordPress without custom code or SQL. Learn how to use WordPress plugins to create, read, update, and delete data in any web application.

In this post I dive deep into building custom CRUD solutions on WordPress that can power any web application. Creating a CRUD system doesn’t have to involve custom code or SQL queries!
WordPress has grown over the years, from a simple blogging platform to a framework that powers around a third of the web, capable of running anything from simple websites to full-blown web applications. Find out how you can leverage WordPress’s built-in capabilities and expanding plugin ecosystem to create CRUD apps in minutes.
What is a CRUD application?
CRUD is a programming term that stands for Create, Read, Update, Delete—the four basic functions of any data management platform!
Essentially, a CRUD application or system allows users to work with entries in a database.
If you think about it, almost any application related to storing information allows users to create new entries, read existing information, update that information when required, and delete irrelevant information.
Why would you need a CRUD system in WordPress?
WordPress itself is a CRUD application. As a Content Management System (CMS), WordPress allows users to create/delete pages and posts, and update existing content.
However, to perform CRUD operations in standard WordPress, you need access to the backend of the site. Furthermore, users must have an Administrator or Editor type role to manage information in the database.
Often times, you’ll want to allow users to perform CRUD operation on the front-end, without needing to be an administrator. Here are some situations where you’d need an independent CRUD system in WordPress:
- You’re building a directory that allows users to update their profiles from the front end.
- You’re building a bug tracker system, an activity log, a task-management app or some other tool that requires users to enter and update data from the front-end.
- You want to allow users to edit businesses-related data from the front end without exposing them to the backend. You may even want to hide the fact that your site runs on WordPress!
How to perform CRUD operations in WordPress
First things first—outline the type of app you’re trying to build and the functionality you’ll need.
This will allow you to scour the WordPress plugin directory to see if there are any reputable plugins built specifically for such a purpose. If you don’t find anything, you essentially have two options:
- Build your CRUD using custom code
- Create a no-code CRUD system using a prebuilt CRUD plugin (e.g., GravityView)
Let’s go through each option in more detail.
Building your WordPress CRUD app using custom code
Coding your own CRUD app on WordPress is not an easy task. You’ll need knowledge of WordPress development, experience building plugins for WordPress, and a lot of free time!
Moreover, building a WordPress plugin from scratch requires knowledge of PHP, MySQL (for database operations), and HTML/JavaScript/CSS for the front-end interface.
Once you have a working plugin, you’ll also need to spend time testing, refining, and debugging your code. This is fine if you don’t have any time constraints, but if you’re working towards a deadline, it might not be the best option.
Build a WordPress CRUD system using a plugin
Ah, isn’t it a nice feeling when you install a plugin that does all of the heavy lifting for you? There are various plugins out there that developers typically keep in their toolbag. I’m thinking about ACF (Advanced Custom Fields), Gravity Forms, and of course, GravityView!
GravityView is a powerful add-on for Gravity Forms that enables you to build web apps with drag-and-drop using your form data. Essentially, Gravity Forms handles the Create function, while GravityView handles the Reading, Updating and Deleting.
Here are some of the advantages of building with GravityView:
- Form-based apps: No need to hassle with custom fields, post types, custom tables or taxonomies!
- Save time: Get a new app up and running in minutes.
- Use a simple framework: Build a diverse range of applications, from business directories to application management systems.
- Future-proof your site: GravityView is a robust plugin with excellent support and documentation.
- Highly extensible: Bolt on additional features with Pro extensions and add-ons.
Pro tipDon’t take my word for it. Sign up for a free demo site to test GravityView for yourself!
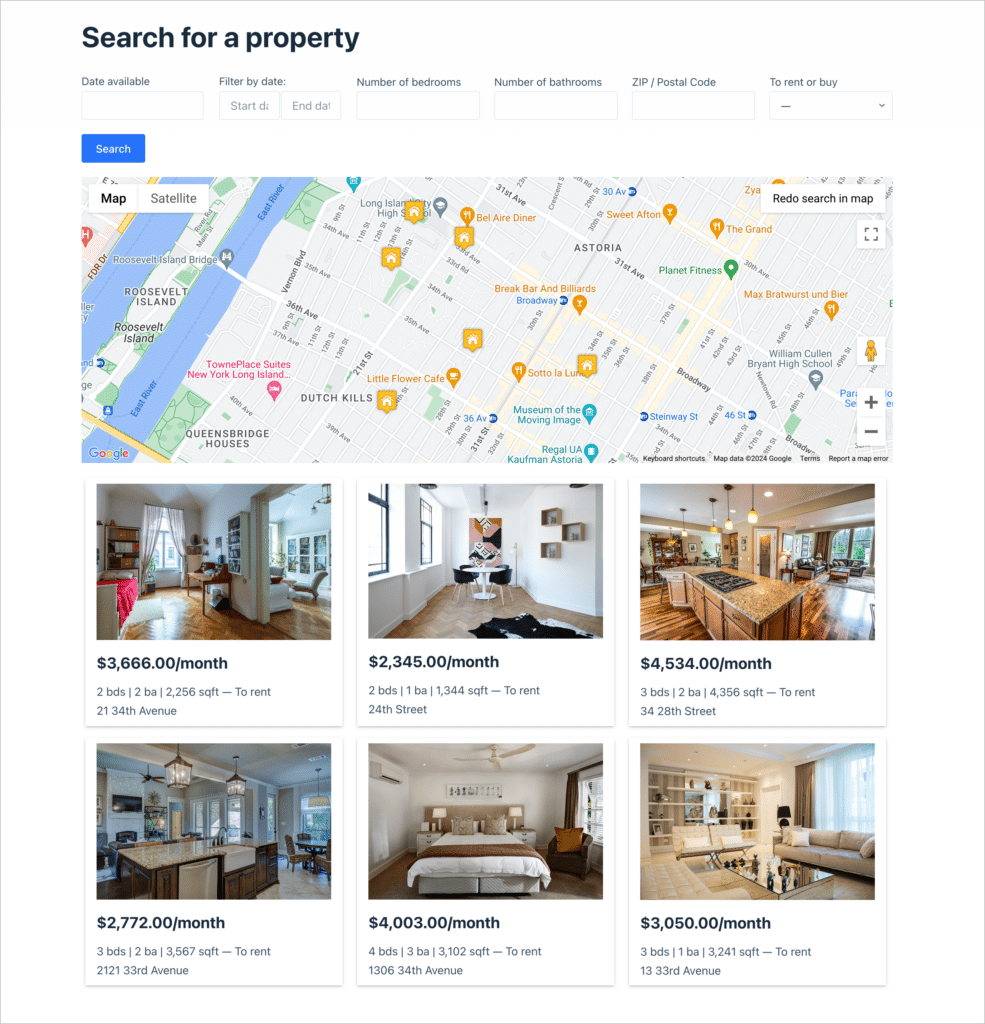
Example #1: Real-estate directory
Here’s how it works: Agents submit property listing information using a form, and that data is displayed on the front end using GravityView. There’s a map at the top with geolocation functionality, a search bar, and a responsive grid layout for showcasing the properties.
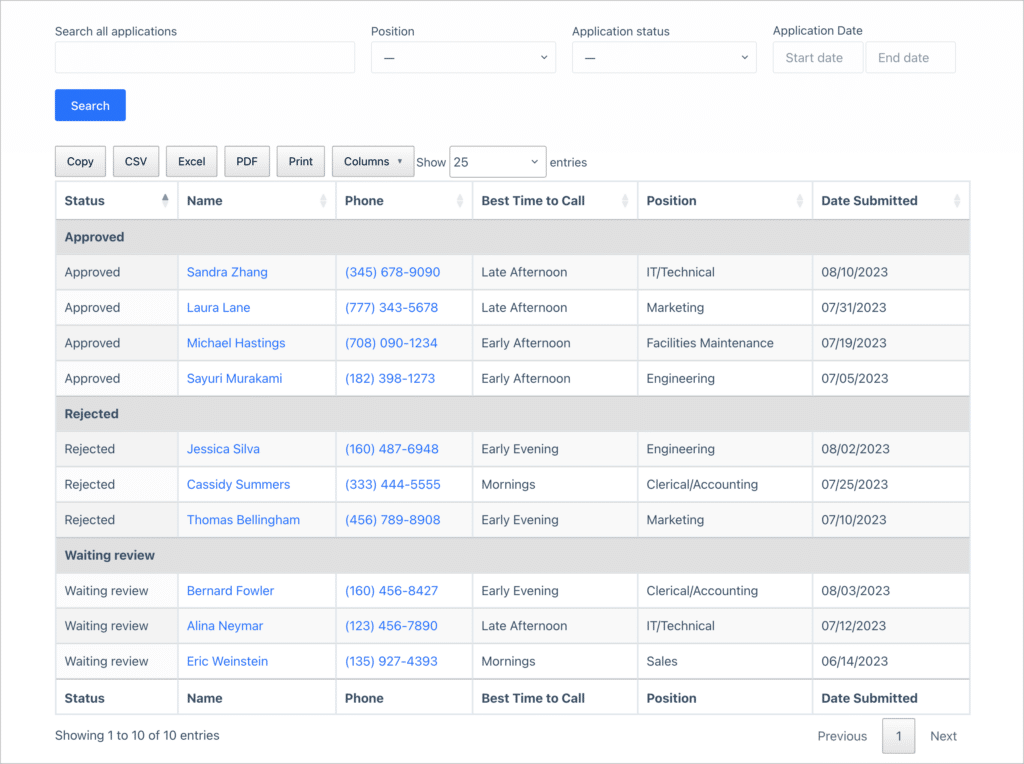
Example #2: Application review system
Here’s an example of a job application management system. Job seekers apply through a Gravity Form, and those applications are stored in a front-end table with filtering, sorting, and exporting capabilities. The hiring team can click to view an individual application, update its status, and even delete it if they think it was spam.
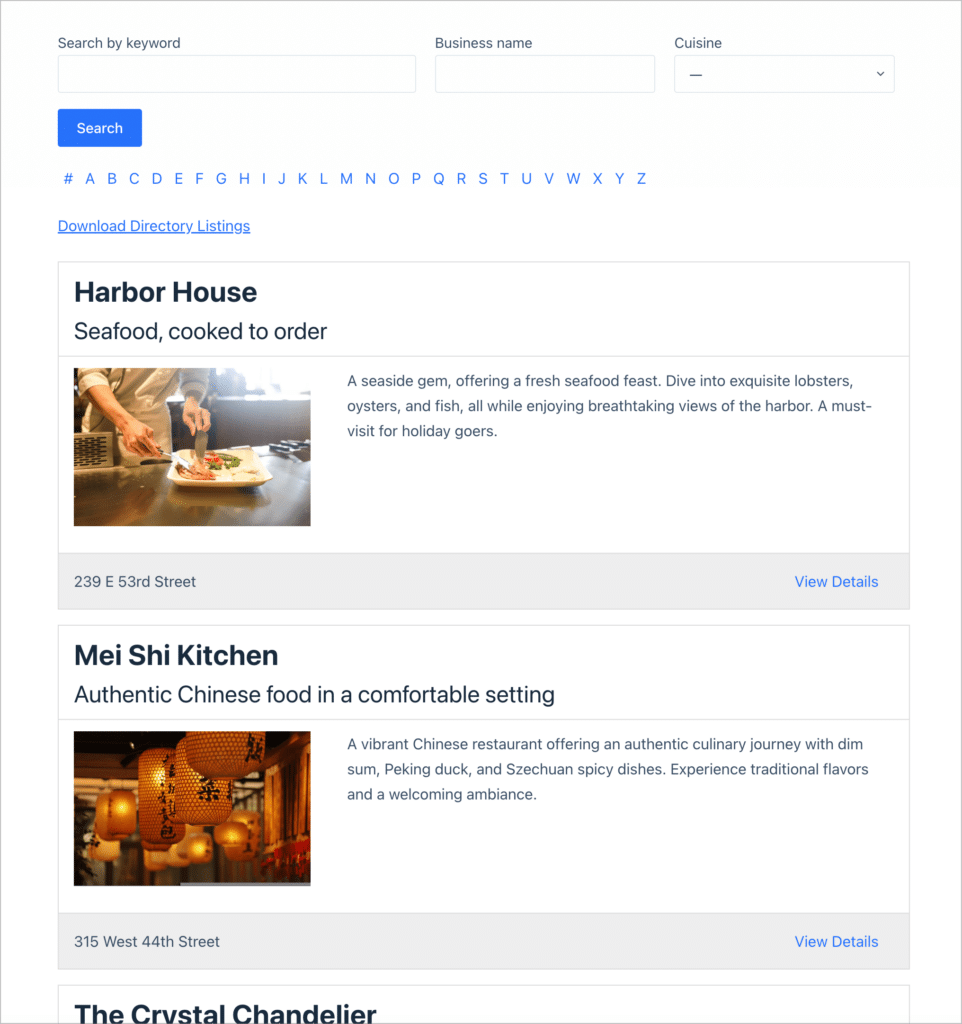
Example #3: Business directory
Here is a simple business directory that uses GravityView’s “List” layout. Businesses can add their profile information through a Gravity Form, and once approved, their listing will show up on the front end.
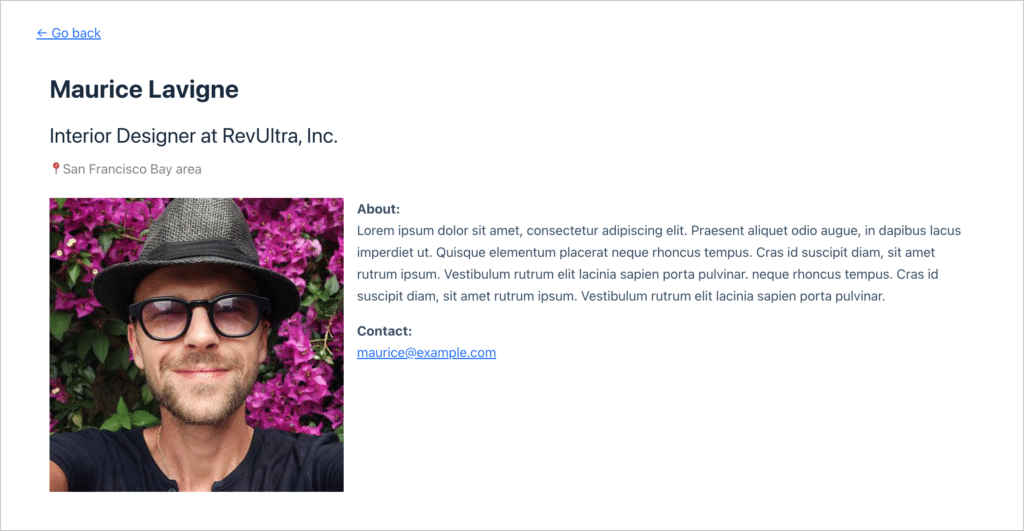
Example #4: User profiles
In our last example, we’re displaying a simple user profile page for a member directory. When users register to become a member, they can fill out their profile via a Gravity Form, and when they save it, their information will be visible on the website.
Pro tipIf you want to see some other examples of front-end applications that you can build using the Gravity Forms/GravityView combo, check out our Build It page.
How to build CRUD apps on WordPress with Gravity Forms and GravityView
Let’s dive in to the nitty gritty, shall we?
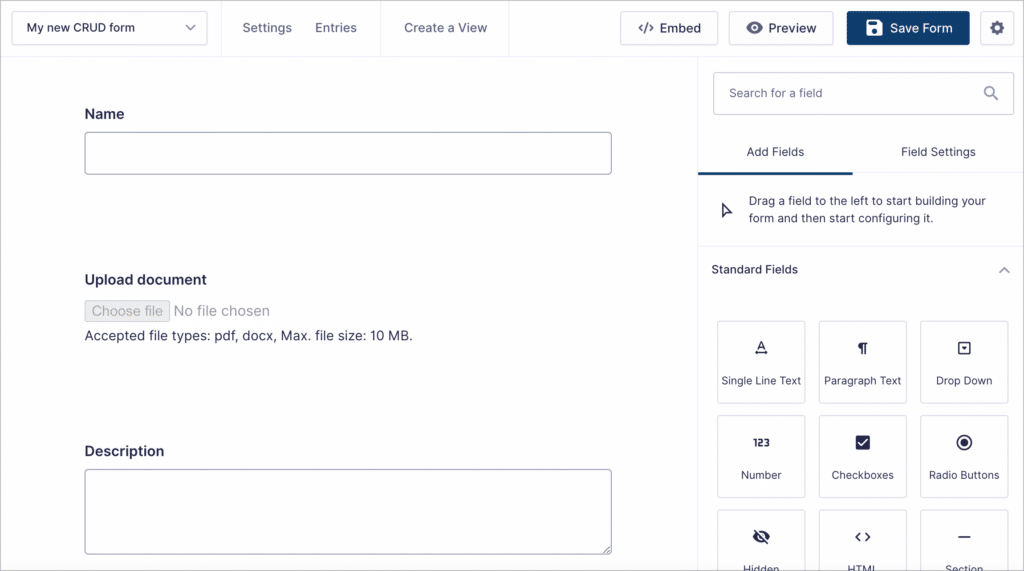
For this example, we’re going to create a simple app for accessing and updating different kinds of documents.
We always begin by creating a form. Think of this as your data source. Because we’re using forms to capture and store data, we don’t need custom post types or custom fields. I enjoy this way of building because it allows me to create apps extremely quickly. It’s also a neat way to sketch out an MVP or proof of concept for ideas that need further refinement.
Moreover, Gravity Forms supports a range of field types, making it perfect for handling the Create function of any web app, and building a new form is easy using the Gravity Forms visual editor.
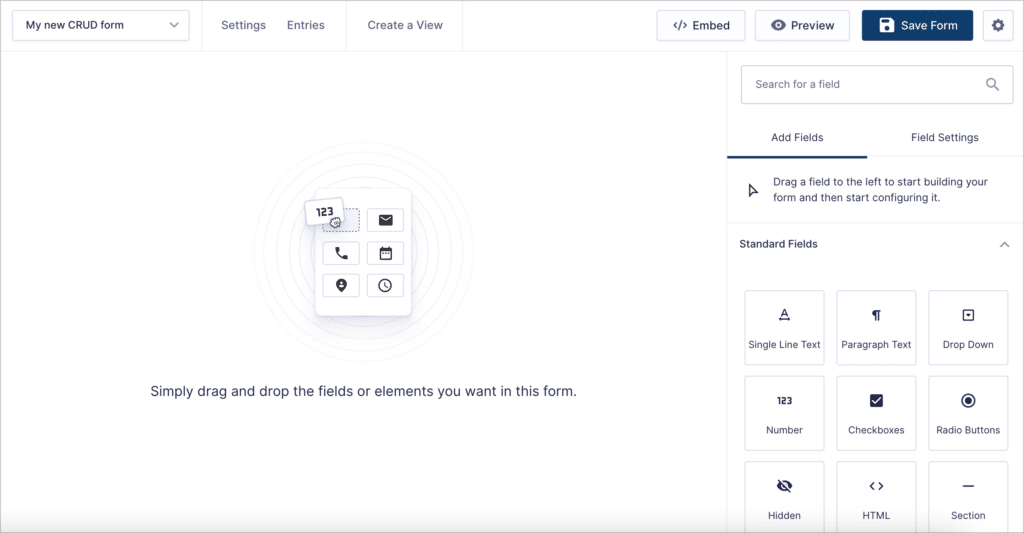
Let’s add a File Upload field so users can upload their documents, and a few other fields for extra information.
After building our form, we can use GravityView to create a “View” to display submission data on the front end.
Pro tipIn GravityView 3.0 you don’t have to build the View by hand. Describe the app you want to an AI assistant and let the GravityKit MCP create and configure the View for you, then fine-tune it from there. It’s opt-in, so nothing connects to AI until you turn it on.
GravityView takes care of read, update and delete
We’ll start by creating a new “View”, and connecting it to our form. After that, we’ll need to select one of GravityView’s preset layouts.
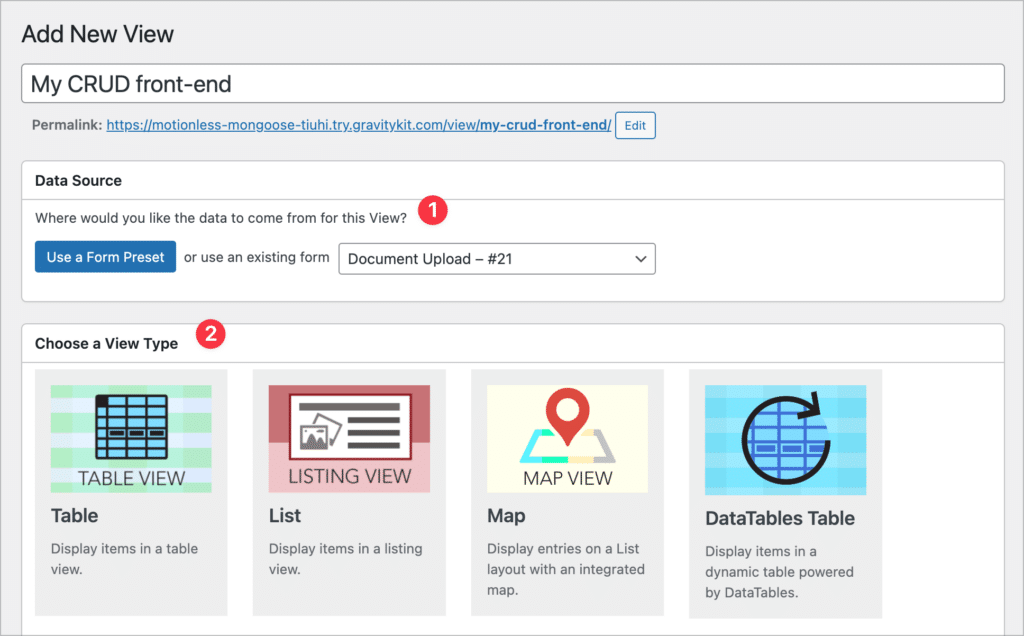
The layout you choose will depend on the kind of CRUD app you’re building.
- Table – Displays data in a table with columns and rows.
- List – Displays form entries one after the other (perfect for directories).
- Map – Display form entries as markers on a Google Map.
- DataTables Table – Includes advanced filtering, sorting and exporting options.
- DIY – Build your own layout using HTML and CSS.
For this example, we’ll select the “DataTables Table” option.
Whichever layout you pick, you don’t need to write CSS to make it look good. Apply the Vantage theme, added in GravityView 3.0, and your View gets a clean, modern, responsive style out of the box, so you can usually skip the DIY HTML-and-CSS route entirely.
After selecting a layout option, we can begin building our View using GravityView’s drag and drop editor. In the editor, we can add fields and widgets to different areas. Fields are the data collected via our form, and widgets are tools for navigating a View (e.g., a search bar).

The View editor includes three pages: the Multiple Entries Layout, the Single Entry Layout and the Edit Entry Layout.
- Multiple Entries Layout
This is the main page where your form entries are displayed one after the other. This is also where users can search and filter entries.
- Single Entry Layout
This is the template for how each entries will be displayed.
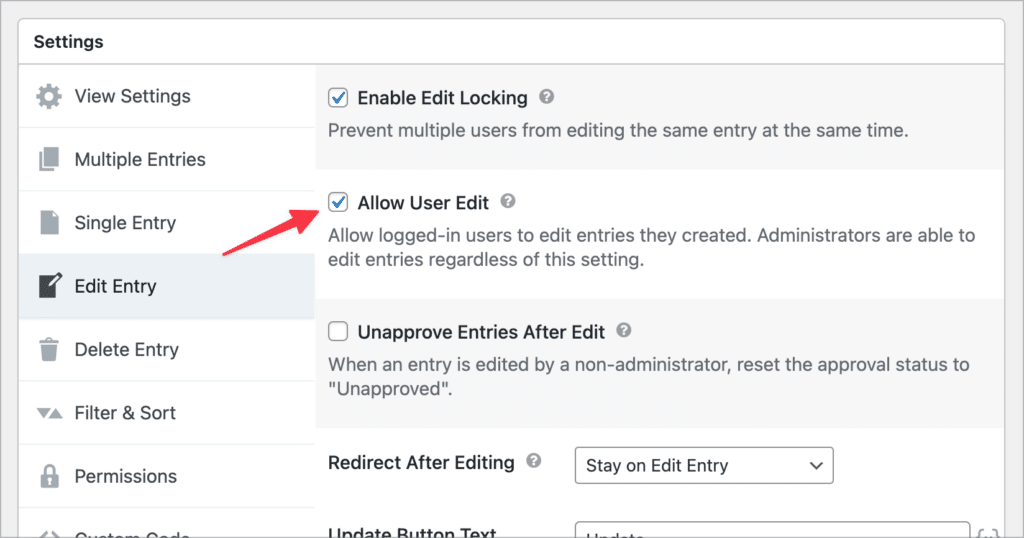
- Edit Entry Layout
Allows you to control which fields are editable from the front end.
After configuring our View, the next step is to make entries editable from the front end! In the View settings there is an option to “Allow User Edit”; enabling this will allow all logged-in users to update entries that they create (directly from the front-end!).
Additionally, if you only want entries to be visible to the user that created them, you can configure this using the advanced filter. GravityView’s advanced filter enables you to use conditional logic to filter entries in a View.
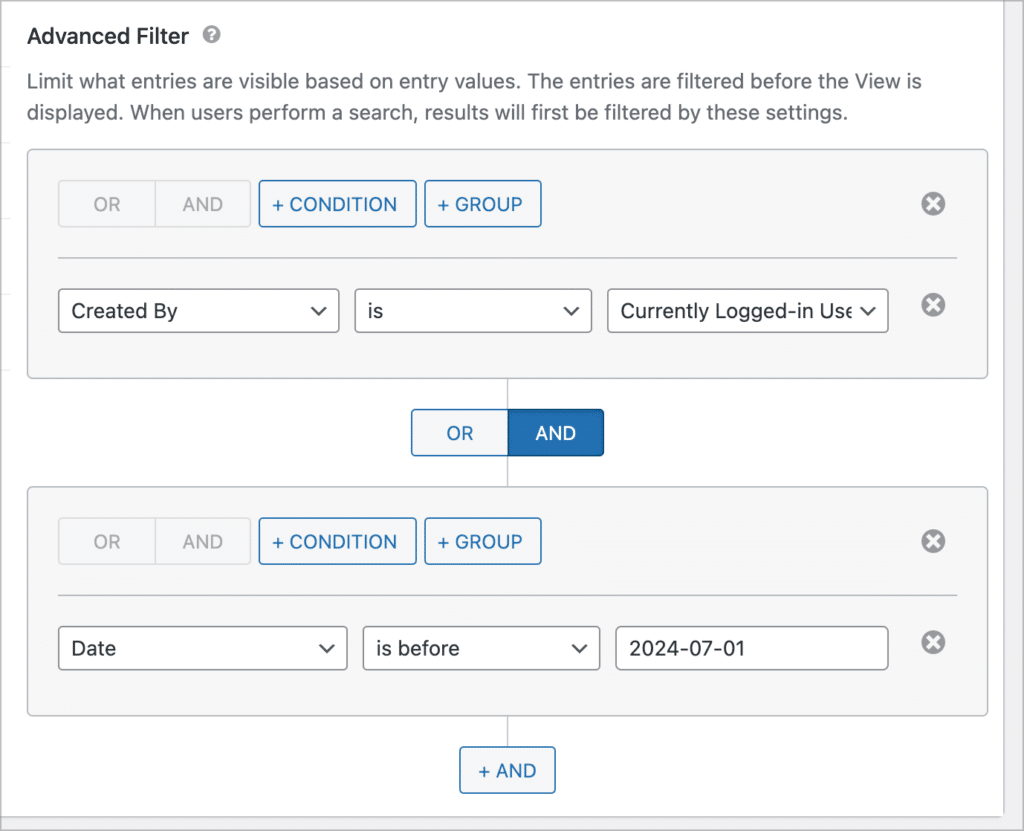
Here are some examples of what you can do:
- Display entries created within a specific timeframe
- Display entries created by the logged-in user
- Hide entries containing a certain value
After configuring our View, we can embed it on a page or post. To do this we can either use a shortcode, or a WordPress block! Here’s our finished document library:

And here’s a look at the edit entry screen, where users can update document details, directly from the front-end!

Editing one entry at a time covers the basics, but a real CRUD app often needs to manage many records at once. GravityView 3.0’s Frontend Bulk Actions widget lets approved users approve, edit, delete, export, or resend notifications on multiple entries together, straight from a table View, with no dashboard access required.
Pro tipFound this post helpful so far? Make sure to read our guide to no-code development on WordPress.
Wanna try it?
Spin up a demo
See what you can build with GravityView — explore the live demo.

WordPress CRUD: Commonly asked questions
After doing som research for this post, I came across some questions that WordPress users were asking about building CRUD apps, so let me address them here.
What is the WordPress plugin for crud operations?
There are several popular plugins that enable you to perform CRUD operations in WordPress, including GravityView, wpDataTables, and ACF. To learn more about the different available solutions, see our comprehensive review of WordPress CRUD plugins.
CRUD vs REST: what’s the difference?
CRUD is an acronym for Create, Read, Update, Delete. It describes the basic functions of any data-management program.
REST on the other hand, stands for “REpresentational State Transfer”: It’s an architectural model for web-based systems.
CRUD operations (Create, Read, Update, Delete) are similar to REST basic commands, i.e., GET, PUT, POST, DELETE. This often leads to confusion between the two.
How do I use WordPress to create a database application?
If you’re looking to build a CRUD system that enables you to display data in tables with rows and columns, GravityView is the perfect tool. GravityView’s different table layouts allow you to display, store and manage data from the front end.
How do I make CRUD forms in WordPress?
A CRUD form is a form that enables users to go back and edit their submissions from the front end. To create a CRUD form in WordPress, simply construct your form using Gravity Forms, install GravityView and create a View to display submissions.
Ensure that you enable GravityView’s “User Edit” option and use the Advanced Filtering extension to limit entries to those created by the logged-in user. To learn more, read Gravity Forms front end editing: Edit entries after clicking “Submit”.
Build your WordPress CRUD application using GravityView
Coding your own CRUD system from scratch requires development skills, WordPress experience and a lot of free time! In this post, I showed you how to create a WordPress CRUD system without writing any code using Gravity Forms and GravityView.

Helpful tips right in your inbox.
Subscribe to get the latest articles, information on releases and helpful Gravity Forms tips!
More articles

Ecommerce platform market share 2026: WooCommerce leads the web, Shopify leads the top tier
Ecommerce platform market share in 2026, from HTTP Archive data. WooCommerce leads the whole web at 6.64%, but Shopify already leads the top 1M sites.

Launch Log: 3D map enhancements, smarter filtering, and improved performance on large data sets
GravityKit’s July 9 launch log: 3D map starting views and viewport loading, searchable field-to-field filtering, and fixes across DataTables and more.
How to build a conference website on WordPress (attendee registration + abstract submission)
Build a conference registration and abstract submission site on WordPress with GravityKit, no code: forms, an attendee directory, sessions, and PDF certificates.