Complete guide
Last updated:
Exporting entries from Gravity Forms: A complete guide
Gravity Forms collects your data, but at some point, you need to get it out. Whether you’re building reports, sharing results with a client, backing up entries before a migration, or feeding data into another tool, exporting is one of the most common tasks for any Gravity Forms user. This guide covers every major export format, automation option, and integration available, with links to detailed tutorials for each.
Table of contents
- How the built-in Gravity Forms export works
- How to export Gravity Forms entries to CSV
- How to export Gravity Forms entries to Excel
- How to export Gravity Forms entries to PDF
- How to export Gravity Forms entries to Google Sheets
- Automating your Gravity Forms exports
- Sending exports to remote storage
- Reporting and data visualization
- Specialized export scenarios
- GravityExport vs built-in export
- Security and best practices for exporting form data
- Frequently asked questions
How the built-in Gravity Forms export works
Gravity Forms ships with a basic export tool. You’ll find it under Forms > Import/Export > Export Entries in your WordPress admin. Select a form, choose which fields to include, optionally set a date range, and download a CSV file.
It works, but it has real limitations:
- CSV only — no native Excel, PDF, or Google Sheets export.
- Admin access required — you need to log into WordPress to run an export.
- No scheduling — every export is manual.
- No saved settings — you configure the export from scratch each time.
For most sites, these limitations are manageable at first but become painful as your forms grow. That’s where plugins like GravityExport fill the gap—adding format options, automation, remote storage, and front-end access. If you’re new to GravityExport, the Getting Started guide walks you through initial setup.
How to export Gravity Forms entries to CSV
CSV is the universal default. Nearly every spreadsheet app, database tool, and analytics platform can read a CSV file, making it the safest choice when you’re unsure what format the recipient needs.
The built-in Gravity Forms export produces CSV files, so you can get started without any additional plugins. If you need more control, like scheduling recurring exports, exporting to different formats, or saving your export configuration for reuse, GravityExport provides much of this functionality.
Go deeper: How to automatically export Gravity Forms entries and send reports via email.
How to export Gravity Forms entries to Excel
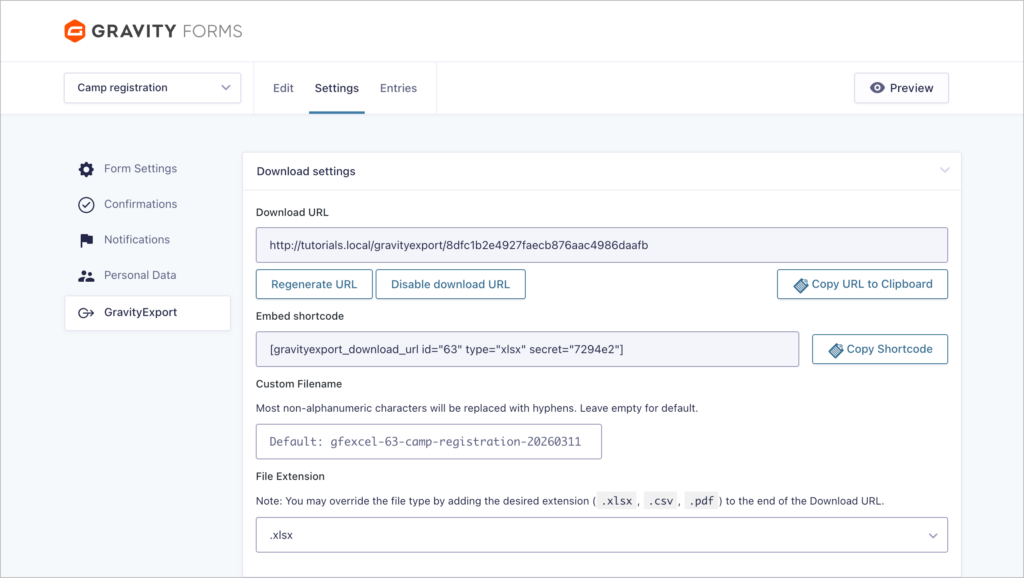
If your team works in Excel, exporting directly to .xlsx format saves you the hassle of opening a CSV and fixing column formatting. GravityExport Lite (free) adds native Excel export to Gravity Forms via a secure URL.
Excel export is especially useful when you need to preserve data types (dates, currencies, numbers) without the formatting issues that often come with CSV-to-Excel conversion. And if you need to export checkbox fields as separate columns or split complex fields into multiple columns, GravityExport Lite handles both.
Go deeper: How to export Gravity Forms entries to Excel (complete guide).
How to export Gravity Forms entries to PDF
PDF exports are ideal when you need a polished, read-only document—think invoices, applications, certificates, or summary reports. Because PDFs maintain consistent formatting across devices, they’re the right choice for anything you’ll share externally or archive.
There are several ways to generate PDFs from Gravity Forms data:
- GravityExport – export entry data as a PDF table, useful for bulk reports. You can also attach PDF exports to Gravity Forms email notifications so that each submission automatically sends a formatted document to the right people.
- Gravity PDF – generate individual PDFs from single entries using customizable templates.
- PDF for GravityView – turn any GravityView layout into a downloadable PDF.
- Fillable PDFs – ideal for legal contracts and government documents.
Go deeper: How to export Gravity Forms entries to PDF (4 easy methods without code).
How to export Gravity Forms entries to Google Sheets
Google Sheets gives you cloud-based access, real-time collaboration, and easy sharing without needing to install desktop software. There are three common approaches for getting Gravity Forms data into Sheets:
- Direct plugin integration — dedicated plugins that sync form entries to a Google Sheet automatically.
- Zapier or Uncanny Automator — use automation tools to trigger a Sheets row update whenever a new entry is submitted.
- CSV or Excel export — download your entries and import the file into Google Sheets manually.
The automated options work best when you need a living spreadsheet that updates itself, while the manual approach is fine for one-off exports.
Go deeper: How to export Gravity Forms entries to Google Sheets: 3 easy methods.
Automating your Gravity Forms exports
Manual exports don’t scale. If you’re downloading the same CSV every Monday morning, it’s time to automate!
You can automate exports through:
- GravityExport – generates exports on demand via a manual trigger URL. This is useful for integrating with external systems or running scheduled reports using a cron job.
- Email attachments – automatically attach a CSV, Excel, or PDF export to any Gravity Forms notification. Learn how.
- Zapier – connect Gravity Forms to 8,000+ apps and trigger actions when new entries arrive. Official Zapier Add-On.
- Other add-ons – Entry Automation by CosmicGiant saves you time by simplifying common tasks like exporting entries.
Go deeper: How to automatically export Gravity Forms entries and send reports via email
Sending exports to remote storage
Sometimes you need your export files delivered somewhere specific—a shared Dropbox folder, a client’s FTP server, or a directory on your own server. GravityExport supports all three:
- Dropbox — connect your Dropbox account and have exports uploaded automatically. Set up Dropbox integration.
- FTP / SFTP — upload export files to any external server that supports FTP or SFTP. Configure FTP uploads.
- Local server storage — save export files directly to a folder on your WordPress server’s file system, useful for backup workflows or feeding data into other server-side processes.
Exporting files and images from Gravity Forms
If your forms include file upload fields, you may need to export the uploaded files alongside the entry data. GravityExport can include download links or bundle the files with your export, so you don’t have to track them down in the WordPress media library separately.
Go deeper: How to export images and files uploaded to Gravity Forms
Reporting and data visualization
Exporting raw data is only half the picture. If you need to spot trends, summarize responses, or present results visually, Gravity Forms data can power charts, graphs, and dashboards directly inside WordPress.
GravityCharts – create bar charts, pie charts, line graphs, and more from your form data, then embed them on any page or post. See how to visualize your data.
Smart data dashboards – combine GravityView and GravityCharts to build interactive dashboards that display live form data. Examples: Expense tracker and fundraising dashboard.

Saved export settings – in GravityExport, save and reuse your export configurations so you can regenerate the same report without reconfiguring it each time. Learn how.
Go deeper: How to create detailed reports in Gravity Forms and analyze your form data.
Specialized export scenarios
Not every export fits neatly into “download a spreadsheet.” Here are some less common but important use cases:
Exporting survey responses
If you’re using the Gravity Forms Survey add-on, exporting survey data requires some extra attention — Likert scales, rankings, and multi-row fields don’t always export cleanly with the built-in tool. This guide walks through the best approach.
Frontend exports for non-admin users
The built-in export tool requires WordPress admin access, but many sites need to let logged-in users download their own data from the front end. GravityExport provides a shareable link with configurable permissions that you can share with anyone who needs the data.
Exporting and migrating forms between sites
If you need to move a form configuration (not the entries, just the form itself) to another WordPress site, Gravity Forms lets you export forms as JSON files through Forms > Import/Export > Export Forms. For full migrations that include both forms, entries, feeds, and more, GravityMigrate handles the complete transfer.
Go deeper: How to migrate your Gravity Forms forms AND entry data to a new site.
GravityExport vs built-in export
| Feature | Built-in export | GravityExport |
|---|---|---|
| CSV export | Yes | Yes |
| Excel (.xlsx) export | No | Yes |
| PDF export | No | Yes |
| Scheduled / automated exports | No | Yes (using cron) |
| Email attachments | No | Yes |
| Saved export settings | No | Yes |
| Conditional logic filtering | Limited | Yes |
| Remote storage (Dropbox, FTP) | No | Yes |
| Front-end export access | No | Via secure URL |
| File / image export | No | Yes |
| Secure download links | No | Yes |
GravityExport Lite (free) is a good starting point if you primarily need Excel export. The premium GravityExport plugin unlocks the full feature set above.
Security and best practices for exporting form data
Exporting data means moving it outside the relative safety of your WordPress database. A few things to keep in mind:
- Limit admin access. The built-in export requires full WordPress admin credentials. Sharing those credentials with team members who only need export access is a security risk. GravityExport’s secure download links are a safer alternative.
- Use secure connections. If you’re sending exports to FTP servers, always use SFTP (encrypted) rather than plain FTP.
- Consider GDPR and data privacy. Exported files containing personal data should be stored securely and deleted when no longer needed. Know your obligations before exporting user data off-site.
- Protect exported files. CSV and Excel files sitting in a shared Dropbox folder or email inbox are only as secure as the access controls around them. Use password-protected storage where possible.
Related guides
This guide is part of a series covering the most important Gravity Forms topics in depth. Explore the other guides in this set:
- How to use Gravity Forms: A complete guide
- Editing entries in Gravity Forms: A complete guide
- Importing entries to Gravity Forms: A complete guide
- Displaying Gravity Forms entries: A complete guide
- Gravity Forms conditional logic: A complete guide
- Gravity Forms calculations: A complete guide
Frequently asked questions
Not with the built-in Gravity Forms export; it only handles one form at a time. To combine entries from multiple forms into a single download, you’ll need a plugin. GravityExport can merge entries from multiple forms into a single Excel workbook with separate sheets per form. WP All Export also supports multi-form exports. If you only need a few forms, another option is to export each form individually and combine the CSVs in a spreadsheet.
Gravity Forms’ built-in export requires admin access, so there’s no way to share a download link with non-WordPress users out of the box. GravityExport solves this by generating a secure, static URL for any export. You can share it directly or embed it in an email notification. The free GravityExport Lite also supports this. This is especially useful for clients, collaborators, or team members who need regular access to entry data but shouldn’t have dashboard access.
This usually comes down to formatting. Common issues include fractions being converted to decimals, leading zeroes being stripped from zip codes or ID numbers, and multi-select fields being merged into a single column. Most of these are caused by how Excel interprets CSV data, not by the export itself. Try opening the CSV in Google Sheets or importing it into Excel using the Data Import wizard (instead of double-clicking) so you can set column types manually. If dropdown values appear wrong when using a dynamic population plugin, check that the export is pulling the stored value rather than the display label.
Yes, but it depends on the tool. GravityExport can generate PDF exports that include images, though files behind a firewall or WAF may return errors during rendering. For individual entry PDFs with full image support, Gravity PDF is a popular option—it generates a PDF per entry using customizable templates. If you need to export the actual files (not just display them in a PDF), see our guide on how to export images and files uploaded to Gravity Forms.
Nested forms requires the Gravity Wiz Nested Forms perk, which adds child fields as selectable columns in the built-in Gravity Forms export. GravityExport also supports nested form fields through its multi-row splitting setting, which separates child entry data into individual rows rather than combining them into a single cell.
Gravity Forms doesn’t include scheduled exports—every export is manual. To automate this, GravityExport lets you schedule recurring exports (daily, weekly, or monthly) and attach them to email notifications as CSV, Excel, or PDF files. You can also configure it to send only new entries since the last export, push files to Dropbox or SFTP, or attach PDF reports directly to Gravity Forms email notifications. WP All Export also offers weekly and monthly scheduling.