
Export Gravity Forms entries to Google Sheets
GravityExport can send your form entries straight to a Google Sheets spreadsheet and keep that spreadsheet in step with your form. Numbers arrive as numbers, dates as dates, and currency as currency, so you can sort, filter, and build formulas in the sheet without converting anything first.
This article walks through connecting a Google account, pointing a form at a spreadsheet, and choosing when the export runs.
Note: Google Sheets export requires GravityExport 1.15.0 or later.
Prefer to watch the video? #
Before you start #
You need all of the following:
- Gravity Forms installed and active, with at least one form that has entries.
- GravityExport 1.15.0 or later installed and active.
- A site served over HTTPS. On a site running over plain HTTP, the connect button appears unavailable.
- A Google account with access to Google Drive.
- A GravityKit license that includes GravityExport, activated on this site.
How the export works #
GravityExport mirrors your form into a single tab of a spreadsheet. Every export rewrites that tab in full rather than appending rows to the bottom, so one new entry and the whole form are the same operation. The tab always reflects the current state of the form, including dropping rows for entries you have deleted.
One Google account is shared by every export on the site. You connect it once, then each feed chooses which spreadsheet and tab it writes to.
How often the sheet updates
The Export Trigger on the feed decides what causes a rewrite. This is the setting that determines whether an edit reaches the sheet straight away:
| Trigger | New entry | Edited entry | Deleted, trashed, or restored entry | Rows added by an import, the REST API, or WP-CLI |
|---|---|---|---|---|
| Automatic | Rewrites | Rewrites, if Export on Update is on (the default) | Rewrites, if Export on Update is on (the default) | Rewrites once at the end of each request that added rows, if Export on Update is on |
| Scheduled | Waits for the schedule | Waits for the schedule | Waits for the schedule | Waits for the schedule |
| Webhook | Waits for the URL | Waits for the URL | Waits for the URL | Waits for the URL |
On an Automatic feed, editing an entry updates the sheet immediately. Edits made on the entry detail page, through GravityView’s Edit Entry or inline edit, or by another add-on calling the API all count. Turning off Export on Update stops edits, deletions, trash and restore, and rows added by an import or the API from triggering a rewrite. Those changes still appear at the next submitted entry, because every export rewrites the whole tab.
On a Scheduled or Webhook feed, nothing an entry does touches the sheet. Only the schedule or the webhook URL causes a write, and Export on Update has no effect.
Changes made in a single request are combined into one rewrite, so importing fifty rows rewrites the tab once rather than fifty times.
Step 1: Connect your Google account #
The connection lives in your site’s GravityKit settings, not on an individual form.
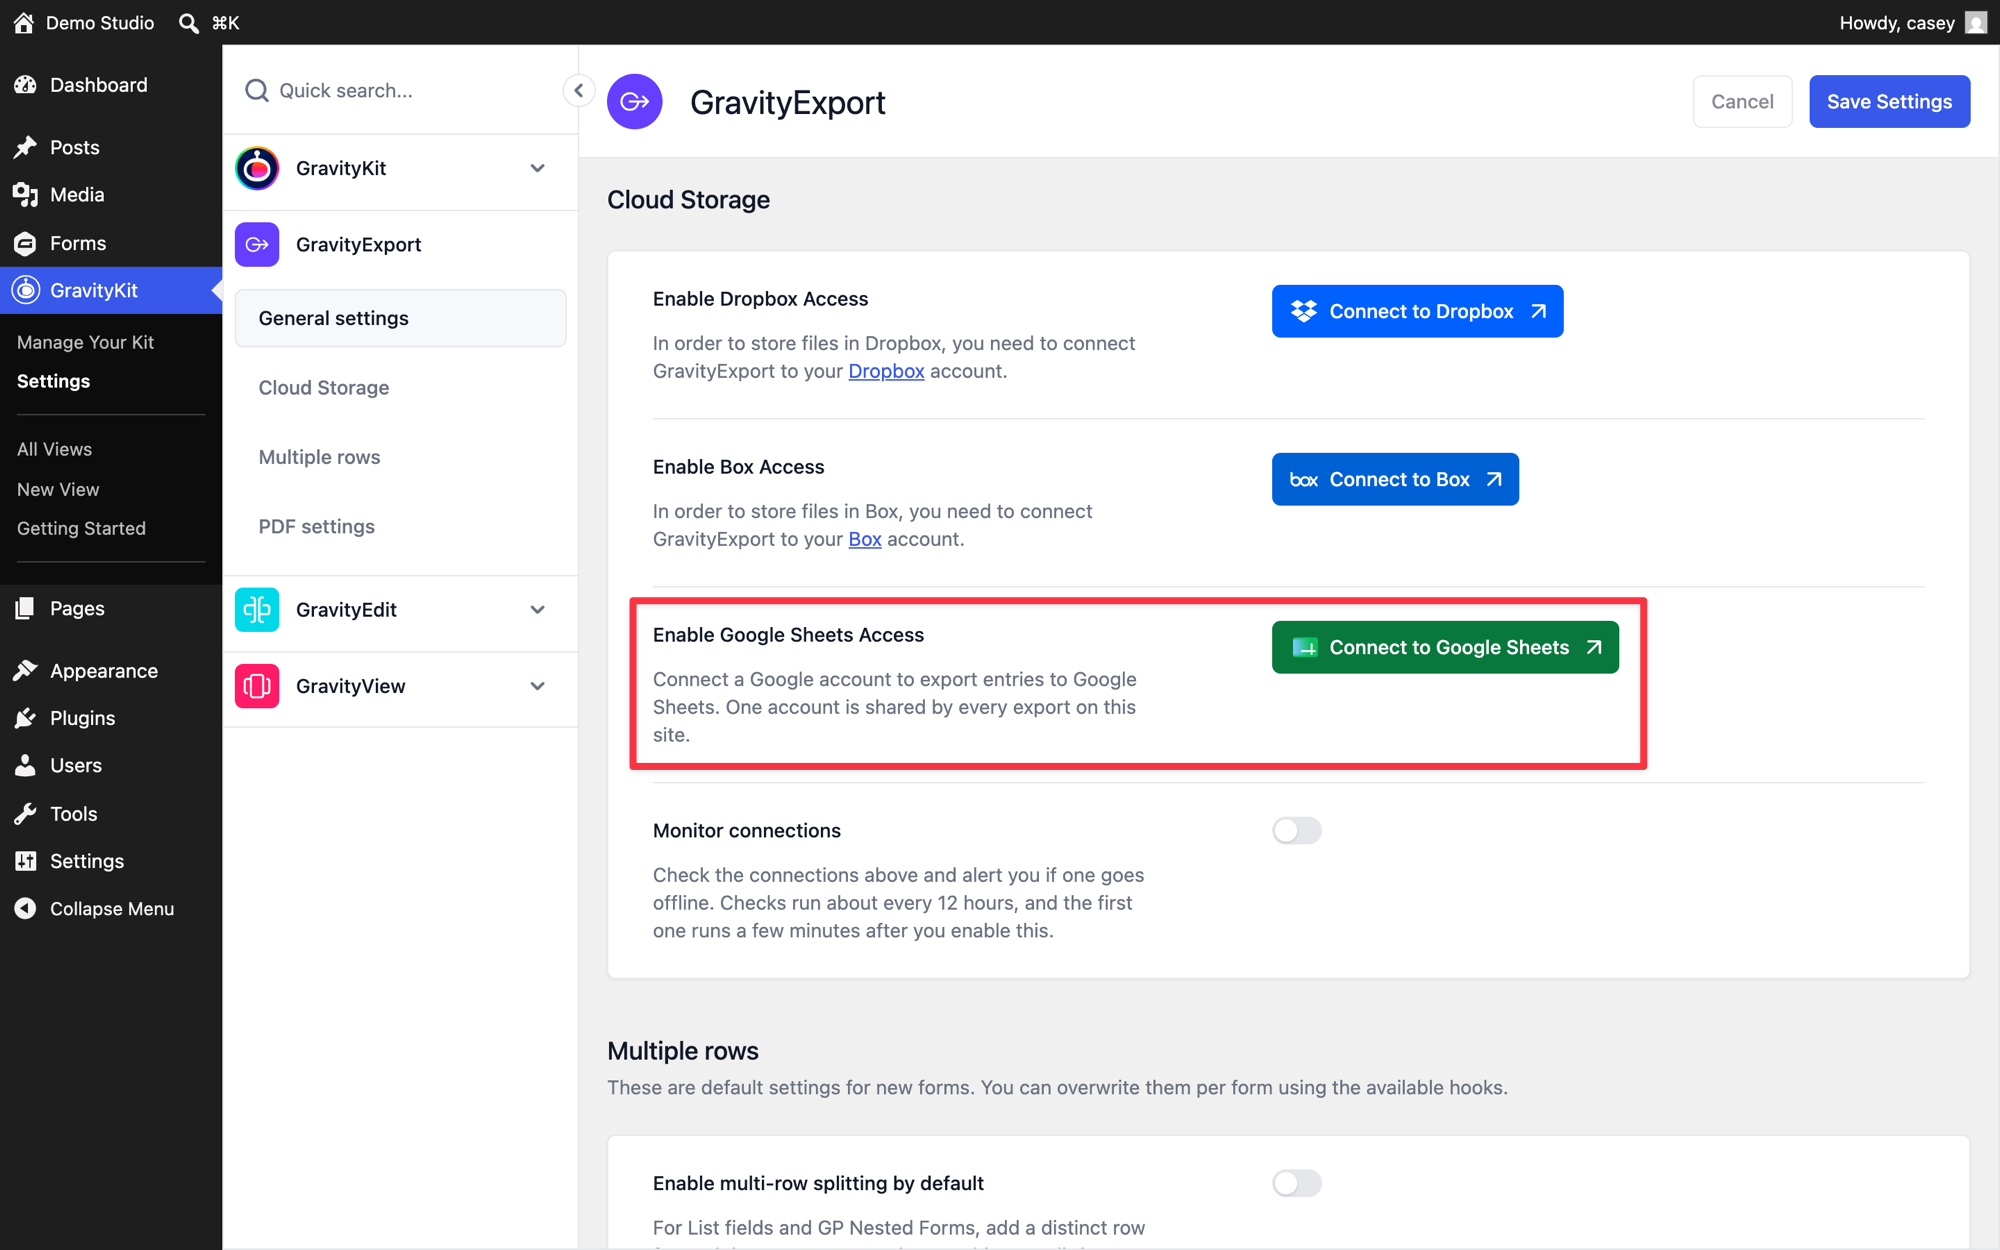
- In your WordPress admin, go to GravityKit > Settings, then click GravityExport in the settings menu.
- Find the Cloud Storage section.
- Click Connect to Google Sheets.
- Sign in to Google and approve the request. GravityExport only asks for access to the spreadsheets you create or pick, not your whole Drive.
- When you return to WordPress, the section shows the connected account address.
Once connected, the same row names the account exports run as, and offers buttons to test or disconnect it.
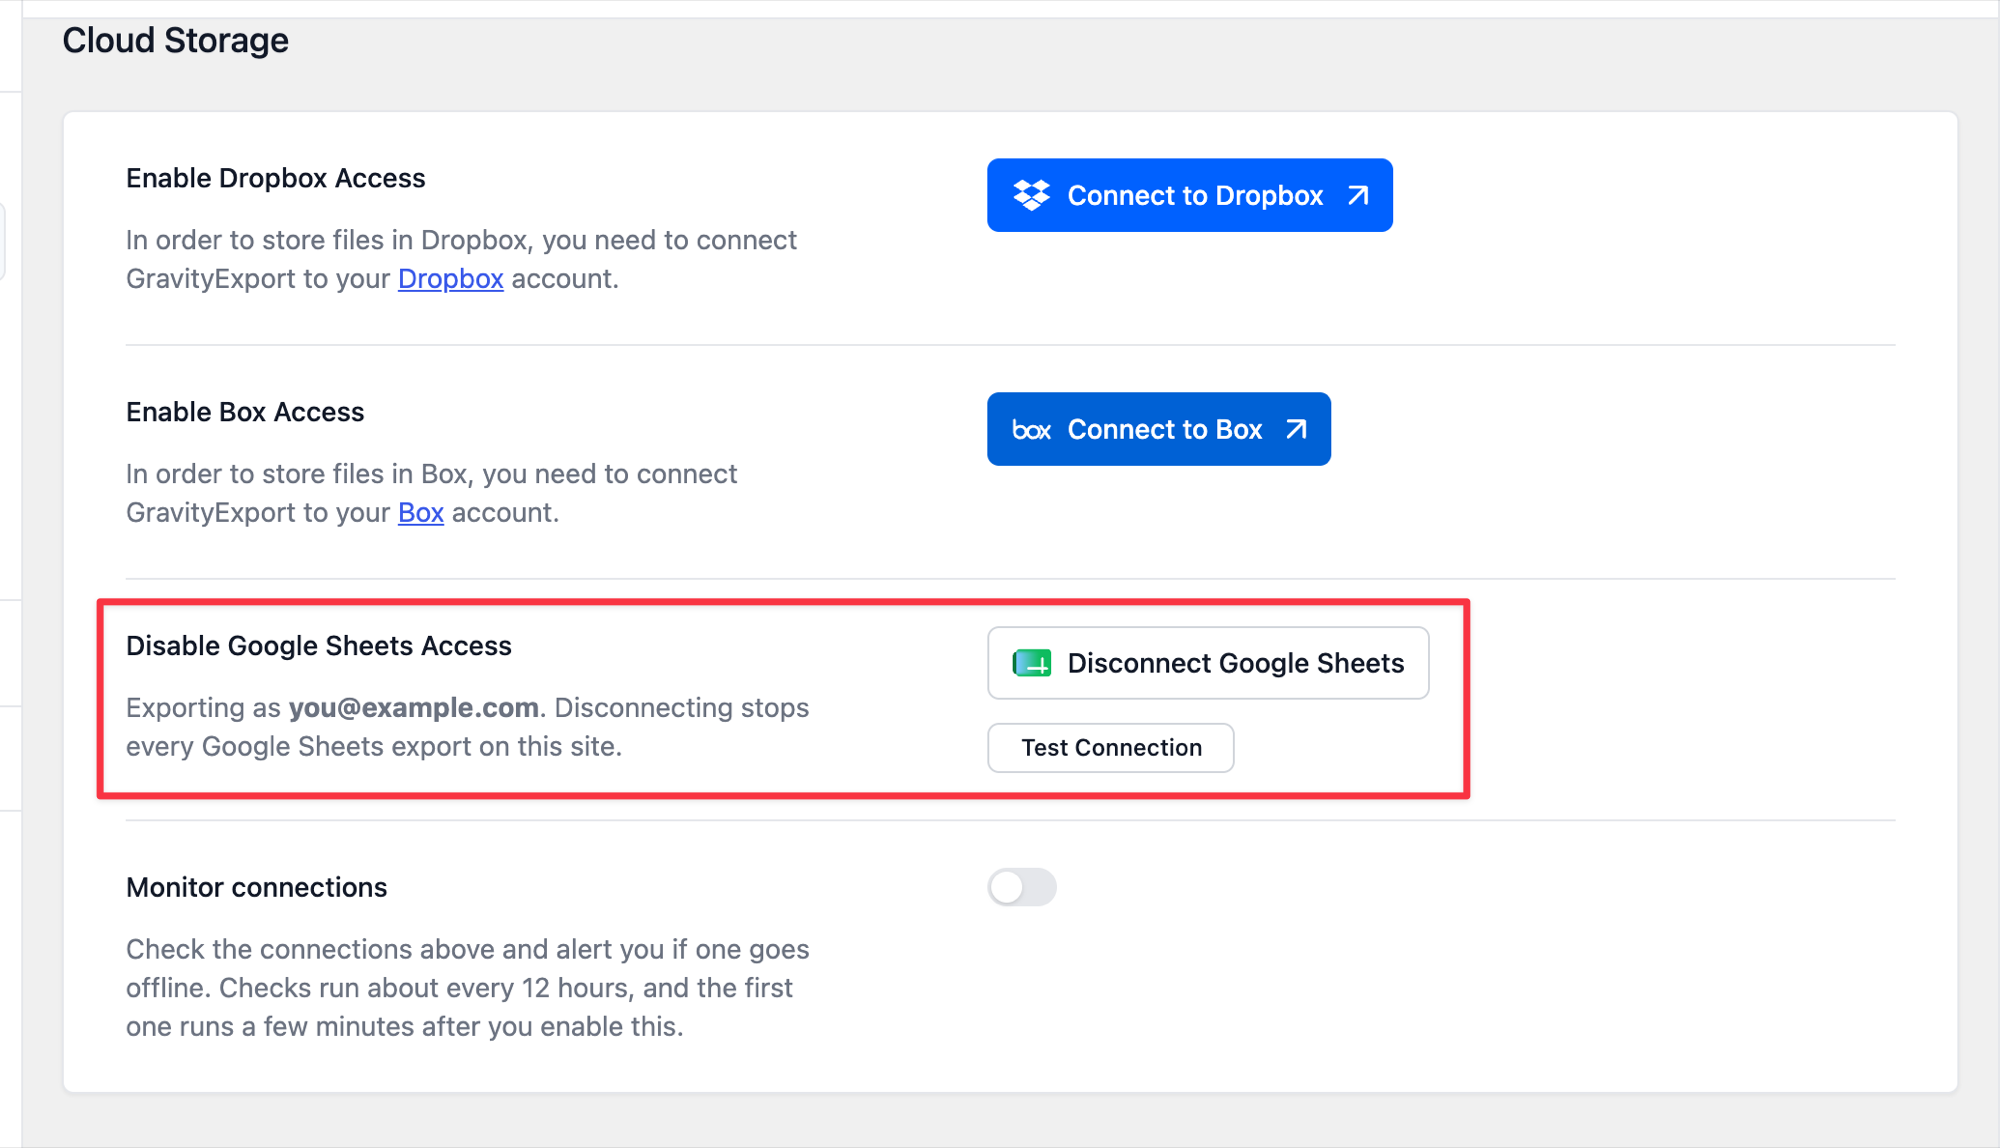
To confirm the connection works, click Test Connection.
While you are on this screen, consider enabling Monitor connections. It checks your cloud connections about every twelve hours and alerts you if one goes offline, which is how you find out that Google has stopped accepting the connection before your exports quietly stop.
Note: If the connect button is unavailable, the reason appears beneath it. The causes are a site not running over HTTPS, a missing or expired license, a license that does not include GravityExport, a site that has not been activated on the license, or a license that has used all its activations.
Step 2: Create the export feed #
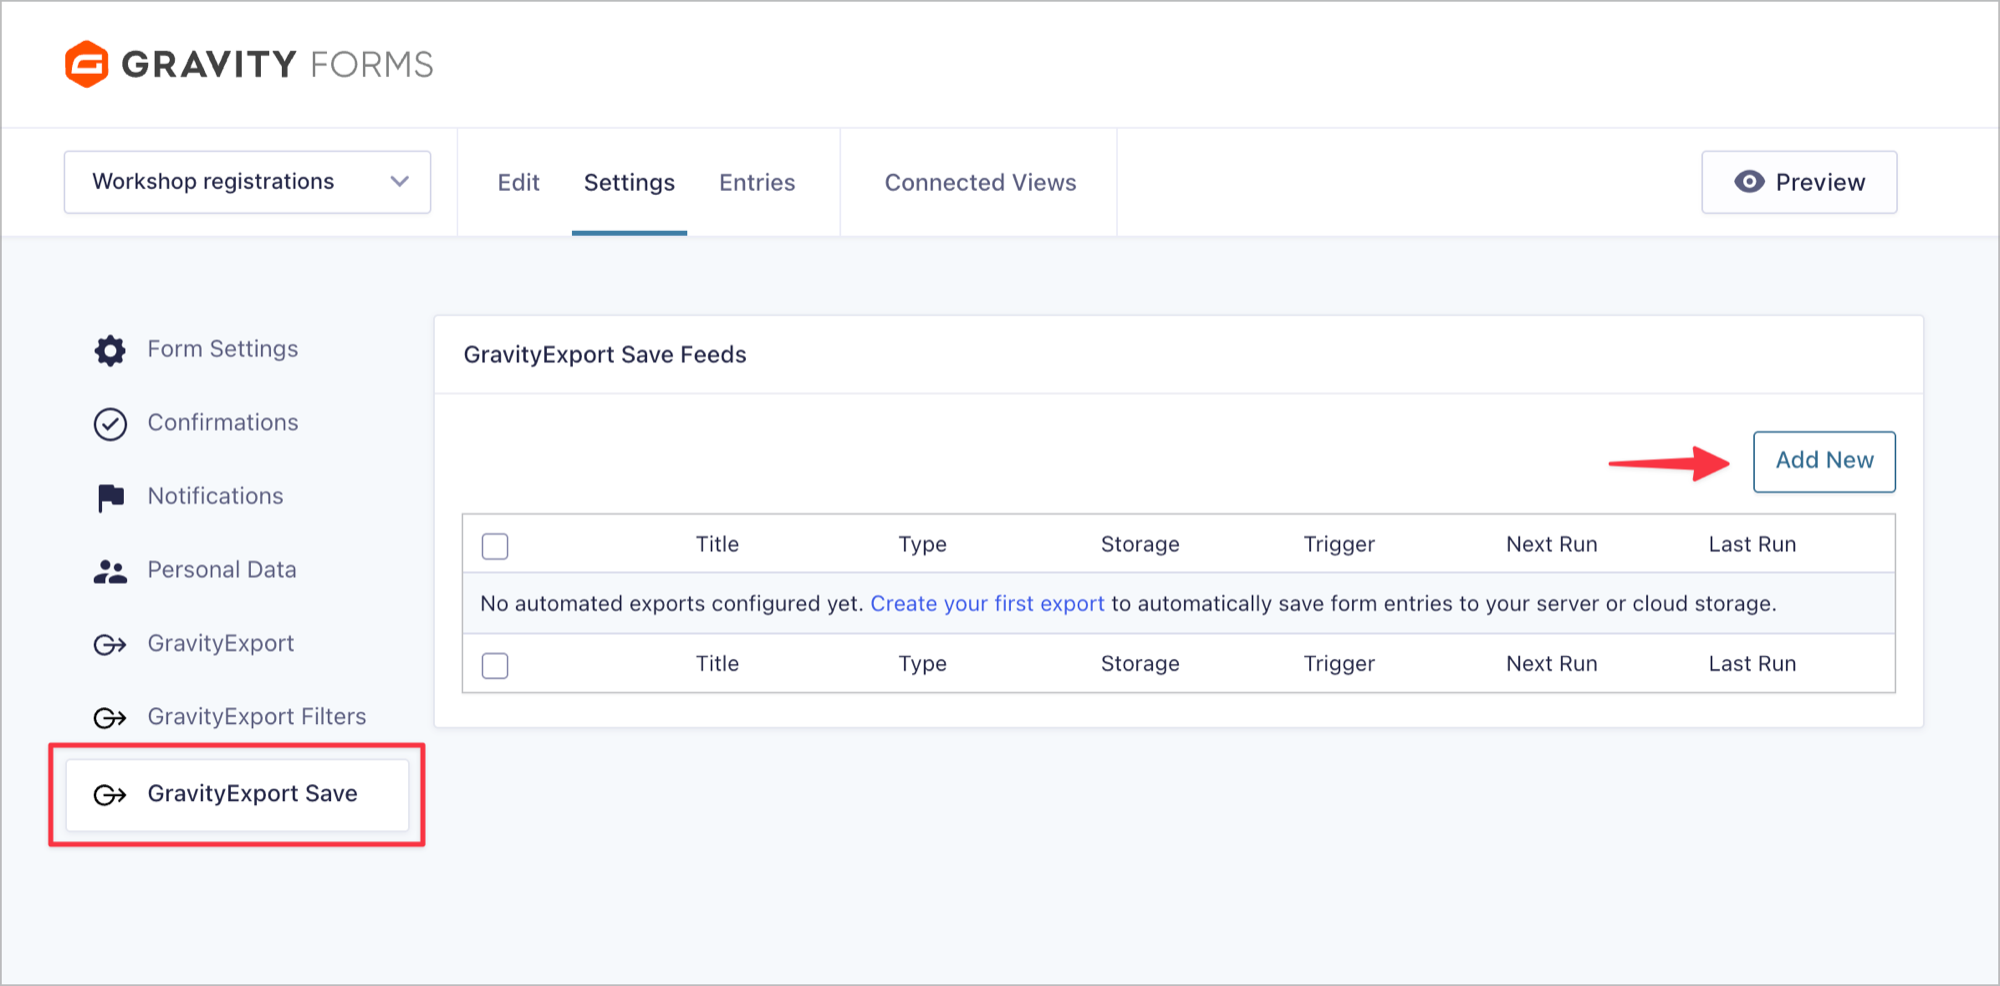
- Go to Settings > GravityExport Save on your form. On GravityExport 1.15 and 1.16, this tab appears only once the form’s download URL is enabled (Settings > GravityExport > Enable download URL) or the form already has an active Save feed. Your Save feed doesn’t use the download URL.
- Click Add New.
- Give the feed an Export Name. This is for your reference only and does not affect the spreadsheet.
Step 3: Choose Google Sheets as the destination #
Open the Storage tab of the feed and choose Google Sheets as the storage type. The feed screen shows which Google Account it will use, which is the account you connected in step 1.
If you skipped step 1, the tile reads Google Sheets — connect it under GravityKit Settings and cannot be selected. Connect the account first, then come back.
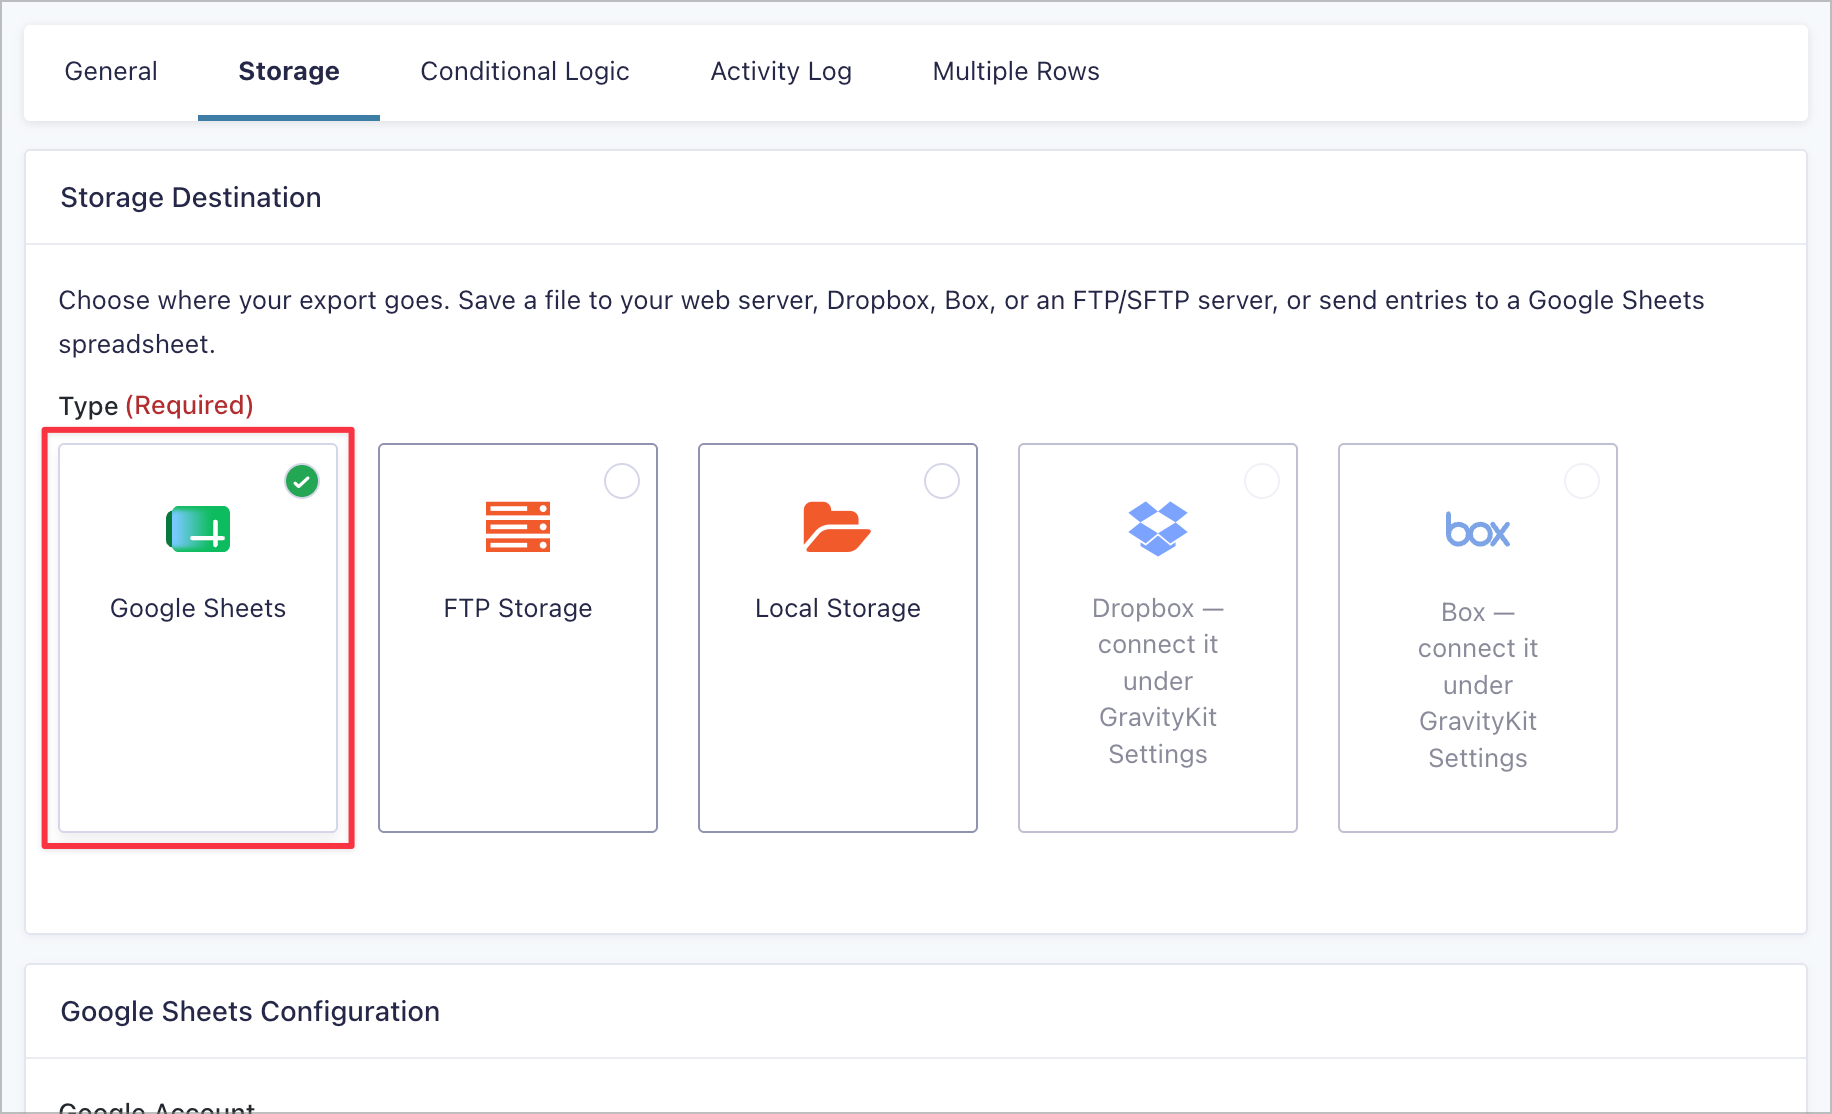
The panel repeats the most important thing about this destination:
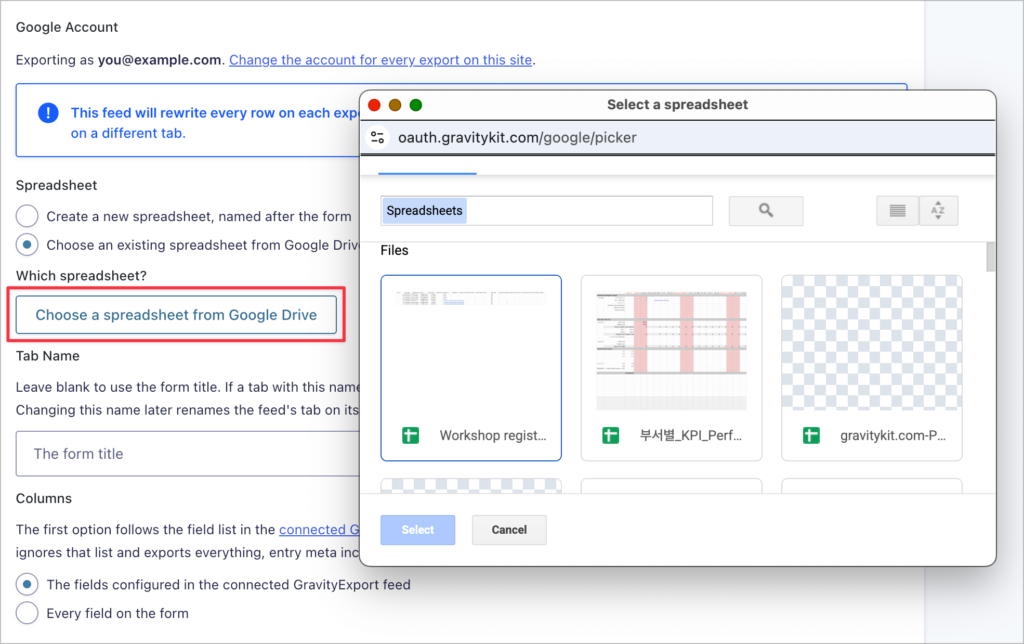
This feed will rewrite every row on each export. Tab contents will be fully overwritten: keep your notes, formulas and charts on a different tab.
Anything you add to the feed’s tab by hand is gone on the next export, so put your own work on a separate tab in the same spreadsheet.
The usual way to do that is a second tab that reads from the exported one. If the feed’s tab is named Contact Form, either of these pulls its data across:
={'Contact Form'!A:Z}=QUERY('Contact Form'!A:F, "select A, C where F = 'Yes'")Formulas, charts and pivot tables on your own tab survive every export, and they keep up to date on their own because the tab they read from does.
Step 4: Pick the spreadsheet #
Under Spreadsheet, choose one of two options.
| Option | What happens |
|---|---|
| Create a new spreadsheet, named after the form | GravityExport creates a spreadsheet in your Google Drive on the first export. After that run, the feed screen links to it. |
| Choose an existing spreadsheet from Google Drive | A picker opens so you can select a spreadsheet you already have. |
If you choose an existing spreadsheet, click Choose a spreadsheet from Google Drive. The picker opens in a separate window, signed in as the connected account. Only the spreadsheets you select here can be reached by GravityExport. There is no field for pasting a spreadsheet link, because picking a file in Google’s own window is what grants access to it. A pasted link grants nothing, so a feed configured that way would look finished and fail on every run.
Note: Picking a spreadsheet requires an administrator, because selecting one grants access to the Google account the site exports with. Users who can edit feeds but are not administrators see which spreadsheet a feed is already bound to. On a feed that has no spreadsheet yet, they aren’t offered the option to choose an existing one.
Step 5: Name the tab #
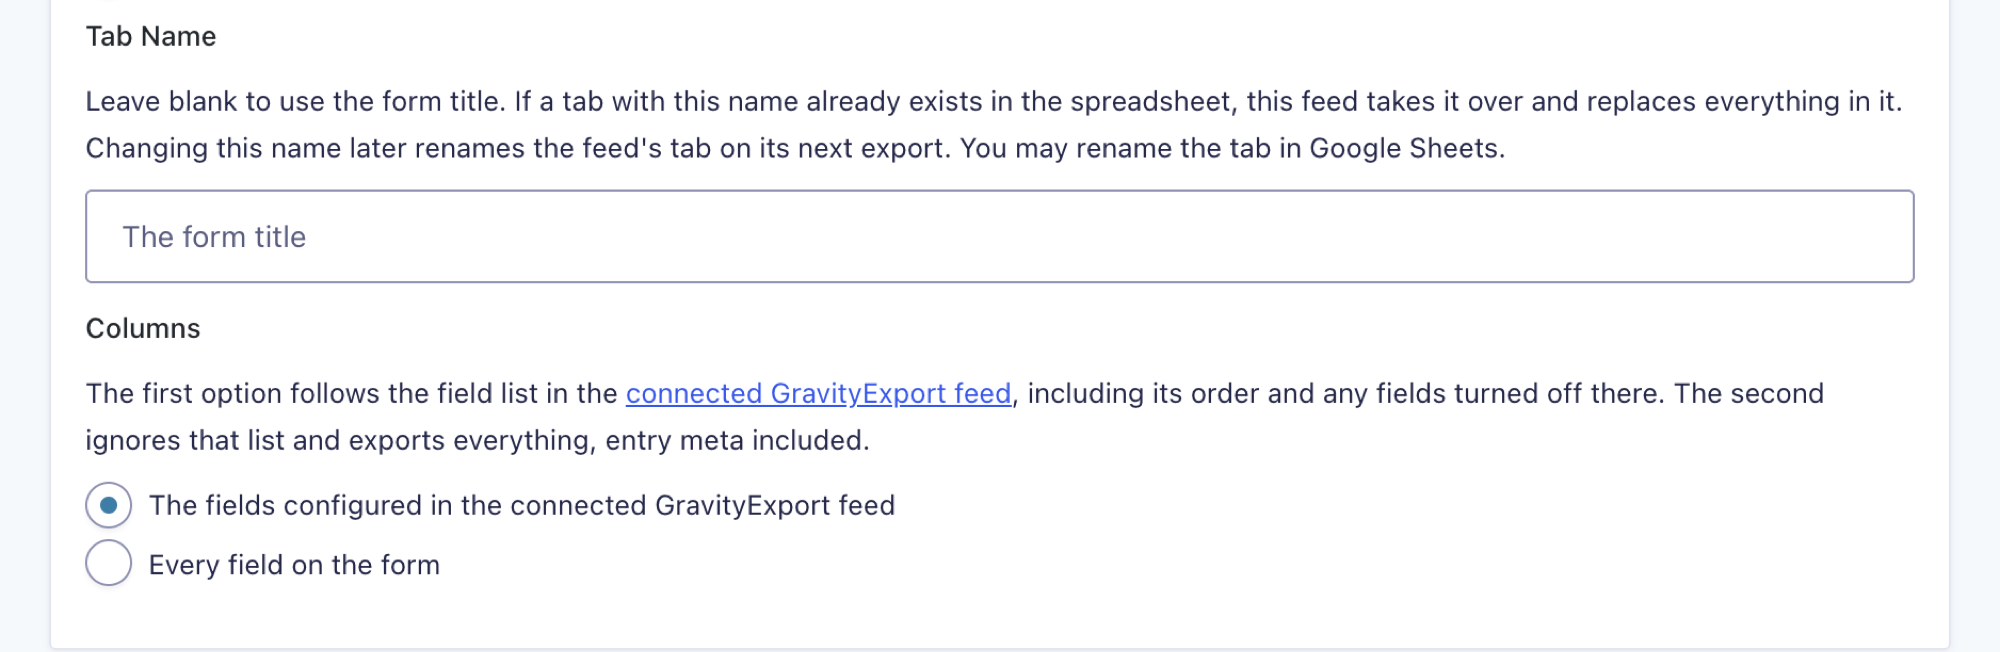
Tab Name controls which tab inside the spreadsheet the feed writes to. Leave it blank to use the form title.
A few things are worth knowing before you save:
- If a tab with this name already exists in the spreadsheet, this feed takes it over and replaces everything in it. Use a name of its own if the spreadsheet holds other work.
- Changing this name later renames the feed’s tab on its next export. You can also rename the tab in Google Sheets, and the feed keeps writing to it.
- Several feeds can share one spreadsheet, each writing to its own tab, so a single workbook can collect entries from several forms. Give each feed its own Tab Name: two feeds on the same form both default to the form title, and the second would take over the first one’s tab.
- Deleting the feed’s tab in Google Sheets is not how you stop exporting. The next run creates it again and refills it. To stop the export, deactivate or delete the feed in WordPress.
- A tab name can be up to 100 characters long and can’t contain
[ ] : / \ ? *. Deleting the feed in WordPress leaves the spreadsheet and its tab in your Google Drive.
Step 6: Choose the columns #
Columns decides which fields become columns, and in what order.
- The fields configured in the connected GravityExport feed follows the field list on the form’s GravityExport tab, including its order and any fields turned off there. This is the default. That list only appears once the form’s download URL is enabled, so without it every field is exported in form order; to remove fields or reorder columns, enable the download URL on the GravityExport tab and set the list there.
- Every field on the form ignores that list and exports everything, entry meta included.
Both settings are shown in the screenshot above.
Step 7: Choose when the export runs #
On the feed’s General tab, set the Export Trigger:
- Automatic (on every new entry) exports whenever an entry is submitted.
- Scheduled exports on a Schedule Interval: Every Hour, Twice Daily, Daily, Weekly, Every 30 Days, or Custom for a number of hours. The first scheduled run happens one interval after you save the feed, and it repeats from there.
- Webhook exports when a request hits the feed’s webhook URL.
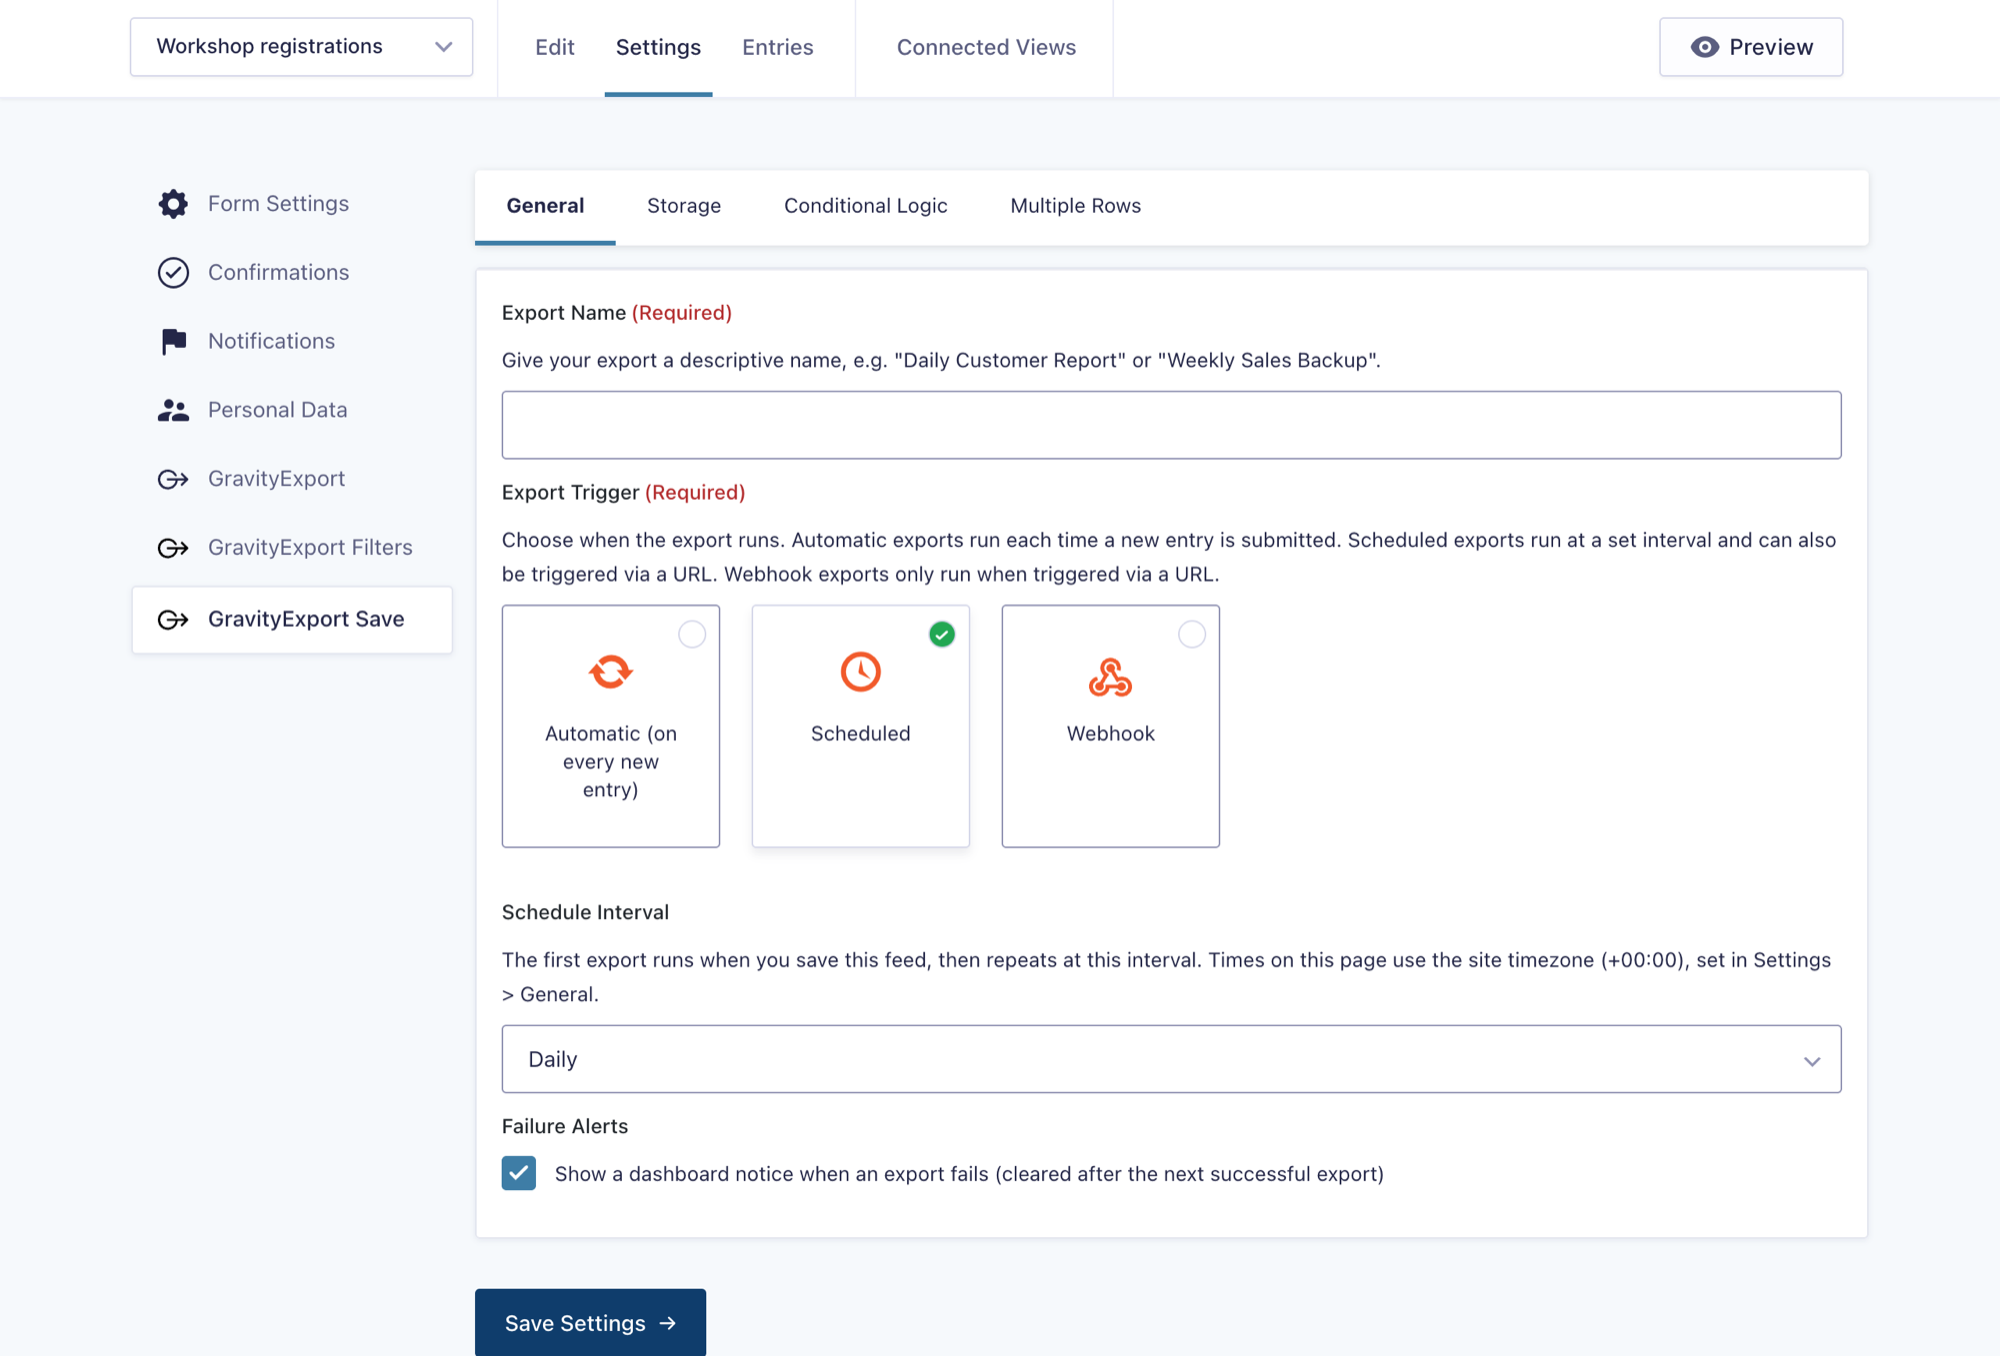
On a Scheduled feed, leave Failure Alerts enabled to get a notice on the WordPress Dashboard when a scheduled export fails. The notice clears after the next successful export.
Note: The Entries to Include option, which lets a scheduled export send only entries received since the last successful run, is not available for Google Sheets. It appears for file-based destinations such as Local, FTP, Dropbox, and Box. A Google Sheets export always sends the whole form, because the tab is a mirror rather than a growing file: narrowing a run would shrink the tab to that interval and overwrite everything before it.
Save the feed. To send entries straight away without waiting for the schedule, use Export Now from the feed list. It asks for confirmation first, since it writes to the destination immediately and replaces what is there.
Checking that exports are working #
Every feed has an Activity Log tab listing its recent exports: what each one wrote, when, and why any of them failed. The most recent 100 runs are kept, and a failure stays visible even after later exports succeed.
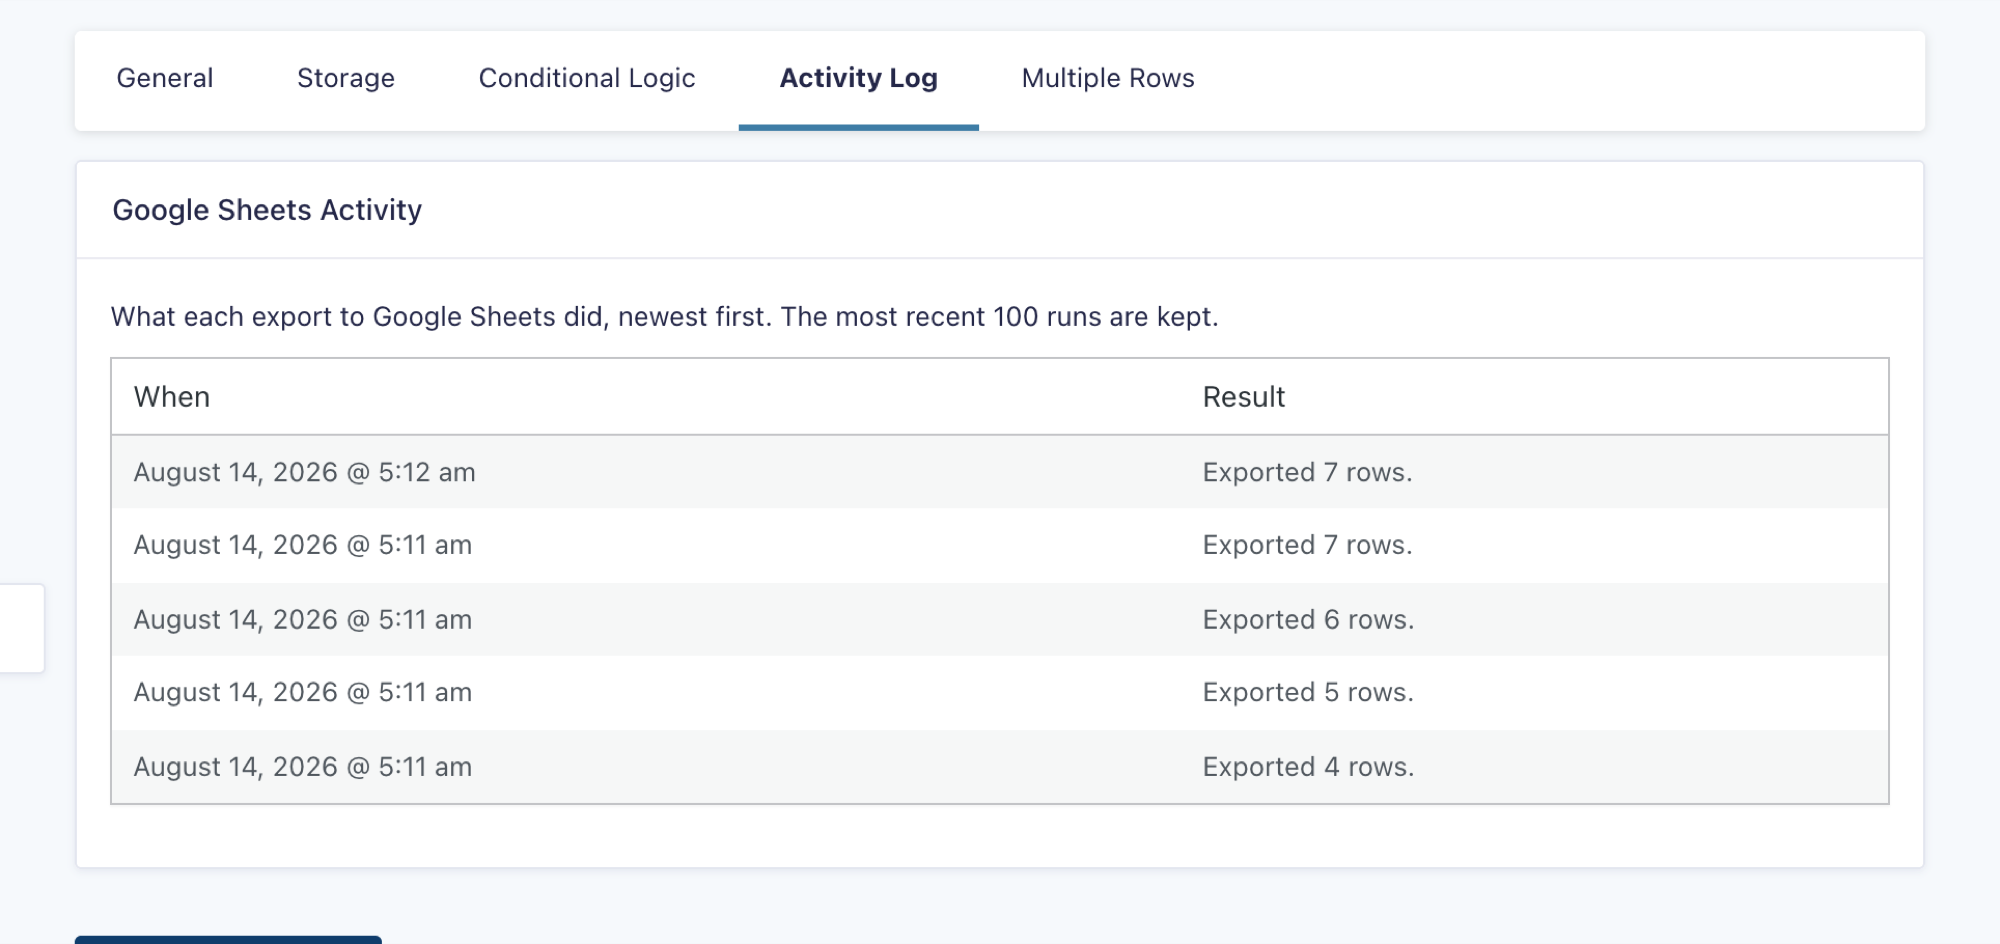
The feed list also shows Last Run and Next Run, and the Storage column links directly to the spreadsheet the feed writes to.
Opening that spreadsheet shows the export itself. Each entry is one row, the header row comes from the columns you chose, and the values arrive typed rather than as text, so dates sort as dates and numbers add up.
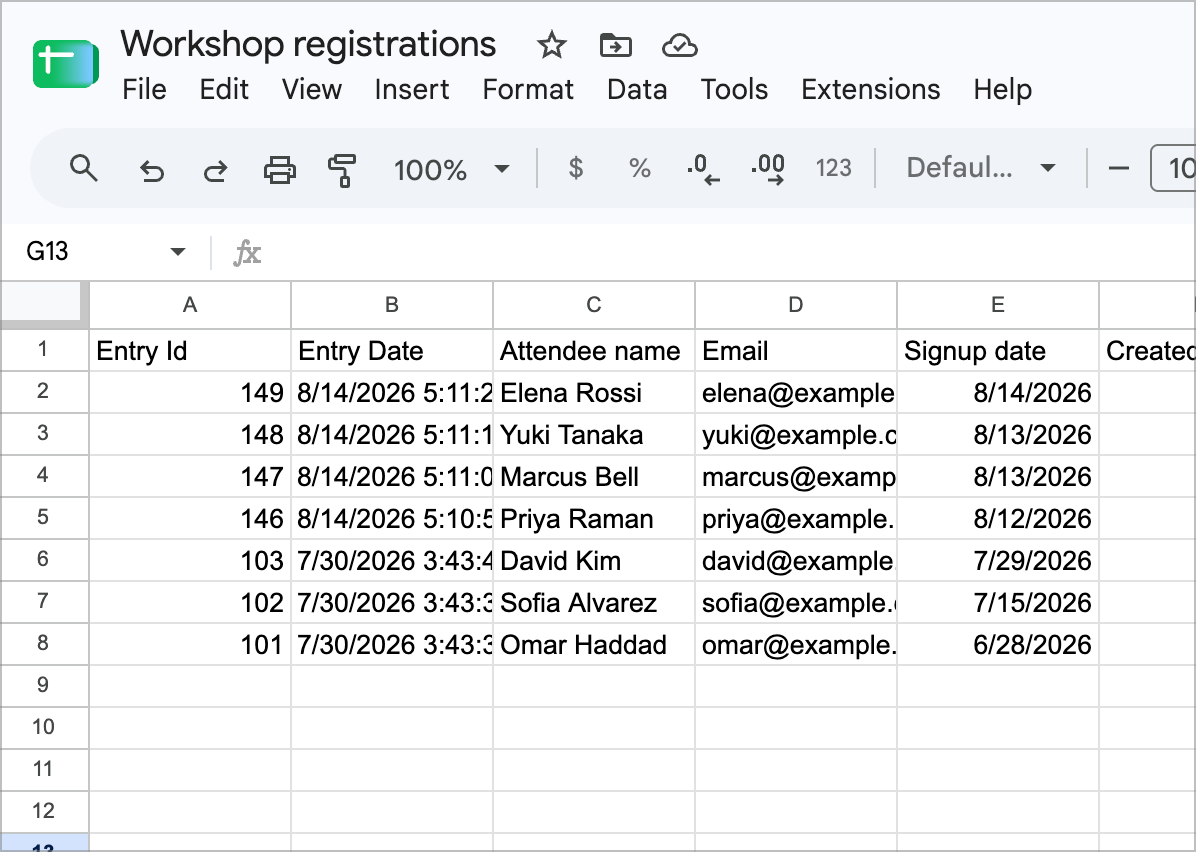
A few things you can rely on in that sheet:
- Numbers, currency and dates arrive as real values, so sorting, SUM and charts work on them without converting anything first.
- Text is written exactly as submitted. Leading zeros and phone numbers keep the form they were entered in.
- A submitted value that looks like a formula is stored as text, so it can never run in your spreadsheet.
GravityExport builds each export on a hidden tab named __gk_export_staging_ plus the feed ID, then moves the data into your tab in one step, so your tab is never half written. If a run fails partway, the hidden tab can stay in the spreadsheet until the feed’s next run removes it.
Limits #
- A Google spreadsheet holds at most 10 million cells across all of its tabs, and an export briefly needs room for two copies of its data. Treat about half that ceiling as the practical limit for one feed.
- A single cell holds at most 50,000 characters. A longer value is shortened and marked with
… [truncated]. The full value stays in your Gravity Forms entry. - Only one Google Sheets export runs at a time on a site. An export started by a new entry while another is running is retried automatically a few minutes later.
If an export does not fit, the run stops and tells you by how much, and your tab is left as it was. Narrow the export with a filtered source feed, or point the feed at a spreadsheet with more room.
If the connection stops working #
If Google stops accepting the connection, exports to Google Sheets begin failing. The failures show in each feed’s Activity Log, and the Cloud Storage section says the connection needs attention. A notice on the WordPress Dashboard appears too if Monitor connections is on, or when a Scheduled feed with Failure Alerts fails. To fix it, return to GravityKit > Settings > GravityExport and click Reconnect to Google Sheets.
Connections you made before your license lapsed keep working and keep refreshing, whether or not the license is current. A current license is only required to make a new connection or to open the spreadsheet picker.
After moving or cloning a site
A Google connection belongs to the site address that made it. Cloning a site, promoting a staging copy to live, or moving to a new domain all read as a different site, so the connection shows as needing attention and exports stop until someone reconnects. Changing the site’s title doesn’t matter; only the address does.
This is deliberate: without it, a copied database would carry the original site’s Google access with it, and every clone would quietly write to your spreadsheets. Two things follow from it: reconnecting on the copy does not affect the original site, and disconnecting on the copy does not cancel the original site’s access.
Related articles #
Was this page helpful?


- Prefer to watch the video?
- Before you start
- How the export works
- Step 1: Connect your Google account
- Step 2: Create the export feed
- Step 3: Choose Google Sheets as the destination
- Step 4: Pick the spreadsheet
- Step 5: Name the tab
- Step 6: Choose the columns
- Step 7: Choose when the export runs
- Checking that exports are working
- Limits
- If the connection stops working
- Related articles