Published
•
Updated
How to build an intranet to power your business with Gravity Forms & GravityView (no code required)
Looking for a way to manage your team, projects, or HR processes from one central place, without the cost of expensive SaaS solutions? With Gravity Forms and GravityKit, you can create a powerful, flexible intranet on WordPress that’s tailored to your business needs (all...
Looking for a way to manage your team, projects, or HR processes from one central place, without the cost of expensive SaaS solutions? With Gravity Forms and GravityKit, you can create a powerful, flexible intranet on WordPress that’s tailored to your business needs (all without code).
Whether you need internal communications, employee directories, project tracking, or HR workflows, GravityKit lets you build modular “mini apps” that you can combine into a comprehensive system. Start with what you need today, and scale as your business grows.
In this tutorial, I’ll walk you through building an intranet that consists of 5 modules that most businesses need. Let’s get started!
Sneak peek
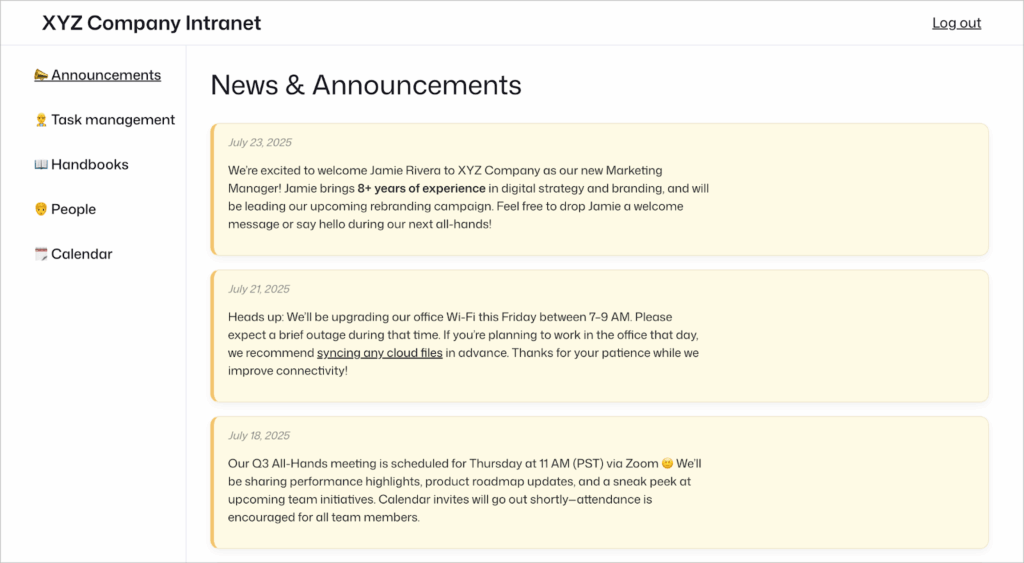
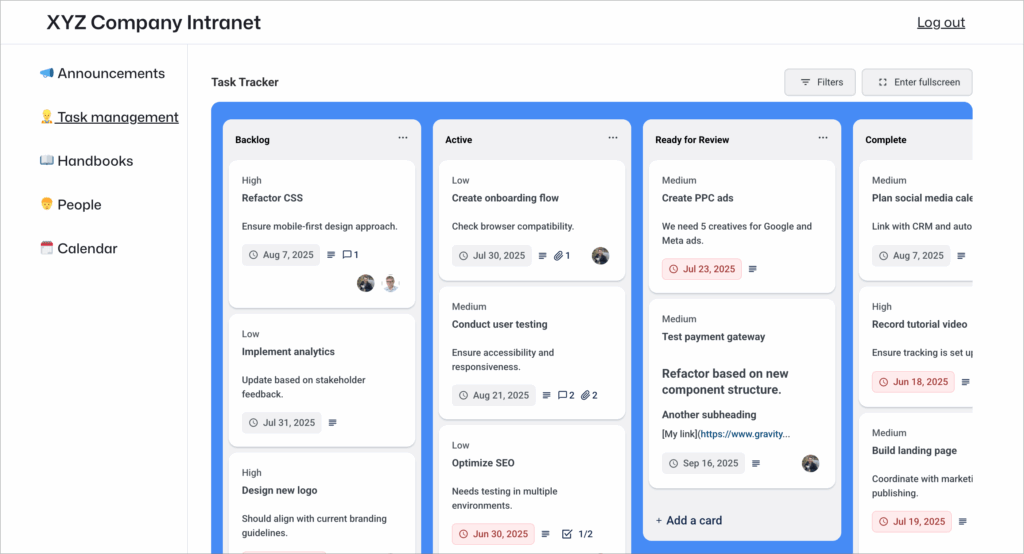
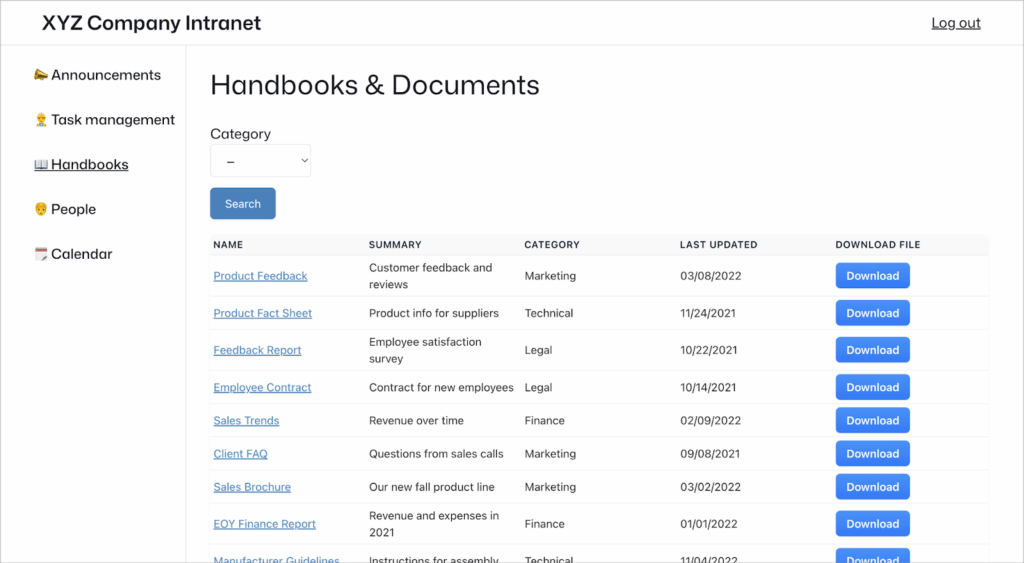
Here’s a quick look at the finished intranet. It includes 5 different modules: an area for news & announcements, a task management portal, a library for handbooks and documents, an employee directory, and a company calendar.
News and Announcements module:
Task Management module:
Handbooks and Documents module:
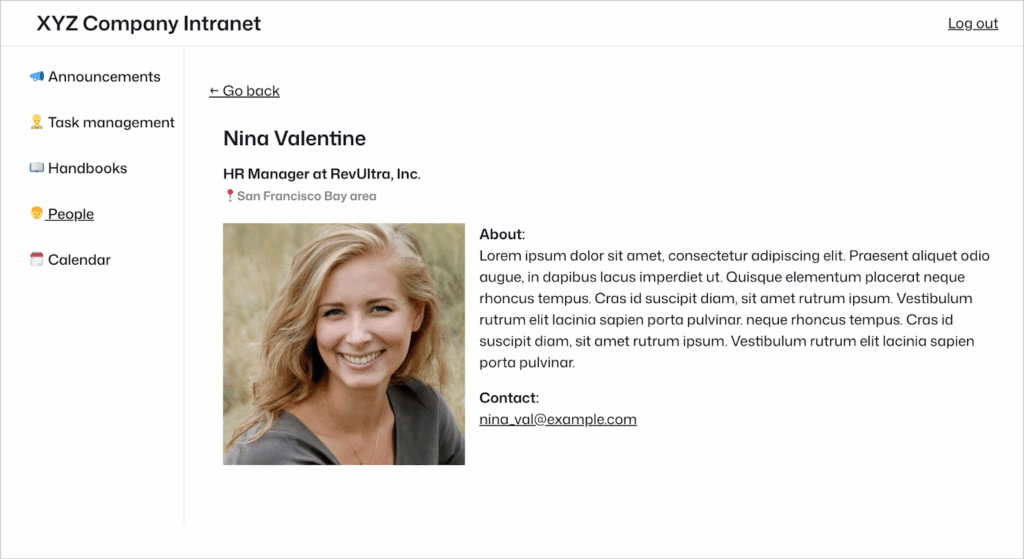
Employee Directory module:

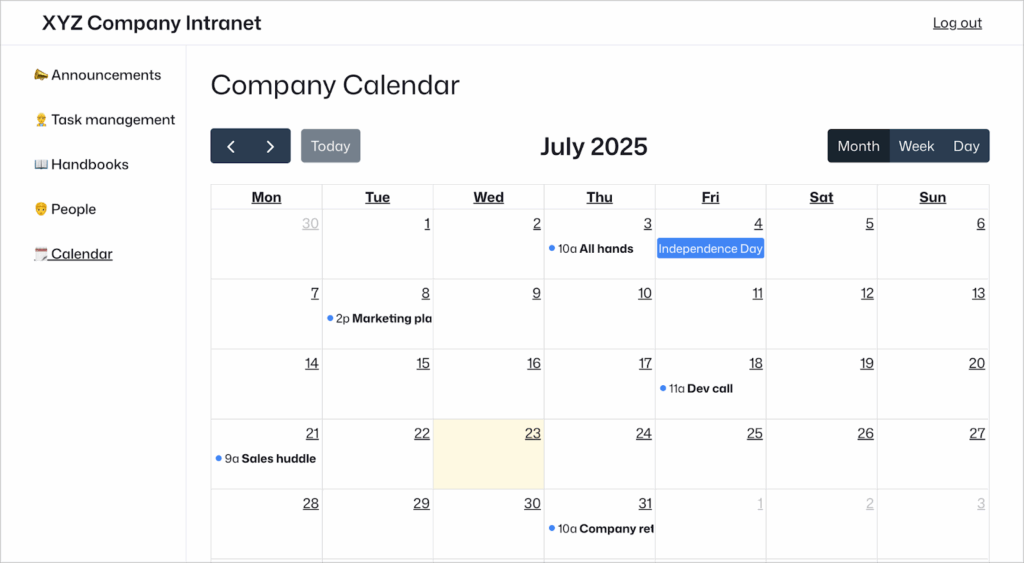
Company Calendar module:
Not only can you customize these modules to your liking, you can also extend the system by adding more modules, depending on your business needs!
Wanna try it?
Spin up a demo
See what you can build with GravityView — explore the live demo.

What you’ll need
Here are the plugins you’ll need to build an intranet like the one in this example:
You can get all the GravityKit plugins you need in the GravityKit All Access Pass.
Why use Gravity Forms + GravityKit vs a SaaS solution
- Customizability
With Gravity Forms and GravityKit, you’re not boxed into someone else’s idea of what an intranet should be. You can tailor every form, layout, and workflow to your exact team needs, whether it’s a staff directory, HR portal, or internal help desk. - Full ownership (including data)
Building your intranet on WordPress means everything lives on your own server (content, submissions, files, data). You’re not handing sensitive employee data over to a third-party platform, and you maintain full control over access, backups, and privacy. - No subscription fees
With GravityKit tools, you pay for a yearly license that accrues value over time. Unlike SaaS apps that charge per user or per month, your costs are predictable and scalable. Over time, that adds up to huge savings, especially for growing teams or distributed workforces. - Scale with additional modules
Need to add a help desk? Onboarding tracker? Internal job board? With GravityKit’s modular approach, you can expand your intranet piece by piece (without starting from scratch or paying for a higher-tier plan!). It grows with your business.
Module 1: News & announcements feed
- Purpose: For sharing company news, policy updates, and leadership messages.
- Features: Employees can view announcements but only authorized users (i.e., leadership, senior managers) can post new messages.
- Needed GravityKit add-ons: GravityView.
Step 1: Create an announcement form
Start by creating a new Gravity Forms form and add a single Paragraph Text field.
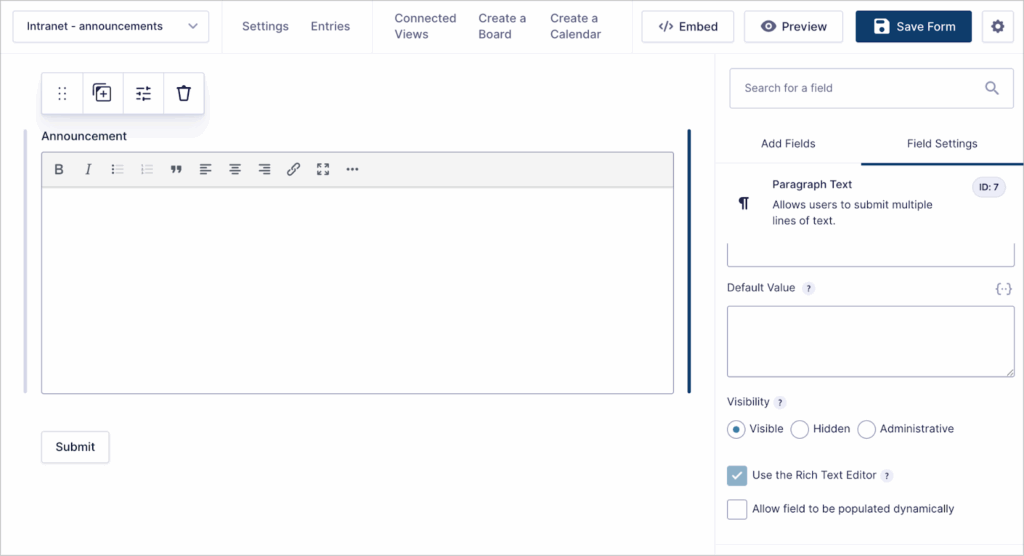
Next, open the field settings and enable the rich text editor. This allows posters to use bold text, links, subheadings and other rich text elements in submissions.

Finally, add any additional fields that you need. For example, you may want to include a title field, or a field that captures the name of the poster.
When your form is complete, save it and embed it on a page or post. If you only want certain users to be able to post announcements (e.g., HR managers, senior executives) you can restrict access to the form using a free plugin like Members.
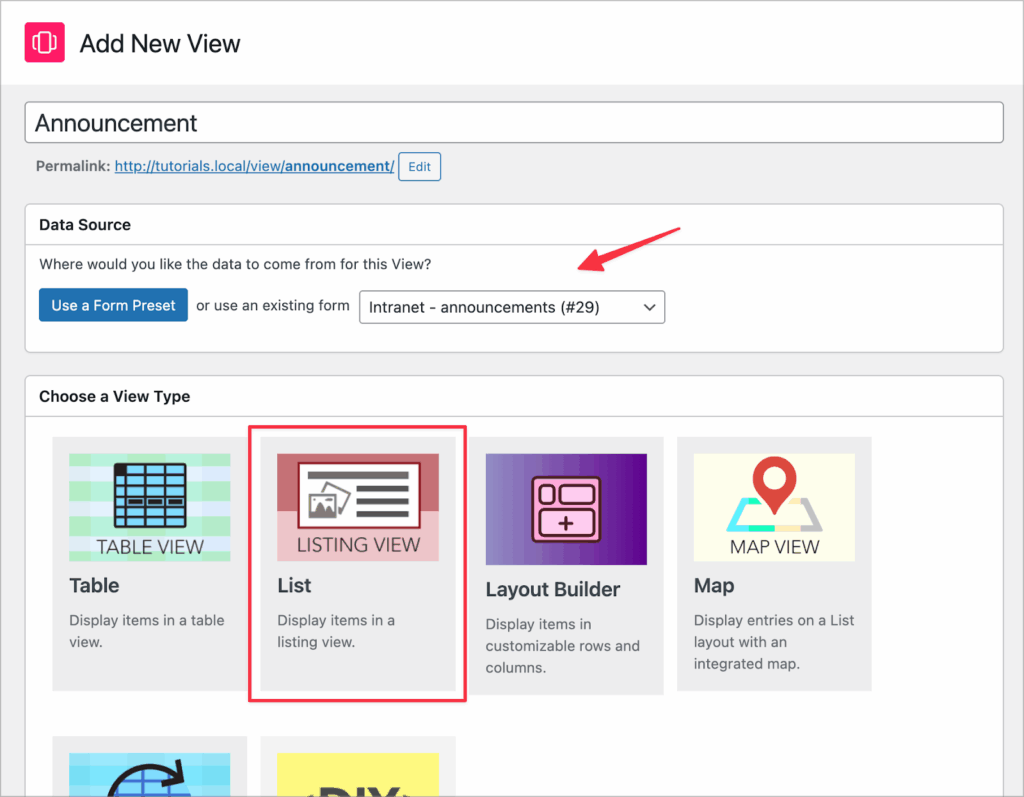
Step 2: Create the news feed using GravityView
Now that you have a form allowing users to post announcements, you can create the front-end news feed using GravityView.
To create a new View, hover over GravityKit and click “New View”. Next, link the View to your form via the data source dropdown field and select “List” as your View Type.
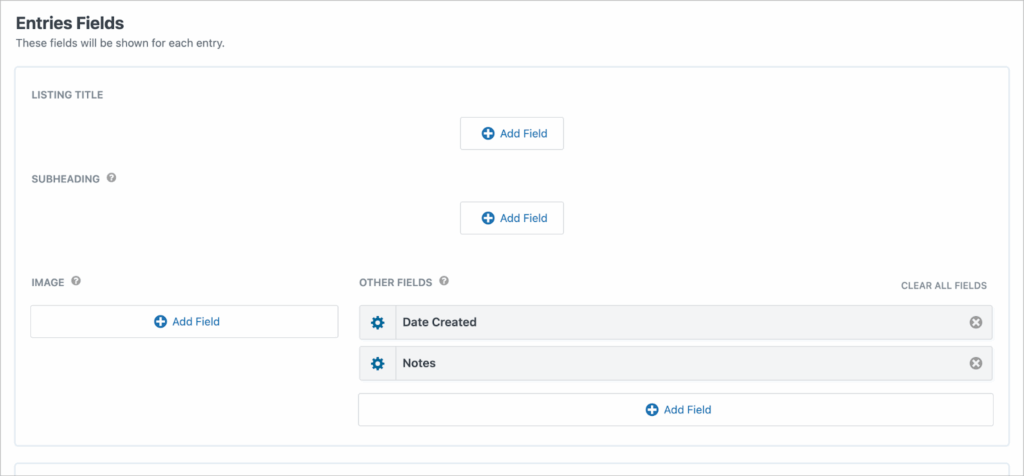
Step 3: Add the information you want to display
Now add the “Date Created” and “Announcement” fields to the Other Fields section of the View editor. Finally, add any other fields that you want to be visible to users.
When your View is complete, publish it and embed it on a page. Now every time a new announcement is posted, it will show up in the View on the frontend.

Pro tipIf you want announcements to undergo an approval process before showing up on the frontend, enable this feature in the View settings.
Module 2: Task management portal
- Purpose: For creating and assigning tasks to users and collaborating on projects.
- Features: User assignment, file attachments, task checklists, and more.
- Needed GravityKit add-ons: GravityBoard.
Step 1: Create a task form
Start by creating a new Gravity Forms form for adding new tasks. Add fields such as:
- Title
- Status
- Priority level
- Description
- Due date
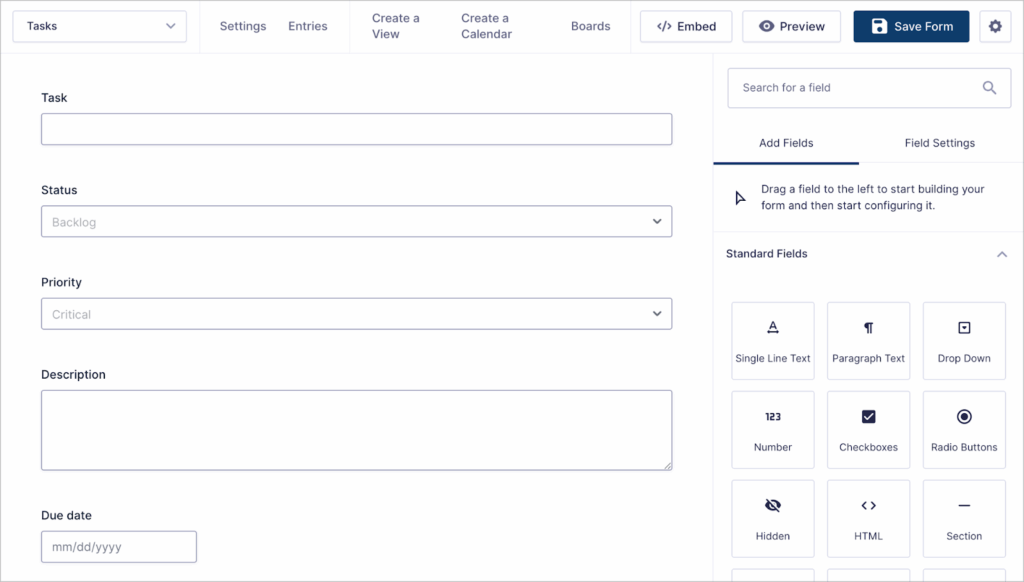
After adding all necessary fields, save the form. You can embed this on a page, but you don’t need to as new tasks can be added directly through GravityBoard.
Step 2: Create a new GravityBoard
To create a new task management board, go to the form settings, select GravityBoard and then click “Add New”.
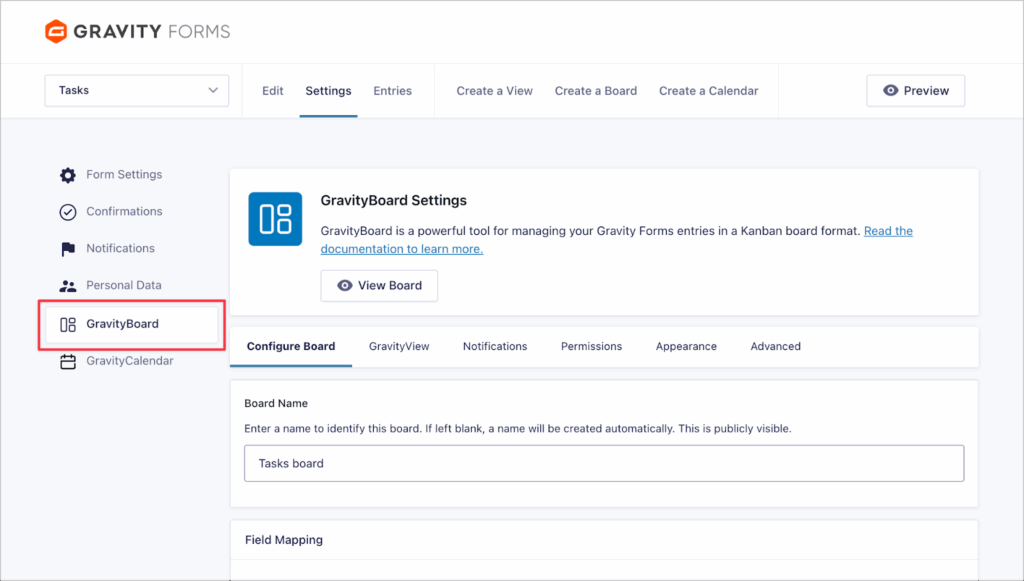
After giving your board a name, you can start customizing it.
Step 3: Set up the board
Start by mapping fields from your task form to the corresponding areas of the board. Choose which field to use as the lanes, and set a card title, description, label and due date.
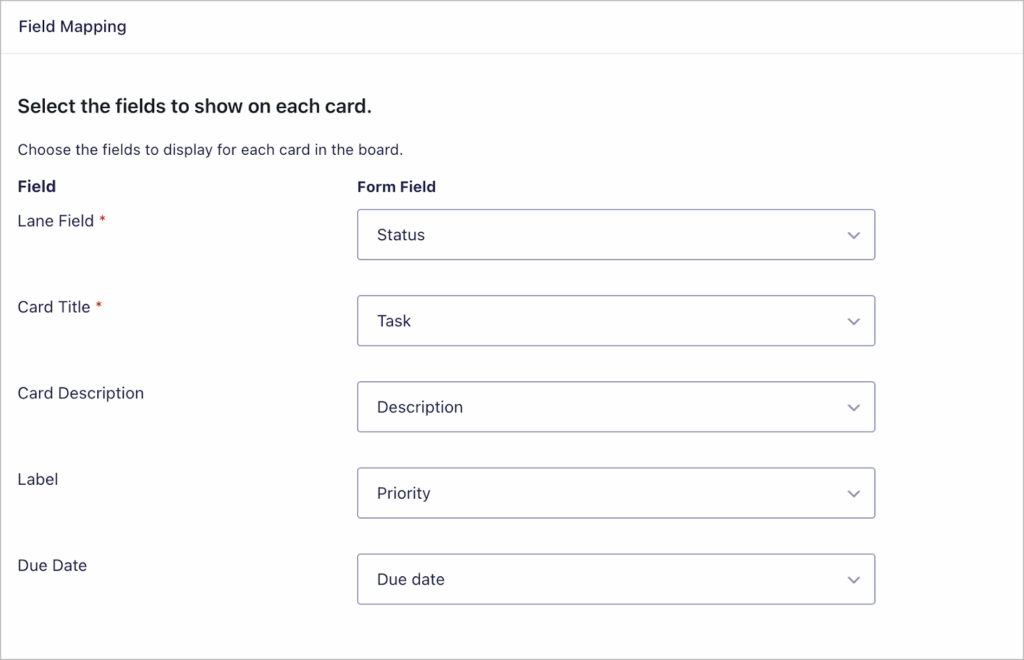
GravityBoard includes a range of additional options for customizing your board: enable/disable certain features, change the look and feel, and set up notifications.
Enable features such as:
- User assignment
- Entry notes
- Checklists
- File attachments
- And more!
After setting up your board, embed it on a page.
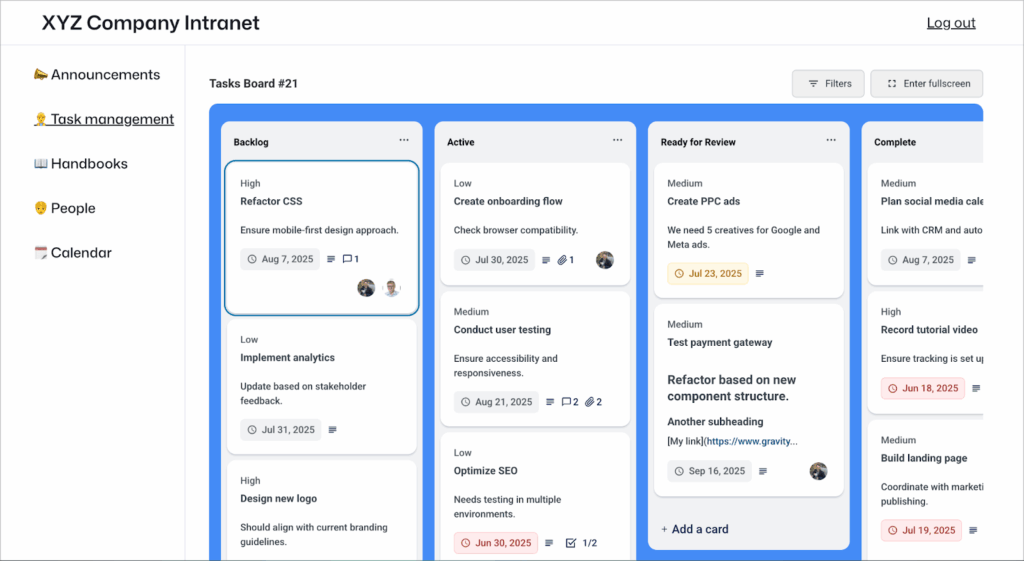
Now employees can add tasks, assign users, and move cards to different lanes using drag and drop.
Module 3: Handbooks & documents
- Purpose: For adding and storing company handbooks, policies, departmental documents, and other important documentation.
- Features: Direct file downloads, searching and filtering.
- Needed GravityKit add-ons: GravityView.
Step 1: Create a document upload form
Start by creating a new Gravity Forms form for uploading and categorizing documents. Add fields such as:
- Name
- Document (a File Upload field which accepts your preferred document formats)
- Summary
- Category
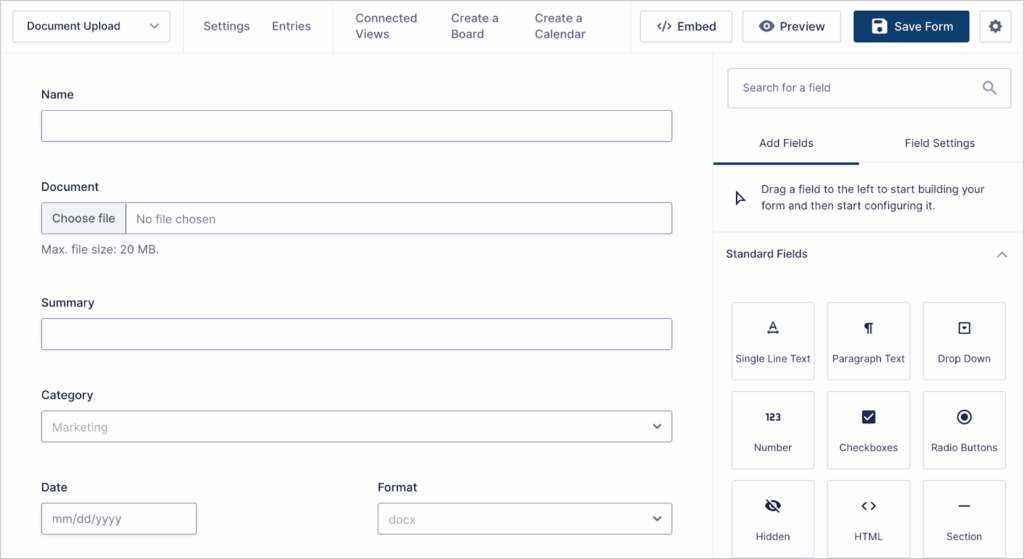
After adding all the necessary fields, save your form and embed it on a page. If you want to restrict the ability to upload new documents, you can limit access to certain users.
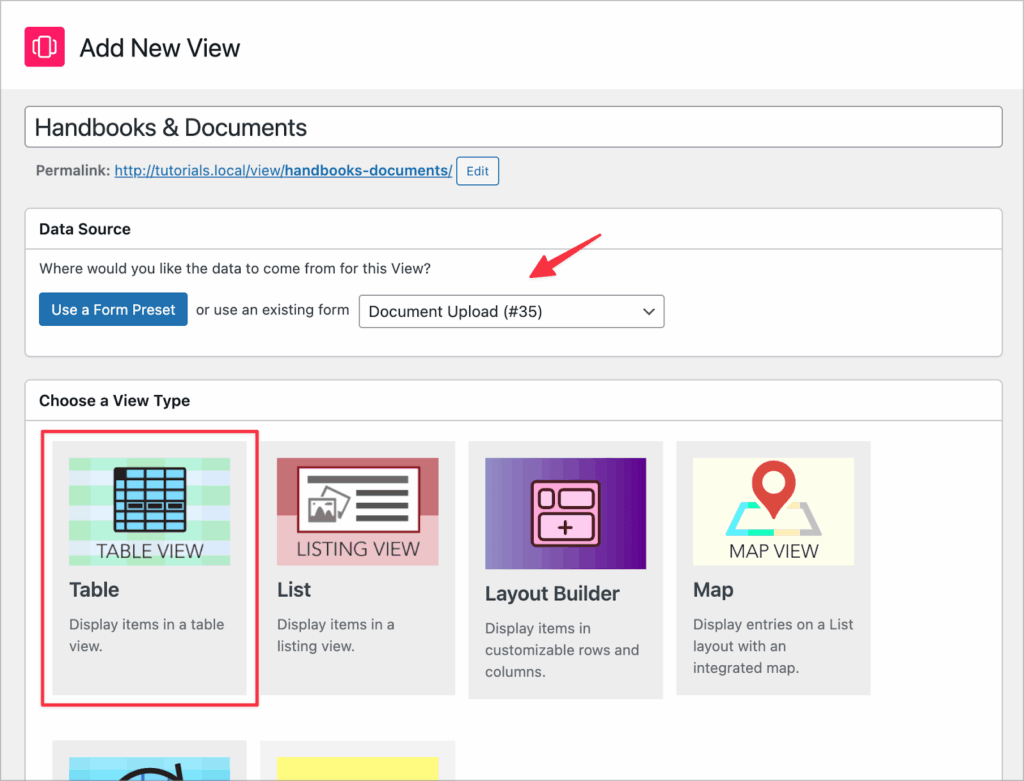
Step 2: Create a table View
The next step is to create a View to showcase documents on the frontend in a searchable table.
Create a new View, choose your document upload form as the data source and select “Table” as your View Type.
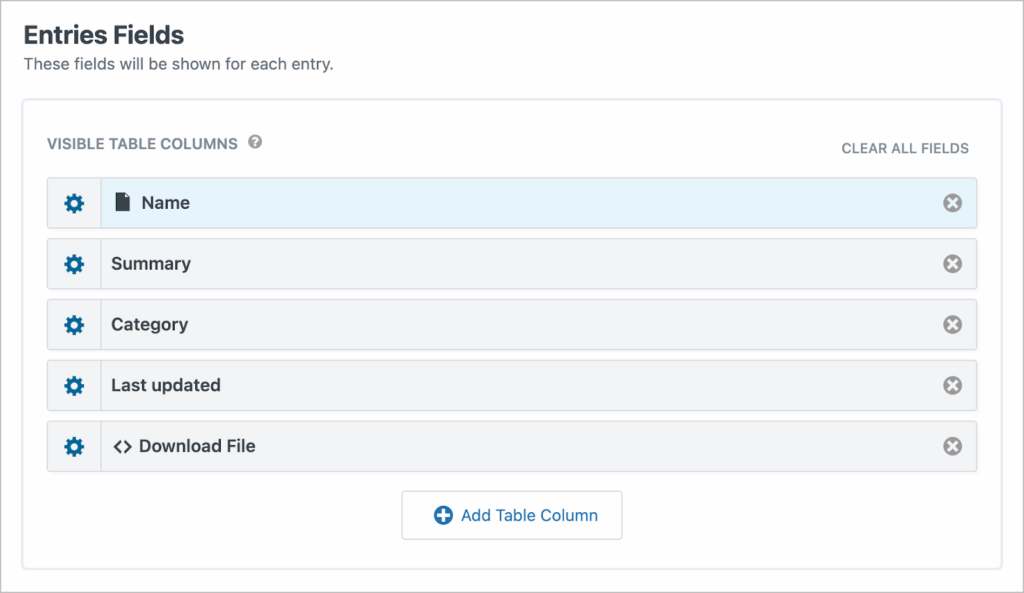
Step 3: Add fields and search features
Now add the fields you want to display in the “Entries Fields” section of the View editor.
Next, add a search bar widget and configure the search inputs so users can search and filter documents by certain metrics.
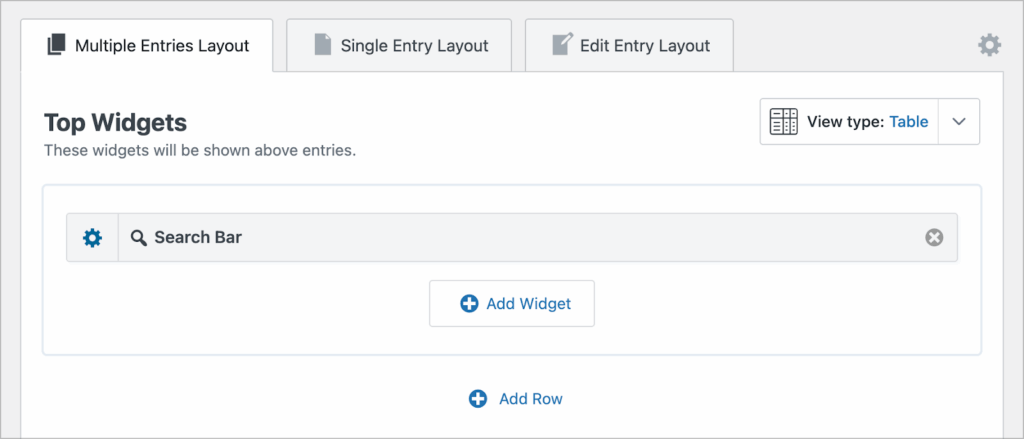
Finally, embed your View on a page.

Module 4: Employee database
- Purpose: For sharing information about employees, including their contact information and bios.
- Features: Employees can find contact information for other team members and update their own profiles.
- Needed GravityKit add-ons: GravityView.
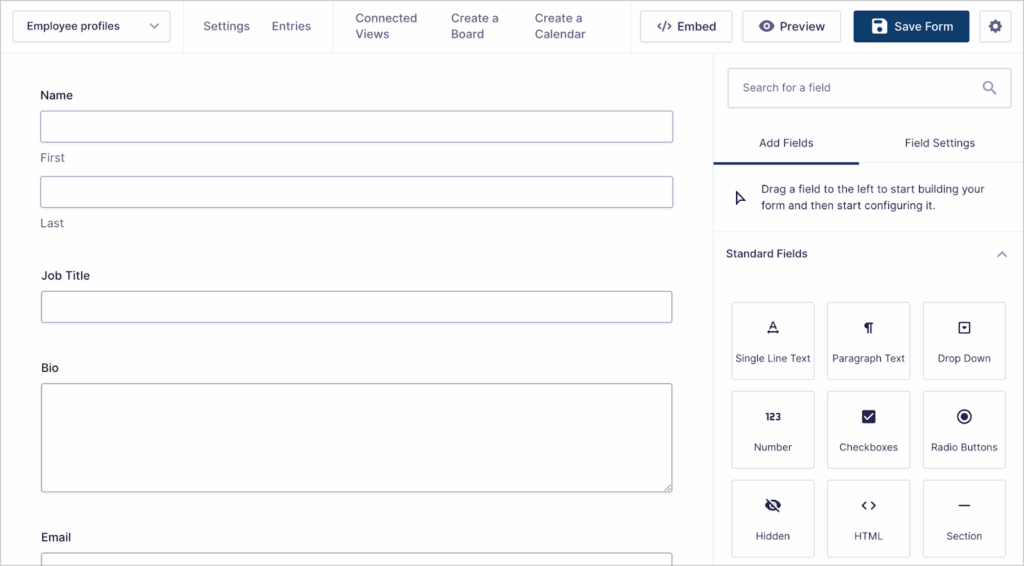
Step 1: Create an employee profile form
Add a new Gravity Forms form that enables employees (or HR managers) to create profiles. Include fields such as:
- Name
- Job title
- Email address
- Location
- Bio
- Image (File Upload field)
Next, save your form, embed it on a page, and restrict access to appropriate users.
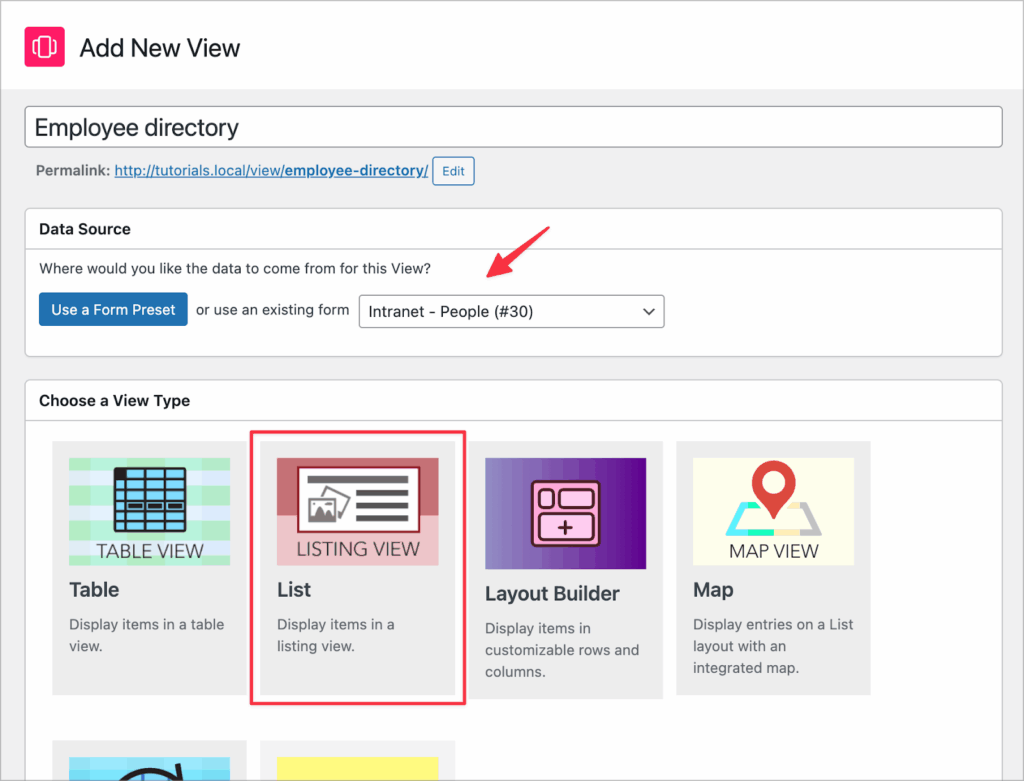
Step 2: Create a new directory View
Create a new View, select your form as the data source and choose “List” as our View Type (Layout Builder will also work).
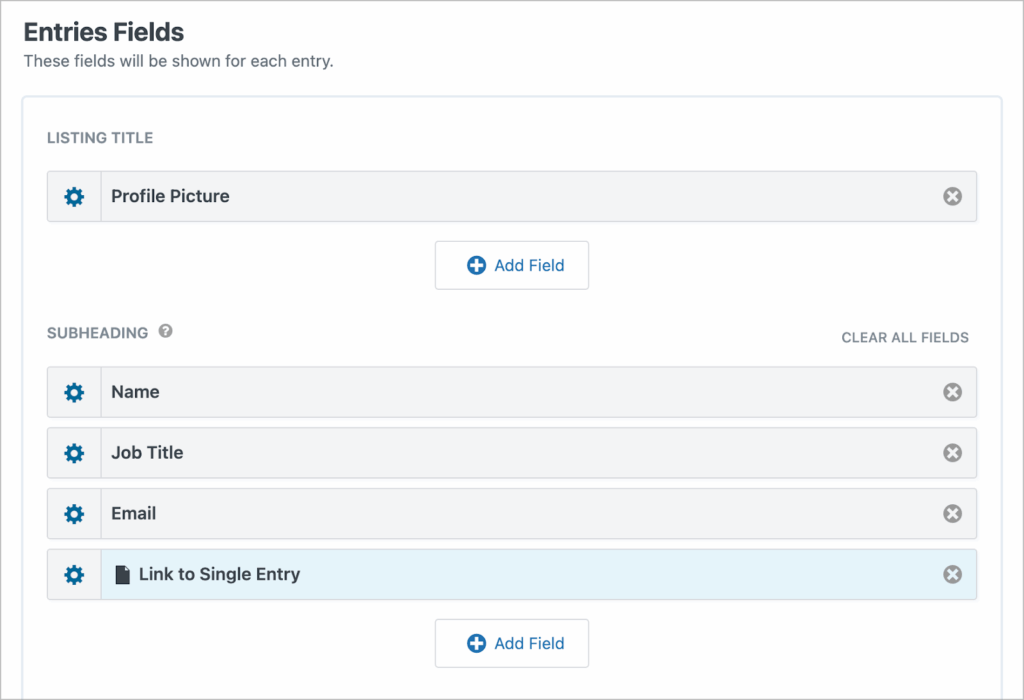
Step 3: Configure the user profiles
Add key user profile fields to the Multiple Entries Layout, such as the profile picture, name, job title, and email address. Next, add a “Link to Single Entry” field.
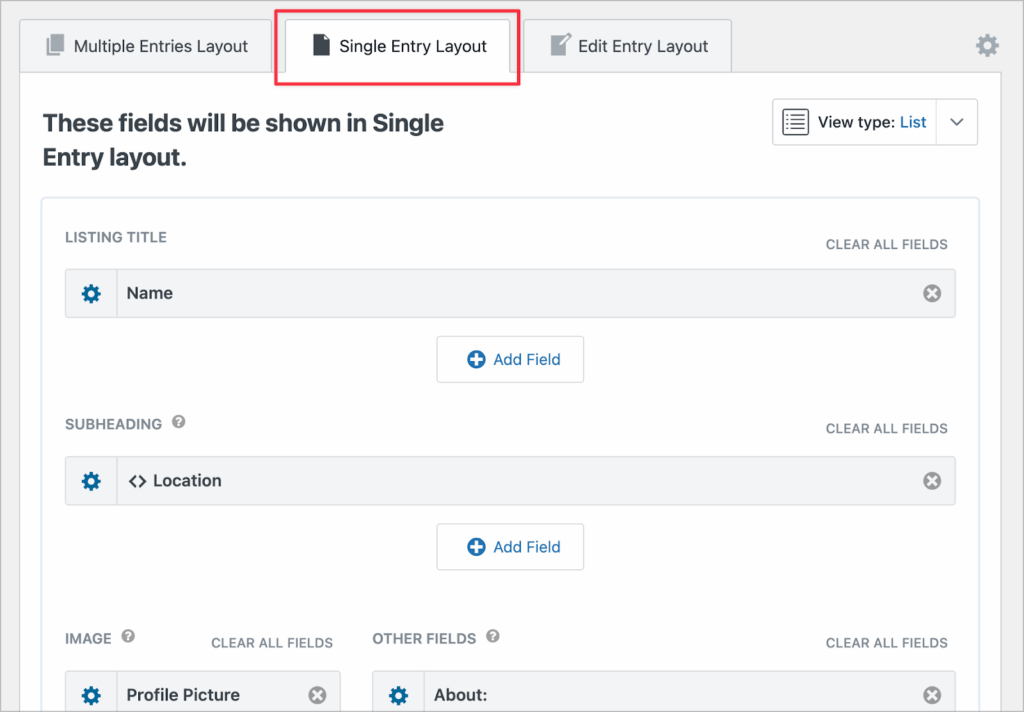
Next, add additional fields to the Single Entry Layout. Here the user’s profile will be displayed in full.
You can optionally enable User Edit in the View settings to allow employees to update their own profiles. Finally, if you wish to display user profiles in a grid instead of a list (like in the example here), use this CSS snippet.
After configuring the View, embed it on a page.
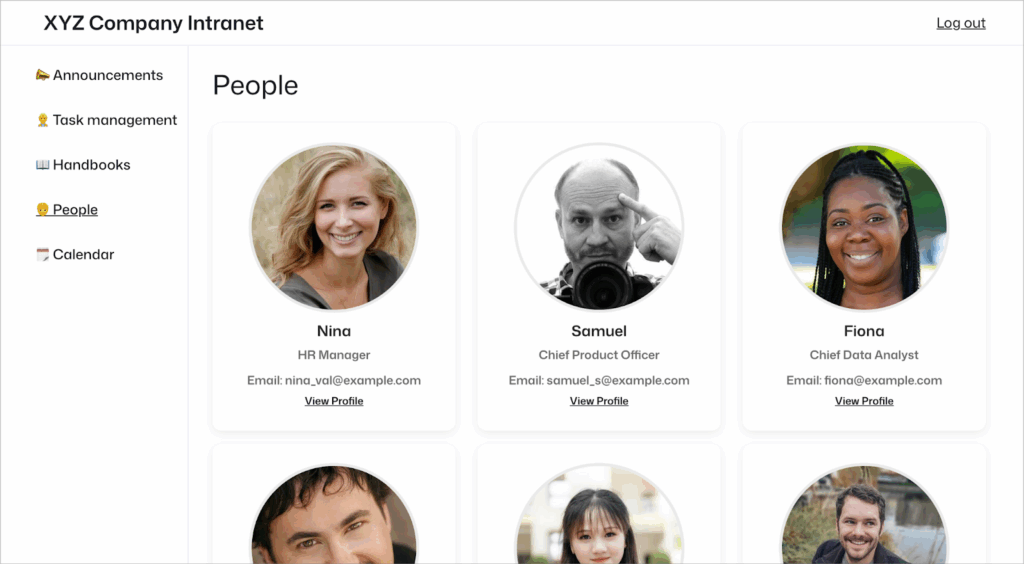
Employees can now browse the profiles of other employees and view their contact information.
Module 5: Company calendar
- Purpose: For displaying company meetings, holidays, and other important events.
- Features: Showcase event information, display public holidays and other information from external calendar feeds.
- Needed GravityKit add-ons: GravityCalendar.
Step 1: Create a form to submit events
Start by creating a new form for submitting events. Include fields such as:
- Event title
- Description
- Start date
- End date
- Start time
- End time
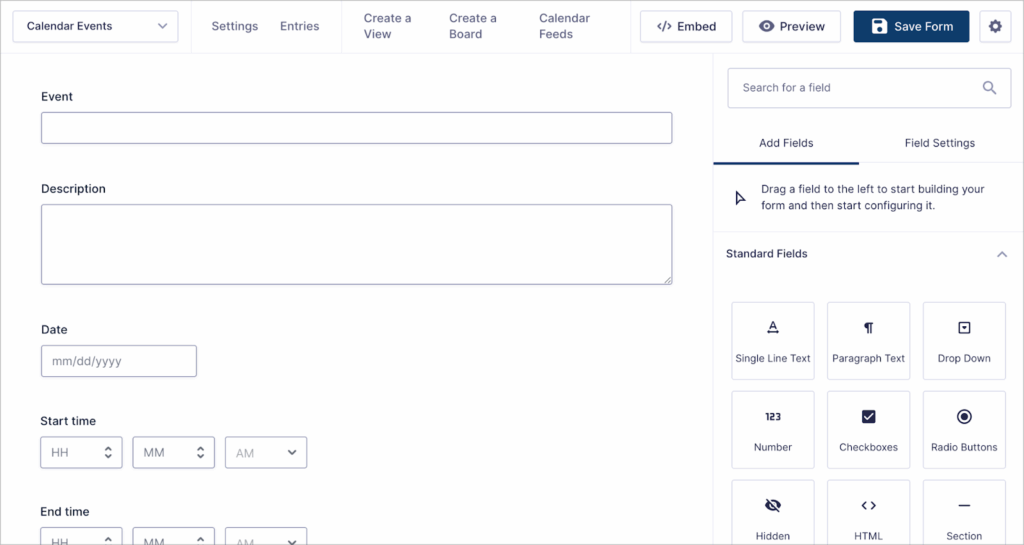
After creating your form, save it, embed it on a page, and restrict access to appropriate users.
Step 2: Create a new GravityCalendar
Go to your form settings, select GravityCalendar and click “Add New” to create a new calendar feed.
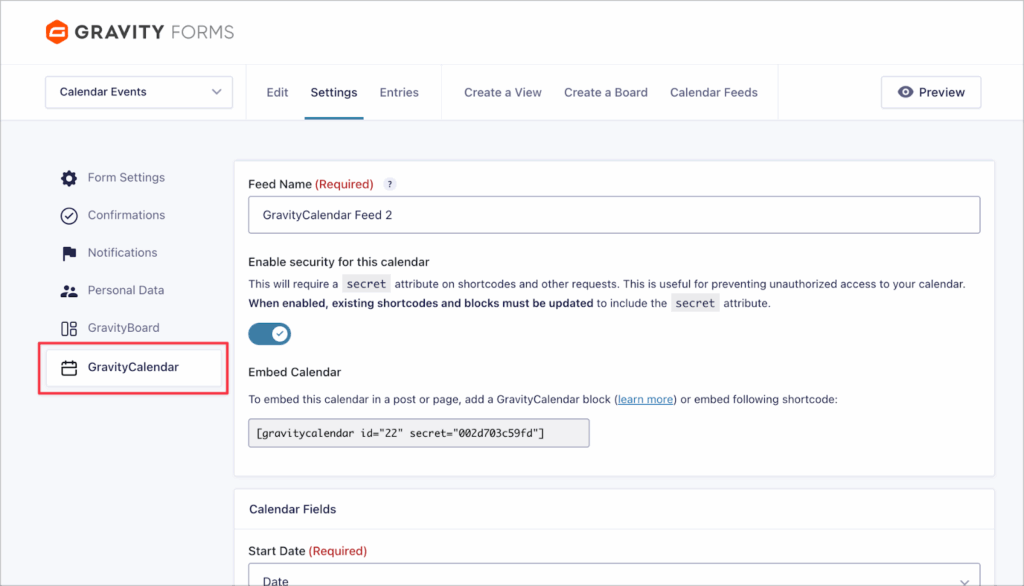
Step 3: Customize your calendar
GravityCalendar includes a wealth of options for customizing your calendars. Map fields, adjust colors, display events from external feed URLs, add navigation controls, and more.
After setting up your calendar, embed it on a page. Now all events submitted through your form will show up on the calendar for all employees to see.

Bonus: Add more modules
GravityKit add-ons turn Gravity Forms into an application builder enabling you to build just about anything! This means you can easily extend your intranet with additional modules. Here are a few examples:
- Internal ticketing/help desk: Create a help desk for employees to submit tickets such as leave requests, expense reports, and requests for technical assistance.
- Internal job application management system: Create a system for managing job applications and moving applications through different stages.
- Dashboards for expense or revenue tracking: Use GravityView, GravityCharts and GravityMath to create interactive dashboards for tracking company expenses, sales, or other important data points.
- Asset tracker: Create an asset tracker for cataloging company equipment.
Summary of steps
Time needed: 30 minutes
Building an intranet on WordPress with Gravity Forms and GravityKit.
- Set up a news & announcements feed (module 1)
Create a Gravity Forms form for announcements and use GravityView to display them in a front-end feed. Restrict posting access to leadership and optionally enable moderation.
- Build a task management portal (module 2)
Use Gravity Forms to collect task details and display them on a drag-and-drop board using GravityBoard. Enable features like user assignment, file uploads, and checklists.
- Create a handbooks & documents library (module 3)
Allow document uploads via a Gravity Forms form and display them in a searchable, filterable table using GravityView for easy employee access.
- Create an employee directory (module 4)
Collect employee profiles with a Gravity Forms form and showcase them in a user-friendly directory layout using GravityView. Enable profile editing if needed.
- Add a company calendar (module 5)
Capture event data with Gravity Forms and display it in a customizable calendar using GravityCalendar. Include internal and external events in one view.
Power your business with Gravity Forms and GravityKit
Building an intranet on WordPress with Gravity Forms and GravityKit means you’re not locked into a rigid system. You can create a flexible, no-code platform tailored to how your business actually runs.
Ready to get started? Learn more about GravityKit, or check out more tutorials on our blog!

Helpful tips right in your inbox.
Subscribe to get the latest articles, information on releases and helpful Gravity Forms tips!
More articles
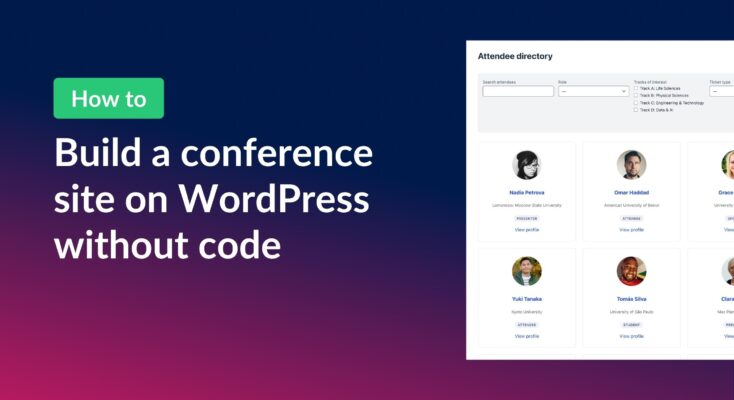
How to build a conference website on WordPress (attendee registration + abstract submission)
Build a conference registration and abstract submission site on WordPress with GravityKit, no code: forms, an attendee directory, sessions, and PDF certificates.

How to build a WordPress CRM without code (a contact database you own)
Build a simple WordPress CRM with GravityView. Turn the Gravity Forms entries you already collect into a no-code contact database you own, with no monthly fees.

Launch Log: Distance sorting for radius searches, DataTables search improvements, and import reliability fixes
The latest GravityKit releases add distance sorting to map searches, bring built-in search to DataTables, and fix GravityCharts and GravityImport edge cases.