
Published
•
Updated
New in GravityView Pro: Live Filters, Connected Views, Edit Window, and more
Live Filters, Connected Views, Edit Window and Featured Tiers are new in GravityView Pro, and every extension and layout is now built into one plugin.

Today we’re releasing a new GravityView Pro. This update adds features for the directories, portals and other apps you build on your Gravity Forms entries, and it brings every extension and layout into one plugin. We’ve been looking forward to this one!
This release adds four new features:
- Live Filters helps visitors narrow results in a directory (also known as faceted search).
- Connected Views lets you turn separate Views into one connected app.
- Edit Window lets people edit their own entries until a deadline you choose.
- Featured Tiers let you charge for the top spots in your directory.
Every GravityView extension and layout, such as DataTables, Maps and Advanced Filtering, is now built into GravityView Pro. That’s one plugin to install and keep updated instead of a separate plugin for each. Your existing Views and settings stay as they are.
Our three free Gravity Forms add-ons are built in too: Dynamic Lookup, Entry Tags and Event Field. They cover jobs most apps need, like linking entries between forms, labeling entries, and handling dates and recurring events.
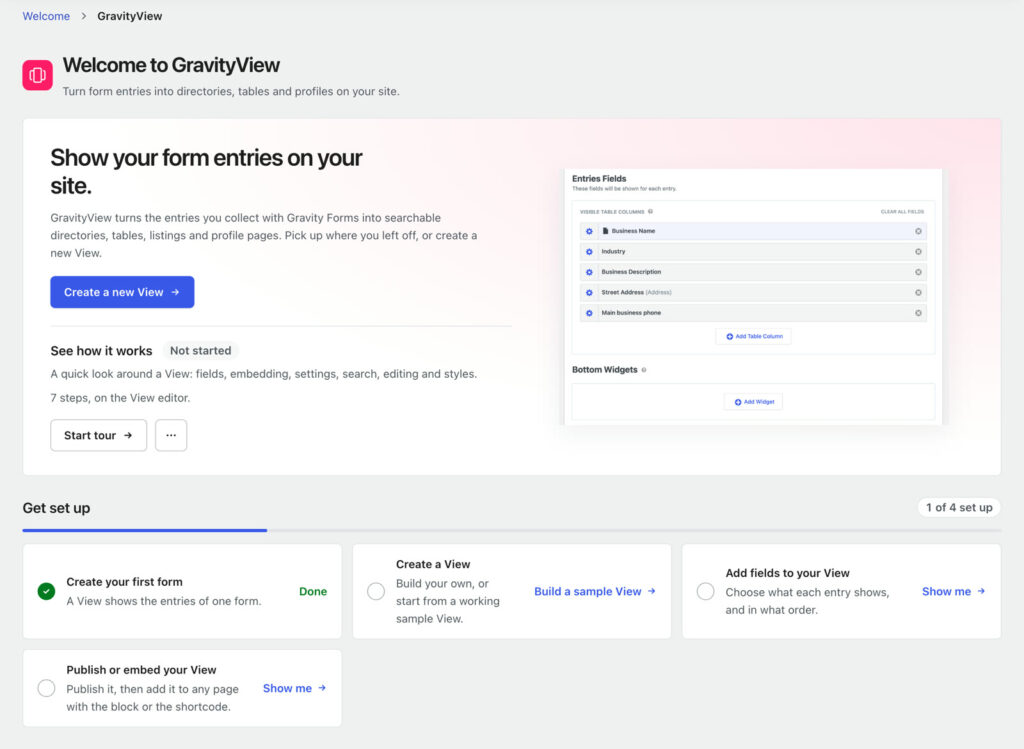
Every GravityView user also gets a new Welcome page, with or without Pro. Guided tours and a short setup checklist walk you through publishing your first View, and there are tutorials, guides and ideas for what to build next.
Below is a closer look at what’s new in GravityView Pro, with guidance on how to update.
Live Filters: help visitors find the right entry
A View with hundreds of entries is hard to use with only a search box. Visitors have to guess a keyword, and they can’t see what’s in the View until they search for it. Some of them may even give up and leave the site.
Live Filters adds a sidebar of filters to a View. Visitors pick from checkboxes, radio buttons, dropdowns, range sliders, date ranges and star ratings, and the results change with every choice, with no page reload. The technical term is faceted search, and it works like the filter sidebar you already use to narrow results on sites like Amazon and Zillow.
Here’s what visitors get with Live Filters:
- Results that update live as they select filters
- Counts that update with every choice
- Several options in one filter, so ticking two boxes shows entries that match either
- A link that keeps the filters, so a filtered View can be bookmarked or shared
- A Show filters button on phones, where the sidebar folds away
You add Live Filters to a View you already have. Turn it on in the View’s settings, add a filter for each field visitors should filter by, and choose how each one displays. It works with the Table, List, Layout Builder, DataTables, Maps and DIY layouts. The search bar keeps working alongside it: a keyword search narrows the entries, and the filter counts follow.
Read more on the Live Filters feature page, or follow the setup guide to add it to a View.
Connected Views: turn separate Views into one app
Related data in Gravity Forms usually lives in several forms: neighborhoods in one, local businesses in another, reviews in a third. Showing them as one connected app used to take custom links, merge tags and URL parameters, set up View by View. When one of those links broke, you heard about it.
Connected Views links your Views so visitors click from one entry to the entries related to it, and back, on the same page. On a neighborhood guide, that’s a list of neighborhoods, then one neighborhood’s local businesses, then the reviews for each business.
Visitors always know where they are:
- Breadcrumbs show the path, and the Back link names where it goes
- Every level has its own web address, so any level can be bookmarked or shared
- Each level loads in place and remembers its search, sort order and page number
- Editing an entry returns visitors to the same level
To connect two Views, open the first View’s Single Entry layout, click Add Field and choose Connect to another View. A short dialog works out how the two Views are related and adds the link for you. Related entries can also show inside an entry with no extra click, and the Connections Map gives you a visual representation of how all your Views link together.
Read more on the Connected Views feature page, or follow the setup guide to get started.
Edit Window: close editing at the deadline you choose
Registrations, applications and RSVPs usually have a cutoff for edits. In GravityView, entries stayed editable after it unless you hid them or wrote custom code.
Edit Window adds that cutoff to a View. Before the deadline, people update their own entries as usual. After it, the Edit link goes away and the entry stays in the View with everything they submitted.
In our workshop demo, members can edit a registration until 7 days before its session. You choose the deadline in each View’s Edit Entry settings:
- When the form’s schedule ends
- A set time after the entry was submitted
- A fixed date
- A Date field on the entry, such as the session date (a GravityBoard Due Date works too)
Custom closing rules can also close the window based on saved values, such as a Status of Confirmed. Staff who can edit other people’s entries keep editing after every deadline, and deleting can close with editing or stay open past the deadline.
Read more on the Edit Window feature page, or follow the setup guide to enable Edit Window.
See them in action
At our October GravityKit Live, we demoed Live Filters and Connected Views on real Views and answered your questions about GravityView Pro. Connected Views was an early beta when we recorded this.
Use Live Filters and Connected Views together
The two features work on the same Views. Visitors narrow down the results with Live Filters, then browse the related entries without leaving the page.
New in Featured Entries: sell and rank featured spots
Featured Tiers let you charge for the top spots in your directory. A business pays on an order form, its listing moves to the top with a badge, and it automatically loses its featured status when its time is up.
With Featured Tiers, you can sort the entries you feature into ranked levels, such as Gold, Silver and Bronze, each with its own badge and row color. A listing gets its tier from a field on the entry, from conditions you set, or from a paid order that ends after the days you choose.
You set up tiers once, in your form’s settings. From then on:
- A paid order features the listing, and the spot ends after the days you set
- Each tier shows its own badge, icon and row color
- Higher tiers sit above lower ones in the same View
Read more on the Featured Tiers feature page, or follow the setup guide to set up your first tier.
Every extension and layout, now built in
The GravityView extensions and layouts you know, such as DataTables, Maps, Advanced Filtering and Multiple Forms, are now features of GravityView Pro. Everything is built into one plugin, so there’s no more installing, updating and keeping track of a separate plugin for each one. You use only the features your application needs.
If you already use the separate plugins, they keep working after you update, until you switch to the built-in versions. The built-in versions use the same settings, so your Views stay as they are. For more information about switching, read Moving from separate extensions to GravityView Pro.
Your GravityView Pro license includes Live Filters, Connected Views and Edit Window alongside every other GravityView Pro feature.
A new Welcome page for every GravityView user
Today’s update also adds a Welcome page for every GravityView user, with or without Pro. You’ll find it under GravityKit, then Welcome. It has everything you need to get started or learn more about building with GravityView:
- Guided tours in the View editor, including one that walks you through building your first View
- A setup checklist, from your first form to a published View
- A sample View you can create in one click, to start from a working example
- Ideas for what to build, with tutorials and guides
How to get the new features
GravityView Pro and All Access Pass customers get all the new features at no extra cost. To get them, go to GravityKit, then Manage Your Kit, and update GravityView.
If you own GravityView without Pro, nothing changes, and GravityView keeps updating as usual. To add these features, upgrade to GravityView Pro.
Legacy GravityView + Extensions licenses keep every extension and its updates. Live Filters, Connected Views and Edit Window come with GravityView Pro only, so upgrading to GravityView Pro is how you get them. If your license includes Featured Entries, Featured Tiers come with its update.
Have more questions about the update?
The FAQ on the GravityView Pro release week page answers the common ones. If yours isn’t there, our support team is happy to help.
Get better at Gravity Forms, one email a week
New GravityKit releases, practical Gravity Forms tutorials, and subscriber-only discounts. One short email every week, unsubscribe anytime.
More articles

New in GravityView Pro: Live Filters, Connected Views, Edit Window, and more
Live Filters, Connected Views, Edit Window and Featured Tiers are new in GravityView Pro, and every extension and layout is now built into one plugin.
Launch Log: Parent Entry ID fields, User Registration fixes, and security updates
Security fixes in Entry Tags, GravityEdit, GravityExport Lite, and GravityView, plus new Parent Entry ID fields and User Registration fixes in Edit Entry.
9 business apps you can build with Gravity Forms and GravityKit
Nine apps small businesses build from the Gravity Forms data they already collect, from a contact list and sales board to customer logins, invoices, and stock counts.