Published
•
Updated
How to schedule recurring exports in Gravity Forms
Schedule Gravity Forms exports daily, weekly, or monthly with GravityExport. Deliver reports automatically to Dropbox, SFTP, or local storage.

If you’re manually exporting Gravity Forms data every day, week, or month, there’s a better way. With GravityExport, you can set up recurring exports that run automatically and deliver files to your server, Dropbox, or an SFTP destination.
In this tutorial, I’ll walk you through two ways to schedule recurring exports:
- Scheduled exports — built-in intervals like hourly, daily, or weekly.
- Webhook-triggered exports — for custom intervals like quarterly or every 5 minutes, using external services like FastCron or Make.
Let’s get started!
Wanna try it?
Spin up a demo
See GravityExport in action on its live demo site.

What you’ll need
- A WordPress site with Gravity Forms installed
- The GravityExport plugin
Method 1: Set up a recurring export
Step 1: Create a GravityExport Save feed
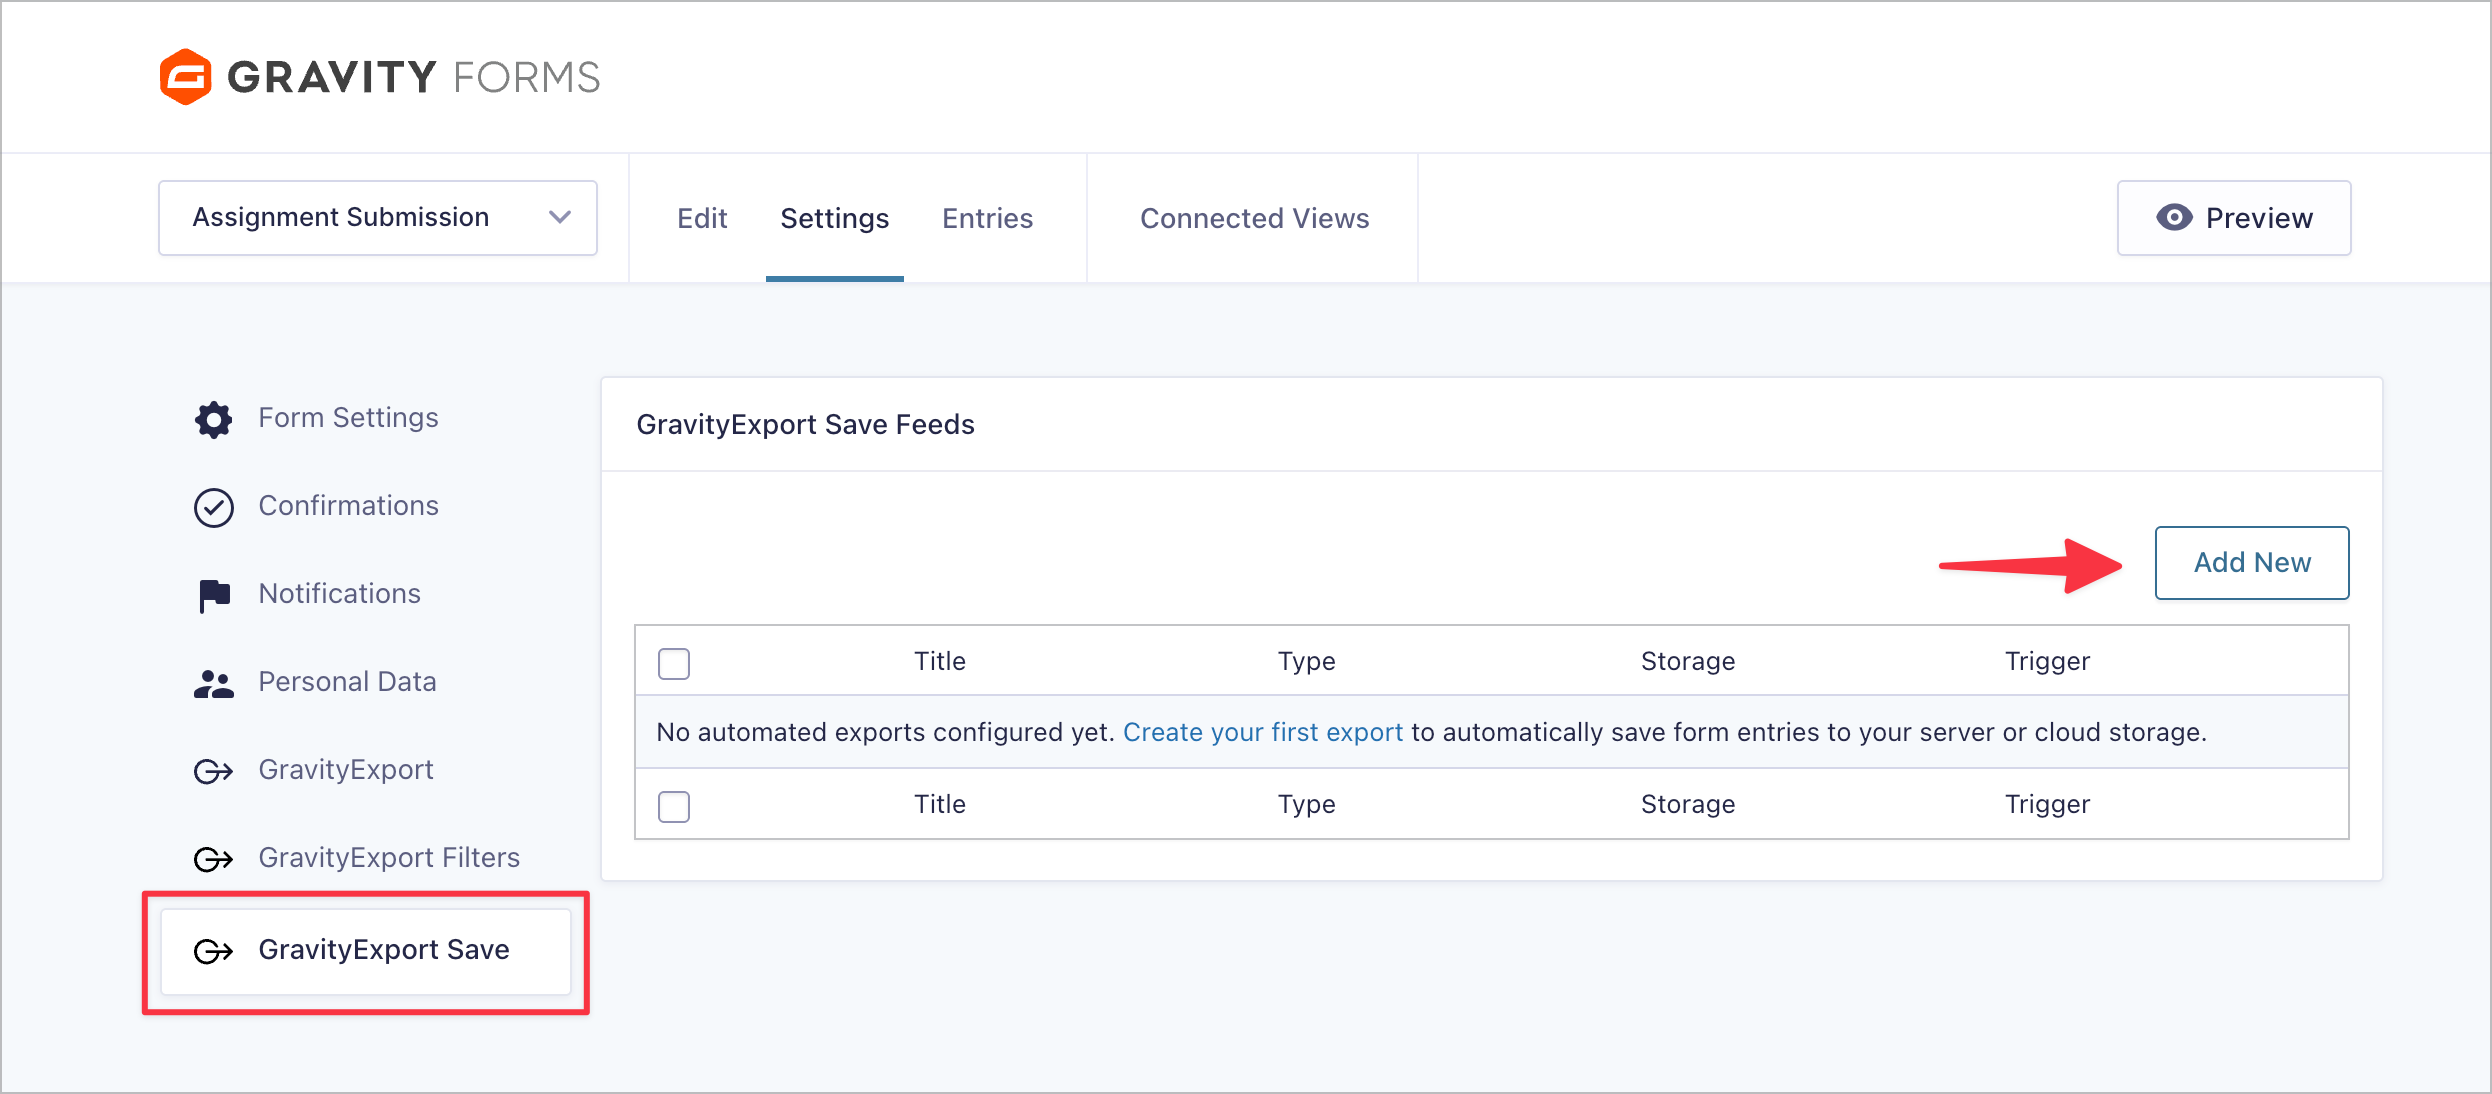
After installing GravityExport, we’ll head to our form’s settings and create a new Save feed. Hover over Settings in the Gravity Forms menu, then click GravityExport Save. From there, click the Add New button.
The feed settings are organized into five tabs:
- General — this is where we’ll configure the schedule and export trigger.
- File Settings — choose the file format (Excel, CSV, or PDF) and set a custom filename.
- Storage — select where exported files are saved (local, Dropbox, or FTP/SFTP).
- Conditional Logic — filter which entries are included in the export.
- Multiple Rows — configure how multi-row fields, like repeaters, are handled.
First, give your feed a descriptive name, something like “Weekly Sales Report” or “Daily Customer Export”. Then choose your Export Type:
- All Entries creates a single file containing every matching entry. This is ideal for recurring reports where you want a comprehensive snapshot.
- Single Entry creates a separate file for each individual entry as it’s submitted. This is better for per-submission workflows, not scheduled reports.
For scheduled exports, you’ll almost always want All Entries.

Next, you can optionally select a filter feed. Filter feeds are reusable report structures that define which fields to include, conditional logic, and other settings. Once configured, you can tie the same filter feed to any Save feed. To create or edit filter feeds, go to “GravityExport Filters.”

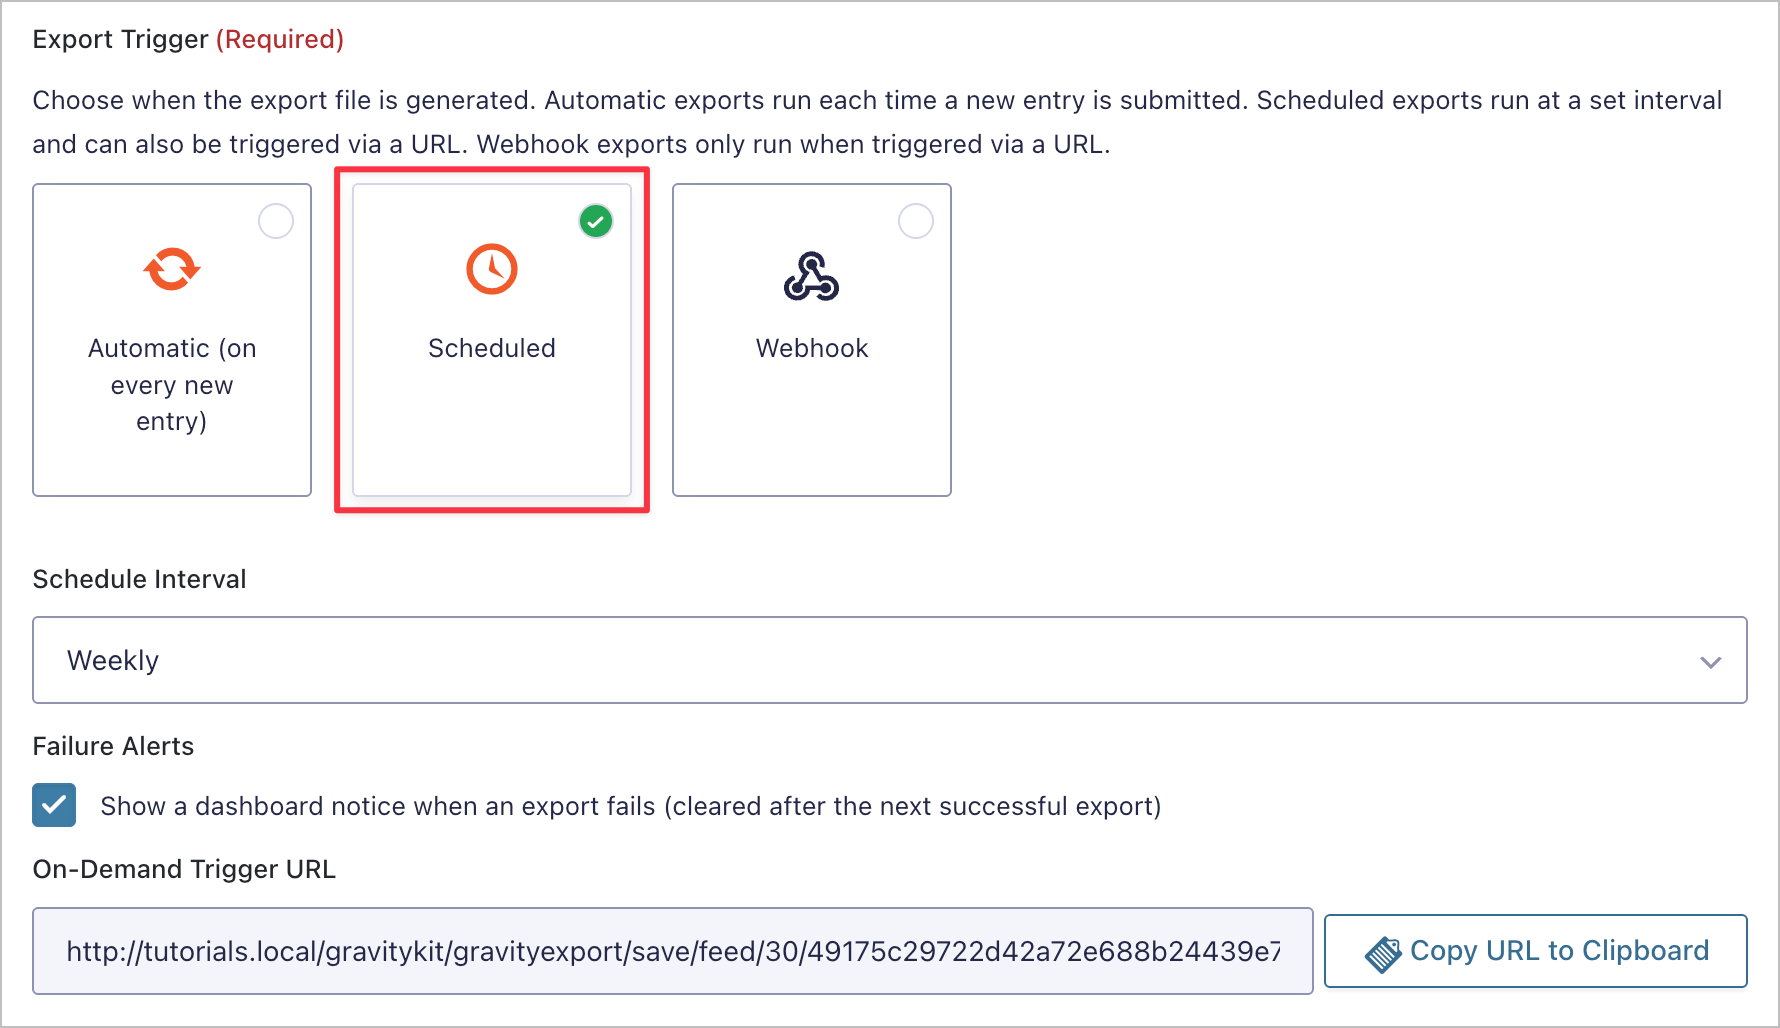
Step 2: Configure a scheduled export
Now we’ll set up the schedule. Scroll down to the Export Trigger section and select Scheduled. Then choose your preferred interval from the Schedule Interval dropdown. You can pick from hourly, twice daily, daily, weekly, or a custom hour-based interval.
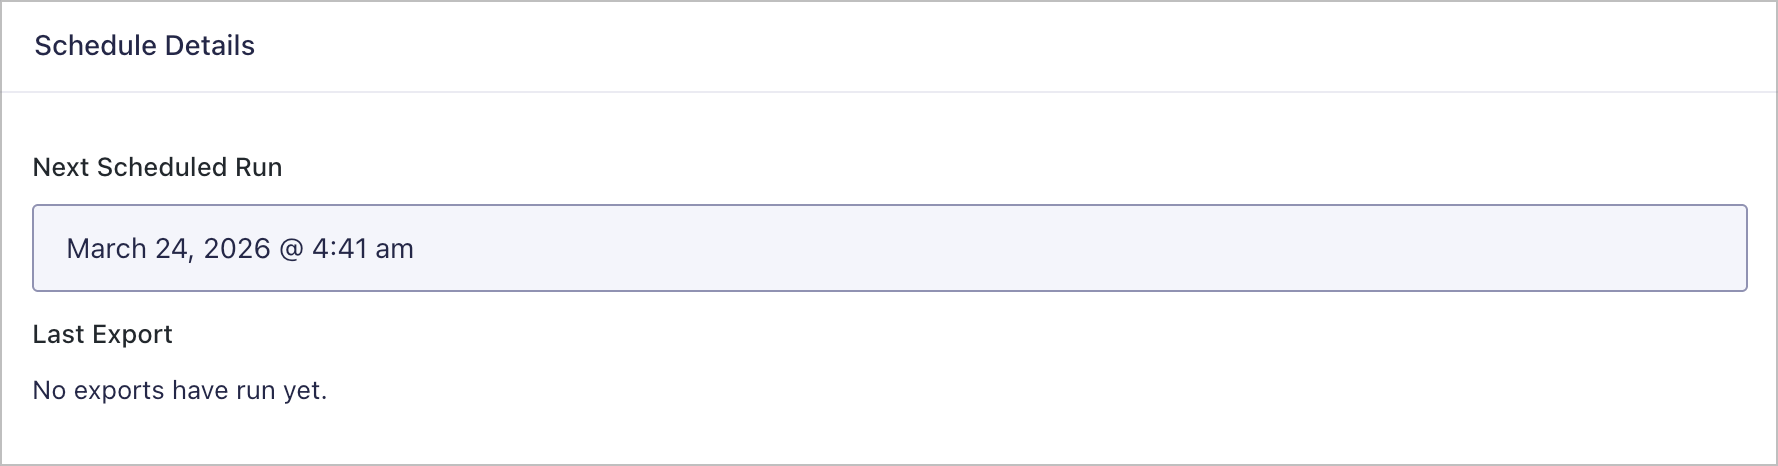
If you scroll down to Schedule Details, you’ll see the date of the next scheduled run, as well as the previous run.

Pro Tip
Scheduled exports run via WordPress background processing, which works independently of WP-Cron. This means your exports will run even if WP-Cron is disabled. However, if your site gets very little traffic, the background processor may not stay active. In that case, you can use a free service like FastCron to visit your homepage regularly and keep things running smoothly.
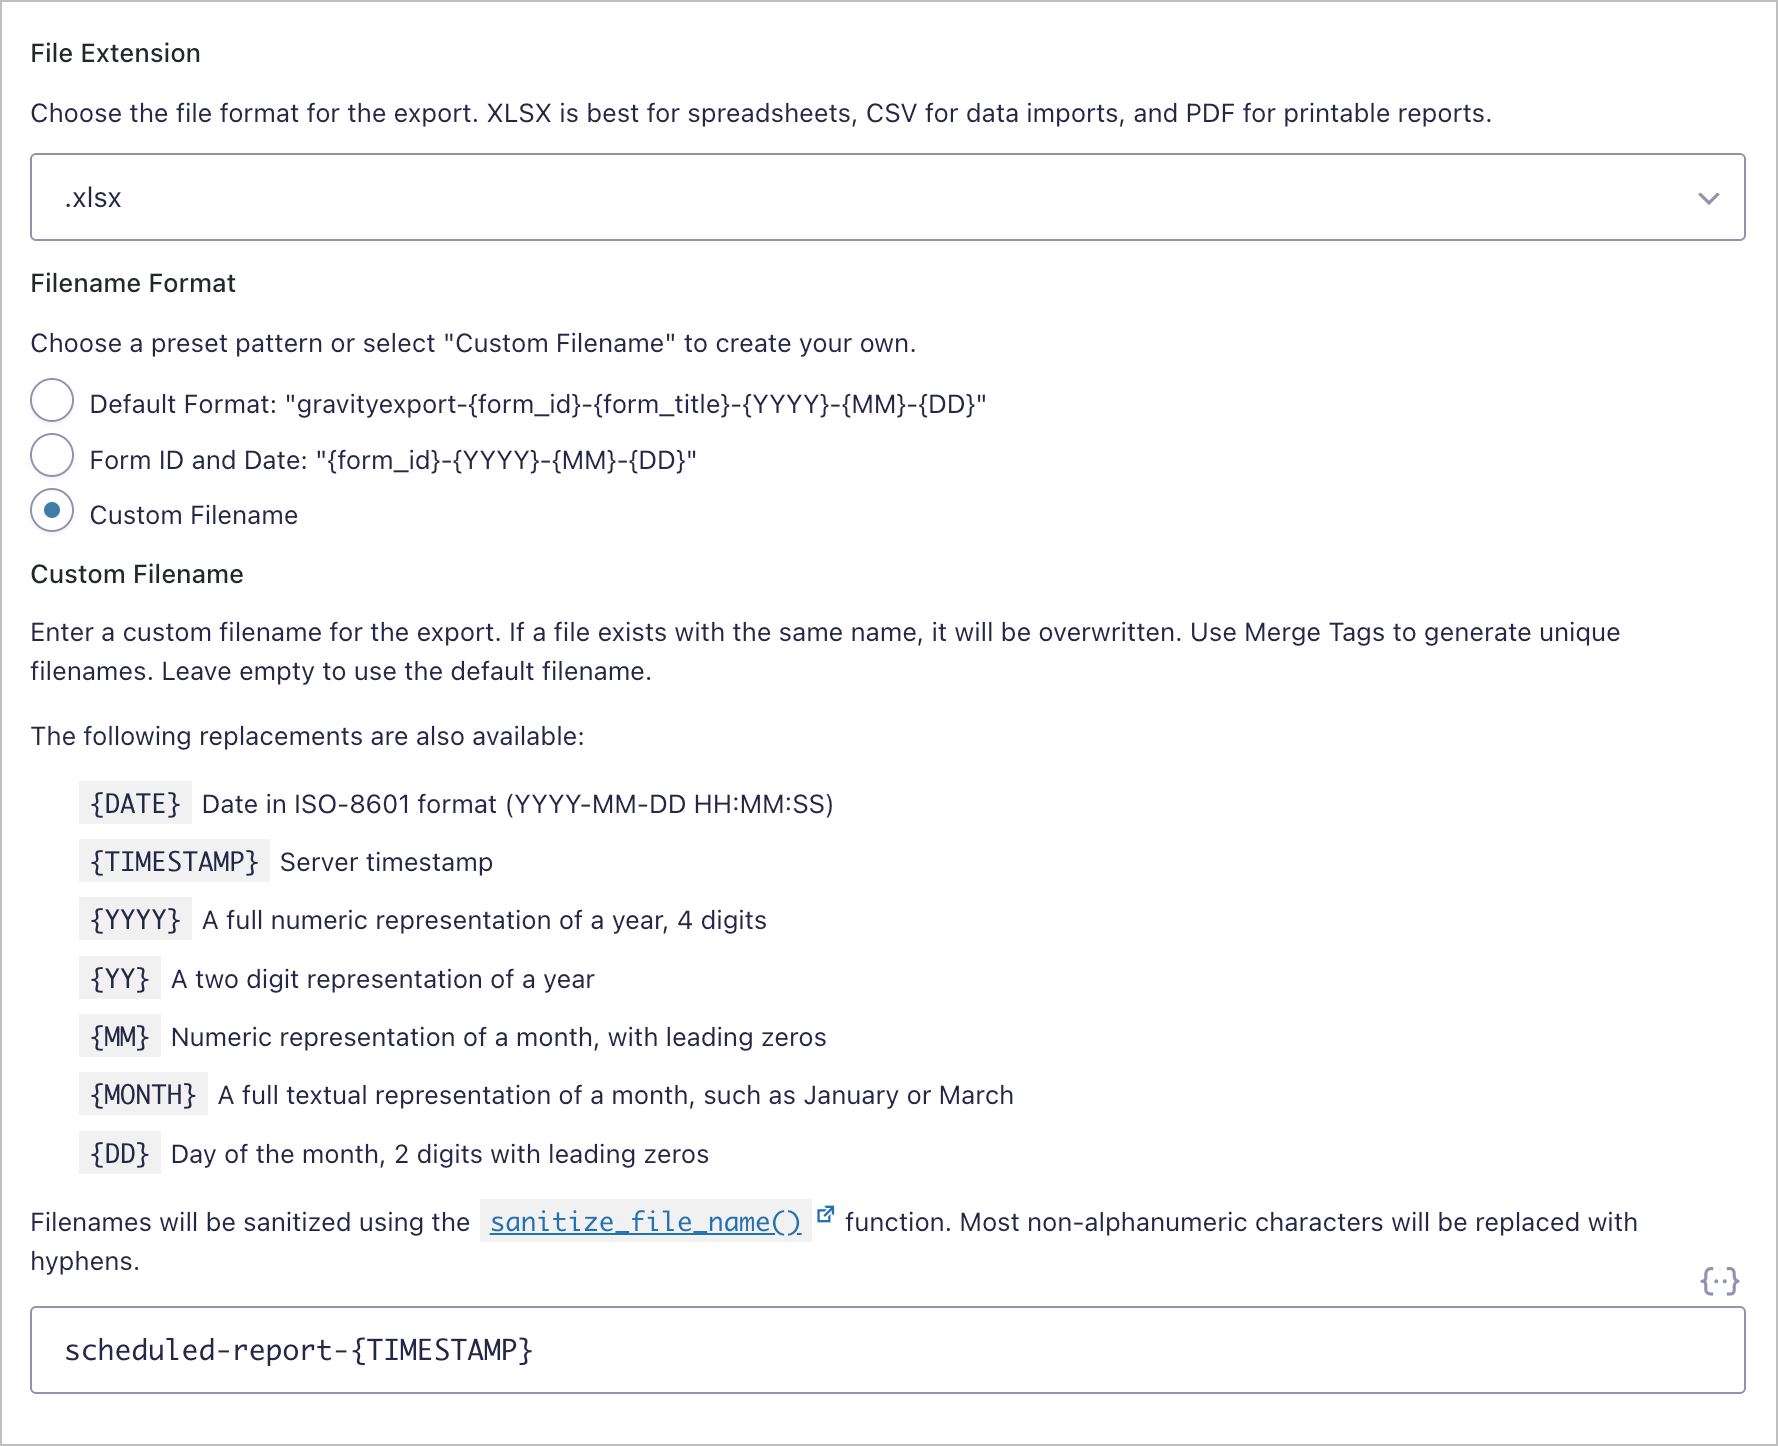
Step 3: Select a file type and file name
Next, click the File Settings tab. Here you’ll choose the file format for your export. XLSX is great for spreadsheets, CSV for data imports, and PDF for printable reports.
You can also set a custom filename using merge tags to keep your files organized. For example, scheduled-report-{TIMESTAMP} will append the current date and time to each export, so files never overwrite each other. Other useful tags include {DATE}, {YYYY}, {MM}, and {DD}.
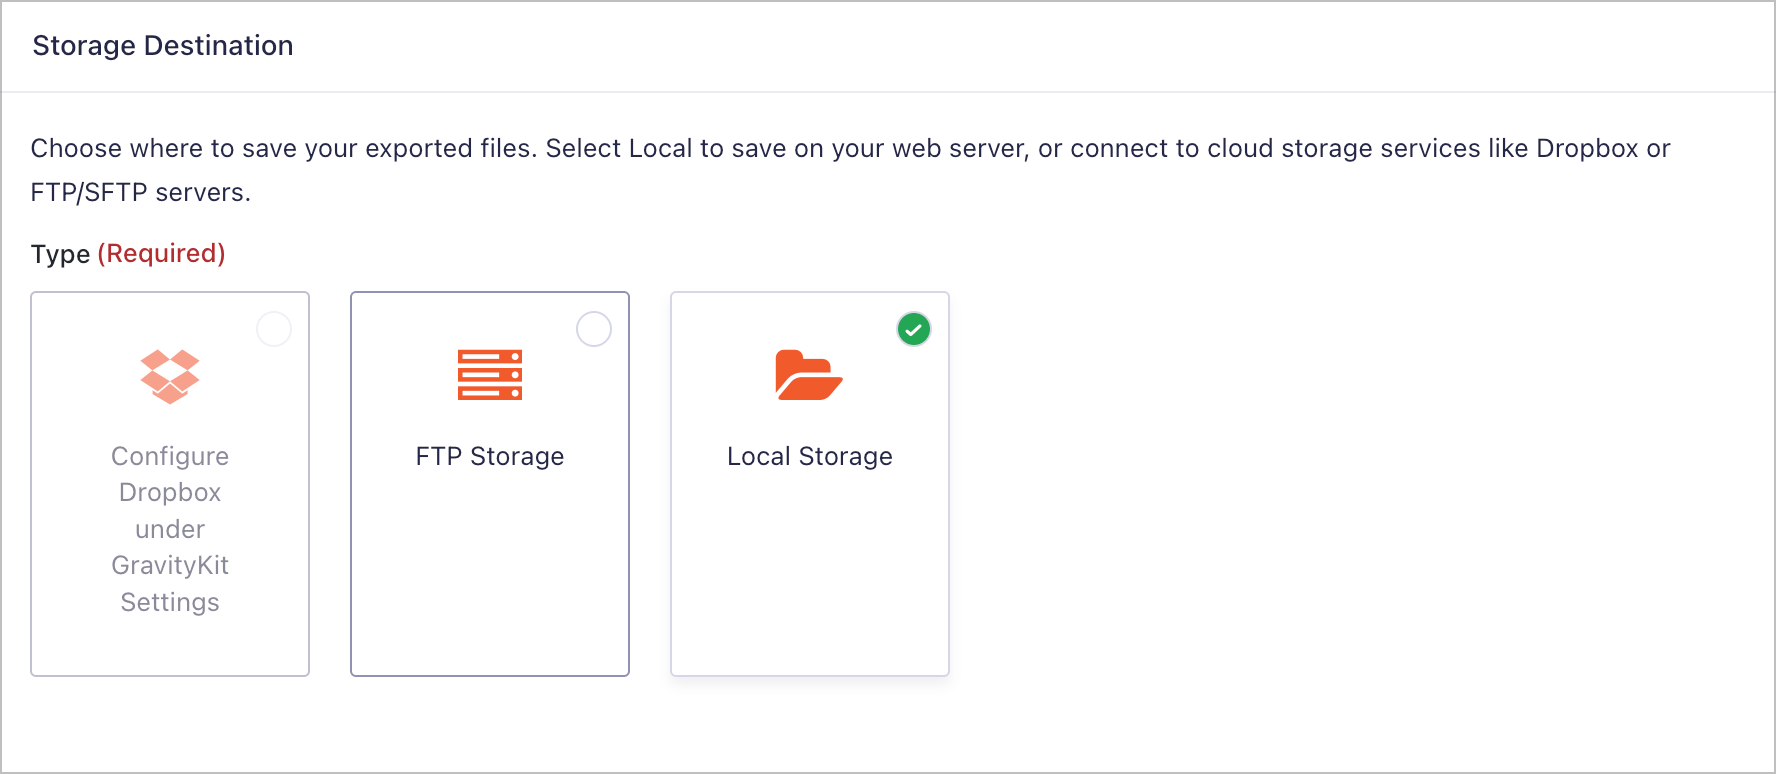
Step 4: Set up a file destination
Click the Storage tab to choose where your exported files are saved. You have three options:
- Local Storage — saves files directly to your web server. Great for backups or when you need to access files via your hosting file manager.
- FTP Storage — sends files to a remote server via FTP or SFTP. Ideal for enterprise integrations where a third-party system needs to pull data automatically. See the FTP setup guide for configuration details.
- Dropbox — delivers files to your Dropbox account for easy sharing with clients or team members. You’ll need to connect your Dropbox account first under GravityKit Settings. See the Dropbox setup guide for instructions.
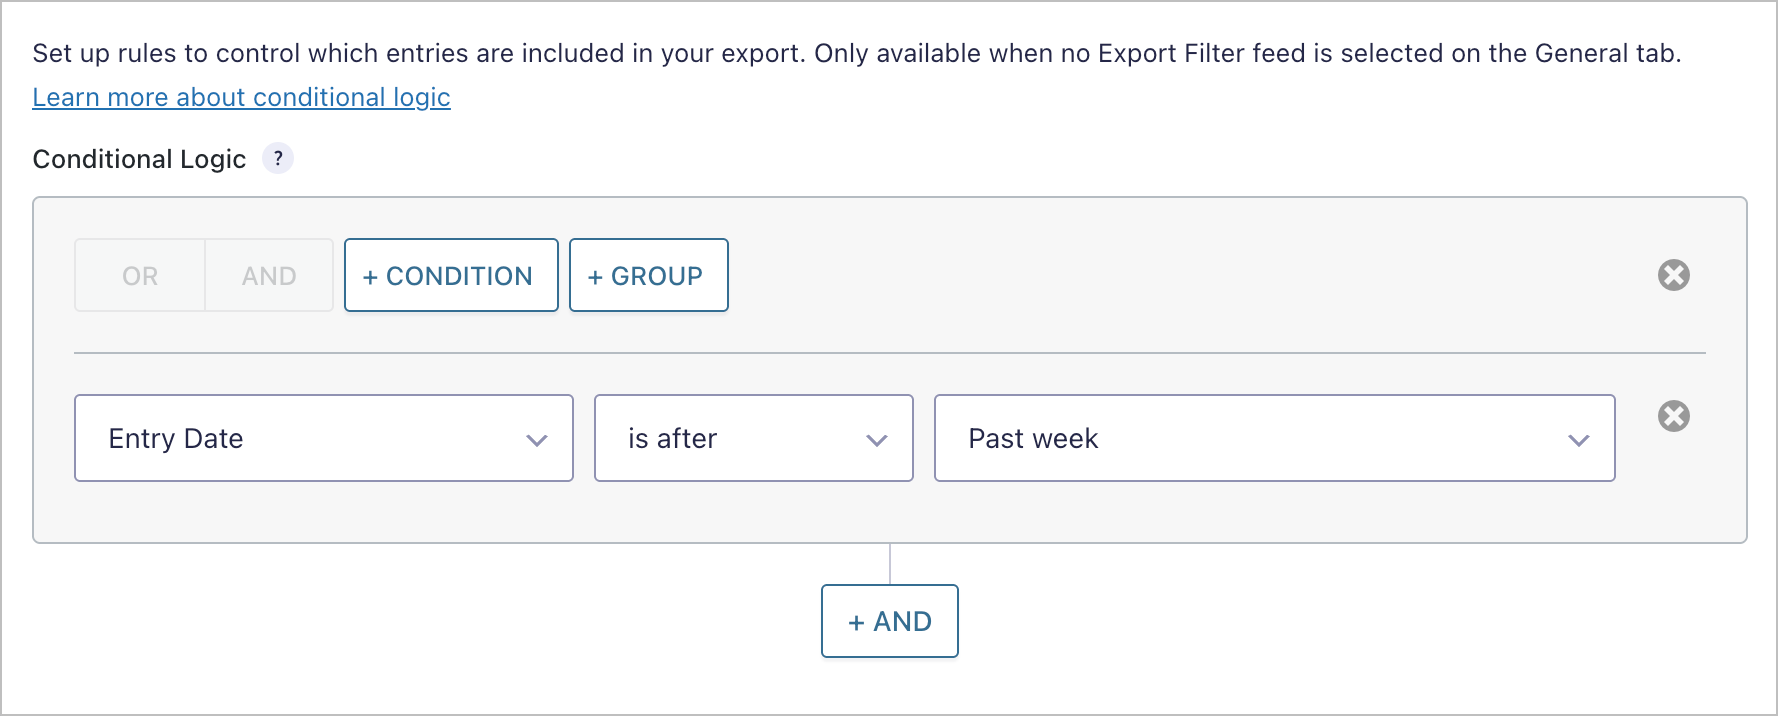
Step 5: Filter exports to include relevant entries
If you only want to export recent entries (e.g., entries from the past week), you can set up a filter on the Conditional Logic tab. Click + Condition, then set the filter to Entry Date is after Past week.
This ensures each export only includes new entries since the last reporting period, so you’re not re-exporting the same data every time. You can also combine multiple conditions using the + AND button to further narrow which entries are included.
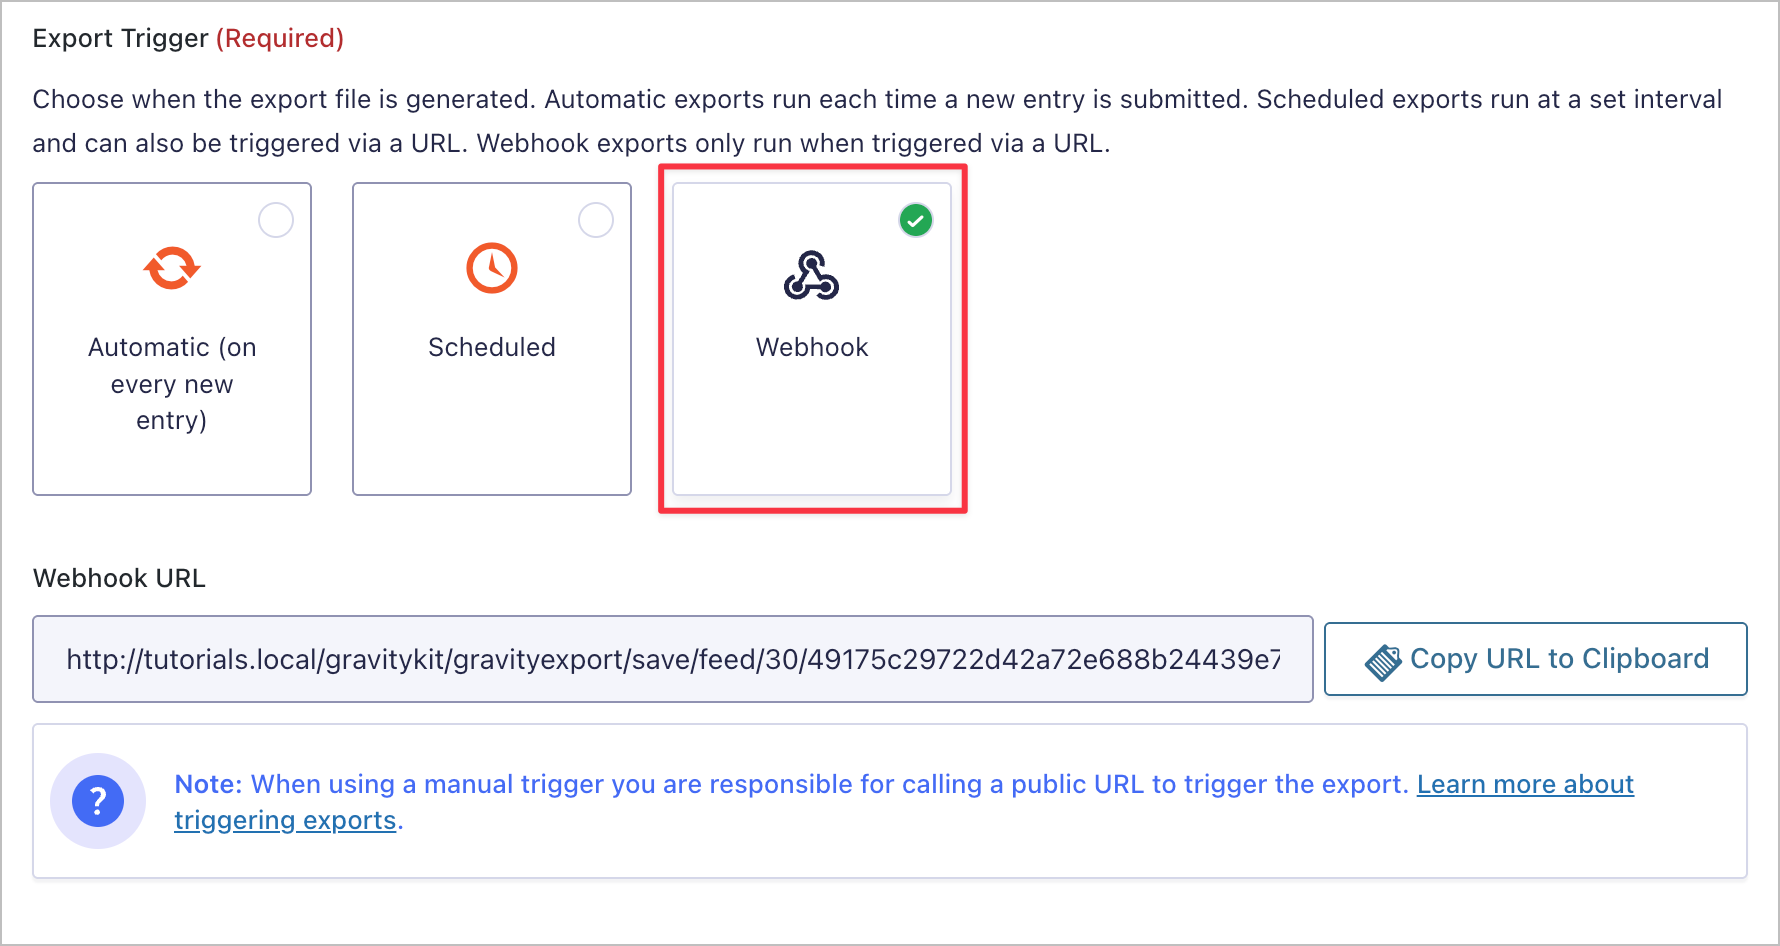
Method 2: Set up custom-interval exports using a webhook
If you need exports on a schedule that isn’t available in the built-in options (like on specific days of the week), you can use the Webhook trigger instead. This generates a unique URL that runs the export whenever it’s called.
To set this up, create a new GravityExport Save feed (or edit an existing one) and select Webhook as the Export Trigger. GravityExport will generate a Webhook URL. Click Copy URL to Clipboard to copy it.
Now you just need an external service to call that URL on your preferred schedule. Here are two popular options.
Option 1: Using FastCron
FastCron is a free cron job service that’s perfect for this (you get up to 5 cron jobs on the free plan!). After signing up, log in, click Cron Jobs, then click + Cron Job to create a new job.
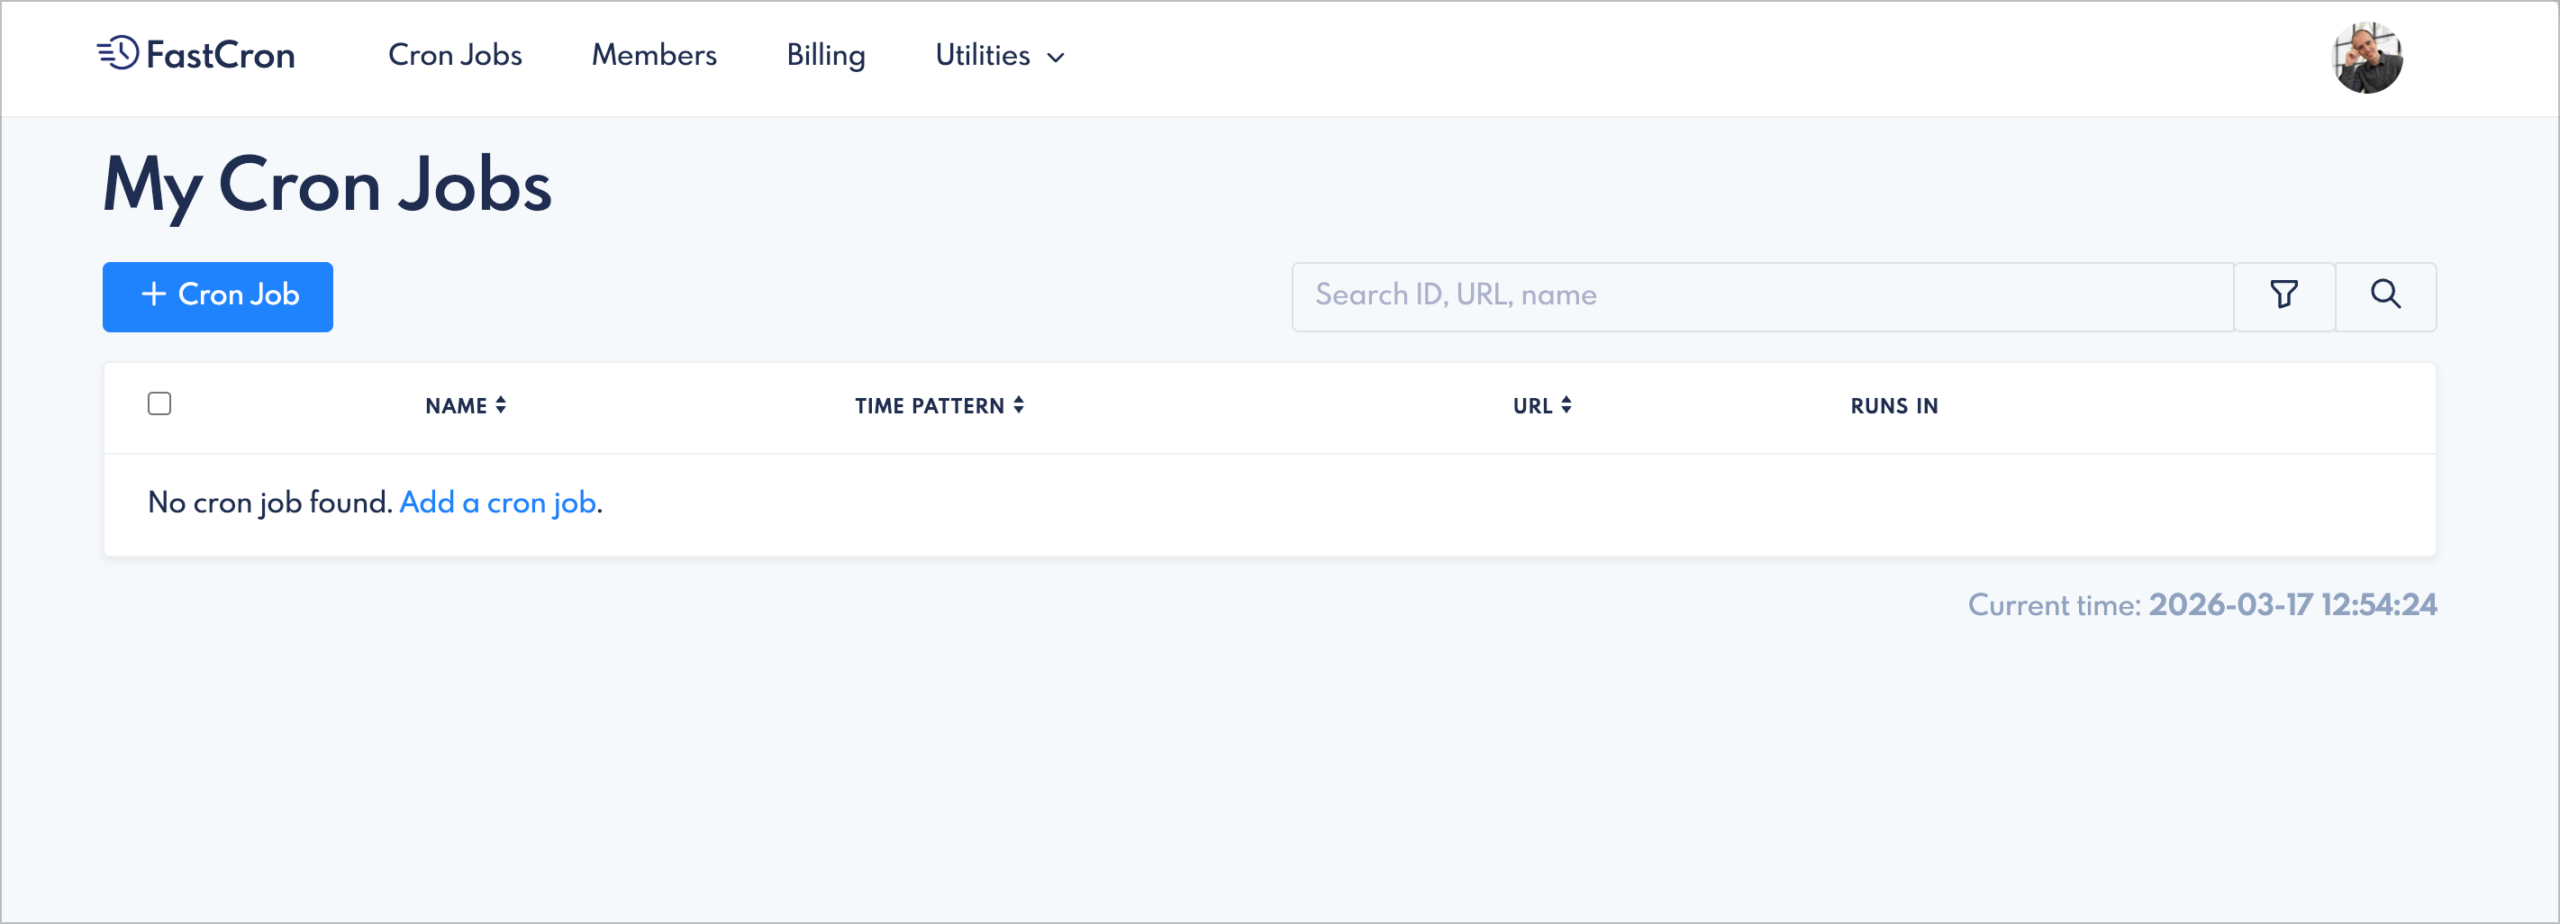
Paste your GravityExport trigger URL into the URL to call field and select your preferred schedule from the When to call dropdown. You can choose from preset intervals like monthly, or click Crontab to set a custom schedule using cron syntax. Once you’re happy, click Save change and your export will run automatically at the specified time.
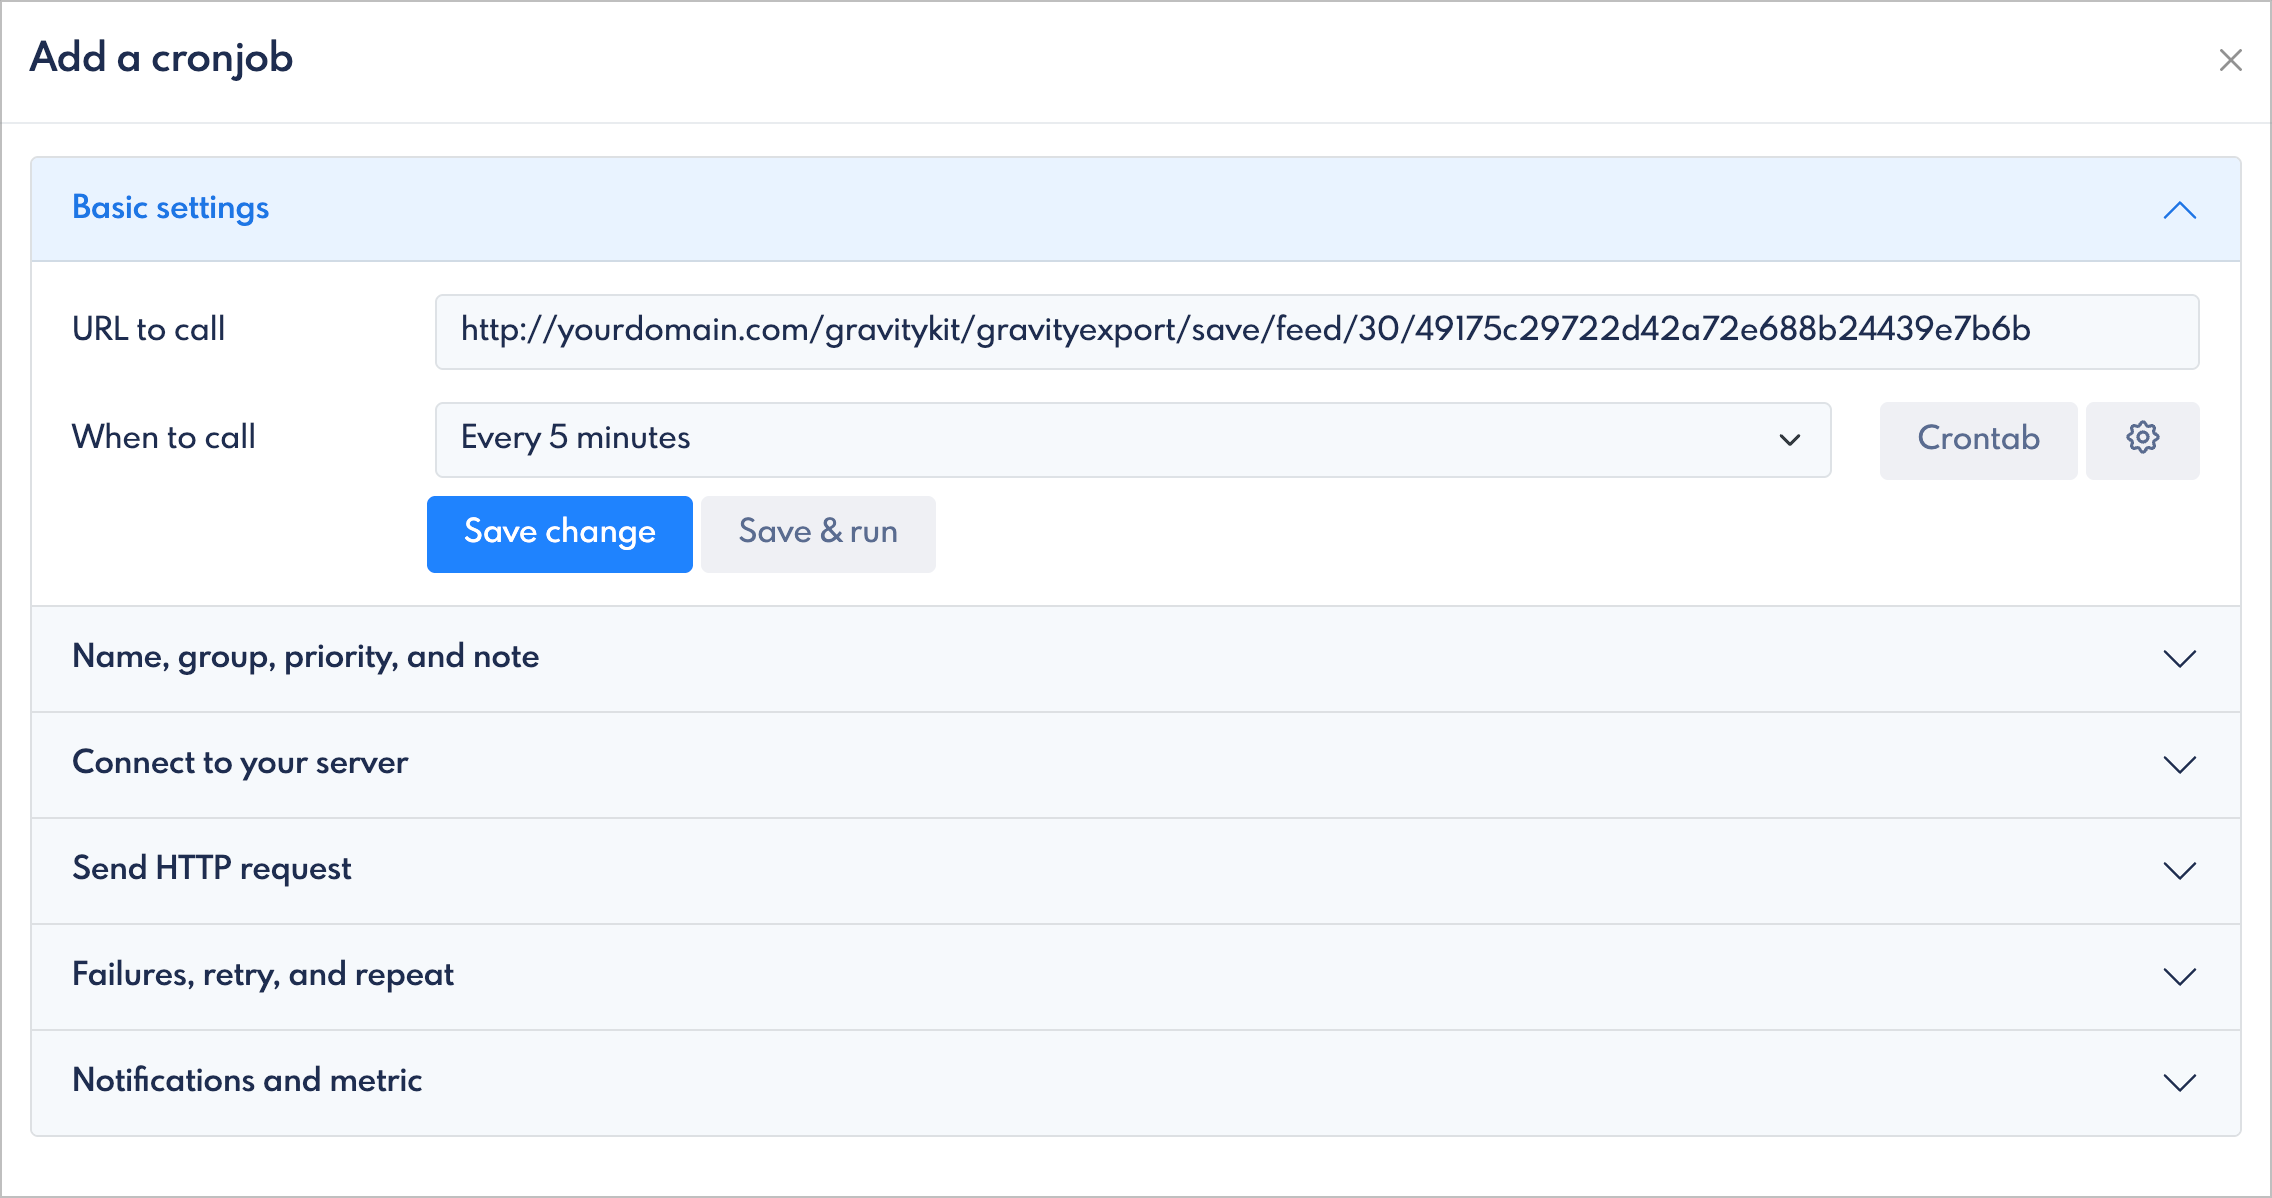
FastCron also offers useful settings like failure notifications (under Notifications and metric) and automatic retries (under Failures, retry, and repeat). These are worth configuring if you’re relying on these exports for critical reporting.
Option 2: Using Make or Zapier
You can also trigger your webhook from automation platforms like Make or Zapier. In Make, add an HTTP > Make a request module, paste your trigger URL into the URL field, set the method to GET, and leave authentication set to No authentication. Then set the scenario’s schedule to your desired interval.
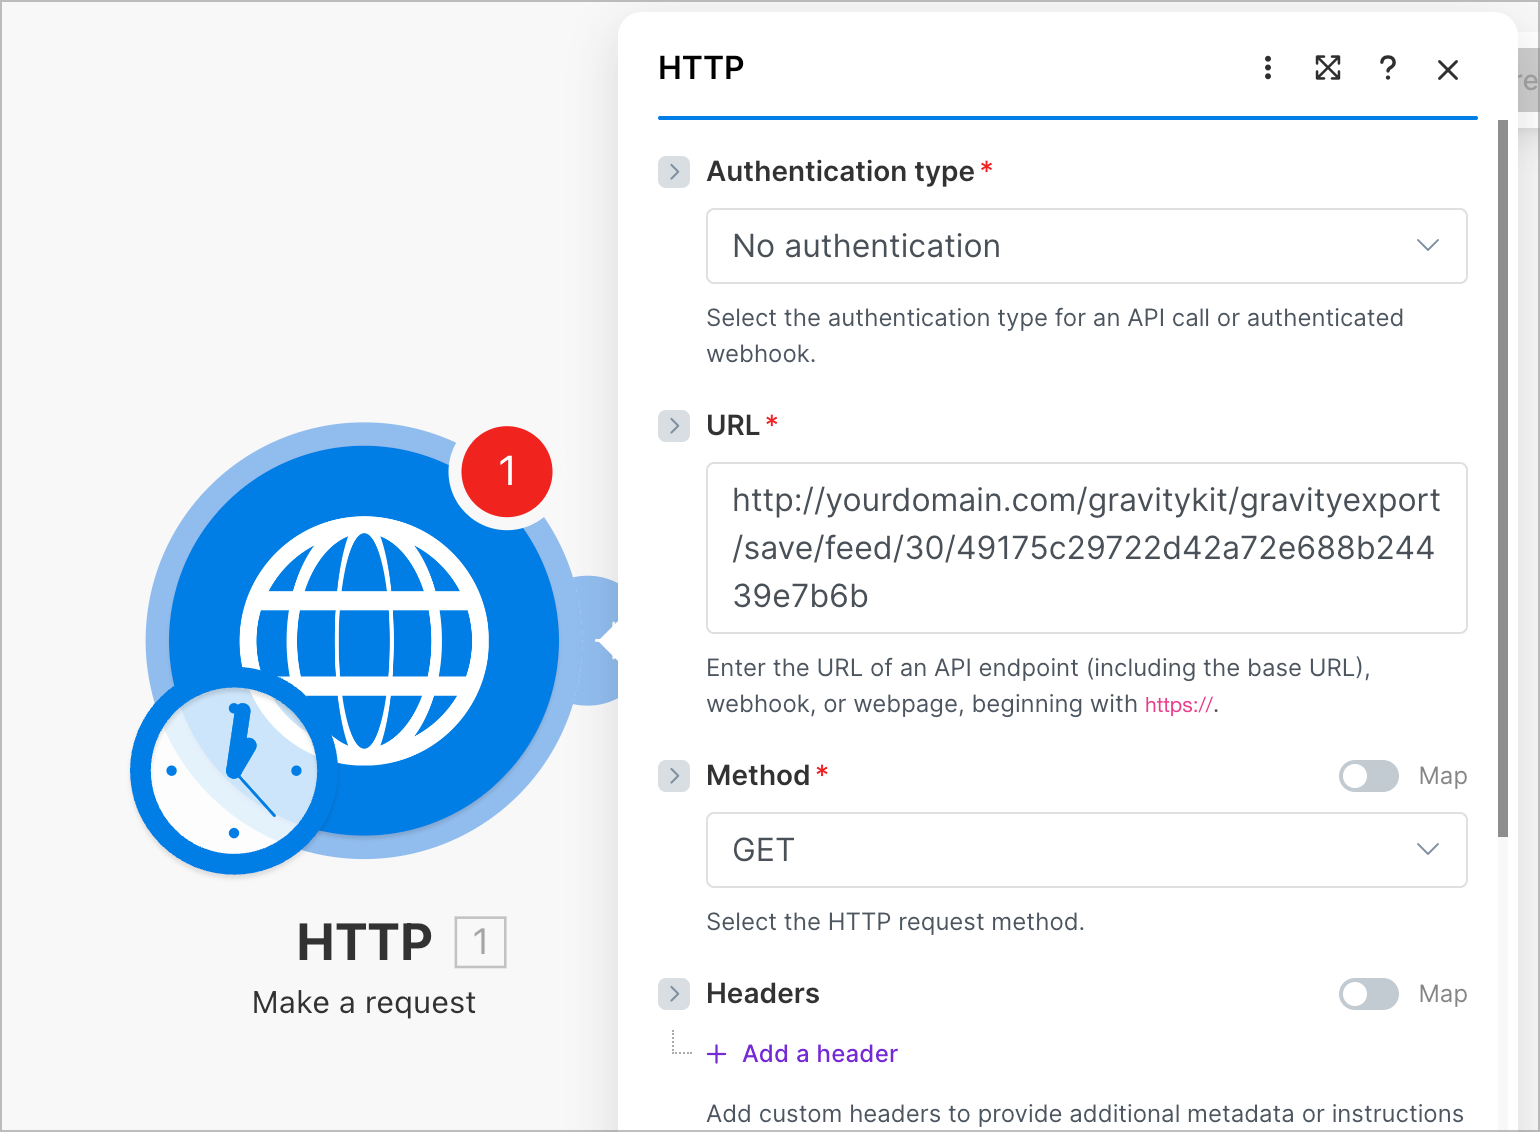
The process is similar in Zapier.
Pro Tip
Keep your trigger URL private. Anyone with access to the URL can trigger your export. Learn more in the GravityExport trigger documentation.
Optional enhancements
Once your scheduled exports are running, here are a few ways to take things further:
- Use conditional logic to export only entries matching specific criteria, such as payment status or approval status
- Set up multiple Save feeds for the same form to deliver different reports to different stakeholders
- Re-run a Save feed manually whenever you need an on-demand export outside of the regular schedule
Set up recurring reports in Gravity Forms today
That’s it! With GravityExport, you can build a report once and let it run on autopilot—whether that’s a daily CSV backup to your server, a weekly Excel report delivered to Dropbox, or a monthly data export sent to an SFTP server for your CRM.
If you’re looking for even more ways to automate your Gravity Forms data, check out our guide on how to automatically export Gravity Forms entries and send reports via email.
Ready to put your exports on autopilot? Get started with GravityExport today.

Helpful tips right in your inbox.
Subscribe to get the latest articles, information on releases and helpful Gravity Forms tips!
More articles

Launch Log: GravityView 3.0, plus AI-assistant upgrades in Block MCP and GravityKit MCP
GravityView 3.0 adds the Vantage theme, frontend bulk actions, and AI-assisted View creation, plus Block MCP and GravityKit MCP updates for AI assistants.

Announcing GravityView 3.0: a fresh new look, AI View creation, and native page builder support
GravityView 3.0 is here: restyle Views with the new Vantage theme, build them with AI, embed them in any page builder, and run bulk actions on the front end.

Launch Log: GravitySearch arrives, plus AI spam review and GravityView fixes
This week, releases are anchored by a brand-new product! GravitySearch joins the GravityKit suite with cross-form entry search for Gravity Forms. Alongside it, Gravity Forms Zero Spam picks up an AI-powered review step, and GravityView sees fixes for Enhanced Security, Edit Entry, and Entry…