Published
•
Updated
How to build a Canny alternative on WordPress with GravityBoard voting
Build a Canny alternative on WordPress with GravityBoard's new card voting — collect, rank, and manage feature requests without leaving your site.
Canny is a great way to collect feature requests… until the bill arrives! Pricing scales by tracked user, your roadmap lives on a separate subdomain, and your customer data sits on someone else’s infrastructure. If you already run WordPress, you already have a site, a user database, and an email sender doing 80% of what Canny charges you for.
In this tutorial, I’ll show you how to build a self-hosted Canny alternative on your WordPress site using Gravity Forms and GravityBoard. By the end, you’ll have a public “submit, vote, prioritize” feedback board running entirely under your own domain.
Let’s dive in!
Wanna try it?
Spin up a demo
See GravityBoard in action on its live demo site.

What we’re building
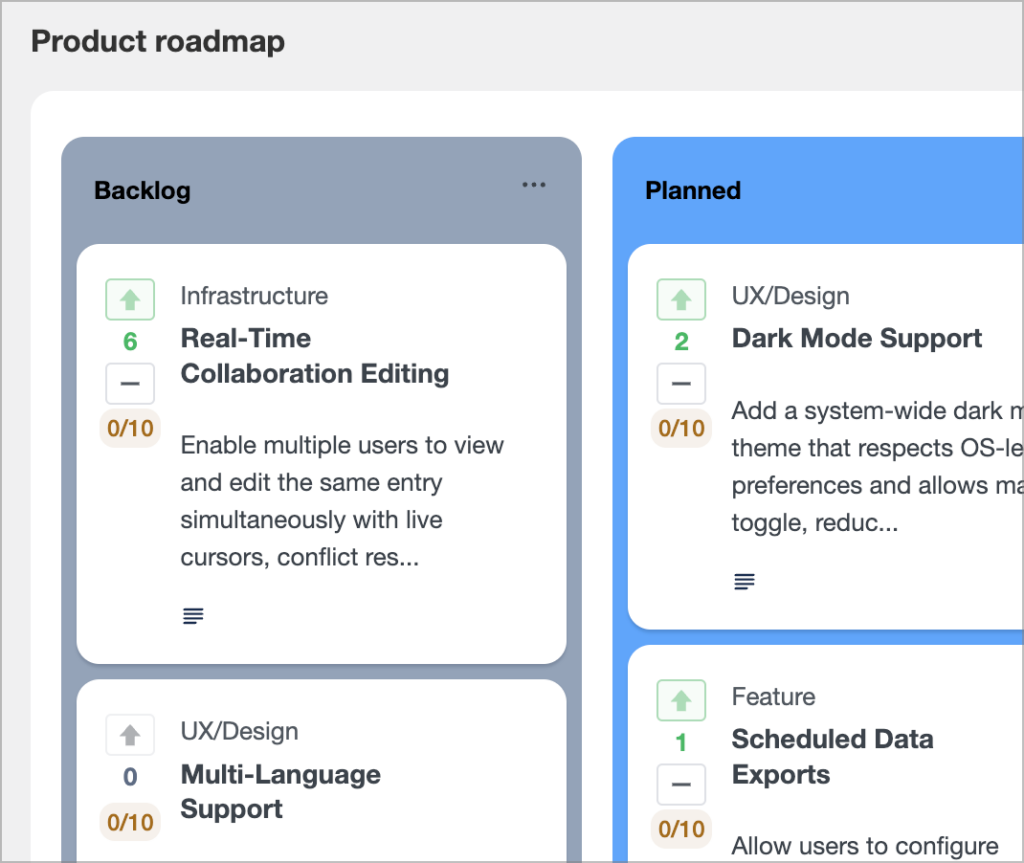
Here’s a preview of what we’re building together—a kanban-style roadmap board where users submit ideas through a Gravity Form, upvote the cards they want to see shipped, and watch their suggestions move from “Ideas” to “Planned” to “Shipped” over time:
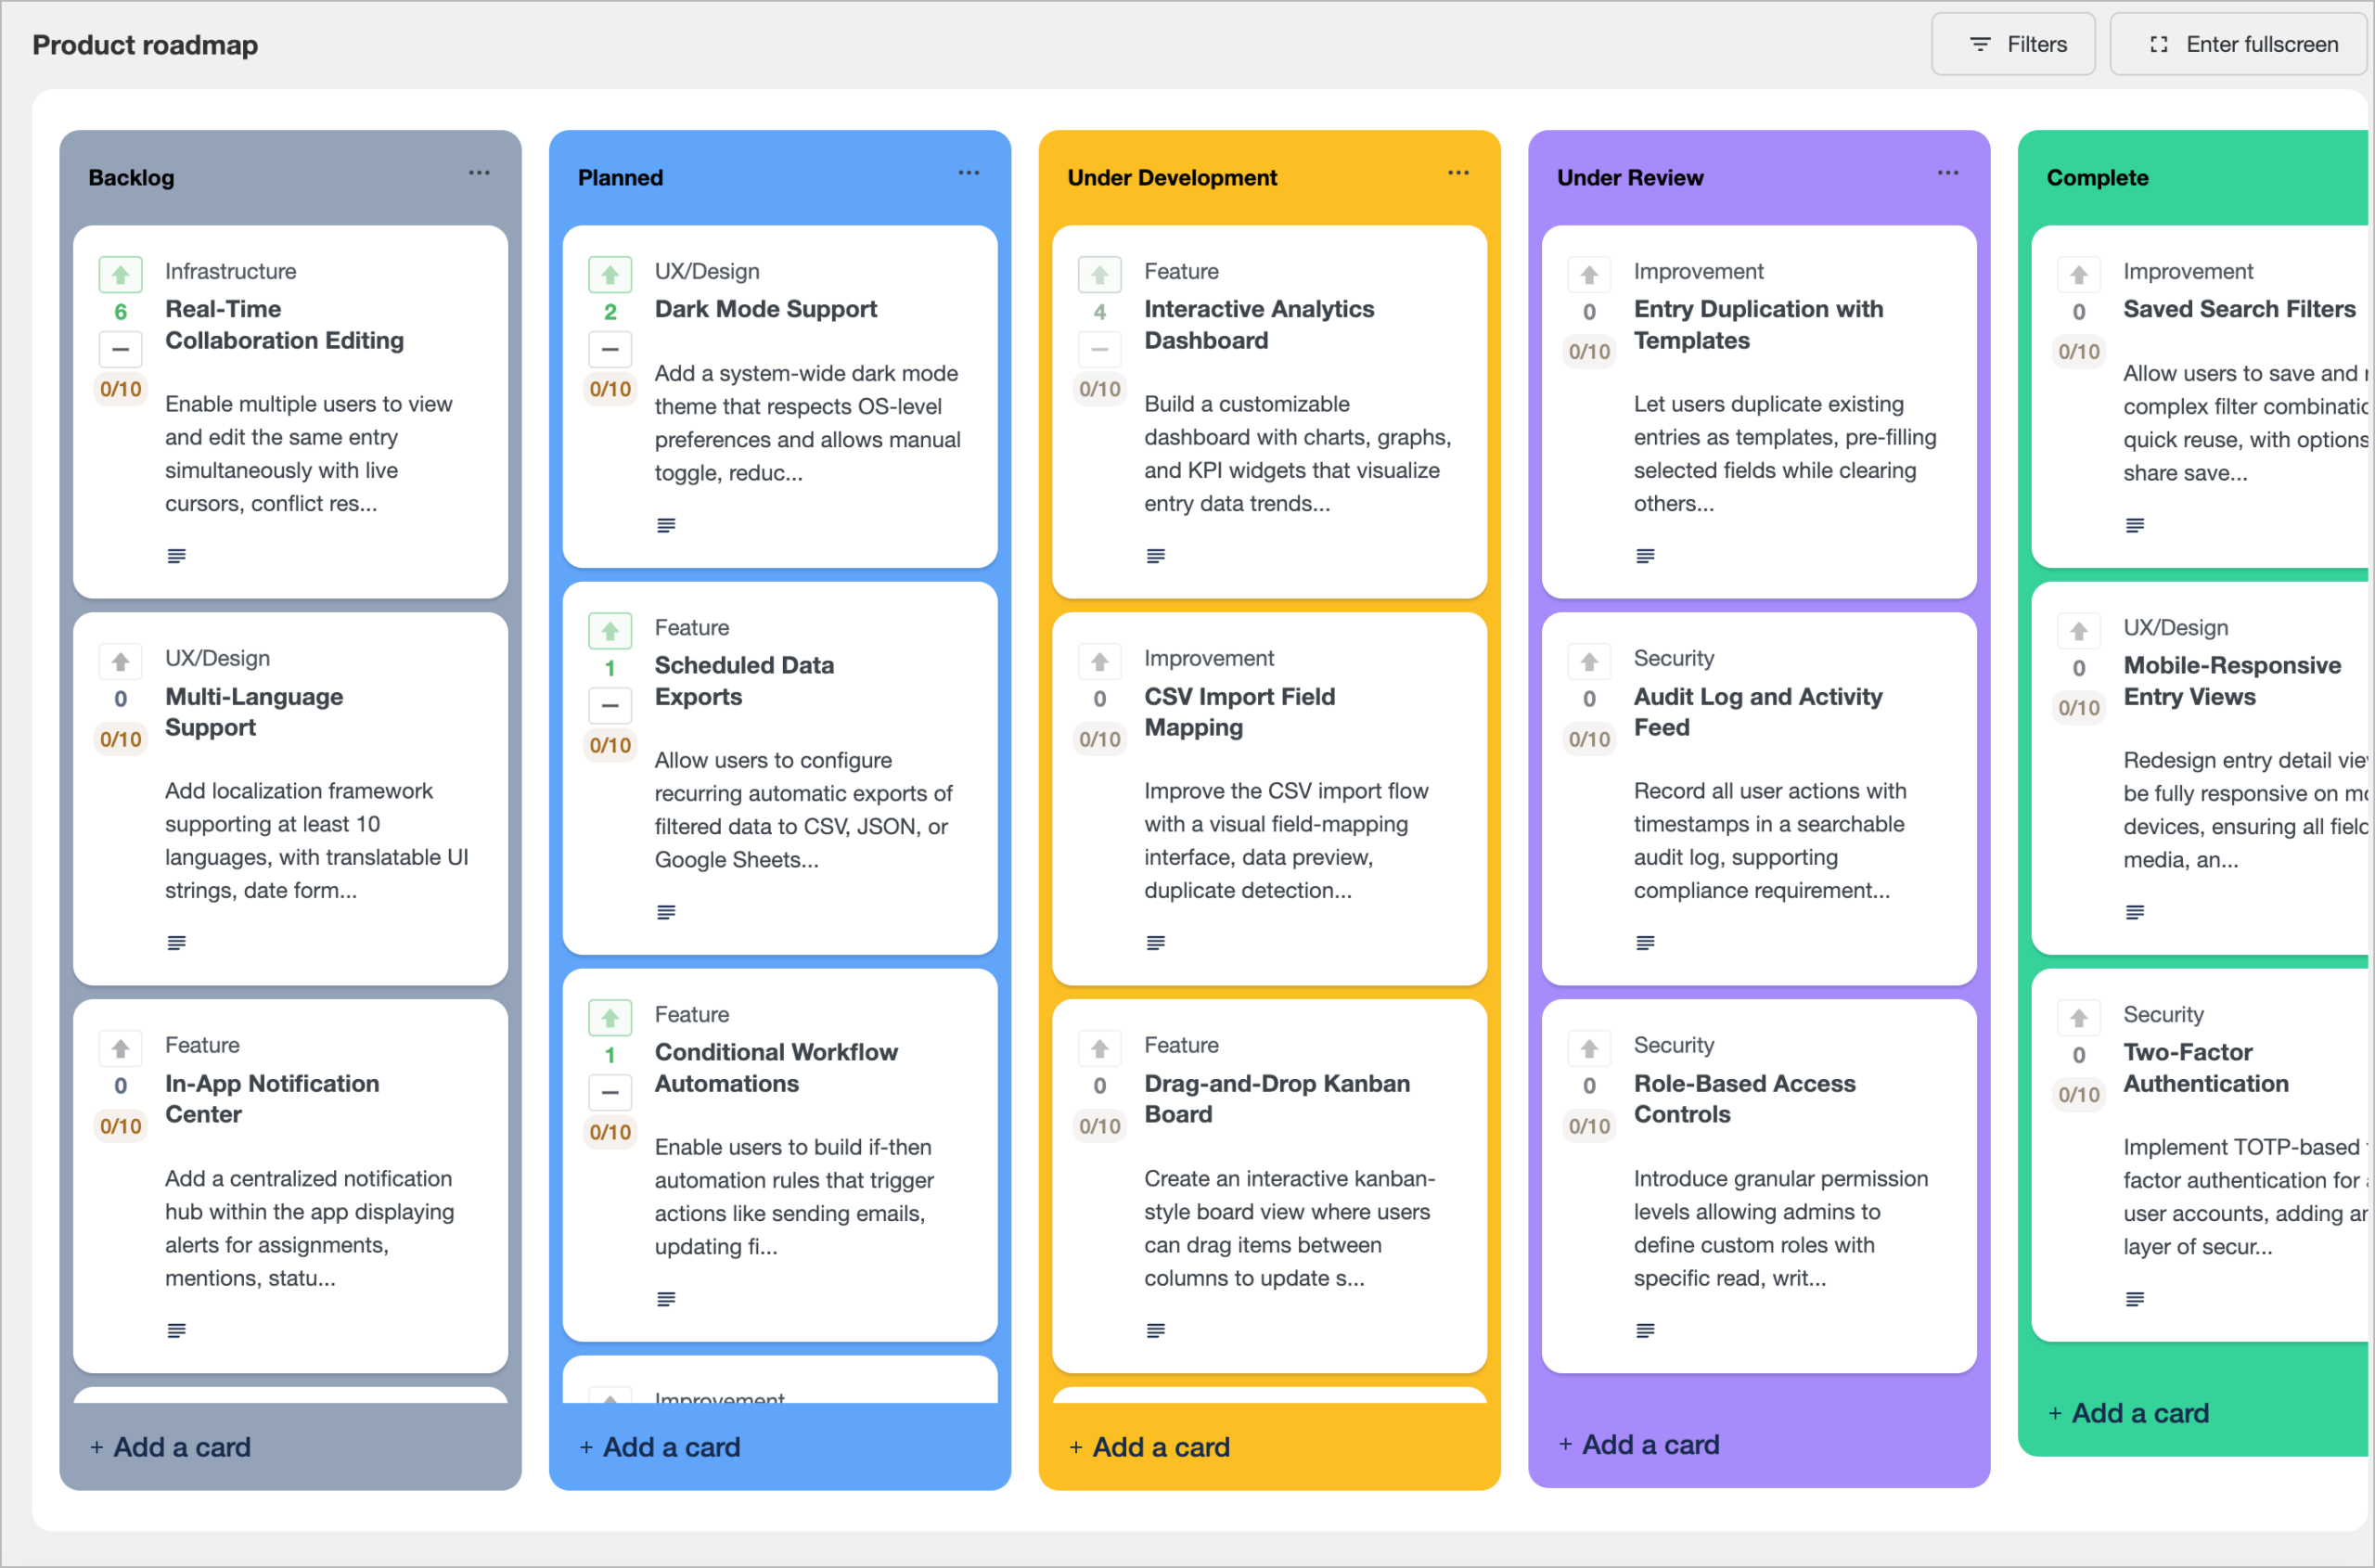
It’s the same workflow Canny popularized (public submission, community voting, transparent status updates) but it lives inside your WordPress admin and uses tools your team already knows.
The new piece that makes this practical is GravityBoard’s native card voting (released April 2026). Before this release, voting on a WordPress feedback board meant bolting on additional plugins or wiring up something custom. Now it ships in the product, with vote budgets, lane-scoped voting, and merge tags for notifications.
What you’ll need
- Gravity Forms — any license tier that supports the field types we’ll use. A Pro license helps if you want conditional logic on the submission form.
- GravityBoard — for building the actual board with voting and other powerful features.
- GravityView (optional) — only needed if you want to create a table or other custom view for your roadmap items.
- A way for users to sign in — standard WordPress accounts work fine; a membership plugin works equally well.
Step 1: Plan the data model
Before clicking anything, it helps to map Canny’s concepts onto GravityBoard’s, so you know what you’re actually building:
| Canny | GravityBoard equivalent |
|---|---|
| Post | Gravity Forms entry → board card |
| Board (e.g., “Features,” “Bug reports”) | A separate Gravity Form |
| Status (Open, Under Review, Planned, In Progress, Complete) | Lanes on a GravityBoard |
| Vote | Native card vote |
| Comment | Threaded card notes (built in) |
Decide your scope upfront. Most teams start with a single board for feature requests and add a second board for bug reports later. There’s no wrong answer—just keep it simple while you’re learning.
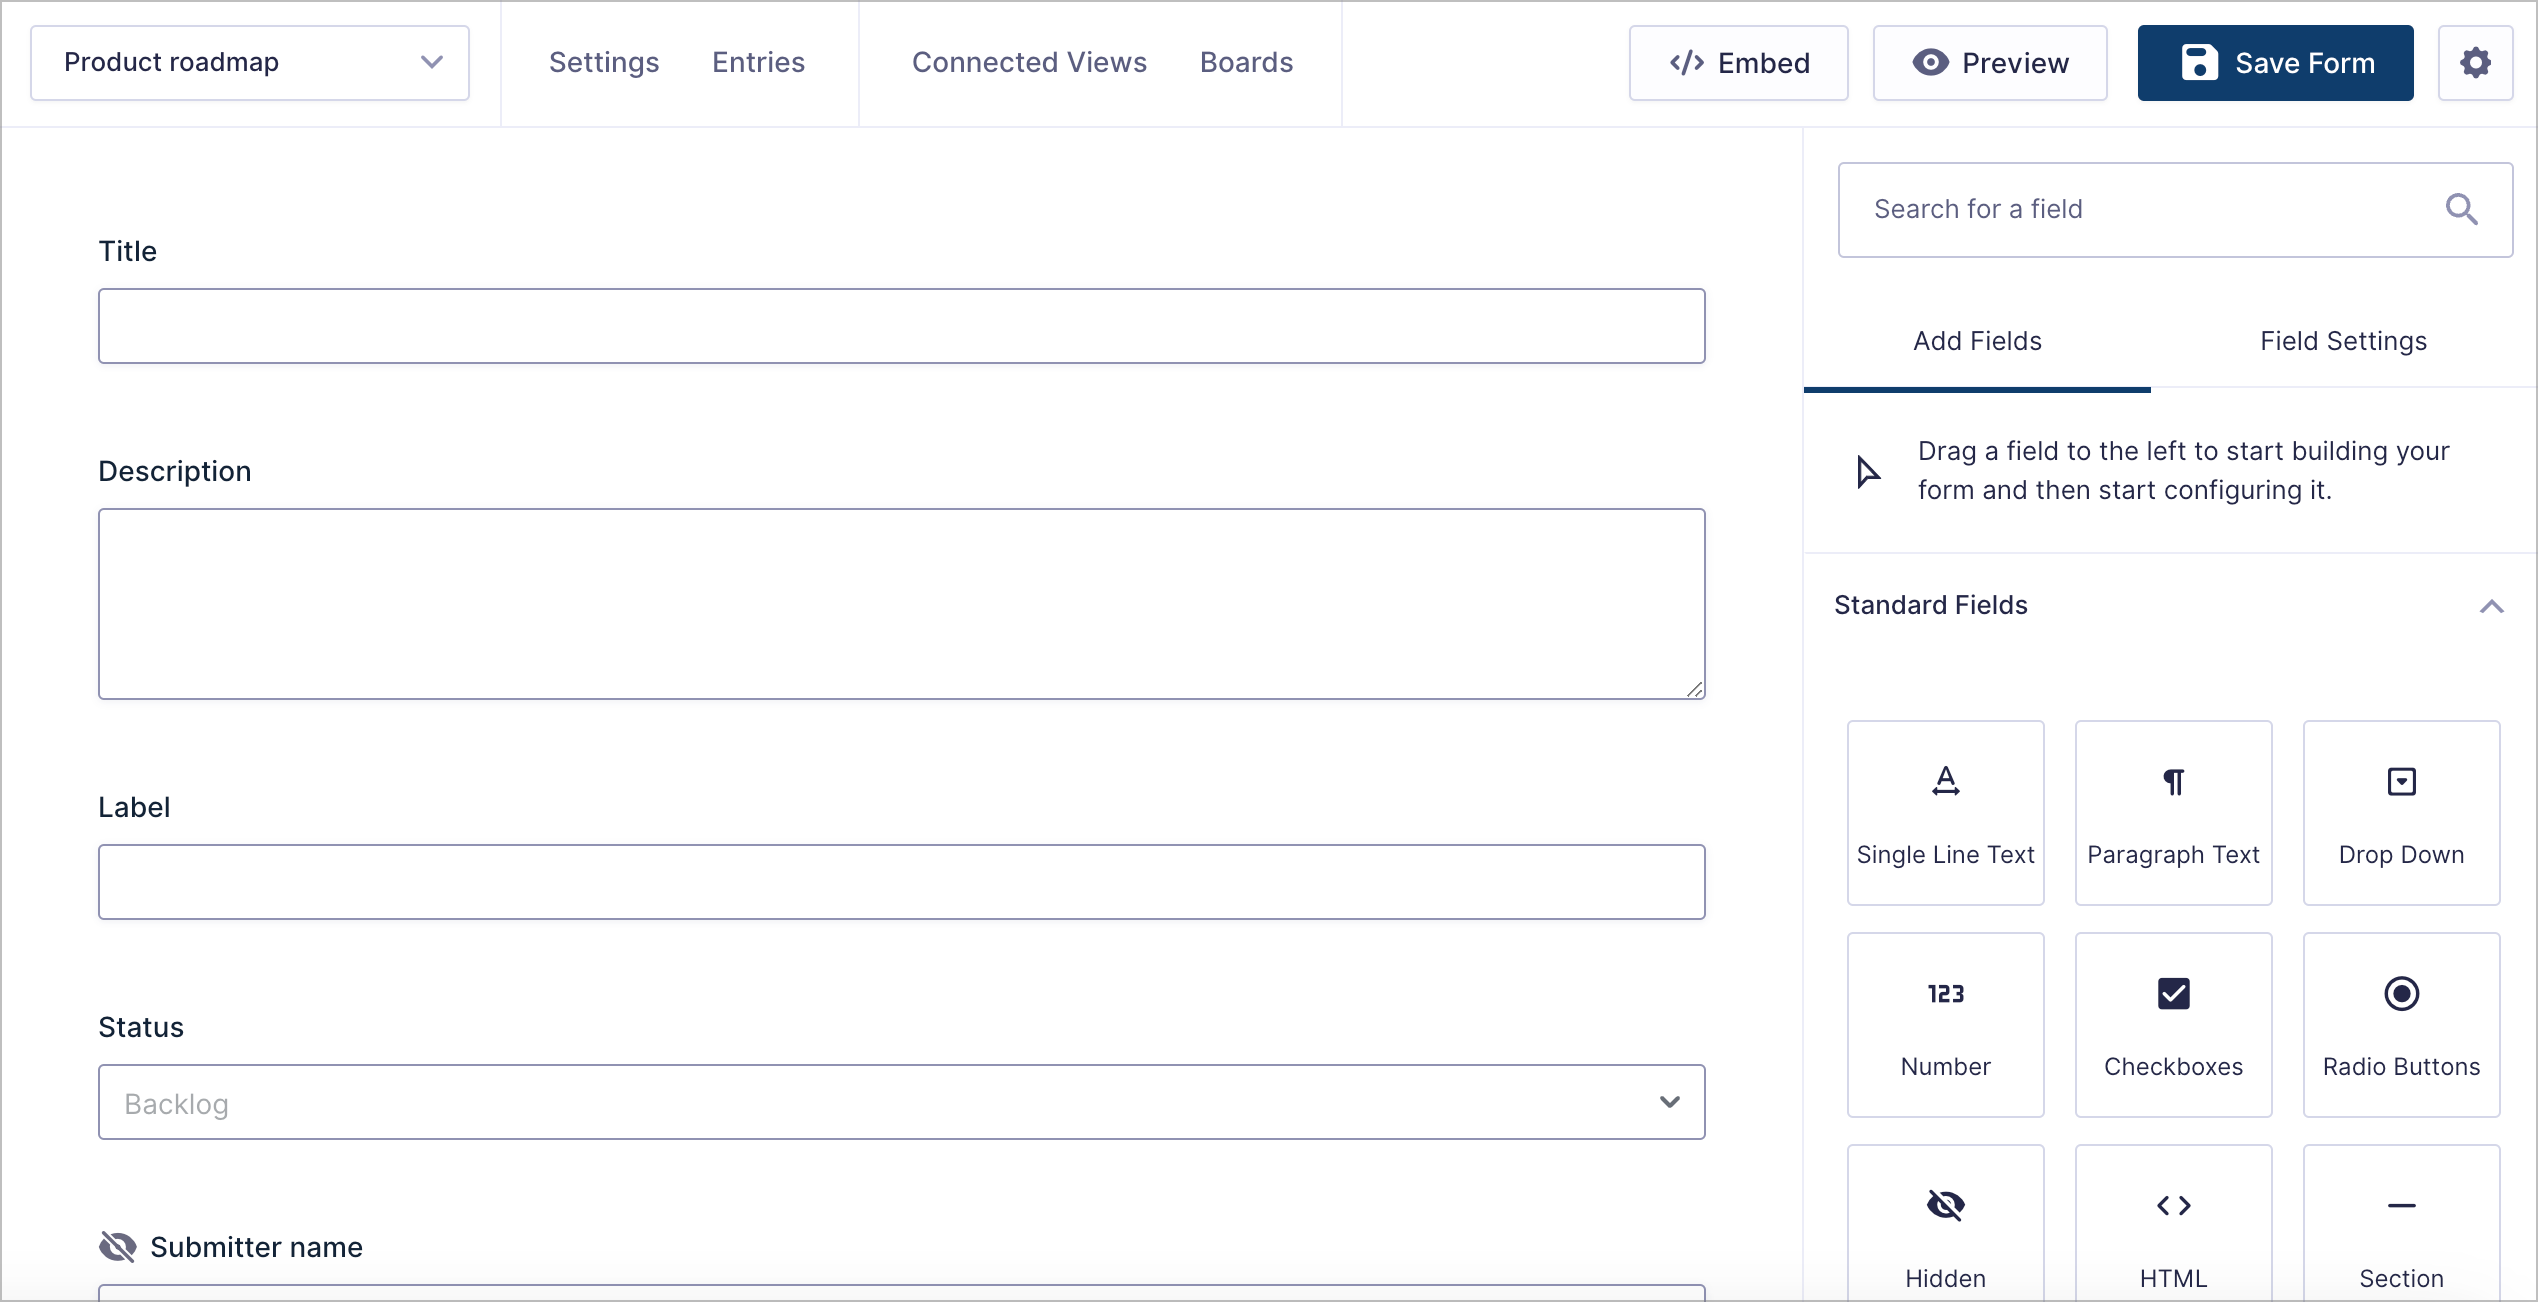
Step 2: Build the submission form in Gravity Forms
Hover over Forms in the WordPress admin and click New Form. Name it something like “Product roadmap” or “Feature requests.”
Add the following fields:
- Title (Single Line Text) — becomes the card title
- Description (Paragraph Text) — the idea itself
- Label (Single Line Text or Drop Down) — optional but useful for filtering (“Feature,” “Bug,” “Integration”)
- Status (Drop Down) — this is the field GravityBoard will use to create lanes. Populate the choices with your lane names:
Ideas,Planned,Under Development,Under Review,Complete. - Submitter Name (Hidden) — auto-populate with the
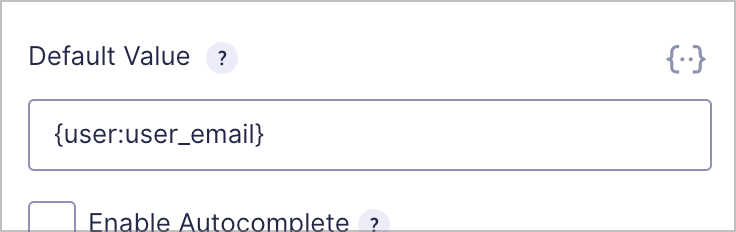
{user:display_name}merge tag - Submitter Email (Hidden) — auto-populate with the
{user:user_email}merge tag
Set the Status field’s default value to Ideas so every new submission lands in the first lane. Then change its visibility to Administrative, so the dropdown is hidden from the front-end form but admins can still edit it from the entry view.
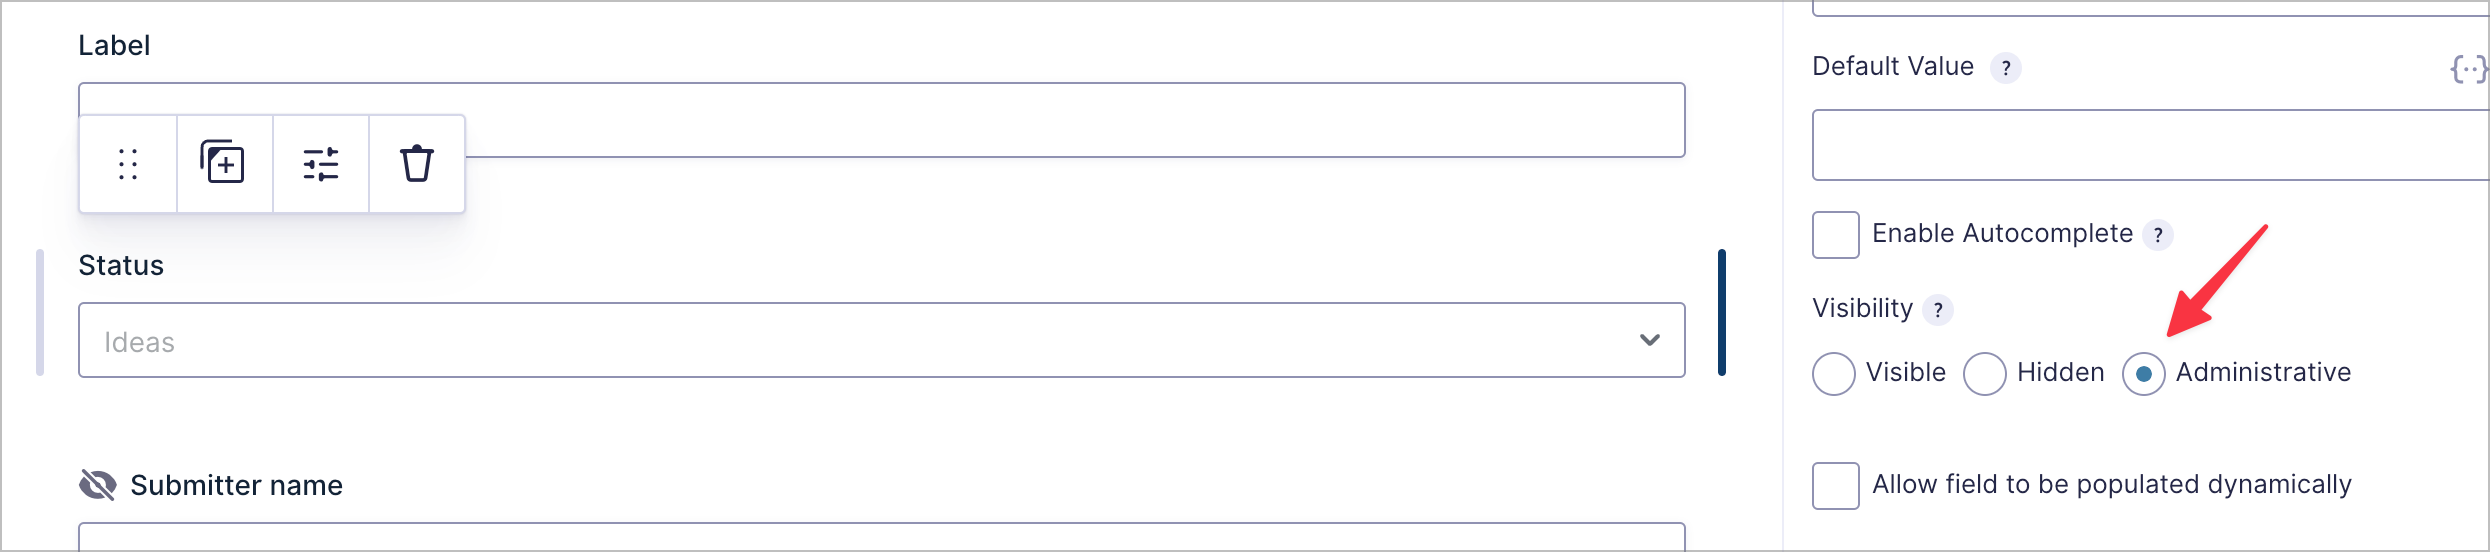
For the Submitter Name field, auto-populate it by adding the {user:display_name} merge tag into the Default Value. For the Submitter Email field, drop the {user:user_email} merge tag into the Default Value:

Pro Tip
In your form settings, open Restrictions and turn on Require user to be logged in. This stops anonymous submissions, prevents sockpuppet voting, and gives you an email address to notify when an idea moves through the pipeline.
Save the form, submit a test entry from the front end, and confirm it shows up in the entries list before moving on. Easier to debug now than after you’ve connected more plugins.
Step 3: Create the GravityBoard feed
In your form’s settings, click GravityBoard, then Add New to create your first board feed. Give the board a name (use something descriptive like “Product roadmap.”)
In the Field Mapping section, map each card field to the corresponding form field:
- Lane Field → Status
- Card Title → Title
- Card Description → Description
- Label → Label
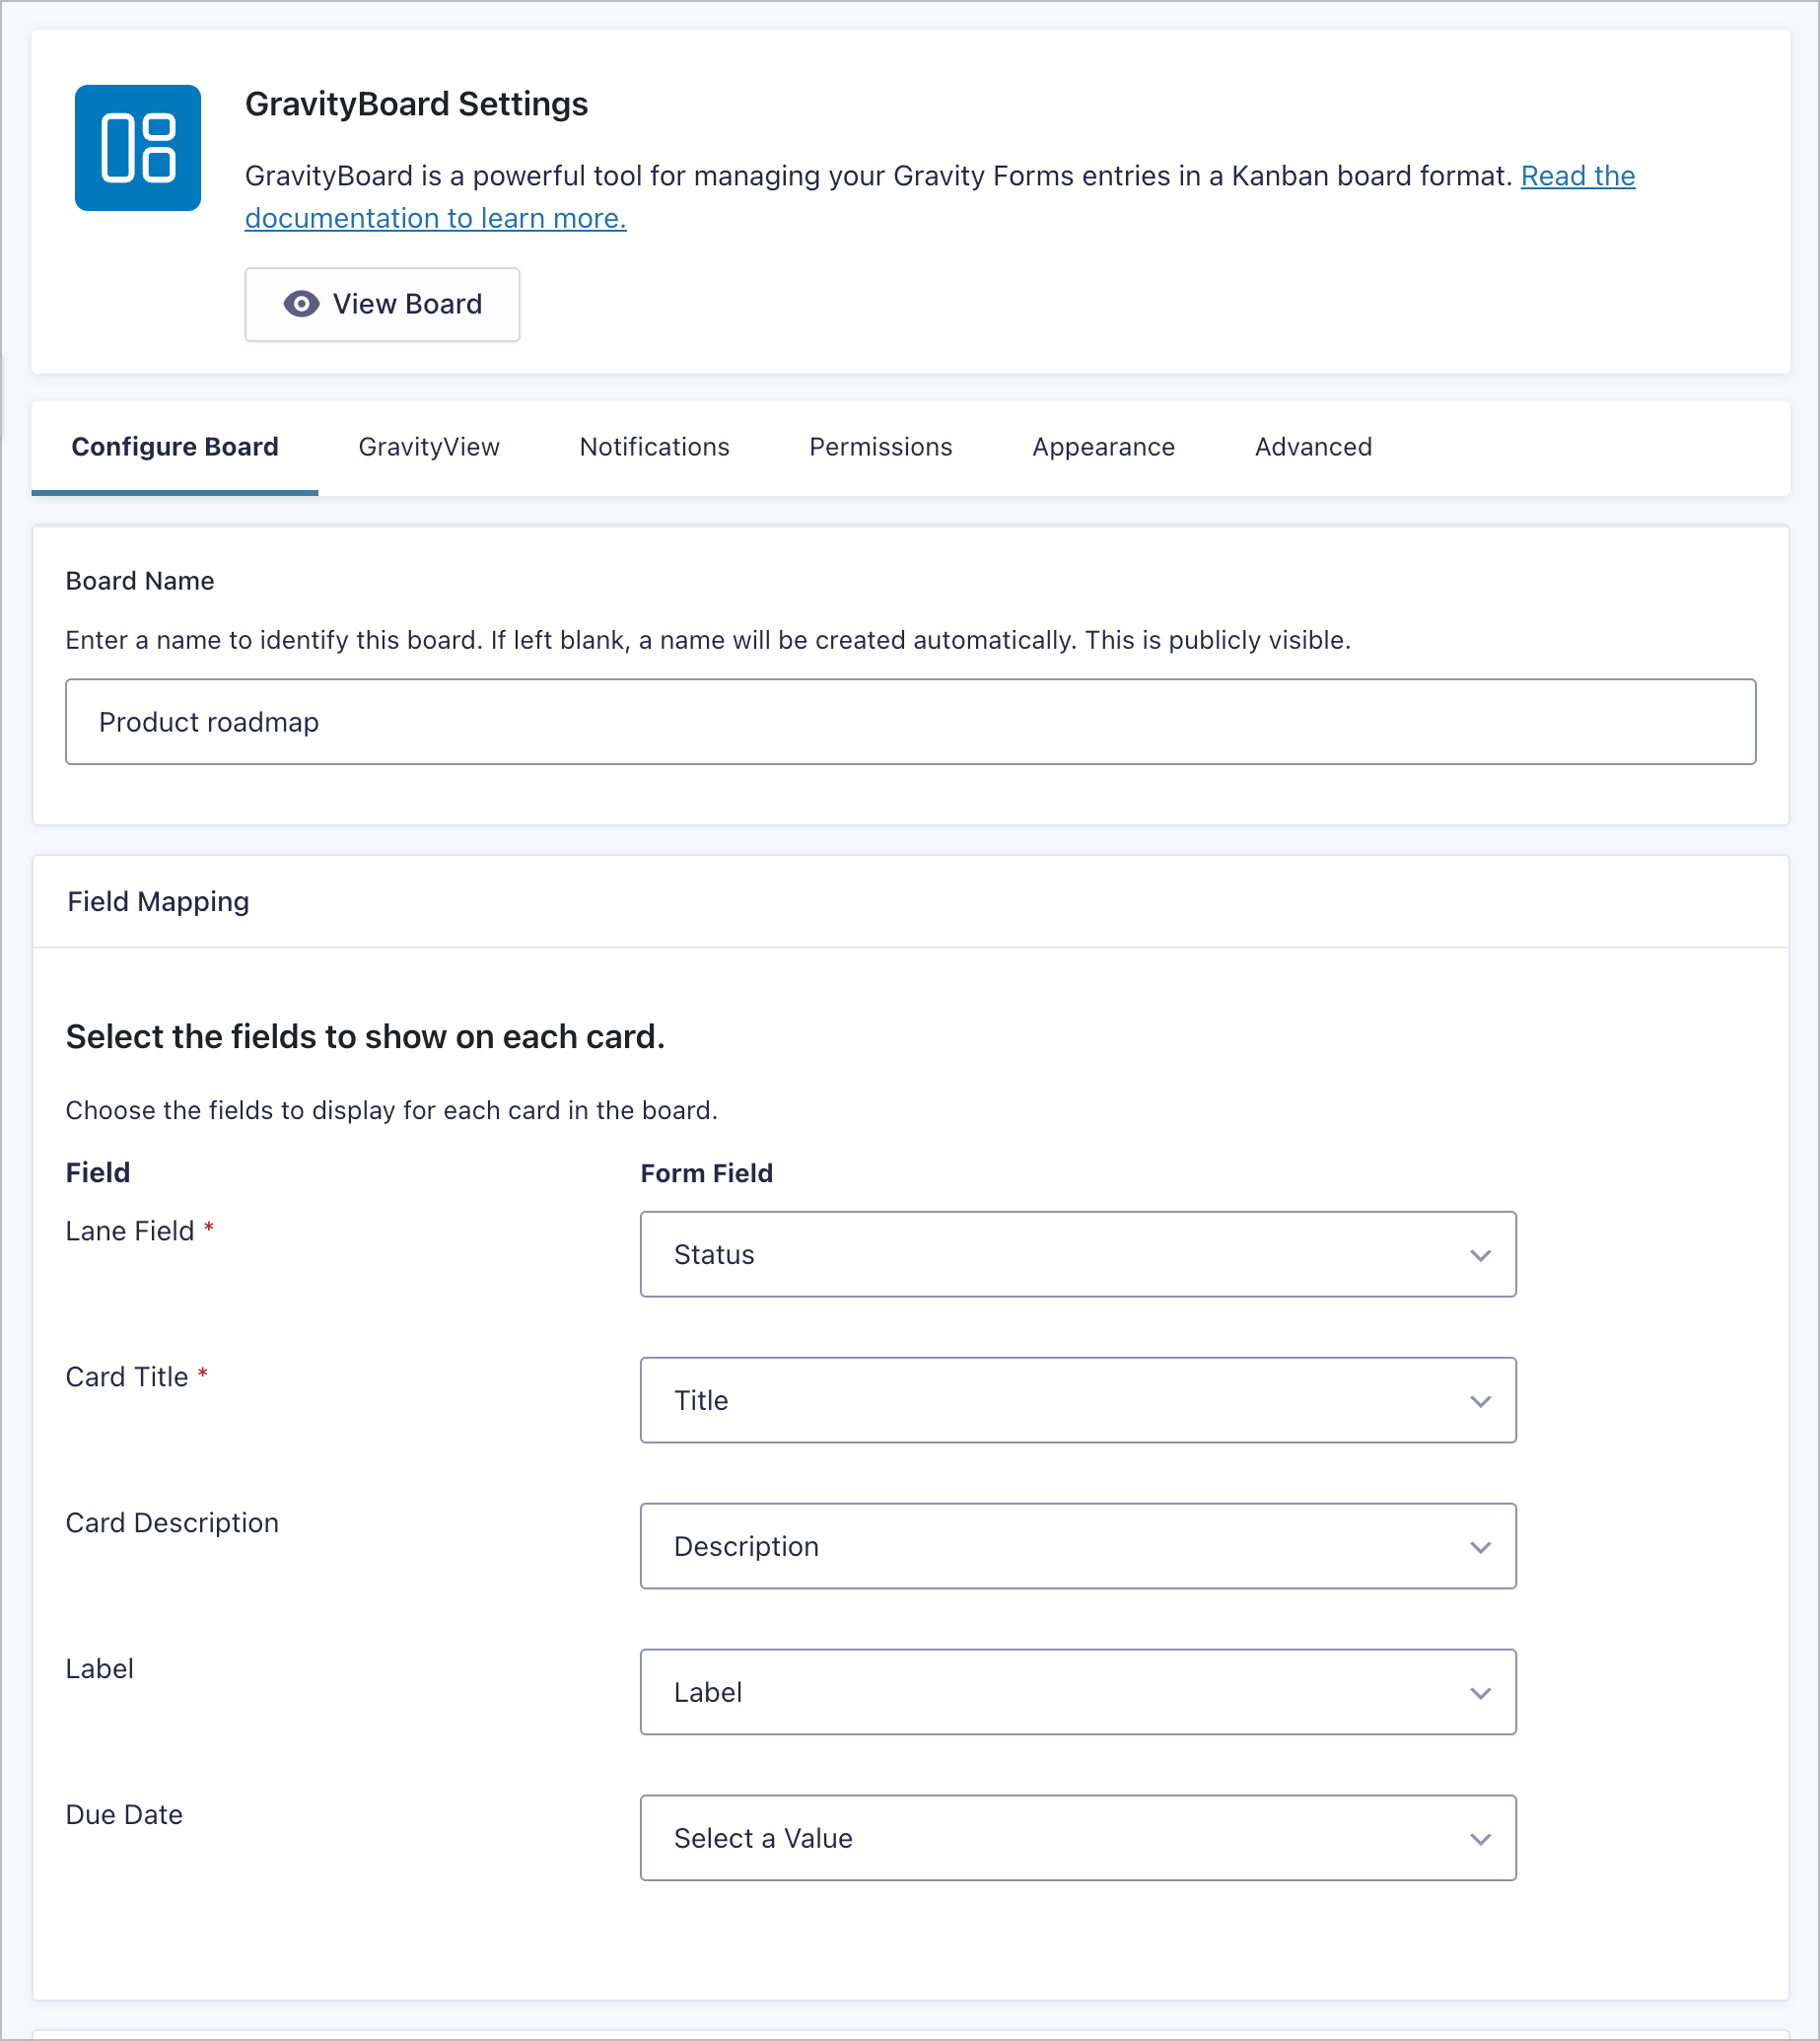
Enable the board features you want: attachments, comments, assignees, checklists. (We’ll come back for voting in the next step.) Take a minute to skim the other options. There’s more here than you’ll need on day one, but it’s worth knowing what’s available. We’ll cover the Permissions tab in Step 5.
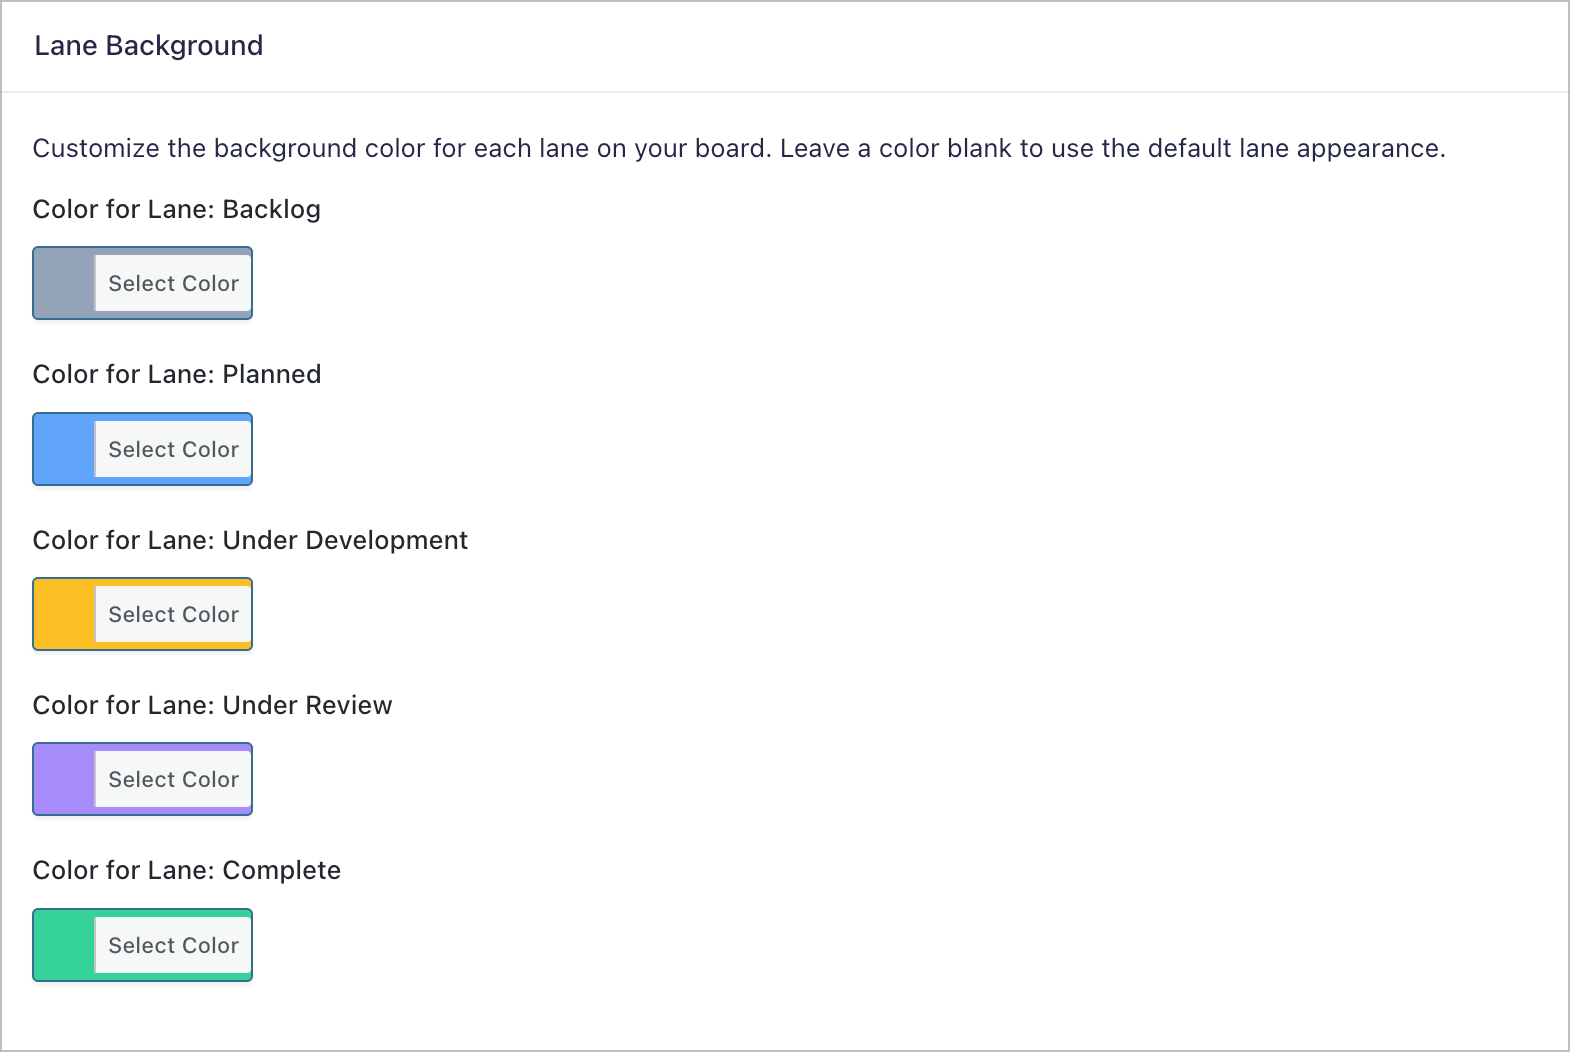
Next, head to the Appearance tab and set a color for each lane. A typical roadmap gradient works well. For example, you could use neutral greys for “Ideas,” blues for “Planned,” orange or amber for active development, purple for review, and green for “Complete.” This is what gives the board its at-a-glance roadmap feel.
Save the feed and click View Board. Every existing form entry now appears as a card in the lane that matches its Status value. If the board is empty, that’s fine—submissions will populate it as they arrive.
Step 4: Configure card voting
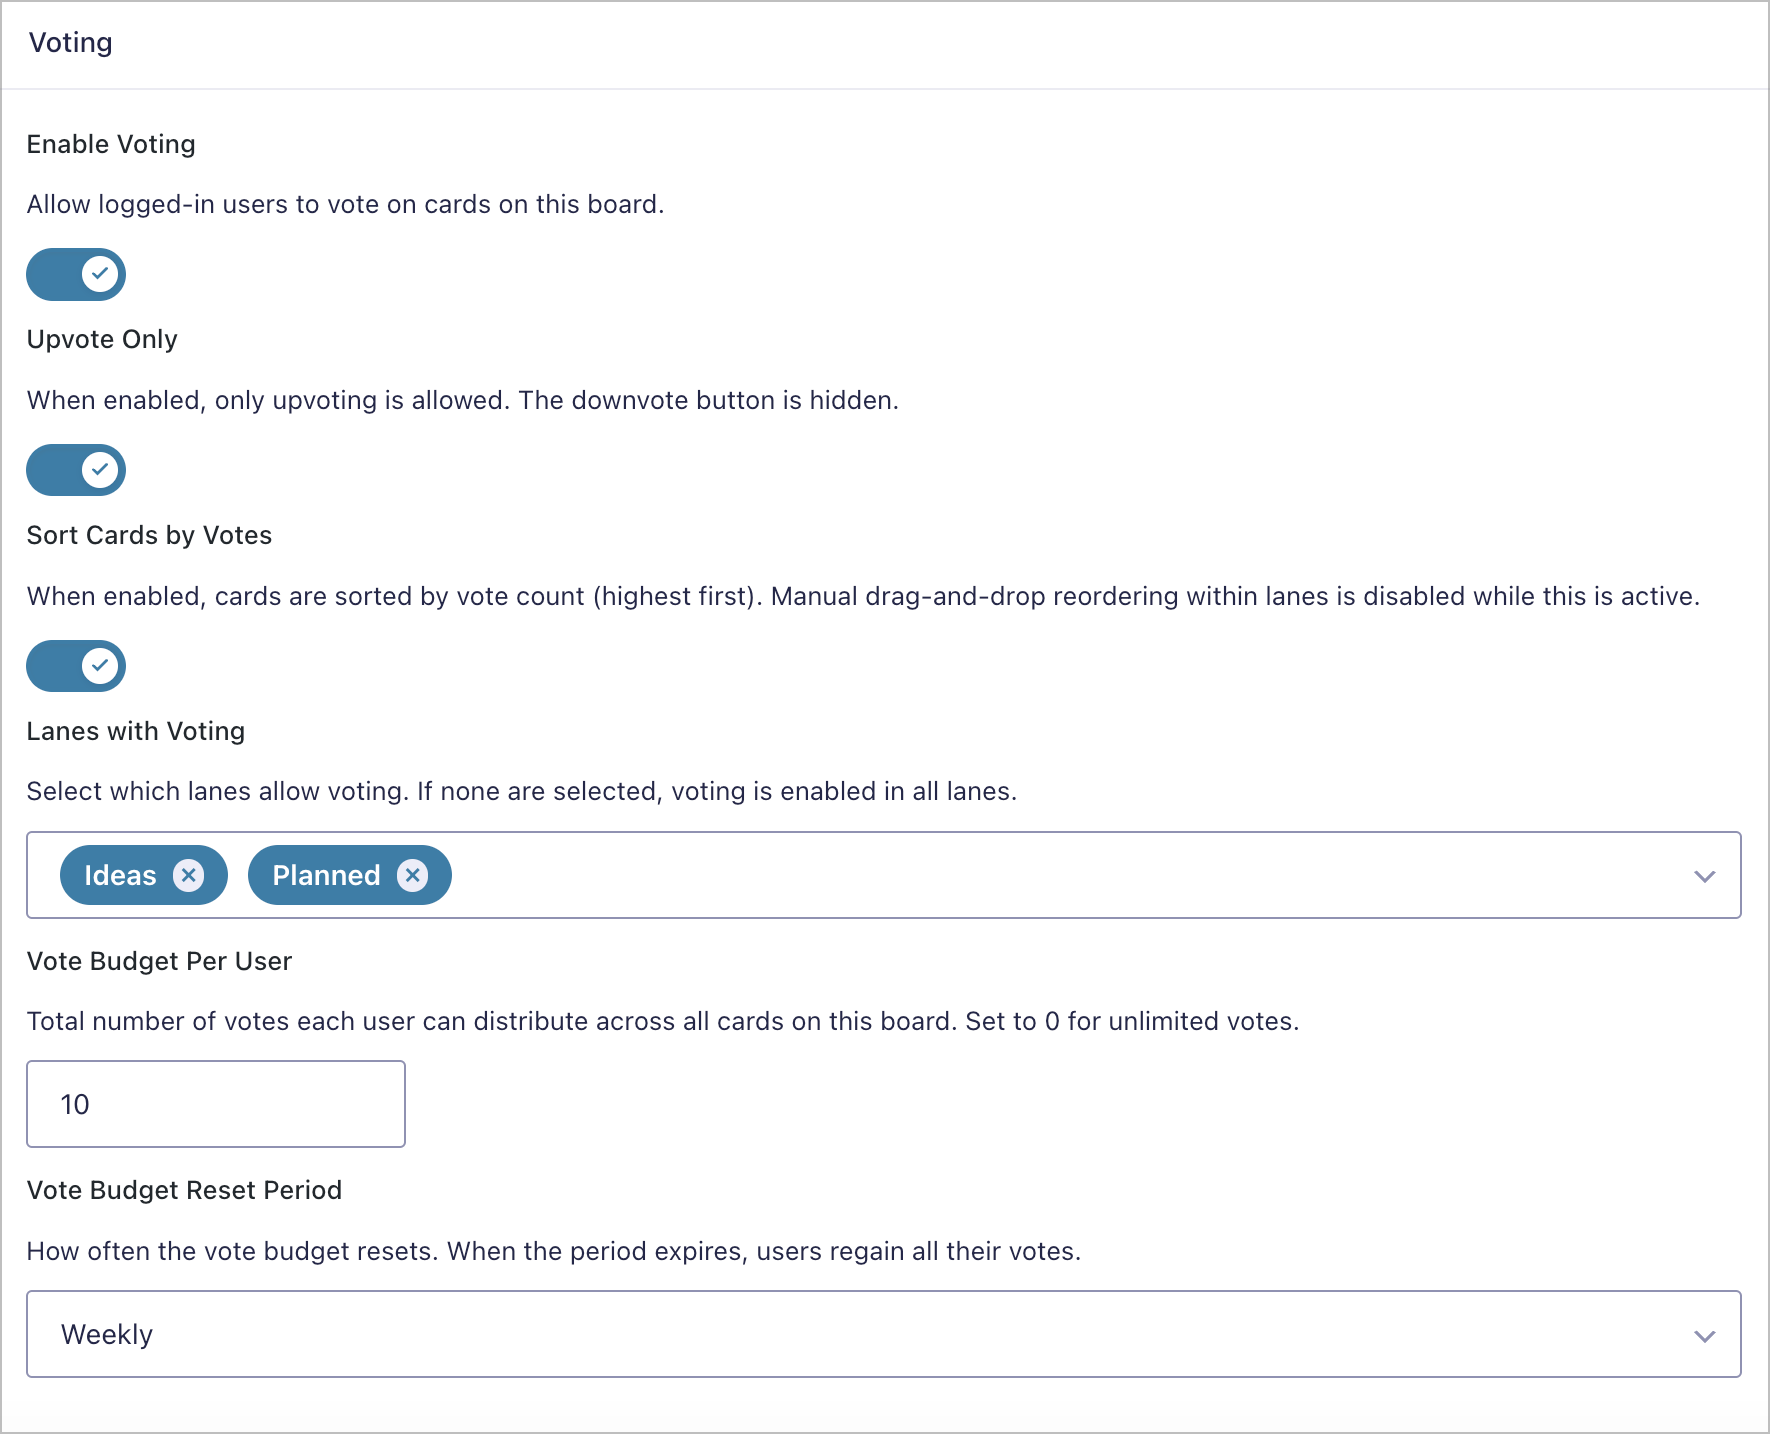
Back in Configure Board, scroll down to the new Voting section.
- Toggle Enable Voting on.
- Turn on Upvote Only. Feature-request boards almost always want one direction. This matches the pattern Canny and UserVoice use, and it stops “pile-on downvoting” from drowning out promising ideas.
- Turn on Sort Cards by Votes so high-vote cards rise to the top of each lane automatically.
- Under Lanes with Voting, select
IdeasandPlanned. Cards that have moved into “Under Development” or later are already on the roadmap, so voting on them doesn’t add signal. - Set Vote Budget Per User to
10. This matches Canny’s default and forces users to make tradeoffs instead of clicking everything in sight. - Pick a Vote Budget Reset Period that fits your community. Weekly works well for active products; monthly or “all-time” suits smaller boards.
Save the feed and refresh the board. You’ll now see vote counts and arrow controls on every card in the votable lanes:
That’s the heart of it. Everything from here is permissions, presentation, and notifications.
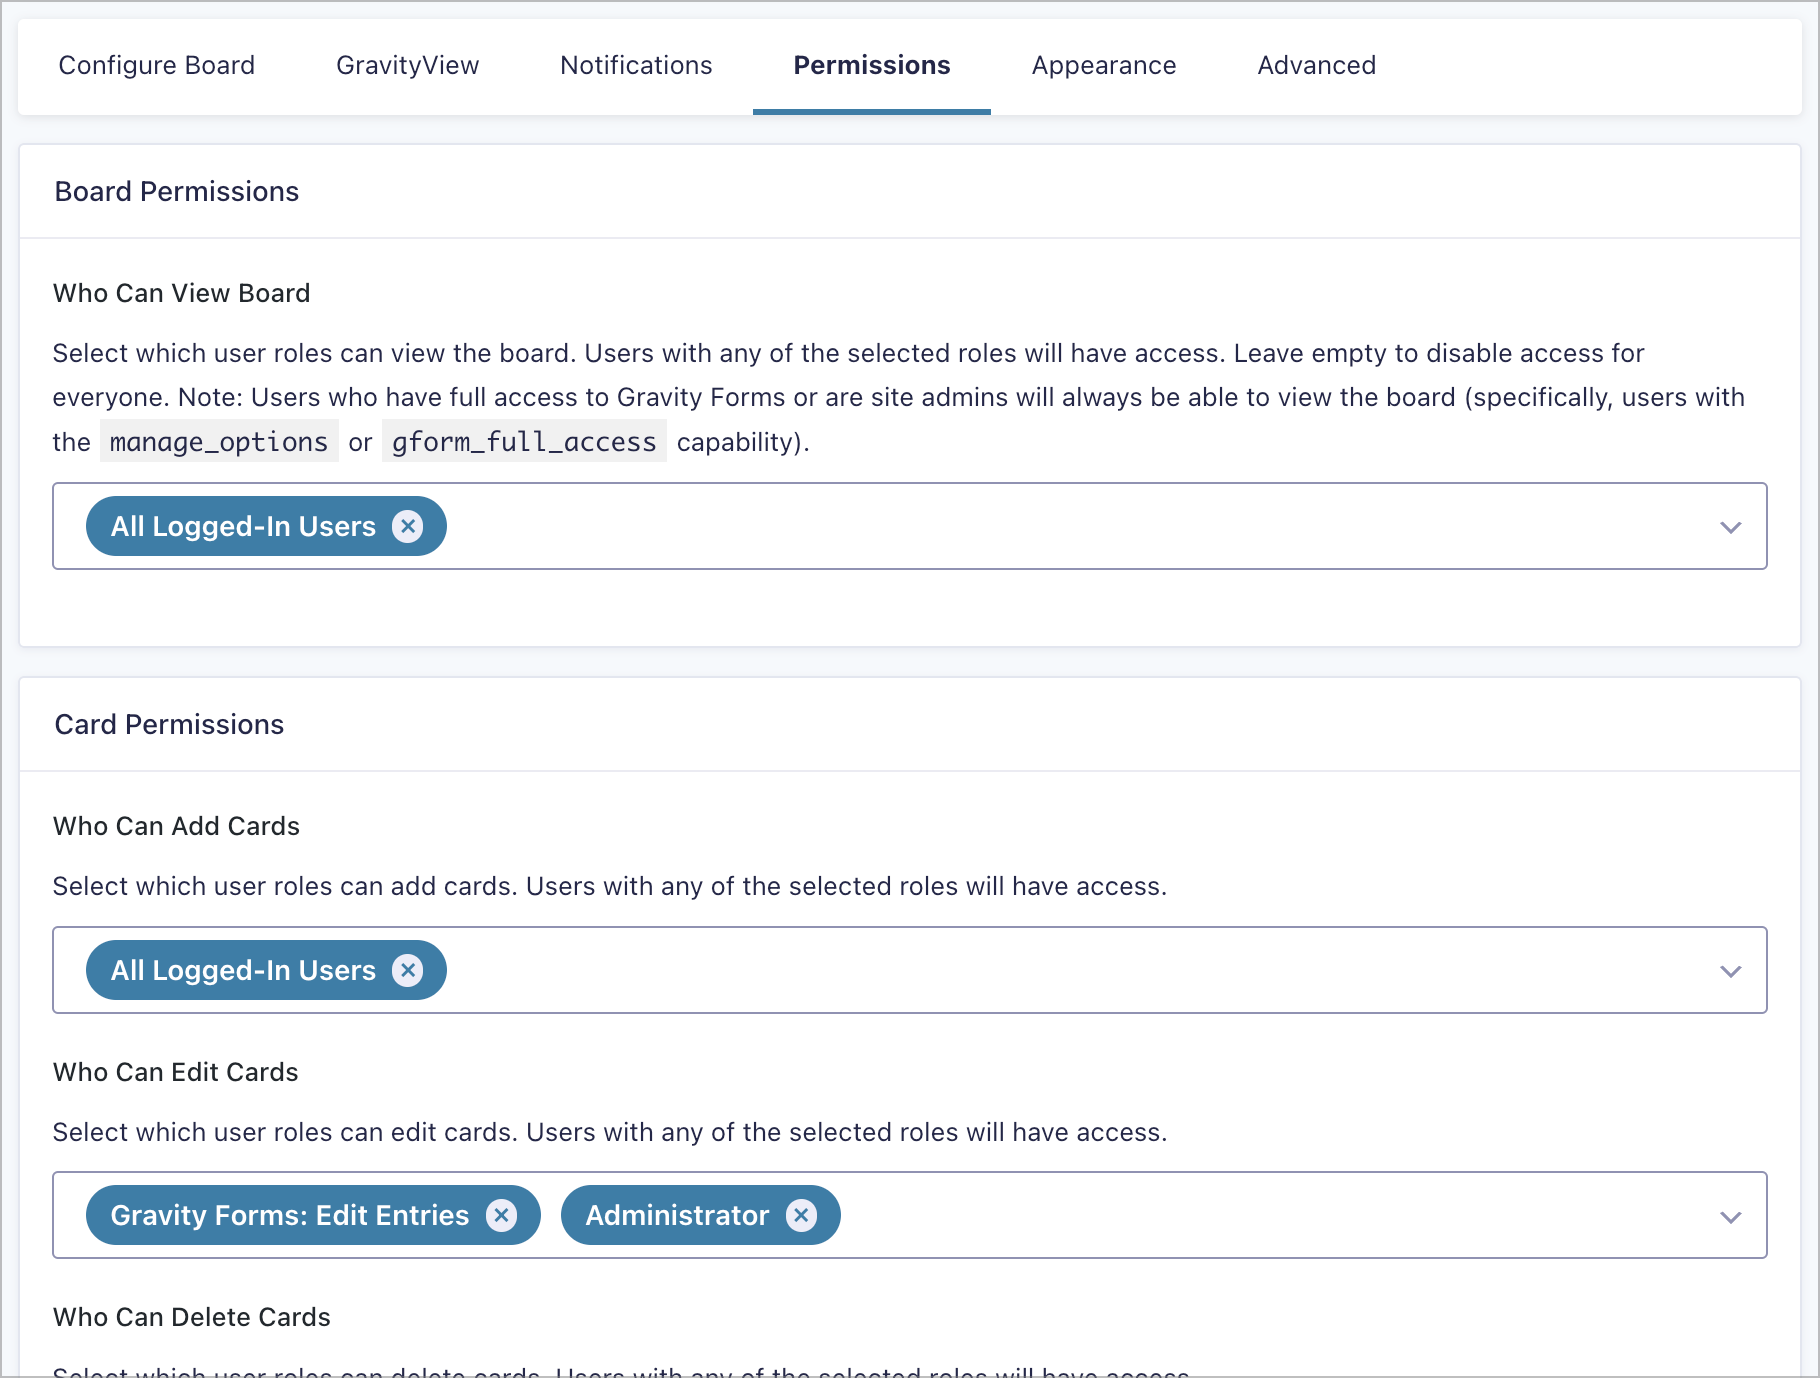
Step 5: Set permissions so users can submit and vote (but not edit status)
Switch to the Permissions tab. The defaults are sensible, but a feature-request board has a specific access pattern:
- Who Can View Board → All Logged-In Users (or “any” if you want a fully public board)
- Who Can Add Cards → All Logged-In Users (the submission form is the canonical entry point)
- Who Can Edit Cards → Submitter + Administrators
- Who Can Delete Cards → Administrators only
- Who Can Move Cards Between Lanes → Administrators or Editors only — users submit to “Ideas,” your team triages
- Who Can Vote → All Logged-In Users (constrained by the budget you set in Step 4)
Step 6: Publish the board on a public page
The simplest path is the GravityBoard Gutenberg block. Create a new WordPress page called “Roadmap” (or “Feedback,” or whatever fits your brand), insert the GravityBoard block, and select your board from the dropdown.
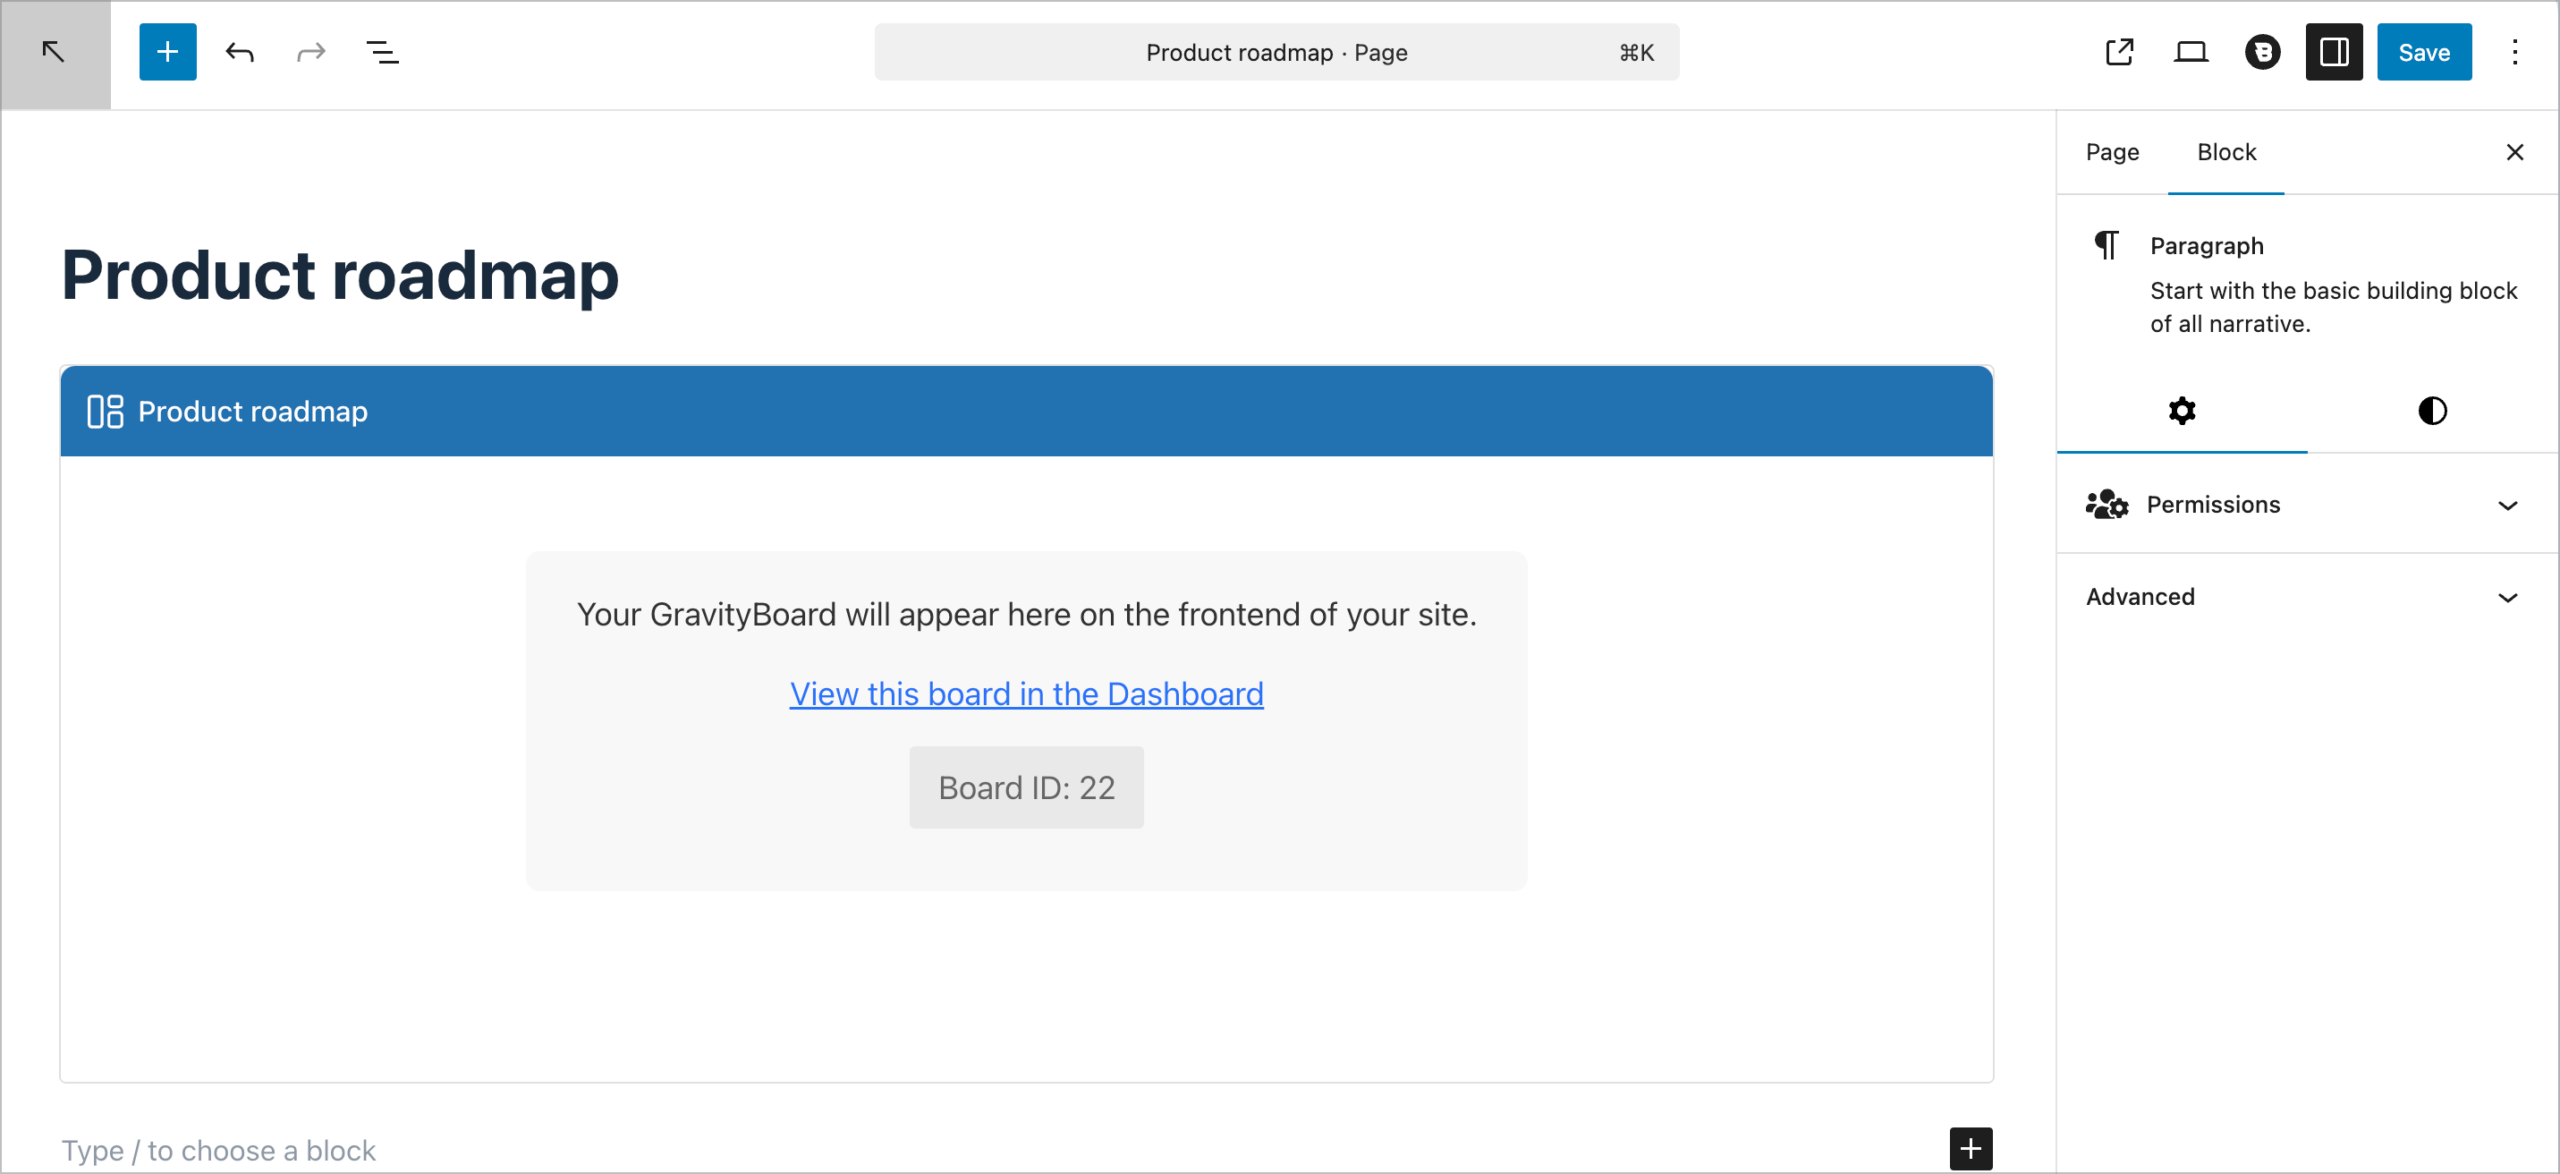
Embed the submission form on the same page (or a sibling page, or a popup using a tool like Popup Maker), publish, and you’re live. Anyone with a logged-in account can now submit ideas, vote on existing cards, and watch the roadmap update in real time.
If you’d rather keep the board on the WordPress admin side and only expose specific views to the public, you can create multiple boards (as many as you like) that pull data from the same source.
Bonus: Build a companion View with GravityView
If you want a sortable table layout alongside the kanban (say, “Top 25 most-requested features” or “All ideas filed this quarter”) connect GravityView to the same form. The GravityBoard vote count works as a sortable field in GravityView too, so you can build a leaderboard view in a few clicks.
Step 7: Notify submitters when their idea moves
This is the part that turns a static board into a living conversation. When someone’s idea moves from “Ideas” to “Planned” or, better yet, to “Complete”, they should hear about it.
Open the form’s Notifications settings and create one notification per key transition. GravityBoard adds its own merge tags you can pull vote data into the email body:
{gravityboard_votes:total}— current vote count{gravityboard_votes:up}/{gravityboard_votes:down}— broken down by direction
Combined with the standard Gravity Forms merge tags for status, title, and submitter, you can write notifications that feel personal:
- “Your idea was received” — sent on submission
- “Your idea is on the roadmap” — fires when status changes to “Planned”
- “Your idea shipped” — fires when status changes to “Complete.” This is the hero notification. Link to the release notes or the new feature page and let the submitter know their vote helped get it built.
Add conditional logic to each notification so they only fire on the specific status transition you care about. Otherwise you’ll send an email every time a card is touched, which is exactly the email storm you’re trying to avoid.
Step 8: Style the board to match Canny’s look (optional)
GravityBoard’s built-in color settings cover most of what you’d want to customize (lane backgrounds, accent colors, and the page background). For everything else, a few CSS overrides go a long way:
- Match lane pill colors to your brand palette (one selector per lane class).
- Hide the default WordPress sidebar on the board page (selector depends on your theme).
- Bump up the size of the vote badge—on a feature-request board, votes are the primary signal, so make them obvious.
The goal here is “directionally close to Canny,” not pixel parity. Save the heavy redesign work for after you’ve got real users on the board.
Step 9: Optional enhancements
Once the basics are running, here’s where teams usually go next:
- Duplicate detection – add a “similar ideas” search to the submission form using a GravityView search widget so users don’t fill the board with near-duplicates.
- Submission analytics – use GravityCharts to visualize submissions over time, cards per lane, or ideas shipped per quarter on an internal dashboard.
- Seed the board with existing ideas – if you’re migrating from Canny or a spreadsheet, GravityImport can bulk-load ideas as form entries, which immediately become cards.
- Slack or Teams notifications – use Gravity Forms webhooks to ping a channel when a card moves to “Planned” or “Shipped.”
- Read-only public view – set up a separate GravityView layout for non-logged-in visitors, with the submit button gated behind login.
A quick honest comparison with Canny
| Canny (Pro plan) | GravityBoard on WordPress | |
|---|---|---|
| Pricing | Starts at $79/mo, scales by tracked user | $119 annual license; unlimited submitters |
| Hosting | Canny’s infrastructure | Your WordPress host |
| Domain | Custom domain | Custom domain |
| Voting & comments | Built in | Built in |
| Status pipeline | Built in | Built in (kanban lanes) |
| AI duplicate detection | Yes | Not built in (use GravityView search) |
| Public SSO via identify() | Yes | Standard WordPress login |
| Customer record attachment | Yes (CRM-style) | Not built in (GravityBoard is a board, not a CRM) |
Canny still wins on AI duplicate detection and SSO niceties out of the box. Where GravityBoard wins is cost (there’s no per-user fee, ever) and ownership: your data lives on your site, and the board lives on your domain.
Wrapping up
That’s the whole build. One Gravity Form, one GravityBoard feed with voting turned on, permissions tuned for submitters and admins, and a published page. It fits comfortably into a 30-minute project for anyone who’s set up a Gravity Form before, and it gives you a feedback workflow that costs the same whether you have ten submitters or ten thousand.
If you want to give it a try, check out our free demos, or get GravityBoard today!

Helpful tips right in your inbox.
Subscribe to get the latest articles, information on releases and helpful Gravity Forms tips!
More articles

Launch Log: theme template editing in Block MCP, Shield silentCAPTCHA for Zero Spam, and GravityView fixes
Block MCP adds safe theme template editing, Gravity Forms Zero Spam gains Shield silentCAPTCHA support, and GravityView fixes lightbox and notice bugs.

GravityKit turns 12: a year in review, and 30% off Lifetime All Access
GravityKit turns 12. A look back at a year of GravityView 3.0, GravitySearch, and AI-assisted building, plus a birthday sale on the Lifetime All Access Pass.

Launch Log: Row headers for screen readers, smarter conditional logic, and multi-View fixes
GravityView 3.1 adds row headers for screen readers, plus smarter conditional logic in GravityCalendar and fixes for DataTables, Maps, and Dynamic Lookup.
