Published
•
Updated
How to combine data from multiple forms into one unified View
If you use multiple Gravity Forms on your site, you’ve probably wished there was a way for users to see all their submissions in one place. In this exanple, we have separate forms for time-off requests, expense reports, and IT support tickets. While each form works great on its own, employees have to visit different…
If you use multiple Gravity Forms on your site, you’ve probably wished there was a way for users to see all their submissions in one place.
In this exanple, we have separate forms for time-off requests, expense reports, and IT support tickets. While each form works great on its own, employees have to visit different pages to check the status of each one.
In this tutorial, I’ll show you how to build a unified dashboard that pulls entries from multiple forms into a single View using GravityView. Each section is filtered to the currently logged-in user, so employees only see their own submissions. This is perfect for building dashboards and client portals that centralize important information for easy access.
Sneak peek
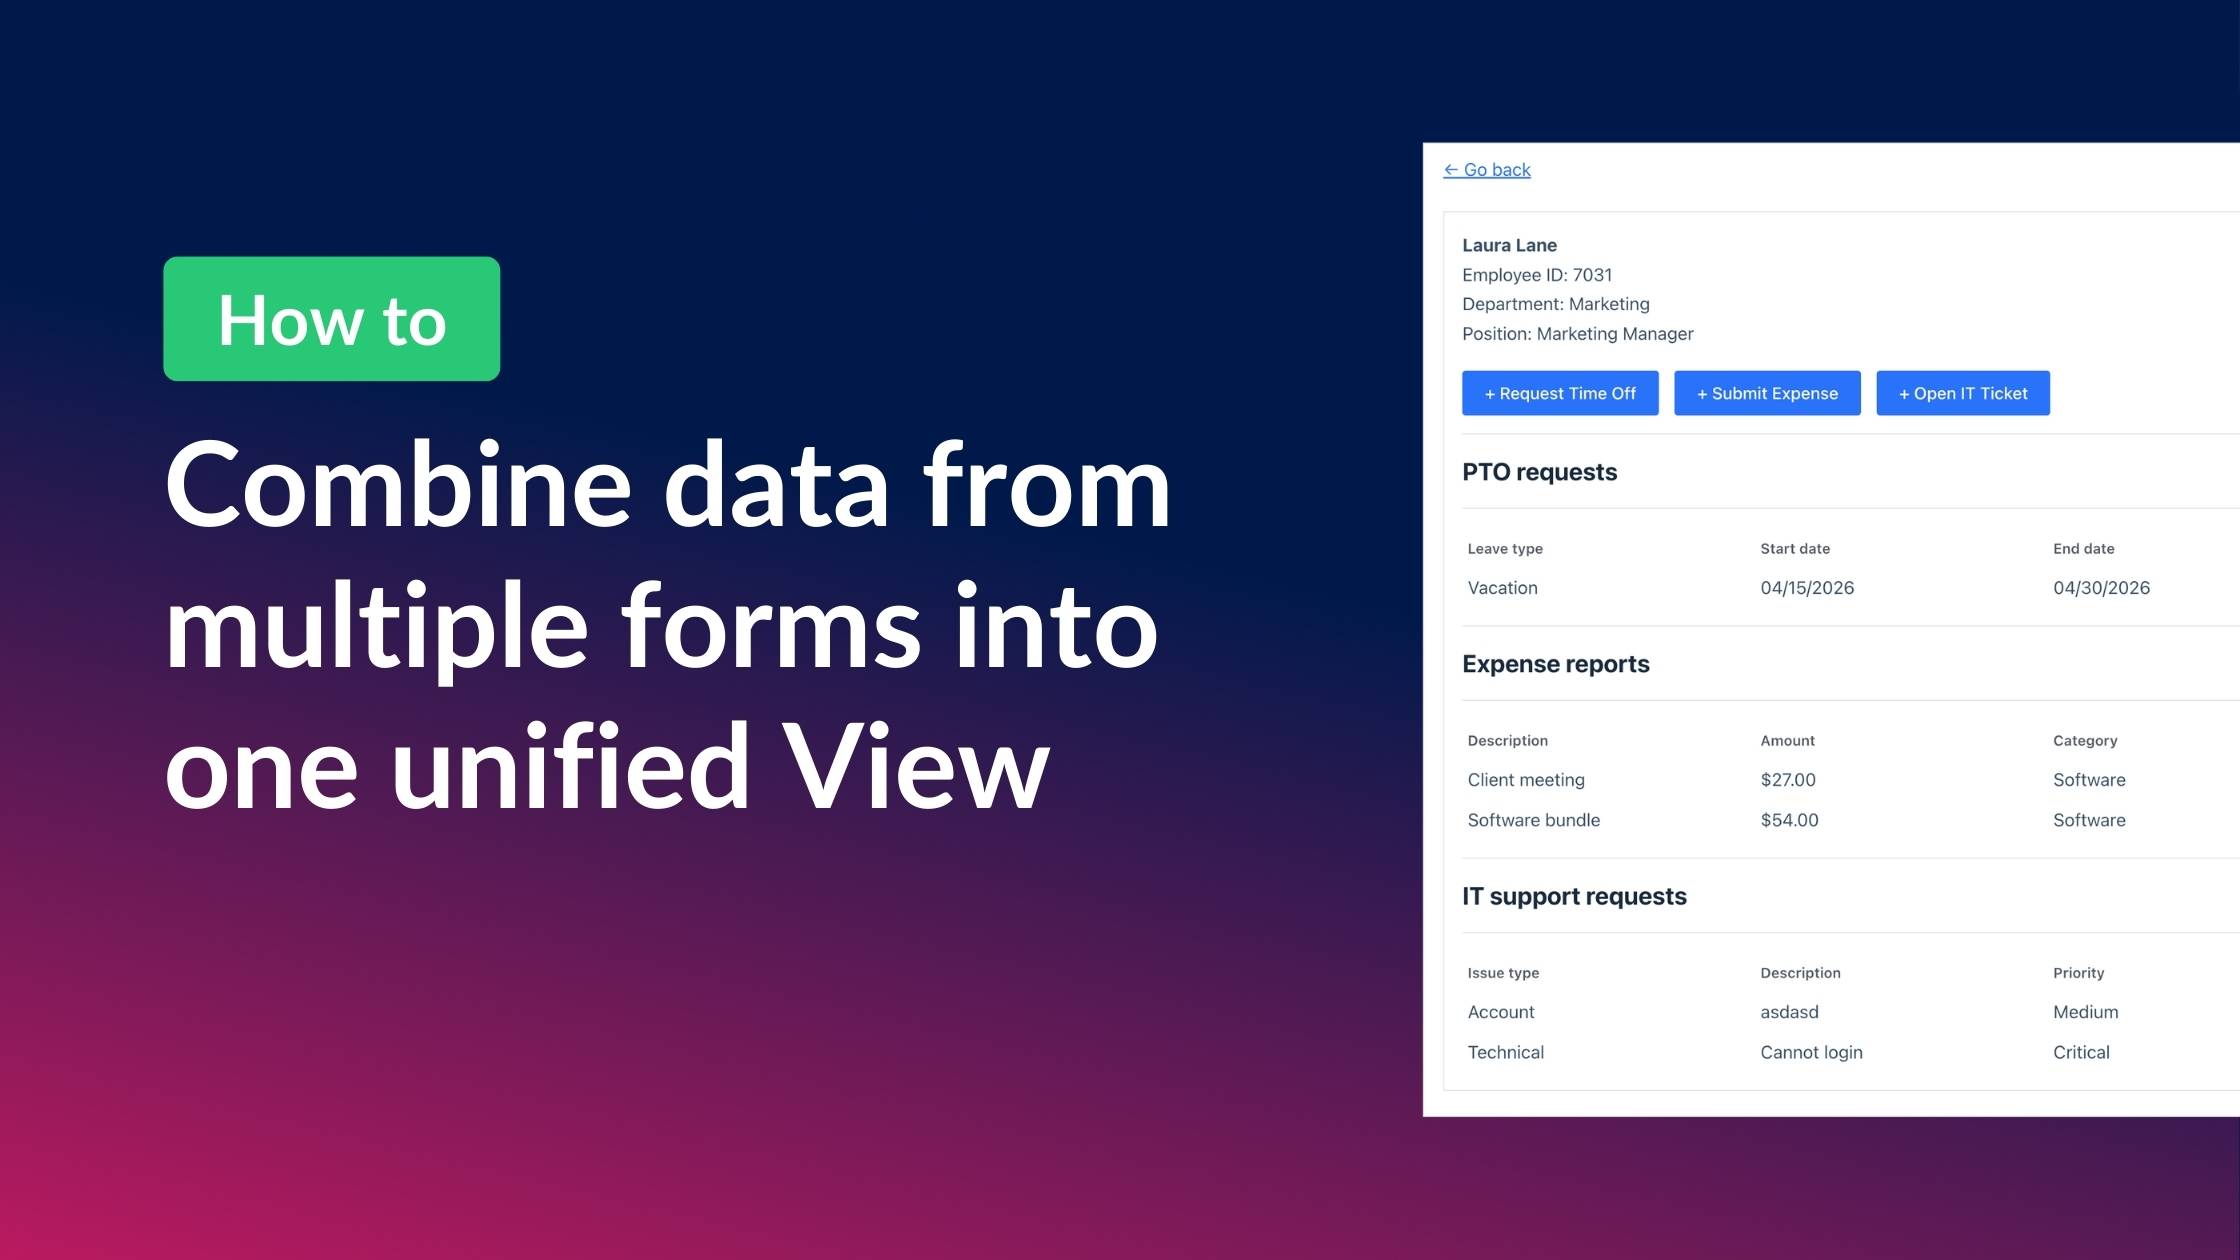
Here’s what the finished result looks like:
The employee sees their name, department, and position at the top, followed by action buttons to submit new requests. Below that, three tables display their PTO requests, expense reports, and IT support tickets — each with a status column.
Wanna try it?
Spin up a demo
See what you can build with GravityView — explore the live demo.

What you’ll need
Let’s get started!
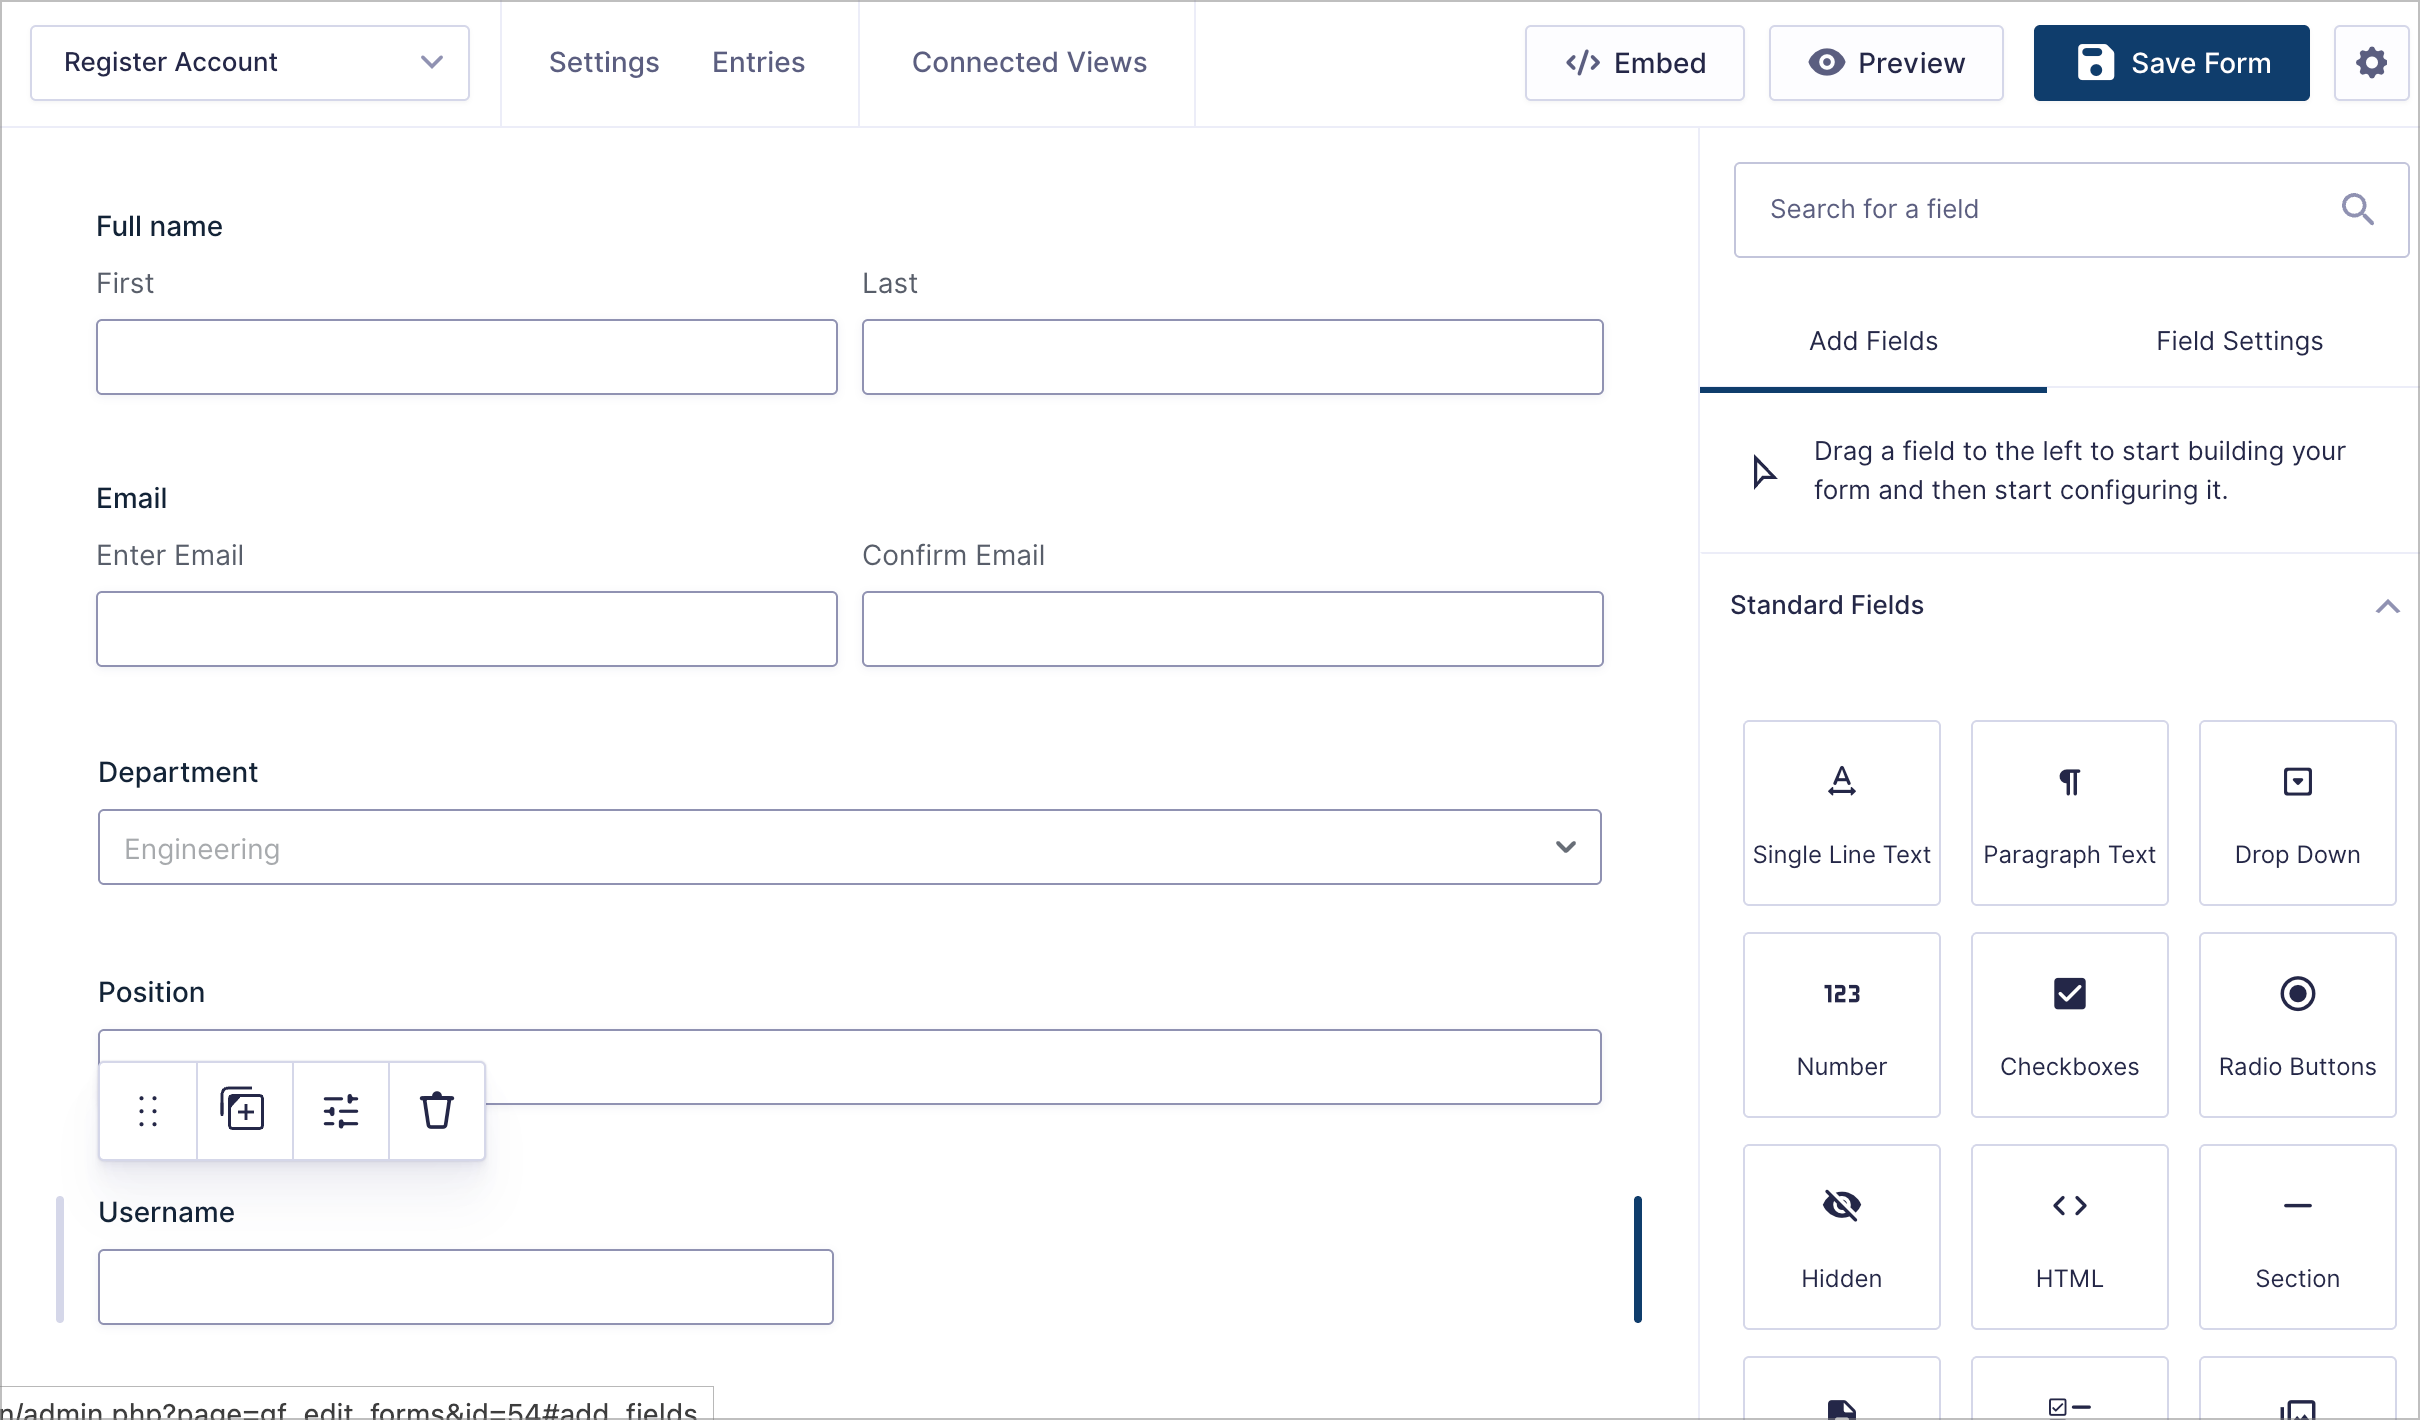
Step 1: Create a registration form (anchor form)
The trick to combining multiple forms into one View is to use an “anchor” form. In this example, our anchor form is a simple registration form that creates a WordPress account for each employee. The entry from this form becomes the single record each employee clicks into to reach their dashboard.
To create the registration form, hover over Forms and click New Form. Add the following fields:
- Full Name (Name field)
- Email (Email field)
- Department (Drop Down field)
- Position (Single Line Text field)
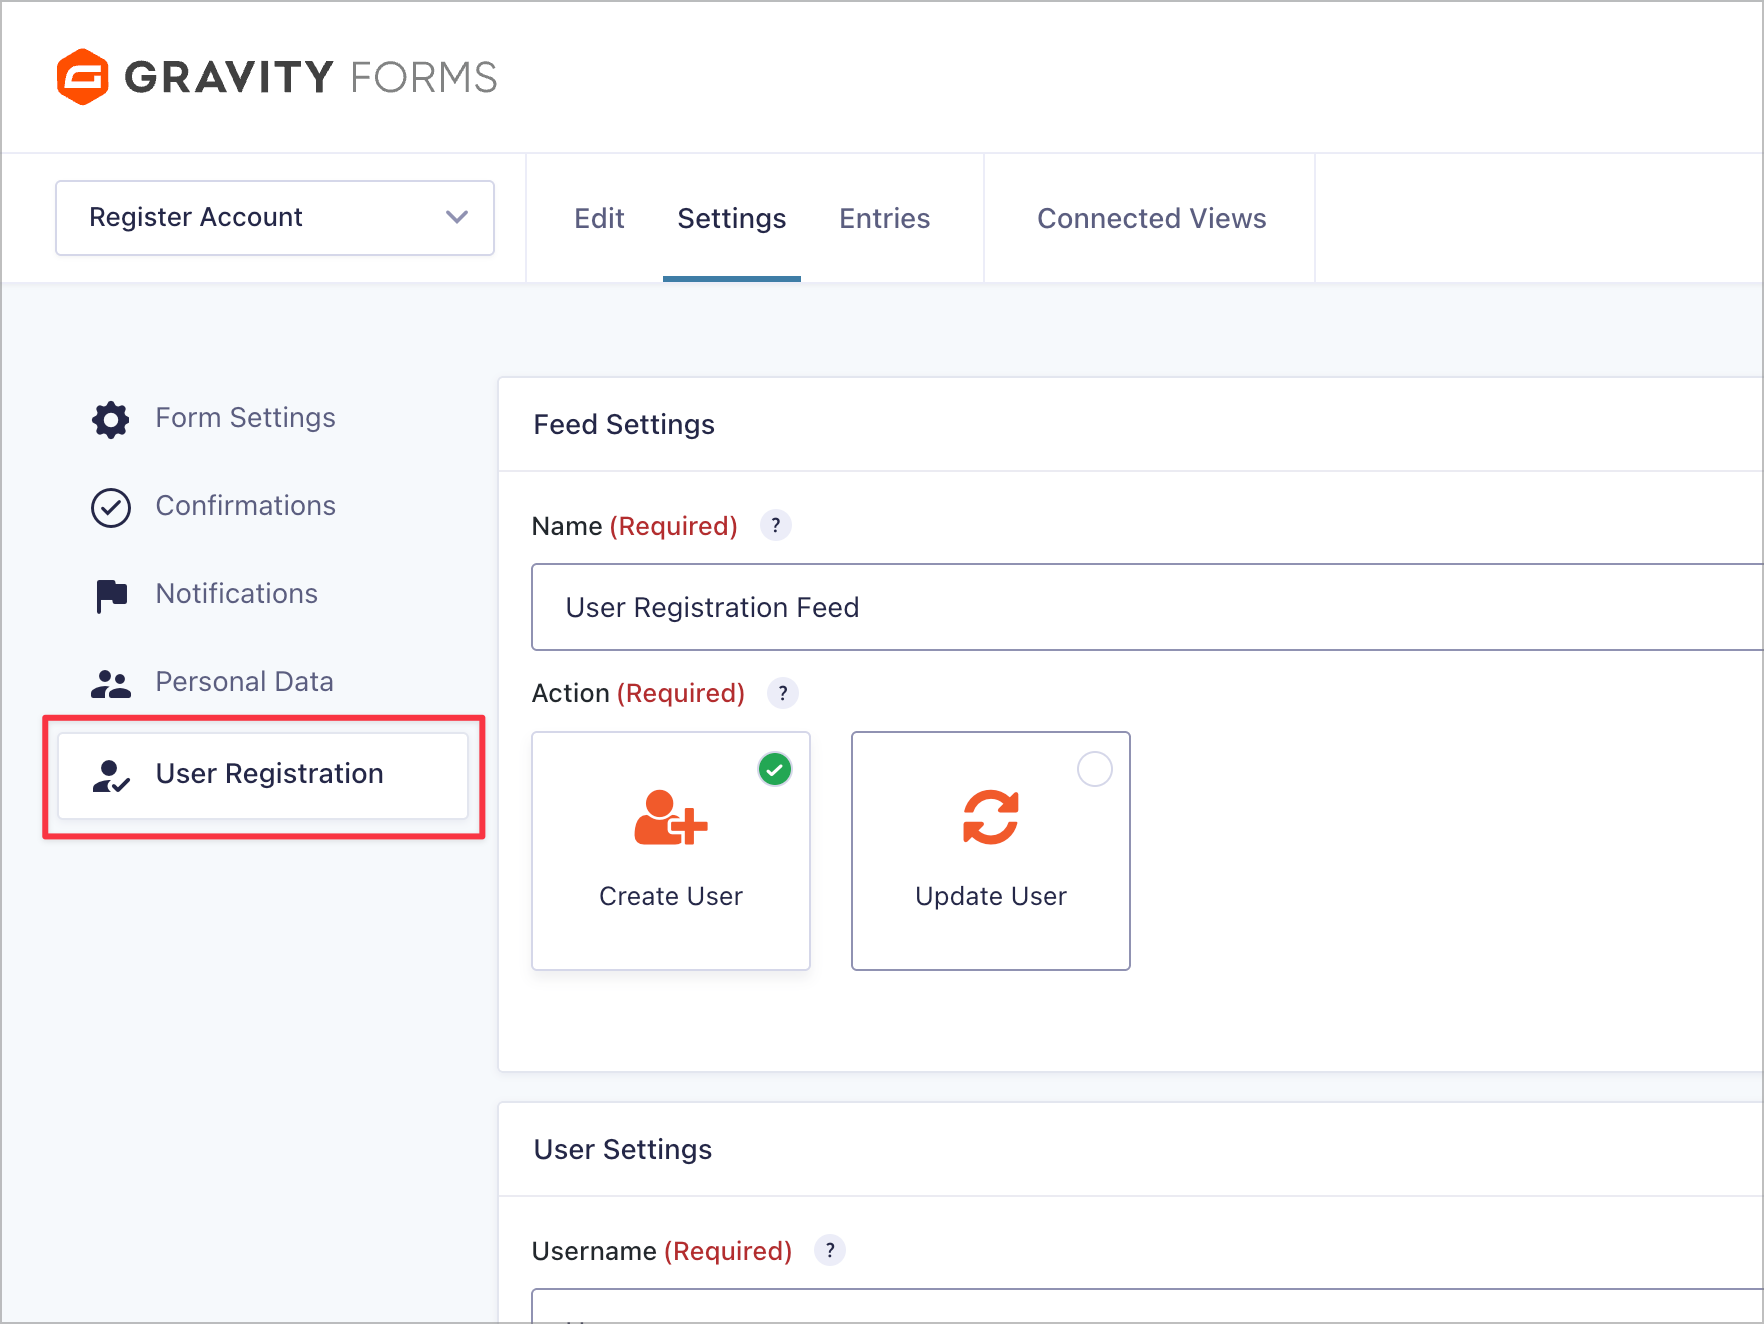
Next, we’ll connect this form to the Gravity Forms User Registration add-on so that each submission automatically creates a WordPress user account.
To do this, we’ll navigate to Settings, click User Registration, and configure a new feed that maps the form fields to user profile fields.

Pro Tip
Start with the Gravity Forms User Registration Form template to save time. It comes pre-configured with the basic fields.
Step 2: Create the remaining forms
Now we’ll create the three forms that employees will actually submit. Each request type gets its own Gravity Forms form. Since employees will be logged in when they submit, Gravity Forms automatically records the Created By user ID on each entry—this is how we’ll filter entries later.
Here are the three forms we’ll create:
- PTO Request Form
- Expense Report Form
- IT Support Request Form
Let’s start with the PTO Request Form. We’ll add fields for Leave type (Radio Buttons: Vacation, Sick, Personal), Start date, End date, Reason (Paragraph Text), and a Status dropdown.
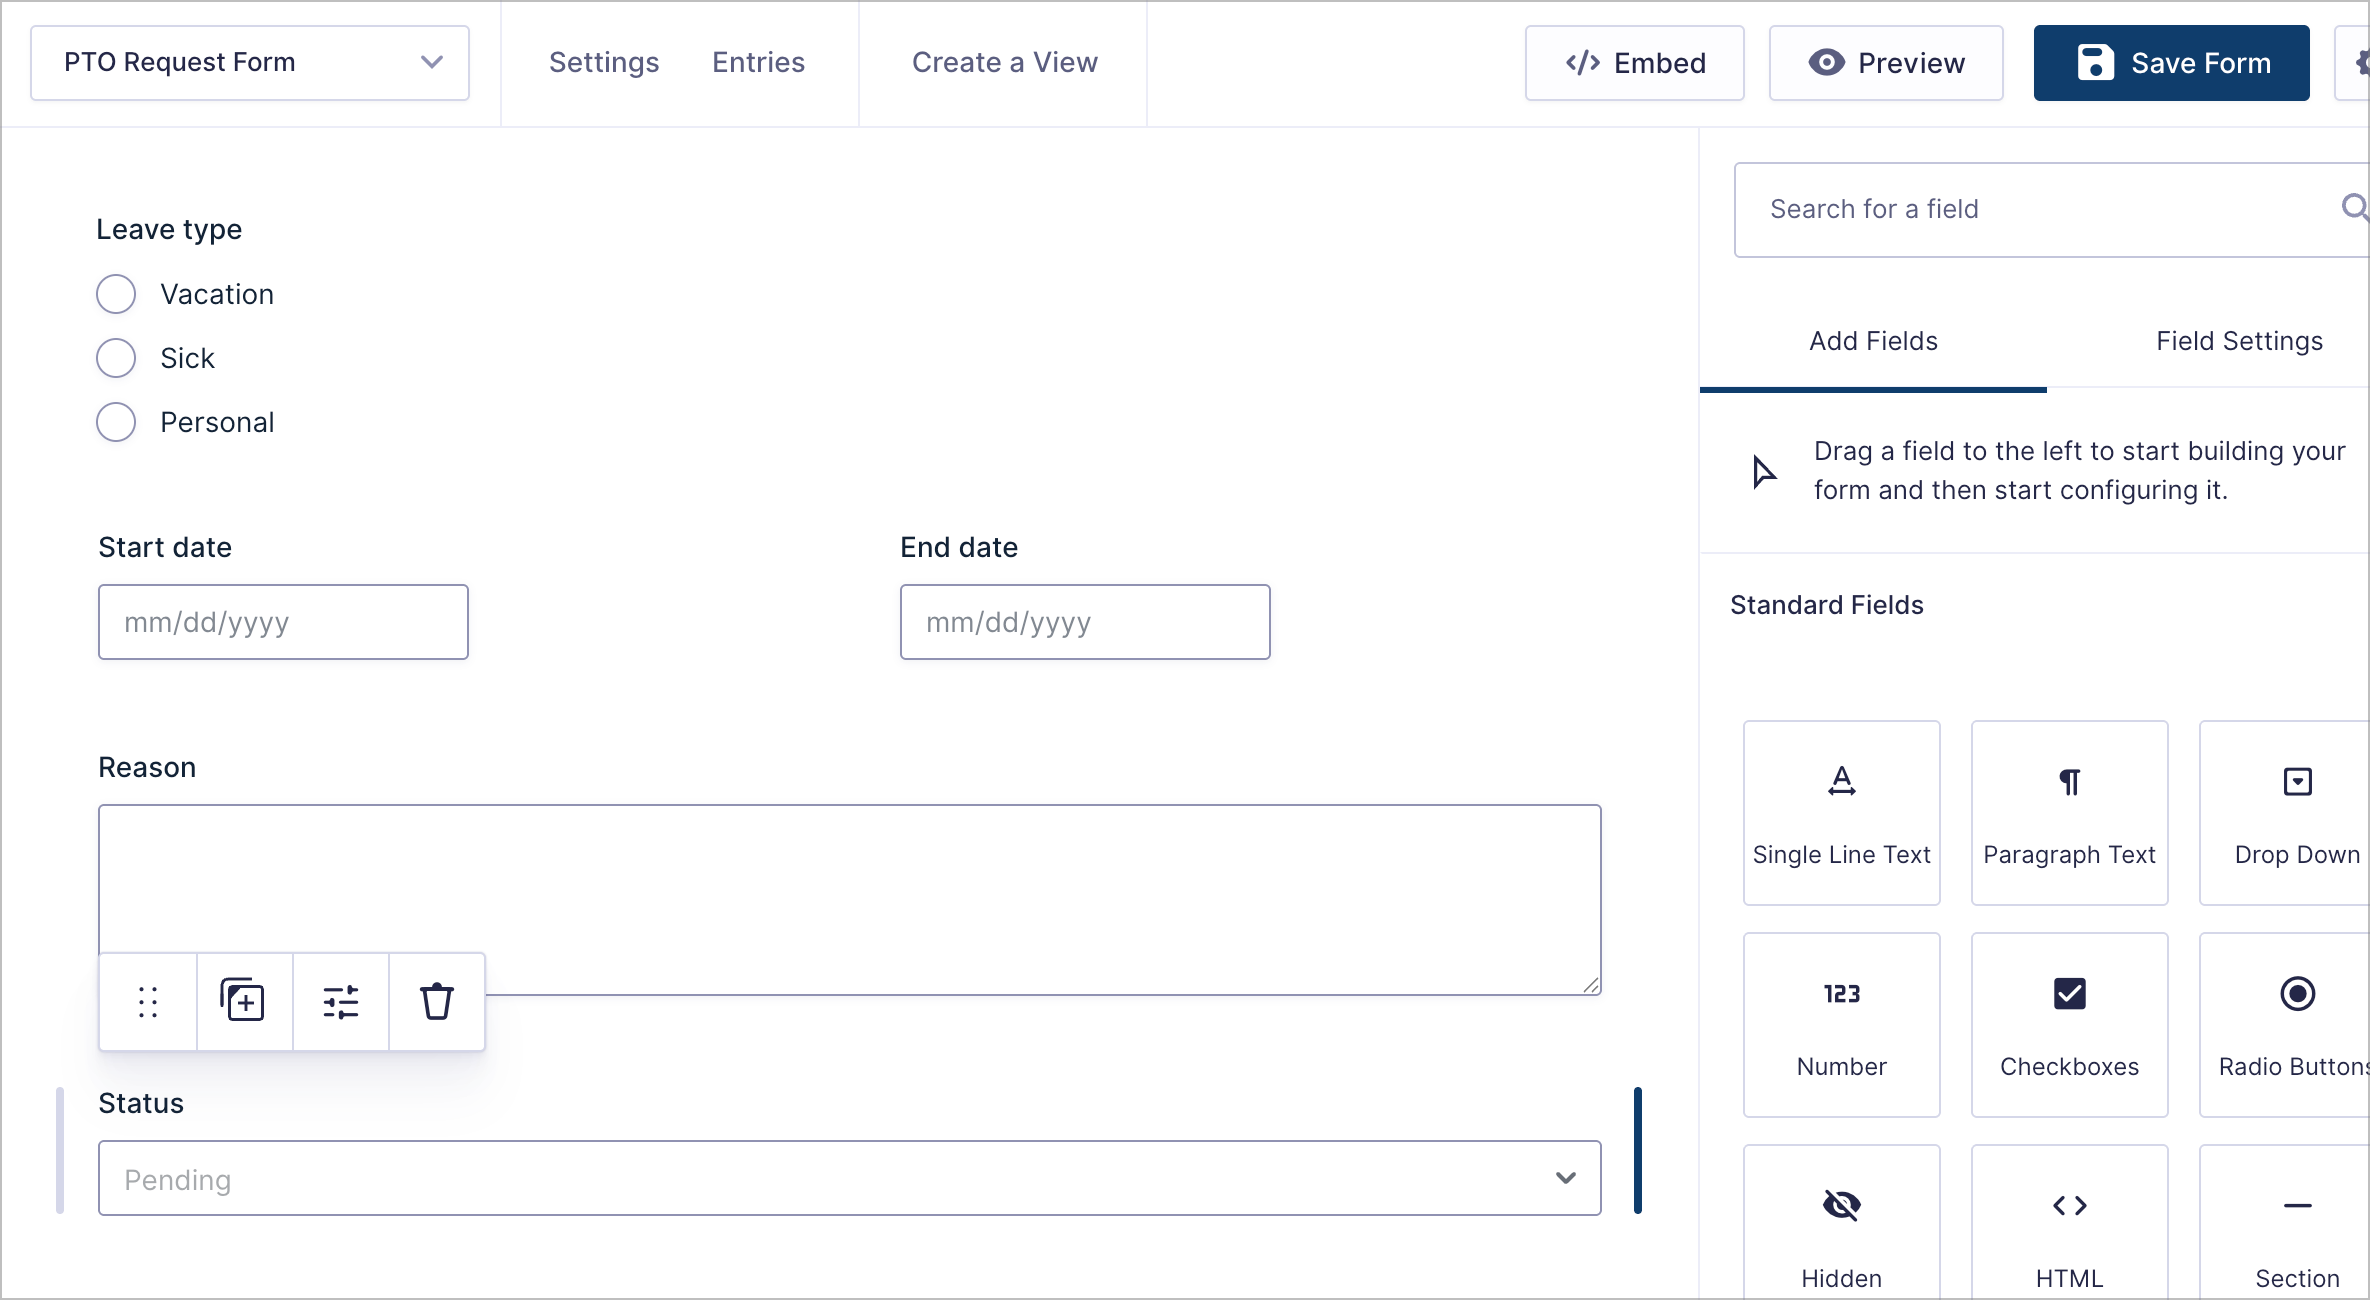
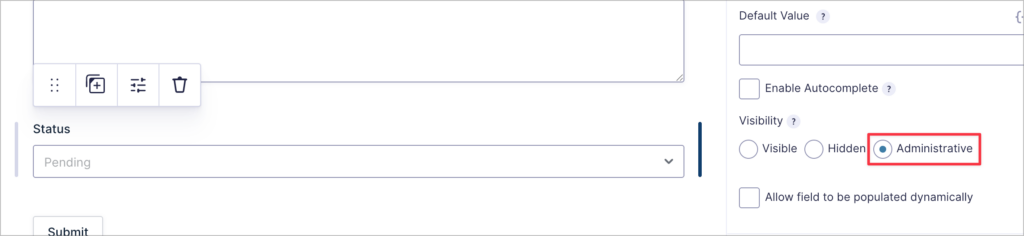
For the Status field, we’ll set the Visibility to Administrative in the field settings. This hides the field from employees on the frontend, ensuring that only admins can see and update the status.
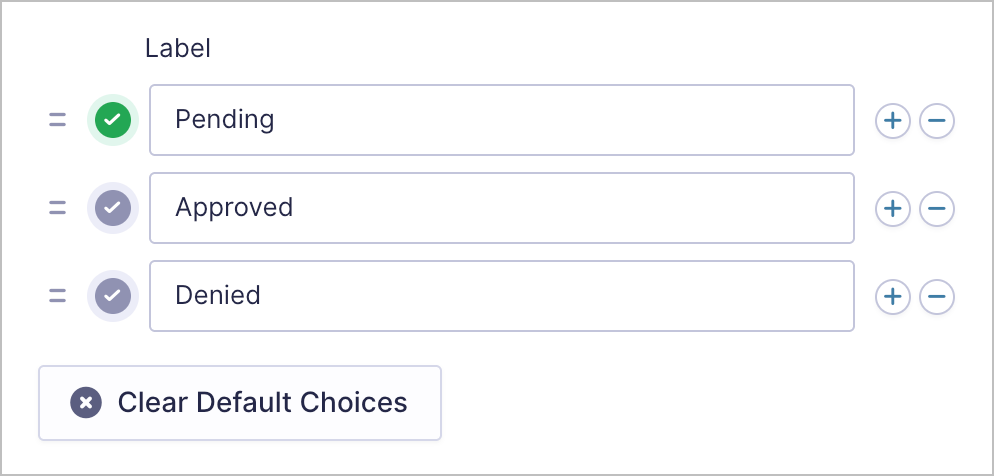
Next, we’ll set the dropdown choices to Pending, Approved, and Denied, with Pending as the default value.
We’ll repeat this pattern for the other two forms:
- Expense Report Form — Description (Single Line Text), Amount (Number), Category (Drop Down), Receipt (File Upload), and Status (Drop Down: Pending, Approved, Denied)
- IT Support Ticket Form — Issue type (Drop Down), Description (Paragraph Text), Priority (Drop Down: Low, Medium, High, Critical), and Status (Drop Down: Open, In Progress, Resolved)
Pro Tip
You might be wondering: why not use the Multiple Forms extension to merge everything into one table? The Multiple Forms extension joins columns from different forms, but it can’t combine rows (entries) from separate forms into a single unified table. That’s why we use this embedded Views approach instead.
Step 3: Create a View for each form
Now we’ll create a separate View for each form. These Views will display the entries in a table format and will later be embedded inside the unified dashboard page.
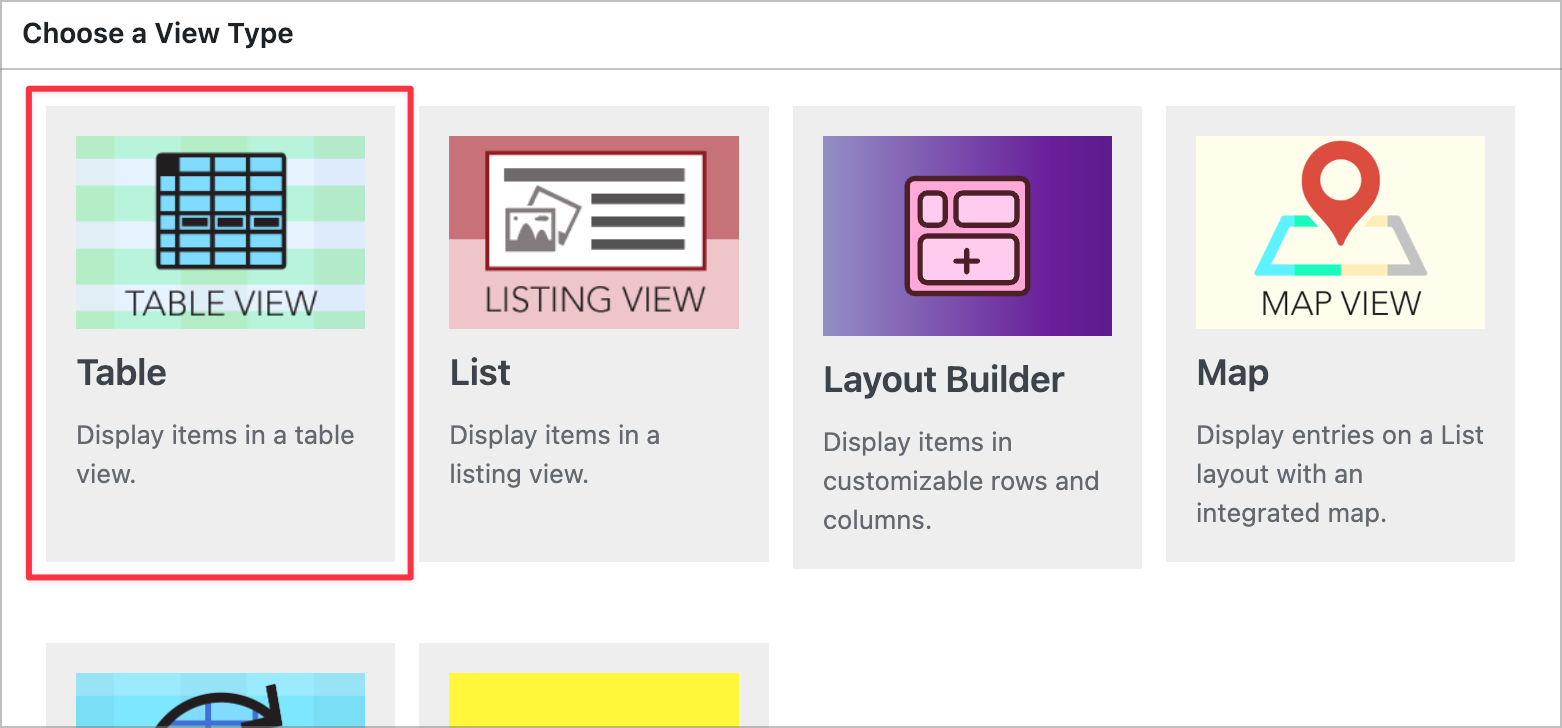
For each form, navigate to Views and click New View. Select the form as the data source, then choose the Table layout.
Add the fields you want to display as table columns. These Views don’t need their own pages — they’ll be embedded inside the dashboard View. Don’t add any user filtering here either; that will be handled by the dashboard View’s embed settings in Step 5.
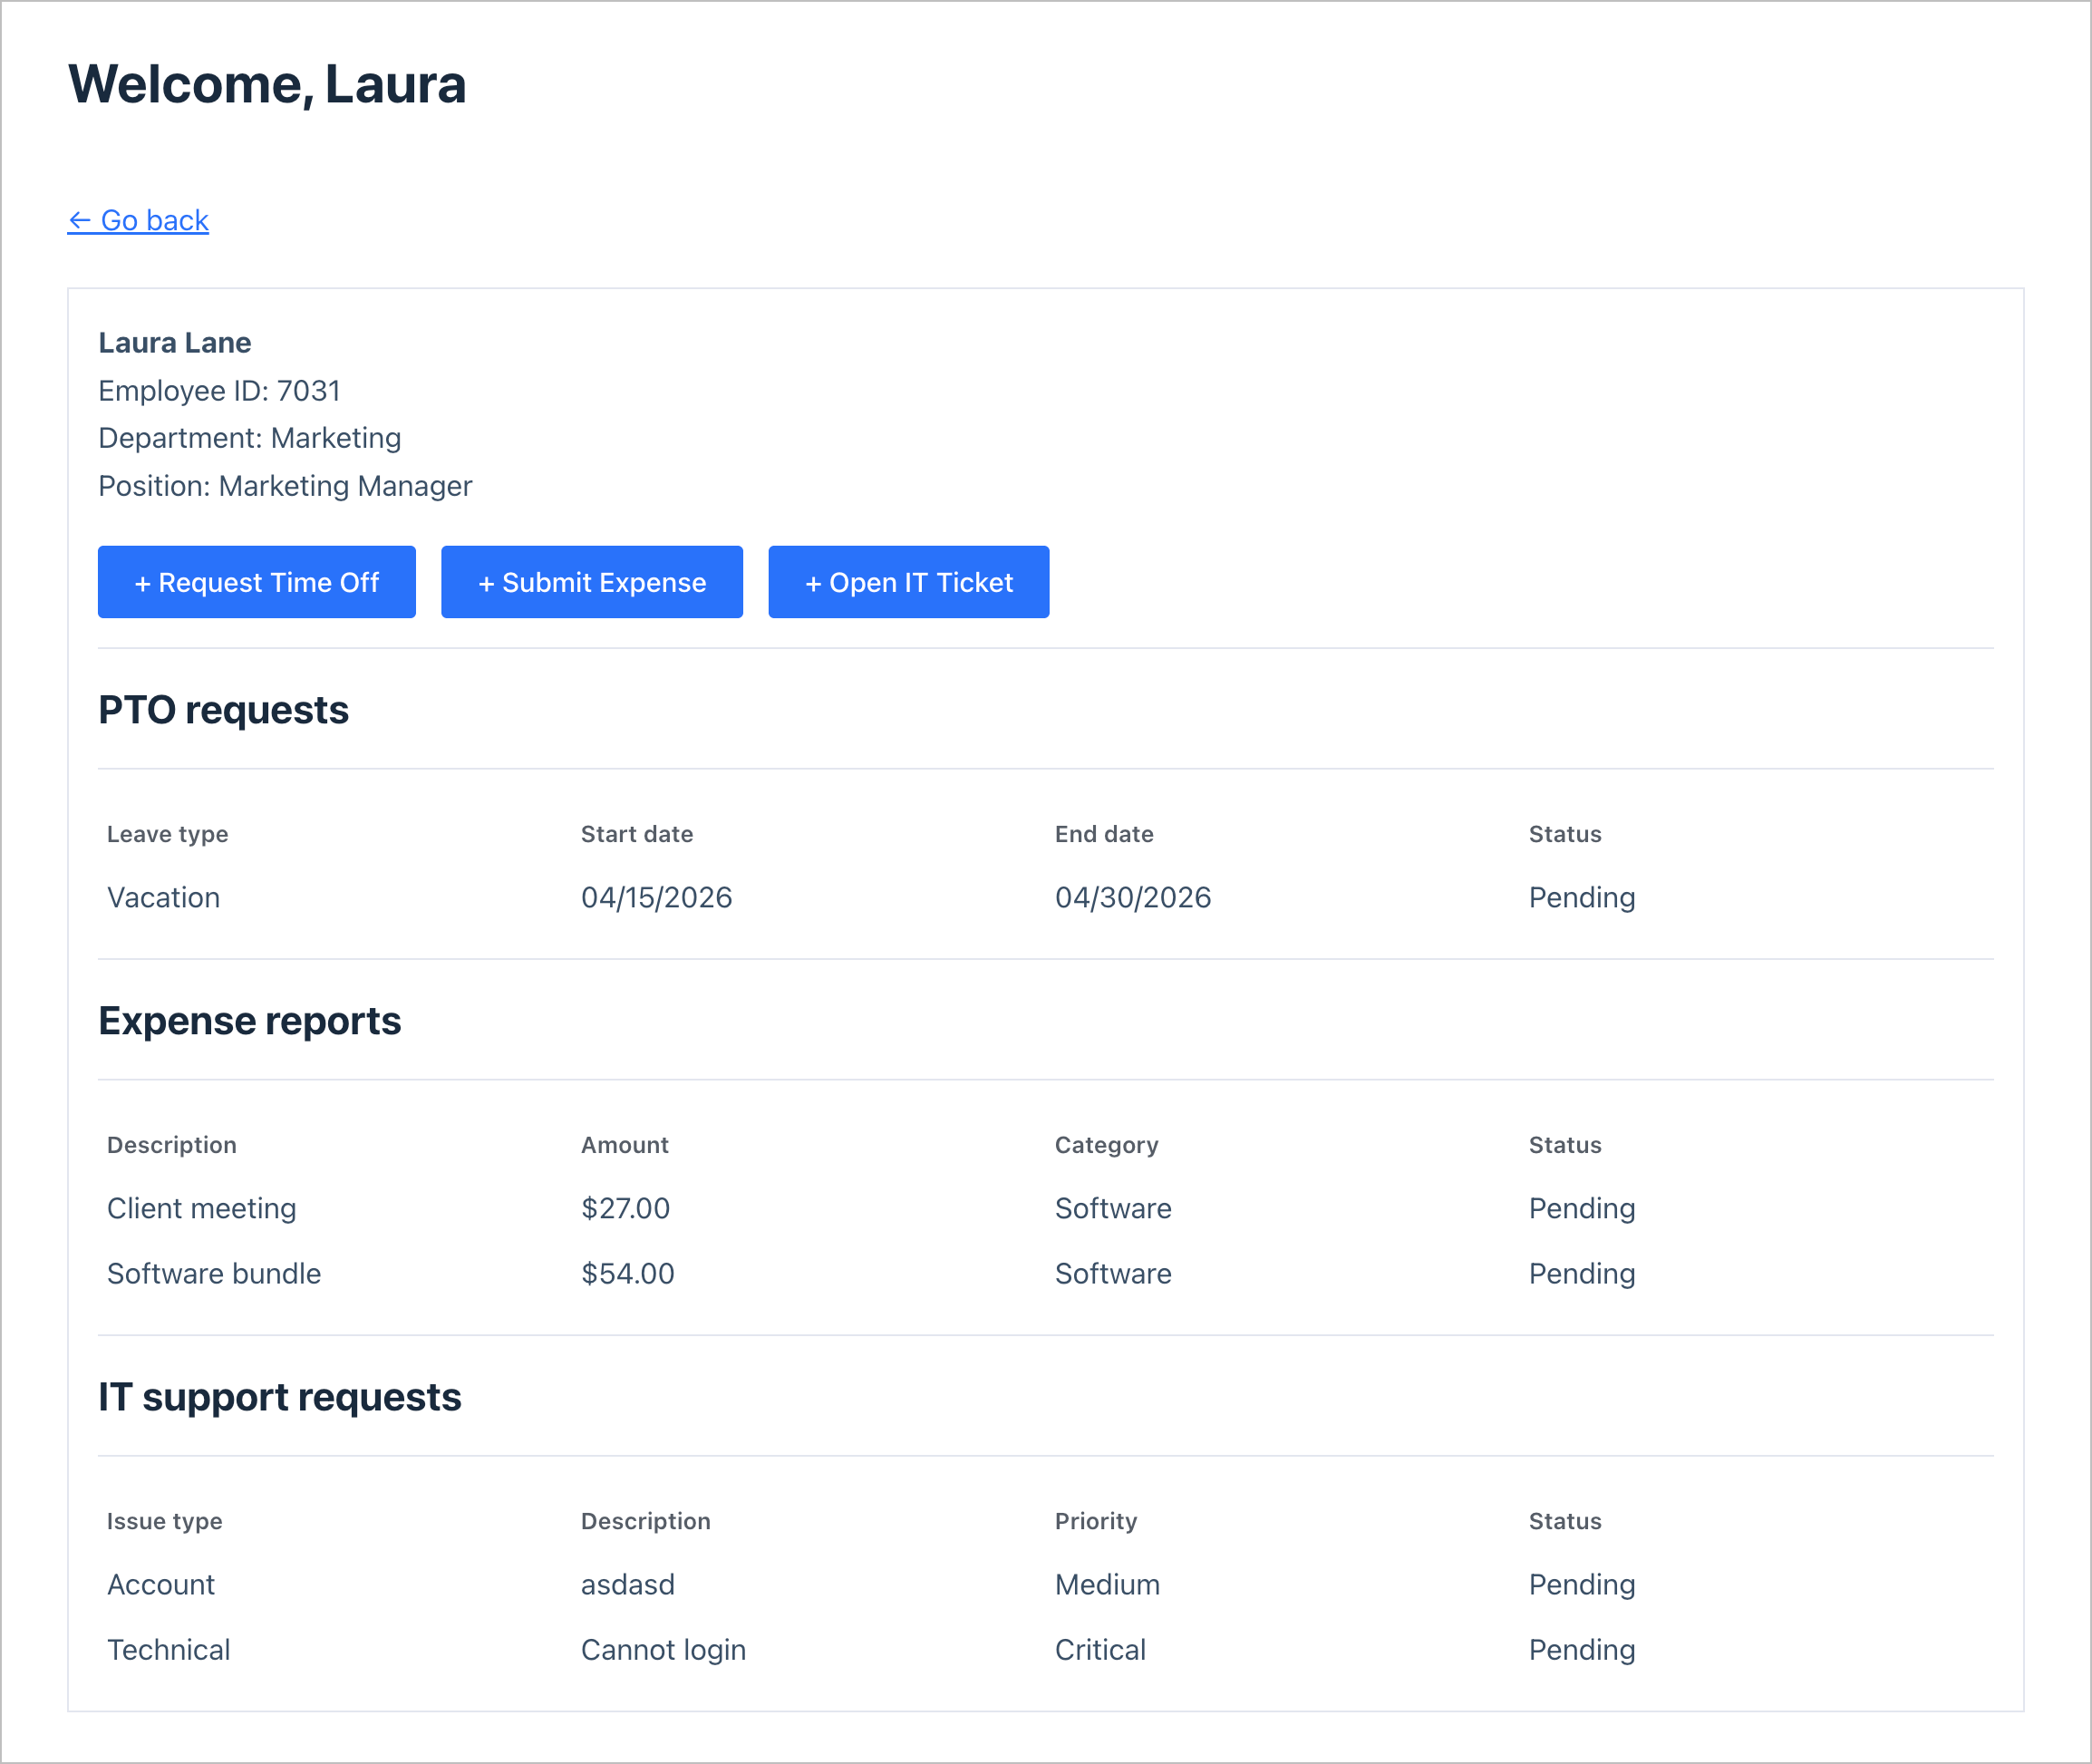
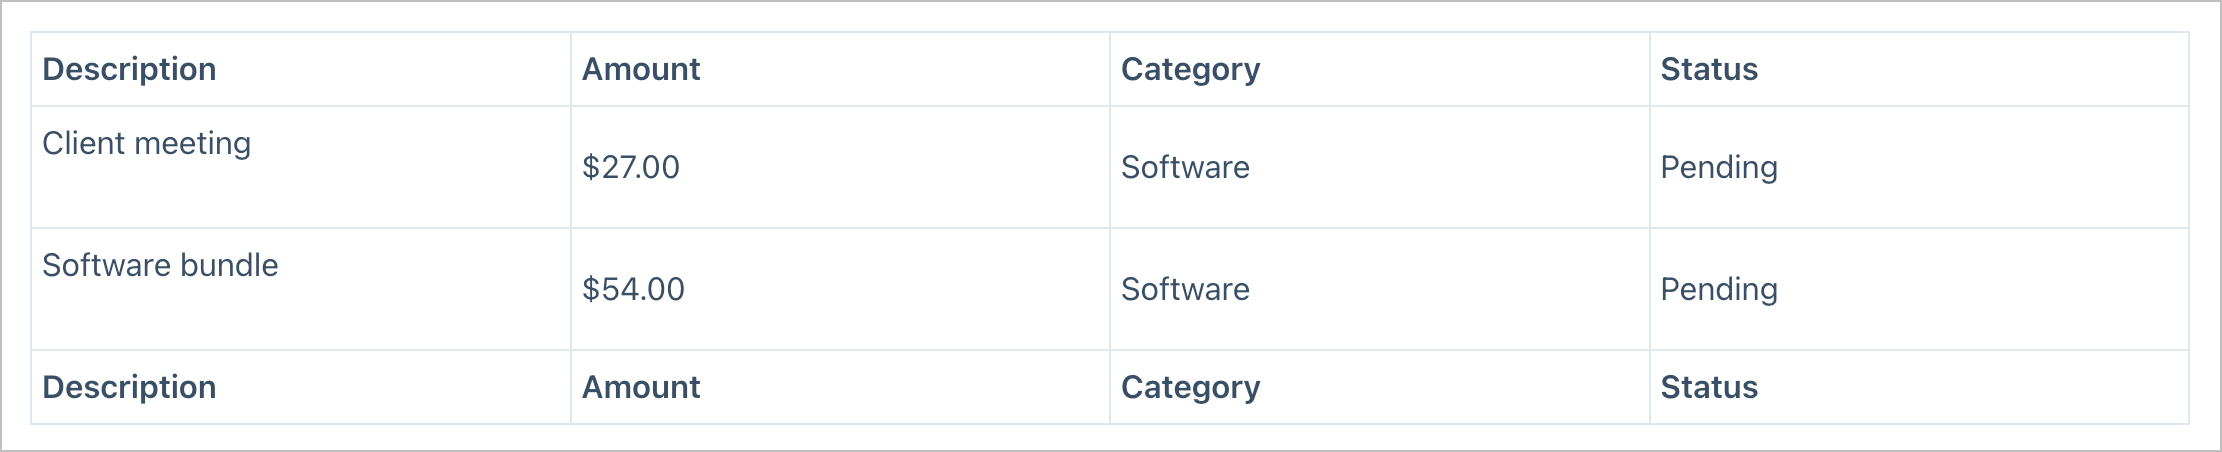
Here’s what the Expense Reports View looks like on the frontend with sample data:
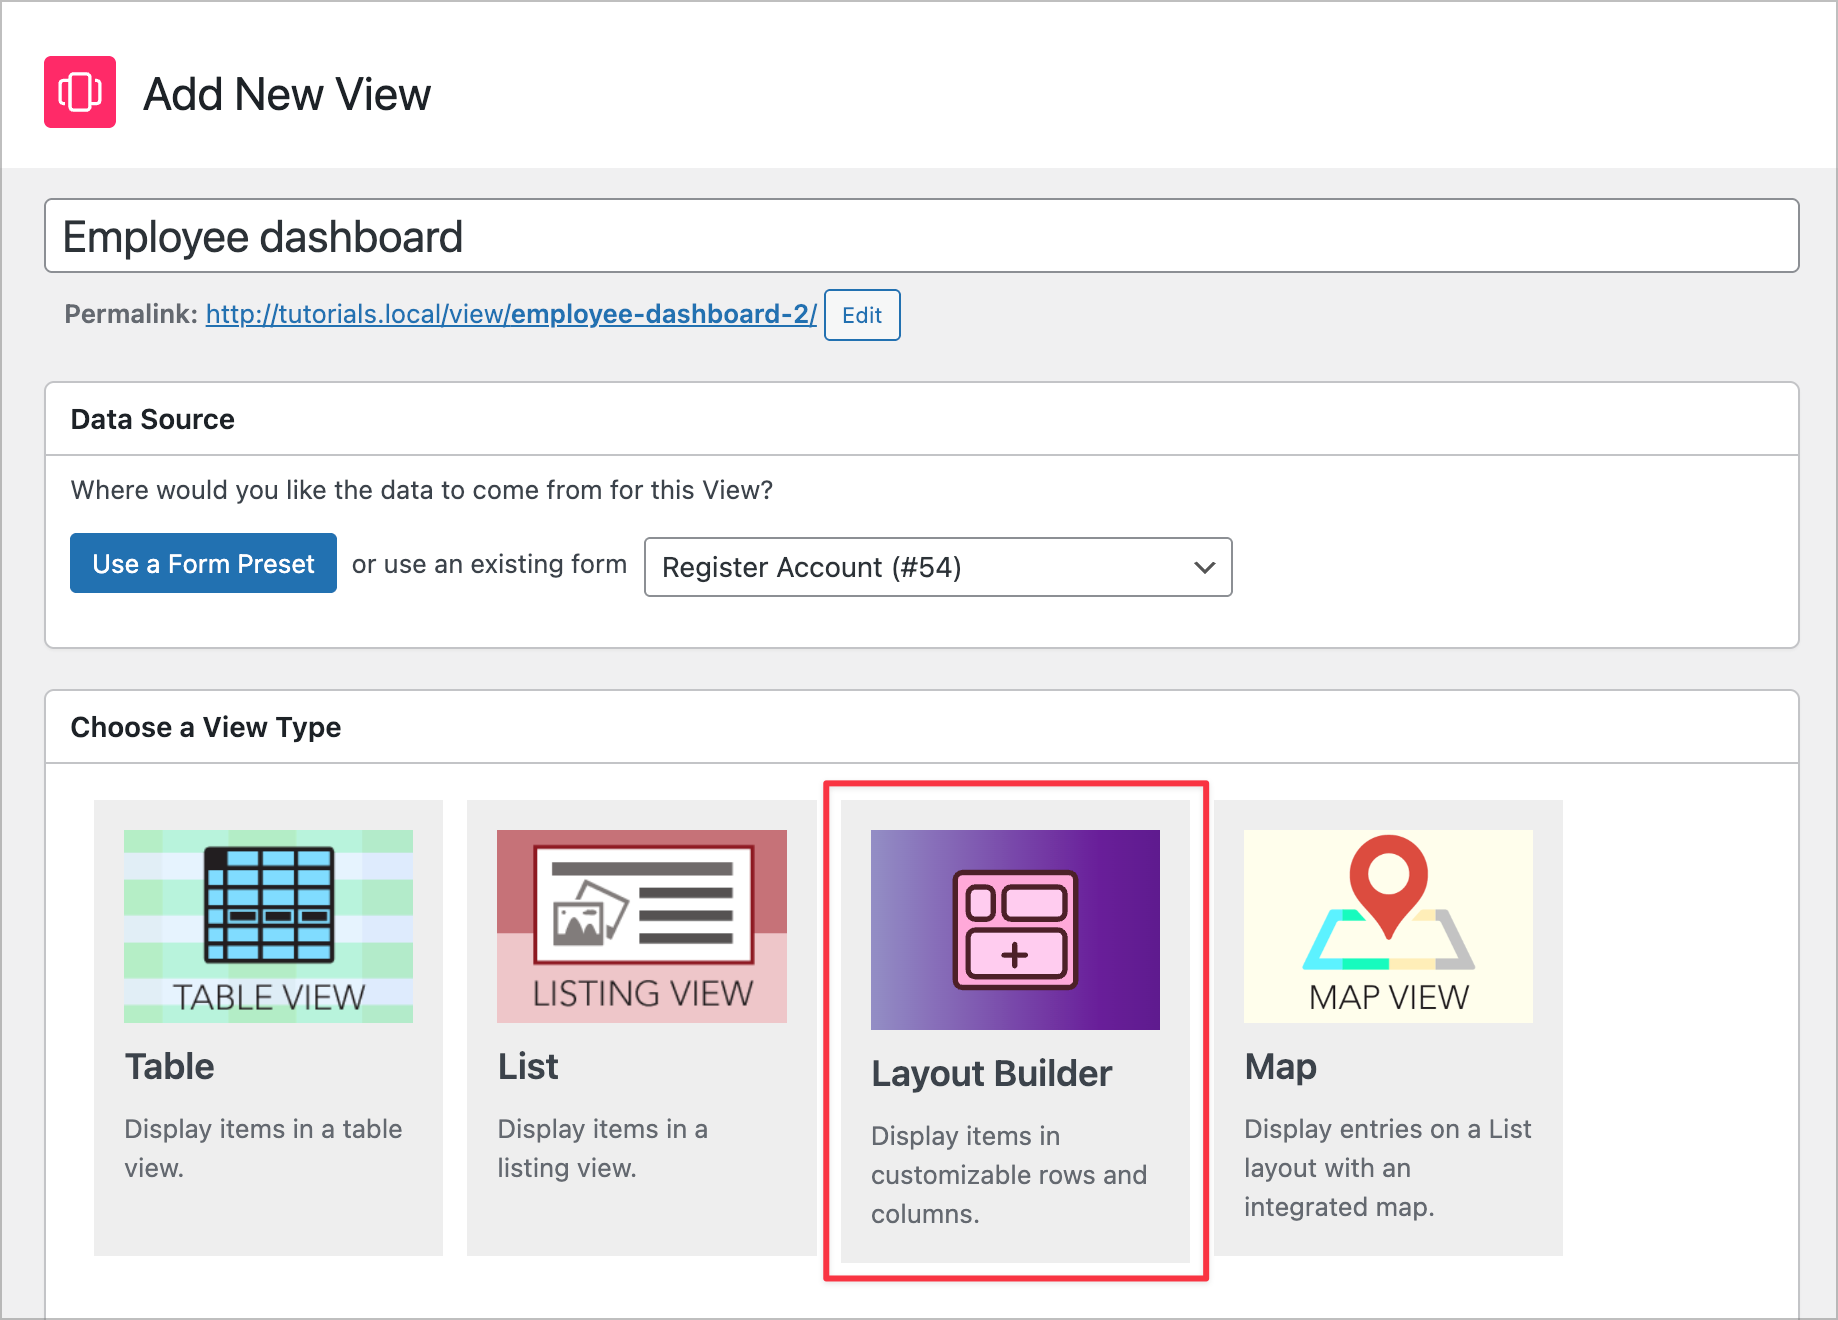
Step 4: Build the dashboard View
Now for the main event. We’ll create a new View connected to the registration form and use the Layout Builder layout. This View serves as the dashboard container—we’re going to embed all the other Views inside this one to create one, unified View that showcases data from all our forms.
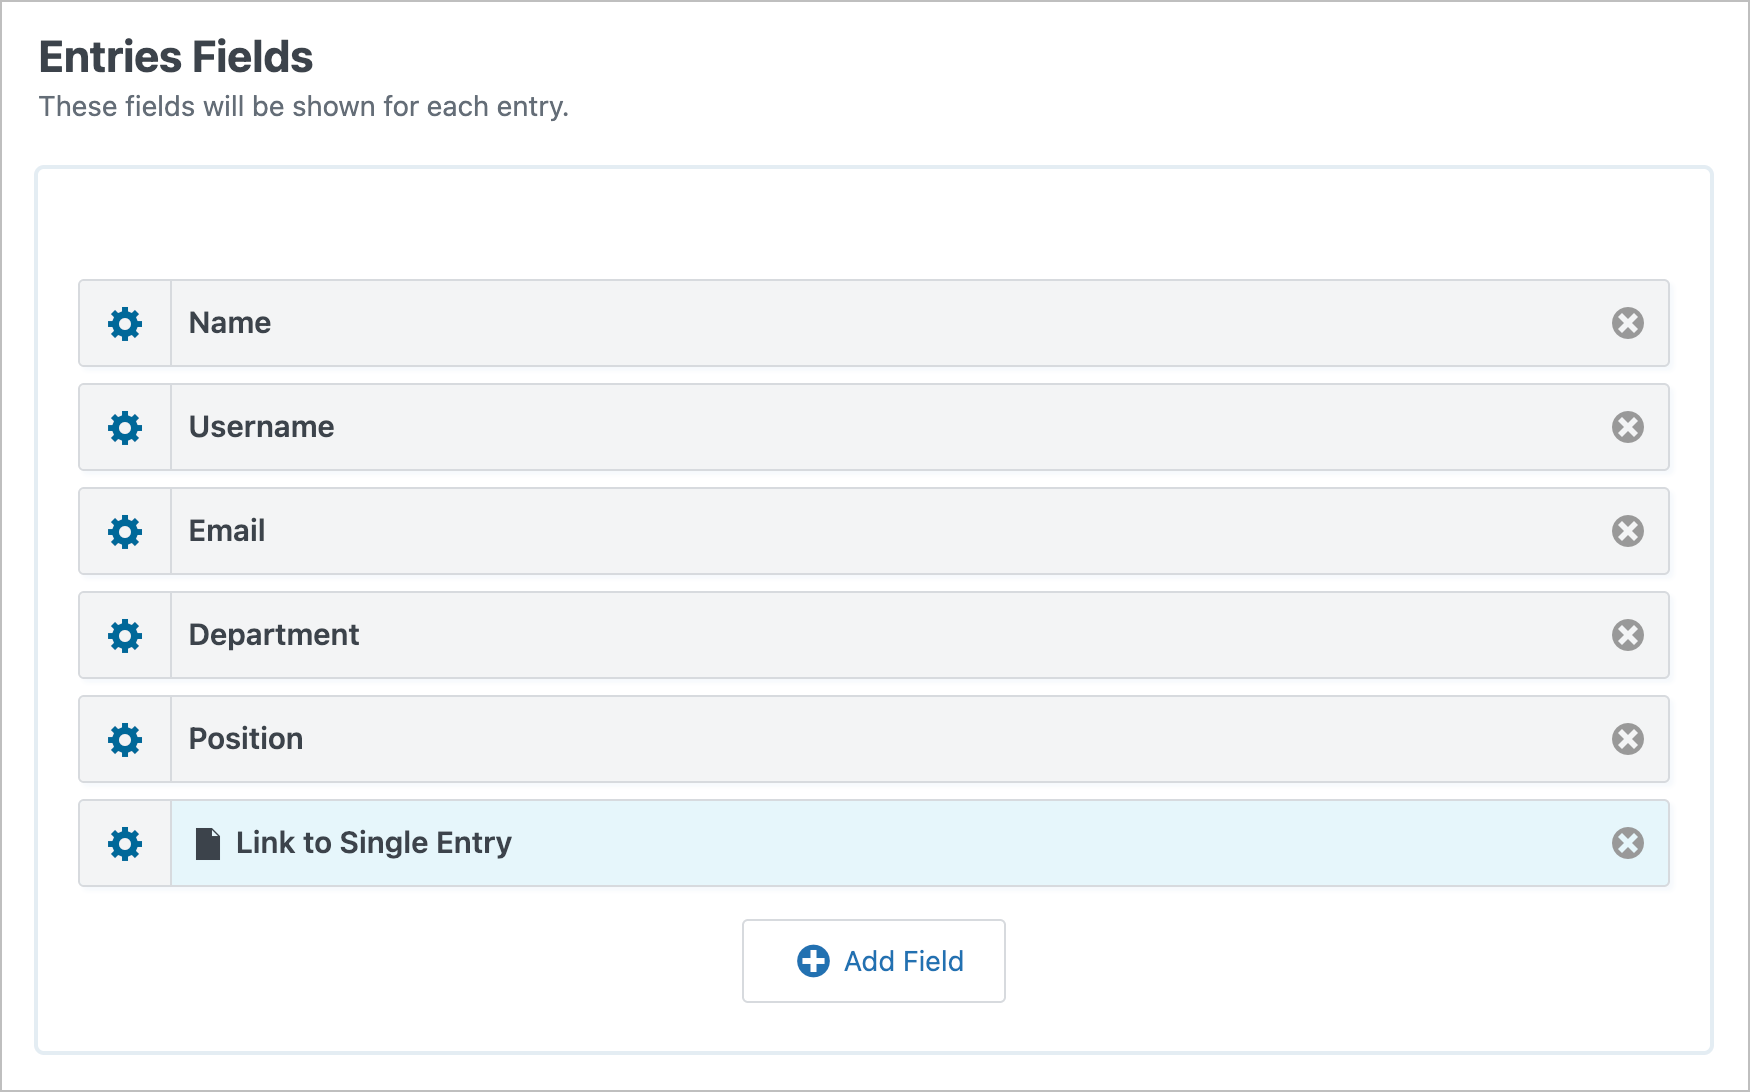
In the Multiple Entries Layout tab, add the fields employees will see on the landing page: Name, Username, Email, Department, Position, and a Link to Single Entry field (rename it to something like “Go to Dashboard”).
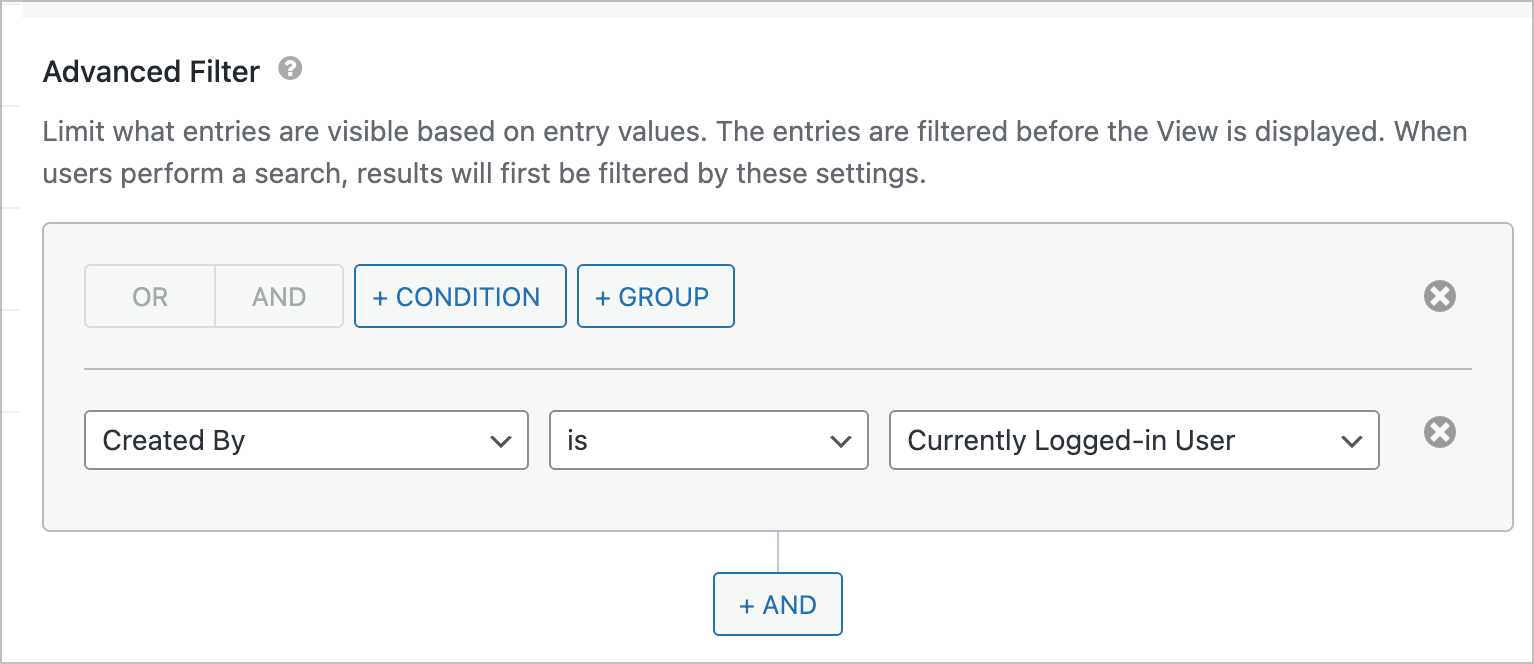
Next, we’ll scroll down to the View settings, click Filter & Sort, select Advanced Filtering, and add a filter: set Created By to is Currently Logged-in User. This ensures each employee only sees their own registration entry with a link straight into their dashboard.
Step 5: Design the Single Entry layout (the dashboard)
This is the heart of the tutorial. The Single Entry Layout is where the actual dashboard lives. Click the Single Entry Layout tab to start building it.
We’ll use a combination of Custom Content fields (for headings and buttons) and GravityView View fields (for the embedded tables). Here’s the field structure:
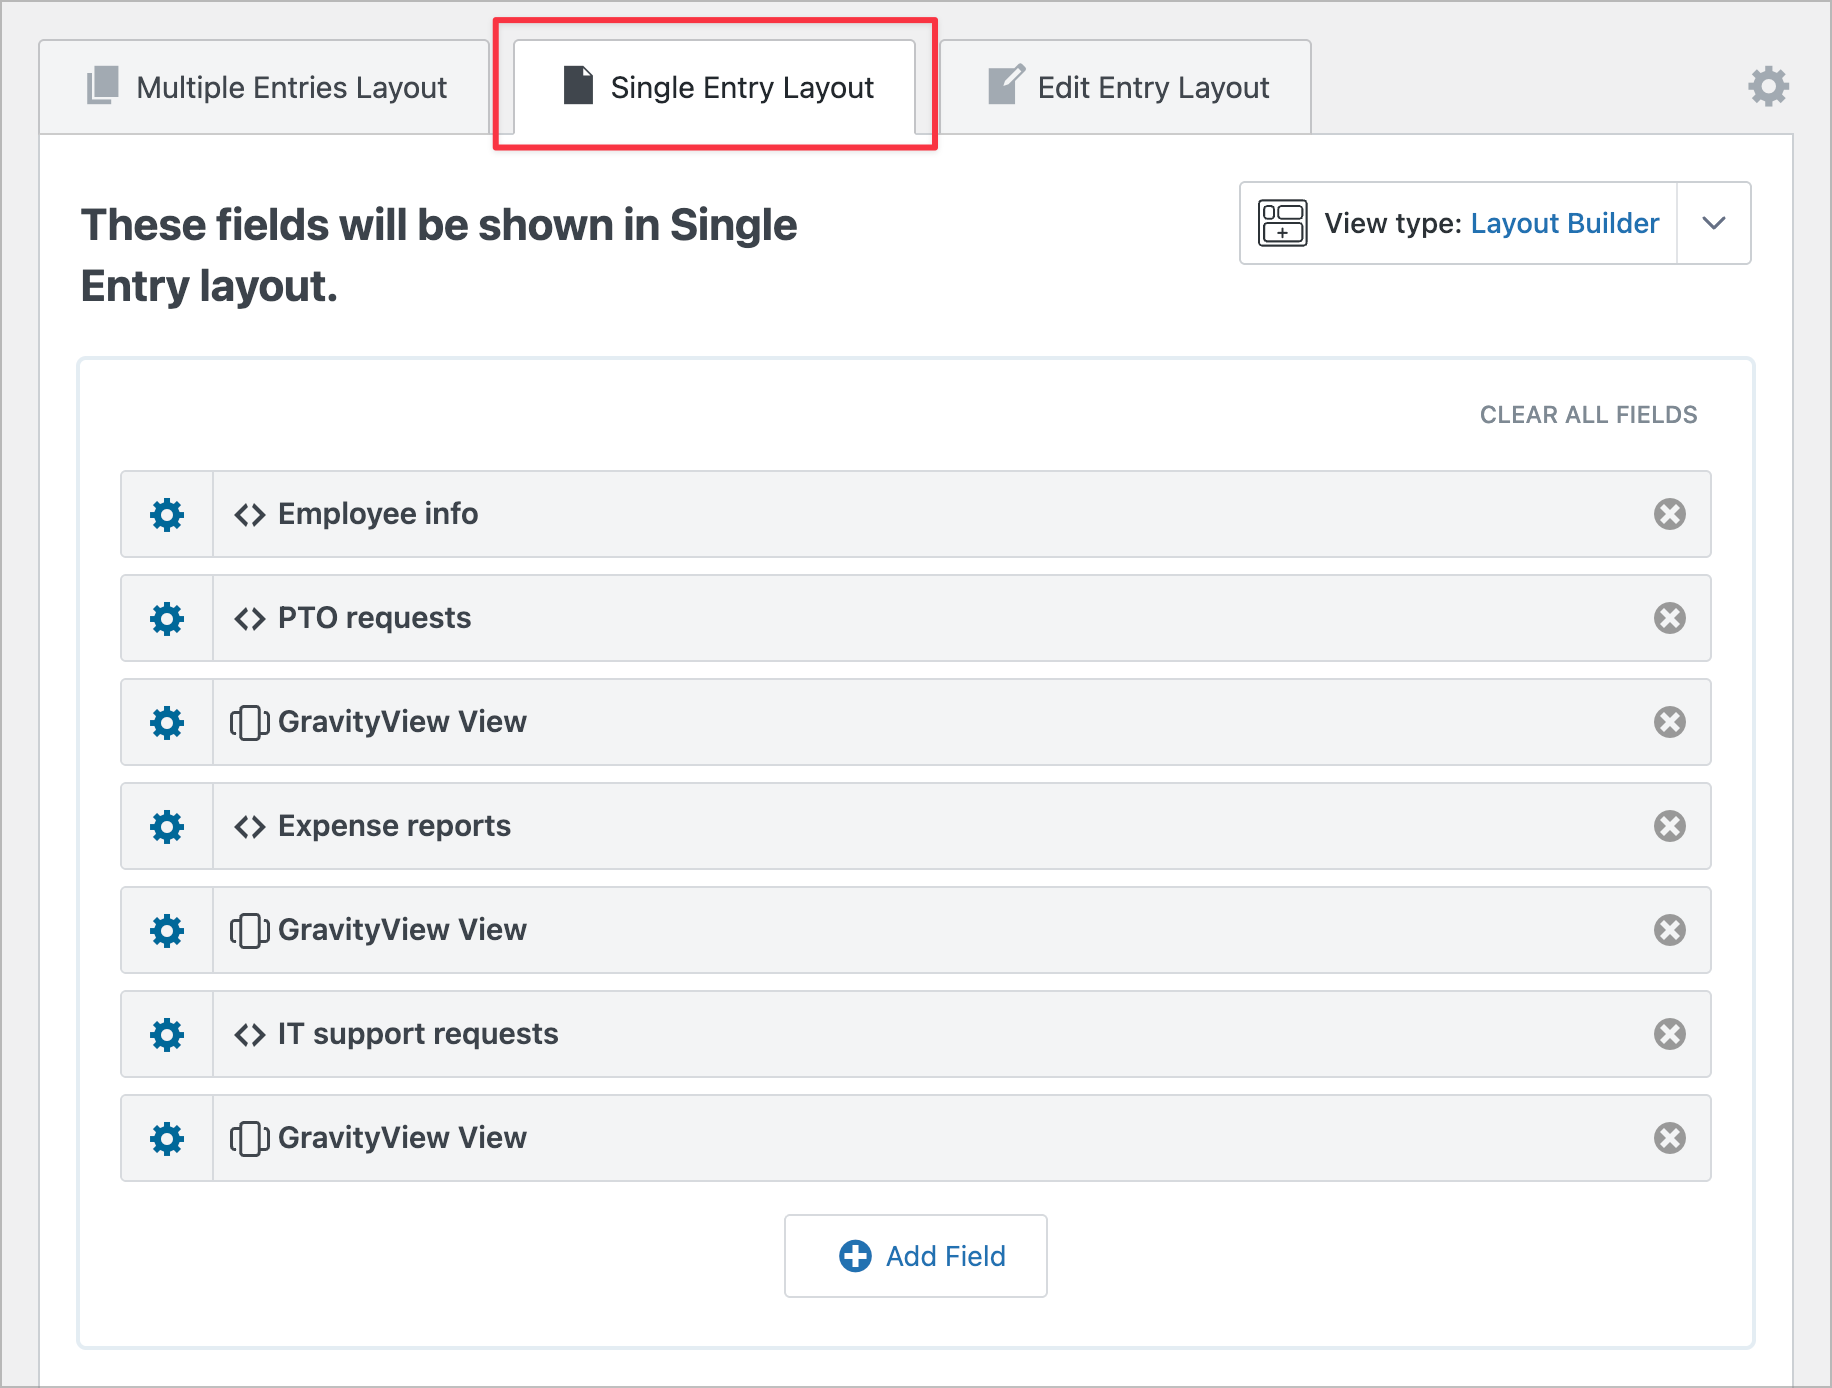
Here’s what each field does:
1. Custom Content field (“Employee info”) — Displays employee details and action buttons. Use merge tags like {Name:1} and {Department:3} to personalize the details. Add links styled as buttons that point to the pages where each form is embedded:
<div>
    <strong>{Name (First):1.3} {Name (Last):1.6}</strong><br>
    Employee ID: {entry_id}{user:ID}<br>
    Department: {Department:5}<br>
    Position: {Position:6}
</div>

<div>
    <a href="/request-time-off" class="button">+ Request Time Off</a>
    <a href="/submit-expense" class="button">+ Submit Expense</a>
    <a href="/open-it-ticket" class="button">+ Open IT Ticket</a>
</div>
2. Custom Content field (“PTO requests”) — A simple section heading: <h2>PTO requests</h2>
3. GravityView View field → PTO Requests View
4. Custom Content field (“Expense reports”) — Section heading: <h2>Expense reports</h2>
5. GravityView View field → Expense Reports View
6. Custom Content field (“IT support requests”) — Section heading: <h2>IT support requests</h2>
7. GravityView View field → IT Support Tickets View
The key step is configuring each GravityView View field so it only shows entries belonging to the logged-in employee. We’ll click the gear icon on each GravityView View field, scroll to the Advanced section, and set:
- Search field:
created_by - Search operator:
is - Search value:
{user:ID}

Repeat this for all three GravityView View fields. The {user:ID} merge tag dynamically resolves to the current user’s WordPress ID, so each embedded View only shows that employee’s entries.
Step 6: Add the dashboard to your site
Finally, we’ll embed the dashboard View on a WordPress page. Create a new page (e.g., “My Dashboard”), then add the View using the [gravityview] shortcode or the GravityView block.
Make sure the page is only accessible to logged-in users. You can set this using WordPress page visibility settings or a membership plugin.
Test it by logging in as an employee and navigating to the dashboard page. You should see only that employee’s registration entry, and clicking into it should show the full dashboard with all three embedded tables—each filtered to that user’s submissions.
Give it a try
That’s it! You now have a unified dashboard that combines entries from multiple Gravity Forms into a single, personalized View. Ready to customize it further? Try adding GravityCharts or GravityMath to display visual summaries alongside your tables.

Helpful tips right in your inbox.
Subscribe to get the latest articles, information on releases and helpful Gravity Forms tips!
More articles

10 things you can ask AI to do with Gravity Forms (using the free GravityKit MCP)
See 10 practical things you can ask AI to do with Gravity Forms using the free GravityKit MCP: create forms, manage entries, build Views, and more.

Launch Log: theme template editing in Block MCP, Shield silentCAPTCHA for Zero Spam, and GravityView fixes
Block MCP adds safe theme template editing, Gravity Forms Zero Spam gains Shield silentCAPTCHA support, and GravityView fixes lightbox and notice bugs.

GravityKit turns 12: a year in review, and 30% off Lifetime All Access
GravityKit turns 12. A look back at a year of GravityView 3.0, GravitySearch, and AI-assisted building, plus a birthday sale on the Lifetime All Access Pass.
