Published
•
Updated
Gravity Forms product calculations: The complete guide to Gravity Forms pricing fields
Master Gravity Forms pricing fields to calculate shipping, apply discounts, and report on order totals. Covers conditional pricing, average order value, and recommended plugins.

Are you looking for an easy way to do product calculations in Gravity Forms? You’re in luck! Gravity Forms includes a number of features that allow it to function as a powerful eCommerce solution.
When selling products on your website, it’s helpful to be able to calculate shipping costs, discounts as well as other metrics such as average order value.
Product calculations are built into Gravity Forms but if you want to take things further you’ll need to install one or more plugins. In this post, we’ll show you different ways to perform Gravity Forms product calculations so that you can:
- Create eCommerce reports
- Update product prices based on conditional logic
- Display the average order value
- Calculate discount percentages
- … and more.
Let’s get started!
When should you use Gravity Forms as an eCommerce solution?
Although Gravity Forms is predominantly thought of as a form plugin, it can also be used as a WordPress eCommerce solution. Not only does Gravity Forms include a range of product pricing fields, but it also integrates with a wide variety of payment processors such as Stripe, PayPal, and more.
You should think about using Gravity Forms as your eCommerce solution if you have a small store that doesn’t require a lot of customization. While Gravity Forms works well for taking payments, it does not provide the expansive features offered by a dedicated eCommerce plugin like WooCommerce. And if you do decide to build on WooCommerce, you can always use a price calculator add-on for product calculations!
Product field calculations in Gravity Forms
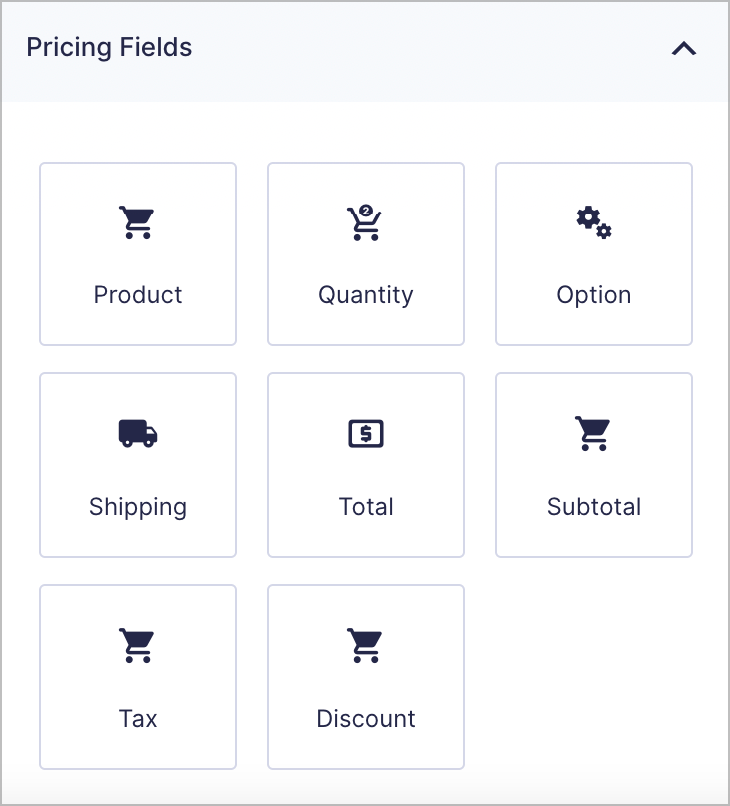
Gravity Forms includes a range of Pricing fields that allow you to perform product calculations inside a form. To see the different fields available, open up the “Pricing Fields” tab from inside the form editor.

The following fields are available for displaying and calculating prices in Gravity Forms.
- Product
The “Product” field allows you to display products inside your form. The “Product” field supports several different Field Types, including “Calculation”, “Single Product”, “Drop Down”, “Radio Buttons”, and “User Defined Price”.
- Quantity
The “Quantity” field allows the user to specify a quantity of a certain product.
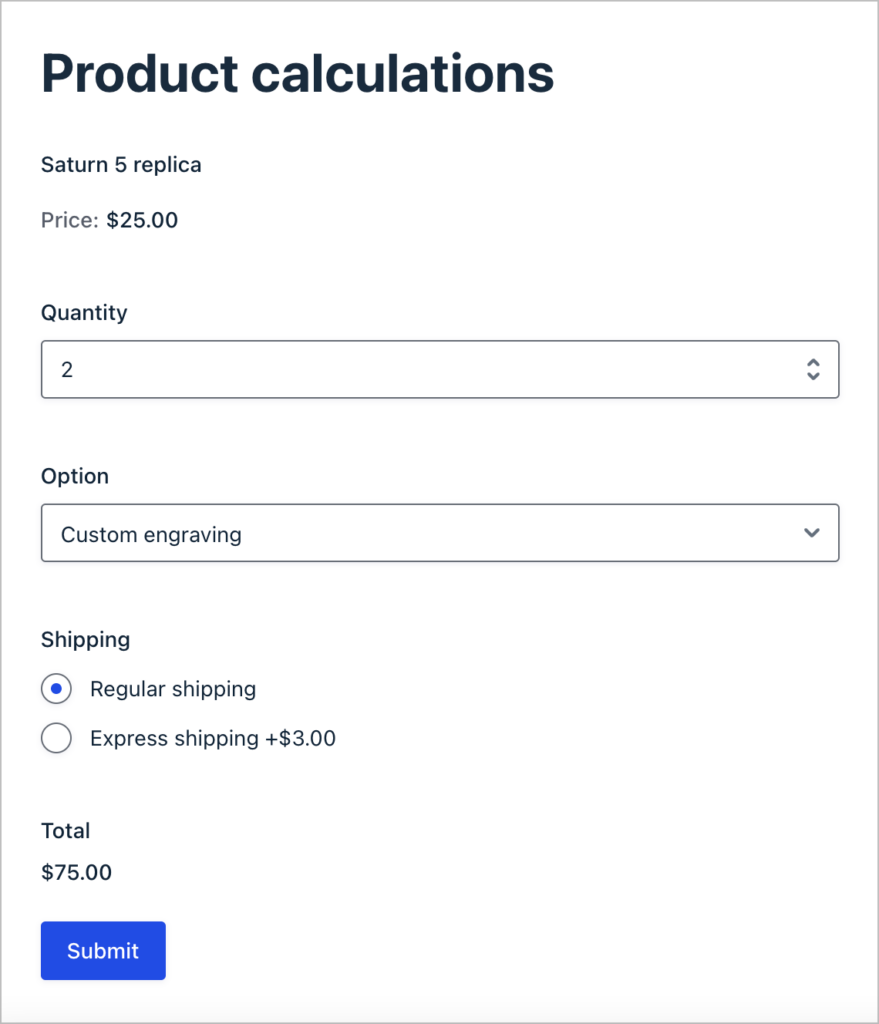
- Option
The “Options” field allows you to offer different options for a specific product with a cost attached.
- Shipping
The “Shipping” field allows you to add a shipping fee to the total cost of the order.
- Total
The “Total” field displays the order total. The “Total” field will dynamically update as the user selects different products, options, and shipping rates.
The above Pricing fields allow Gravity Forms to be used as a basic eCommerce solution. This is handy if you want to sell products on your website but don’t want the bloat of a full WooCommerce installation.
Let’s have a look at some examples of how to perform different product calculations in Gravity Forms.
Example #1: Calculating product shipping costs
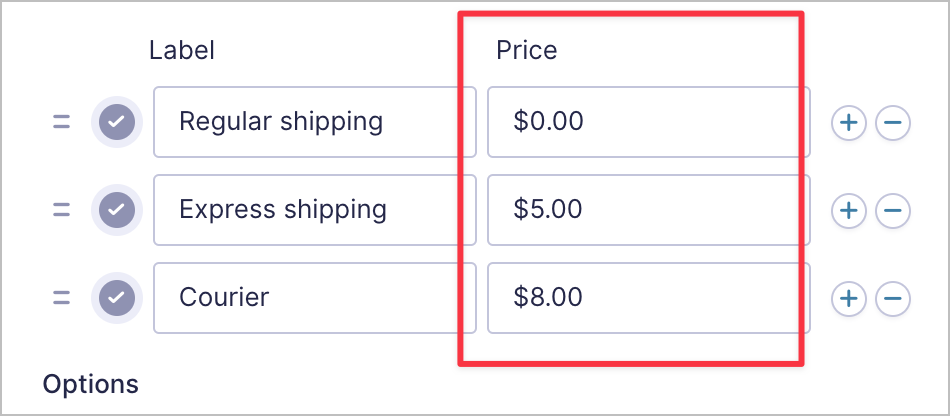
To add shipping options to your order form, simply add the “Shipping” field and change the field type to either “Drop Down” or “Radio Buttons”. This will enable you to set multiple shipping options with associated prices.

For example, here we’ve created 3 shipping options: “Regular” (no extra fee), “Express” (+ $5.00), and “Courier” (+ $8.00).
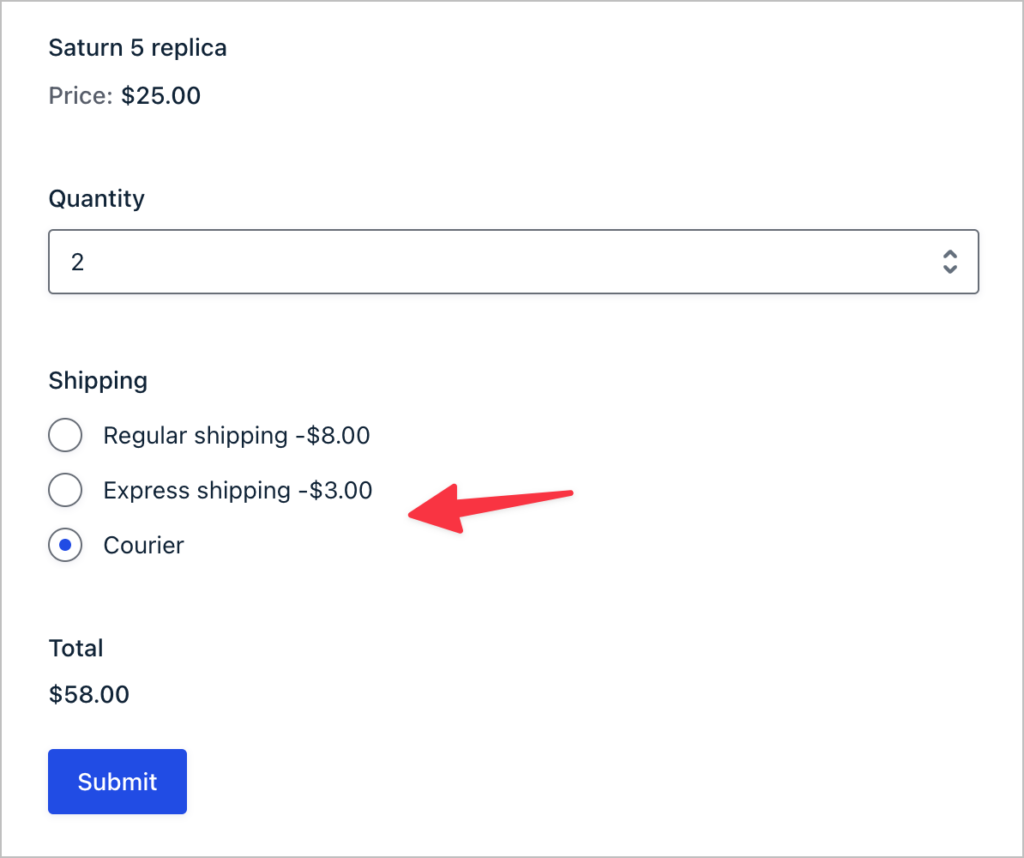
Here’s our form on the front end. As you can see, selecting the “Courier” shipping option add’s an extra $8.00 to the order total.
Example #2: Variable product prices (customizable products)
If you’re selling a product that has different variations, such as a T-shirt that comes in different sizes, or a bag of coffee that comes in different amounts, ypu will need a way to change the price based on the option the user select.
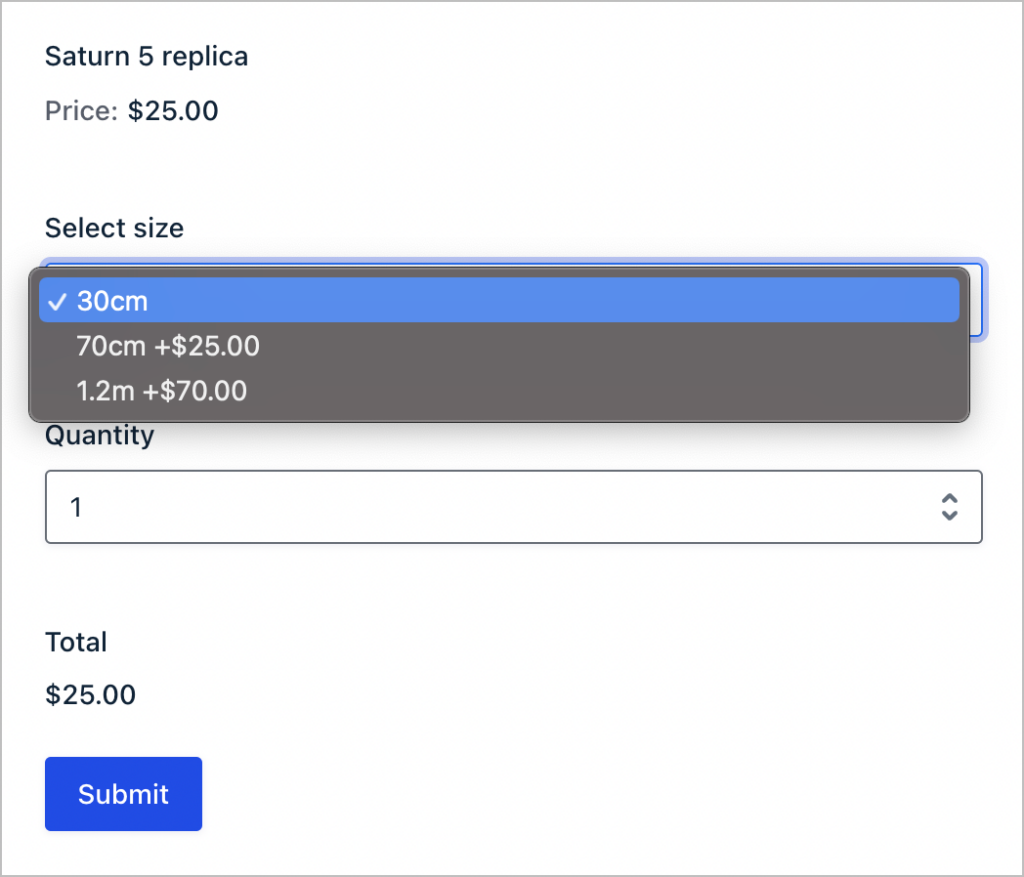
For this, you can use the “Option” field. After adding the field to your form, open the field settings to map it to the correct product and select a field type.
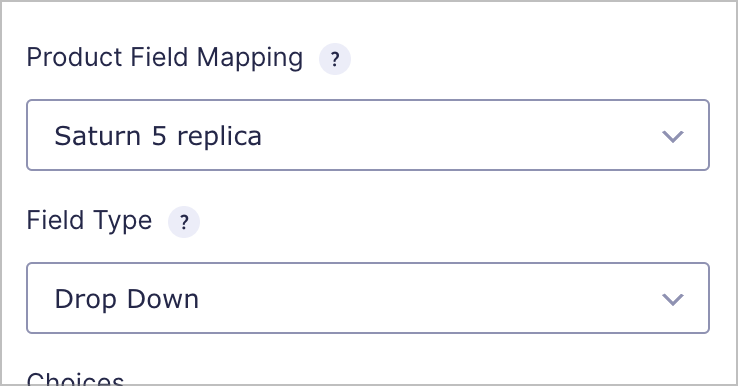
Now you can enter in the various product options.
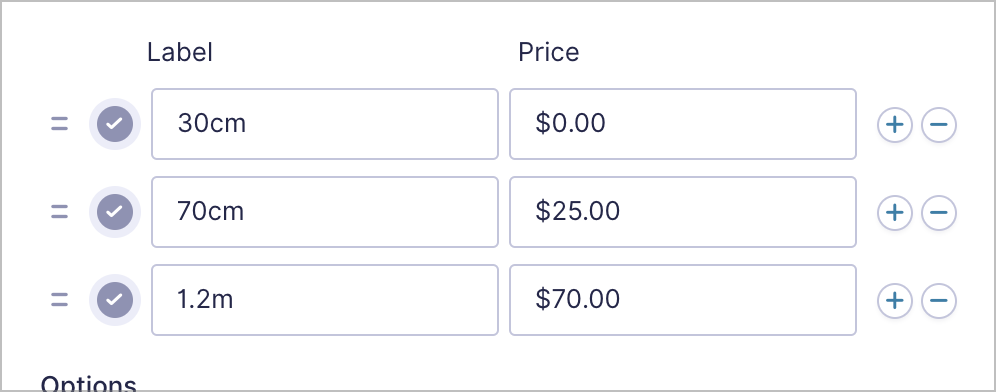
So in this example, the price of the product will either stay the same or increase based on the size chosen by the user.
Example #3: Calculating a percentage (product tax)
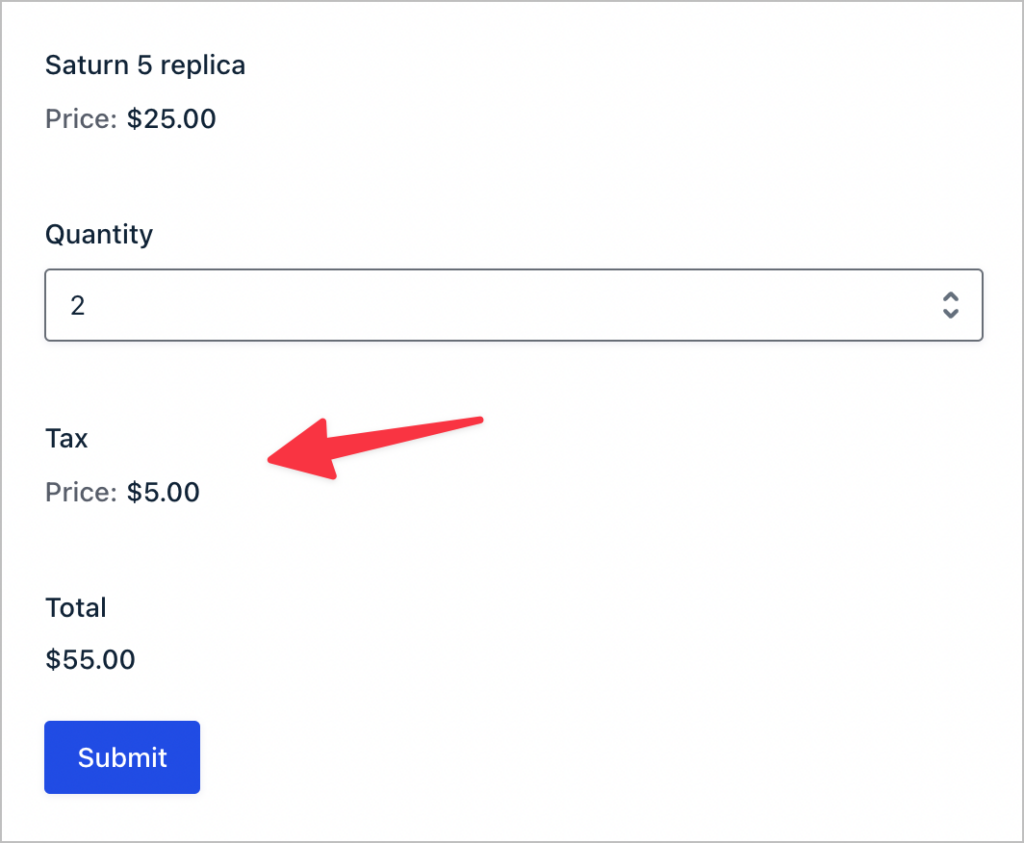
Adding a “Product” field to your form and setting the Field Type to “Calculation” allows you to perform dynamic calculations inside your form. This is useful for several reasons. For example, you could calculate the product tax or VAT as a percentage of the total cost.
In this example, we’ve got a product that costs $25. Below that is a Quantity field, and then we have a calculated field called “Tax” which calculates 10% of the order value.
Let’s go through how we set this up. To add a calculation to your form, add a “Product” field and set the Field Type to “Calculation”.

Next, write your calculation using Gravity Forms merge tags inside the formula text box. Merge tags allow you to reference other fields in your form. To select a merge tag, click on the merge tag picker icon at the upper right of the formula input box.
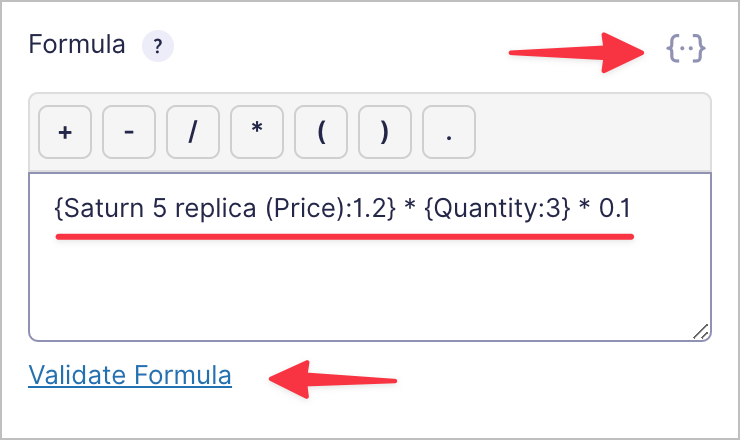
After writing your formula, click “Validate Formula” to check if it’s valid before saving your form. As you can see, in this example we’re multiplying the product price by the quantity and then multiplying that by 0.1 to get 10% of the overall value.
Gravity Forms product calculation plugins
If you’re looking for a way to do more complex calculations in Gravity Forms, you’ll need to make use of one or more plugins.
There are several plugins that allow you to perform advanced calculations in Gravity Forms. Choosing the right plugin for you depends on your needs. Before we look at some more detailed examples, here is a brief overview of some different plugins that you can use for Gravity Forms Product calculations.
- GravityMath
This powerful add-on for Gravity Forms allows you to perform advanced calculations on your form data using the[gravitymath]shortcode. Using[you can create detailed reports, display the average order value, build frontend calculators, and more.gravitymath]
- Gravity Forms eCommerce Fields
This plugin adds support for a variety of eCommerce-related fields and features. If you’re looking to make Gravity Forms more eCommerce-friendly, Gravity Forms eCommerce Fields is the perfect add-on for you.
- Gravity Forms Conditional Pricing
This add-on by Gravity Wiz allows you to create product pricing tiers based on conditional logic. This is handy if you’re selling variable products like custom-made t-shirts, for example.
Now that we’ve gone over some of the helpful plugins for Gravity Forms product calculations, let’s have a look at some more specific examples with regards to eCommerce functionality in Gravity Forms.
Calculation your average order value
When running an eCommerce store, there are several important metrics to keep track of. One of these is the average order value (AOV). Tracking the average order value over a certain period of time can help you understand your customers’ purchasing behavior.
Using GravityMath, it’s easy to calculate the average order value. First, ensure your product order form contains a “Total” field. Next, add the below shortcode anywhere on your website to display the average order value (being sure to replace the form id and the merge tag).
Average order value: $[gravitymath id="22" scope="form"] {Total Amount:14:avg} [/gravitymath]As you can see, the shortcode contains two important parameters: ‘id’ and ‘scope’.
id– The ID of your form in Gravity Forms.scope– This should be set to “form” as the calculation is being made using form entry data.
Finally, we’re calculating the average order value by using the Total merge tag with the :avg operator. When loading the page/post on the front end, the shortcode will be replaced with the average order value across our eCommere store.
Average order value: $182.00You can use the [gravitymath] shortcode to calculate totals, averages, maximum values, minimum values, and much more!
Pro tipLearn more about performing product calculations in Gravity Forms using the GravityMath shortcode.
Now let’s have a look at how to create detailed eCommerce reports.
Calculating total revenue
Calculating total revenue is a matter of adding up the total order amount for each order that you’ve received. This is easy to do using the [gravitymath] shortcode
Once again, we’ll set the scope to “form” and then we’ll use the “Total Amount” merge tag with the :sum operator. This tells [gravitymath] to add up all the values in the “Total Amount” field across all of our orders.
Total revenue: $[gravitymath id="22" scope="form"] {Total:14:sum} [/gravitymath]As you can see, when we load the page on the front end, the shortcode is replaced by the total revenue amount.
Total revenue: $6,286.00Next, we’ll look at using the filter parameter to calculate metrics based on certain conditions.
Calculating the average order value for a specific date
The [gravitymath] shortcode also accepts a filter parameter, allowing you to restrict calculations to certain entries based on conditions that you set. For example, by filtering on the order date, you could calculate the average order value for a single day.
[gravitymath scope="form" id="22" filter="filter_13=2021-10-20"] {Total Amount:14:avg} [/gravitymath]Now let’s look at how to create eCommerce reports.
Creating eCommerce order reports
If you need a way to export your product order information, check out our add-on, GravityExport. Using GravityExport, you can export your Gravity Forms data to CSV, Excel or PDF and send reports to external storage locations (like Dropbox!).
Displaying reports on the front end using GravityView
We also offer an add-on called GravityView, which allows you to display your Gravity Forms entry data on the front end of your website. This is helpful for creating tables of orders or showcasing other eCommerce data. See our live demos for more examples.
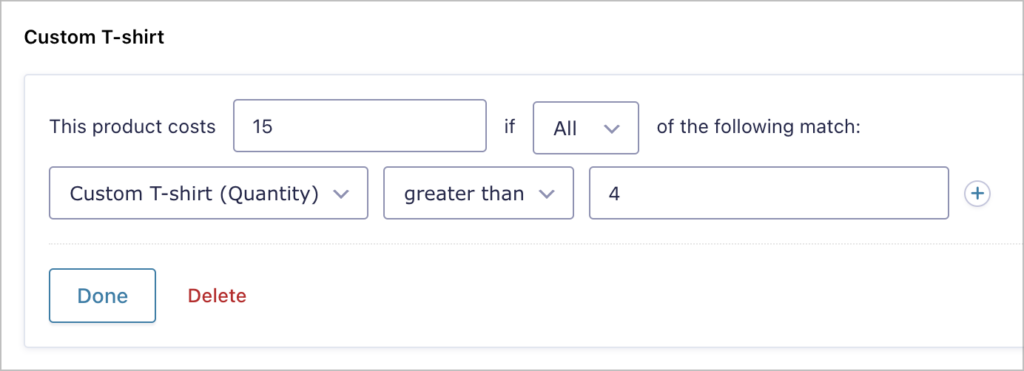
Creating different pricing tiers using conditional logic
Conditional logic enables you to vary your product pricing based on the quantity purchased. For example, let’s say you’re selling custom-made t-shirts. If the user buys one it will cost them $20 but if they decide to buy 5, the price for one t-shirt drops to $15 each, saving them 25%.
To get started with conditional pricing, you’ll need to install the Conditional Pricing perk offered by Gravity Wiz. After activating conditional pricing, head over to your Form Settings and click on the “Conditional Pricing” tab on the left.
Now you can create unlimited pricing tiers based on conditional logic. When you’re done, make sure to click “Save Pricing”.
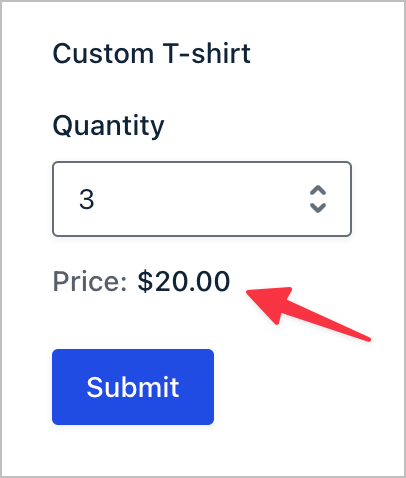
After loading our form on the front end and adding 3 custom t-shirts to our cart, you can see the price remains $20 each.
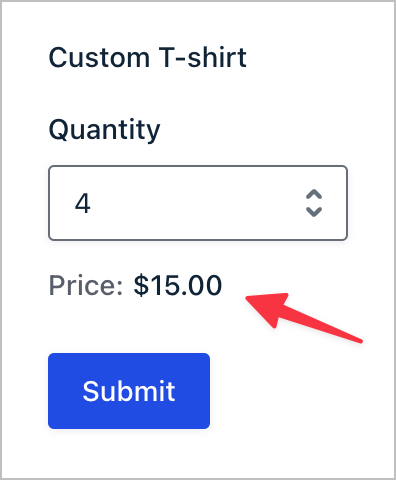
However, as you can see, when we up the quantity to 4, the price drops to $15 per t-shirt!
Now let’s look at what can be accomplished using another Gravity Wiz perk called “eCommerce Fields”.
Adding additional functionality with eCommerce fields
The eCommerce Fields Perk offered by Gravity Wiz adds a bunch of helpful eCommerce features to Gravity Forms including a “Tax”, “Discount”, and “Subtotal” field. and click Install.
After installing the GP eCommerce Fields perk, head back to your form and open up the “Pricing Fields” tab. You’ll see three new fields:
- Subtotal
This field allows you to show a subtotal before shipping or taxes have been applied. This makes it easier for customers to understand their orders.
- Tax
The Tax field allows you to calculate and apply a percentage-based tax to customer orders.
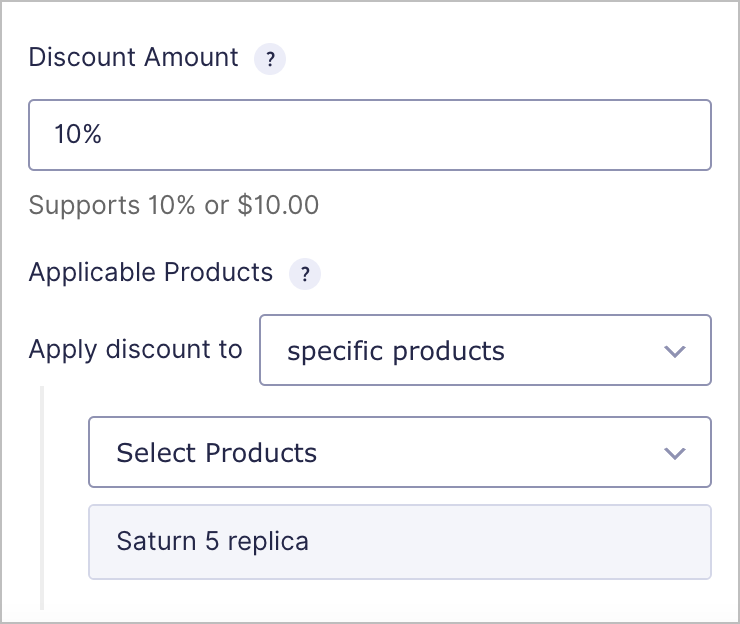
- Discount
This field allows you to add a flat rate or percentage discount to one or more products.
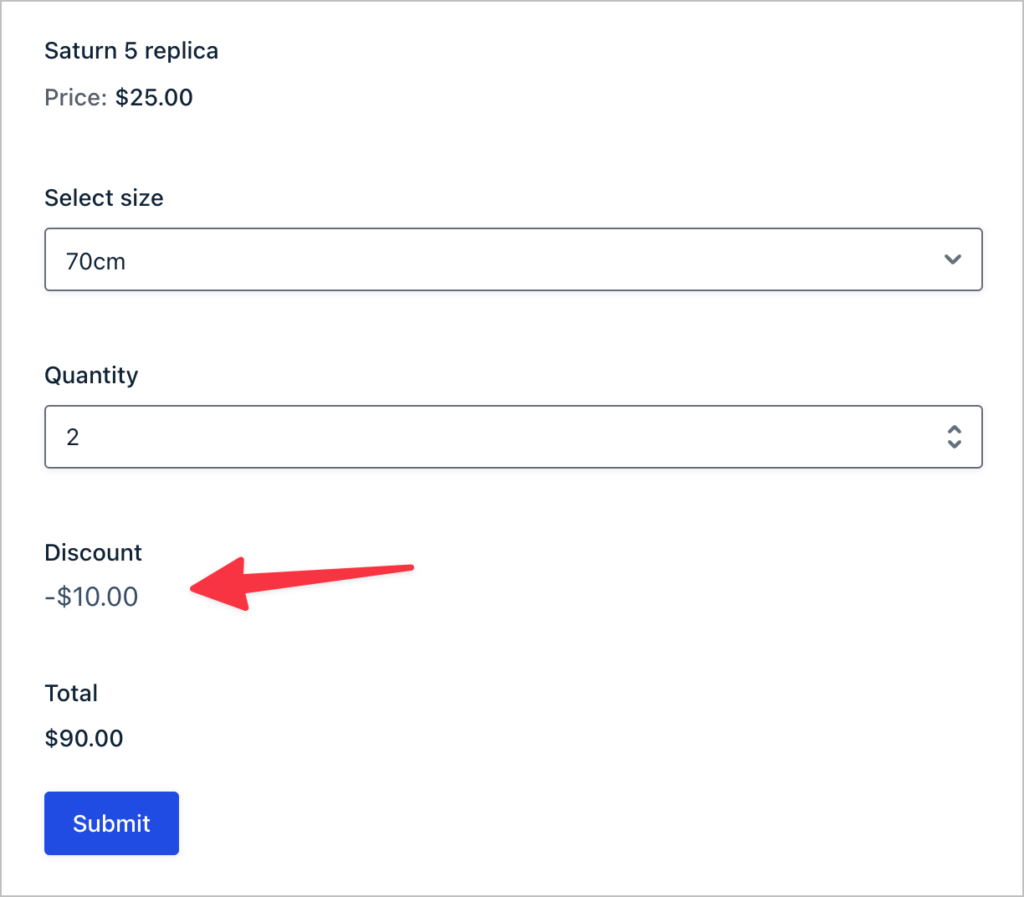
As an example, we’ll add the “Discount” field to our form. This allows us to apply a discount to product orders. We can add the discount as either a flat amount or a percentage.
Here’s how that looks on the front end:
That’s it! You should now have a good grasp of Gravity Forms product calculations and how to create different pricing structures in Gravity Forms!
Gravity Forms product calculations: Final thoughts
Gravity Forms is the most powerful form plugin for WordPress, but it’s also a robust eCommerce tool. Gravity Forms includes several product fields and payment integrations, allowing you to sell products without any hassle.
When running an eCommerce store, it’s important to be able to calculate freight or courier costs, discounts, and tax/VAT. In this post, we showed you several ways to perform product calculations in Gravity Forms. If you enjoyed this post, subscribe to our email list below or learn more about Gravity Forms calculations.

Helpful tips right in your inbox.
Subscribe to get the latest articles, information on releases and helpful Gravity Forms tips!
More articles

GravityKit turns 12: a year in review, and 30% off Lifetime All Access
GravityKit turns 12. A look back at a year of GravityView 3.0, GravitySearch, and AI-assisted building, plus a birthday sale on the Lifetime All Access Pass.

Launch Log: Row headers for screen readers, smarter conditional logic, and multi-View fixes
GravityView 3.1 adds row headers for screen readers, plus smarter conditional logic in GravityCalendar and fixes for DataTables, Maps, and Dynamic Lookup.

Ecommerce platform market share 2026: WooCommerce leads the web, Shopify leads the top tier
Ecommerce platform market share in 2026, from HTTP Archive data. WooCommerce leads the whole web at 6.64%, but Shopify already leads the top 1M sites.
