Published
•
Updated
How to add Gravity Forms to Elementor (complete guide)
Are you among the millions of WordPress users building sites with Elementor? If so, you’ll love how easy it is to integrate Gravity Forms! In this post, I’ll walk you through the two best ways to embed and configure Gravity Forms in Elementor: Plus,...
Are you among the millions of WordPress users building sites with Elementor? If so, you’ll love how easy it is to integrate Gravity Forms!
In this post, I’ll walk you through the two best ways to embed and configure Gravity Forms in Elementor:
- Using the free Gravity Forms Widget for Elementor plugin
- Using the Gravity Forms shortcode
Plus, I show you how to style your forms, explain why Gravity Forms may be a better choice than the Elementor Form widget, and more.
Let’s get started!
TL;DR: Gravity Forms in Elementor
If you’re building a WordPress site with Elementor and need a serious form plugin, Gravity Forms is the most flexible option. Here’s the fastest path to getting it embedded:
- Elementor Pro includes a built-in Form widget, but it’s tied to Elementor and lacks Gravity Forms’ depth in payments, conditional logic, and add-on ecosystem.
- The simplest way to embed a Gravity Form in Elementor is the free Gravity Forms Widget for Elementor add-on by GravityKit. Drag, drop, pick a form, done.
- Without the add-on, you can paste the Gravity Forms shortcode into an Elementor Shortcode widget. This works, but you lose the visual settings panel.
- For deeper styling, pair the widget with a styling plugin or a GravityKit add-on like GravityView for front-end entry displays.
What is Elementor?
Elementor is one of the most popular visual page builders for WordPress, offering a user-friendly, drag-and-drop experience making it easy to design custom websites without code. Elementor competes with the likes of Beaver Builder, Visual Composer, and the Divi Builder.
Using Elementor you can build new web pages quickly and efficiently. The basic version of Elementor is available for free on WordPress.org. There is also a Pro version with additional features available on the Elementor website.
Why use Gravity Forms with Elementor?
While Elementor enables you to build professional web pages using drag-and-drop, Gravity Forms offers a visual form builder with advanced features and robust data management capabilities. These no-code tools are a match made in heaven! Combining both Elementor and Gravity Forms on your website unlocks a wealth of possibilities.
Method 1: Embedding your form using the Gravity Forms Widget for Elementor
In Elementor, “widgets” are the basic elements that make up a page. Elementor includes several widgets that enable you to add different visual components and functionality to your pages and posts. This includes image galleries, icons, text fields, Google Maps blocks, and much more.
Although Elementor does not include a “Gravity Forms” widget, it’s easy to add one with the help our FREE Gravity Forms Widget for Elementor add-on. You can download it directly from our site!
After installing and activating the plugin, you’ll have access to a new “Gravity Forms” widget that you can use to embed and configure your Gravity Forms directly inside the Elementor builder.

After installing and activating the Gravity Forms Widget for Elementor add-on, you’ll need to create a new form.
Creating a new form in Gravity Forms
If you already have a form set up, you can skip this step!
To create a new form, hover over “Forms” in your WordPress sidebar menu and click “New Form”. After giving your form a name, you can start adding fields using the Gravity Forms visual editor.
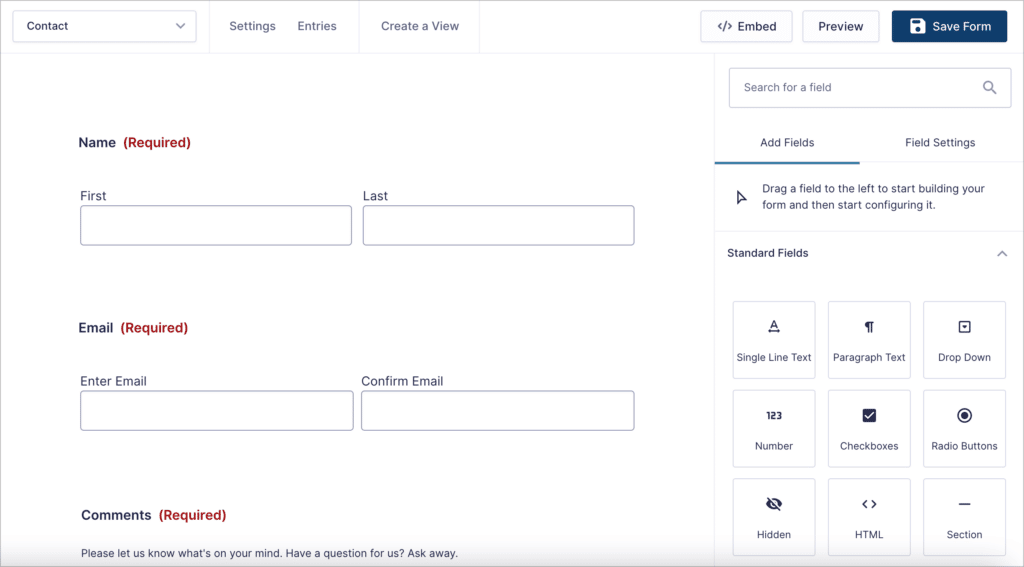
In this example, we’ll create a basic contact form with the following fields:
- Name (“Name” field)
- Email (“Email” field)
- Comments (“Paragraph Text” field)
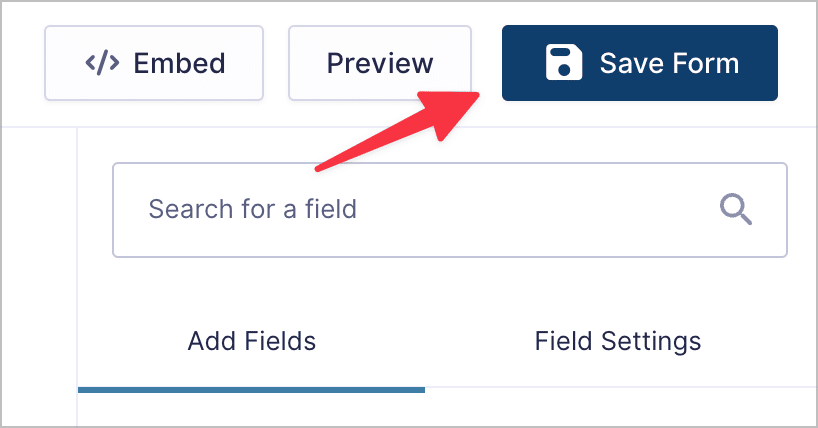
When you’re done building your form, click the “Save Form” button in the top right corner.
Embedding your form in Elementor
Now that you’ve created a new form, you can use the Gravity Forms Widget for Elementor to add it to a page or post on your website!
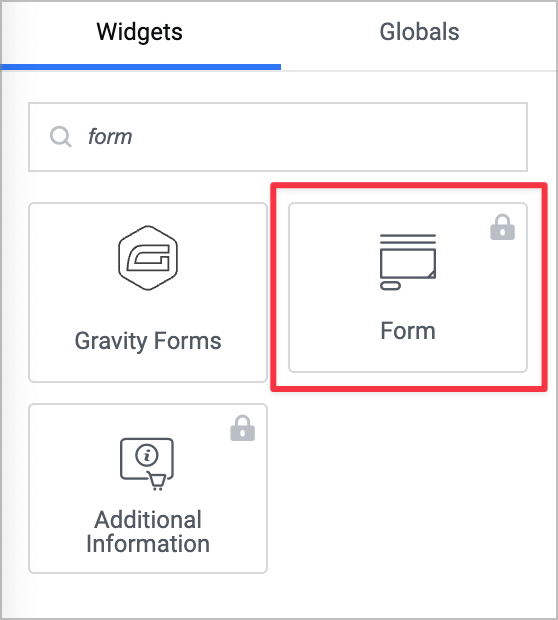
Launch the Elementor builder by editing an existing page or creating a new one. Now, under “Widgets” at the top left, search for “Gravity Forms”.
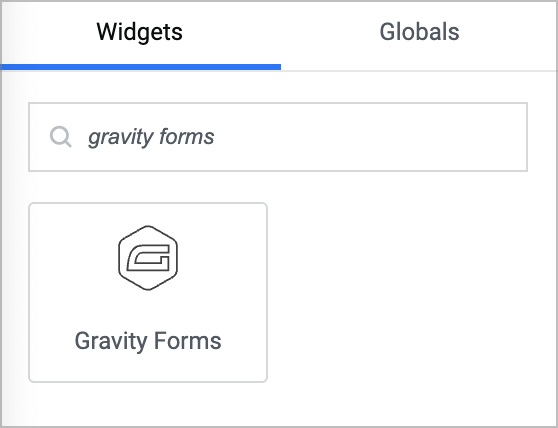
To add the widget to your page layout, simply drag and drop it onto your page.
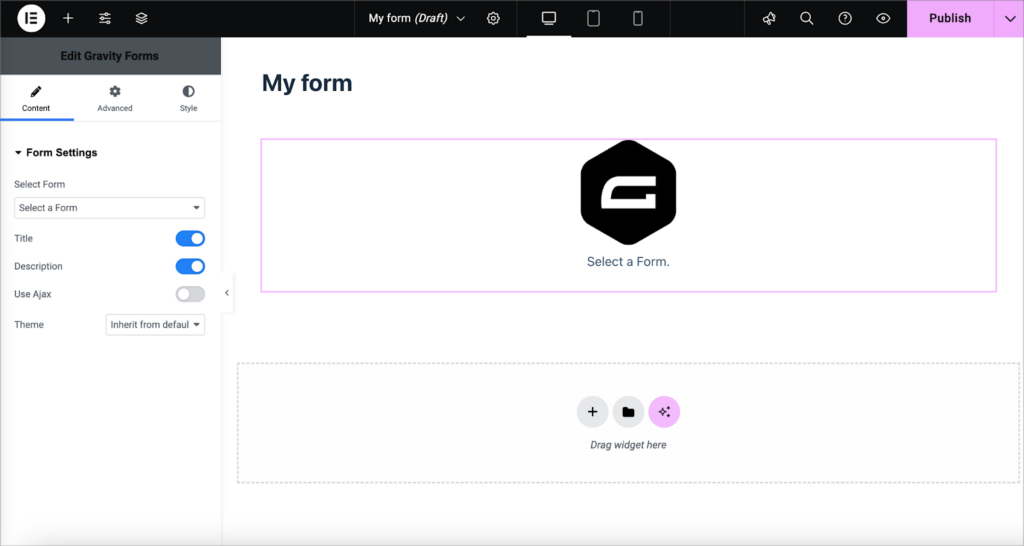
After that, select the form you want to embed from the dropdown field in the widget settings. After selecting a form, you will see a live preview of it inside the editor. This preview will update as you configure your form, so you can see exactly what it will look like before publishing your page!
Underneath the “Select Form” dropdown, you’ll see options for configuring important aspects of your form:
- Title: Show or hide the form title.
- Description: Show or hide the form description.
- Use Ajax: Enable Ajax submit, allowing forms to be submitted without a page refresh.
- Theme: Select a Gravity Forms theme to alter the default form styles.

When you’re done, click on the “Advanced” tab to configure additional options.
Here you’ll see an input box labeled “Field Values”. This enables you to prepopulate form fields where dynamic population has been enabled. To learn more about this, read our ultimate guide to dynamic field population in Gravity Forms.
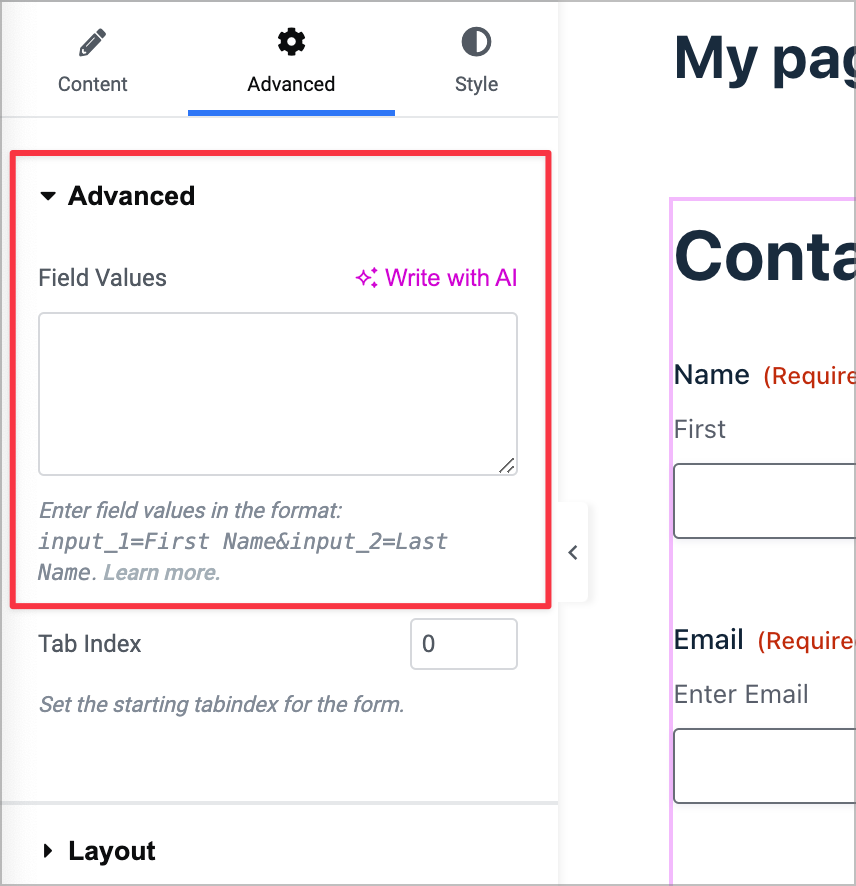
Below that, you’ll find some additional Elementor settings that you can configure, including responsive controls!
Adding basic form styles
The Gravity Forms Widget for Elementor also enables you to utilize basic styles to change the look and feel of the form widget. Simply click on the “Style” tab to bring up the styling options.
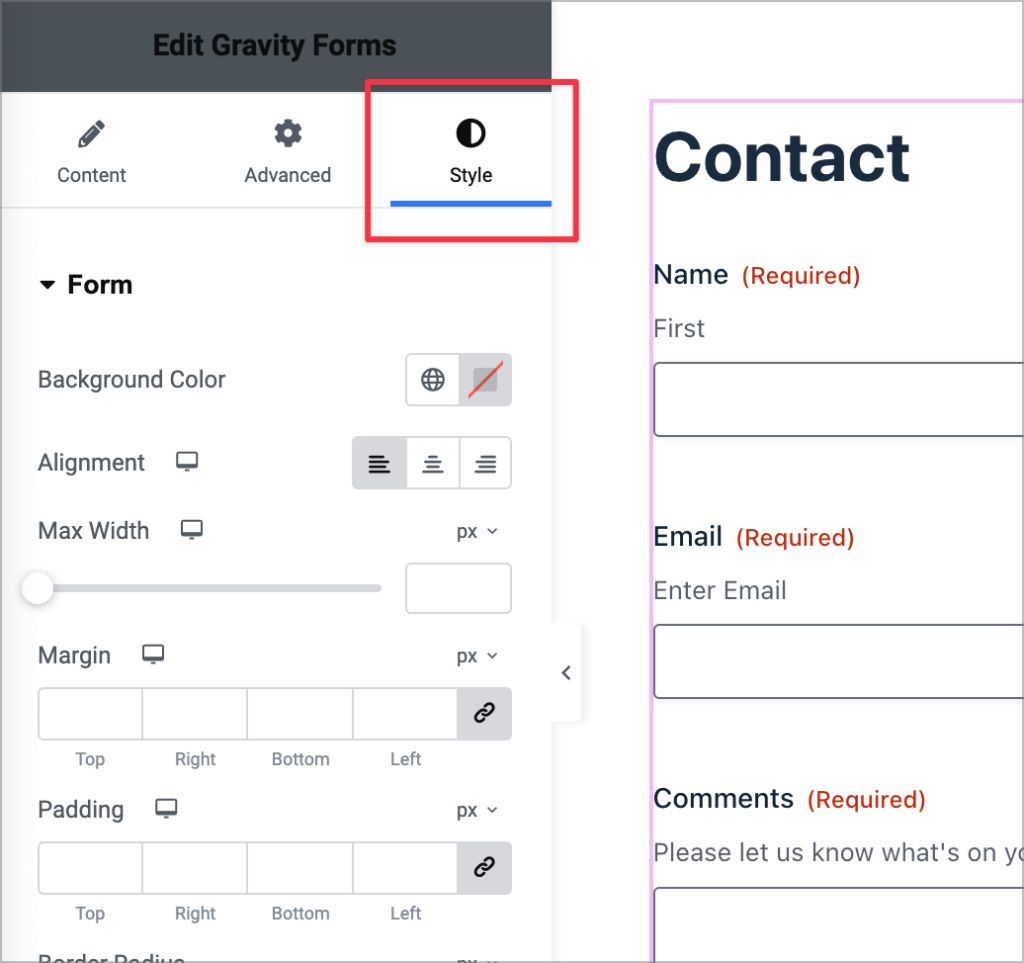
Here you’ll see several options for modifying the look and feel of your form. Here are the styling options that are currently available:
- Background Color: Set the fill color behind the form.
- Alignment: Adjust the horizontal position of the form on the page.
- Max Width: Limit the maximum width of the form container.
- Margin: Control the outer spacing around the form.
- Padding: Define the inner space within the form container.
- Border Radius: Round the edges of the form’s border.
- Border Type: Choose a border style, such as solid, dotted, or dashed.
- Box Shadow: Add shadow effects to create depth around the form.
When you’re finished styling your form, click “Publish” to save your changes. As you can see, it’s easy to embed, configure and style your Gravity Forms using the free Gravity Forms Widget for Elementor!
Method 2: Embedding a Gravity Form in Elementor using a shortcode
If you want to add a Gravity Form to Elementor without installing a third-party plugin, you can do so using a shortcode.
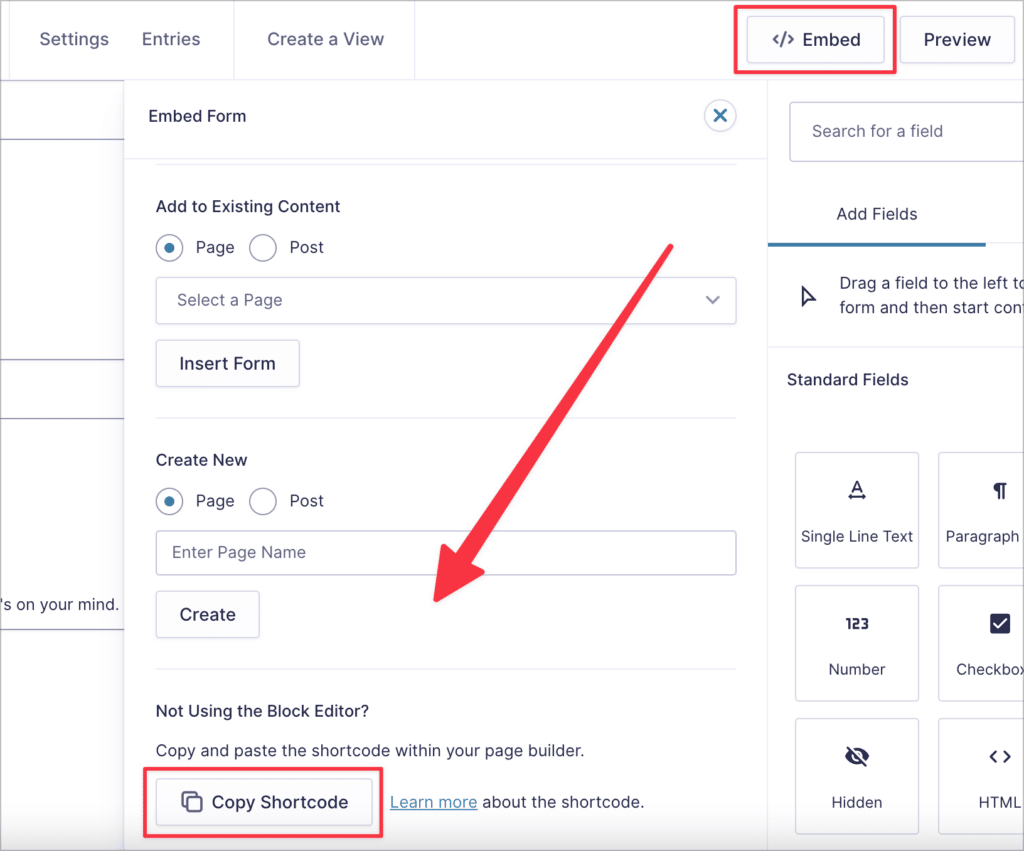
All you need to do is copy the Gravity Forms embed shortcode for your form, and paste it into an Elementor “Shortcode” widget.
You can find the embed shortcode by clicking the “Embed” button inside the form editor. This will open a new fly-out menu. Next, scroll down to the bottom and click “Copy Shortcode”.
Alternatively, you can manually construct the shortcode for your form using your form ID. To find this, hover over “Forms” and click “Forms”. You’ll see the ID of your form in the column to the right.
A basic Gravity Forms shortcode includes the following parameters:
id– The ID of the form you want to embed (required).title– Show or hide the form title (either ‘true’ or ‘false’).description– Show or hide the form description (either ‘true’ or ‘false’).ajax– Enable or disable AJAX when submitting the form (either ‘true’ or ‘false’).
Here’s an example of what a completed shortcode looks like:
[[gravityform id="9" title="true" description="true" ajax="true"]]The next step is to copy and paste your shortcode into an Elementor Shortcode widget.
Create a new page or edit an existing page with Elementor. Next, search for “Shortcode” in the search bar at the top and drag and drop a Shortcode widget onto your page.

Next, paste your Gravity Forms shortcode into the text box in the widget settings. You should now see a preview of your form load in the visual editor.
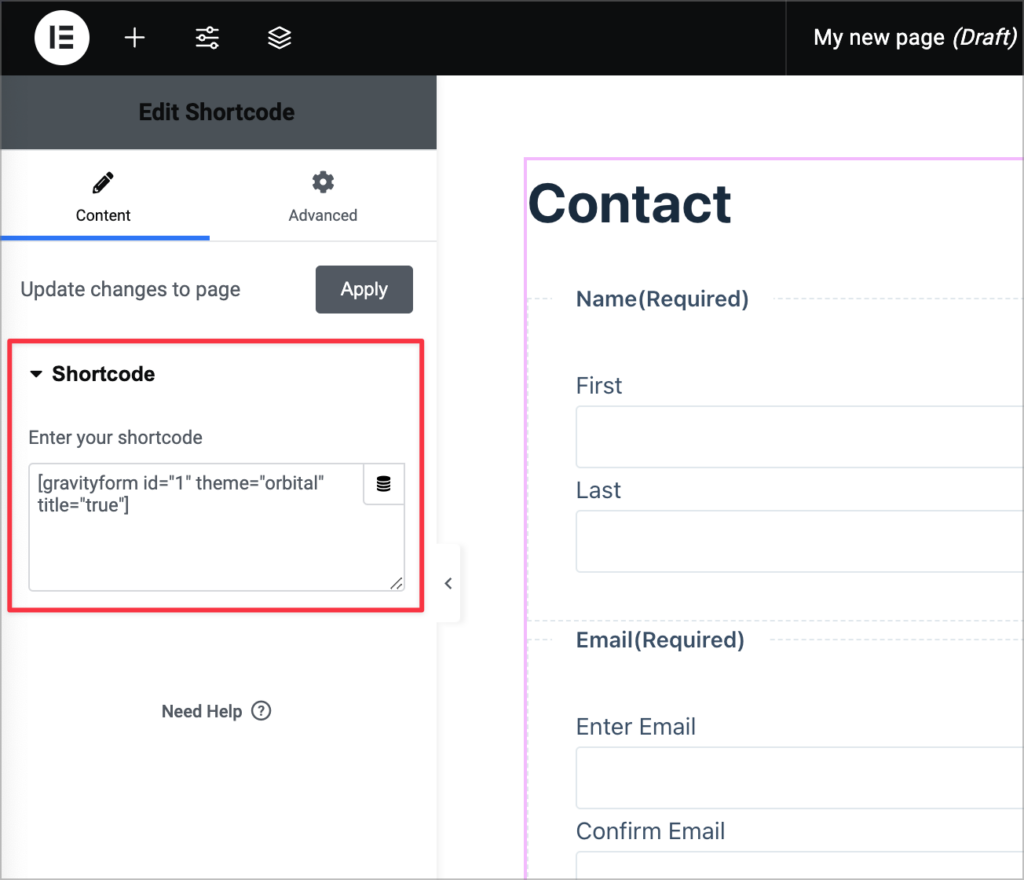
It’s important to note that if you add your form to Elementor using a shortcode, you won’t be able to style it from inside the Elementor editor! Instead, you’ll have to write your own, custom CSS code.
Pro tipLearn more about embedding Gravity Forms in WordPress pages and posts.
Styling Gravity Forms in Elementor
While the Gravity Forms Widget for Elementor enables you to add basic styles to your forms, it doesn’t give you complete control over all your form elements.
However, there are other third-party plugins available that include more advanced Gravity Forms stylers for Elementor. For example you can try PowerPack or Ultimate Add-Ons (may require a paid subscription).
Comparison: Elementor Forms vs Gravity Forms
Elementor Pro (paid subscription required) includes a Form widget, allowing you to create forms from inside the Elementor builder.
Both Gravity Forms and Elementor forms include a range of different field types, such as file uploads, date fields, and other standard and advanced field types you might expect a form to have. They also both support multi-step forms, allowing you to split up long forms into individual steps.
However, there’s a reason that Gravity Forms is the most popular form plugin for WordPress. In Gravity Forms, you can perform calculations, use conditional logic, manage your entries, integrate your forms with hundreds of third-party platforms and applications, and take advantage of the powerful ecosystem of Certified Developer add-ons.
See the comparison table below for a brief overview of the similarities and differences between Gravity Forms and the Elementor Form widget.
| Feature | Gravity Forms | Elementor Forms |
| Standalone WordPress plugin | ✅ | Part of the Elementor builder. |
| Email marketing integrations | ✅ | ✅ |
| CRM integrations | ✅ | ✅ |
| Dynamic field population | ✅ | ❌ |
| Drag-and-drop builder | ✅ | ✅ |
| Embed forms using a shortcode | ✅ | ❌ |
| Highly extensible (hooks, filters, and API options) | ✅ | Limited. |
| Payment integrations | ✅ | ❌ |

Pro Tip
Want to dive deeper? Read our in-depth comparison: Gravity Forms vs Elementor Forms.
Which form is best for Elementor?
In the end, it depends on your specific needs. If your site is built with Elementor and you only need a basic contact form, then the Elementor form widget is the obvious choice. However, if you’re looking for a more comprehensive form management solution that offers flexibility outside the Elementor builder, Gravity Forms is the better option.
Gravity Forms Elementor integration: Final thoughts
Elementor is one of the most popular visual page builders for WordPress. Although Elementor doesn’t integrate directly with Gravity Forms, you can use the free Gravity Forms Widget for Elementor to add a Gravity Forms Elementor widget to your website.
The widget also gives you the ability to update the form theme and add basic styles from inside the the Elementor builder. This means you can create beautiful forms without having to write a single line of code!
If you don’t want to add another plugin to your website, you can embed your Gravity Forms inside Elementor using a shortcode. This is easy to do using the “Shortcode” widget.
Pro Tip
To learn more about how Gravity Forms works with different plugins, read How to use Gravity Forms: The ultimate guide.
Frequently asked questions
No. The free Gravity Forms Widget for Elementor works with both the free version of Elementor and Elementor Pro. You only need Gravity Forms (any license) and Elementor active on the same WordPress site.
Elementor Pro’s Form widget covers basic contact, lead, and registration use cases. Gravity Forms is a standalone WordPress plugin with payment fields, conditional logic, repeaters, partial entries, hundreds of integrations, and an extensive add-on ecosystem. If you need anything beyond simple lead capture, Gravity Forms is the deeper toolkit.
The free Gravity Forms Widget for Elementor exposes Elementor’s container-level style controls (background, padding, alignment, border) but does not currently expose per-field controls inside Elementor. For per-field styling you can apply a Gravity Forms theme inside the widget settings, write custom CSS, or use a dedicated Gravity Forms styling add-on.
Yes. Drop an Elementor Shortcode widget on the page and paste a Gravity Forms shortcode such as [gravityform id="1" title="true" description="true" ajax="true"]. You won’t get the widget’s settings panel, but the form will render. The GravityKit widget exists so you don’t have to manage shortcodes by hand.
Yes, with GravityView. GravityView is a separate GravityKit add-on that builds front-end displays, directories, tables, and dashboards from Gravity Forms entries. Its Advanced Elementor Widget gives you full visual styling control over those displays inside Elementor.

Helpful tips right in your inbox.
Subscribe to get the latest articles, information on releases and helpful Gravity Forms tips!
More articles

Launch Log: Edit Entry title customization, conditional logic hotfixes across the suite
A meaningful Save feed enhancement in GravityExport, new Edit Entry and Search Bar options in GravityView, plus coordinated hotfixes that restore conditional logic controls across GravityBoard, GravityCalendar, GravityCharts, and the Advanced Filter Extension.
GravityImport vs GravityMigrate: which add-on do you actually need?
Confused between GravityImport and GravityMigrate? GravityImport handles CSVs into entries; GravityMigrate moves entire Gravity Forms setups between sites.

GravityView 3.0 beta is here: what’s changing and how to try it
GravityView 3.0 is a structural rewrite. Here’s what’s new, how to opt in to the beta, and what to test to help us get it over the line.