Published
•
Updated
Essential Gravity Forms shortcodes: Save time and enhance your forms
Master Gravity Forms shortcodes to embed forms, add conditional content, display user data, and build login forms without code. Complete reference guide with examples for every action.

I dive deep into Gravity Forms shortcodes, showing you how to use them effectively on your website. Whether you want to display forms dynamically, pre-fill fields, or customize form behavior without touching a single line of code, shortcodes make it easy.
Gravity Forms shortcodes may seem confusing at first, but once you start playing with them, you’ll realize how intuitive and simple they are to use.
Let’s get started!
Key takeaways
- Gravity Forms exposes one shortcode tag,
[gravityform](with[gravityforms]as an alias), and supports five documented actions: the default embed plusconditional,login,user, andpolls. - The default action embeds a form anywhere shortcodes work; the
actionattribute switches the same shortcode into conditional content, login forms, user meta output, or polls. - The
loginanduseractions require the Gravity Forms User Registration add-on; thepollsaction requires the Polls add-on. - We verified this reference against the current Gravity Forms 2.x release in April 2026.
What this covers and does not cover
What this covers: native Gravity Forms shortcodes only. That means the [gravityform] tag (and its [gravityforms] alias) plus the actions Gravity Forms ships with: embed, conditional, login, user, and polls. The login and user actions are added by the User Registration add-on, and the polls action is added by the Polls add-on. Both are first-party Gravity Forms add-ons by Rocketgenius.
What this does not cover: GravityView shortcodes such as [gravityview], [gventry], and [gv_logic]. Those are part of GravityKit’s GravityView plugin, not Gravity Forms itself, and are documented in the GravityView shortcode documentation. If you came here looking for the GravityView shortcodes, that is the right place to start.
What is a WordPress shortcode?
Shortcodes in WordPress allow you to do awesome things without having to write custom code! With shortcodes, you can embed interactive content, create attractive page layouts, and much more.
Shortcodes are text strings enclosed in square brackets, like this: [shortcode].
WordPress Core ships with a range of preset shortcodes that you can take advantage of to improve the way you build websites. Certain plugins also add shortcodes to WordPress, including Gravity Forms!
Canonical Gravity Forms shortcode reference
Every native Gravity Forms shortcode in one place. GravityKit verified each shortcode, parameter, and allowed value against the official Gravity Forms documentation in April 2026. The login, user, and polls actions are provided by first-party Gravity Forms add-ons (User Registration and Polls). GravityView shortcodes are not part of this reference; see the “What this covers and does not cover” section above.
| Shortcode | Parameters | Allowed values | Code example | Description |
|---|---|---|---|---|
[gravityform](alias [gravityforms]) | id (required), title, description, ajax, tabindex, field_values, theme, styles | id: integer form ID. title, description: true or false (default true). ajax: true or false (default false). tabindex: integer (default 0). field_values: param=value pairs separated by ampersands. theme: orbital or gravity. styles: JSON-encoded style configuration. | [gravityform id="1" title="false" ajax="true" theme="orbital"] | Embeds the specified form into any page, post, or widget area. This is the default behavior when no action attribute is set. |
[gravityforms action="conditional"] | action, merge_tag, condition, value (all required) | action: must be conditional. merge_tag: any form field merge tag, e.g. {Number:1}. condition: is, isnot, greater_than, less_than, contains, starts_with, ends_with. value: any string the merge tag is compared against. | [gravityforms action="conditional" merge_tag="{Number:1}" condition="greater_than" value="3"]Content shown when condition is met[/gravityforms] | Shows or hides wrapped content inside confirmations and notifications based on the user’s submission. Nested conditional shortcodes are not supported. |
[gravityform action="login"] (requires User Registration add-on) | title, description, logged_in_avatar, logged_in_message, login_redirect, logout_redirect, registration_link_display, registration_link_text, forgot_password_display, forgot_password_text, tabindex | title (default true), description (default false), logged_in_avatar (default true), registration_link_display (default true), forgot_password_display (default true): true or false. logged_in_message: any string. login_redirect, logout_redirect: absolute or relative URL. registration_link_text (default Register), forgot_password_text (default Forgot Password): any string. tabindex: integer. | [gravityform action="login" login_redirect="/dashboard" registration_link_text="Create account"] | Renders a Gravity Forms login form on the front end. Available when the User Registration add-on is active. |
[gravityforms action="user"] (requires User Registration add-on) | id, key (required), output | id: integer user ID; defaults to the currently logged-in user. key: any WordPress user meta key, e.g. nickname, username. output: raw, csv, or list. | [gravityforms action="user" key="nickname" output="list"] | Outputs WordPress user meta for the specified or current user. All output is escaped via esc_html(). Available when the User Registration add-on is active. |
[gravityform action="polls"] (requires Polls add-on) | id (required), field, mode, title, description, confirmation, style, cookie, show_results_link, display_results, ajax, percentages, counts, tabindex | id: integer form ID. field: comma-separated field IDs. mode: poll or results (default poll). title, description, confirmation, show_results_link, display_results, ajax, percentages, counts: true or false. style: red, green, orange, or blue (default green). cookie: 1 day, 1 week, 1 month, or a YYYY-MM-DD date. tabindex: integer. | [gravityform action="polls" id="2" mode="poll" style="green" cookie="1 month"] | Renders the form as a poll, or shows the poll’s current results. Available when the Polls add-on is active. |
1. The Gravity Forms embed shortcode
First up is the most important shortcode for Gravity Forms—the embed shortcode.
You can use the embed shortcode to:
- Embed Gravity Forms anywhere on your site (including pages, posts, and sidebar widgets)
- Show or hide the title and description of a form
- Enable or disable AJAX
- Pre-populate form fields with specific values
Here’s a simple example of a Gravity Forms embed shortcode:
[gravityform id="7" title="false" description="false" ajax="true"]Let’s explore the shortcode in more detail.
Where to find your form’s shortcode?
To find the shortcode for any form in Gravity Forms, all you need to do is edit your form, click on “</> Embed” in the top right and then click the button that says “Copy Shortcode”.
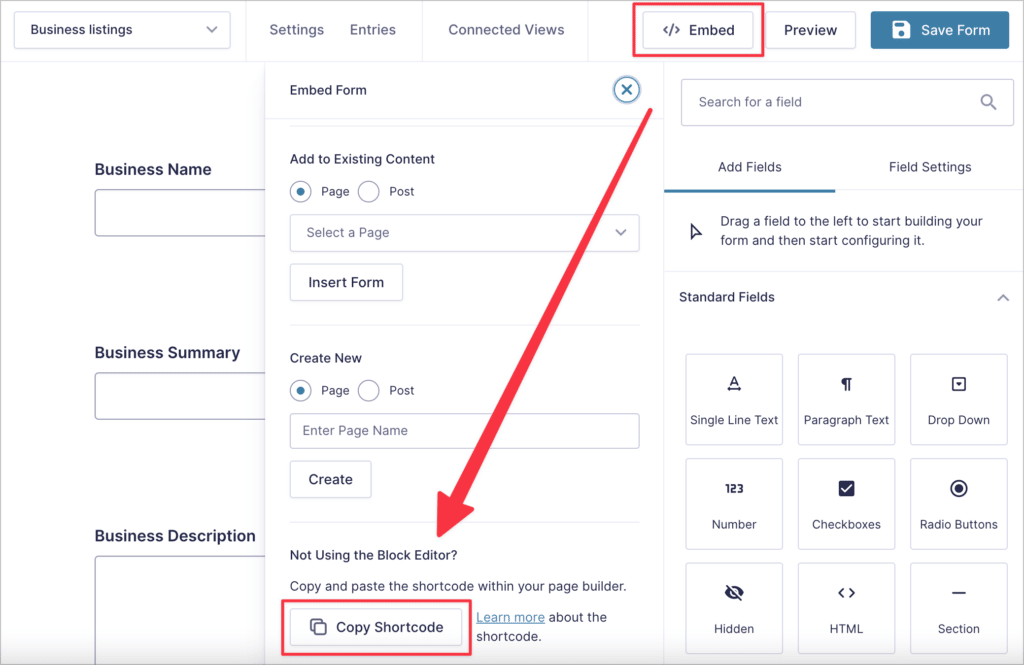
You can now paste the shortcode anywhere on your website where you want your form to appear. You can also construct the shortcode manually: All you need is the form ID!
Gravity Forms shortcode parameters
The Gravity Forms embed shortcode supports the following 7 parameters: id, title, description, ajax, tabindex, field_values, and theme.
Okay, let’s break them down, one by one:
id– The id parameter refers to the ID of the form you want to embed. It’s the most important parameter and it’s the only one that’s required. The rest are optional.title– Either true or false. If true, the title will be displayed, if false, it will be hidden.description– Either true or false. If true, the description will be displayed, if false, it will be hidden.ajax– Either true or false. If true, the form will use AJAX submit, if false it will require a page-load to process submissions.tabindex– Takes a number, such as 11, and uses this as the starting tab index for the form.field_values– Allows you to dynamically populate fields with preset values. This is helpful if you’re using the same form on multiple parts of your website and need to include a custom value based on which page the form is displayed on. This is explained in-depth below.theme– Allows to to specify a form theme to change the styles of your form. Useorbitalfor the Orbital theme andgravityfor the Gravity Forms 2.5 theme. You can learn more about form themes here.
If you’re feeling confused, don’t worry! We’ll go over some helpful examples below.
Helpful shortcode examples
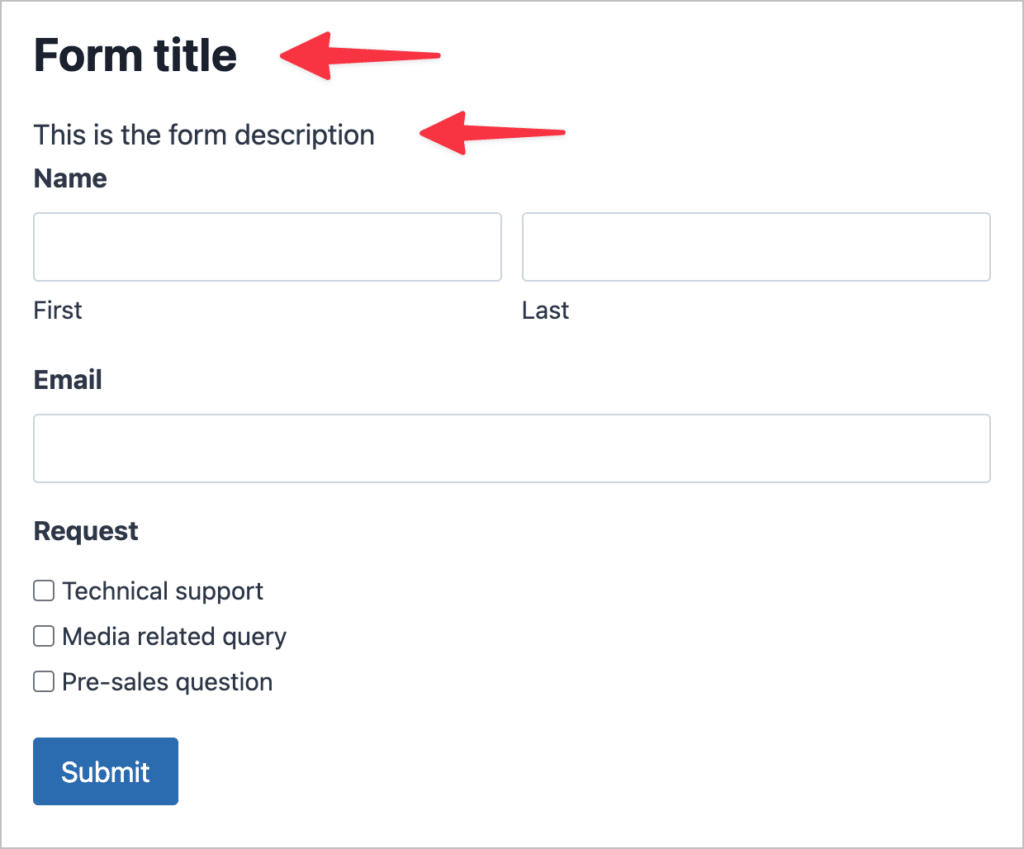
Here’s a simple shortcode example where the title and description parameters are set to “true”. This ensures that both the title and description are visible on the page.
[gravityforms id="21" title="true" description="true"]And here’s what our form looks like on the front end:
Populating fields dynamically using the shortcode
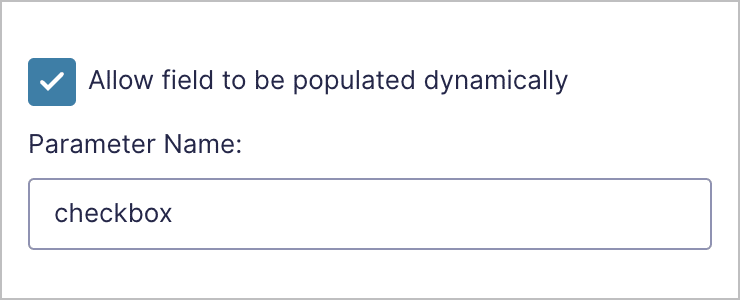
The field_values parameter allows you to dynamically populate form fields. In this example, our form contains a checkbox field with three options and we want to auto-select the first option when the user loads the page.
For the field_values parameter to work correctly we first need to enable dynamic population on the form field that we’re targeting. To do this, we’ll click on the field inside the Gravity Forms editor, open the “Advanced” settings tab and check the box that says “Allow field to be populated dynamically”.
Next, we’ll enter a parameter name in the box. This is how we’ll reference the field when constructing our shortcode.
Okay, done! Now we can write our shortcode. Here’s what it looks like:
[gravityforms id="21" field_values="checkbox=Technical support"]And here’s what our form looks like on the front end.
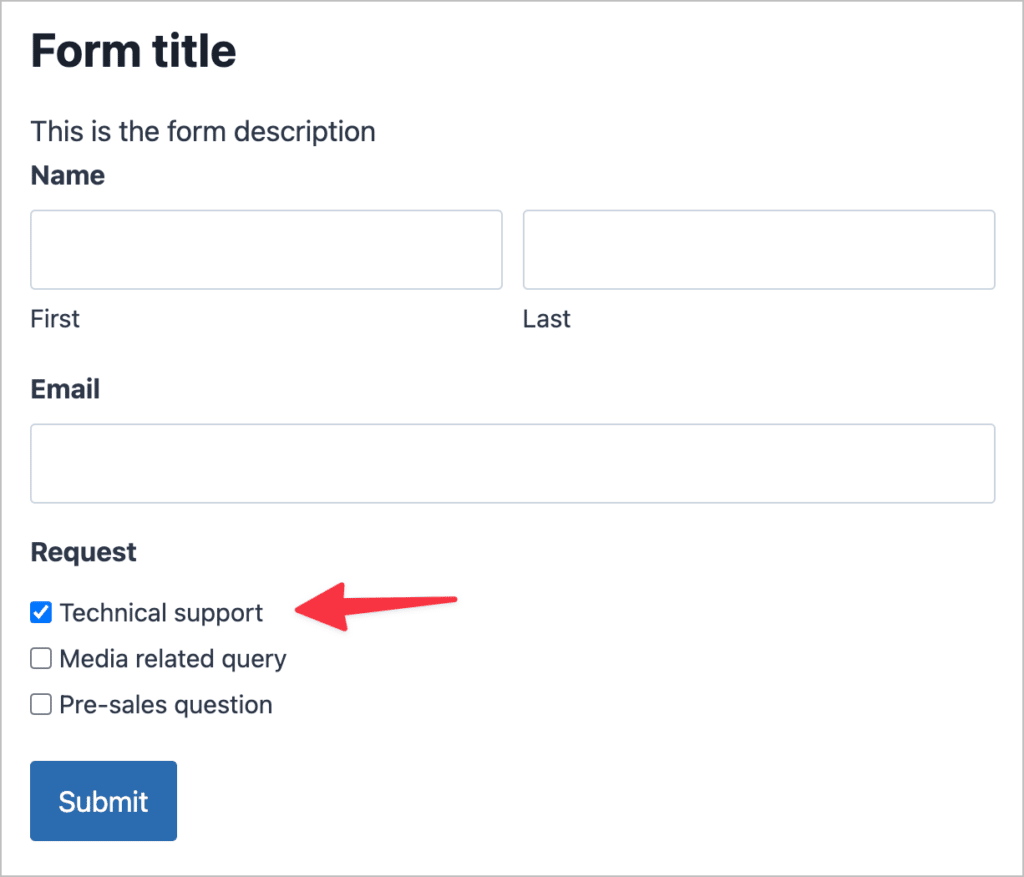
As you can see, when the user opens the page containing our form, the “Technical support” checkbox is already checked. Let’s have a look at the field_values parameter in a little more detail.
field_values="checkbox=Technical support"After field_values= you need to specify the parameter name and then the value you want to populate it with. In the above example, we’re passing the value of the first checkbox option.
Now, let’s look at another example involving a text field.
In this case, we’ve got a Single Line Text field and we’ve given it the parameter name event_name. We can now use the field_values shortcode parameter to dynamically populate the field with the correct event name.
[gravityforms id="36" field_values="event_name=5K Charity Run"]
As you can see, the “Event Name” field is automatically populated with the value we specified in our shortcode! If you want to dynamically populate multiple fields at once, simply separate them with an ampersand (“&”).
Pro tipTo learn more, read our ultimate guide to dynamic field population in Gravity Forms!
Chaining forms together using shortcodes
Did you know that you can chain multiple forms together by placing the shortcode of the second form inside the confirmation message of first? In this way, the second form will display oncethe first form has been submitted. Additionally, data from the first form can be carried over to the second using dynamic population!
This may be helpful for a two-stage application process where you require the user to fill out two separate forms in sequential order.
When to use the Gravity Forms embed shortcode
- Your page builder doesn’t have a Gravity Forms integration and you need to add a form to your post or page
- You want to add a form to your sidebar
- You want to use the dynamic field population functionality
That’s it for the embed shortcode, let’s have a look at the Gravity Forms conditional shortcode.
2. The Gravity Forms conditional shortcode
Next up is the Gravity Forms conditional shortcode, which allows you to show or hide content based on conditions that you set. The shortcode is helpful for customizing messages based on user responses. You can use the conditional shortcode inside confirmation messages, or email notifications!
The conditional shortcode looks like this:
[gravityforms action="conditional" merge_tag="" condition="" value=""]
The content you want to show/hide based on a condition.
[/gravityforms]
Conditional shortcode parameters
The conditional shortcode accepts the following four parameters: action, merge_tag, condition, and value.
Unlike the embed shortcode, all four of these parameters are required for the conditional shortcode to work. So what do they all mean? Let’s examine each of them in more detail.
action– Describes the action to be taken and should always be set to “conditional”.merge_tag– The merge tag of the field whose value you’re assessing in your conditional logic statement.condition– The condition you’re evaluating. Accepted values include: is, isnot, greater_than, less_than, contains, starts_with, ends_with.value– The value you’re comparing against for the condition to be met.
The conditional shortcode may seem a little more difficult to understand than the embed shortcode, but once you start playing around with it, you’ll see that it’s simple to master. Let’s have a look at some helpful examples.
Gravity Forms conditional shortcode examples
In this example, we have a form asking the user to choose their favorite color. There are three options; “Blue”, “Green” and “Yellow”. Let’s suppose we want to show a customized confirmation message if the user chooses “Green” as their favorite color.
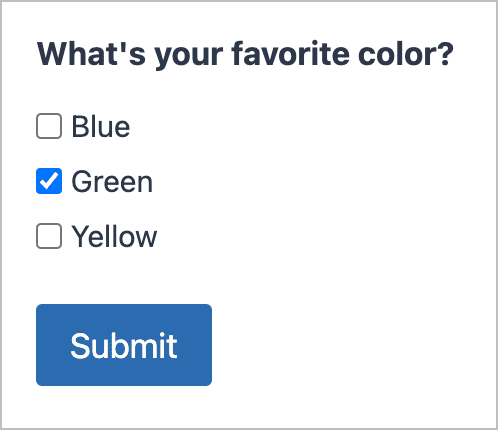
We can do this by constructing a conditional shortcode to check if the value of the checkbox field is “Green”, and if it is, display a custom message.
[gravityforms action="conditional" merge_tag={What's Your Favorite Color?:5} condition="is" value="Green"]
You chose green!
[/gravityforms]
Here’s what it looks like inside the confirmation message:
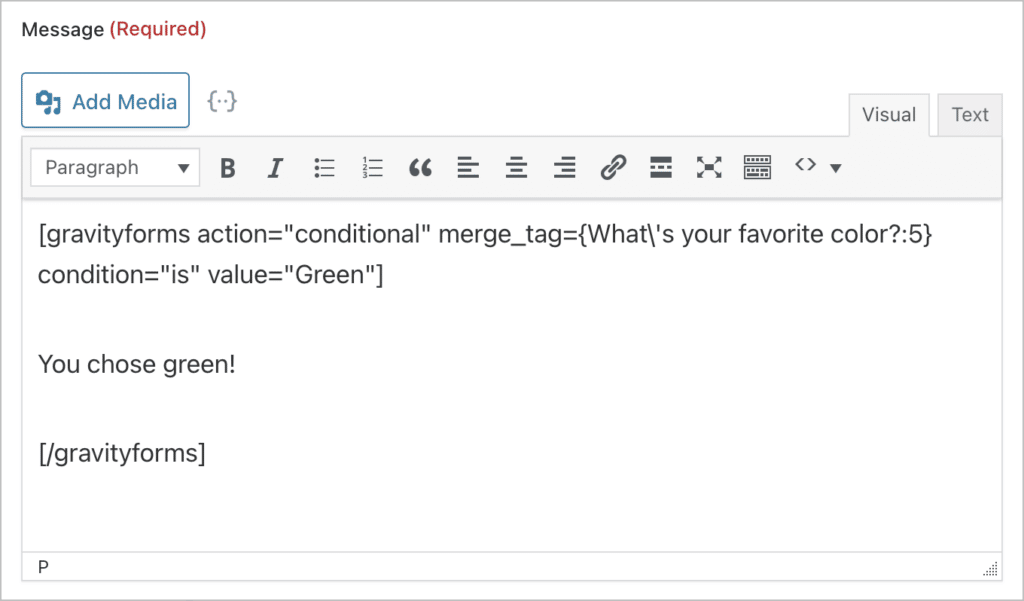
If the user chooses green and submits the form, they will see a message saying, “You chose green!”. Remember, the content that you want to show/hide should be placed between the opening and closing shortcodes.
We can extend this example to account for other choices as well by adding another shortcode after the first one, like so:
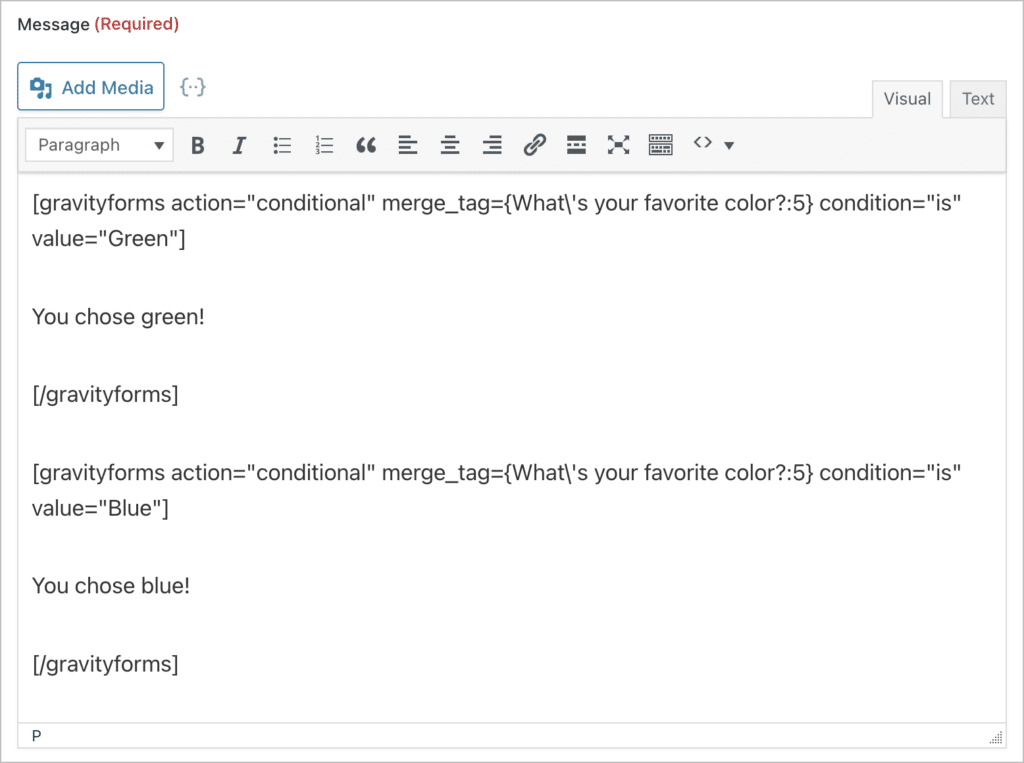
Now when a user chooses the color blue, they’ll see a message saying “You chose blue!”
When to use the Gravity Forms conditional shortcode
- You want to display a custom confirmation message based on user-submitted content.
- You want to send a custom notification (to an admin or user) based on information included in the user’s submission.
Pro tipTo learn more, check out our ultimate guide to the Gravity Forms conditional shortcode.
3. The Gravity Forms login form shortcode
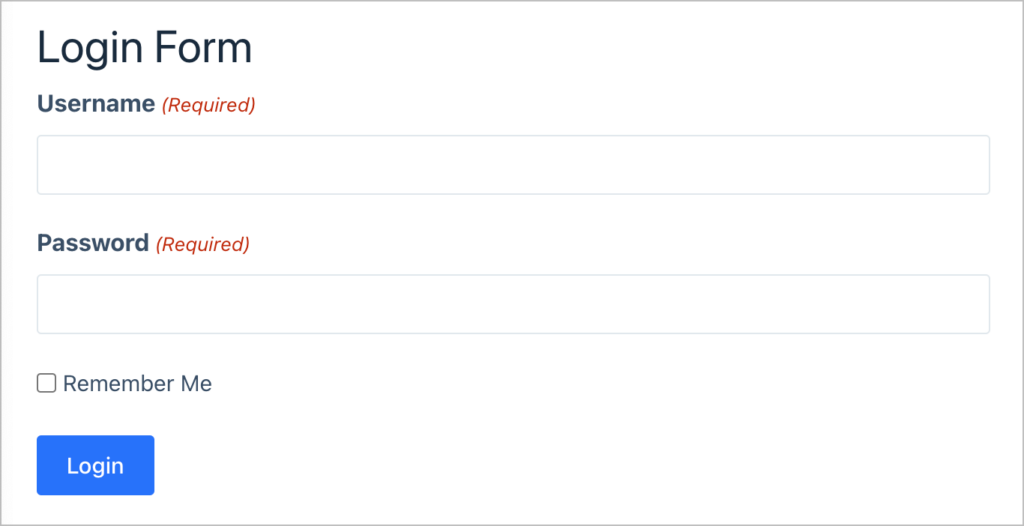
With the Gravity Forms User Registration add-on, you can handle WordPress user registration and login directly through Gravity Forms! This add-on also supports a shortcode “action” that enables you to embed a login form on your site.
[gravityform action="login" description="false" logged_in_message="You are not logged in"/]There is no need to create a new form, all you need to do is constuct an embed shortcode with action="login" to embed a preset login form anywhere on your site! Here’s what it looks like:
This shortcode also supports a range of additional parameters, enabling you to redirect users after logging in, display additional information, and more!
Pro tipTo learn more, read our ultimate guide to creating a Gravity Forms login form.
Gravity Forms shortcode not working? Here’s the problem
If you’ve added your shortcode to a page or post but your form isn’t showing up on the front end, it’s likely because the form ID is incorrect. If you accidentally entered an ID that does not exist, Gravity Forms will display an error message saying that your form could not be located.

Another common reason for shortcodes not working is missing quotation marks around parameter values. You can use either single (‘) or double (“) quotes, but you can’t mix and match them.
Frequently asked questions about Gravity Forms shortcodes
So, when I first started writing this guide, I scoured the Gravity Forms community forum, Reddit, and other sites to find our what issues people were having with shortcodes. While doing this, I came across some frequently asked questions and decided to answer them all here!
Yes, absolutely. Gravity Forms integrates with the WordPress Block Editor (Gutenberg), enabling you to embed forms on your pages with a block. And if you’re using the Elementor page builder, you can embed a Gravity Form using our free Gravity Forms Widget for Elementor add-on!
However, if you’re using a different page builder like Divi or Beaver Builder, you’ll need to use the Gravity Forms embed shortcode to insert your form inside a page or post.
Gravity Forms exposes a single shortcode tag, [gravityform] (with [gravityforms] as an alias). It supports five documented actions: the default embed action plus conditional, login, user, and polls. The login and user actions require the User Registration add-on, and polls requires the Polls add-on. GravityKit’s reference table above lists every parameter, allowed values, and a code example for each.
If your shortcode renders as plain text on the front end like [gravityform id="1"] instead of showing your form, the most common causes are: a form ID that doesn’t exist on your site, mismatched or smart-style quotes around parameter values, a plugin or theme that’s interfering with WordPress shortcode processing, or pasting the shortcode into the Classic Editor’s visual tab (it should go in the text tab). If the shortcode works on a regular page but not in a Full Site Editor template or page builder, try wrapping it in a Shortcode block or your builder’s Shortcode element. Gravity Forms’ Common Form Issues doc has a fuller checklist.
Yes — just add multiple [gravityform] shortcodes to the same page with different id values, and each form will render independently. If you’re loading multiple AJAX-enabled forms on one page, set ajax="true" on each so they submit without reloading the page and stepping on each other. Each form keeps its own field IDs internally, so there’s no risk of submission collisions, but if you’ve added custom JavaScript that targets a field by ID, scope it carefully — Gravity Forms reuses field IDs across separate form instances.
Add ajax="true" to your embed shortcode: [gravityform id="1" ajax="true"]. With AJAX on, the form submits in the background and the confirmation message replaces the form without reloading the page — useful for multi-step forms, forms inside modals, or pages where a reload would lose context. AJAX is off by default. For a deeper look, see our complete guide to Gravity Forms AJAX.
Add the theme parameter: theme="orbital" for the modern Orbital theme or theme="gravity" for the Gravity Forms 2.5 theme. The shortcode-level theme overrides the default set on the form itself, which is handy for testing styles on one page or running an A/B test without changing the global form configuration. For more on how the two themes differ, see Gravity Forms themes explained.
You have two options. The quickest is to wrap the shortcode in WordPress’s do_shortcode() function: echo do_shortcode( '[gravityform id="1" ajax="true"]' );. The cleaner option for theme files is the dedicated PHP function gravity_form(), which takes the form ID, title/description toggles, and a few other parameters as arguments — see Gravity Forms’ “Adding a Form to the Theme File” doc for the full signature. If you call gravity_form() outside the main loop, you may also need to enqueue the form’s scripts and styles manually for conditional logic and date pickers to work.
The Gravity Forms HTML field allows you to add custom content to your forms in the forms of text, HTML or other embedded content. The HTML field also accepts shortcodes. In the example below, we added a WordPress shortcode to the HTML field content in order to embed a YouTube video inside the form.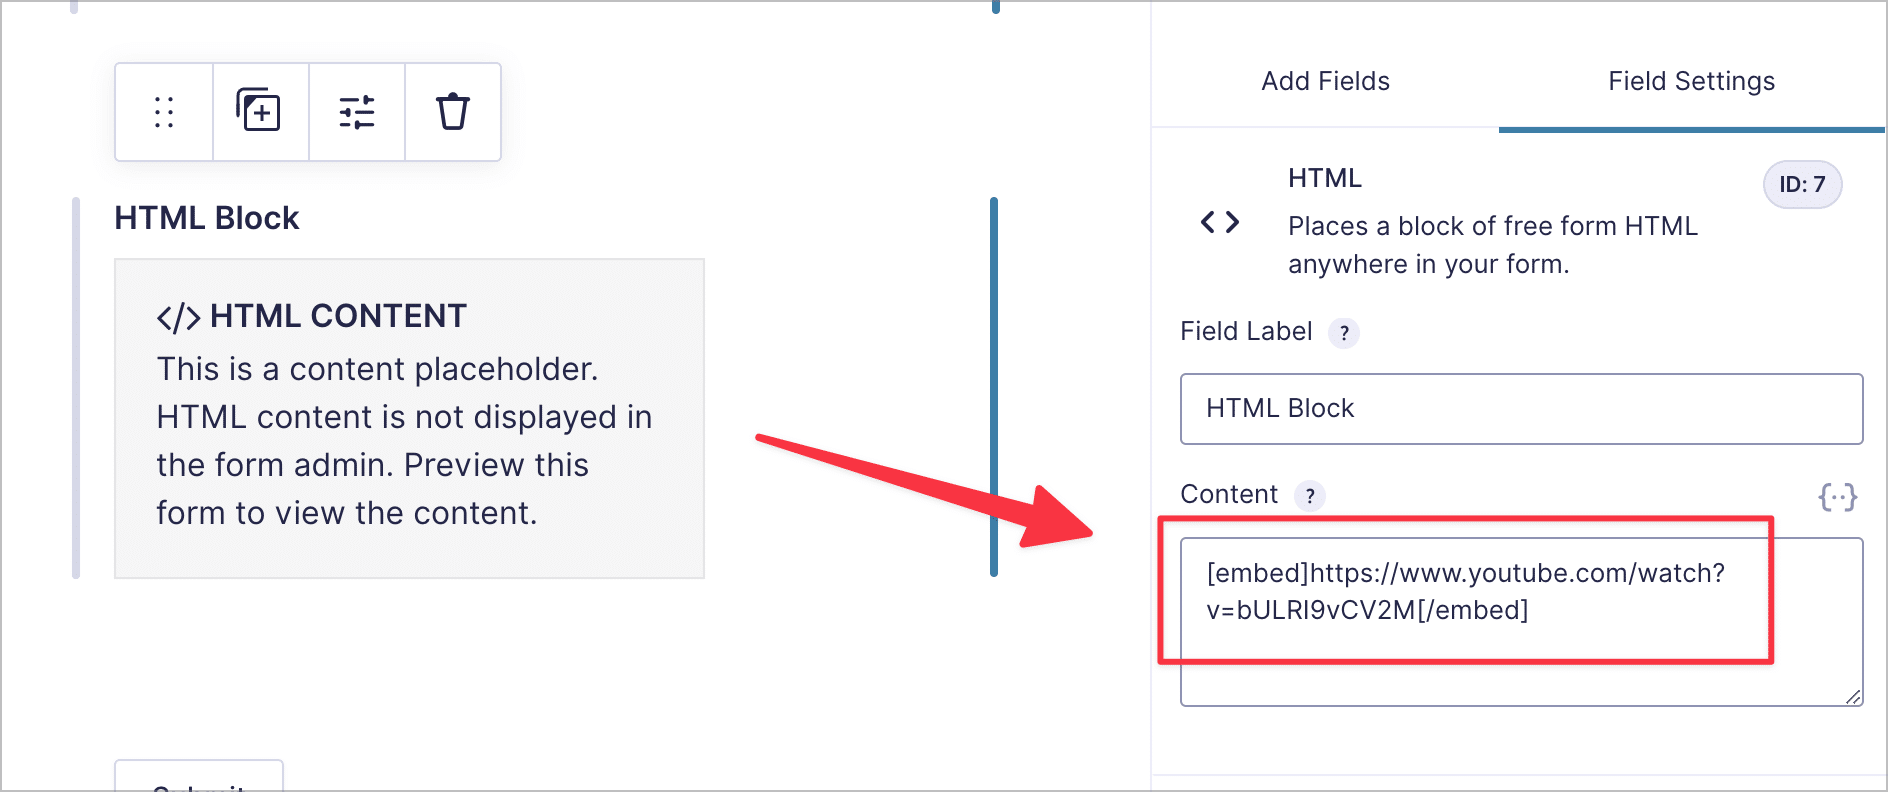
Yes, you can use shortcodes inside Gravity Forms notification messages. An example of this is the conditional shortcode, which you can use to show different notification messages based on a user’s submission.
Unleash the power of Gravity Forms shortcodes!
Shortcodes are small snippets of text that, when inserted into a page, are replcaed by some other content. In Gravity Forms, you can use shortcodes to embed forms or show/hide content in your confirmation and notification messages.
If you found this post helpful, make sure you subscribe to our newsletter below for more Gravity Forms tips and tricks!

Helpful tips right in your inbox.
Subscribe to get the latest articles, information on releases and helpful Gravity Forms tips!
More articles

How to build a WordPress CRM without code (a contact database you own)
Build a simple WordPress CRM with GravityView. Turn the Gravity Forms entries you already collect into a no-code contact database you own, with no monthly fees.

Launch Log: Distance sorting for radius searches, DataTables search improvements, and import reliability fixes
The latest GravityKit releases add distance sorting to map searches, bring built-in search to DataTables, and fix GravityCharts and GravityImport edge cases.

WordPress page builder market share 2026: Elementor leads at 32.67%
Elementor reaches 32.7% of WordPress sites. WordPress Block Editor 20.6%, wpBakery 8.5%, Divi 5.7%. Latest HTTP Archive crawl, share-of-WordPress basis throughout.