Published
•
Updated
How to easily add Gravity Forms to Divi: step-by-step guide
Does your website use the popular Divi theme? Are you looking to embed a Gravity Form into one of your pages or posts? Although Gutenberg has evolved, many WordPress users still prefer visual page builders like Elementor, Beaver Builder, and Divi for building beautiful...

Does your website use the popular Divi theme? Are you looking to embed a Gravity Form into one of your pages or posts?
Although Gutenberg has evolved, many WordPress users still prefer visual page builders like Elementor, Beaver Builder, and Divi for building beautiful layouts easily. If you’re using Gravity Forms with Divi, this tutorial is for you.
In this guide, you’ll learn two ways to embed Gravity Forms in Divi, how to style them, and how to display submitted form data on your site.
Does Divi have a native Gravity Forms module?
Short answer: not as of April 2026. Neither Rocketgenius (the team behind Gravity Forms) nor Elegant Themes (the team behind Divi) ships a first-party Gravity Forms module. Divi 5 added a native Contact Form 7 module in early 2026, and Elegant Themes has publicly acknowledged Gravity Forms as a candidate for a similar treatment, but no built-in option exists yet.
Two third-party plugins are widely treated as the de-facto standard:
Both add a Divi module that lets you drop a form into a layout without touching a shortcode. If you’d rather skip paid plugins entirely, the shortcode method in Method 1 stays the most reliable option.
Method 1: Embedding a Gravity Forms form in Divi using a shortcode
The Divi Builder does not have a built-in Gravity Forms module (yet), but you can manually embed a Gravity Form into a Divi page or post by using a shortcode.
Step 1: Copy/construct your Gravity Forms shortcode
- Open the Gravity Forms editor by editing your form
- Click the “</> Embed” button in the top right corner
- Scroll down and click “Copy Shortcode”
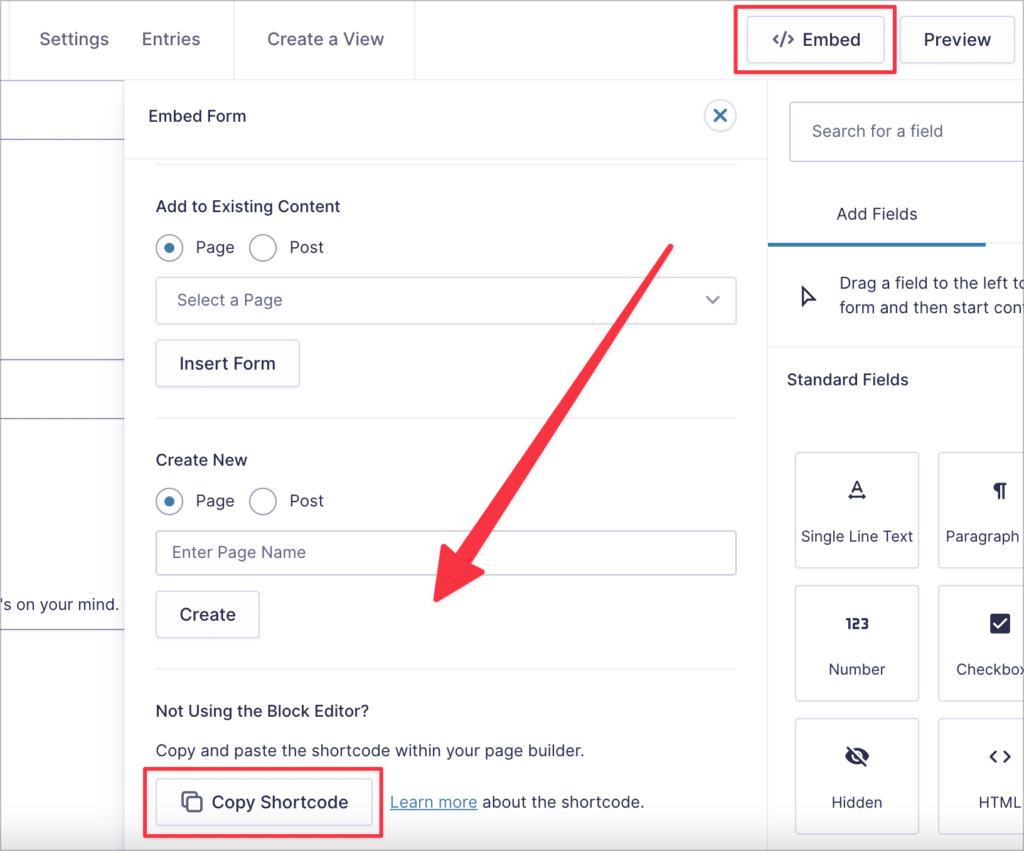
Alternatively, you can manually construct the shortcode using your form ID.
To get your form ID, log into your WordPress dashboard, hover over “Forms”, and click on “Forms”. You will see a list of all your Gravity Forms with the form ID displayed in the first column on the right. Copy the ID so you don’t forget it.
Here’s an example of a Gravity Forms embed shortcode:
[gravityform id="1" title="true" description="true" ajax="true"]You can copy this shortcode, just remember to replace the “id” value with your form ID.
Pro tipTo find out more about the different shortcode parameters, check out the Gravity Forms documentation.
Step 2: Add your shortcode to a Divi builder module
Now that you have a working shortcode, you can embed it into a post or page using the Divi builder. The best way to do this is by copying and pasting the shortcode into a Divi “Code” Module.
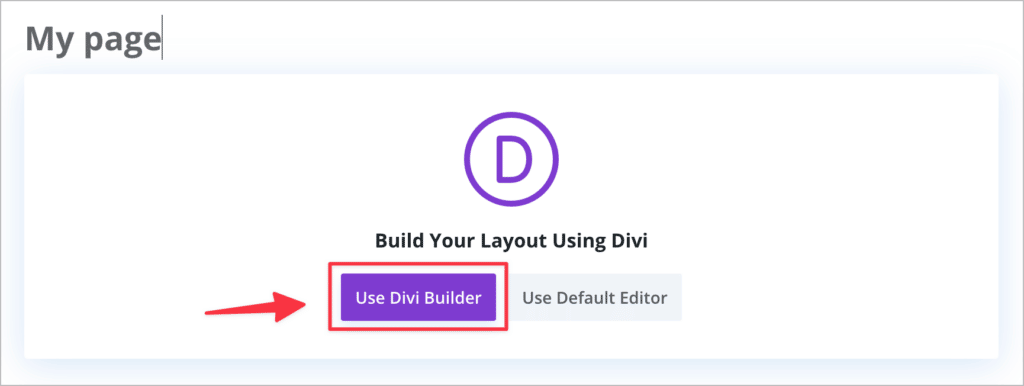
- Hover over “Pages” and click “Add New”
- Name your page and click “Use Divi Builder”
- Add a new “Code” or “Text” module
- Paste your shortcode into the module and save
Here’s a quick video showing how this works:
Method 2: Embedding a Gravity Form in Divi using a plugin
If you don’t want to use a shortcode, you can use the “WP Tools Gravity Forms Divi Module” plugin to embed Gravity Forms into your Divi posts or pages. The plugin allows you to:
- Add Gravity Forms using a visual module inside Divi
- Adjust shortcode properties (like title/description) inside the module
Step 1: Install the plugin
Follow these steps to install WP Tools Gravity Forms Divi Module:
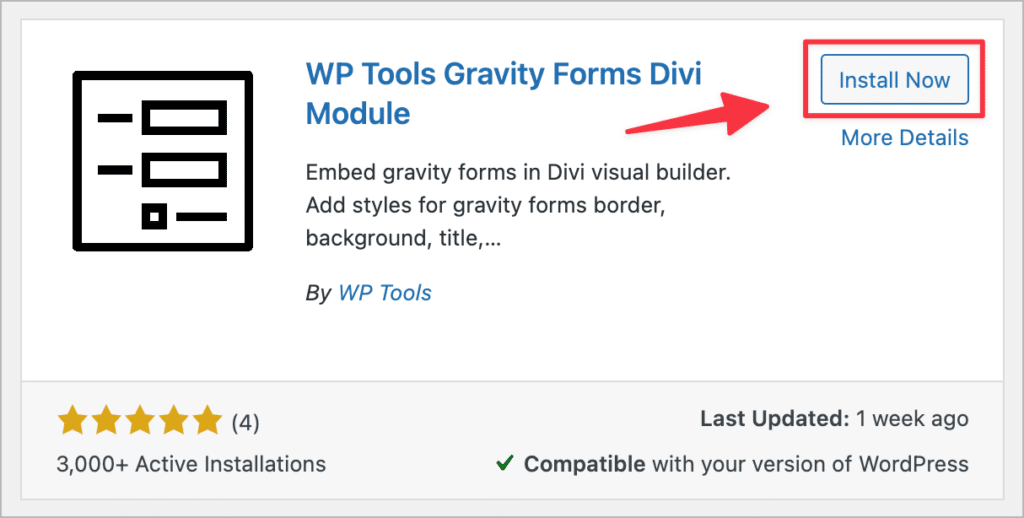
- Go to “Plugins” and click “Add New”
- Search for “WP Tools Gravity Forms Divi Module”
- Click “Install Now” and activate
- Alternatively, you can download it from WordPress.org and upload it to your site.
Step 2: Add the module to your Divi page layout
Now, inside the Divi Builder:
- Click the “+” icon to add a module
- Search for “Gravity Forms” and select it
- Use the dropdown to choose your form and configure display options
That’s it—no shortcode required!
There you have it. Those are the two methods for embedding Gravity Forms into your Divi website.
How to style Gravity Forms in Divi
To make your forms match your Divi styles, you have two main options:
Option 1: WP Tools (Pro version)
The Pro version of the WP Tools module gives you styling control directly in the Divi Builder:
- Font colors
- Buttons
- Spacing and layout
- And more
Option 2: Surbma Divi & Gravity Forms plugin (Free)
This lightweight plugin automatically applies Divi’s native form styles to Gravity Forms. Simply install and activate it—no configuration required. Be sure to check when it was last updated to ensure the plugin is still being maintained.
Option 3: Use Gravity Forms’ built-in styling and a CSS snippet
If you’d rather avoid adding more plugins, Gravity Forms ships with two styling tools that work cleanly inside any theme, Divi included.
CSS ready classes for layout. Gravity Forms includes a built-in set of CSS ready classes you can paste into a field’s “Custom CSS Class” setting (under the field’s Appearance tab) to control layout without writing CSS:
gf_left_half / gf_right_half to split two fields onto a single rowgf_list_inline to render checkbox or radio choices in a horizontal rowgf_inline to sit a field next to other inline fields without forcing equal columnsTheme settings via the Orbital theme framework. Gravity Forms 2.7 and later expose color, spacing, and typography controls through the Orbital theme framework, which is built on CSS custom properties. Open the form in the block editor, select the Form block, and adjust the Form Settings panel. Those settings apply wherever the form renders, including inside a Divi page.
A practical CSS snippet for matching Divi’s button look. If your Divi buttons use a specific color and border-radius, target the Gravity Forms submit button to match. Paste this into Divi → Theme Options → Custom CSS and swap the values for whatever your Divi buttons use:
body #gform_wrapper_1 .gform_footer input[type="submit"] {
    background-color: #2ea3f2;
    border-radius: 3px;
    padding: 9px 20px;
    font-weight: 700;
}

body #gform_wrapper_1 .gform_footer input[type="submit"]:hover {
    background-color: #1f8fda;
}
The _1 in #gform_wrapper_1 is the form ID. Change it to target a different form, or drop the ID entirely (body .gform_wrapper .gform_footer input[type="submit"]) to style every form on the site.
For deeper customization (CSS variables, per-field selectors, label and validation styling), see GravityKit’s full guide to styling Gravity Forms.
Bonus: Display Gravity Forms entries on your Divi site
After users submit your forms, you might want to display that submission data on your website—for example, to create:
You can do this using GravityView—an add-on that allows you to build front-end displays of your Gravity Forms entries.
Here’s how it works:
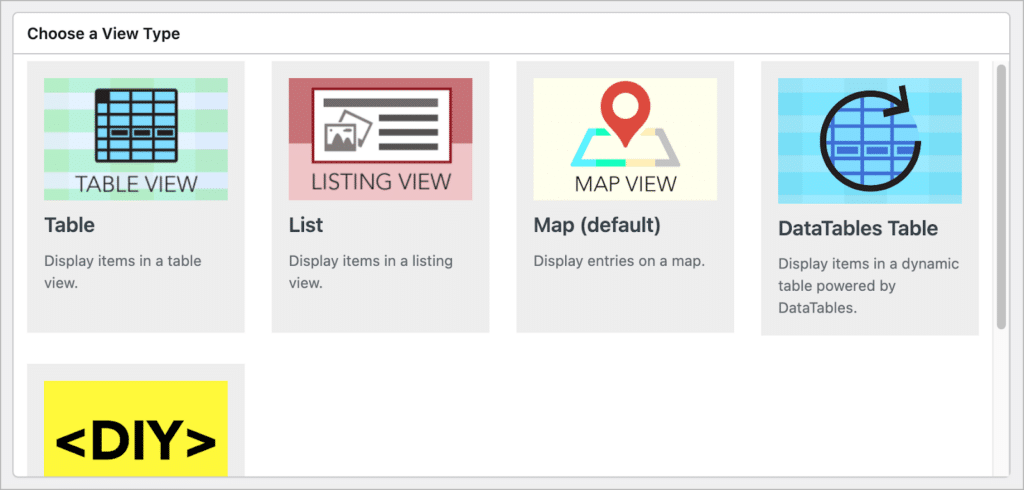
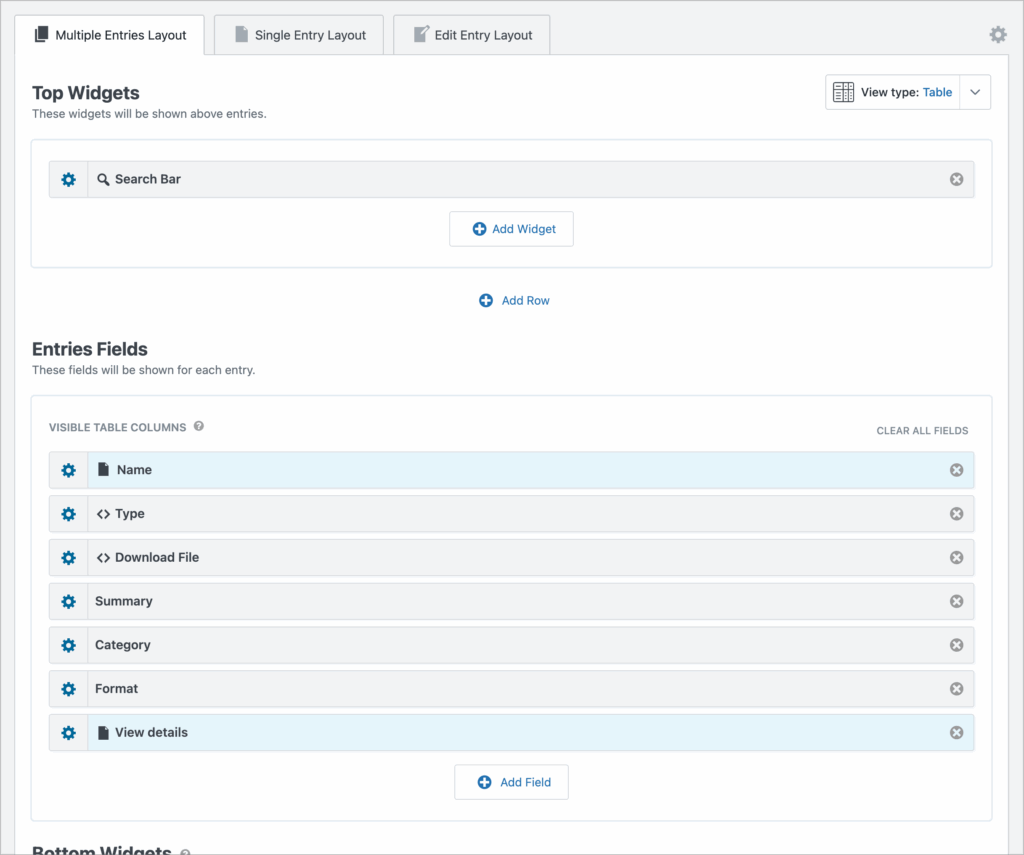
After installing GravityView, you can create a “View”, enabling you to display form submissions using different layouts. You can display data in a table, a list, on a map, in a DataTable, or create a custom layout using the DIY builder.
GravityView features a drag-and-drop editor, so you can create front end interfaces without writing any code!
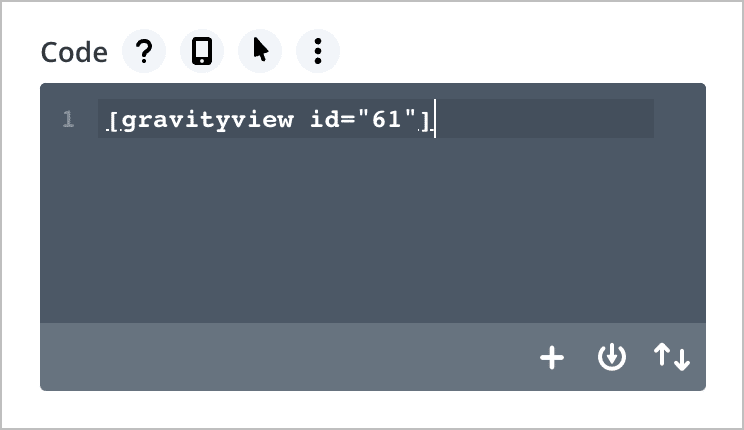
After you’ve configured your layout, you can use the GravityView embed shortcode to embed your View in a Divi page or post.
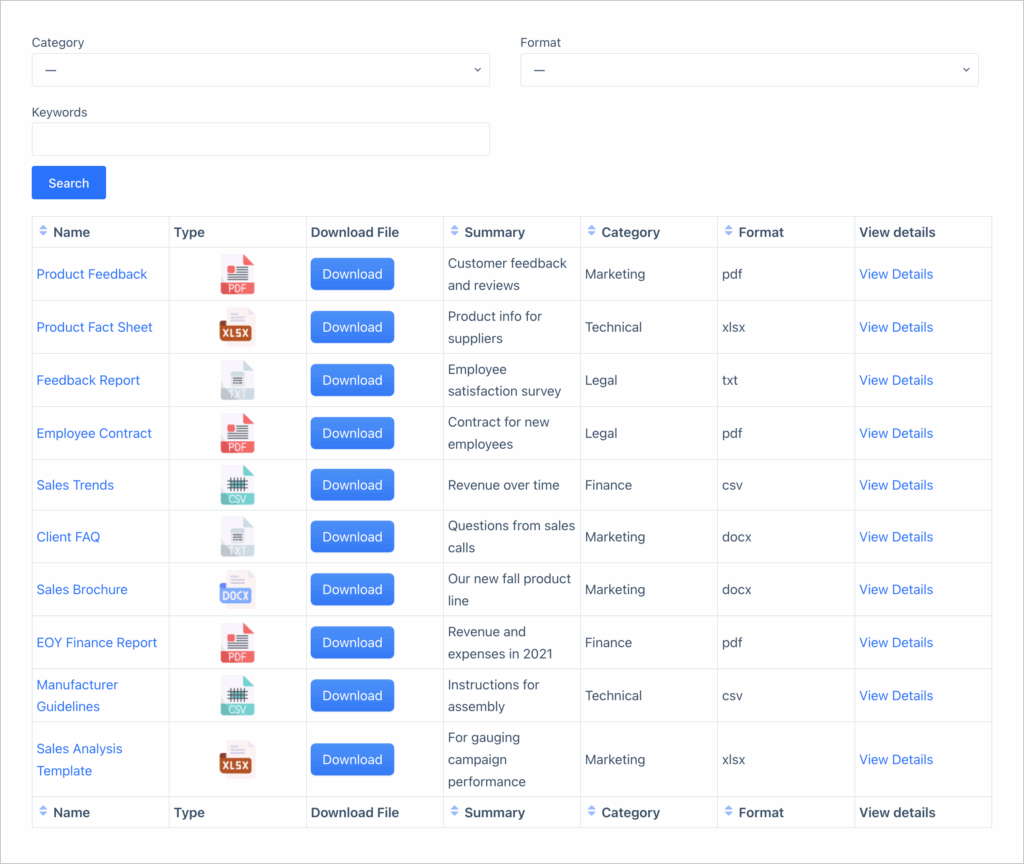
That’s it! Here’s an example of a document library View that displays documents uploaded via Gravity Forms.
You can learn more about GravityView on our website.
Using Gravity Forms with Divi: Final thoughts
While Divi doesn’t yet have native support for Gravity Forms, shortcodes and third-party plugins make integration simple.
To recap:
- Use a shortcode or the WP Tools plugin to embed forms
- Style your forms using either WP Tools Pro or Surbma’s Divi plugin
- Display submitted entries with GravityView and take your site to the next level

Helpful tips right in your inbox.
Subscribe to get the latest articles, information on releases and helpful Gravity Forms tips!
More articles

Launch Log: Zero Spam goes multilingual, GravityView extends search flexibility
A quick tour of this week’s GravityKit releases: Gravity Forms Zero Spam gains translations in 27 languages, and GravityView adds flexible date-range search, a live Search Bar summary, and Gravity Forms 2.9.31.3+ compatibility fixes.

How to get your Gravity Forms data into external tools
Learn 6 ways to get Gravity Forms data into external tools—from scheduled exports to REST API and Zapier. Covers CRMs, spreadsheets, and more.
Gravity Forms payment gateways: A guide to official and community add-ons
Want to accept payments from your WordPress site? No problem! Gravity Forms makes it easy to build a custom payment form for eCommerce transactions, nonprofit donations, subscription billing for digital products and services, and beyond. But first, you’ll need to choose one of Gravity…