Published
•
Updated
How to create a two-step intake workflow with Gravity Forms and GravityView
Learn how to build a two-step intake workflow where customers start a form online and staff complete it later. Uses GravityView's Search Bar and Edit Entry features.
Many workflows require two people to complete a single form. The customer fills out their part online, and then a staff member adds the rest later. Think fitness intake forms, medical questionnaires, rental contracts, or event check-ins. The challenge? You don’t want customers seeing or filling out the staff-only fields.
In this tutorial, I’ll show you how to build a two-step intake workflow using Gravity Forms and GravityView. The client submits their information through a frontend form, and the staff can then look up the submission, review it, and fill in the remaining fields—all from the frontend of your WordPress site.
Let’s get started!
Sneak peek
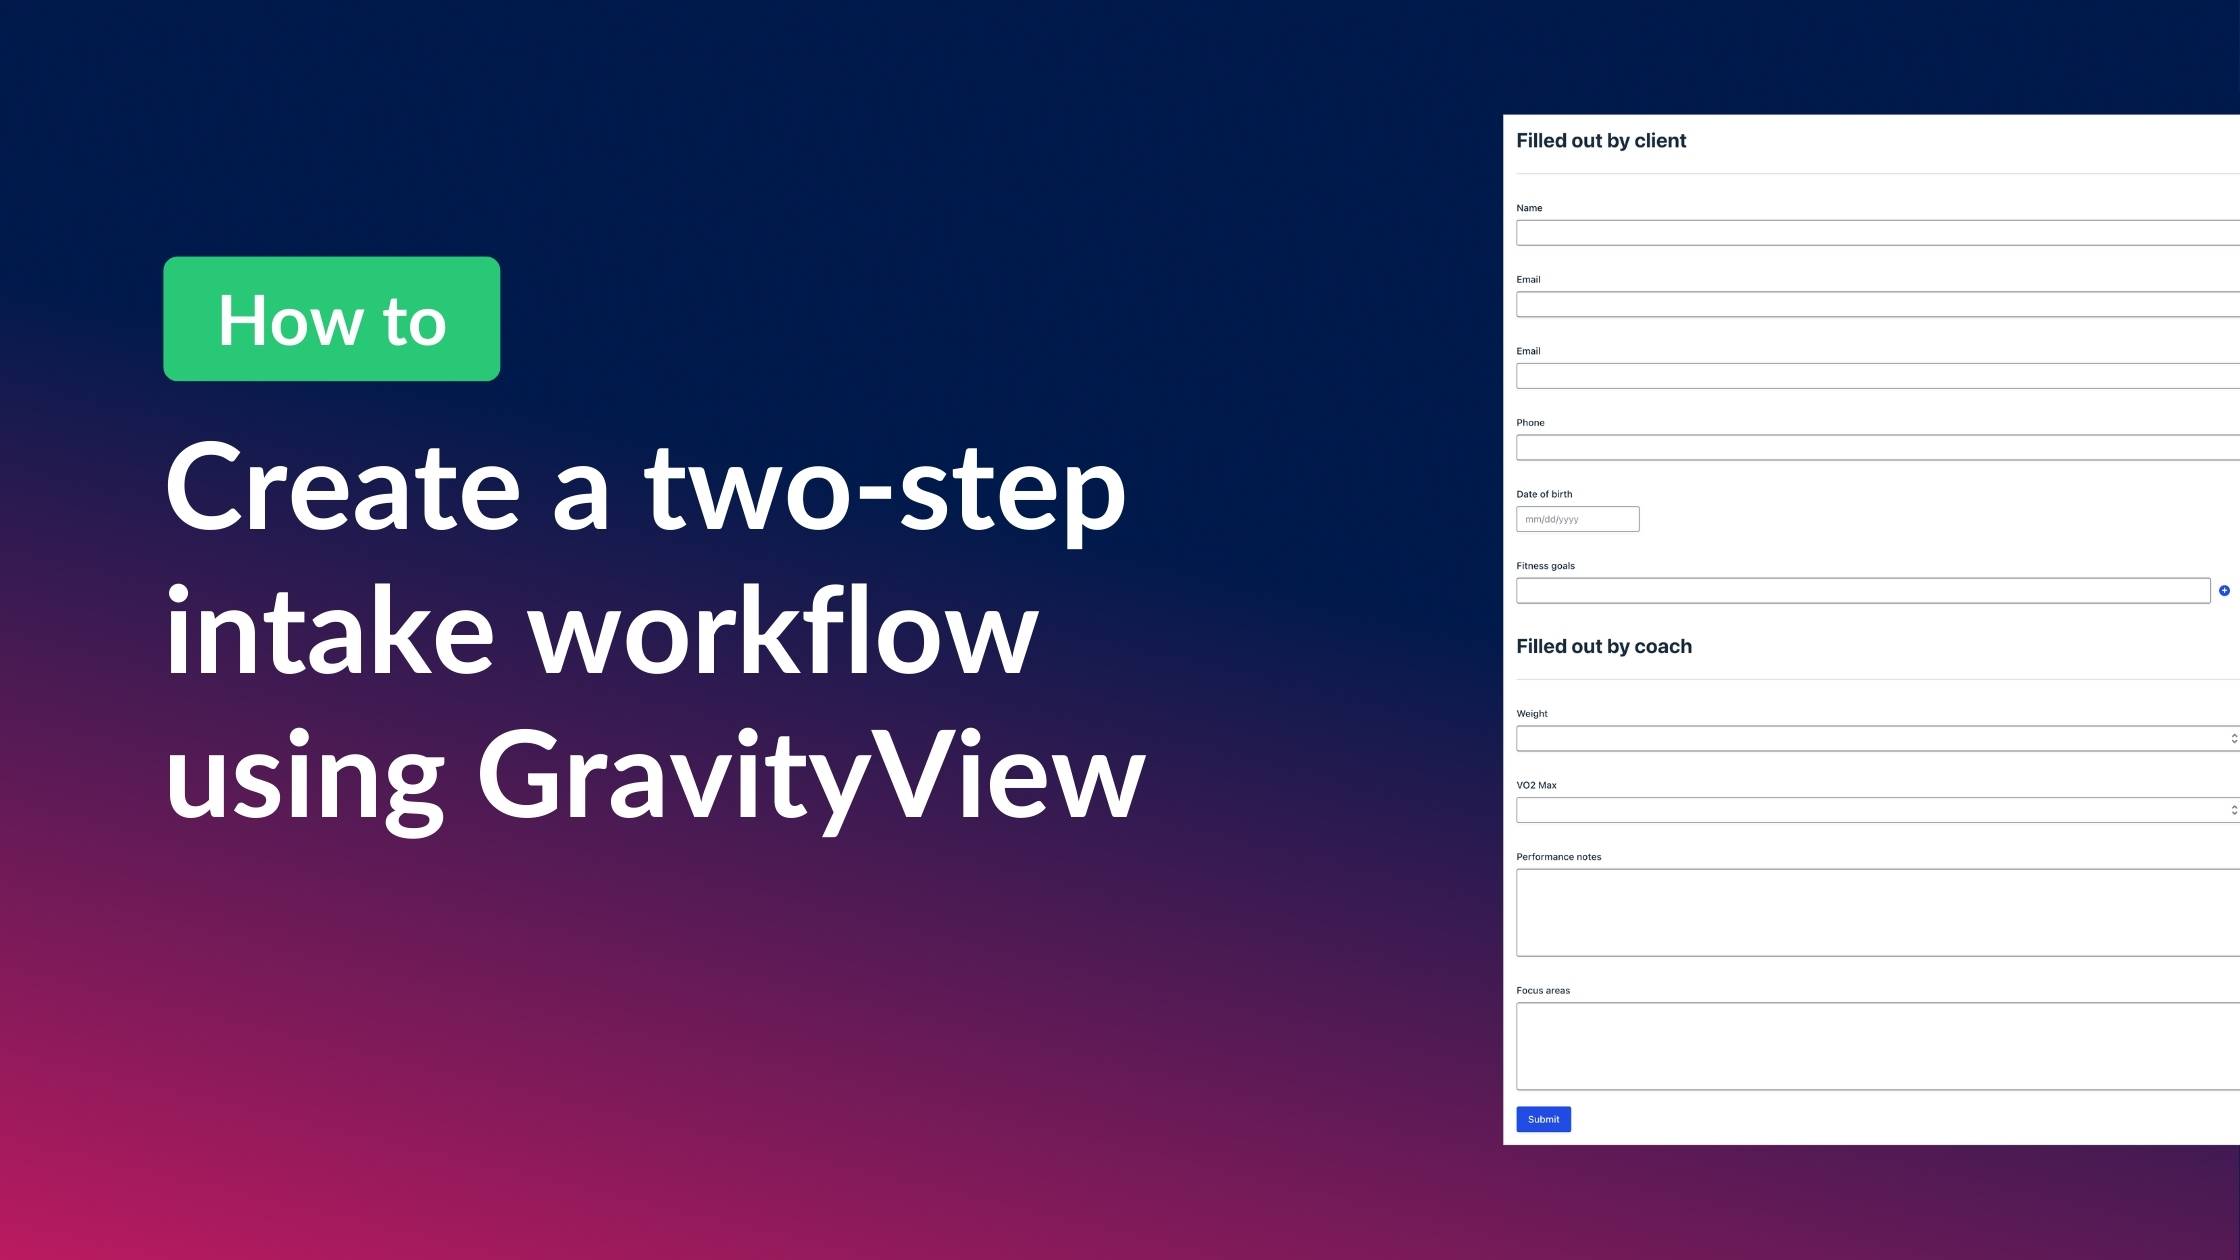
Here’s what our finished workflow looks like for a fictitious fitness coaching business. First, clients fill out the intake form with their personal details and fitness goals:
Next, coaches log in and use a staff dashboard to search for clients, see their status, and click through to review or edit entries:
When a coach opens an entry for editing, they see only the coach-specific fields—Weight, VO2 Max, Performance notes, and Focus areas:
After completing the fitness assessment (the second step of the intake process), the coach can update the client’s status from “Awaiting assessment” to “Enrolled”.
Wanna try it?
Spin up a demo
See what you can build with GravityView — explore the live demo.

What you’ll need
Here are the plugins you’ll need to create a two-step intake workflow like the one in this tutorial:
- Gravity Forms (any license level) – for building the intake form with both client and staff sections
- GravityView Pro – for creating the staff lookup dashboard with search, single entry, edit entry, and approval functionality.
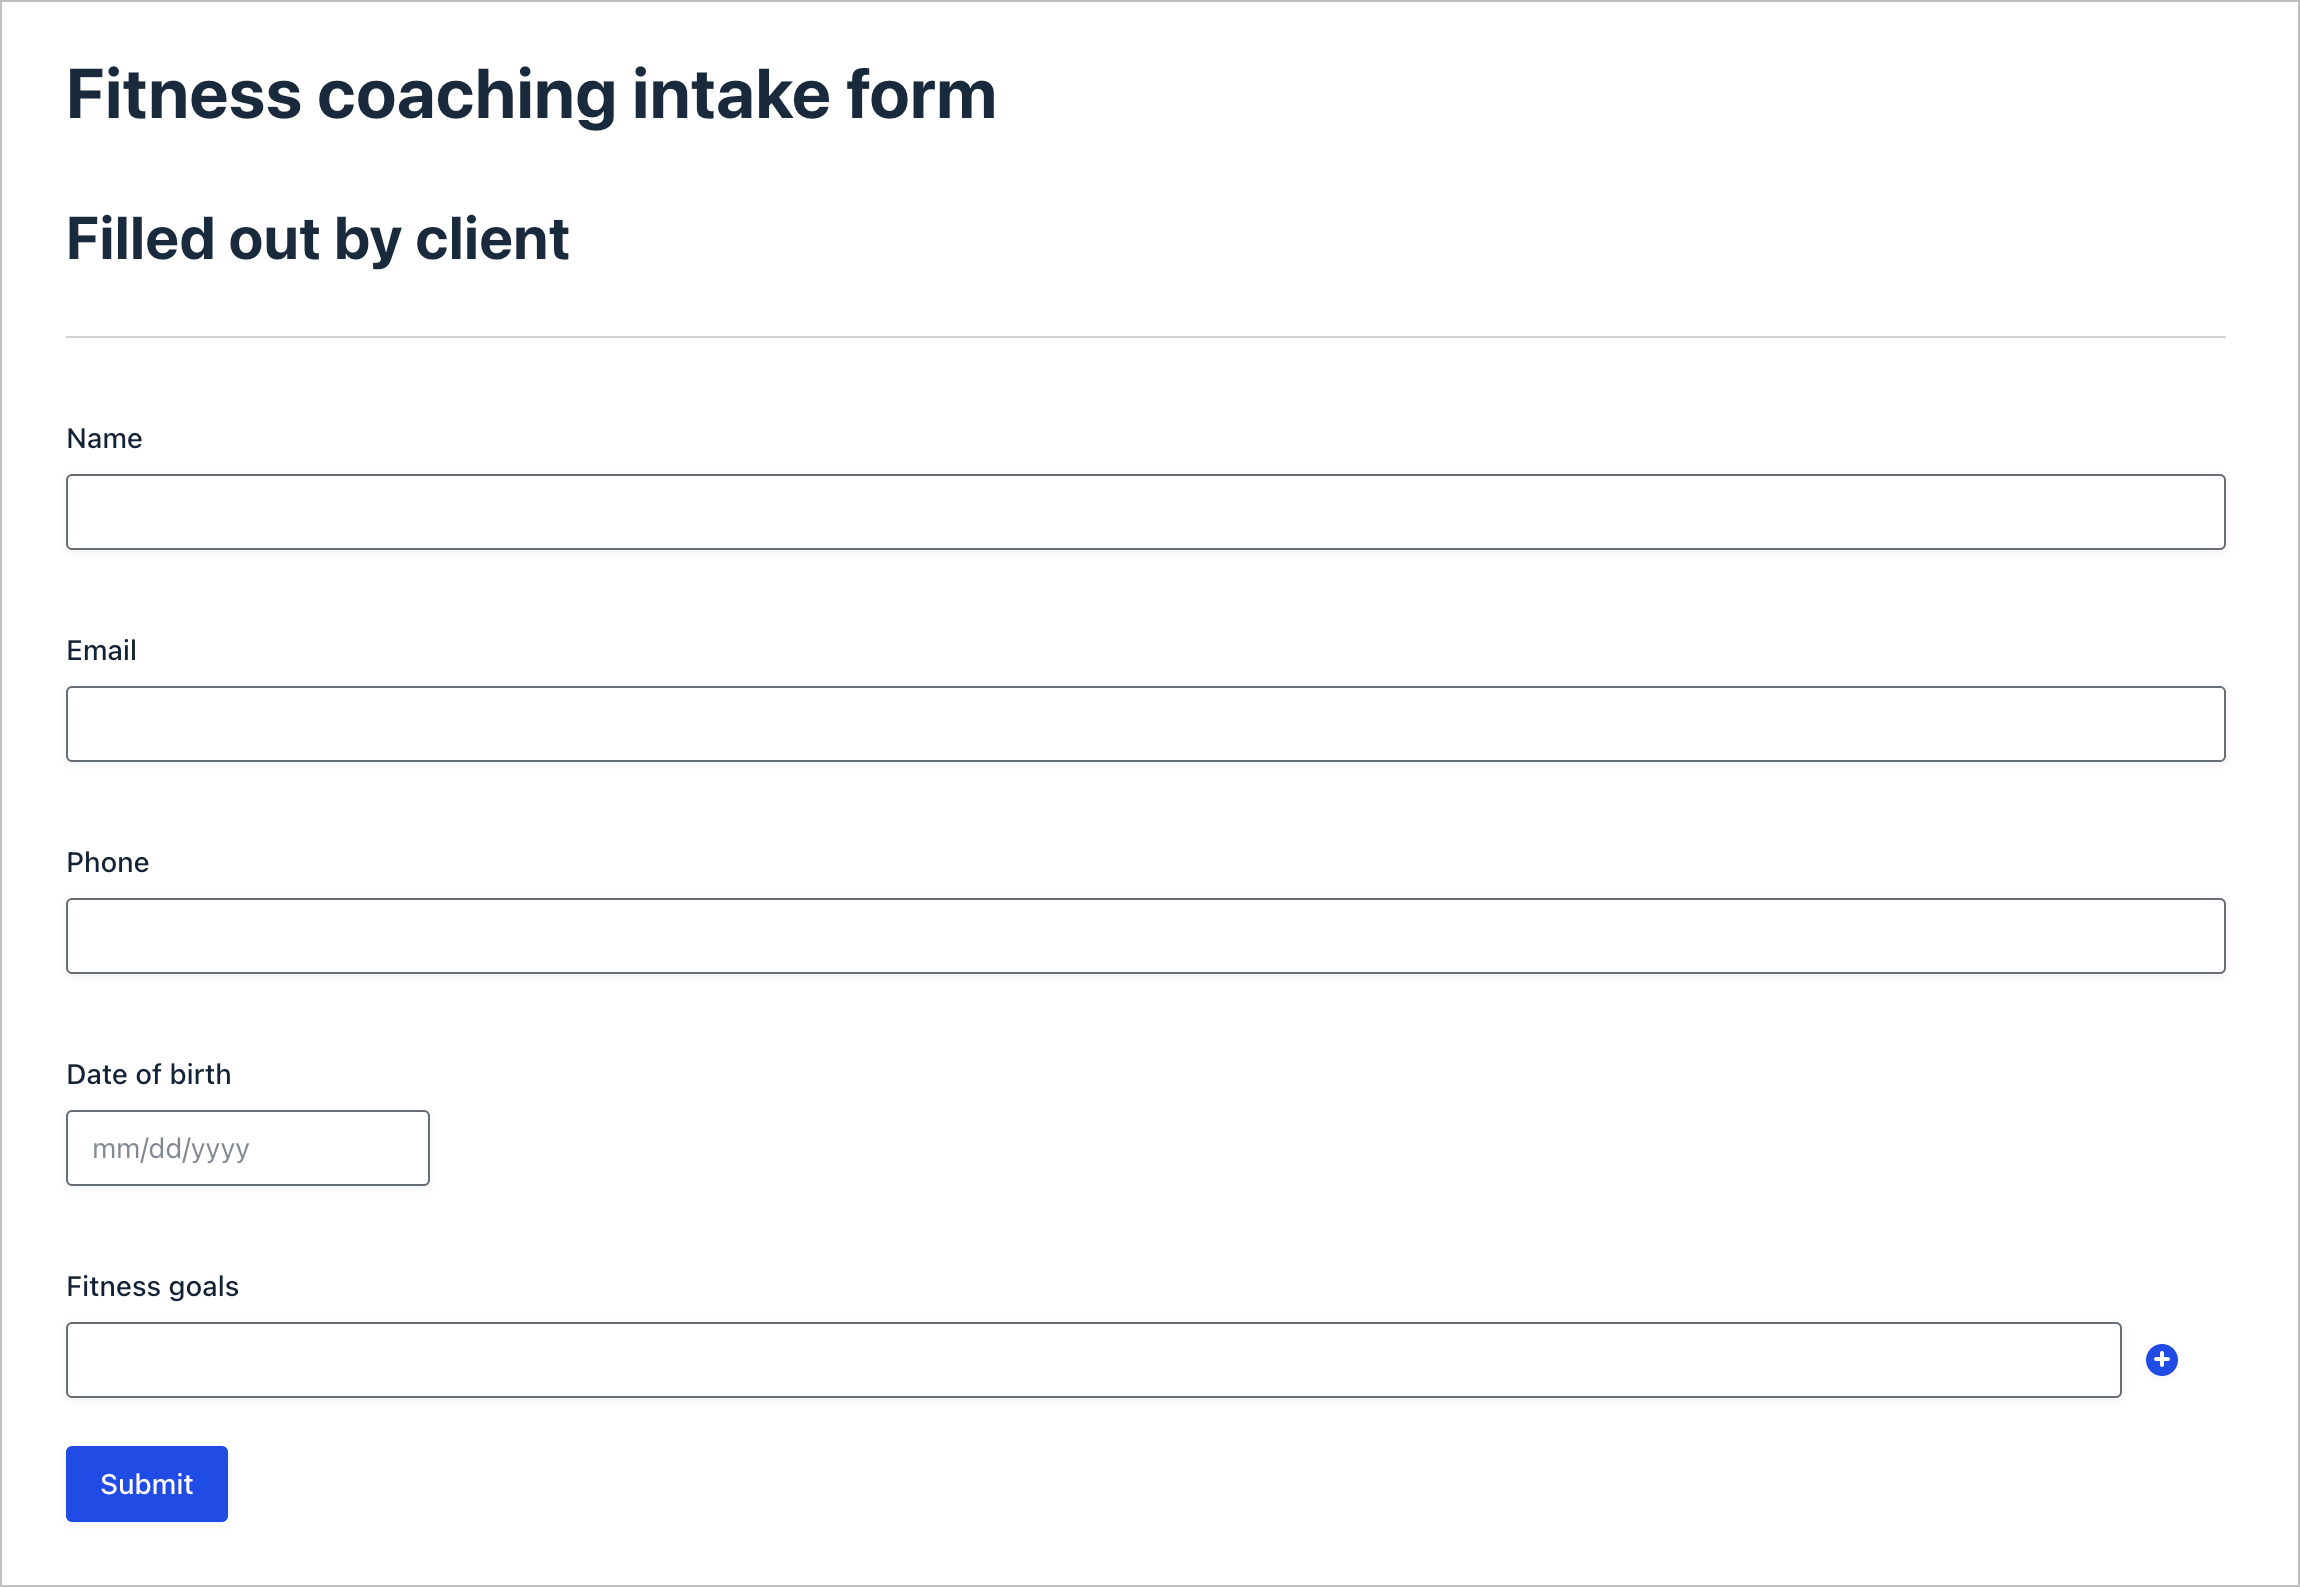
Step 1: Create the coaching intake form
First, we’ll build a single Gravity Forms form that contains fields for both the client and the coach. The key here is using Gravity Forms’ Administrative field visibility to hide the coach’s section from the frontend form.
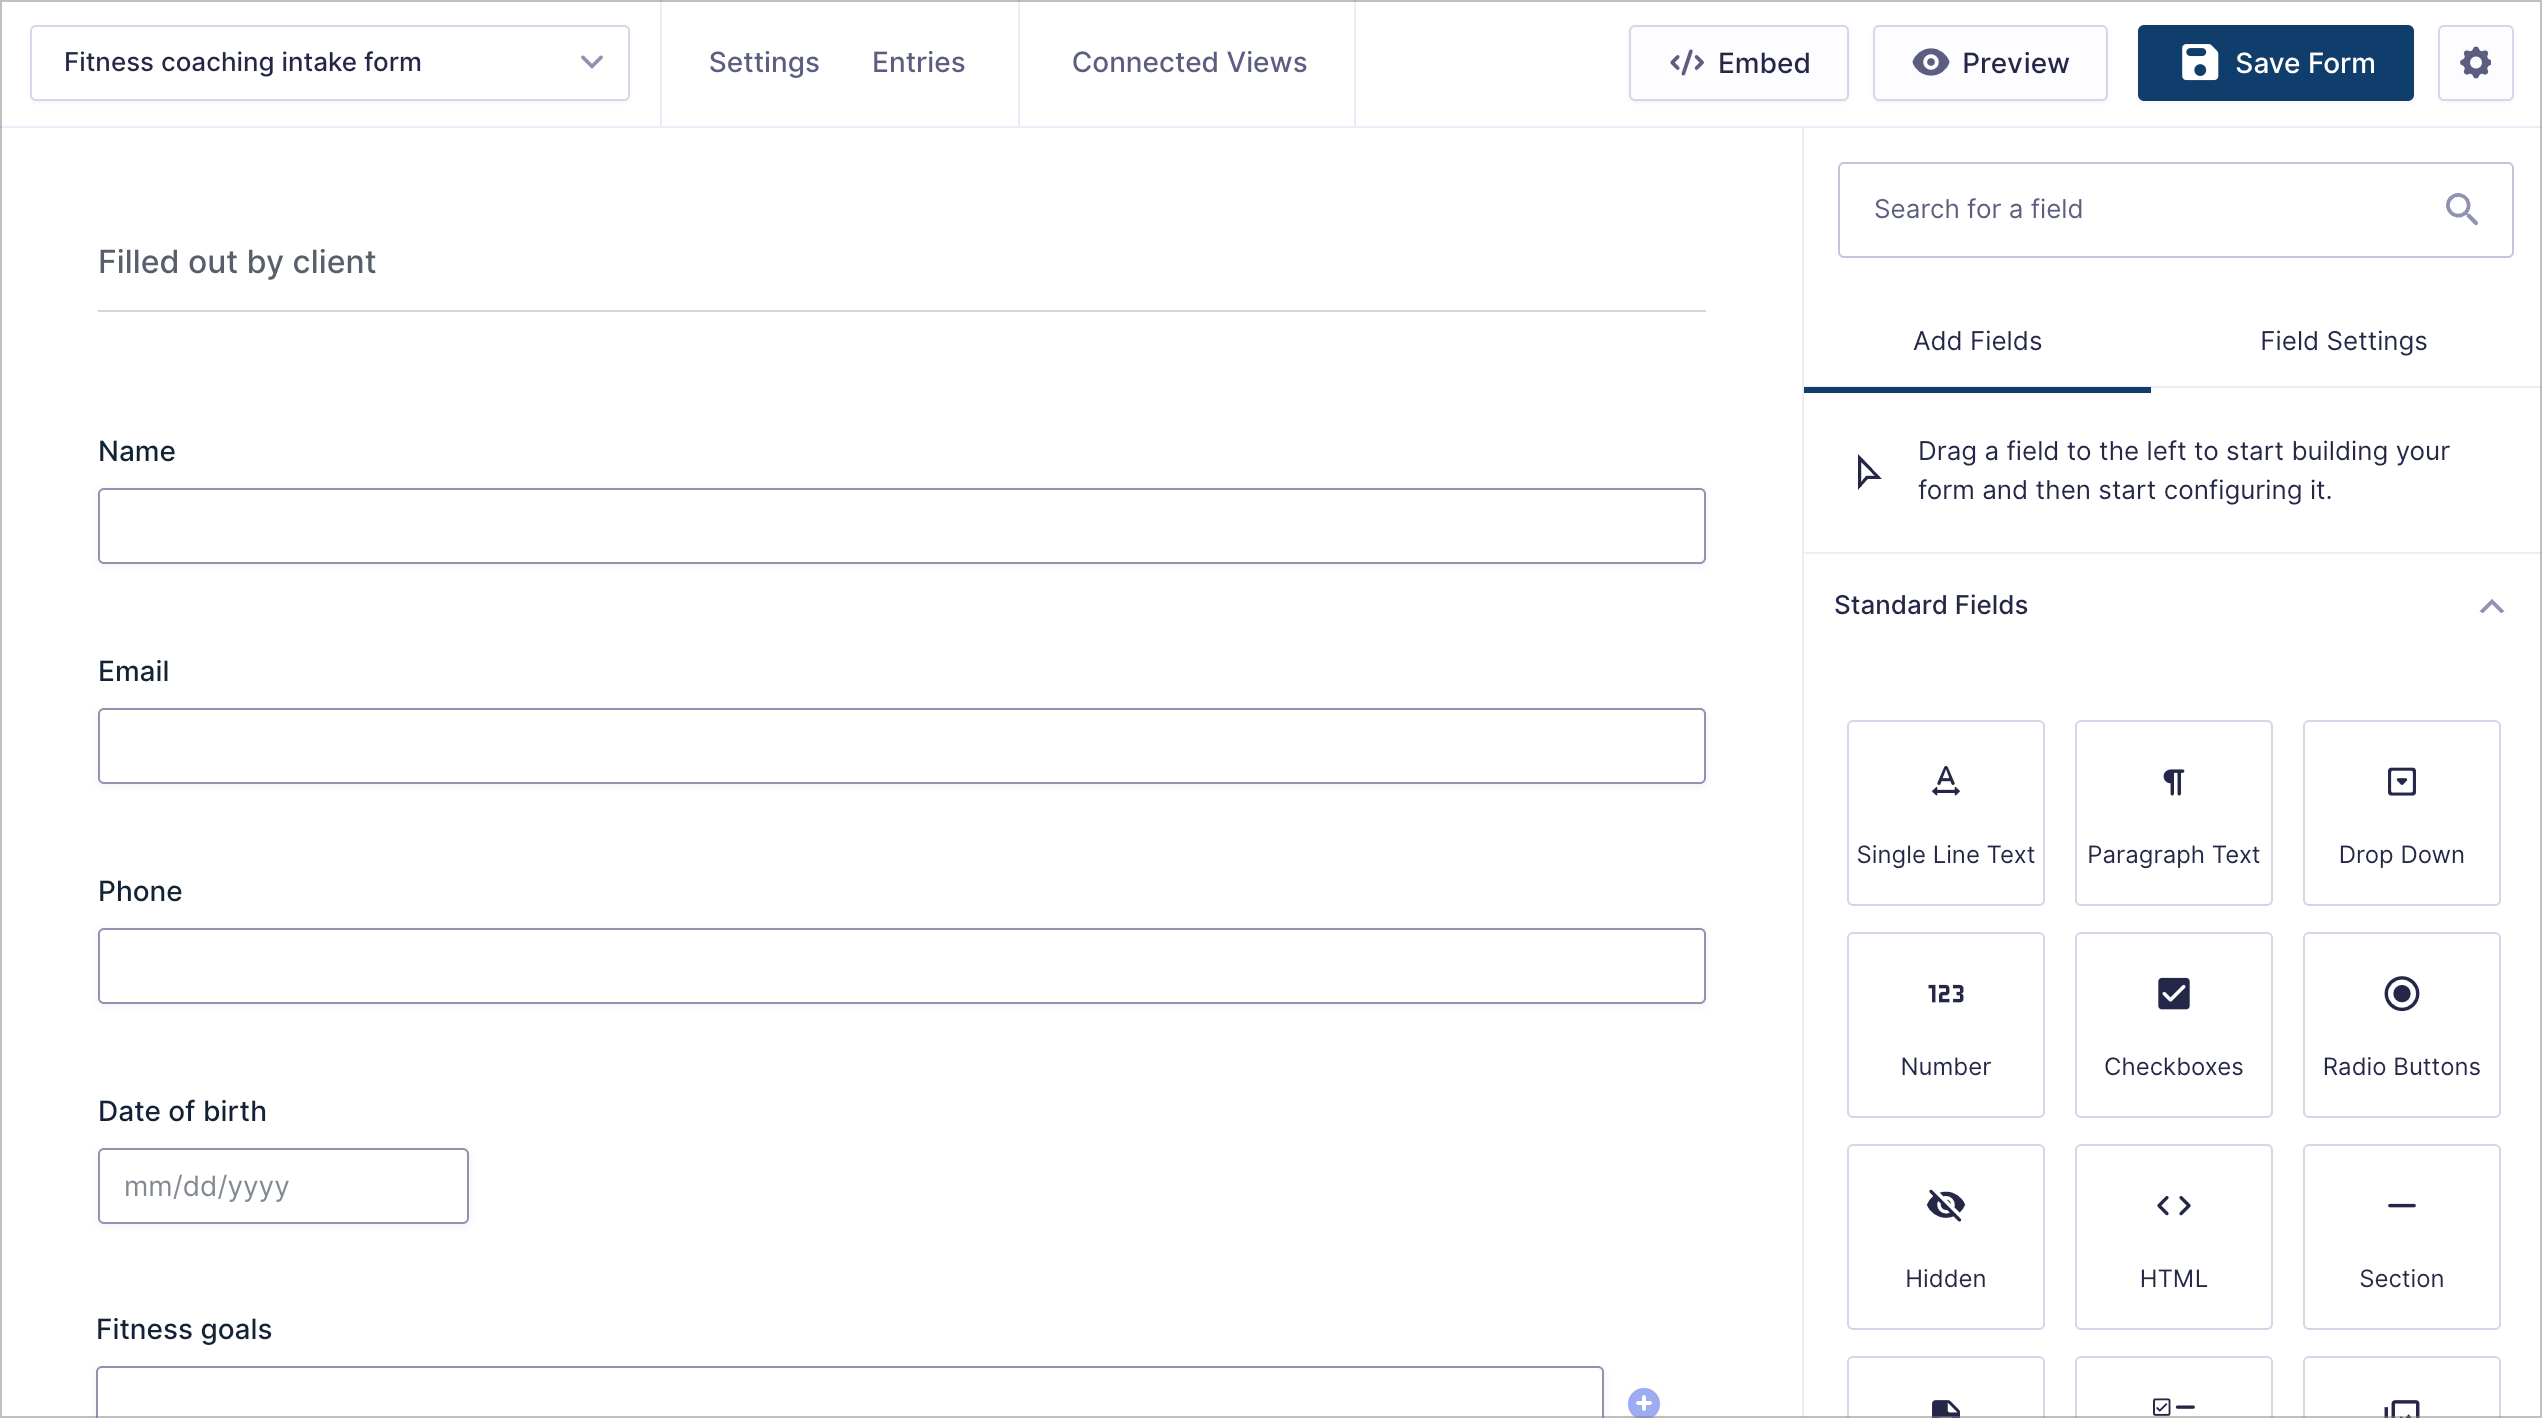
We’ll start by adding the client-facing fields. In the Gravity Forms editor, we’ll create a new form called “Fitness coaching intake form” and add the following fields under a “Filled out by client” Section field:
- Name (Name field)
- Email (Email field)
- Phone (Phone field)
- Date of birth (Date field)
- Fitness goals (Paragraph Text field)
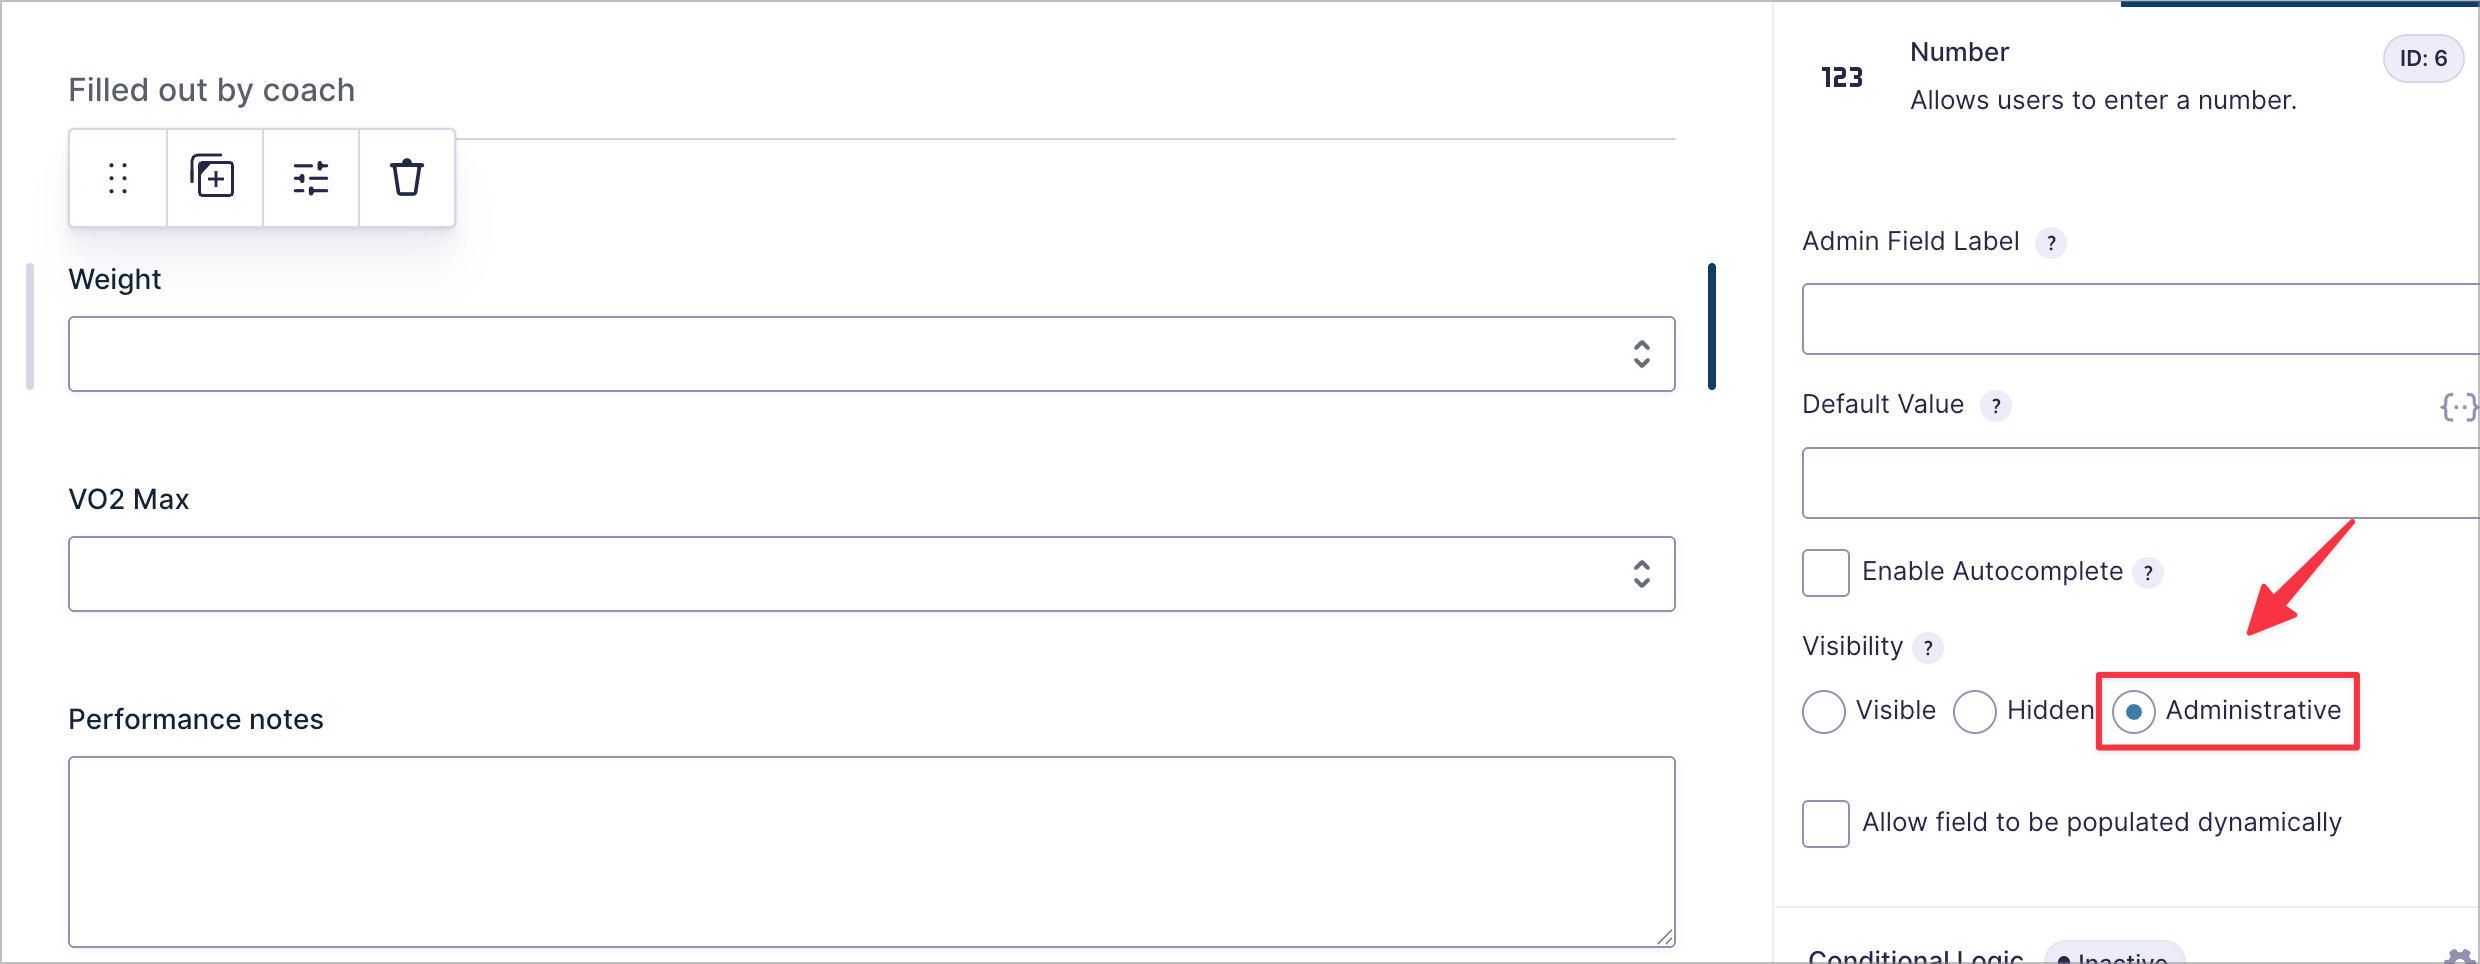
Now we’ll add the coach’s section. Below the client fields, we’ll add another Section field labeled “Filled out by coach” and include these fields:
- Weight (Number field)
- VO2 Max (Number field)
- Performance notes (Paragraph Text field)
- Focus areas (Paragraph Text field)
Here’s the important part: for each field in the coach section, click on the field and set the Visibility to Administrative in the Field Settings panel on the right. This ensures the coach fields won’t appear when the form is displayed on the frontend, but they’ll still be available through GravityView’s Edit Entry feature later.
Click Save Form when you’re done.
Step 2: Set up the staff lookup View
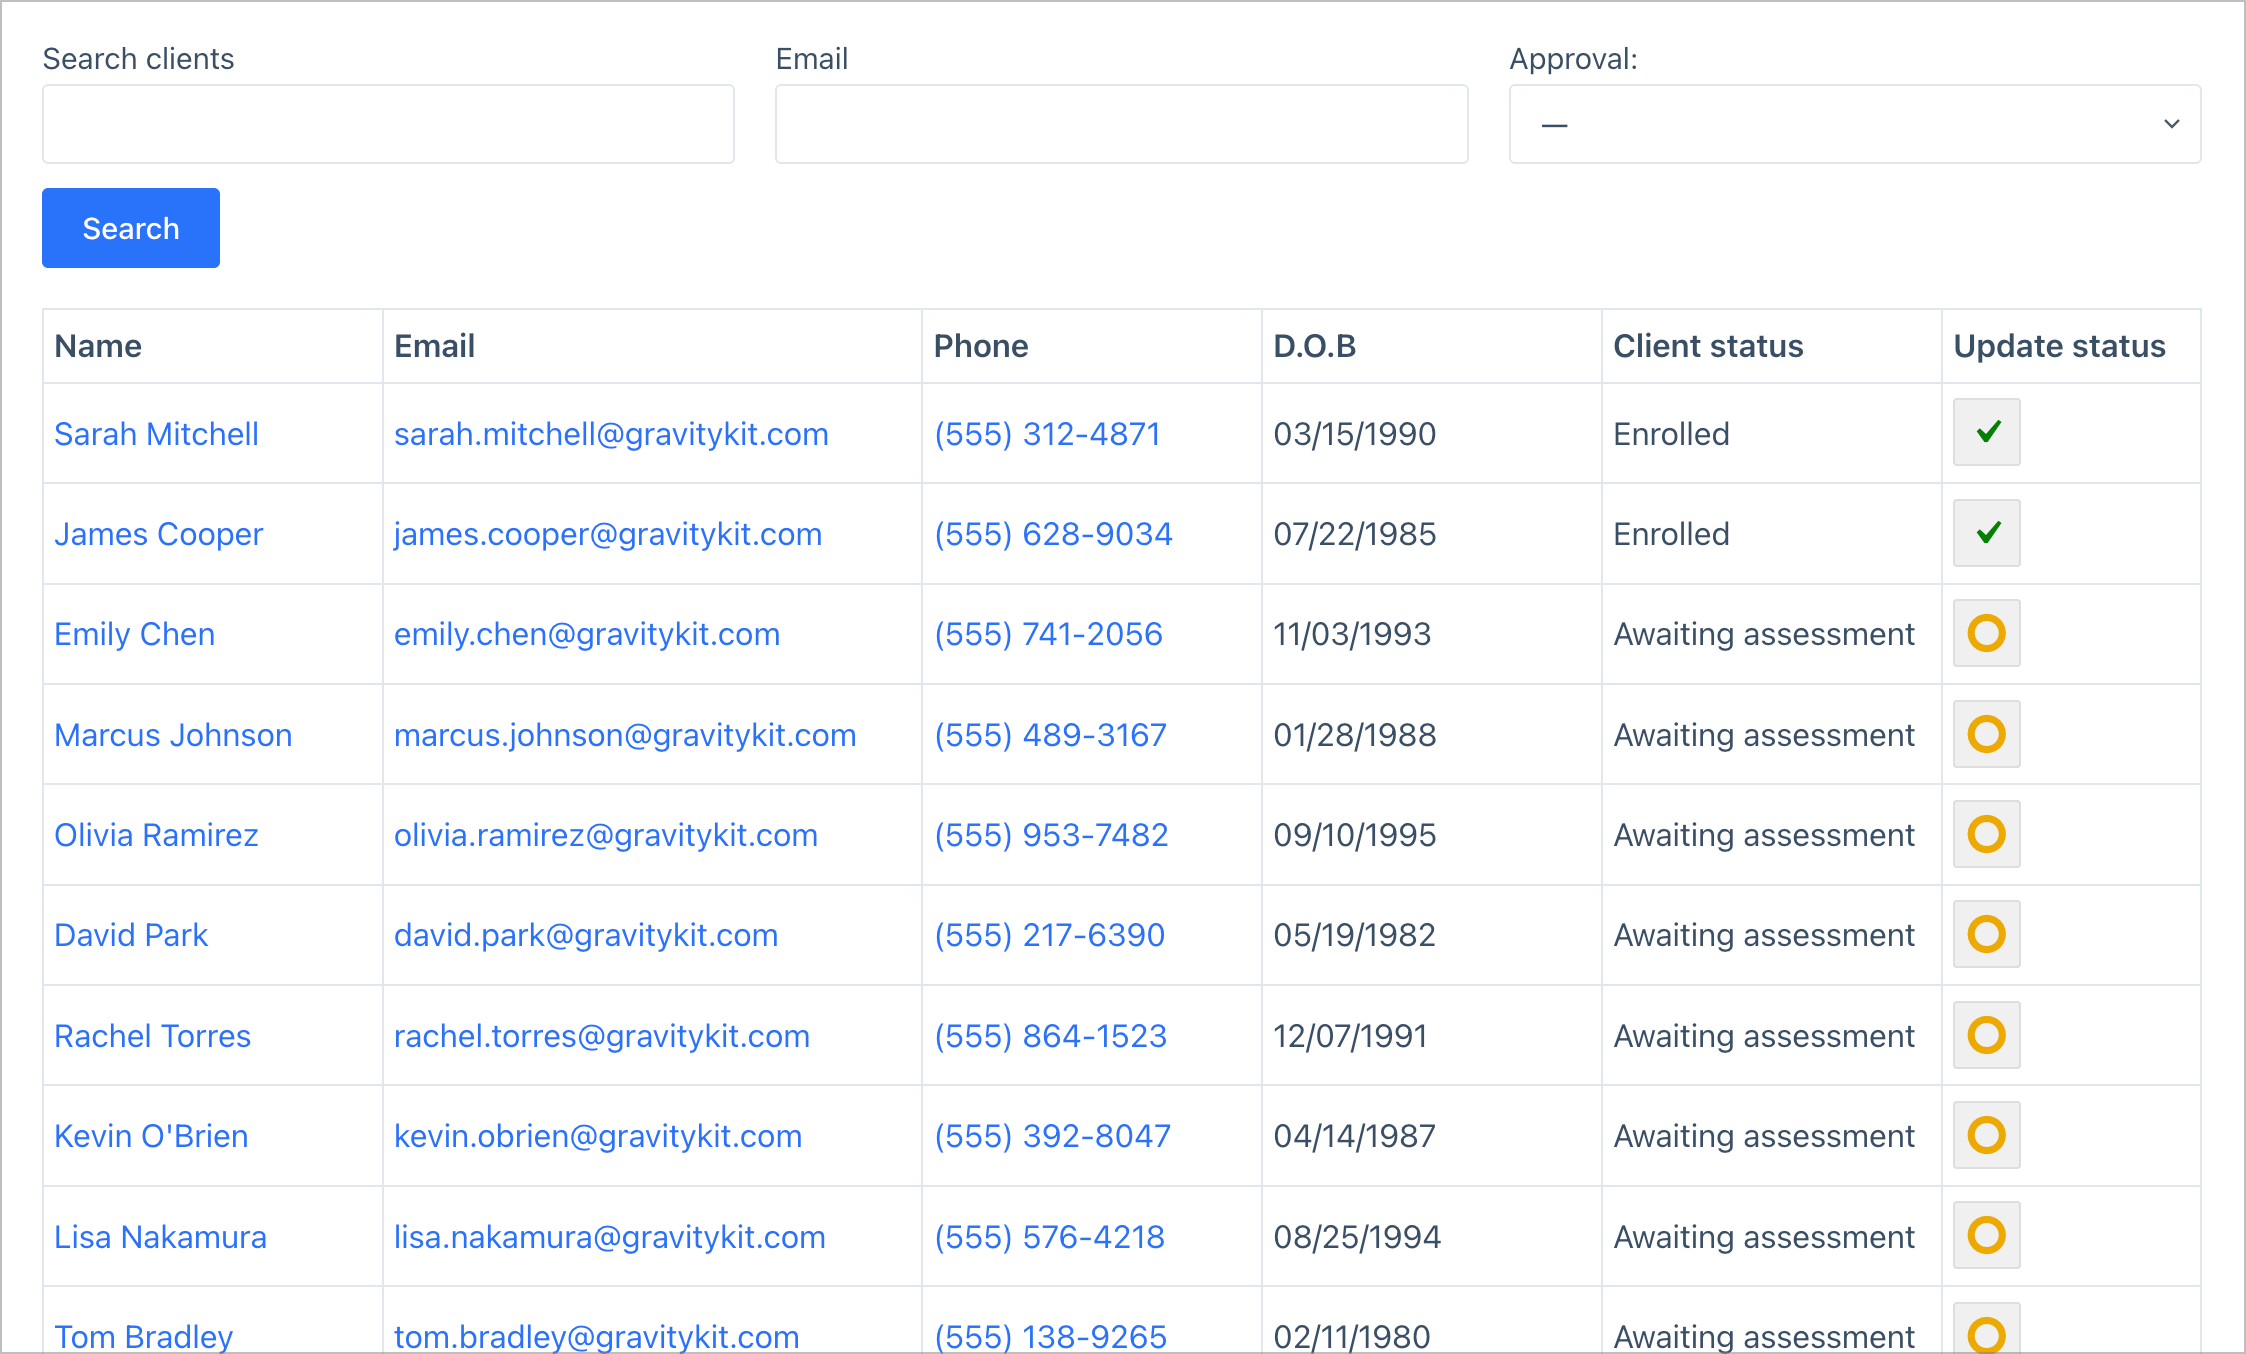
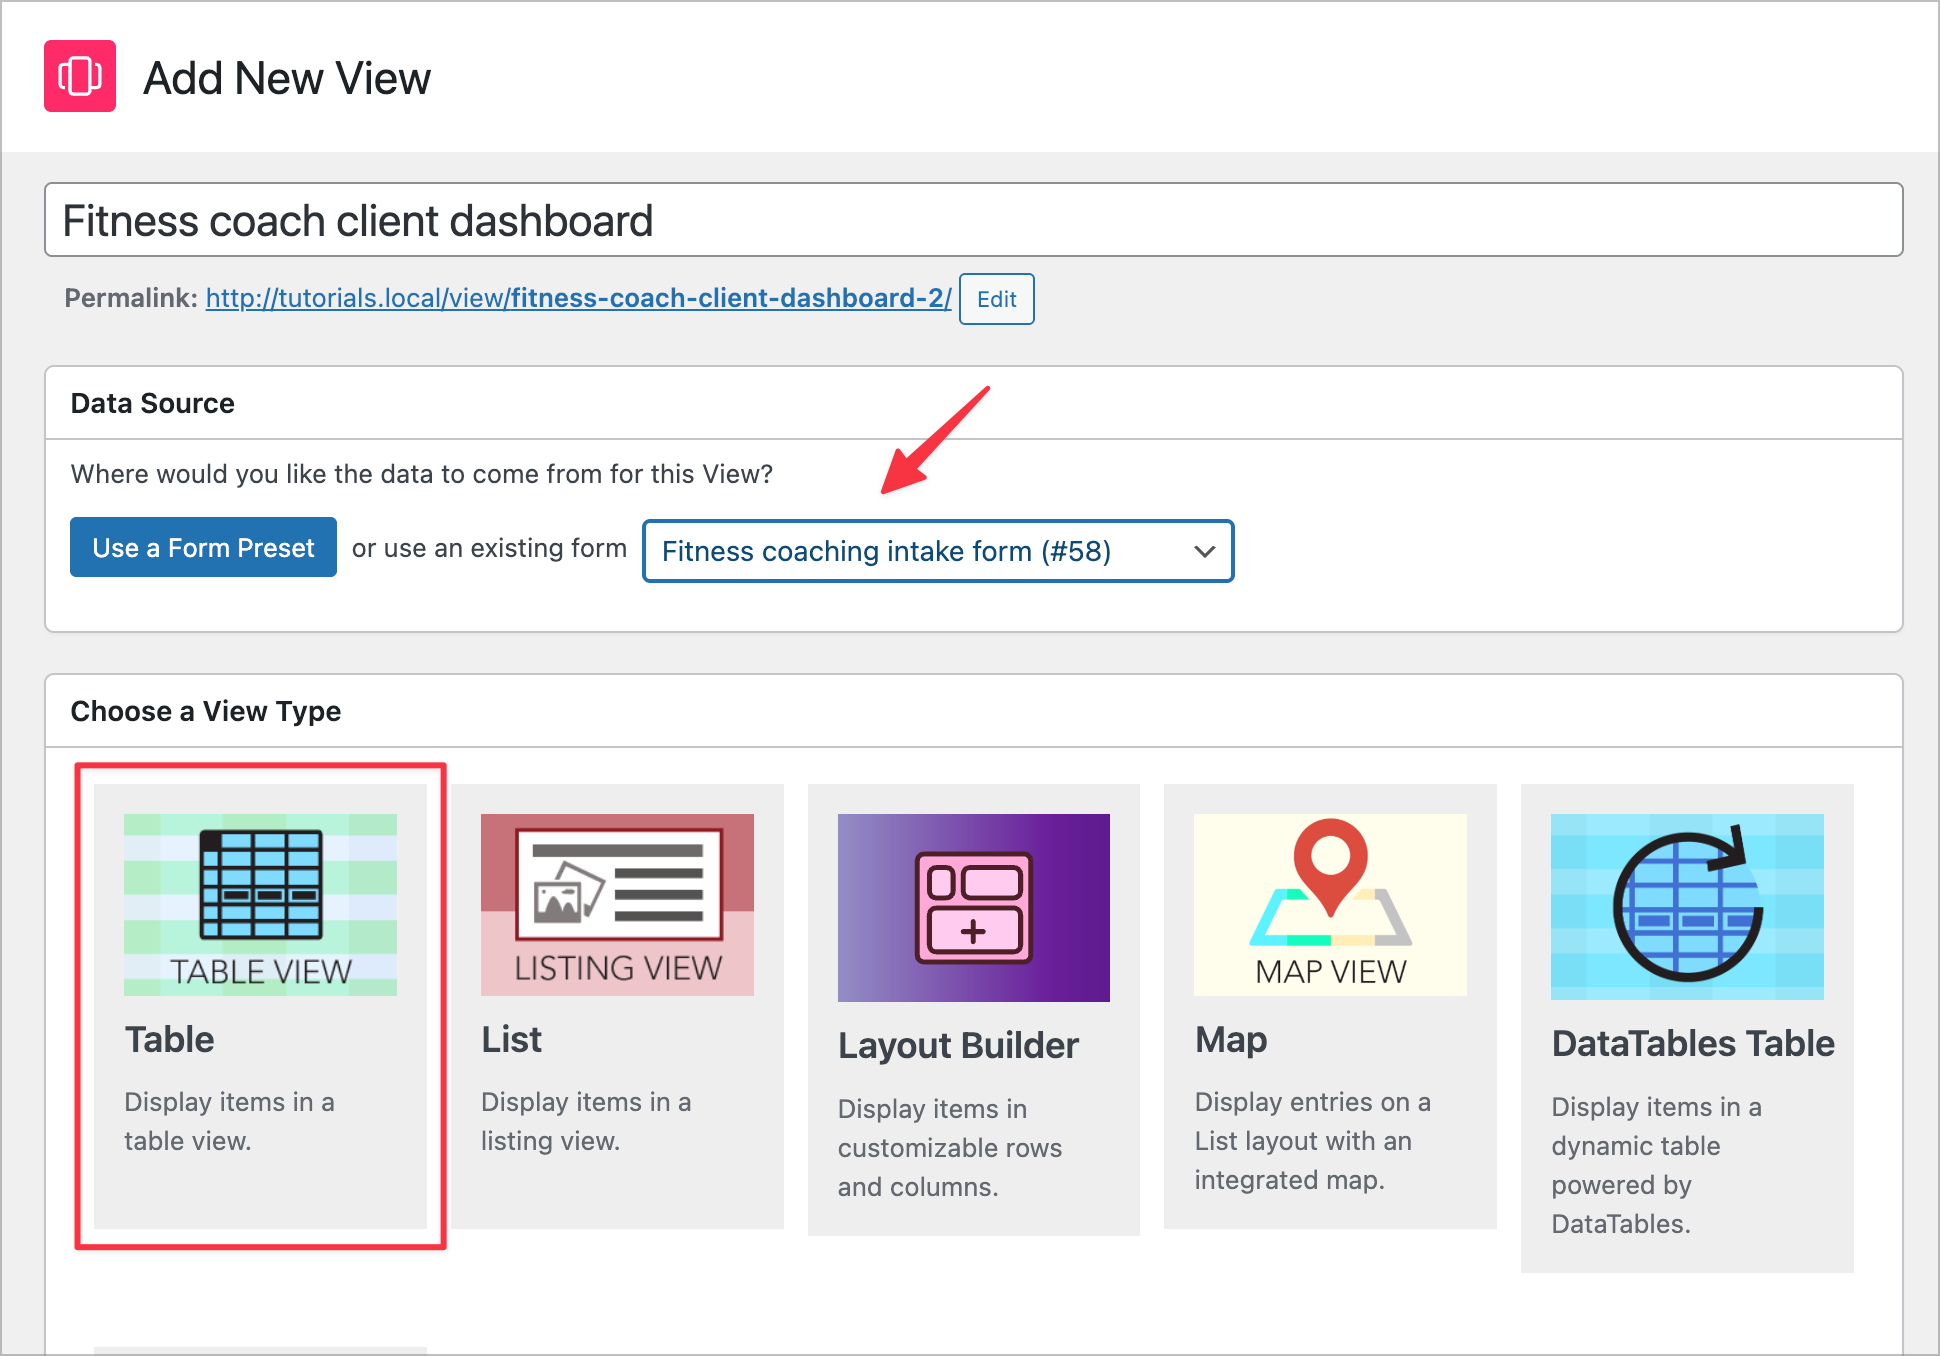
Now we’ll create a GravityView Table View that serves as the coach’s dashboard for looking up and managing client submissions.
Navigate to GravityView and click New View. Give it a name like “Fitness coach client dashboard”, select your intake form as the data source, and choose the Table View type.
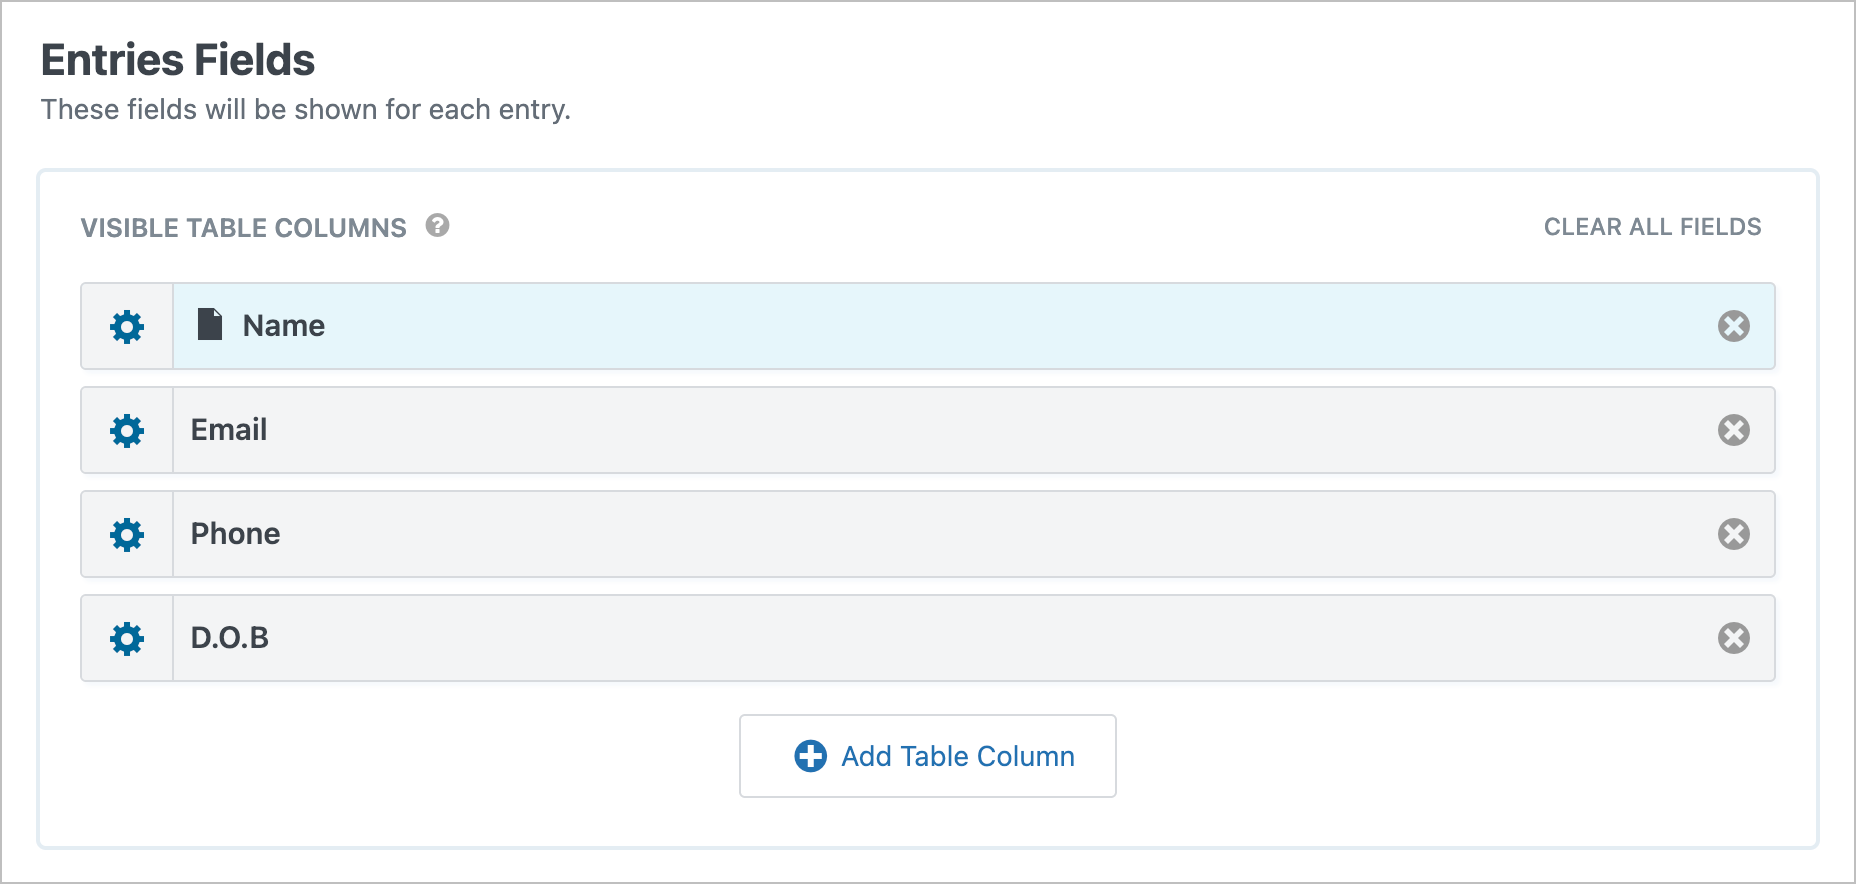
In the Multiple Entries Layout tab, we’ll add the table columns that coaches need to see at a glance by clicking Add Table Column and adding the following fields:
- Name
- Phone
- Date of birth (D.O.B)
Next, we’ll add a Search Bar widget so coaches can quickly find clients. We’ll do this by scrolling up to the Top Widgets area clicking Add Widget, and selecting Search Bar.
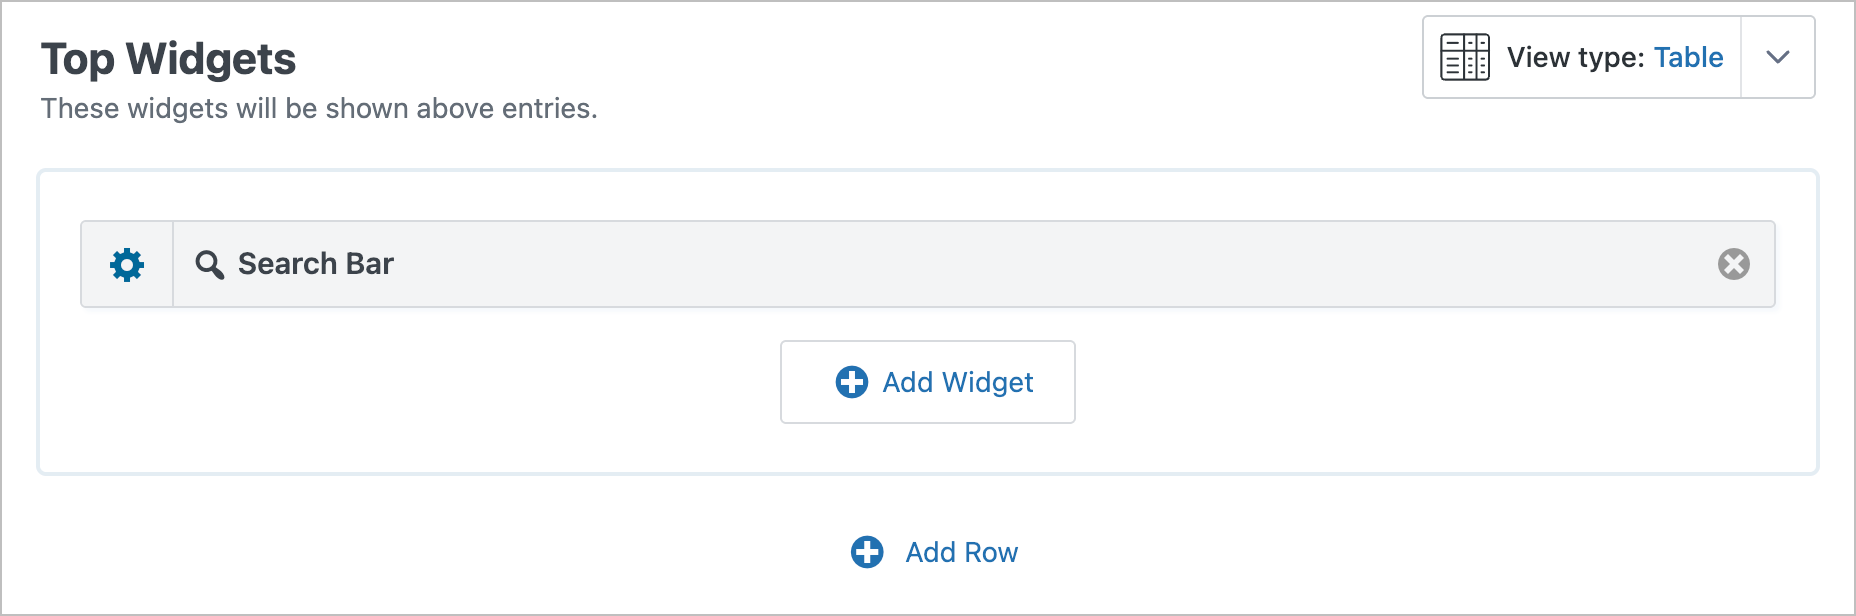
We’ll click the gear icon on the Search Bar to configure it, adding search fields for Name, Email, and Approval status. This way, coaches can look up clients by name or email, or filter by status to see only those awaiting assessment.
Step 3: Configure the Single Entry Layout
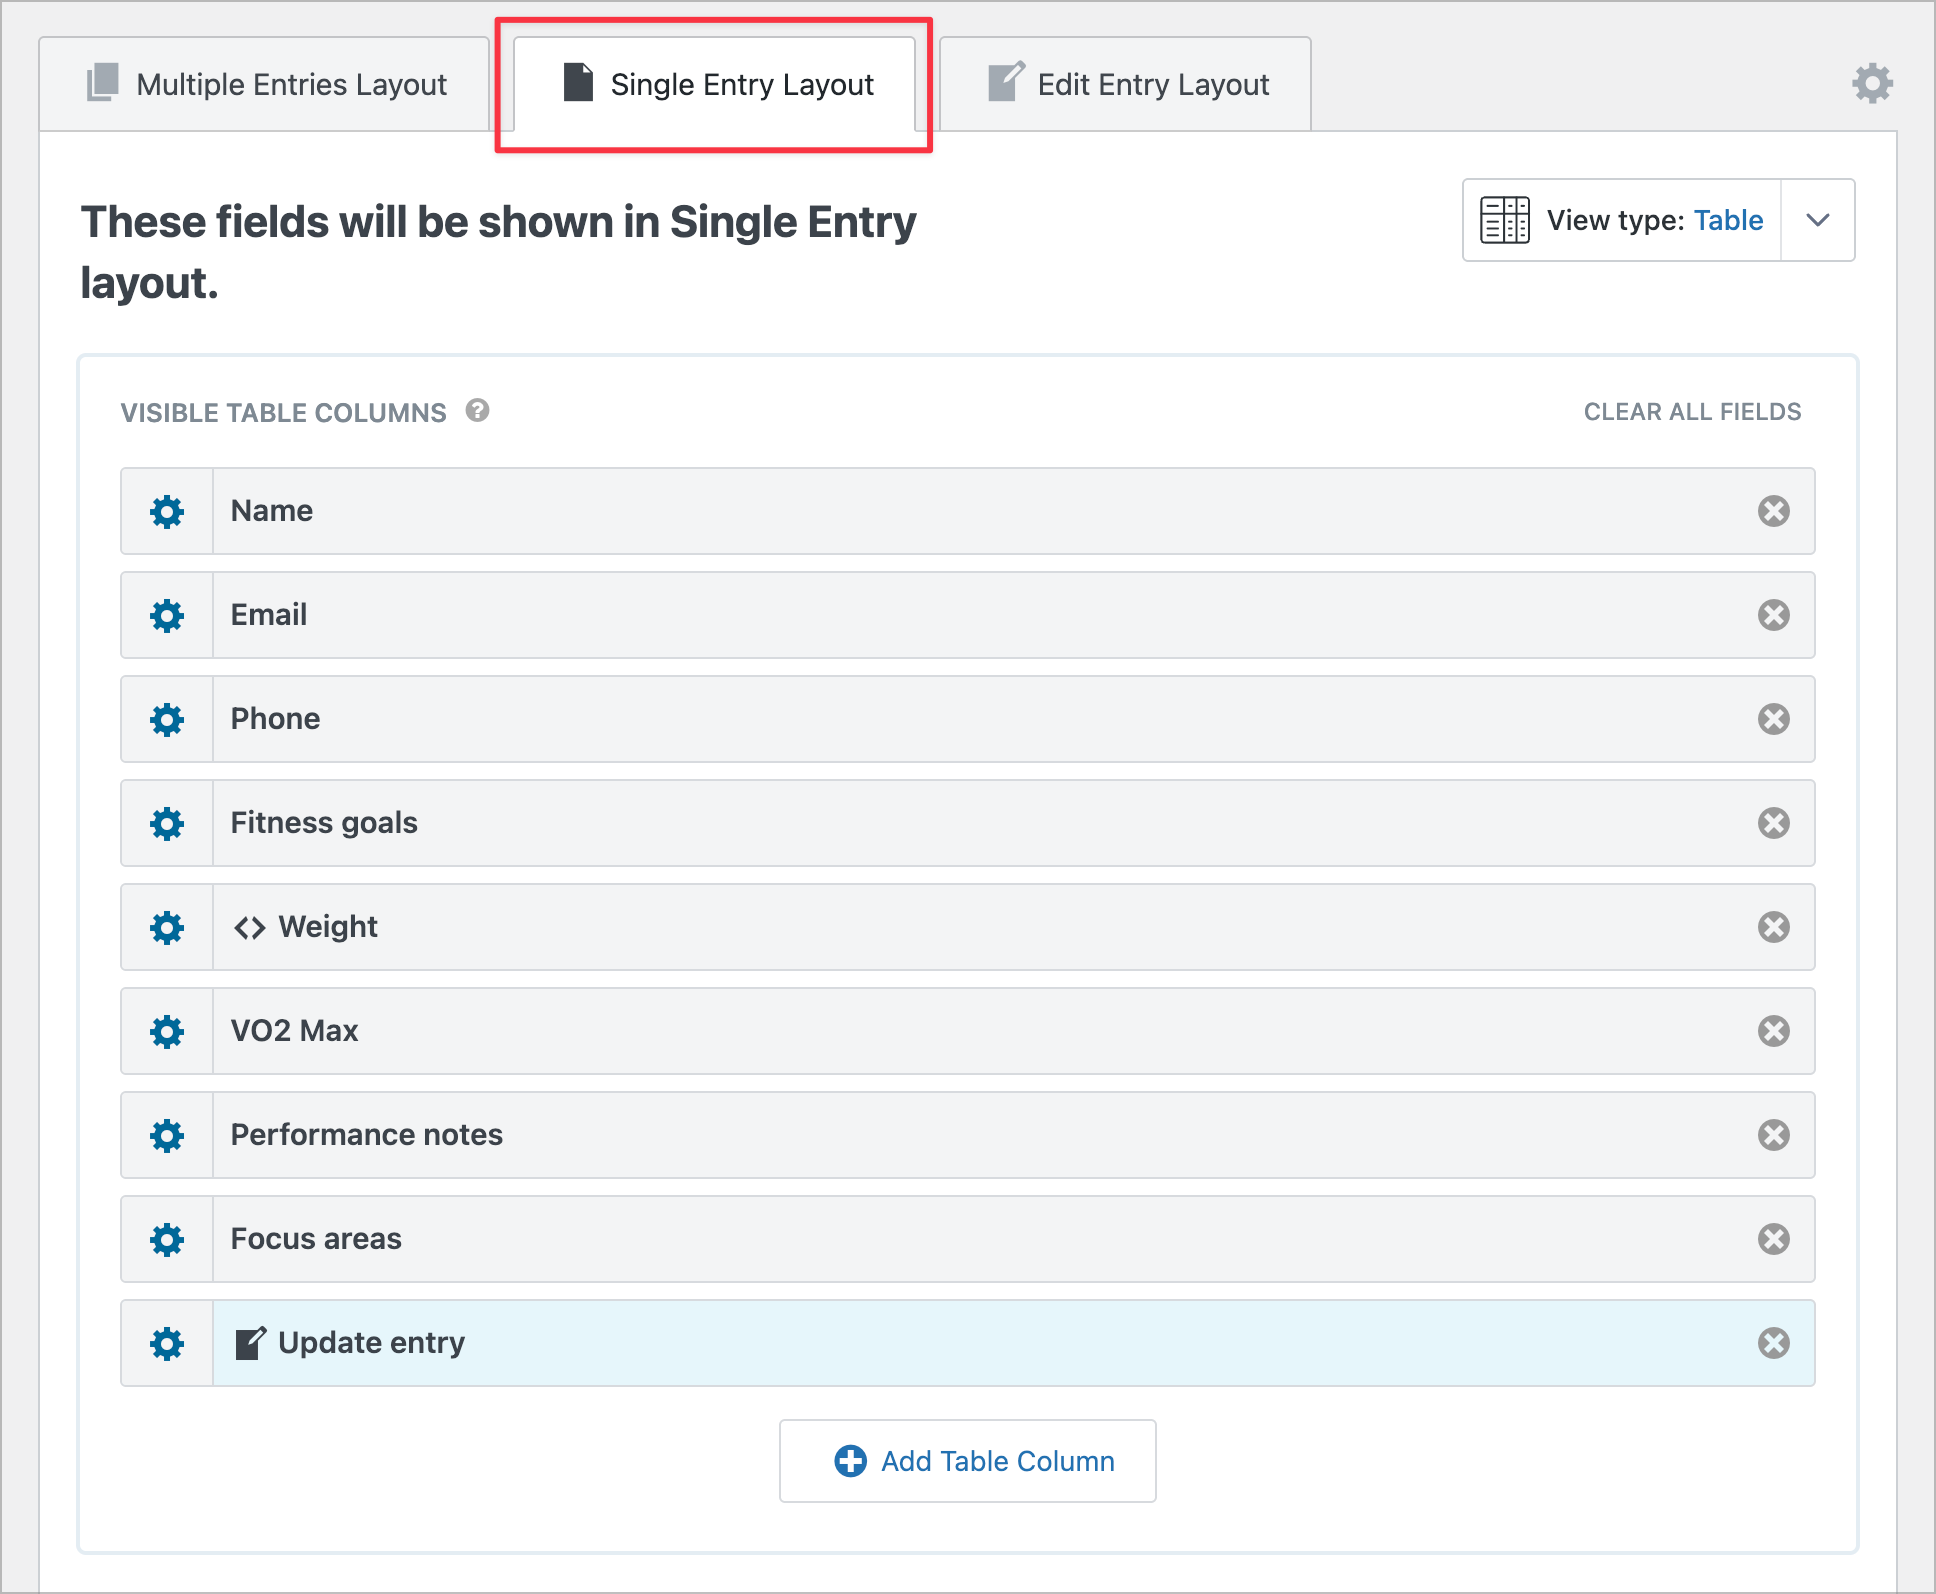
When a coach clicks on a client’s name in the table, they’ll see the Single Entry view with full details. To configure this layout, we’ll switch to the Single Entry Layout tab and add all the relevant fields:
- Name
- Phone
- Fitness goals
- Weight
- VO2 Max
- Performance notes
- Focus areas
- Update entry (an Edit Entry link)
To make client names clickable in the table, go back to the Multiple Entries Layout tab, click the gear icon on the Name field, and check the option to Link to Single Entry.
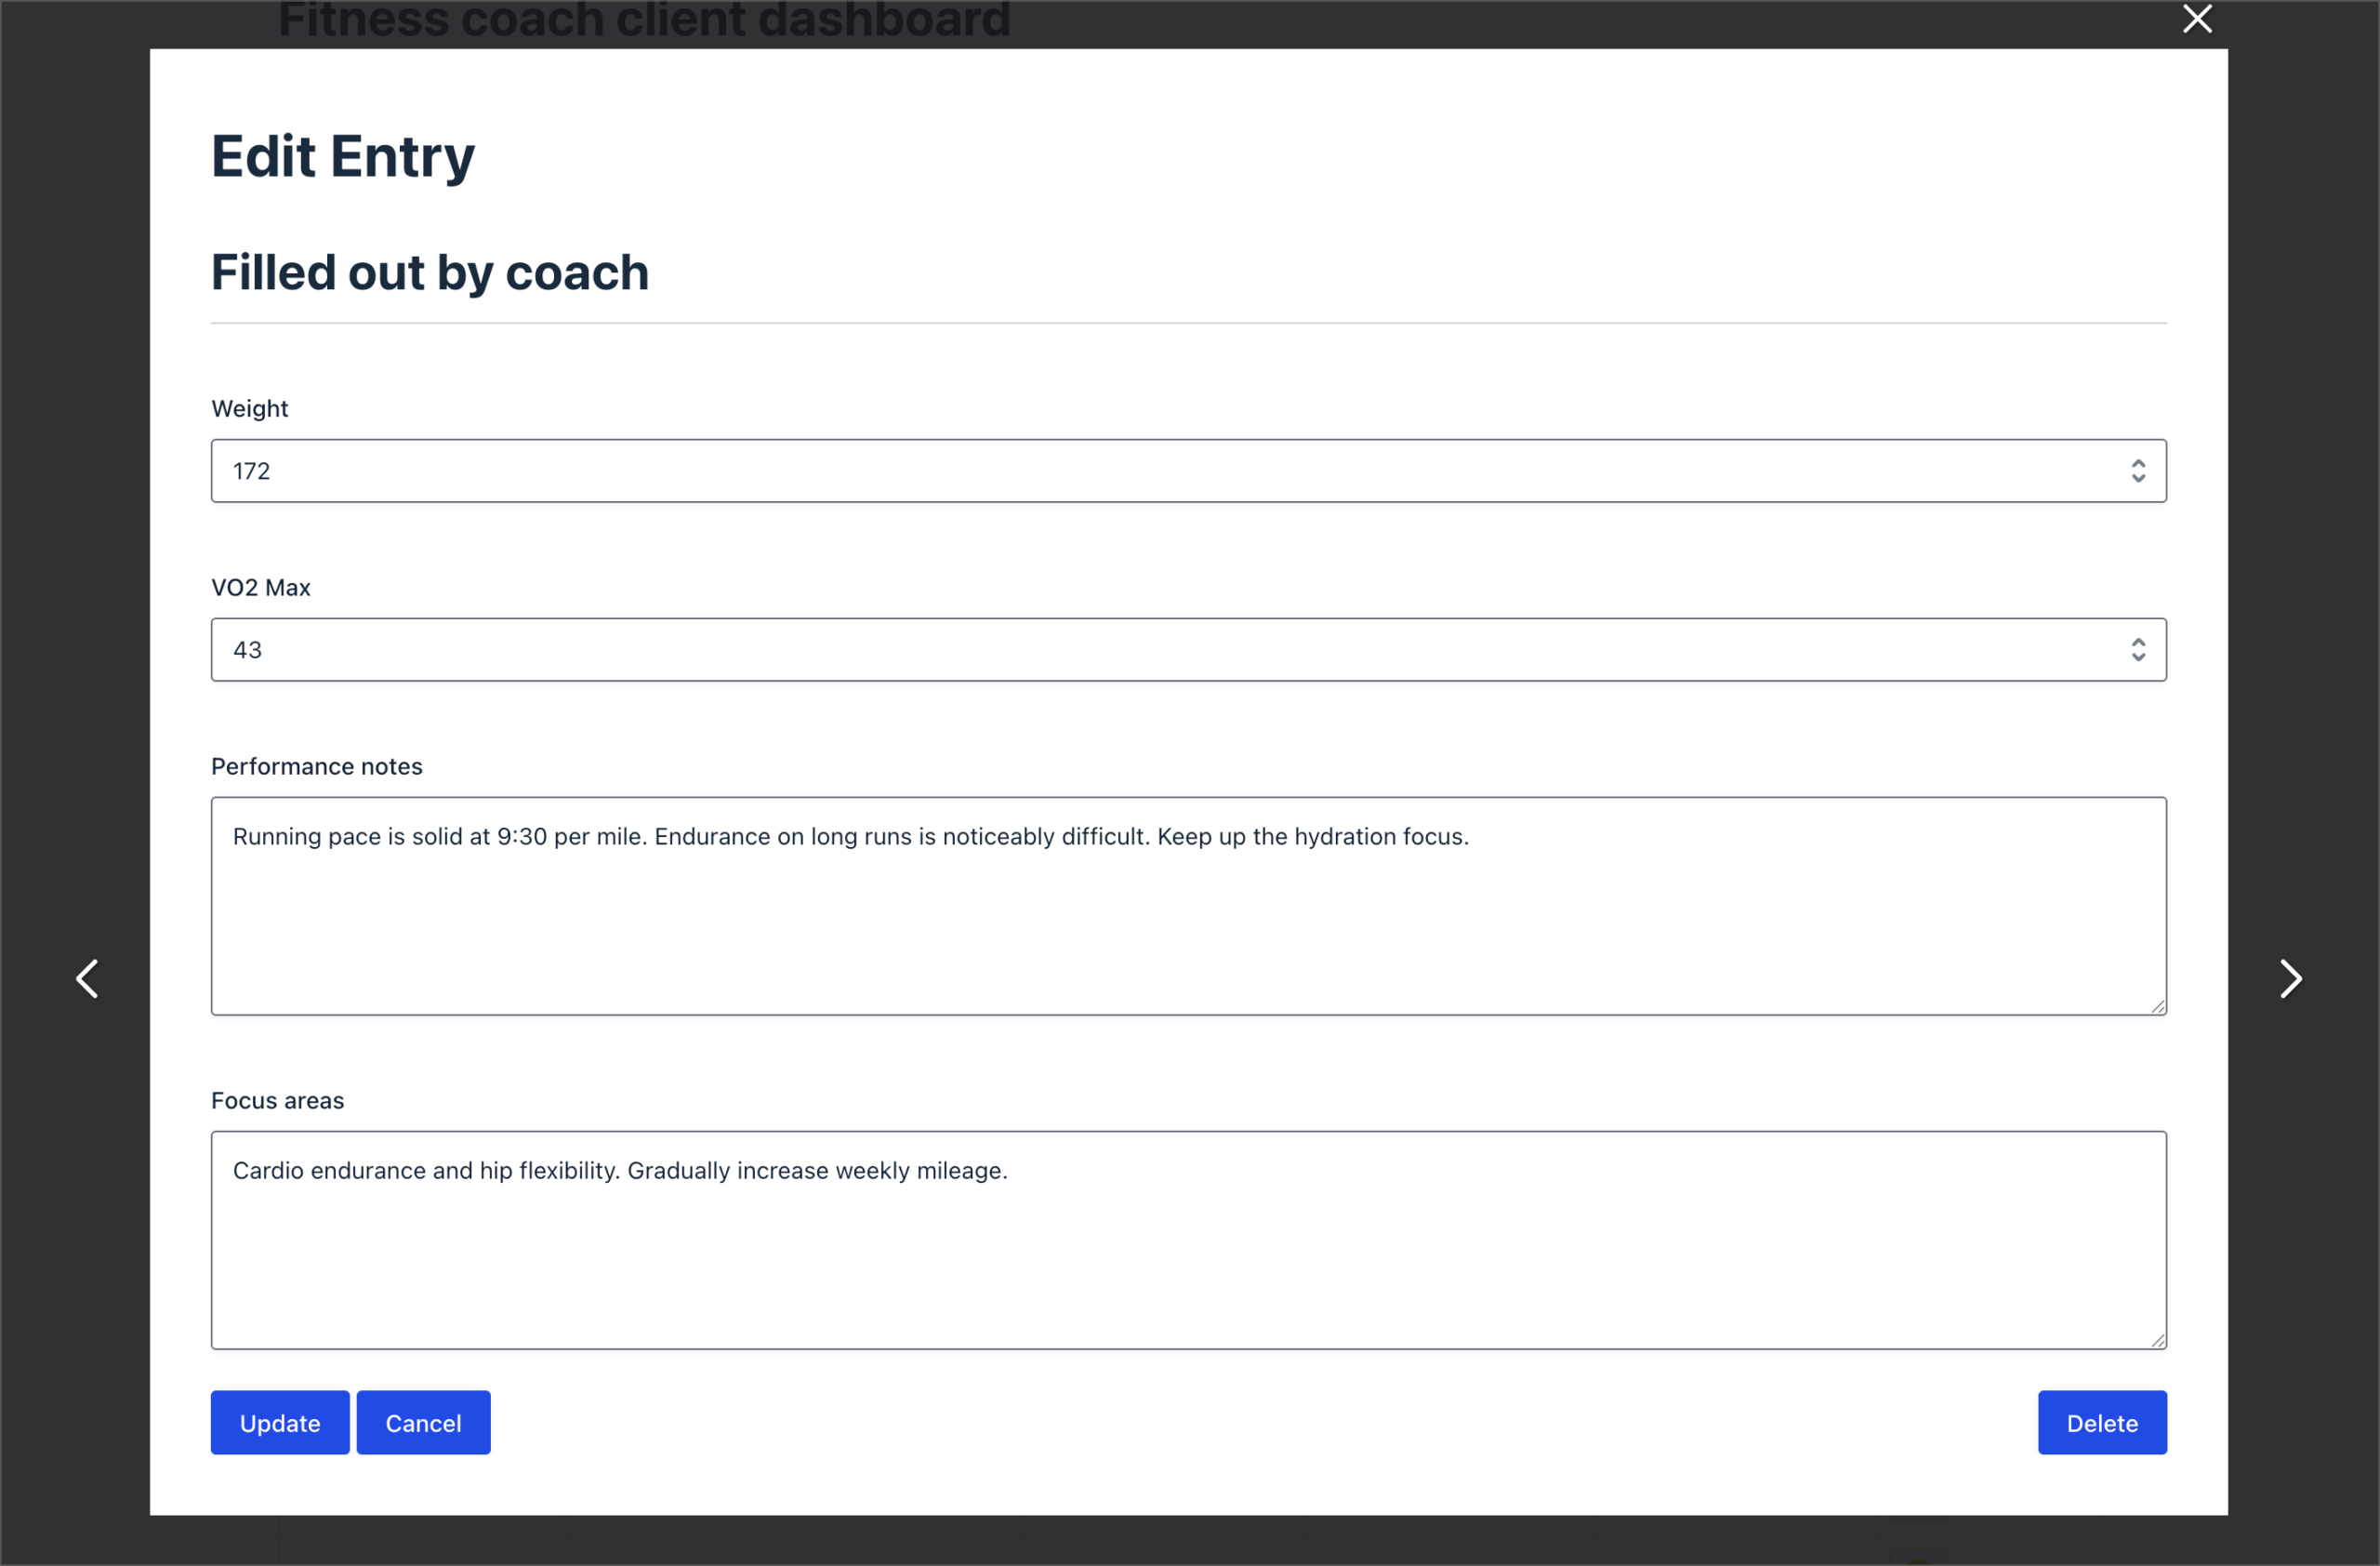
Step 4: Configure the Edit Entry Layout
Now we’ll set up the Edit Entry layout so coaches can fill in their section of the form. Switch to the Edit Entry Layout tab.
Here, we’ll only include the coach-specific fields. This way, coaches won’t accidentally modify the client’s original submission:
- Filled out by coach (Section field)
- Weight
- VO2 Max
- Performance notes
- Focus areas
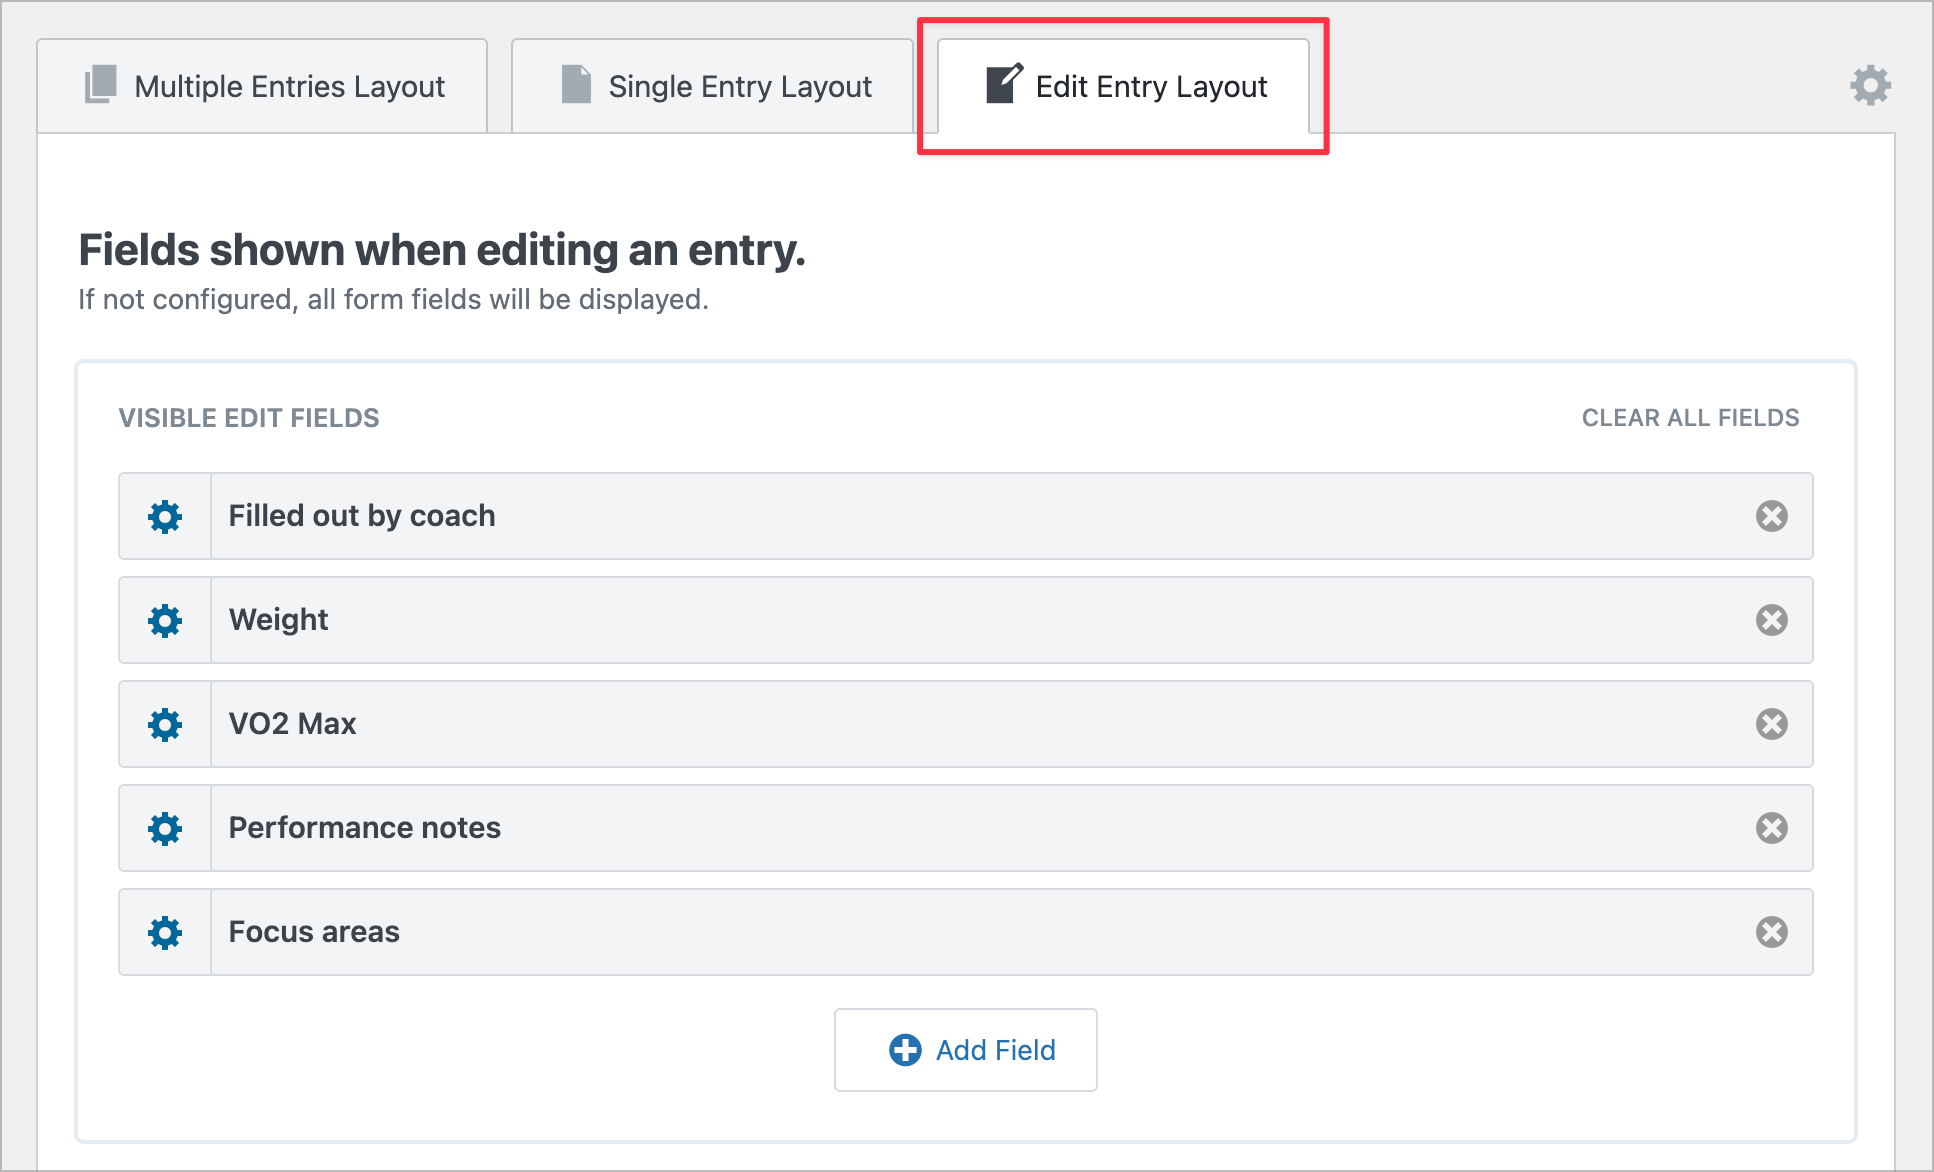
When a coach clicks the Edit Entry link on the frontend, they’ll see only these fields, ready to be filled in with the client’s assessment results.
Step 5: Add status tracking
To help coaches keep track of which clients have been assessed, we’ll add GravityView’s built-in approval fields to the View.
Go back to the Multiple Entries Layout tab and click Add Table Column. Search for “approval” and add both the Approve Entries and Approval Status fields.
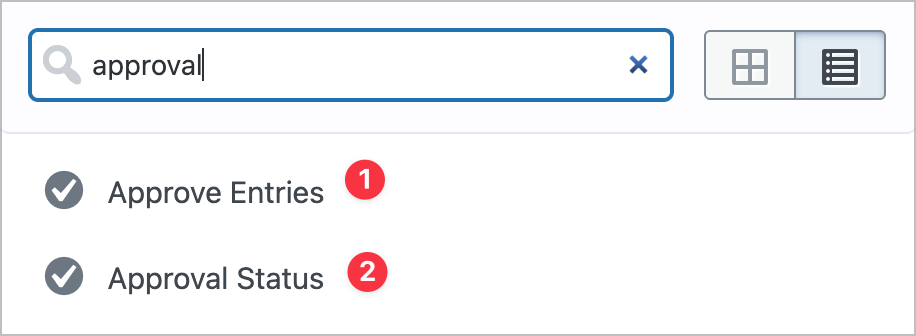
The Approve Entries field adds a clickable toggle that coaches can use to update a client’s status directly from the table. The Approval Status field displays the current status as a text label (e.g., “Awaiting assessment” or “Enrolled”).

Pro Tip
You can also add an Advanced Filter condition to only show entries with a specific status. For example, filter the View to show only entries where the approval status is “Unapproved” so coaches see only clients who still need assessment.
Step 6: Add optional enhancements
Once your basic workflow is running, here are a couple of ways to take it further:
- Email notifications – Set up Gravity Forms notifications to email the coaching team when a new client submits the intake form. You can also trigger a notification when a coach updates the entry status to “Approved”, confirming to the client that their assessment is complete.
- Multiple Views – Create a second View filtered to show only “Approved” entries. This gives you a separate archive of completed assessments for easy reference.
Other use cases for this workflow
This same two-step pattern works for many scenarios beyond fitness coaching:
- Instrument rental contracts – The customer fills out personal details online, and staff add instrument information and collect a signature at pickup.
- Medical intake – A patient completes their health history online, and a nurse reviews it and adds vitals at the appointment.
- Event check-in – Attendees register online, and staff confirm attendance and assign badges or table numbers at the door.
- Service appointments – A client books an appointment and describes the issue, then a technician adds diagnosis and resolution notes.
Ready to build your own intake workflow?
That’s it! With Gravity Forms and GravityView, you can create a smooth two-step workflow where clients fill out their part and staff complete the rest—all from the frontend of your WordPress site. So what are you waiting for? Try GravityView today!

Helpful tips right in your inbox.
Subscribe to get the latest articles, information on releases and helpful Gravity Forms tips!
More articles

GravityKit turns 12: a year in review, and 30% off Lifetime All Access
GravityKit turns 12. A look back at a year of GravityView 3.0, GravitySearch, and AI-assisted building, plus a birthday sale on the Lifetime All Access Pass.

Launch Log: Row headers for screen readers, smarter conditional logic, and multi-View fixes
GravityView 3.1 adds row headers for screen readers, plus smarter conditional logic in GravityCalendar and fixes for DataTables, Maps, and Dynamic Lookup.

Ecommerce platform market share 2026: WooCommerce leads the web, Shopify leads the top tier
Ecommerce platform market share in 2026, from HTTP Archive data. WooCommerce leads the whole web at 6.64%, but Shopify already leads the top 1M sites.
