Published
•
Updated
How to build an employee evaluation system on WordPress using GravityKit
Managing employee evaluations is often slow, inconsistent, and awkward for everyone involved. Chasing managers for feedback, emailing documents back and forth, and keeping track of approvals can quickly turn into a mess. In this tutorial, we’ll build a streamlined employee evaluation workflow that runs entirely on the frontend using Gravity Forms and GravityKit. Here’s the…
Managing employee evaluations is often slow, inconsistent, and awkward for everyone involved. Chasing managers for feedback, emailing documents back and forth, and keeping track of approvals can quickly turn into a mess.
In this tutorial, we’ll build a streamlined employee evaluation workflow that runs entirely on the frontend using Gravity Forms and GravityKit.
Here’s the workflow:
- Employee submits self-evaluation
- Manager is notified and prompted to submit their independent evaluation
- Once approved, the completed evaluation is automatically emailed back to the employee
Let’s dive in.
Sneak peek
Here’s a preview of the finished employee evaluation system. It starts with a self-evaluation form that employees fill out to evaluate their own performance.

The form includes a hidden section for managers to fill out that employees never see. When the employee submits their self-evaluation, a notification is sent to their manager with a special link to submit their own evaluation of the employee.
Once managers submit their evaluation, they mark the full evaluation as “Approved” and it is sent back to the employee for review.

Managers also have access to their own dashboard where they can view all evaluations awaiting approval.

Wanna try it?
Spin up a demo
See what you can build with GravityView — explore the live demo.

What you’ll need
Here are the plugins you’ll need to build an employee evaluation system like the one in this example:
Step 1: Create the evaluation form
The first step is to create the employee evaluation form. We’ll do this by hovering over Forms and clicking New Form. Now we can create our form using the Gravity Forms visual builder.
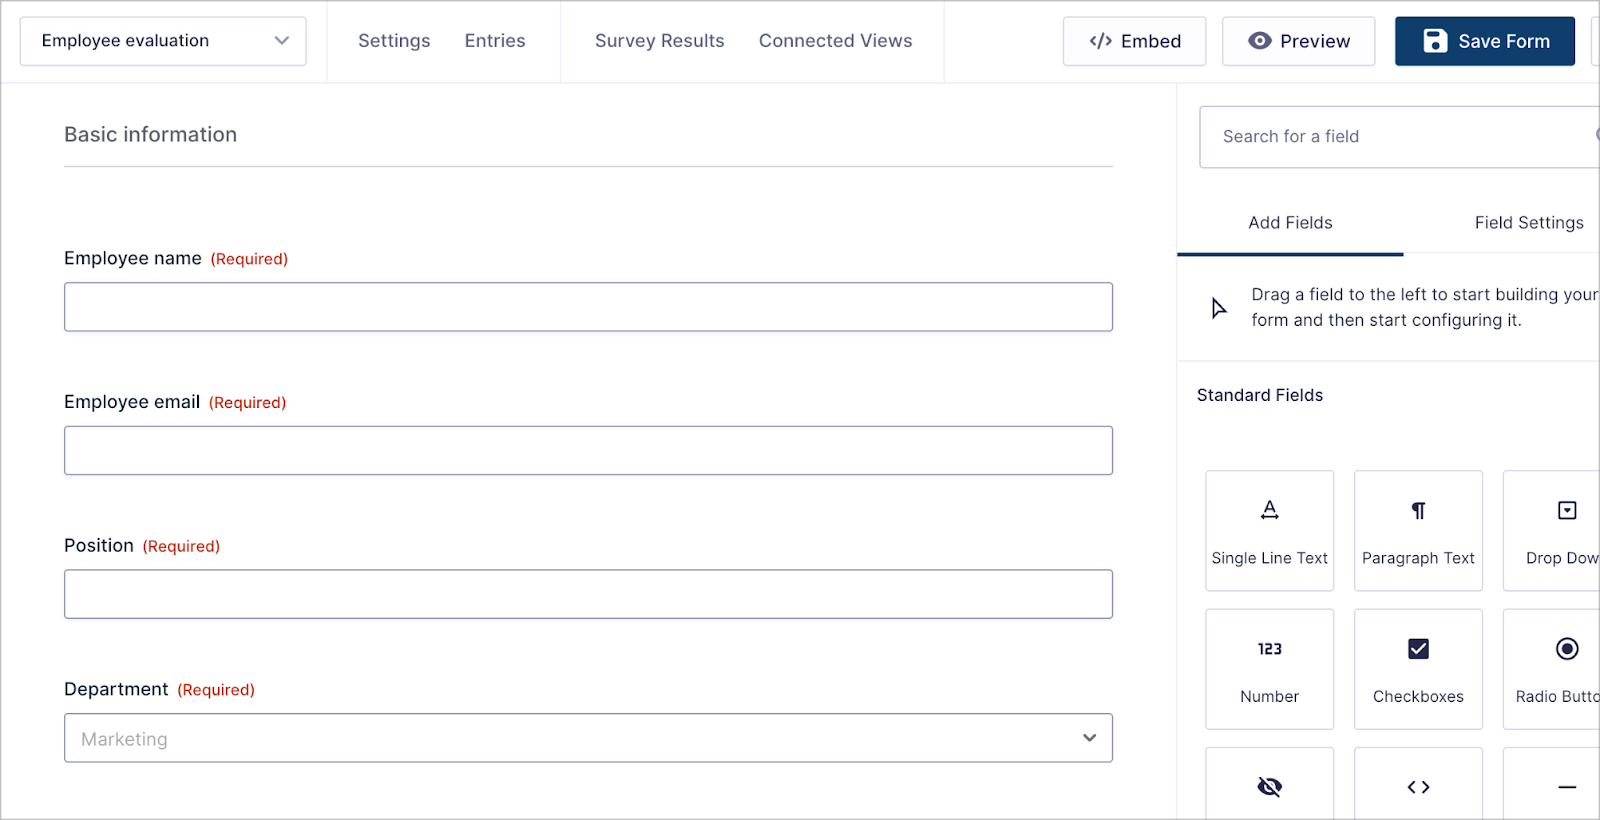
Our form will be divided into three sections.
- Section 1: Basic information about the employee
- Employee name (Single Line Text field)
- Employee email (Email field)
- Position (Single Line Text field)
- Department (Drop Down field)
- Manager name (Single Line Text field)
- Manager email (Email field)
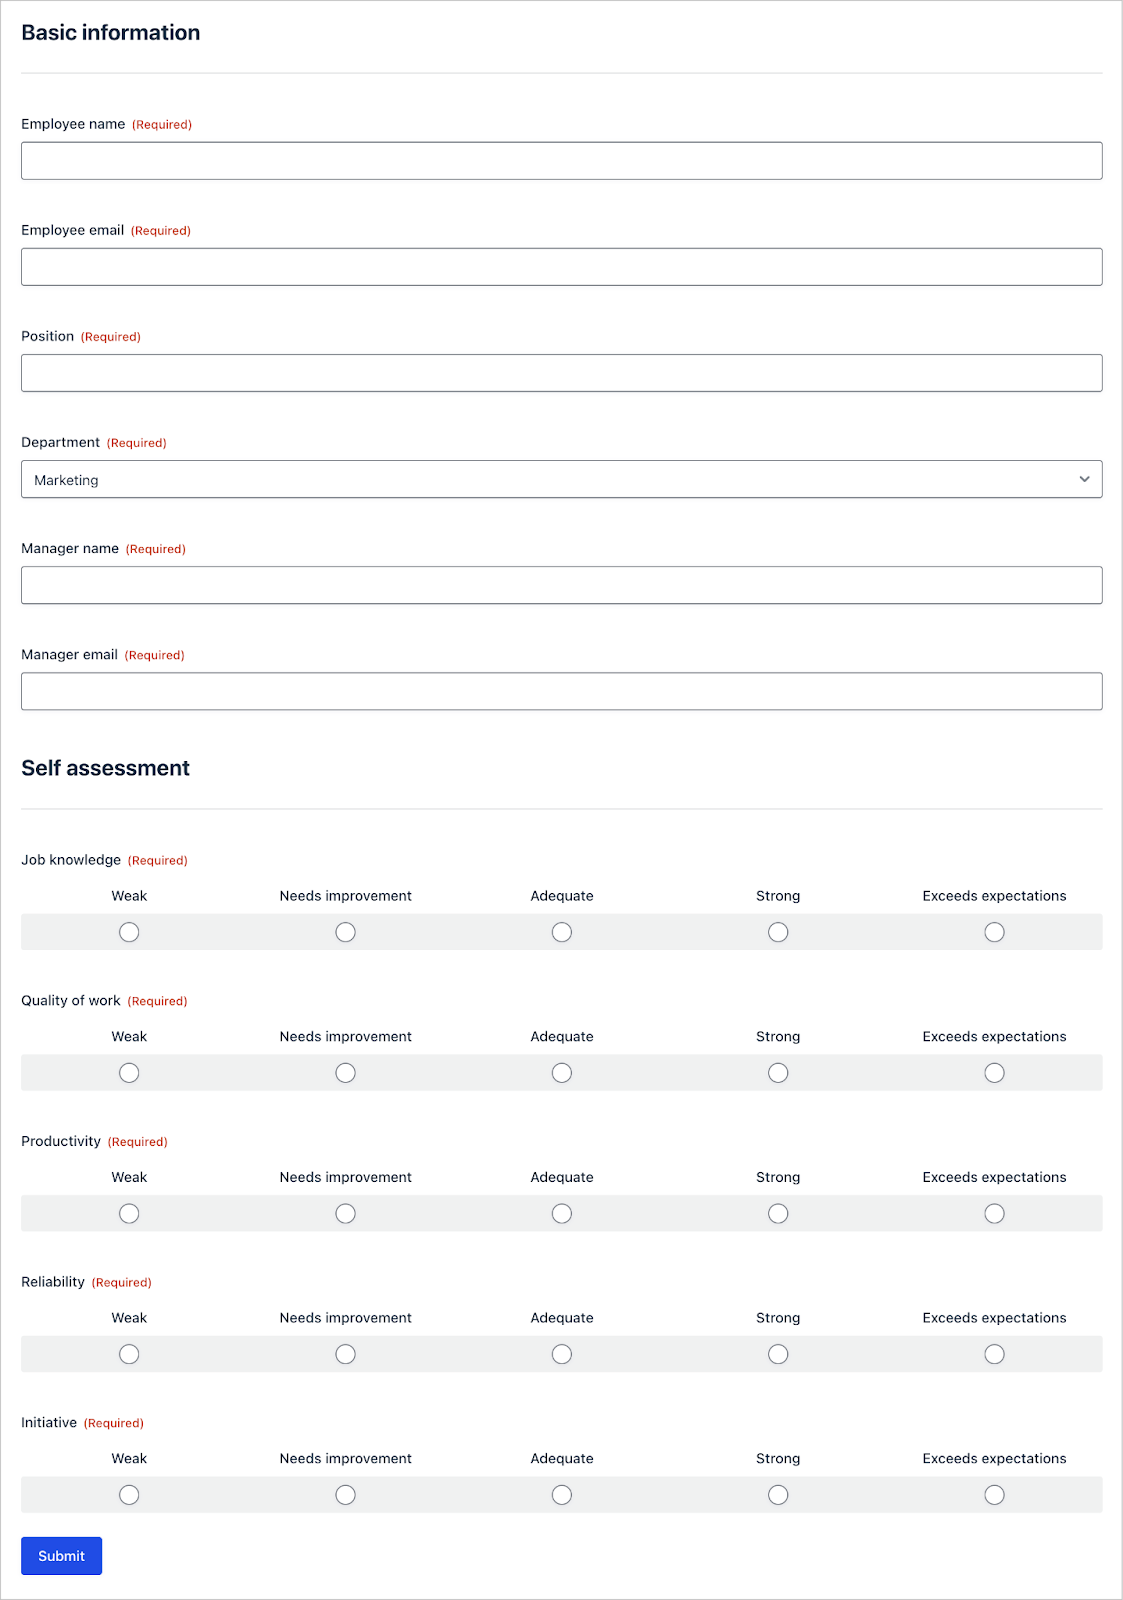
- Section 2: Employee self-evaluation questions
- Job knowledge (Survey field)
- Quality of work (Survey field)
- Productivity (Survey field)
- Reliability (Survey field)
- Initiative (Survey field)
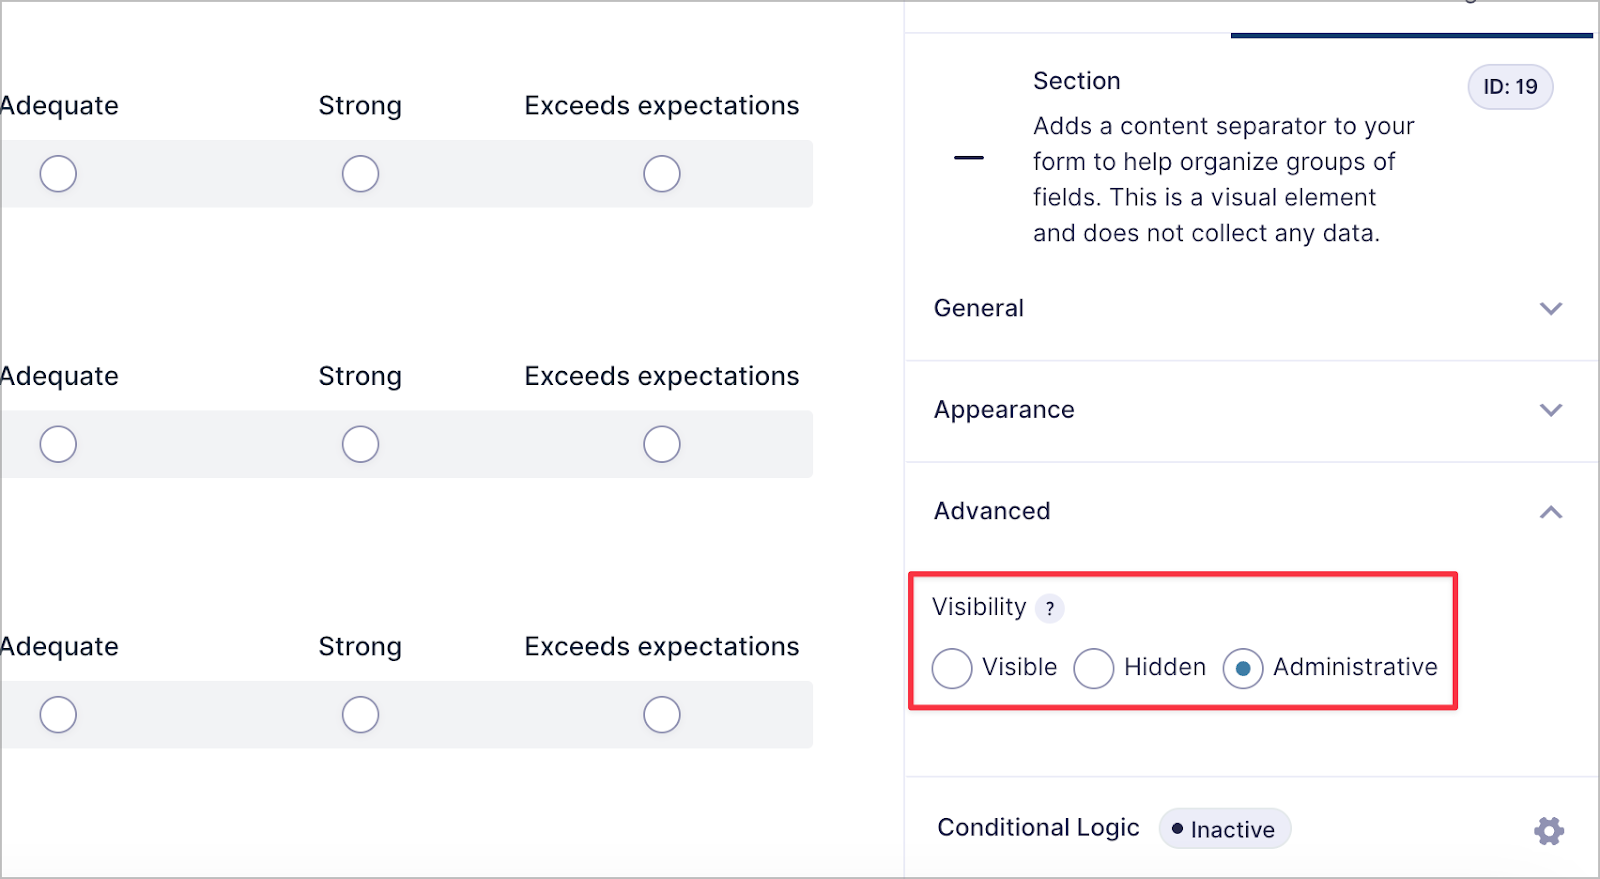
- Section 3: Manager evaluation questions (hidden from employees)
- Job knowledge (Survey field)
- Quality of work (Survey field)
- Productivity (Survey field)
- Reliability (Survey field)
- Initiative (Survey field)
- Summary & key development areas (Paragraph Text field)
Importantly, we’ll ensure that the manager evaluation questions are hidden from employees by setting the visibility to Administrative.
Here’s what our form looks like on the frontend:
Step 2: Create the View
The next step is to create a View for managers to see submitted employee self-evaluations. This provides a dashboard for managers to see which evaluations still require their input and approval.
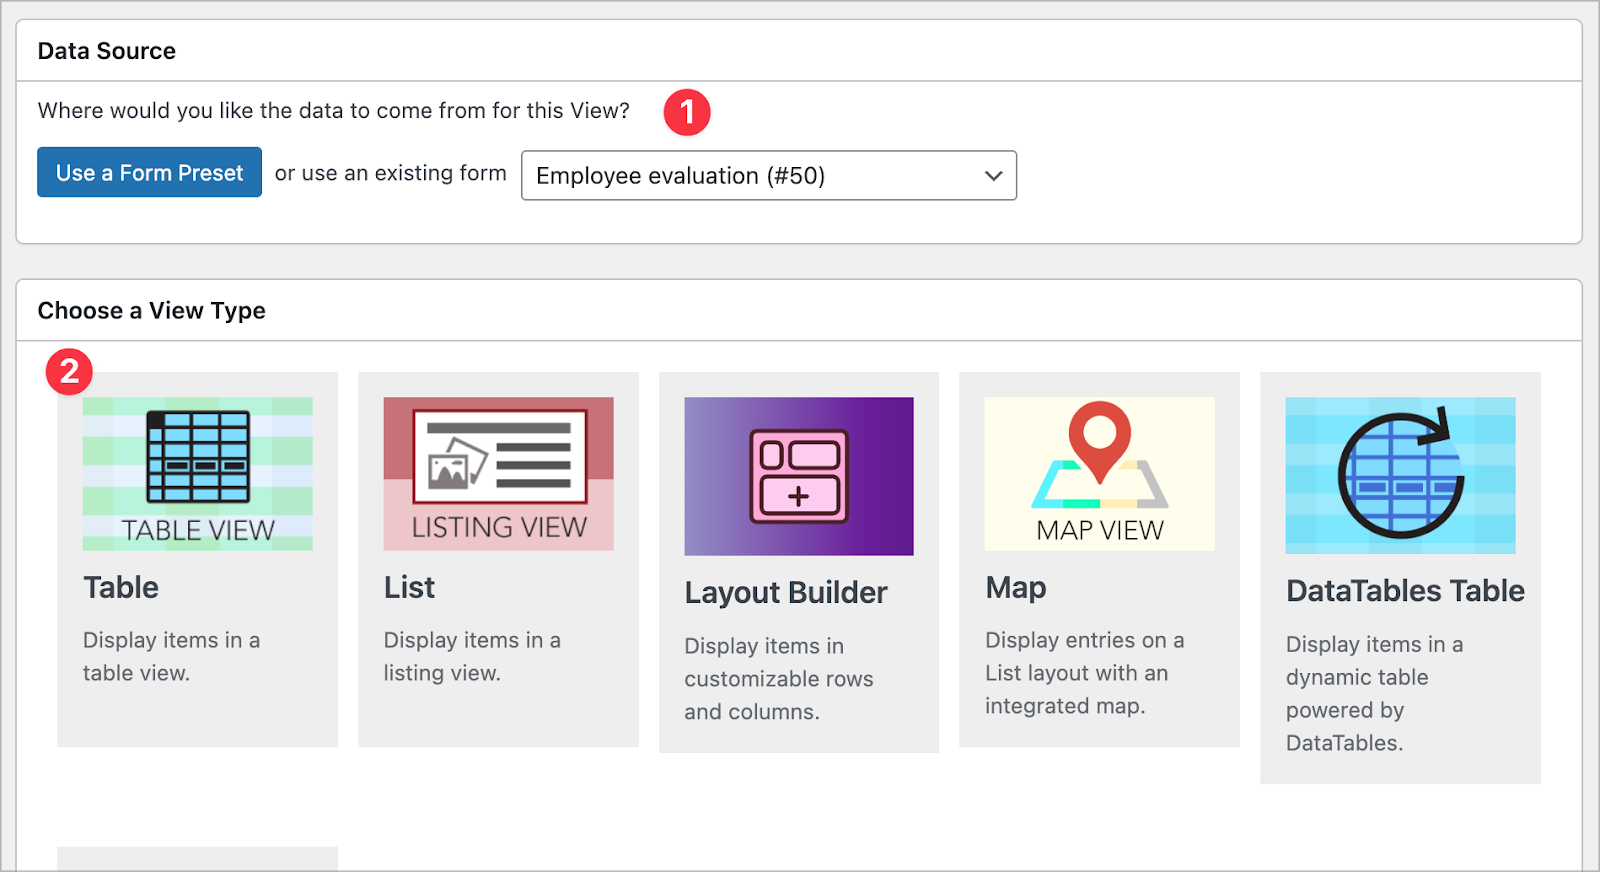
To create a new View, we’ll hover over GravityKit and click New View. After giving our View a name, we’ll select our Employee evaluation form as the data source and choose Table as our View type.
Configuring the Multiple Entries Layout
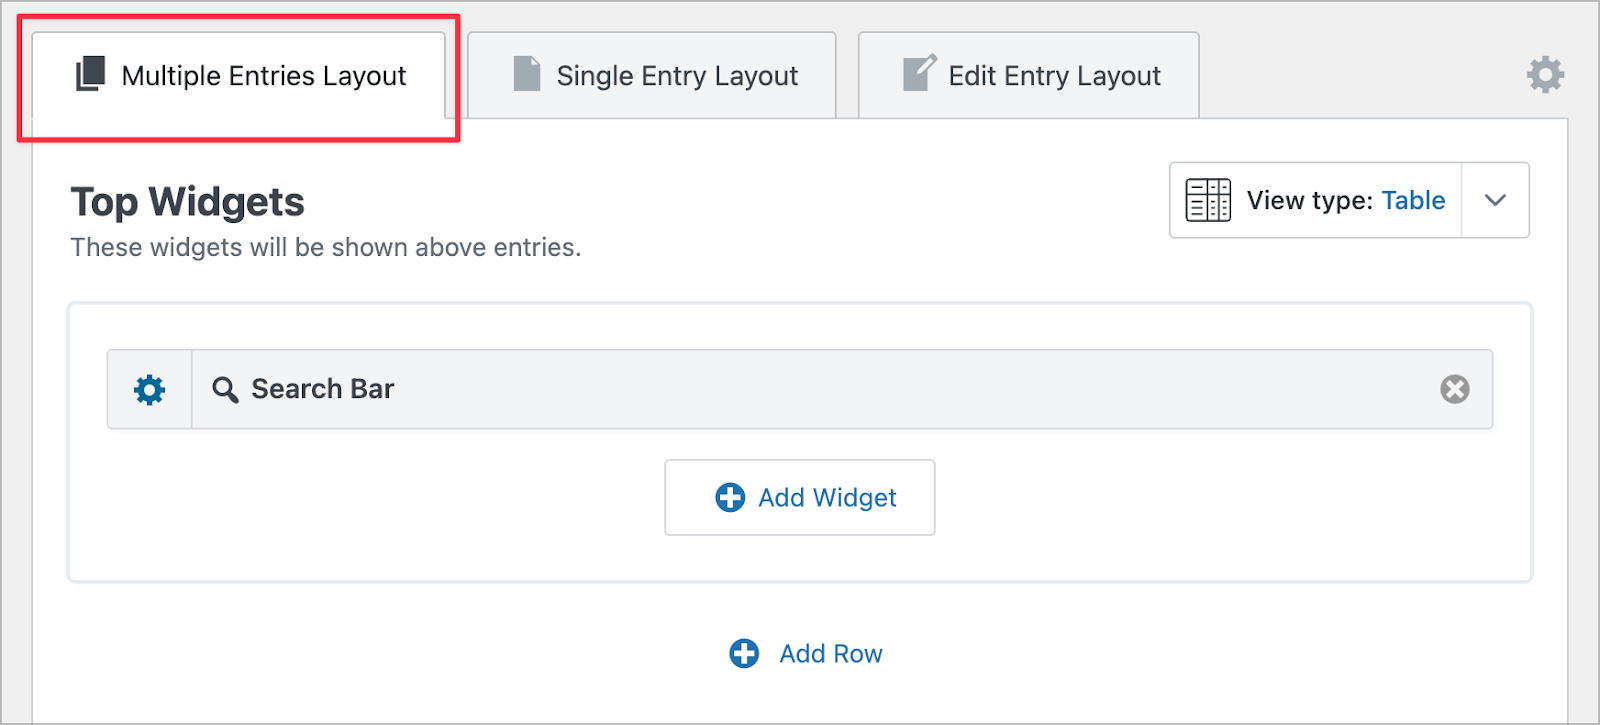
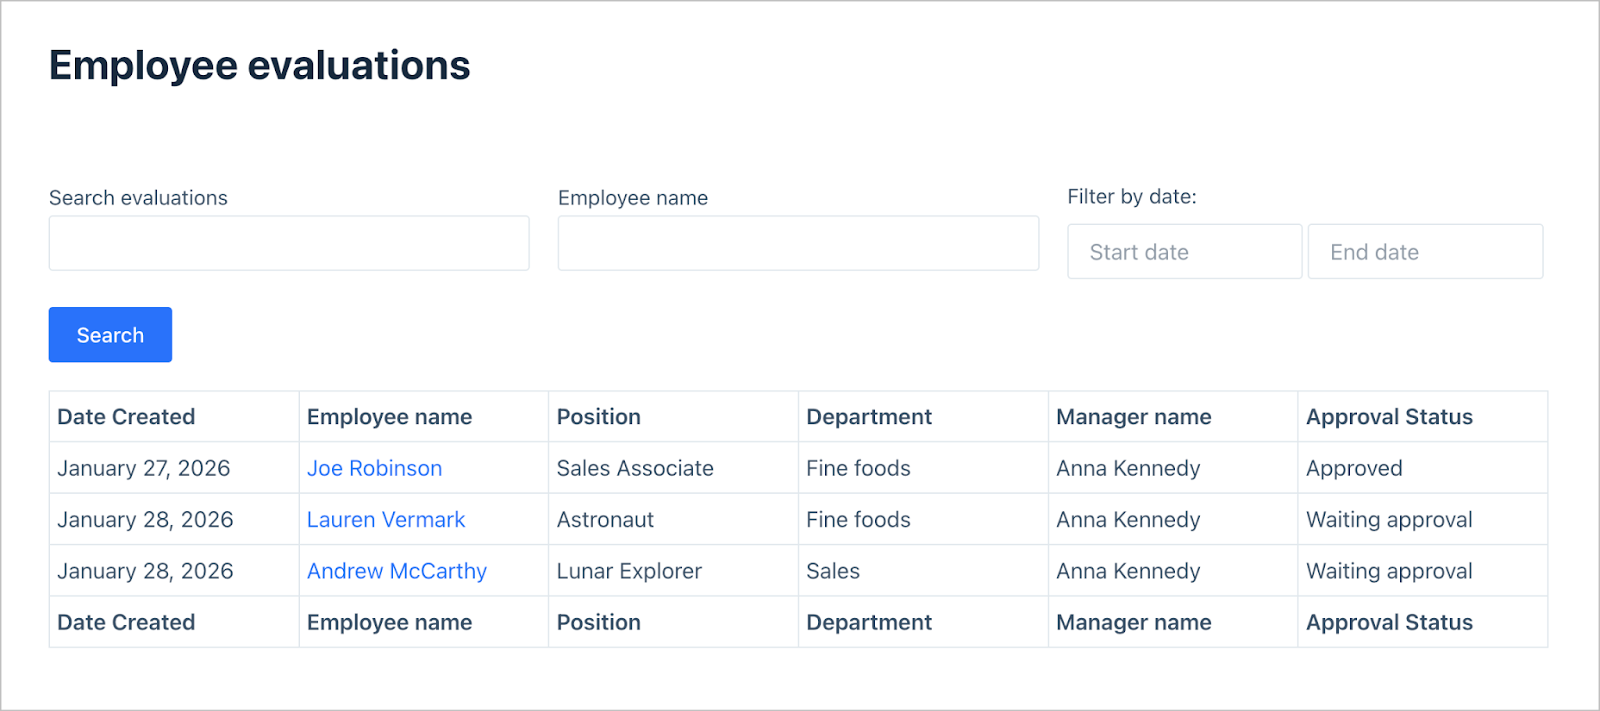
Now we can use GravityView’s visual builder to create a front-end dashboard for employee evaluations. We’ll start by configuring the Multiple Entries Layout—the main dashboard page that shows employee evaluations in a table.
First, we’ll add a search bar widget, allowing managers to filter evaluations by field value.
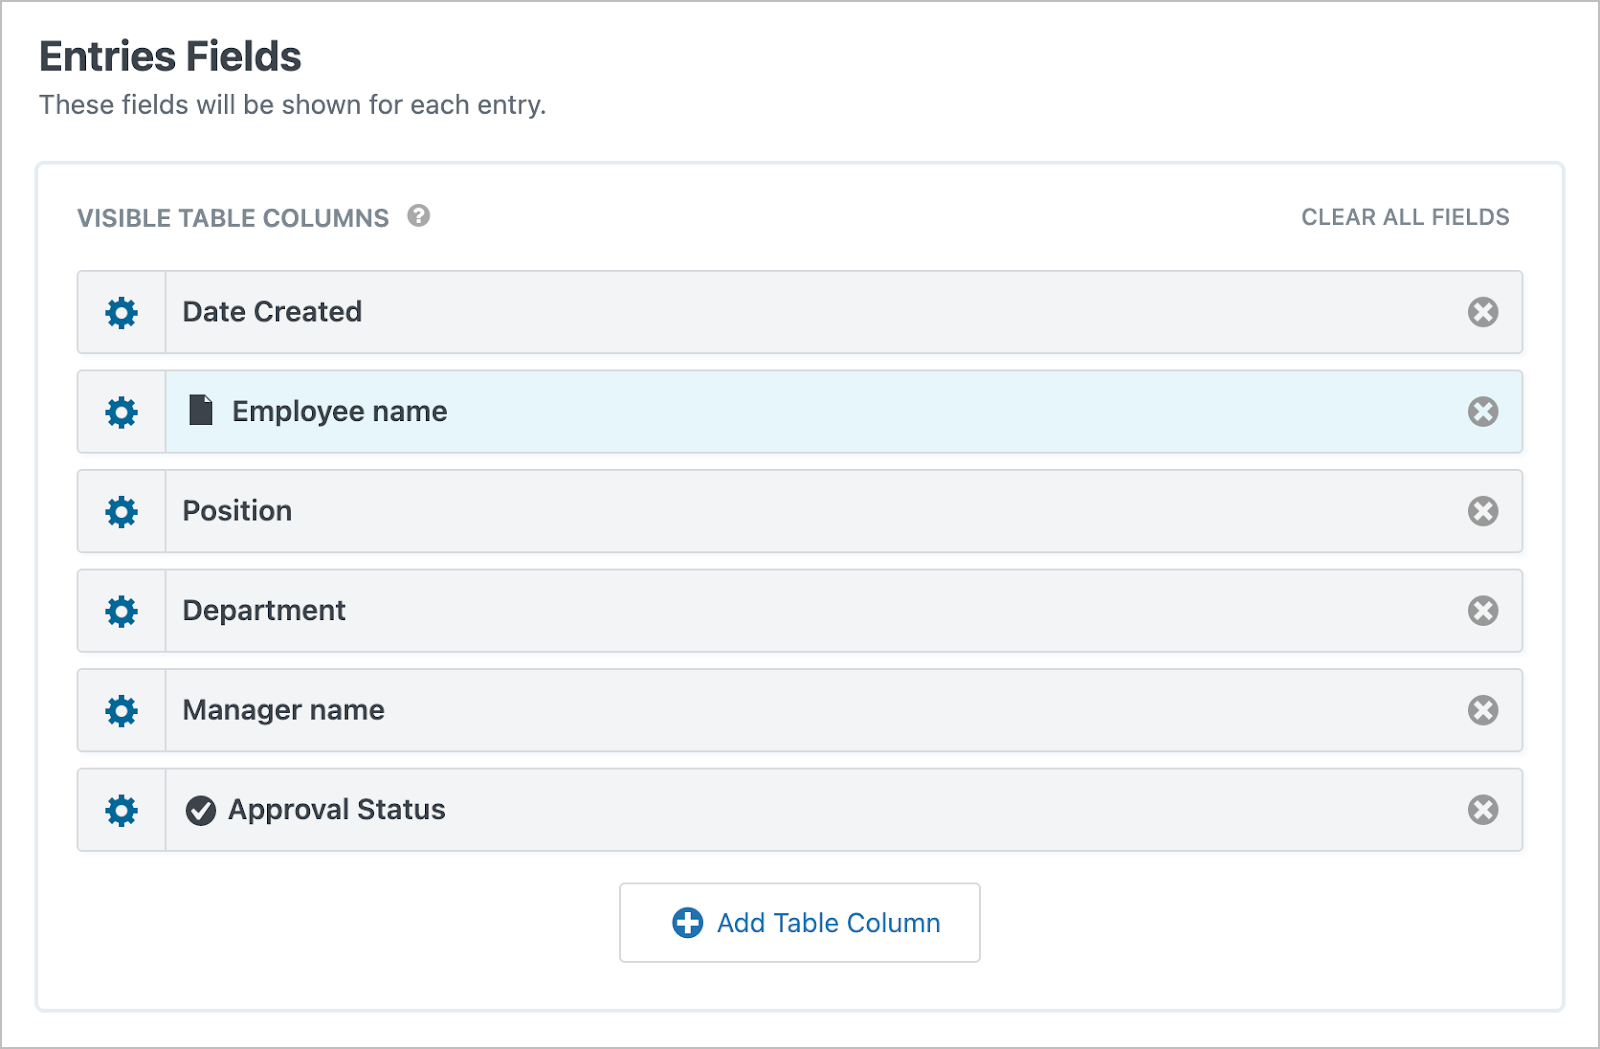
Next, we’ll scroll down to the Entries Fields section and add the fields we want to display as columns in our table. Here we’ll add the Date Created, Employee name, Position, Department, Manager name, and Approval Status fields.
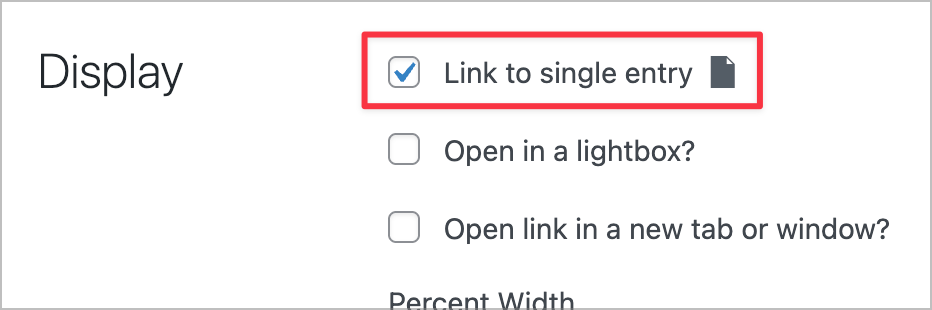
Next, we’ll click the gear icon next to the Employee name field to open the field settings. We’ll then check the box labeled “Link to single entry.” This allows managers to click an employee’s name to view the full evaluation, which we’ll configure in the next section.
Here’s what the Multiple Entries Layout looks like on the frontend:
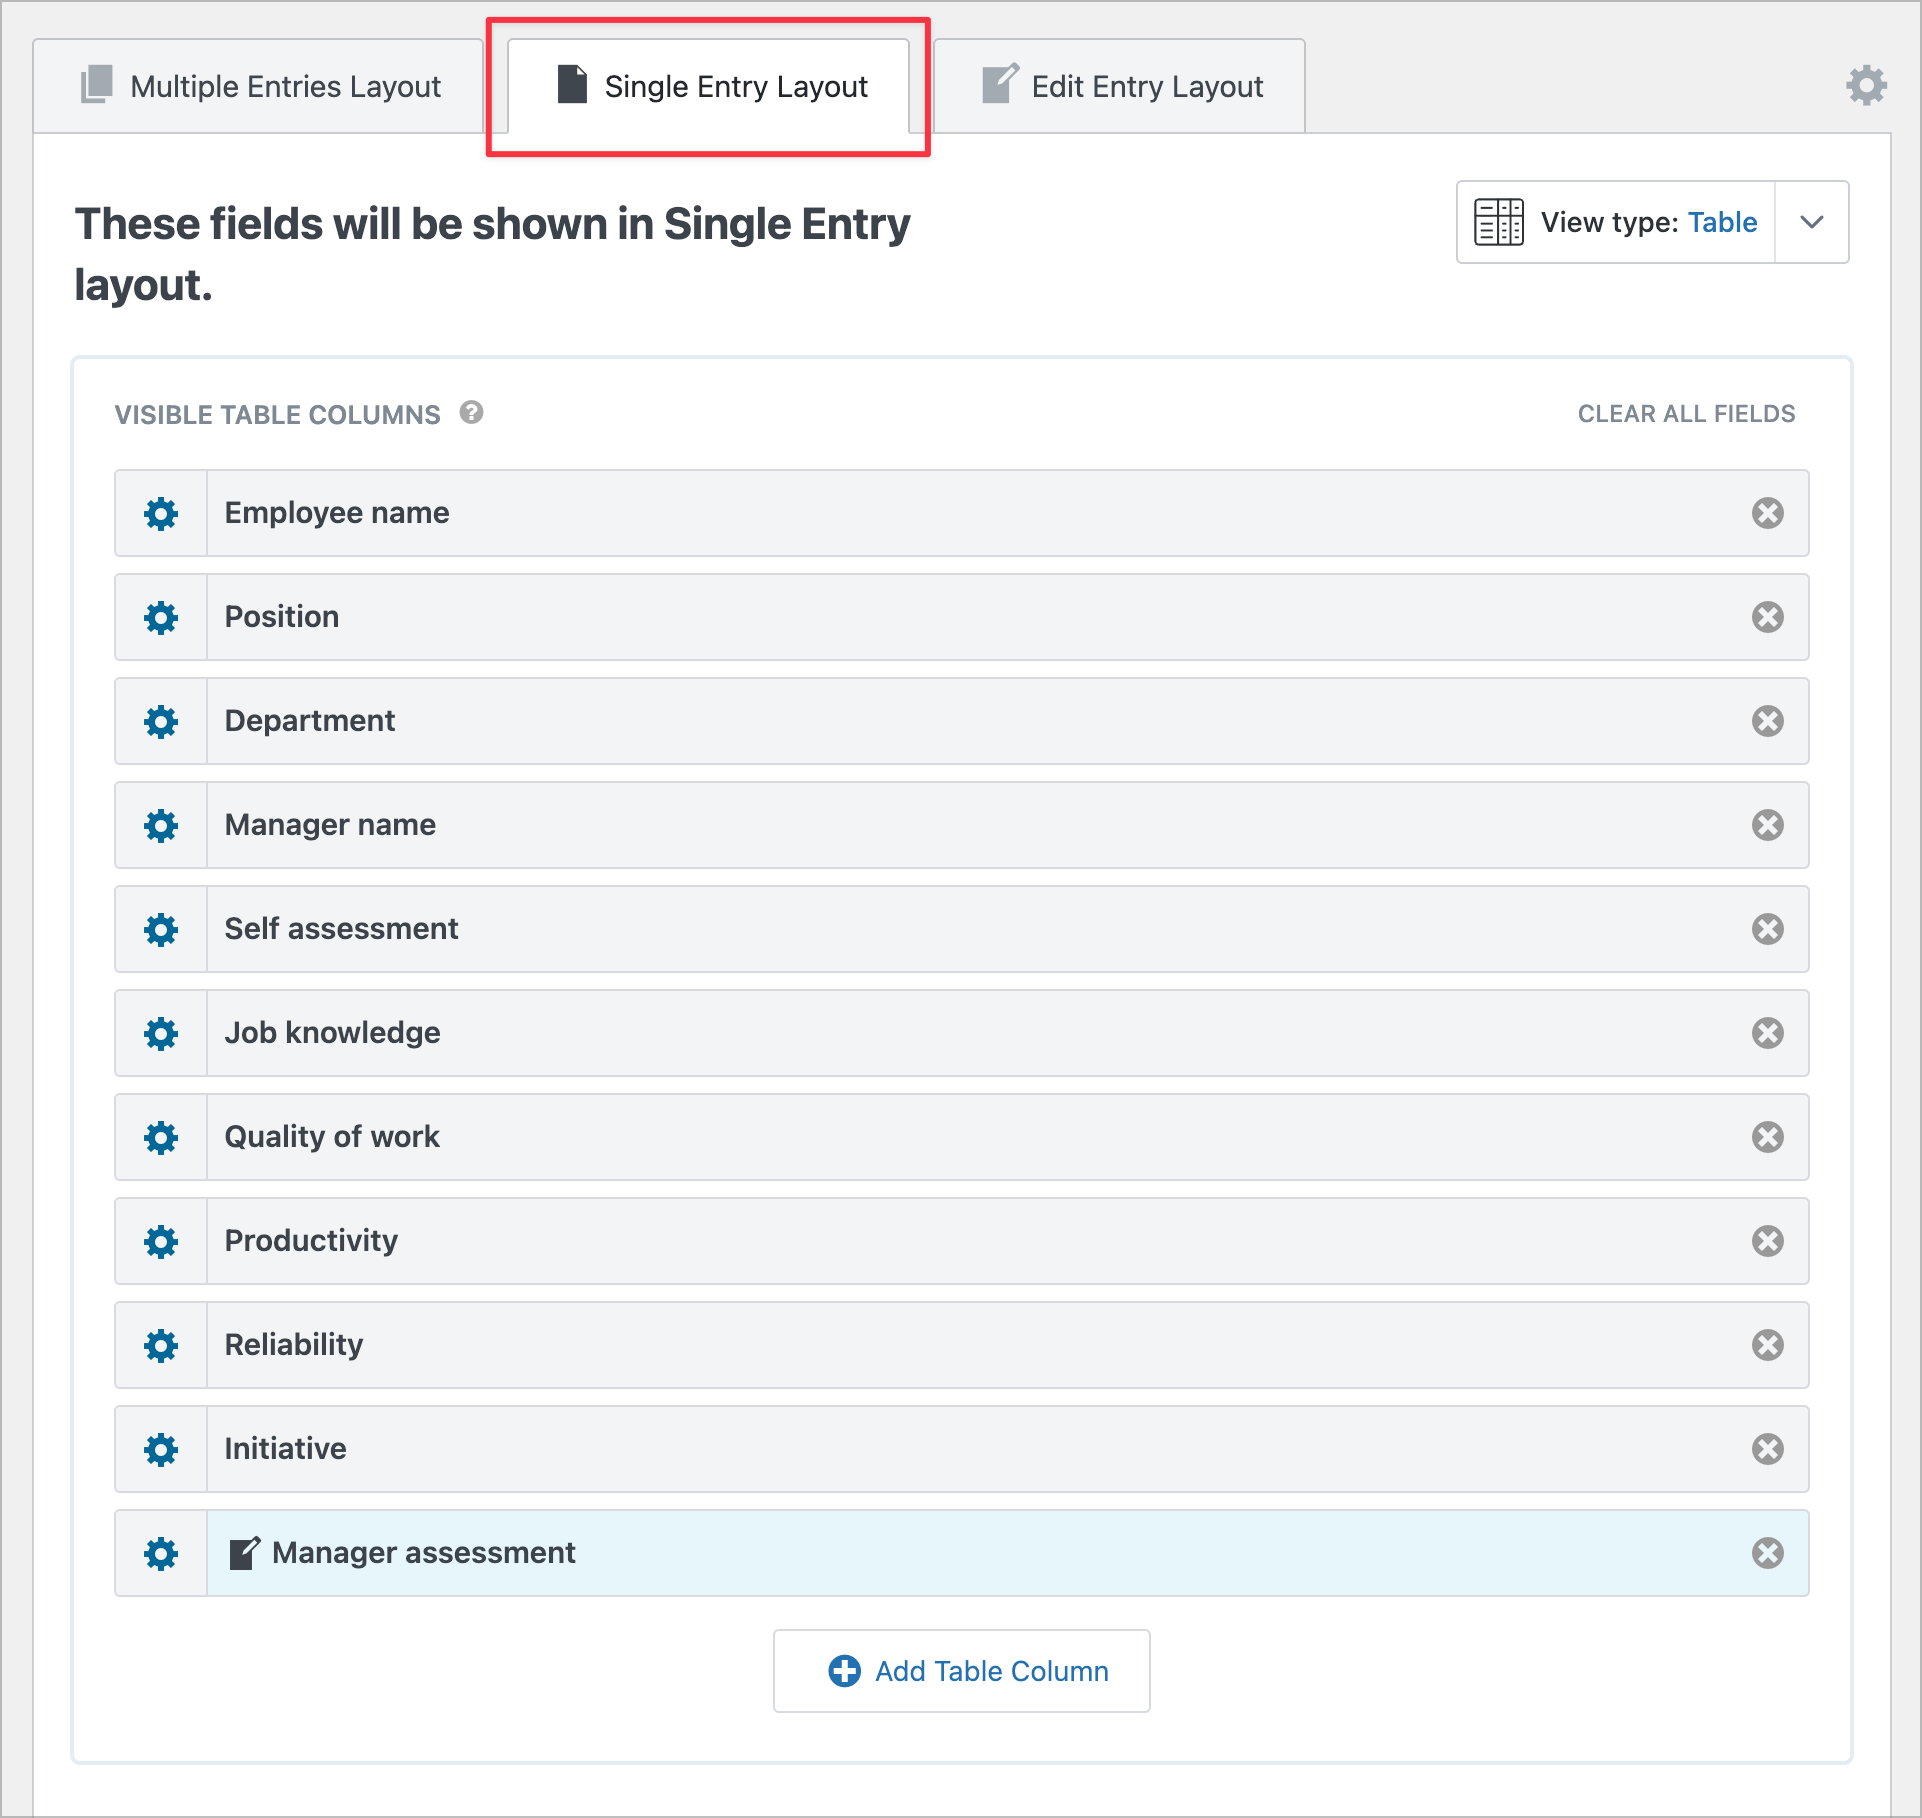
Configuring the Single Entry Layout
The Single Entry Layout allows managers to see more information about a specific entry. Here we’ll add all employee self-evaluation fields, giving managers a complete picture of how employees have rated themselves.
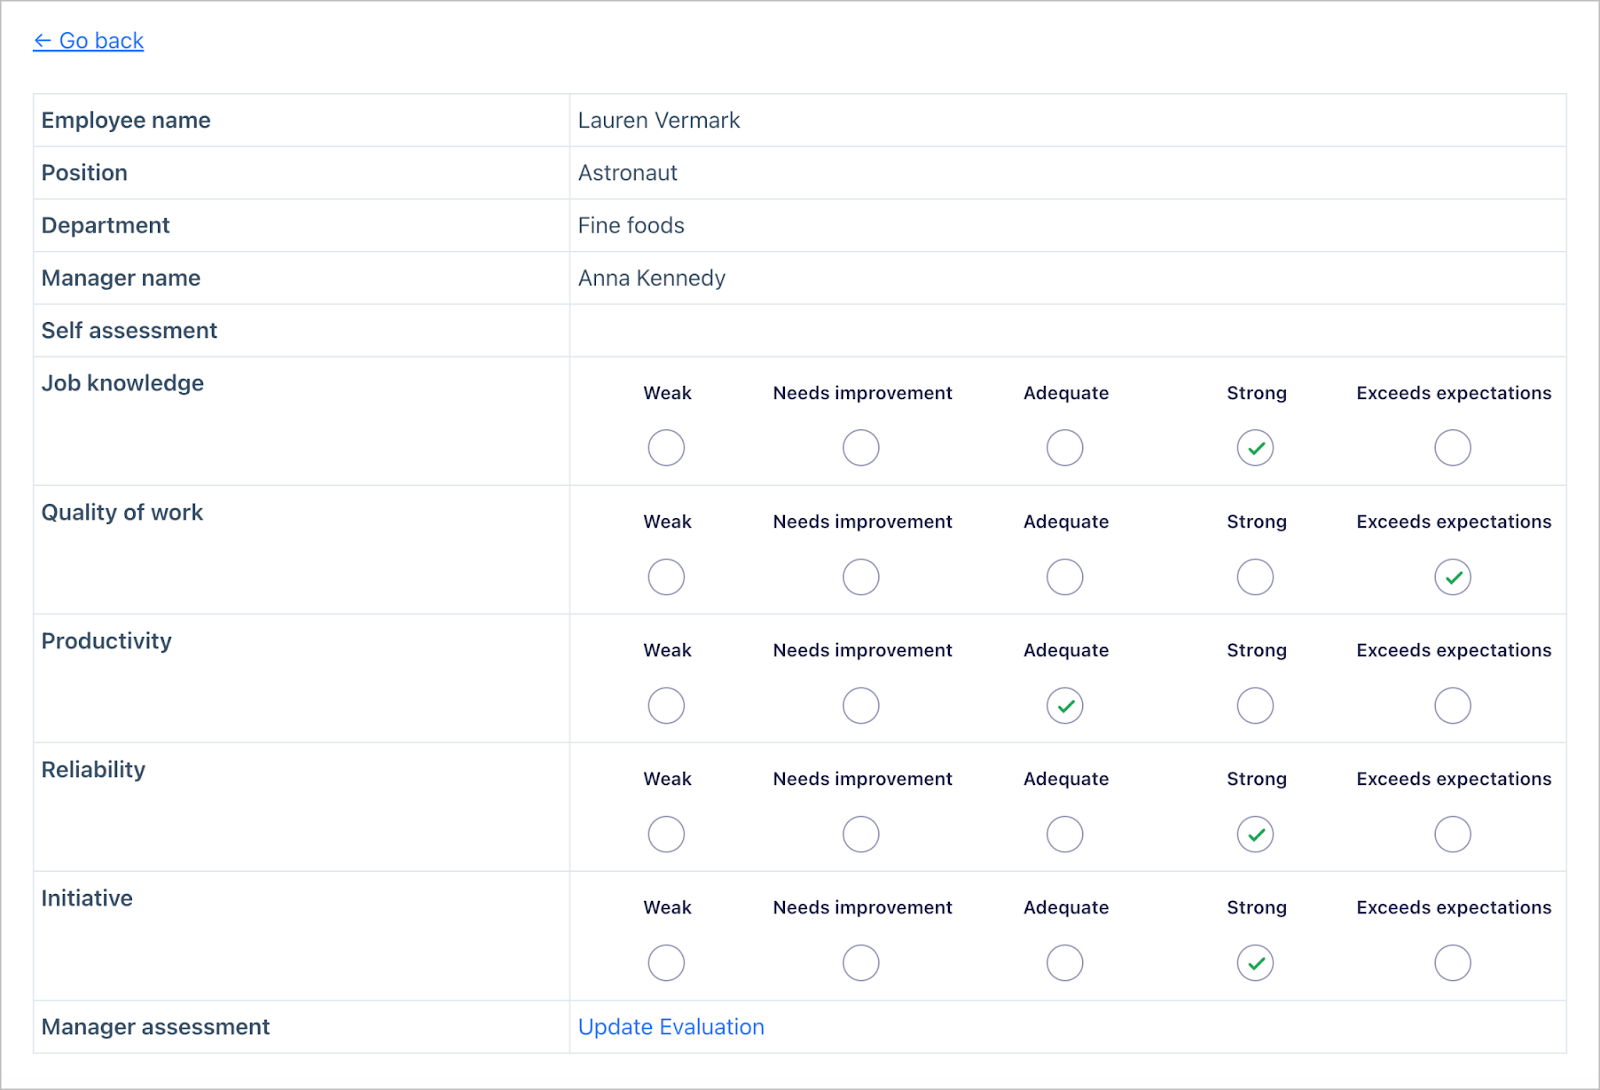
Here’s what the Single Entry Layout looks like on the frontend:
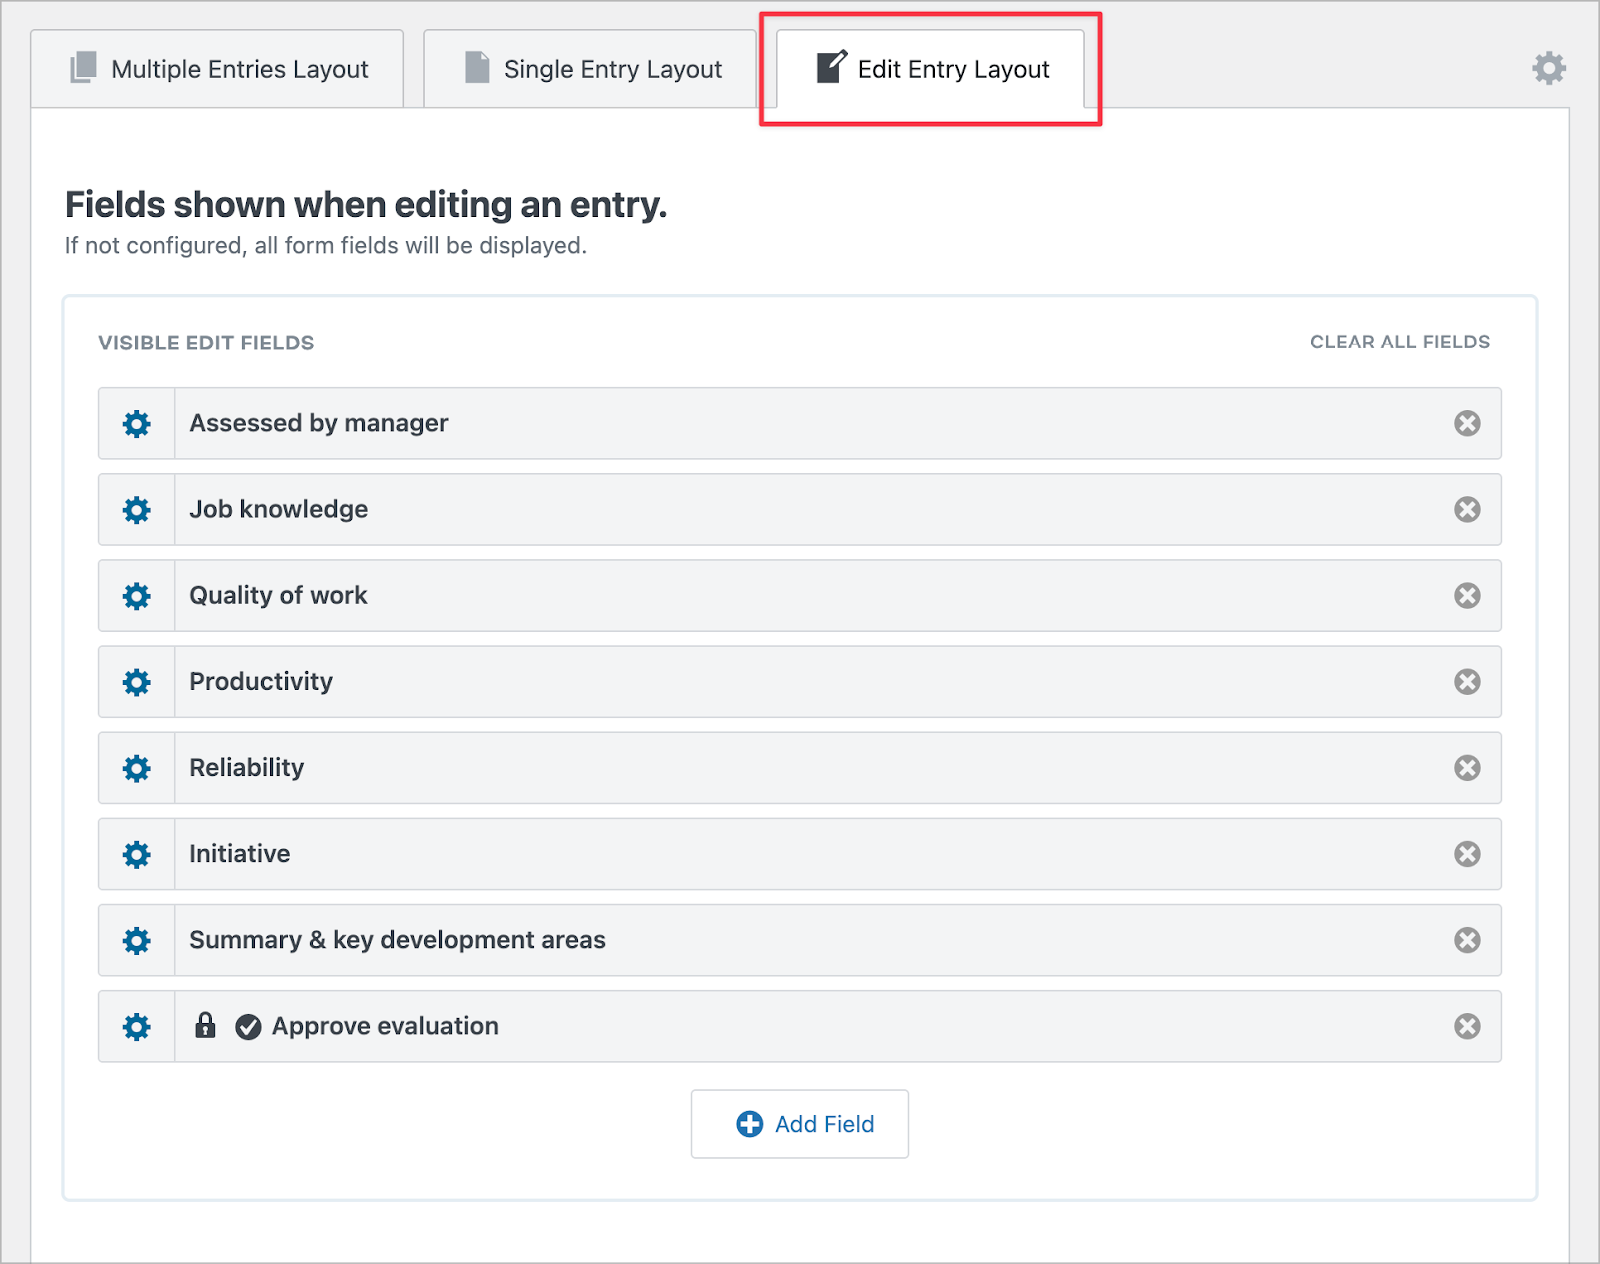
Configuring the Edit Entry Layout
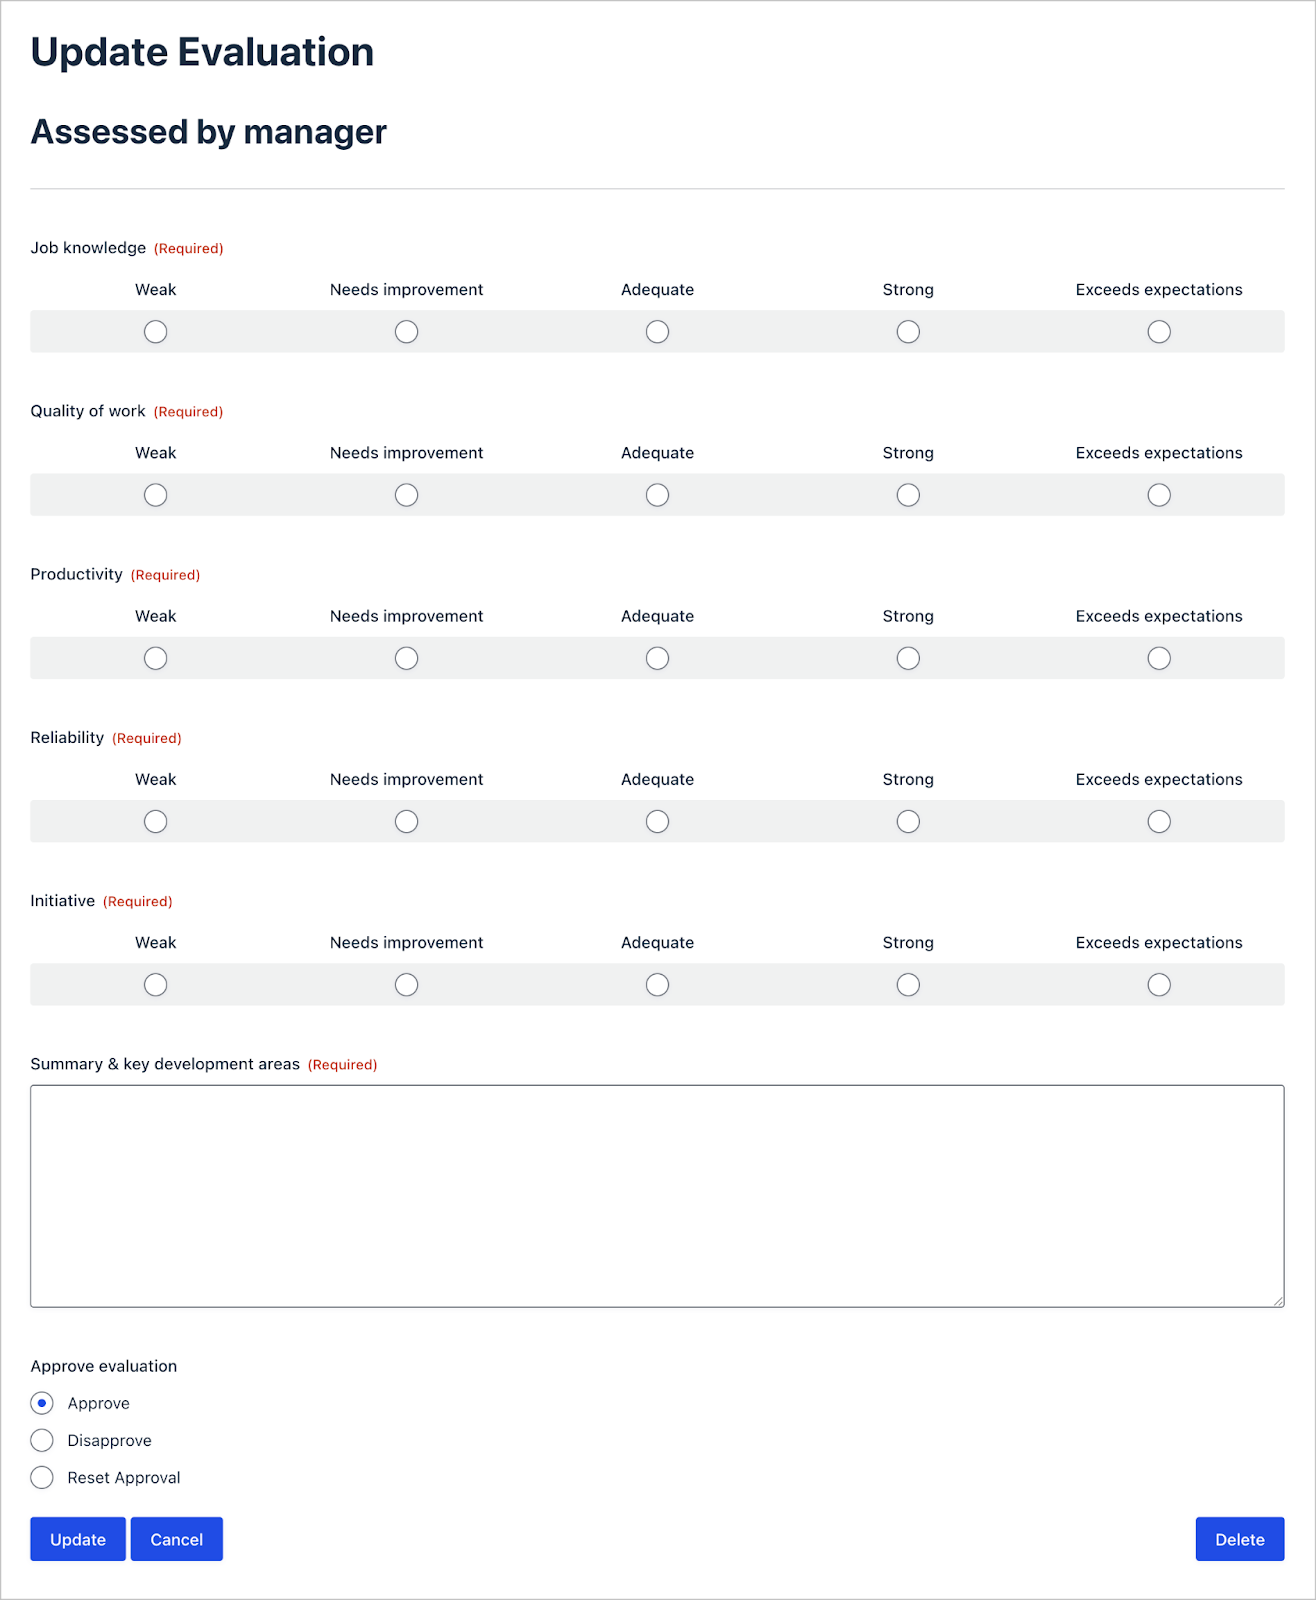
Finally, we’ll configure the Edit Entry Layout, which allows authorized users to edit fields directly from the frontend. In our system, this is where managers submit their own, independent evaluations and mark them as approved.
Here we’ll add all of the manager assessment fields, as well as a custom GravityView field called Approve Entries.
The Approve Entries field lets managers mark an evaluation as complete. Once an entry is approved, it can trigger workflows like email notifications, restrict further edits, and signal that the evaluation is ready to be shared with the employee.

Pro Tip
Read this guide to learn more about GravityView’s built-in approval capabilities.
Here’s what the Edit Entry Layout looks like on the frontend.
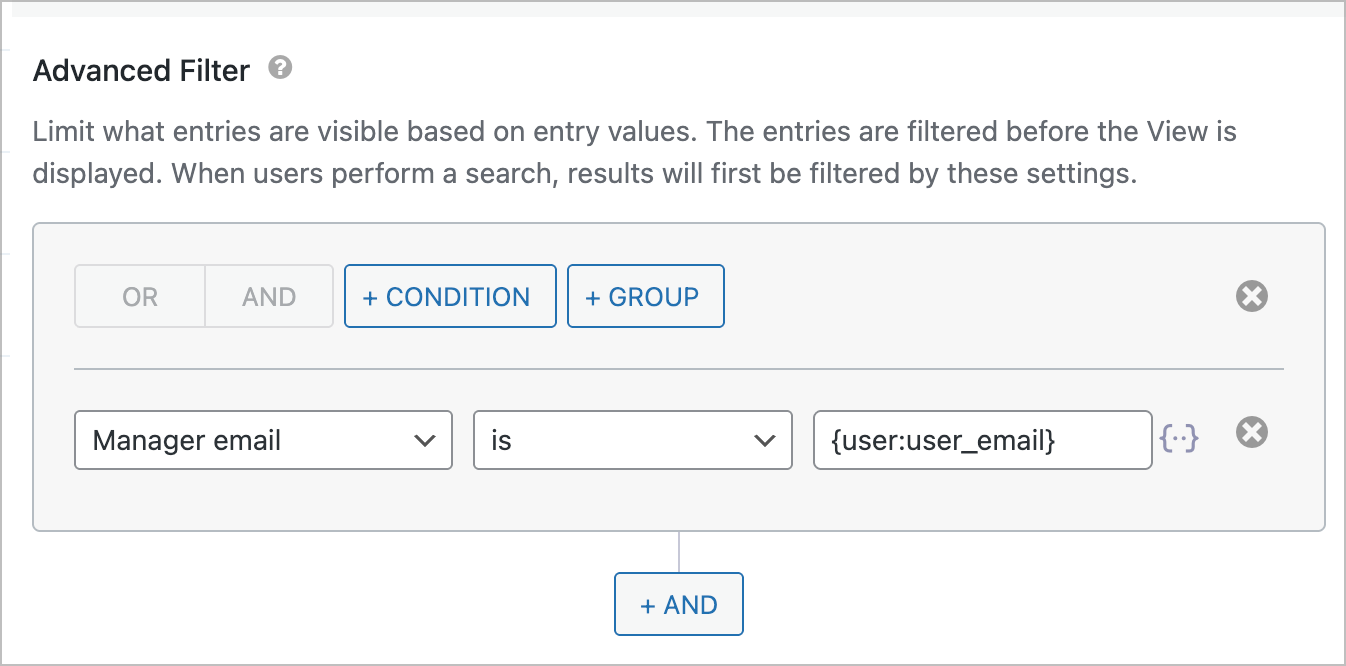
Step 3: Configure the advanced filter
We want to ensure that managers can only see evaluations for employees who work under them. To ensure this is the case, we’ll set up an advanced filtering condition to check the value of the Manager email field on the evaluation against the email address of the logged-in user.
To do this, we’ll use the {user} merge tag with the user_email modifier.
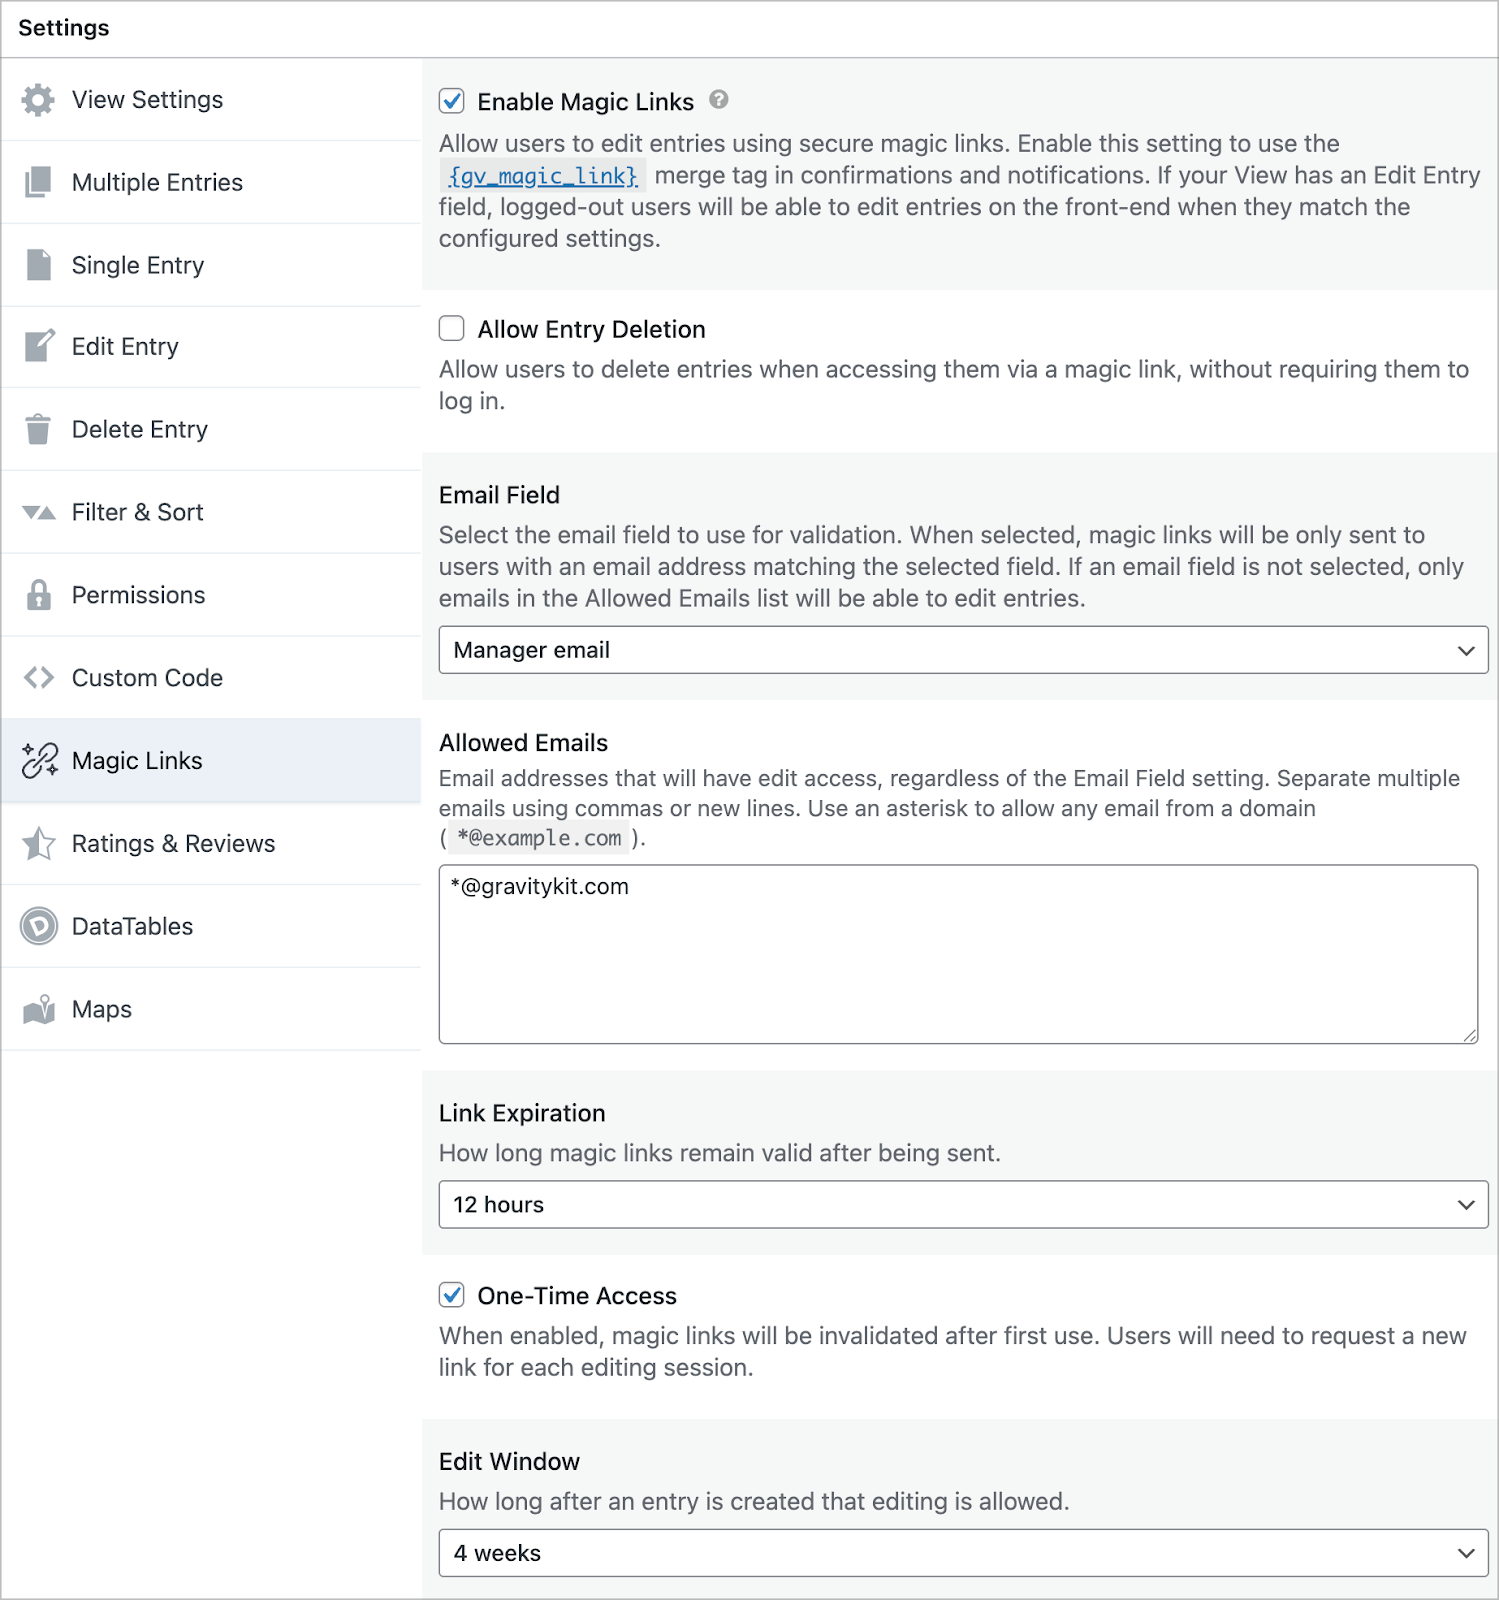
Step 4: Configure Magic Links
Magic Links allow managers to securely edit an evaluation without logging in, which removes friction and speeds up the review process.
To set this up, we’ll scroll down to the View settings, click Magic Links and check the box to enable the functionality. Now we can configure the link by filling out the remaining options:
- Email field: Used for validation purposes to ensure magic links are only sent to authorized recipients.
- Allowed Emails: Define a list of allowed email addresses or limit access to emails from specific domains.
- Link Expiration: Set a time for how long magic links remain valid after being sent.
- One-Time Access: Enable this to invalidate a magic link after first use.
- Edit Window: Define a period after which editing is no longer allowed.
To send magic links we need to add them to an email notification.
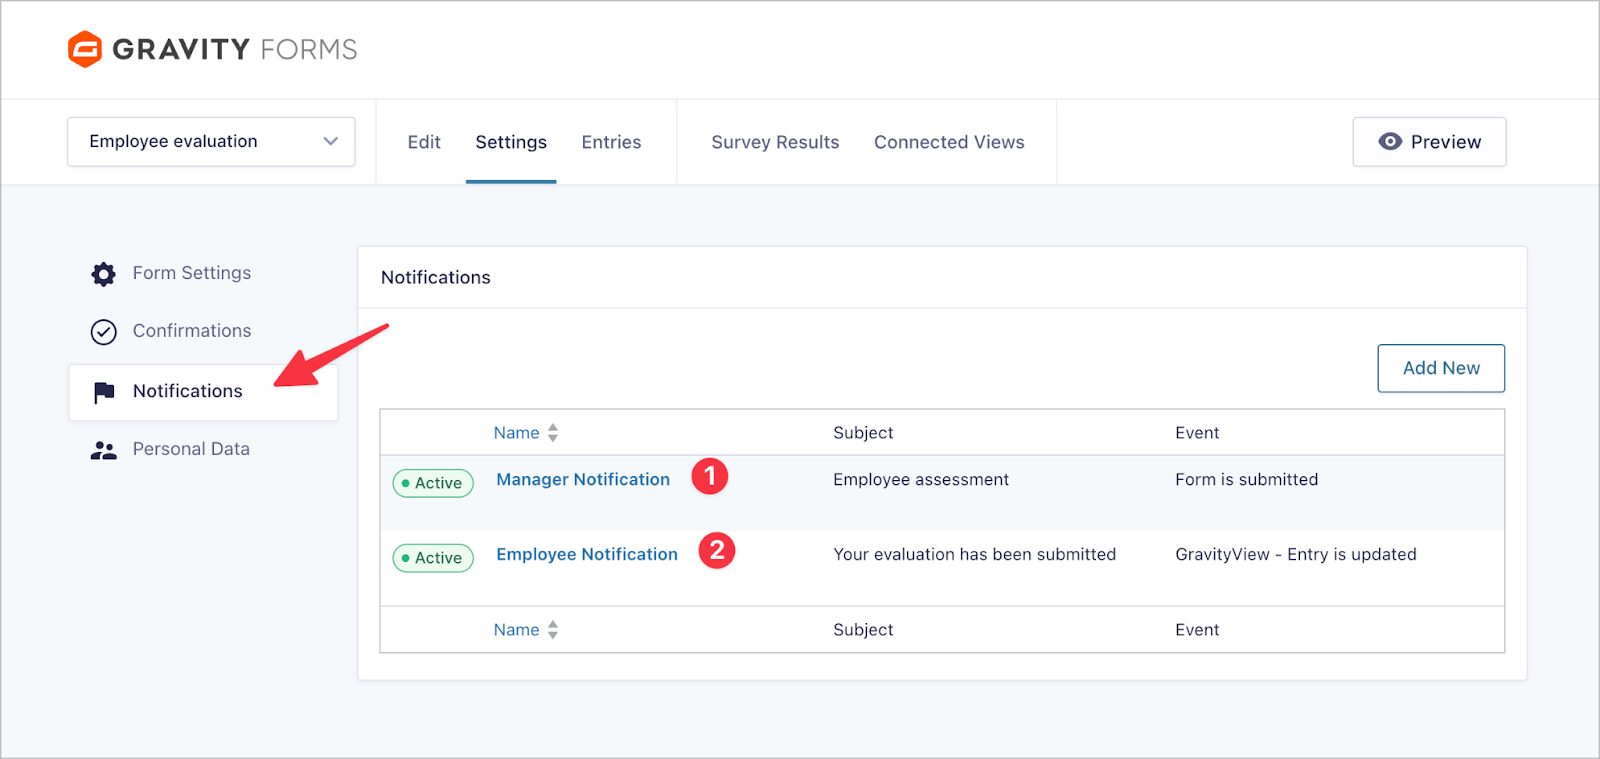
Step 5: Configure the required email notifications
The final step is to add two email notifications that will let employees and managers know when they need to take action.
- Manager Notification: Sent to managers when an employee submits a self-evaluation. The email includes a magic link that allows the manager to submit their own evaluation and approve it, completing the evaluation process.
- Employee Notification: Sends the full evaluation back to employees after a manager has submitted and approved the evaluation.
Configuring the manager notification
First, we need to define an event that triggers the notification. We want this notification to fire every time an employee submits a self-evaluation so we’ll select Form is submitted.
Next, we’ll set the Send To Email to the Manager email field in our form.

Finally, we need to fill in the actual notification message. Here, we’ll add the gv_magic_link merge tag which is replaced by a special link that allows the manager to edit the entry without needing to log in. This is how they will update the entry with their own evaluation and mark it as approved.

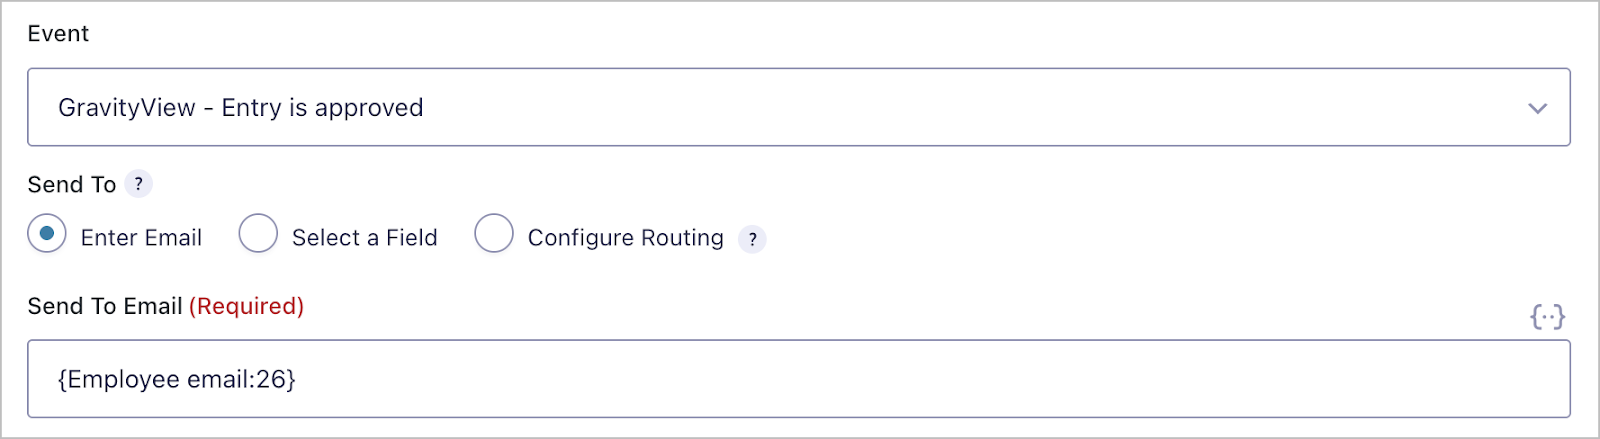
Configuring the employee notification
First, we’ll set the event to GravityView – Entry is approved to ensure the employee is only notified once the manager has approved the full evaluation. Next, we’ll set the Send To Email to the Employee email field in our form.
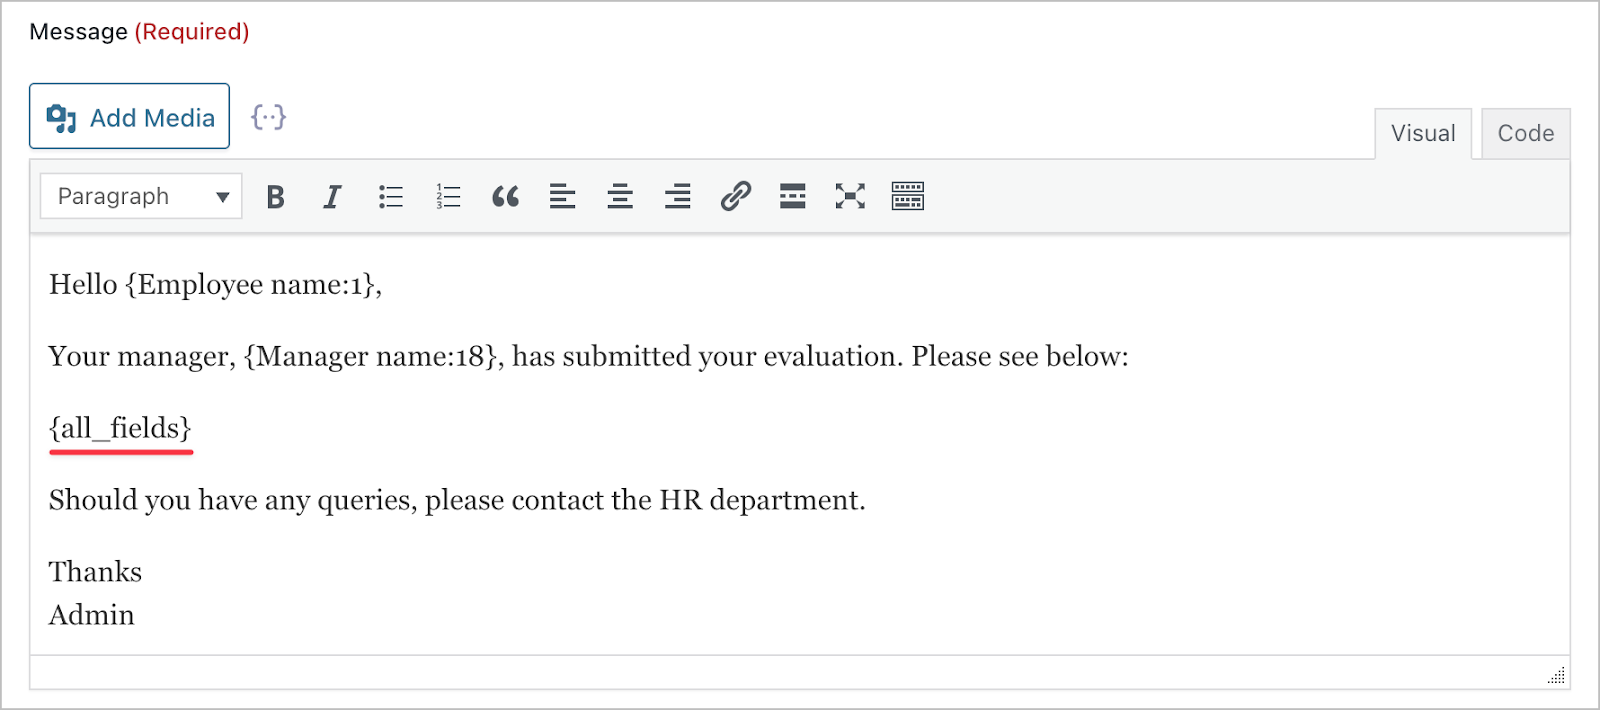
Finally, we’ll add a message and include the all_fields merge tag which will populate the email body with the completed evaluation.
Create your own employee evaluation system today
And that’s it. In this tutorial, we built a complete employee evaluation system that runs entirely on the frontend.
With this setup, employees can submit self-evaluations, managers can review and approve them without logging in, and everyone stays informed through automated notifications. Better yet, managers get a clear dashboard of evaluations that still need attention, keeping the whole process organized and transparent.
If you’d like to extend this system further, you could add scoring logic, reporting Views, or integrate evaluations into a broader HR workflow!

Helpful tips right in your inbox.
Subscribe to get the latest articles, information on releases and helpful Gravity Forms tips!
More articles

Launch Log: theme template editing in Block MCP, Shield silentCAPTCHA for Zero Spam, and GravityView fixes
Block MCP adds safe theme template editing, Gravity Forms Zero Spam gains Shield silentCAPTCHA support, and GravityView fixes lightbox and notice bugs.

GravityKit turns 12: a year in review, and 30% off Lifetime All Access
GravityKit turns 12. A look back at a year of GravityView 3.0, GravitySearch, and AI-assisted building, plus a birthday sale on the Lifetime All Access Pass.

Launch Log: Row headers for screen readers, smarter conditional logic, and multi-View fixes
GravityView 3.1 adds row headers for screen readers, plus smarter conditional logic in GravityCalendar and fixes for DataTables, Maps, and Dynamic Lookup.
