
Building boards with AI using the GravityKit MCP
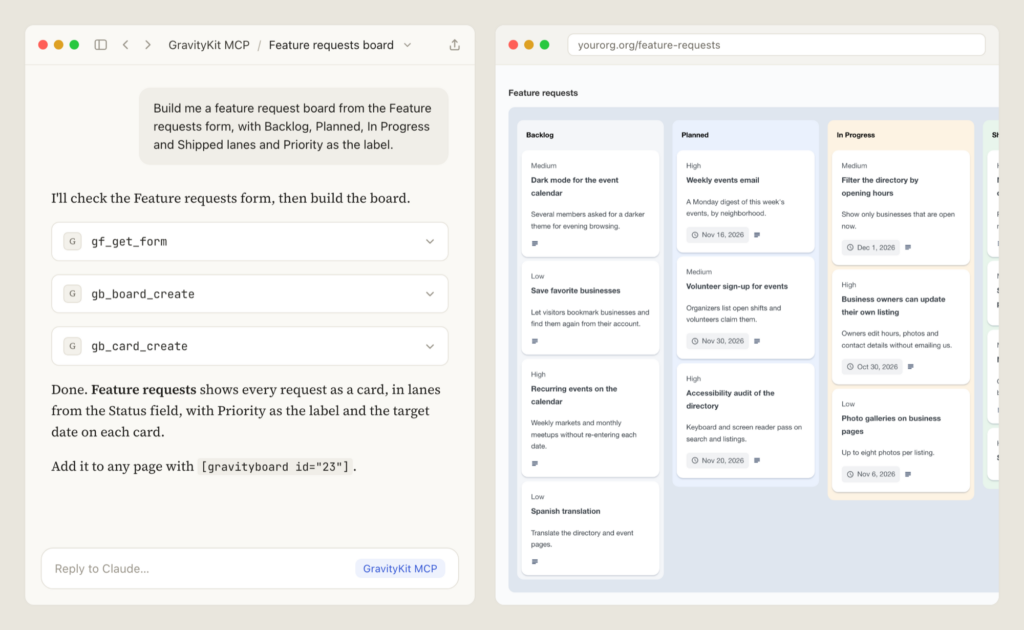
GravityBoard 1.6.0 and later can be set up and run by an AI assistant, such as Claude. You connect the assistant to your site with the GravityKit MCP, then describe the board you want in plain words, for example:
Build a feature request board with Backlog, Planned, In Progress and Shipped lanes, and add these three cards.MCP stands for Model Context Protocol, the standard that lets an AI assistant use tools on your site.
This article covers what the assistant can do, what you need before you start, how to build a board with it, and how its permissions work. Everything the assistant does can also be done by hand in the board’s settings or on the board itself.
Things you can ask for #
Once the connection is in place, you can ask the assistant to:
- Create a board on a Gravity Forms form, with the lanes, card fields, permissions, voting, and colors you describe.
- Change a board’s settings later, such as who can see it, who can move cards, or which lanes allow voting.
- Add, rename, reorder, and delete lanes.
- Add cards with a title, description, label, and due date, then edit them, move them between lanes or within a lane, and delete them.
- List the boards on the site, and the cards on a board, lane by lane.
The assistant can also create the form the board is built on, with the GravityKit MCP’s Gravity Forms tools. A board needs a Drop Down or Radio Buttons field for its lanes and a Single Line Text field for the card titles.
Before you start #
Make sure you have the following in place:
- GravityBoard 1.6.0 or later, with Gravity Forms active.
- WordPress 6.9 or later. GravityBoard’s AI tools use the WordPress Abilities API, which arrived in WordPress 6.9. On an older version, GravityBoard works as before and the assistant gets no GravityBoard tools.
- The GravityKit MCP connected to your site with an application password, a separate password WordPress creates for one app so you never share your login. Getting started with GravityKit MCP covers the setup, including the Claude Desktop extension.
- An account with the right access for the work you want done. What the assistant is allowed to do explains which permissions each task needs.
Check that the tools are there #
Ask the assistant:
Which GravityBoard tools do you have?Their names start with gb_, such as gb_boards_list and gb_board_create. The GravityKit MCP tools reference explains how the tool list is built.
If no GravityBoard tools appear, check the versions above, then ask the assistant to reload abilities. That makes it read your site’s tools again without restarting the app.
Build a board with the assistant #
The steps below build a feature request board from scratch. Change the names and lanes to fit your own project.
Step 1: Pick or create the form
Tell the assistant which form to use. If you don’t have one yet, ask it to create one, for example:
Create a form called Feature requests with a Request field, a Details paragraph field, a Status drop down with Backlog, Planned, In Progress and Shipped, a Priority drop down with High, Medium and Low, and a Target date field.The Status field becomes the lanes, and each of its choices is one lane, in the order the choices are listed.
Step 2: Describe the board
Describe how the board should look and who can use it, for example:
Create a board on the Feature requests form. Use Status for the lanes, Priority as the label, and Target date as the due date. Anyone can see the board, and logged-in users can vote on cards in Backlog and Planned. Give each lane its own color.Before it creates the board, the assistant reads the form and the full list of board settings, so it picks fields that fit each part of a card. Settings you don’t mention get the same defaults as the board settings screen.
Step 3: Put the board on a page
The assistant’s answer includes the board’s shortcode, such as [gravityboard id="23"]. Add it to one page, and the board appears there. A second copy of the same board on one page shows nothing to visitors.
Step 4: Add the first cards
Ask for cards by lane name, for example:
Add "Weekly events email" to Planned with priority High, due November 16. Add "Dark mode for the event calendar" to Backlog with priority Medium.Each value goes to the form field the board uses for it. A card is a Gravity Forms entry, so it also appears under the form’s entries.
Step 5: Check the warnings
The assistant passes on problems it notices while it works. Two common ones:
- The lane field has no default choice. New form submissions then have no lane, and they wait in a Not set lane until someone moves them. Set a default choice on the field in the form editor to send new cards to a first lane.
- Notifications are on. Form notifications and mention emails are on by default, the same as on the settings screen. On a test or demo site, ask the assistant to turn them off so moving cards around doesn’t send real email.
Working with lanes and cards #
Lanes are the choices of the board’s lane field. Adding, renaming, reordering, or deleting a lane changes that field on the form. A lane that still holds cards can’t be deleted, so the assistant moves the cards out first or tells you which ones are left.
The assistant can move a card to another lane, or to a position in a lane, for example:
Move "Filter the directory by opening hours" to the top of In Progress.It can also change a card’s title, description, label, or due date. A value for a field the board doesn’t use is refused.
On a board that sorts cards by votes, the votes decide the order within a lane. The assistant can still move a card to another lane.
What the assistant is allowed to do #
The assistant works as the WordPress user whose application password you used, and it gets that user’s access:
| Task | Permission it needs |
|---|---|
| Create, change, or delete boards, and read a board’s settings | The Gravity Forms Edit Forms capability |
| See, add, edit, move, or delete cards | The board’s own permission settings for each of those actions |
| Add, rename, reorder, or delete lanes | The board’s lane permission setting, which defaults to the Gravity Forms Edit Forms capability |
A board’s filter can show different cards to different people. The assistant sees the cards the connected user would see on the board. When something isn’t allowed, the assistant’s answer names the board setting involved.
Allowing the delete tools #
The GravityKit MCP keeps destructive tools off until you allow them. GravityBoard has three: gb_board_delete, gb_lane_delete, and gb_card_delete. Until you allow them, they appear in the assistant’s tool list marked as disabled.
To allow all three, add gb to the GRAVITYKIT_MCP_ALLOW_DESTRUCTIVE setting in the env block of your configuration file:
"GRAVITYKIT_MCP_ALLOW_DESTRUCTIVE": "gb"With gb as the only value in that list, the GravityView and GravityMigrate destructive tools stay off. To allow only one of GravityBoard’s, use its tool name instead, such as gb_card_delete.
In the Claude Desktop extension, enter the same value in Allow only some destructive tools (optional). Destructive product tools describes both settings in full.
Deleting a board removes the board only. The form and its entries stay in Gravity Forms. Deleting a card moves its entry to the Gravity Forms trash, or deletes it for good, depending on the board’s deletion setting.
Troubleshooting #
- The assistant has no GravityBoard tools. Confirm GravityBoard 1.6.0 or later and WordPress 6.9 or later, then ask the assistant to reload abilities.
- The assistant says the account isn’t allowed to do something. The answer names the board setting involved. Change that setting on the board, or connect with a different account.
- New cards from the form appear in a Not set lane. The lane field has no default choice. Set one in the form editor, or move the cards to a lane.
- The board doesn’t show on the page. Check that the shortcode is on the page only once, and that the board’s visibility setting includes the person viewing it.
- A delete tool is disabled. See Allowing the delete tools.

