Published
•
Updated
Gravity Forms front end entry management: all you need to know
Complete guide to managing Gravity Forms entries from the front end using GravityView. Covers building Views, searching, sorting, filtering, and editing submissions without admin access.

It’s no secret that efficient data collection and management are vital for businesses and organizations to thrive. Gravity Forms has long been a go-to solution for capturing user information and managing data on WordPress.
However, when it comes to front-end entry management and harnessing the full potential of collected data, GravityView emerges as a go-to tool.
In this article, we explore front-end entry management using Gravity Forms and GravityView. We’ll show you how GravityView enables you to build front-end Views, making it easy to search, sort, filter and analyze your data from the front end.
Whether you’re a web developer looking to enhance user experiences or a business owner seeking a streamlined approach to handling form submissions, we’ll explore the features, benefits, and best practices of combining these two powerful tools!
Check out our live demo applications and get your own free trial site preloaded with all GravityKit add-ons!
What is form entry management?
Form entry management refers to the process of efficiently handling and organizing the data submitted through online forms.
In fact, many organizations see data capture as a key accelerant of a business’s digitization and transformation efforts.
When visitors fill out a form on a website, whether it’s a contact form, a registration form, or a survey, the submitted information needs to be collected, stored, and accessible for further analysis and action.
Form entry management involves implementing strategies, tools, and workflows to streamline this data management process. This ensures that form submissions are properly organized, easily retrievable, and ready for analysis or integration with other systems.
Effective form entry management plays a crucial role in optimizing user experiences, and facilitating communication. This in turn enables businesses and organizations to make informed decisions based on the data they collect.
Gravity Forms entry management in the backend
Gravity Forms allows you to manage entries from the Admin backend of your WordPress website. Simply hover over “Forms” and click “Entries”. If you have multiple forms on your site, you can select the form with the entries you want to view from the dropdown in the top left corner.
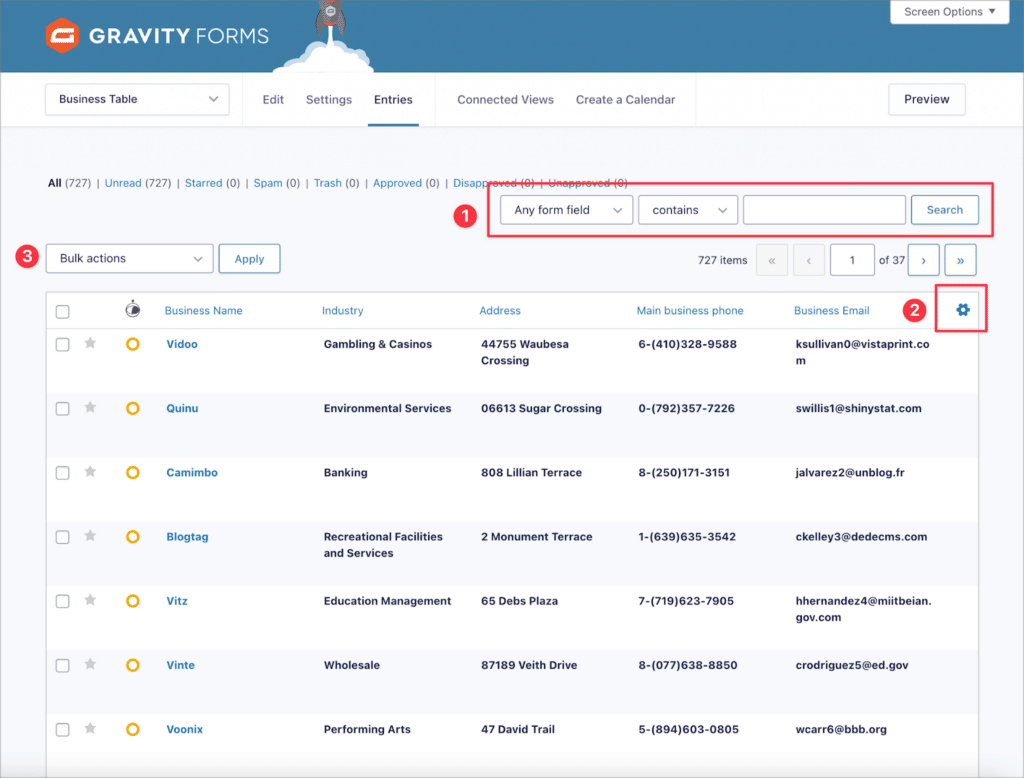
There are three tools that facilitate entry management in Gravity Forms—the search bar, the column settings, and the “Bulk actions” menu:
- Search field: The search bar allows you to search for entries that contain certain keywords. You can search all form fields, or limit your search to a single field.
- Column settings: By clicking on the gear icon on the right, you can open the column settings. Here, you can select which form fields should be displayed as columns in the entry table.
- Bulk actions: The Bulk action dropdown allows you to perform actions on multiple entries at the same time. Simply select the entries you want to modify by checking the box on the left, select the action you want to perform (such as sending them to the trash) and click “Apply”.
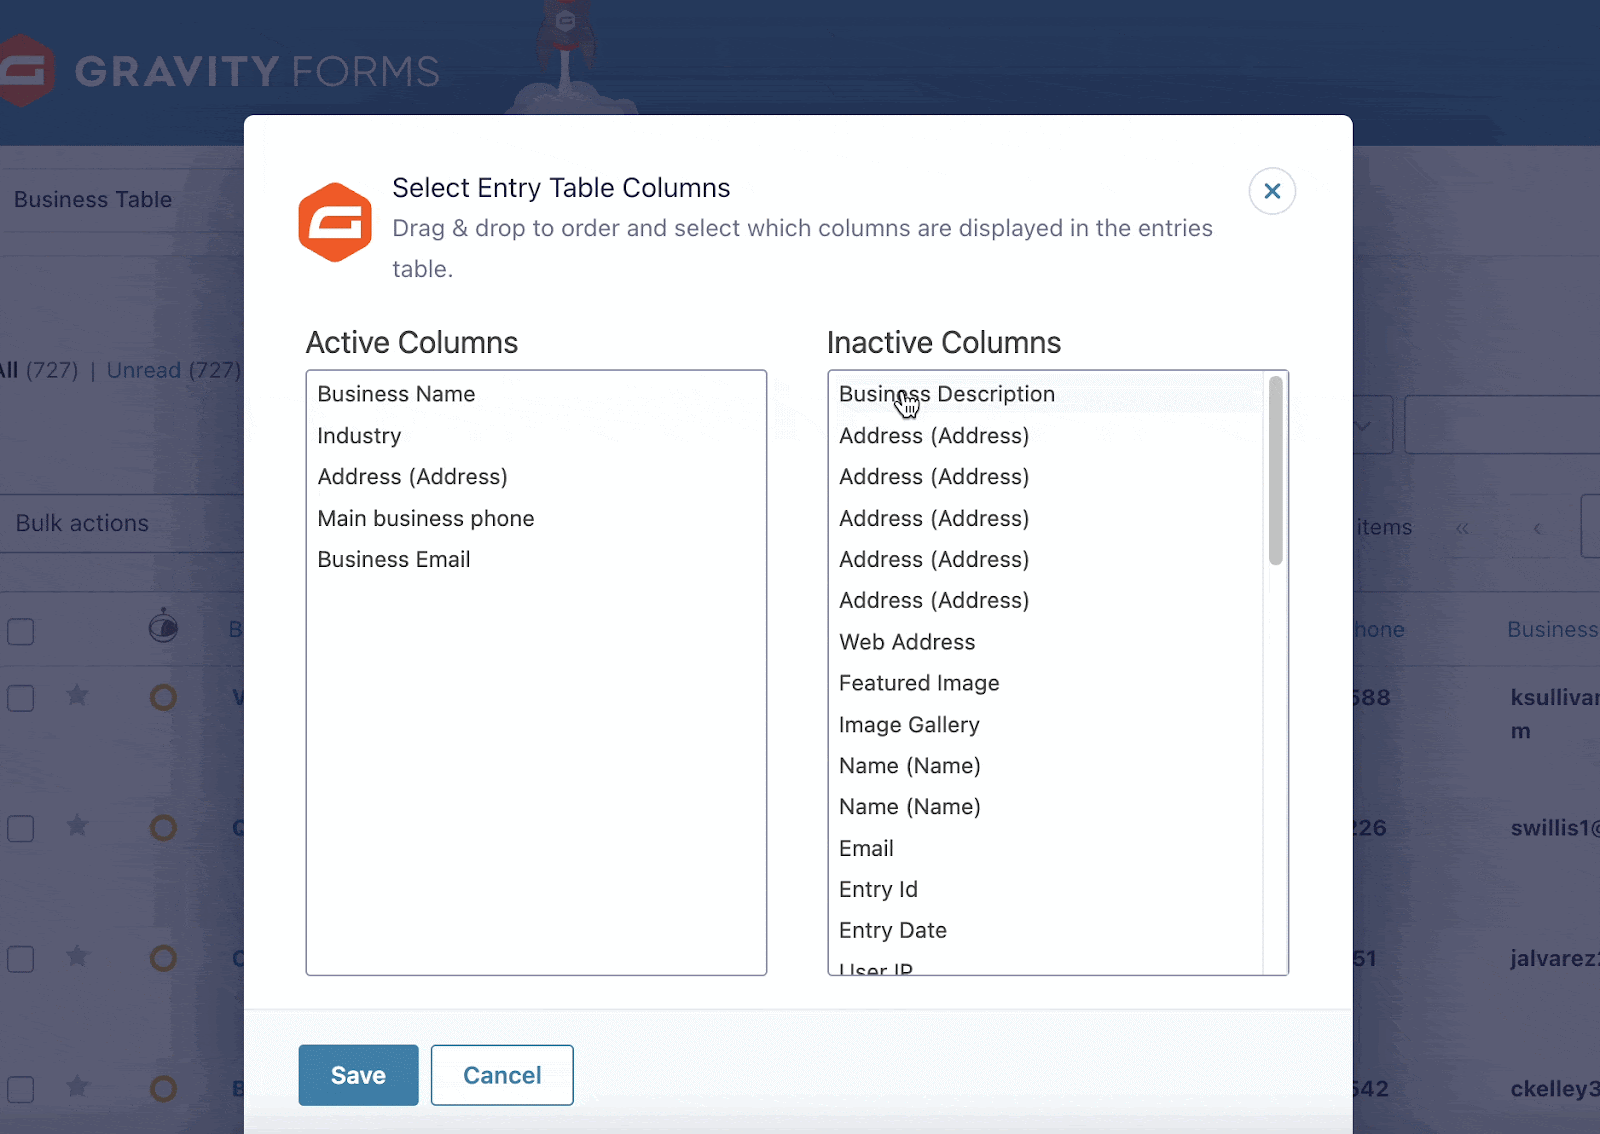
Here’s a demonstration of the column settings. To display a field as a column on the entry table, all you need to do is drag it from “Inactive Columns” to “Active Columns”.
Now let’s take a look at how to manage form entries on the front end using GravityView.
Front end entry management for Gravity Forms
GravityView is a powerful WordPress plugin that acts as a companion to Gravity Forms, extending its capabilities to enable front-end entry management!
With GravityView, you can transform collected data into visually appealing and interactive tables, profiles, directories, and more, providing a seamless and user-friendly experience for both site visitors and administrators.
With GravityView you can build a front end entries dashboard
GravityView allows you to build Views (front-end layouts of your Gravity Forms entries). To get started, all you need is a form with entries! After that, you can create a new View by hovering over “GravityKit” and clicking “New View”.
Now the View configuration process begins. First, you’ll need to give your View a name. After that, you can link your form by selecting it as the data source for that View. Linking your form as the data source will allow you to display user-submitted values from that form on the front end!

The third and final step is to choose a View Type. Each View Type allows you to display Gravity Forms entries using a different layout. The View Type you select will depend on the type of data you want to display or the kind of web app you’re building.
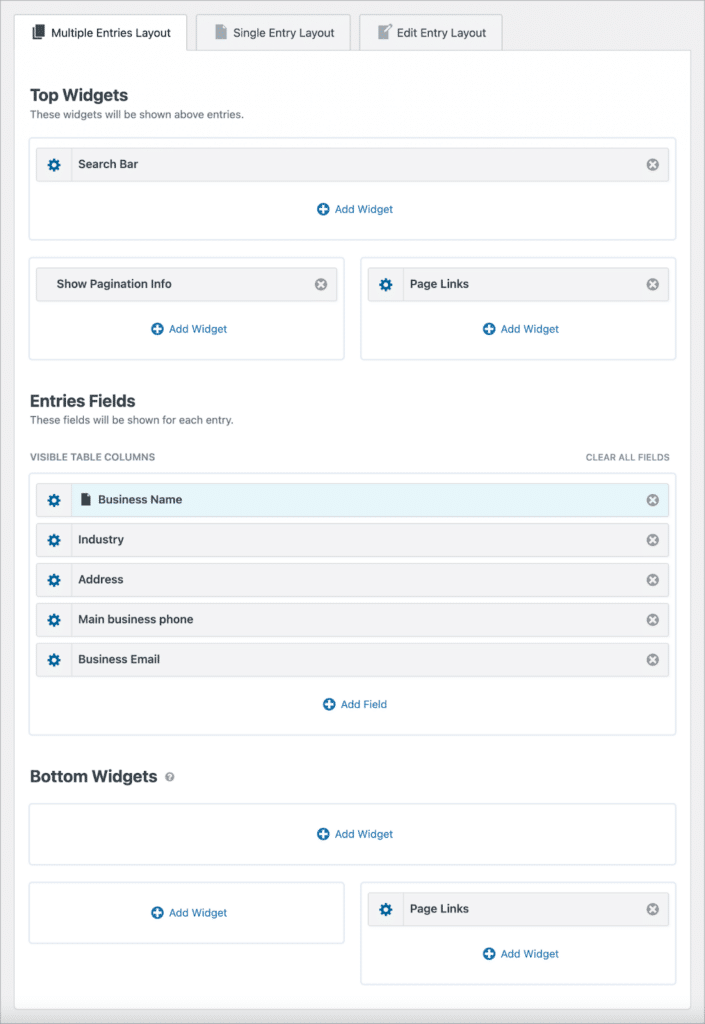
After selecting a layout, you can start configuring how you want your data to be displayed using the GravityView drag-and-drop builder. The View builder also supports widgets, which include search bars, entry maps and other helpful tools.
Here’s an example of a front end entry table we created using the DataTables layout!
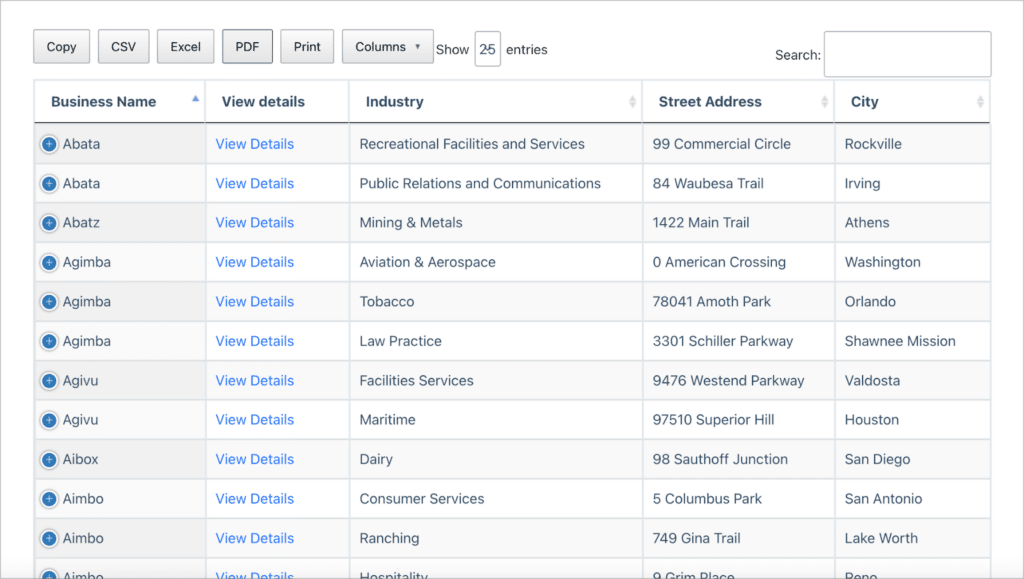
The DataTables layout includes buttons for exporting entries to a variety of formats, including CSV, Excel, and PDF. It also includes per-field filtering. Enabling this option adds a search box in each table column. Using this input box, you can filter data on a per-column basis.
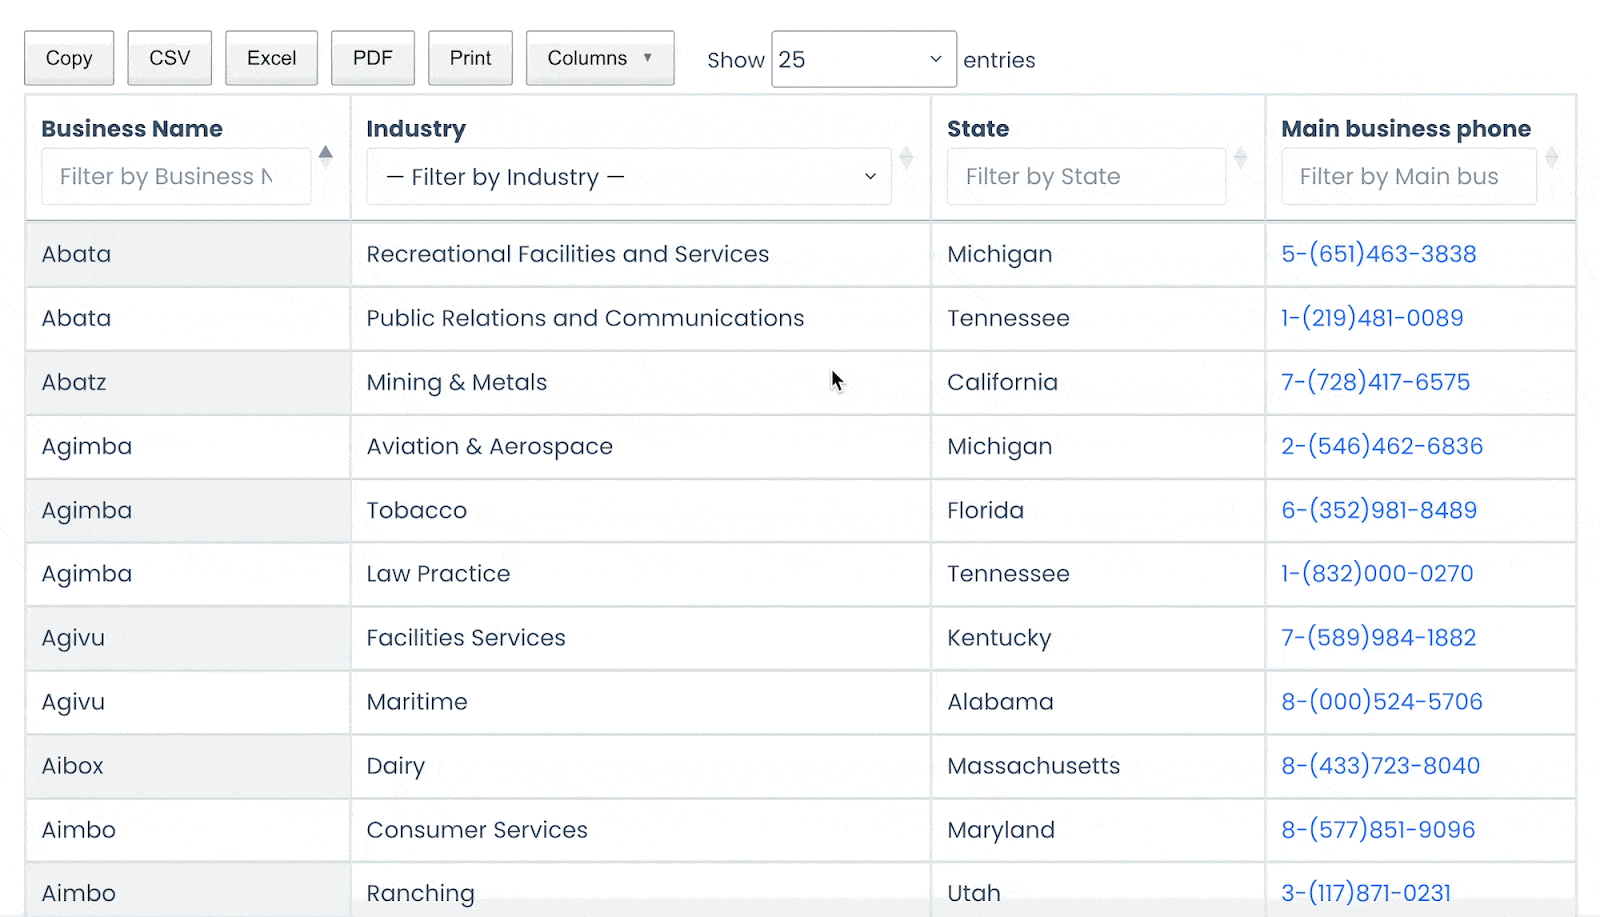
Field filtering allows you to drill down into your data and uncover valuable insights. DataTables also includes auto-update, meaning that your tables will automatically update as you receive new entries.
As you can see, GravityView gives you an easy way to list Gravity Forms entries on your website.
Bonus: Additional tools for Gravity Forms entry management
Now that you know how GravityView enables more efficient entry management from the front end, let’s take a look at some other add-ons that improve form entry management on WordPress.
- GravityEdit: With this powerful Gravity Forms add-on, you can edit form entries inline, without leaving the “Entries” page. This massively speeds up the process of updating existing entries.
- GravityActions: This certified add-on allows you to update entries in bulk.
- GravityRevisions: After installing this add-on, each entry update you make will be saved. You can then go back and restore prior versions of an entry.
- GravityExport: This add-on offers an easy way to export form entries from your site. You can export entries to multiple file formats, compile reports, and save them to your Dropbox.
- GravityImport: With GravityImport, you can import form entry data to Gravity Forms from a CSV file.
Get started with GravityView and manage entries from the front end
In this article, we explored entry management in Gravity Forms and how GravityView enables this on the front end. With GravityView, you can transform your form management into a seamless, visually appealing, and interactive experience for both users and administrators!
Now that you understand front-end entry management using GravityView, it’s time to unleash the full potential of Gravity Forms and revolutionize the way you handle and display form submissions. If you found this post helpful, make sure to view more content on our blog.

Helpful tips right in your inbox.
Subscribe to get the latest articles, information on releases and helpful Gravity Forms tips!
More articles

Launch Log: GravitySearch arrives, plus AI spam review and GravityView fixes
This week, releases are anchored by a brand-new product! GravitySearch joins the GravityKit suite with cross-form entry search for Gravity Forms. Alongside it, Gravity Forms Zero Spam picks up an AI-powered review step, and GravityView sees fixes for Enhanced Security, Edit Entry, and Entry…

Meet GravitySearch: advanced global search for Gravity Forms
GravitySearch adds cross-form search to Gravity Forms: find any entry from one screen, build advanced filters, and preview results without leaving the page.

Block MCP is now a free WordPress plugin (and it sets itself up)
Block MCP is now a free WordPress plugin. Connect Claude or any MCP client to your site in minutes and let AI edit your content without breaking blocks.