Published
•
Updated
How to build an applicant tracking system (ATS) on WordPress without code
Most applicant tracking systems (ATS) are expensive, overly complex, and not designed for WordPress users. That leaves many small businesses and hiring teams struggling with tools that don’t integrate with their existing site. With Gravity Forms and GravityBoard, you can create a Kanban-style applicant...
Most applicant tracking systems (ATS) are expensive, overly complex, and not designed for WordPress users. That leaves many small businesses and hiring teams struggling with tools that don’t integrate with their existing site.
With Gravity Forms and GravityBoard, you can create a Kanban-style applicant tracking system directly inside your WordPress site. In this tutorial, you’ll learn how to set up a fully functional ATS where you can accept applications, track candidates through multiple hiring stages, and collaborate with your team—all without writing a single line of code. Let’s get started!
What is an applicant tracking system (ATS)?
An applicant tracking system is software that allows organizations to collect, organize, and manage job applications in one place. Instead of juggling email inboxes, spreadsheets, and shared folders, an ATS centralizes the process—helping hiring teams stay organized, evaluate applicants consistently, and move candidates through the recruitment pipeline efficiently.
Traditionally, ATS tools are used by HR teams at medium-to-large companies. But even small businesses benefit from the structure and efficiency an ATS provides. If you regularly receive job applications—or simply want a clearer process for evaluating candidates—an ATS is invaluable.
Any business that needs to recruit can benefit from using one, including:
- Agencies hiring contractors
- Startups building their first team
- Nonprofits managing volunteer applications
- Small businesses adding part-time or full-time staff
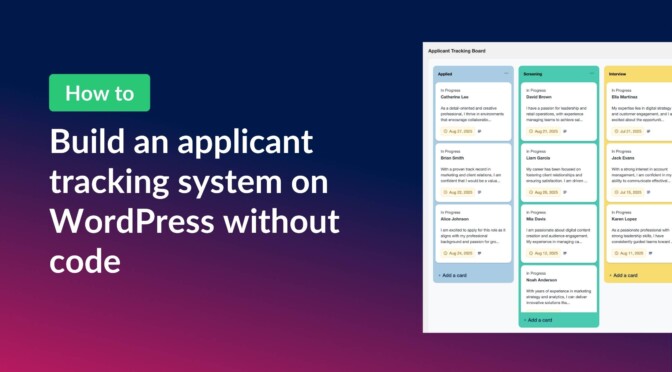
Sneak peek
Here’s what the finished ATS will look like in GravityBoard:

Each applicant who submits your Gravity Forms form appears automatically as a card on your hiring board. You can drag and drop applicants between stages, assign them to team members, add notes, and upload attachments like resumes—all from a simple, visual interface!
Each applicant typically moves through stages like these:
- Applied – A new application has been submitted.
- Screening – You’re reviewing resumes and basic qualifications.
- Interview – The applicant is scheduled for an interview.
- Offer – You’ve decided to move forward and sent an offer.
- Hired / Rejected – The process is complete.

Pro Tip
You can see a live demo of the finished ATS board here and clone the site to try GravityBoard free for 7 days.
What you’ll need
Here are the plugins you’ll need to build your WordPress-based ATS:
- Gravity Forms (any license level)
- GravityBoard
- GravityView (optional, for job postings or extended applicant views)
Step 0 (optional): Use GravityView to create job postings
While this tutorial focuses on using GravityBoard to build an applicant tracking system, you may also want to list open roles on your site. GravityView makes it easy to publish a careers page or job board by displaying form entries on the front end. You can even link directly from a job posting to your ATS form.
Step 1: Create the ATS form
First, we’ll need to create the form applicants will use to submit their details. To do this, we’ll hover over “Forms”, click “New Form”, and start with a blank form. From the Gravity Forms visual editor, we’ll add fields like:
- Full Name (Single Line Text)
- Email (Email field)
- Phone Number (Phone field)
- Resume Upload (File Upload field)
- Cover Letter / Message (Paragraph Text)
- Position Applied For (Drop Down field)
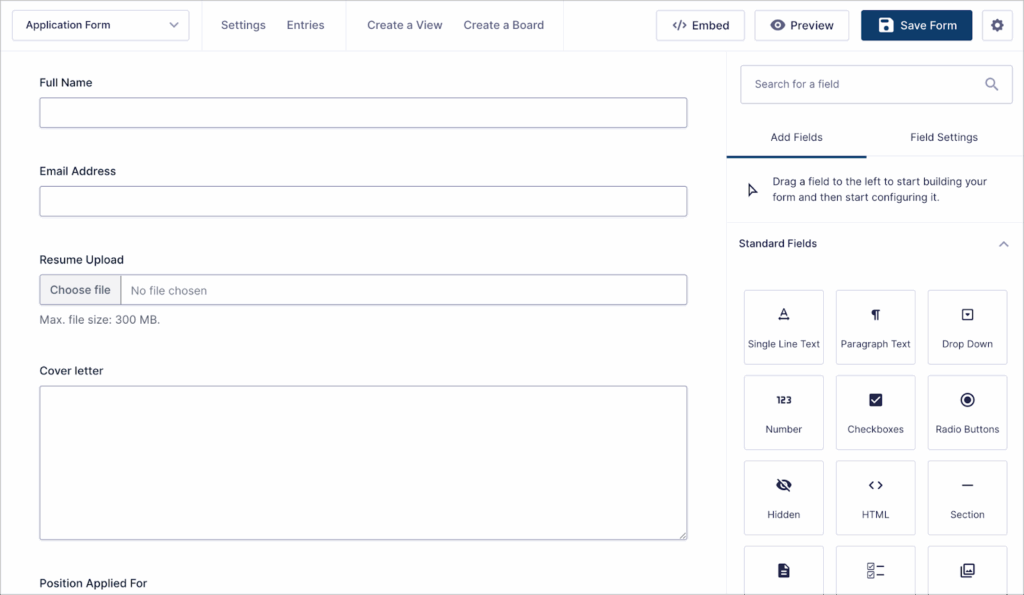
This form will feed applicants directly into our ATS!
Step 2: Define your ATS stages (lane field)
Now, let’s define how applicants move through the hiring process. To do this, we’ll add two administrative fields to our form:
- Stage – A Dropdown field representing the ATS pipeline stage. For this example, we’ll use: Applied, Screening, Interview, Offer, Hired.
- Status (optional) – A Dropdown to label candidates more specifically (e.g., In Progress, No Response, Withdrawn).
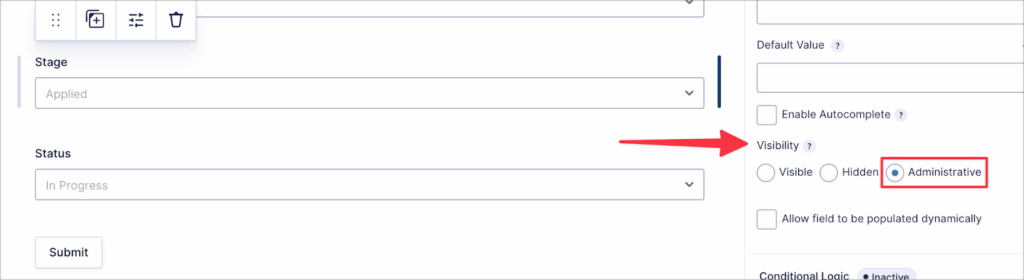
These fields power the lanes and labels on our board.
Step 3: Create a board and map form fields
Next, we’ll create a board in GravityBoard and connect our form. From the form settings, we’ll select “GravityBoard” and click “Add New”.
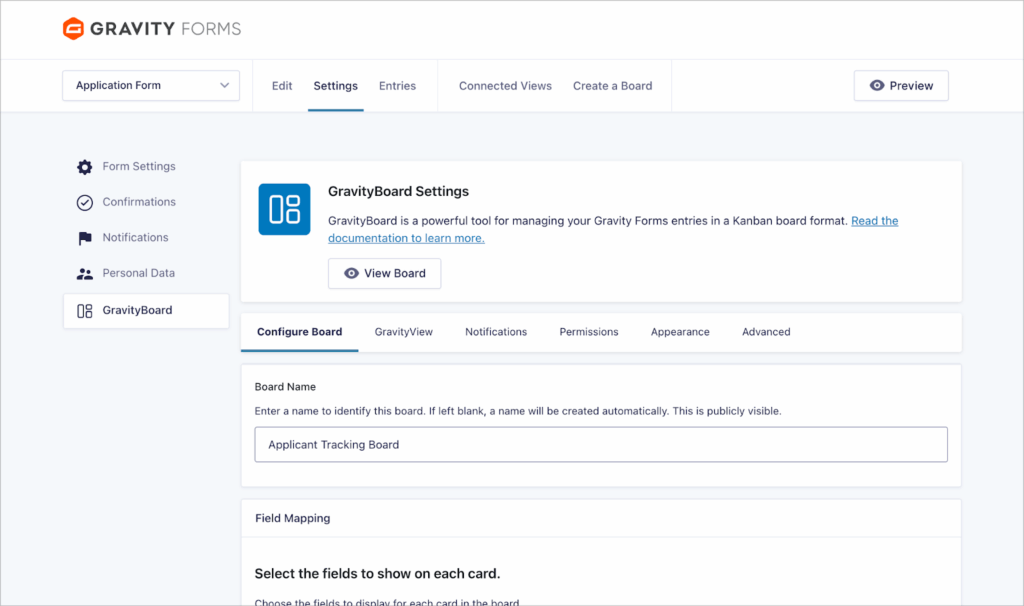
Next, we’ll name our board (e.g., “Applicant Tracking Board”), and map our form fields to card display areas.
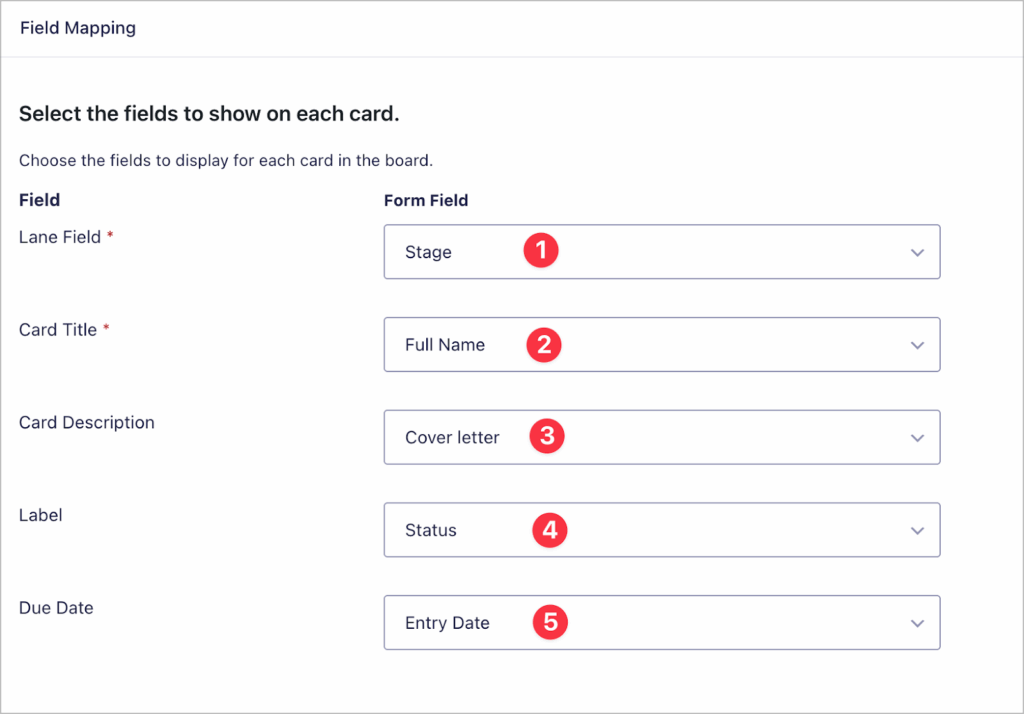
- Lane field: Stage
- Card title: Full Name
- Card description: Cover Letter
- Label: Status
- Due date: Entry Date (or Interview Date if collected)
Step 4: Tailor your board to your workflow
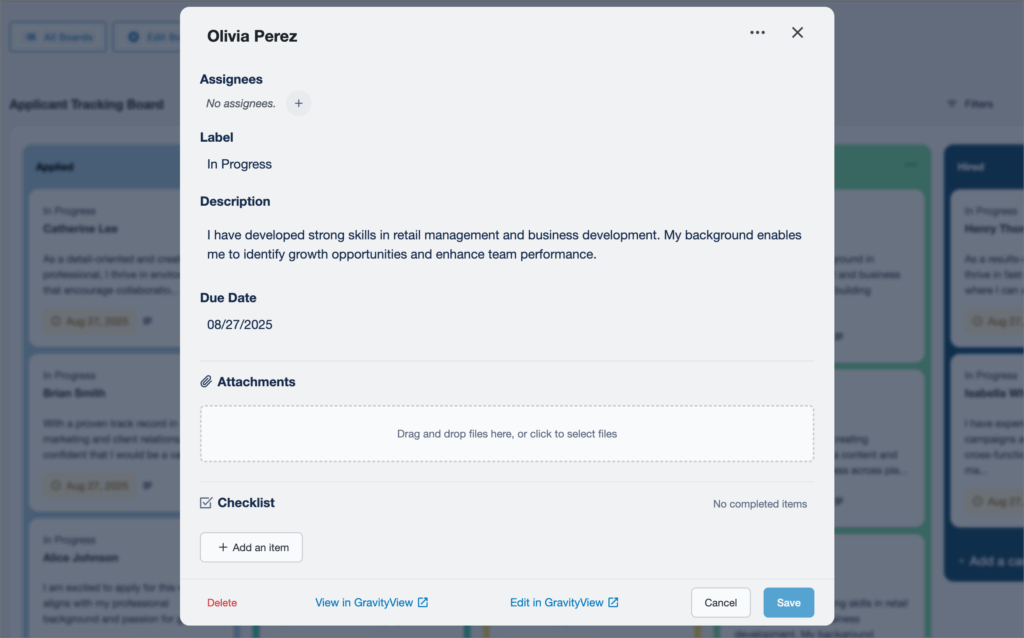
GravityBoard includes flexible features that make applicant management smoother. For ATS use cases, the most useful include:
- Notes and attachments – Add interview notes or upload resumes directly to applicant cards.
- Assignees – Assign applicants to specific recruiters or team members.
- Email notifications – Automatically notify team members or applicants when an applicant moves stages.
- Permissions – Control who can move applicants between stages (e.g., only managers can mark “Hired”).
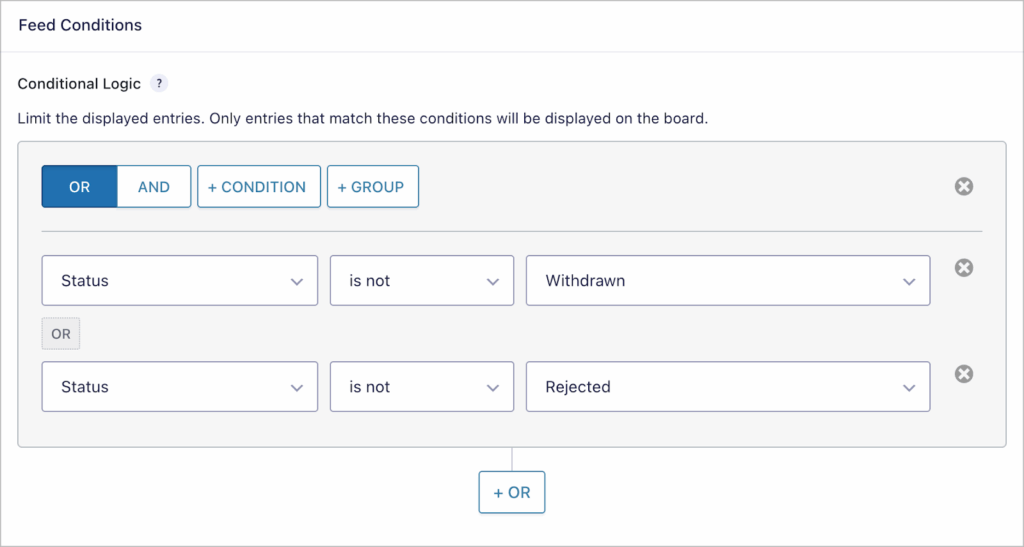
- Filtering – Use conditional logic to filter applicants (e.g., only show applicants for a specific position).
These small adjustments help create a board that mirrors your actual hiring workflow. Here’s an example where we’re using conditional logic to hide applicants that either withdrew from the hiring process or were rejected.
Step 5: Manage applicants visually
Now comes the fun part: managing applicants visually! Each time someone submits the form, a new card appears on your board. Drag and drop applicants between stages, leave notes for your team, and track the entire hiring pipeline from a single interface. No spreadsheets, no email chains needed.

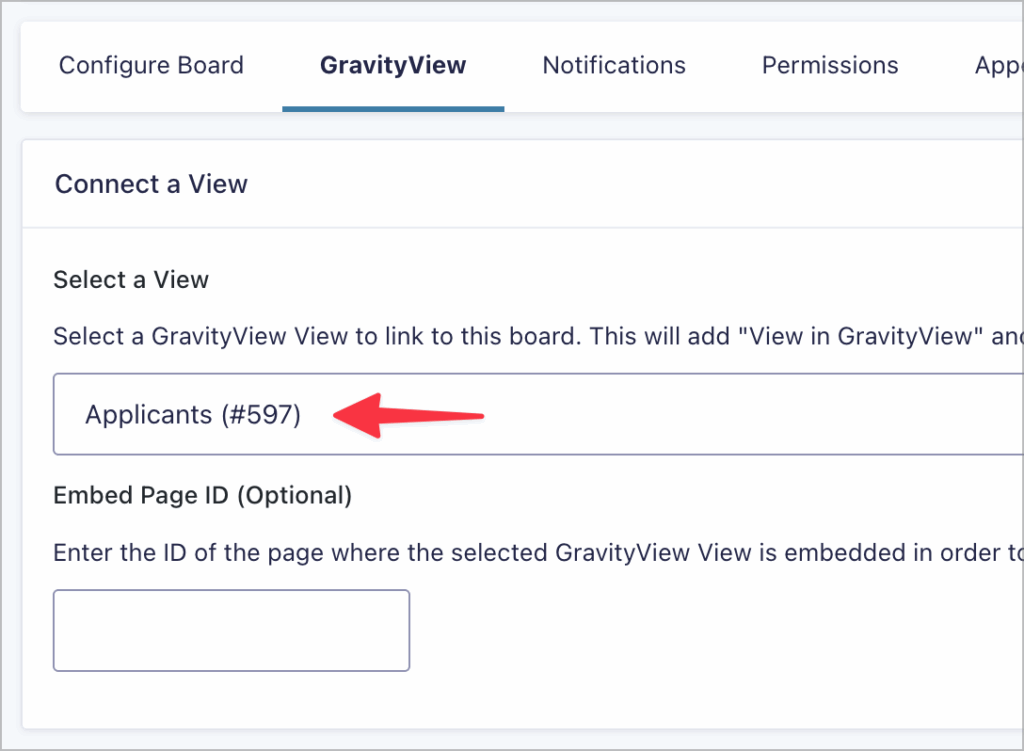
Step 6 (optional): Integrate GravityView
For added power, you can connect GravityView with GravityBoard. For example, create a View for your applicants and link it to your board. In GravityView, you can set up detailed profiles for each applicant based on a template. This allows you to review resumes, cover letters, and other application info.
When you open the applicant’s card in GravityBoard, you’ll see links to view in Gravity Forms and view/edit in GravityView.
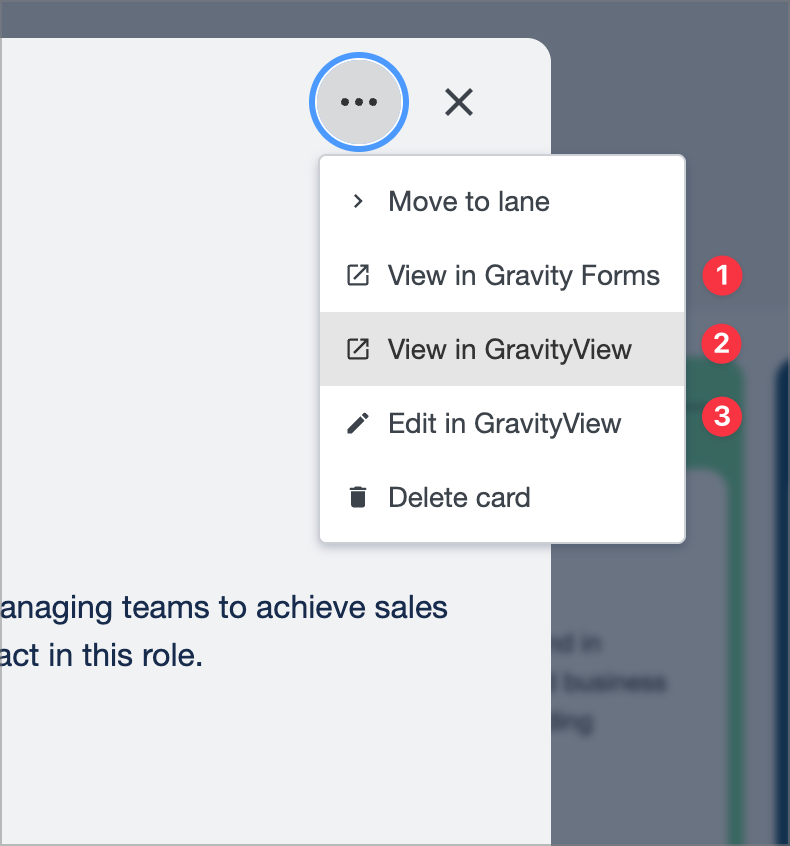
Here’s a simple example of what an applicant profile might look like in GravityView. One advantage of using GravityView rather than viewing entries in Gravity Forms is the ability to keep all the data on the front-end of your site and control access via permissions.

Try it yourself: Spin up a demo of GravityBoard
Want to see it in action before setting it up on your site? You can try the GravityBoard demo right now. The demo site lets you test-drive live applications, explore features, and even clone the site for free to experiment on your own for 7 days. Try the GravityBoard demo here.
Build your applicant tracking system in WordPress
With Gravity Forms and GravityBoard, you can build a powerful, flexible applicant tracking system right inside WordPress. Instead of relying on expensive, rigid SaaS platforms, you’ll have a fully customizable workflow that fits your business.
So what are you waiting for? Learn more about GravityBoard today!

Helpful tips right in your inbox.
Subscribe to get the latest articles, information on releases and helpful Gravity Forms tips!
More articles

Ecommerce platform market share 2026: WooCommerce leads the web, Shopify leads the top tier
Ecommerce platform market share in 2026, from HTTP Archive data. WooCommerce leads the whole web at 6.64%, but Shopify already leads the top 1M sites.

Launch Log: 3D map enhancements, smarter filtering, and improved performance on large data sets
GravityKit’s July 9 launch log: 3D map starting views and viewport loading, searchable field-to-field filtering, and fixes across DataTables and more.
How to build a conference website on WordPress (attendee registration + abstract submission)
Build a conference registration and abstract submission site on WordPress with GravityKit, no code: forms, an attendee directory, sessions, and PDF certificates.