Published
•
Updated
How to export Gravity Forms entries to Excel (complete guide)
So you need a way to export your Gravity Forms entries to Excel spreadsheets? You’re not alone! Many people (including me) like to work with Microsoft Excel because it’s a powerful program for data analysis and charting. It makes it so easy to extract...

So you need a way to export your Gravity Forms entries to Excel spreadsheets?
You’re not alone! Many people (including me) like to work with Microsoft Excel because it’s a powerful program for data analysis and charting. It makes it so easy to extract insights from your form data.
In this post, I’ll walk you through 3 effective methods for exporting your form entries to Excel. Let’s dive in.
Can Gravity Forms export to Excel, by default?
By default, Gravity Forms does not allow you to export form entries directly to Excel (.xlsx). You can only export entries to a CSV file and then convert that to an Excel file (which can be cumbersome. Trust me, I know!). If you want to export your Gravity Forms data directly to Excel, you can use a free plugin called GravityExport Lite.
Method 1: Export Gravity Forms to Excel using a free plugin

GravityExport Lite provides a straightforward way to export your Gravity Forms data to .xlsx format (the file format used by Microsoft Excel). Using GravityExport, you can create Excel reports without having to log in to your site or go through any manual steps. And it’s worth mentioning again that GravityExport Lite is free to download from WordPress.org!
To get started, log in to your WordPress dashboard and install GravityExport Lite by navigating to the “Plugins” page in the sidebar and clicking the “Add New” link. You can either search for the plugin by typing “GravityExport” into the search bar, or you can download the latest version from WordPress.org and upload it to your site directly.
Next, click on “Forms”, find the form you want to export, hover over the “Settings” link, scroll down and click on “GravityExport Lite”. Next, click “Enable Download”.
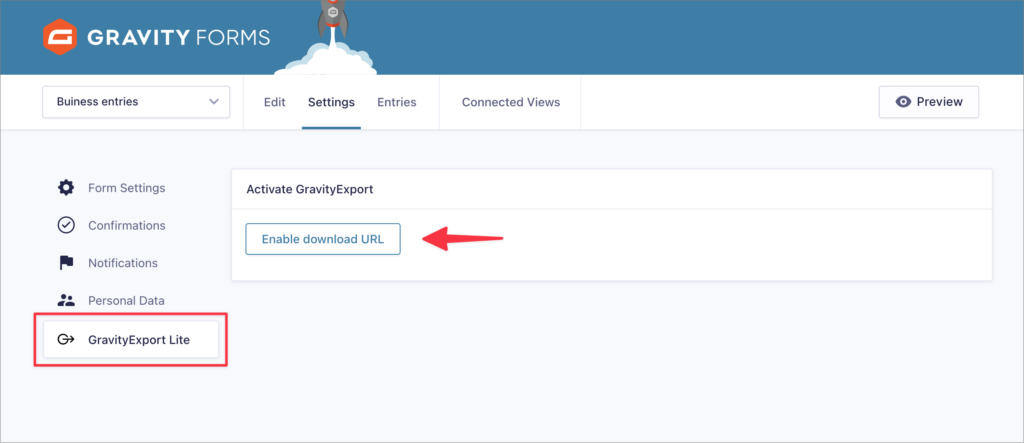
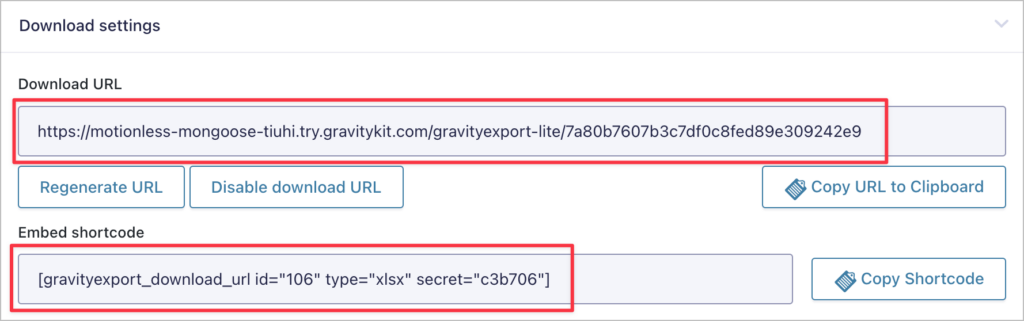
The plugin will now generate a unique download link. By pasting this link into your browser and hitting “Enter”, your Excel report will download automatically. You can also share this link with anybody who needs access to the data!
I’ve seen the benefits of this approach firsthand. For example, if I need to share data with third parties, but don’t want to give them access to my site, I can just email them a download link!
As you can see, GravityExport Lite also generates a shortcode that you can use to embed the download link anywhere on your WordPress site.
Scrolling down, you’ll see several different options for customizing your report. Let’s go through them, one by one.
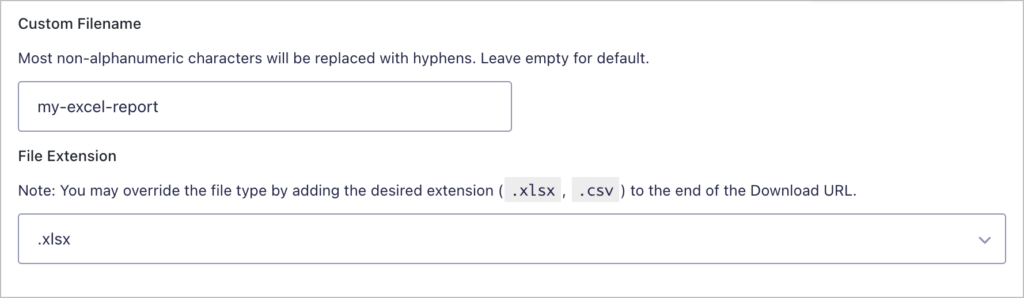
First, you can choose a filename for your Excel spreadsheet download. Next, you can choose whether you want to export your data to .xlsx or CSV format.
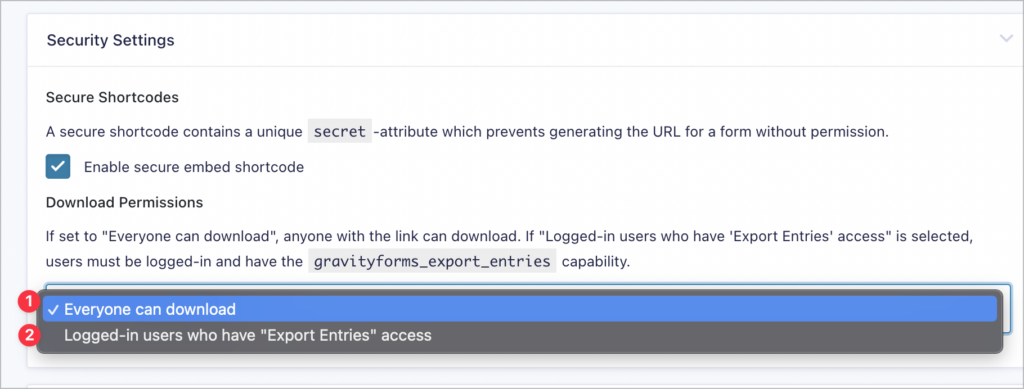
Next up is security settings. Here, you can enable shortcode security, ensuring users without the necessary permissions can’t generate download URLs. You can also modify the download permissions for the report itself; there are two options here:
- Everyone can download: This ensures that anyone with the download link can download the data
- Logged-in users: This option restricts access to logged-in users with the correct permissions.
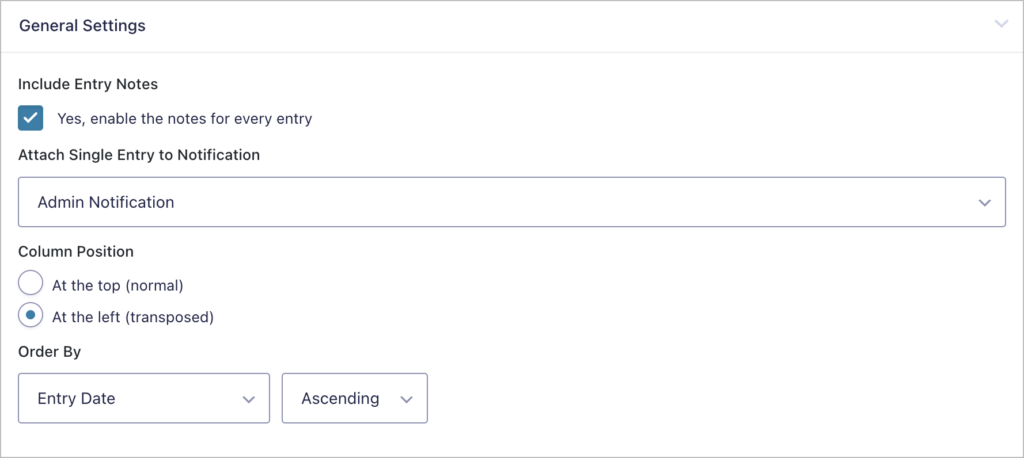
Next are the general settings. Here, you can include entry notes in your Excel file, attach reports to notification emails, select the Excel column position and choose a sort order for your data.
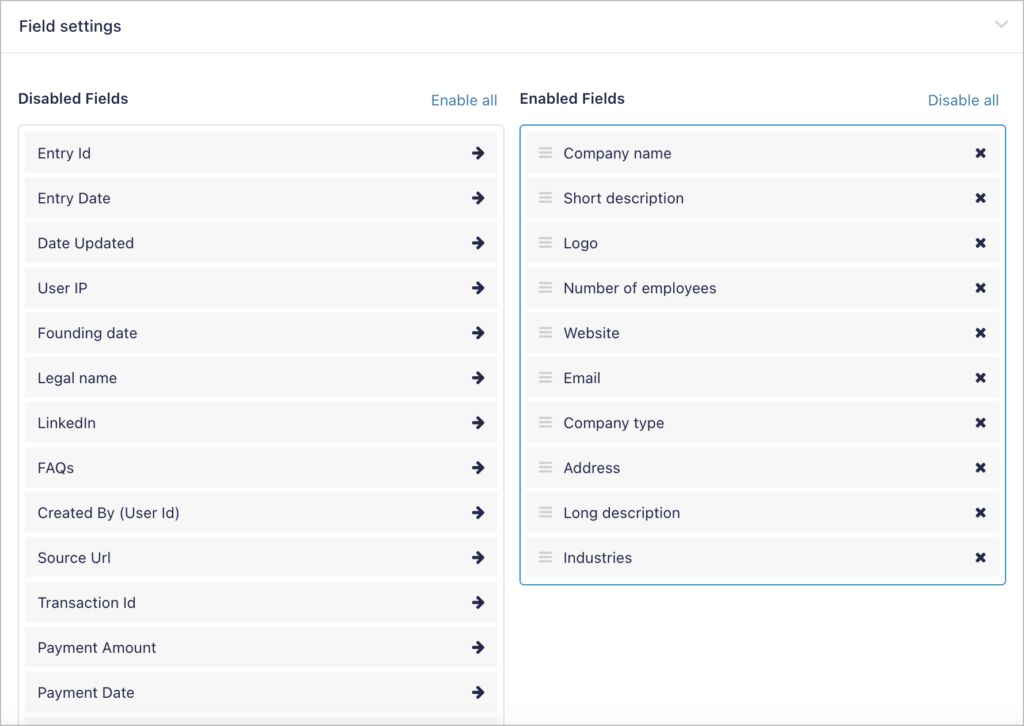
Finally, you can choose which form fields to include in your spreadsheet and which to exclude. To exclude fields from the download file, simply drag them into the “Disabled Fields” column on the left.
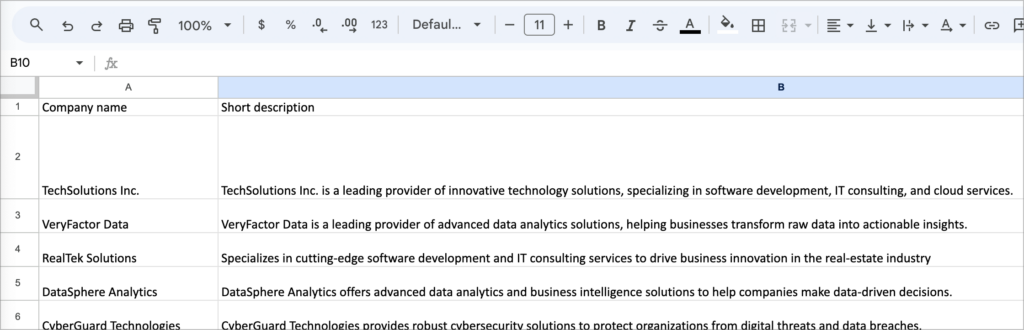
Here’s an example of the output file:
GravityExport is perfect for those who want a simple way to set up an Excel export. After saving the feed, all you need to do is share the URL with those who need access to the data. As you receive new form entries, the Excel report will update automatically!
Pro tipBy default, the download file will include all your form entries, but you can export single entries by adding ?entry={entry_id} to the end of the URL!
Method 2: Create advanced Excel reports with GravityExport (paid)

If you’re in need of a more robust solution for creating, sending, and storing Excel spreadsheet report, look no further than GravityExport!
With GravityExport (the premium version of GravityExport Lite), you can create multiple reports for each form, send data to remote storage (like Dropbox), customize your files, and export Gravity Forms entries to different file types (PDF, for example).
After installing GravityExport, you’ll see three new feeds on your form’s settings page.
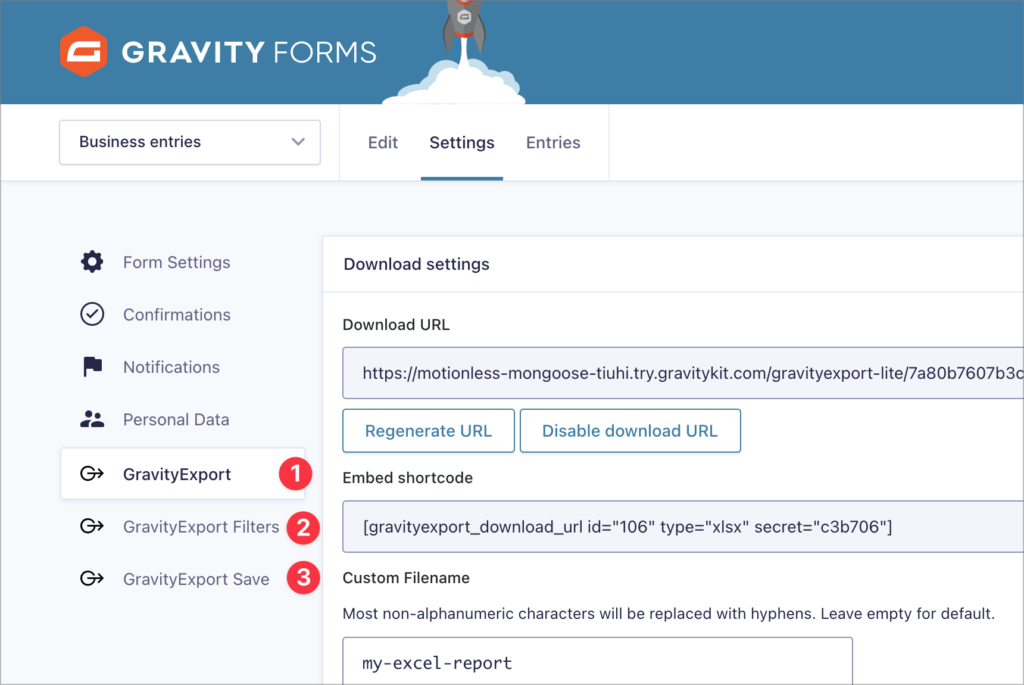
- GravityExport: Enable the report download link and configure your export file.
- GravityExport Filters: Create multiple different reports with different file extensions, settings configurations, and fields.
- GravityExport Save: Send your Excel entry reports to a remote storage location such as Dropbox, or a server running SFTP.
Now let’s take a look at a few of the new options added by GravityExport.
Split fields into multiple rows
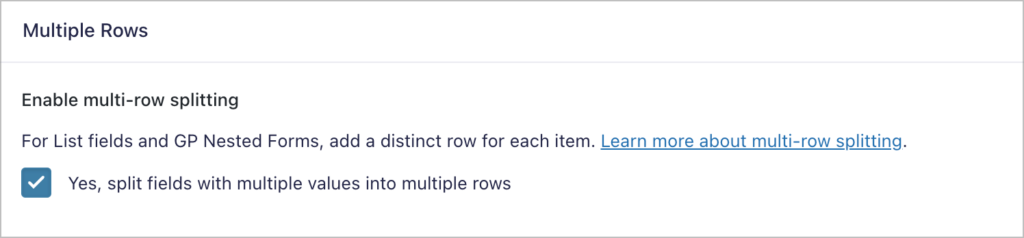
By enabling multi-row splitting, GravityExport will create multiple rows in the Excel file for fields that have multiple values.
Here’s a simple example. Let’s say you have a form with a List field, asking users what their favorite fruit is. The regular output would look like this:
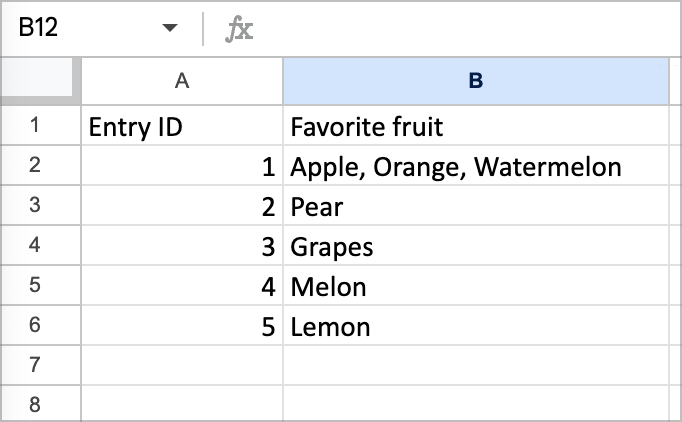
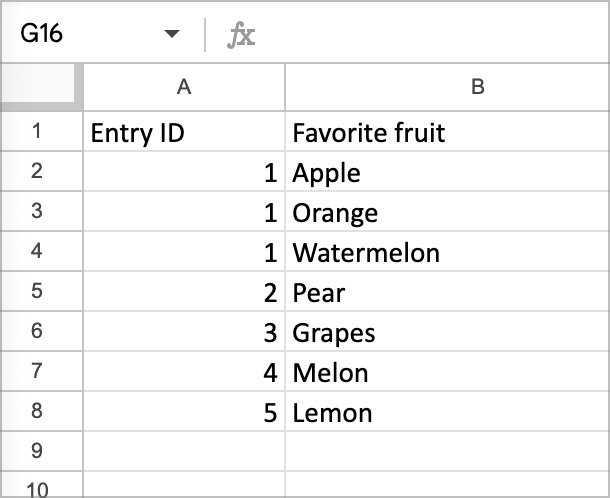
As you can see, multiple values are contained within the same cell, making it difficult to analyze the data. By enabling multi-row splitting, each value becomes a new row in the spreadsheet:
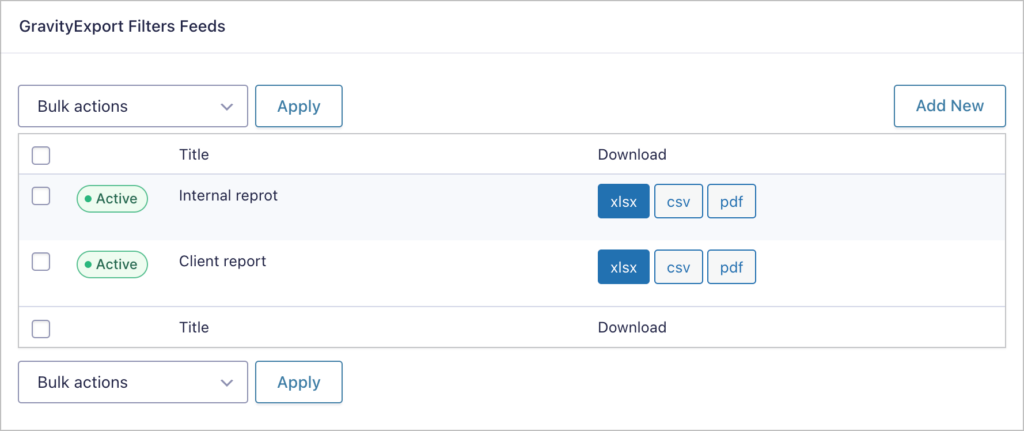
Create multiple Excel exports
With GravityExport, you can also build multiple exports for a single form. For example, you could create one Excel report for internal analysis and a separate one for your clients to access. What’s more, both reports can contain different information!
Export to Excel and send to remote storage
With GravityExport, you can also send your Excel reports to your Dropbox, FTP storage, or a local folder. this is helpful if you need a way to back up your data or share it with third parties securely.
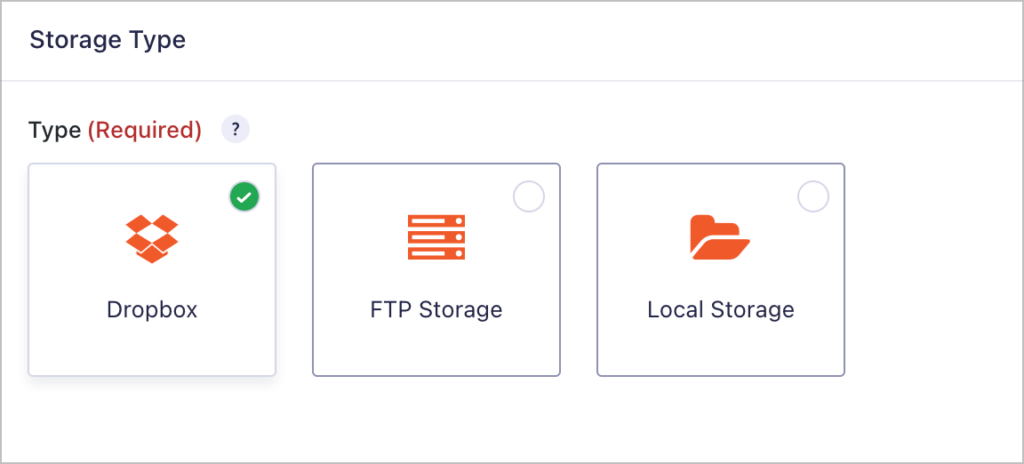
Personally, I’ve also noticed how powerful this is when you need to share data with different applications.
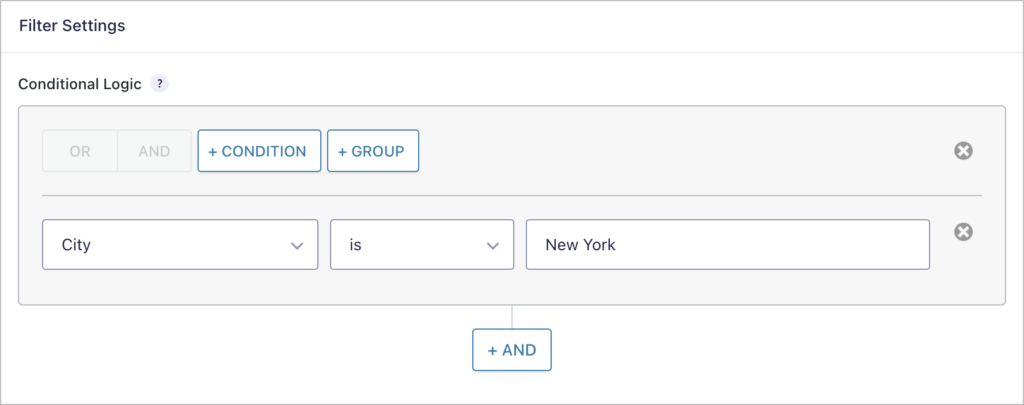
Export entries where fields contain specific information
Finally, you can also use conditional logic to add filtering conditions so that you only export form submissions that contain specific information. In the example below, we’ve added a filtering option to export entries where the “City” field is “New York”.
Method 3: Send Gravity Forms entries to Excel using Zapier
If you want form entries to appear in your Excel spreadsheet automatically, without needing to download any files, you can use Zapier to connect Gravity Forms directly to Microsoft Excel.
Here’s how it works: every time someone submits a form, Zapier sends the entry data to a specified Excel spreadsheet as a new row. No manual exports, no file downloads.
Here’s what you’ll need:
- A Gravity Forms Pro, Elite, or Nonprofit license (the Zapier add-on isn’t available on the Basic plan)
- A Zapier account (a free plan works, though it only checks for new data every 15 minutes)
- An Excel workbook stored in OneDrive for Business
Setting up the Zap
- In WordPress, go to Forms → Settings → REST API. Enable the API and click “Add Key” to generate your API credentials
- In Zapier, create a new Zap and select Gravity Forms as the trigger app. Choose the “Form Submission” trigger event
- Connect your Gravity Forms account using the API key you just created
- Select the specific form you want to export entries from
- For the action step, choose Microsoft Excel and select “Add Row” as the action event
- Connect your Microsoft account and select your workbook and worksheet
- Map each Gravity Forms field to the corresponding column in your Excel spreadsheet
- Test the Zap, and then turn it on
From this point on, every new form submission will automatically appear as a new row in your Excel spreadsheet.
This method is ideal if you need a live, always-up-to-date spreadsheet that’s stored in the cloud. If you’d rather export entries on demand (or on a schedule) without leaving WordPress, GravityExport is a better fit.
Bonus: Other plugins for exporting Gravity Forms to Excel
GravityExport isn’t the only option for exporting Gravity Forms entries to Excel. Here’s how it compares to other popular tools:
| Plugin | Format support | Automation | Price |
|---|---|---|---|
| GravityExport | .xlsx, CSV, PDF | Shareable download links, remote storage (Dropbox, FTP) | Free (Lite) / Premium ($99/year) |
| WP All Export | .xls, .xlsx, CSV, XML | Scheduled exports via cron, Zapier integration | From $149/year |
| Zapier | Excel (via OneDrive) | Real-time row creation on form submission | Free plan available with limits |
GravityExport is the simplest option if you want a direct download link to an Excel file that updates automatically with new entries. It works entirely inside WordPress and doesn’t require any external accounts.
WP All Export is a more general-purpose export tool that supports Gravity Forms alongside other WordPress data types. It offers drag-and-drop column customization and scheduled exports, but it’s built for broader use cases beyond just form entries.
Zapier is the best choice if you need real-time syncing to a cloud-hosted Excel file, but it requires a Gravity Forms Pro license and an external Zapier account.
For most users who simply need to export form entries to Excel, GravityExport Lite (free) is the easiest way to get started.
Create Excel sheets from your Gravity Forms entries
We built GravityExport Lite because we identified a need for an easy way to export Gravity Forms entries to Excel. Being able to download reports using a secure link has many benefits. In fact, I often use these links to create simple ‘Download’ buttons that I can incorporate into demos or tutorial posts that I write!
If you need more control over who has access to what data, or you need to send data to a remote location, you’re better off using GravityExport (the premium version).

Helpful tips right in your inbox.
Subscribe to get the latest articles, information on releases and helpful Gravity Forms tips!
More articles

Launch Log: Zero Spam goes multilingual, GravityView extends search flexibility
A quick tour of this week’s GravityKit releases: Gravity Forms Zero Spam gains translations in 27 languages, and GravityView adds flexible date-range search, a live Search Bar summary, and Gravity Forms 2.9.31.3+ compatibility fixes.

How to get your Gravity Forms data into external tools
Learn 6 ways to get Gravity Forms data into external tools—from scheduled exports to REST API and Zapier. Covers CRMs, spreadsheets, and more.
Gravity Forms payment gateways: A guide to official and community add-ons
Want to accept payments from your WordPress site? No problem! Gravity Forms makes it easy to build a custom payment form for eCommerce transactions, nonprofit donations, subscription billing for digital products and services, and beyond. But first, you’ll need to choose one of Gravity…