Published
•
Updated
How to build a sales pipeline on WordPress for lead tracking (without code)
Looking for a simple way to manage your leads without paying for complicated external CRM tools? With Gravity Forms and GravityBoard you can create a Kanban-style sales pipeline directly inside your WordPress site. In this tutorial, you’ll learn how to set up a fully functional sales pipeline where you can capture leads, track progress, assign…
Looking for a simple way to manage your leads without paying for complicated external CRM tools? With Gravity Forms and GravityBoard you can create a Kanban-style sales pipeline directly inside your WordPress site.
In this tutorial, you’ll learn how to set up a fully functional sales pipeline where you can capture leads, track progress, assign tasks, and collaborate with your team—all without writing a single line of code.
Let’s get started!
What is a sales pipeline (and why does it matter)
A sales pipeline is a visual way to track where each lead or prospect is in your sales process. Think of it as a series of stages, from the initial inquiry through to a closed deal. By mapping each lead to a stage, you’ll see at a glance which opportunities are moving forward, which ones are stalled, and where you need to focus your attention.
Having a structured pipeline ensures that no lead falls through the cracks, and it makes it easier for your whole team to collaborate. Instead of juggling spreadsheets or digging through emails, you’ll have one shared view of your sales activity.
Any business selling products online can benefit from having a sales pipeline, including:
- Course creators
- Software vendors
- Coaches
- Web agencies
The challenges with external CRM and SaaS tools
Most sales teams default to using external CRM or project management tools. While these platforms can be powerful, they often come with challenges:
- High cost: Monthly subscription fees add up quickly as your team grows.
- Complex setup: Many CRMs are overloaded with features you’ll never use.
- Disconnected systems: Your lead forms live in WordPress, but your pipeline lives elsewhere. This leads to more integrations, syncing, and data headaches.
By building your sales pipeline directly in WordPress, you remove these barriers because everything happens in one place.
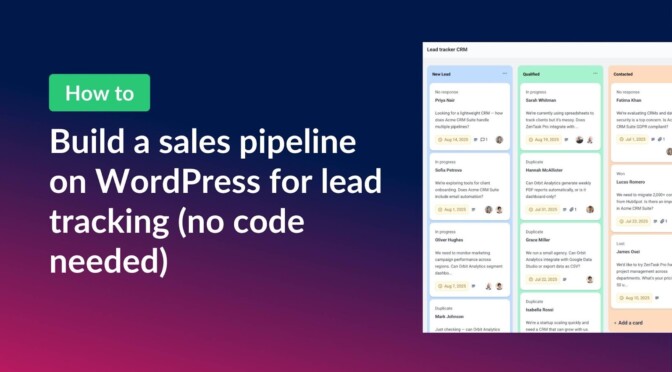
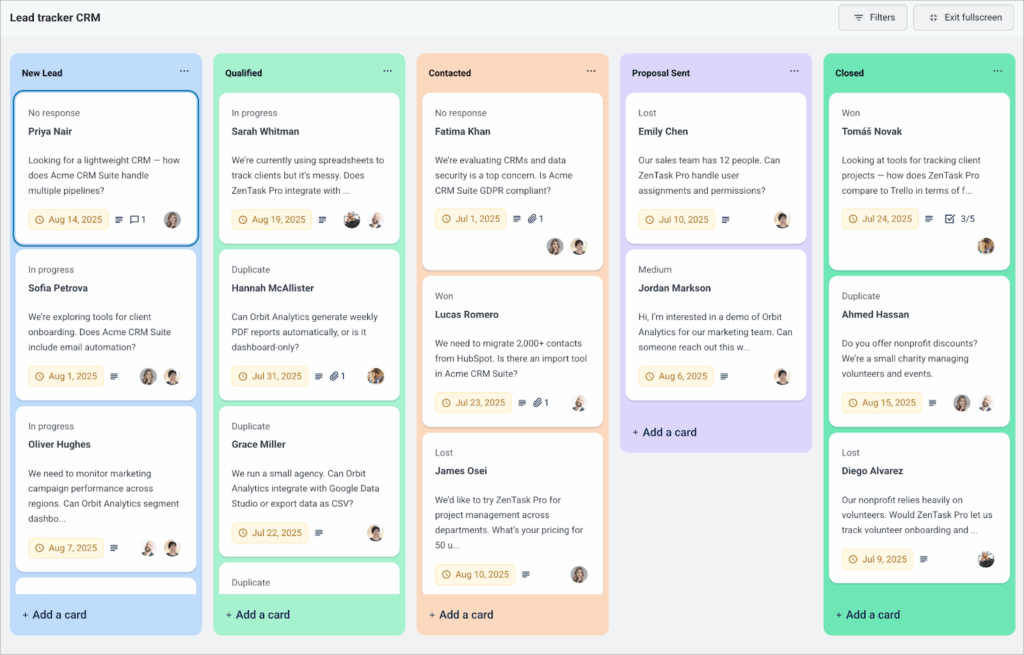
Sneak peek
Here’s what our finished Kanban-style sales pipeline looks like:

Each lead you capture through a Gravity Form automatically appears as a card on your sales board. You can drag and drop cards between stages, add notes, attach files, and assign leads to team members.
Each lead moves through five phases:
- New Lead – This is where new leads automatically show up.
- Qualified – Leads that meet your basic criteria and are worth pursuing further.
- Contacted – Outreach has been made through email, call, or another channel.
- Proposal Sent – A formal proposal or quote has been shared with the lead.
- Closed – The deal is finalized, either won or lost.
Pro tipYou can see a live demo of the finished sales pipeline board here and clone the site to demo the plugin free for 7 days.
What you’ll need
Here are the plugins you’ll need to build a custom sales pipeline (lead tracker) like the one in this tutorial:
Step 1: Create a lead capture form in Gravity Forms
First, we’ll create a form to collect new leads. To do this, we’ll hover over “Gravity Forms”, and click “New Form”. Next, we’ll start with a blank form, give it a name, and add the following fields:
- Name (Single Line Text field)
- Message (Paragraph Text field)
- Email (Email field)
- Phone (Phone field)
- Product of interest (Dropdown field)
- Budget (Drop Down field)
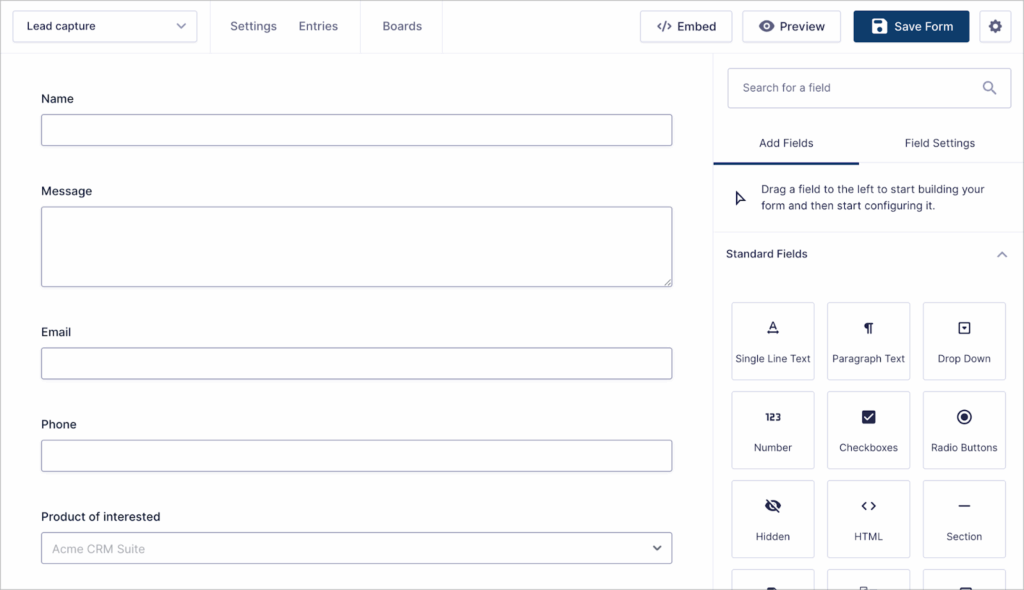
Feel free to customize your lead capture form as you see fit.
Step 2: Define your sales pipeline stages (lane field)
Next, we’ll create the fields that will power our Kanban board. To do this, we’ll add two new administrative fields to our form:
- Stage – A Drop Down field that represents the pipeline lane. For this example, we’ll add the following choices: New Lead, Qualified, Contacted, Proposal Sent, Closed.
- Status – A Drop Down field that lets you quickly label prospects. For this example, we’ll add the following choices: In Progress, No Response, Duplicate, Lost, Won.
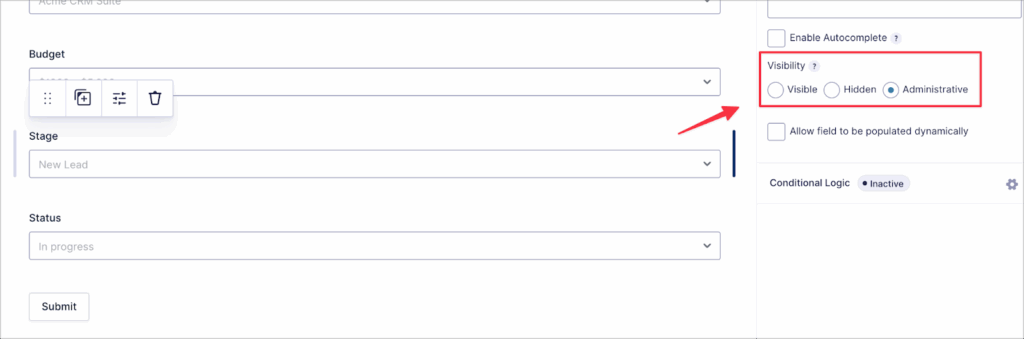
In Gravity Forms, administrative fields don’t show up in the form but they can still capture data. So these fields won’t be visible to prospects—they’re just for your team’s internal use.
Step 3: Map form fields to cards in GravityBoard
To create a new board, we’ll go to our form settings, click on “GravityBoard”, click “Add New”, and give our board a name (e.g., “Sales Pipeline”). Now let’s connect our form to GravityBoard by mapping form fields to card display areas.
- Lane field: Stage
- Card title: Name
- Card description: Message
- Label: Status
- Due date: Entry Date
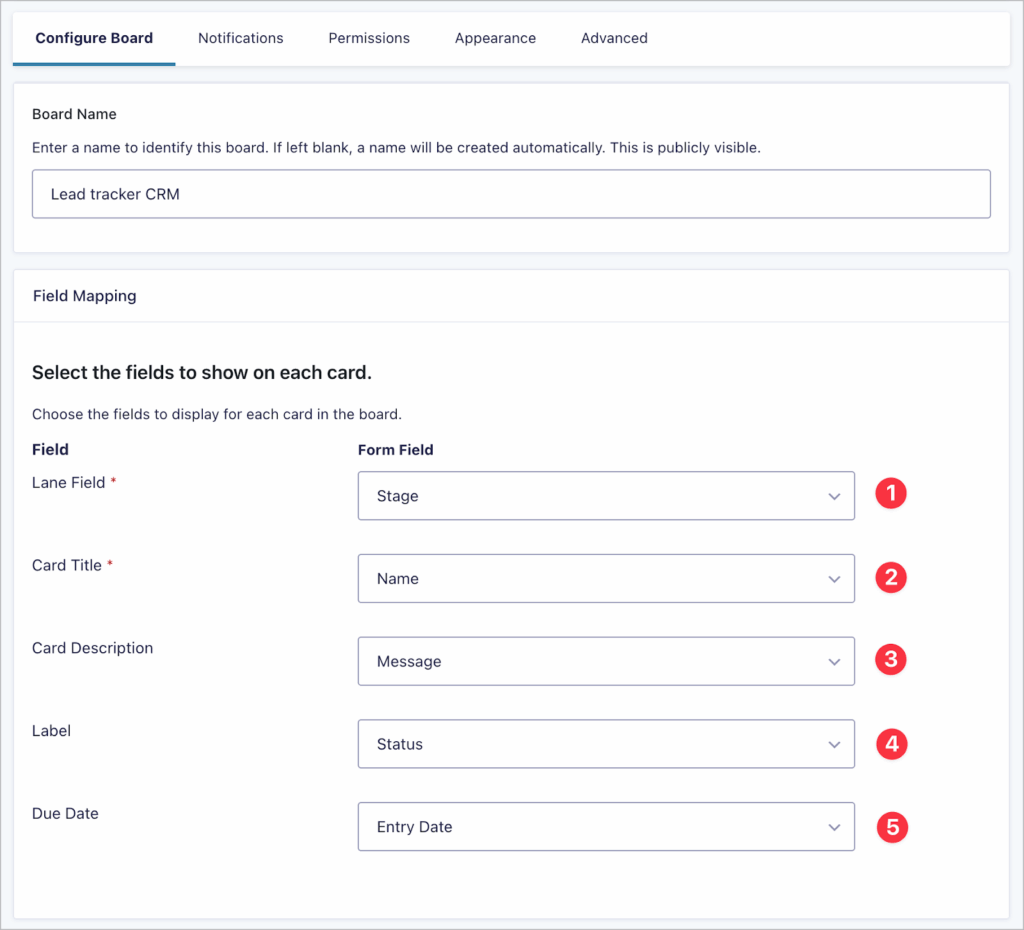
Now, when prospects submit the form, their details will automatically feed into our sales pipeline!
Step 4: Configure board options
GravityBoard comes with flexible features that help you manage leads effectively.
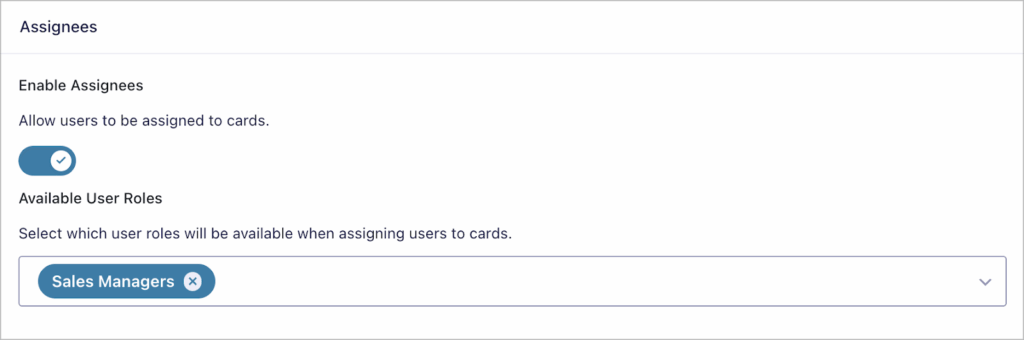
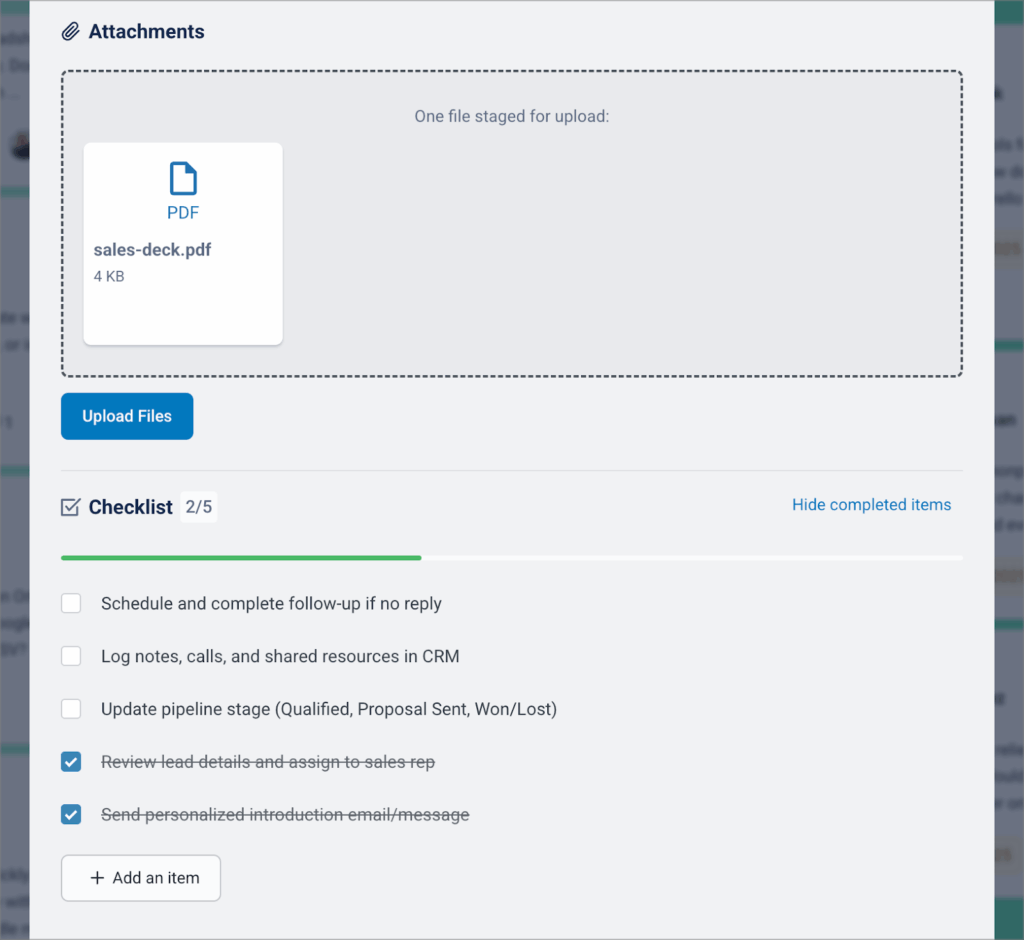
- Enable entry notes, checklists, file attachments, and assignees so your team can collaborate on each lead.
- Choose a user role for available assignees (e.g., only sales managers can be assigned leads).
Configure automatic email notifications
Want to send team members and prospects instant updates? GravityBoard uses Gravity Forms’ built-in notification system to send custom email messages. To create a new notification email, we’ll navigate to “Notifications”, click “Add New”, and:
- Choose a trigger event (like “Card Added” or “Card Changed Lane”)
- Customize the email body using merge tags to include lead details and personalized messaging
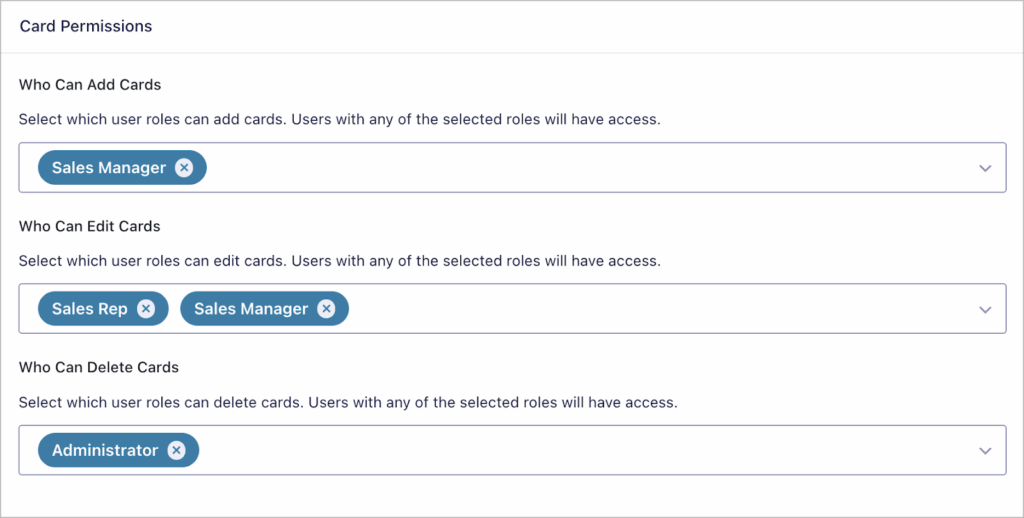
Assign user permissions
Decide who can create, edit, or move cards. For example, sales reps may only update existing leads, while managers can view and edit everything.
Change the board appearance
Make your pipeline easier to scan by customizing:
- Lane colors
- Background color
- Background image
Add precision filtering
Use advanced conditional logic filters to automatically display only the cards you need (e.g., only show leads where budget exceeds $5,000).
Step 5: Track, update, and manage leads visually
That’s it—you now have a visual sales pipeline!
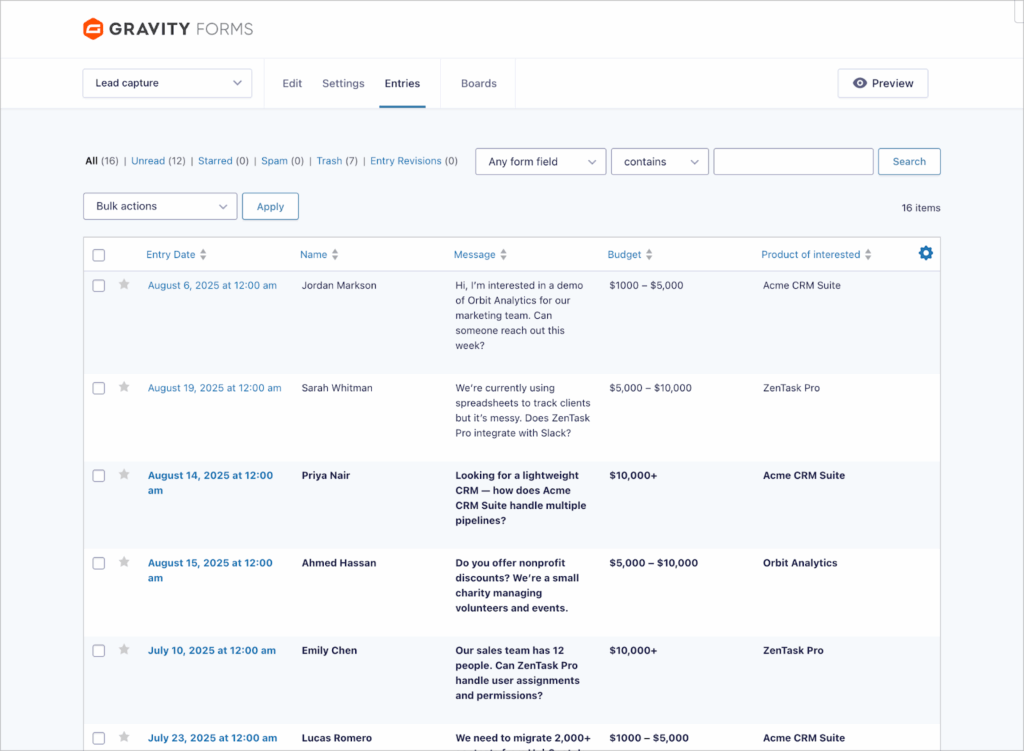
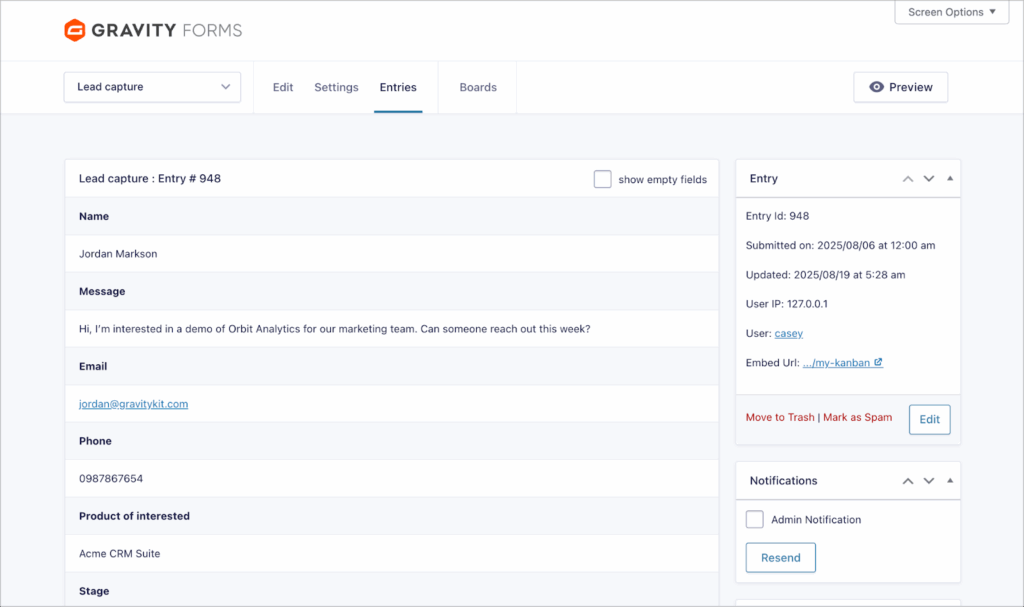
Drag and drop leads across stages to update their progress. Open a card, click the three dots, and select “View in Gravity Forms” to see the full entry.
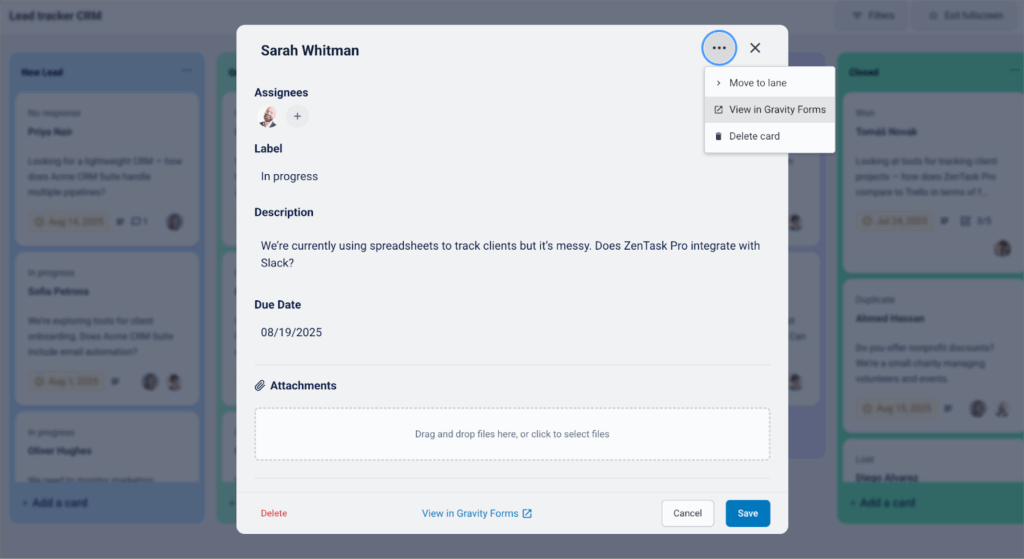
Here you can see all prospect details, including budget and product of interest.
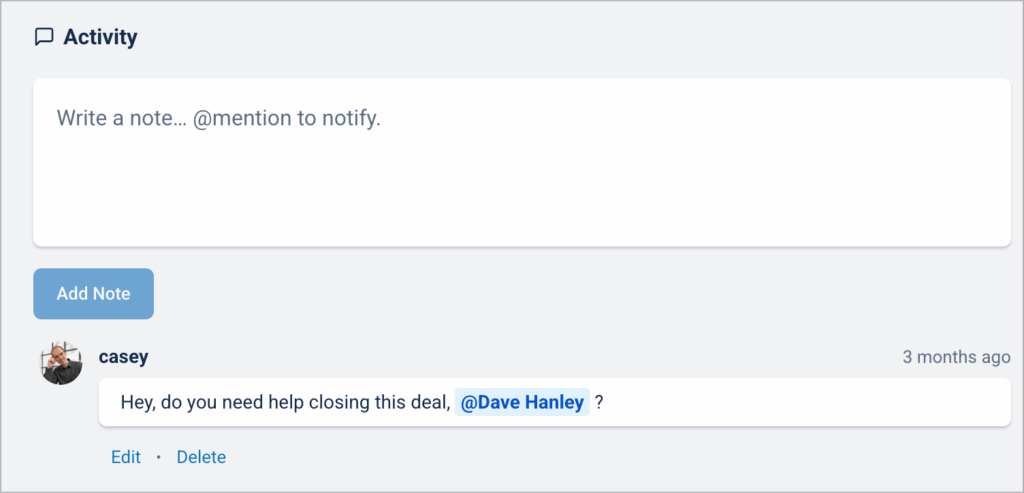
Collaborate with your team by creating checklists, leaving comments, and @mentioning colleagues.
And thanks to automatic email notifications, you’ll always know what’s happening with each lead!
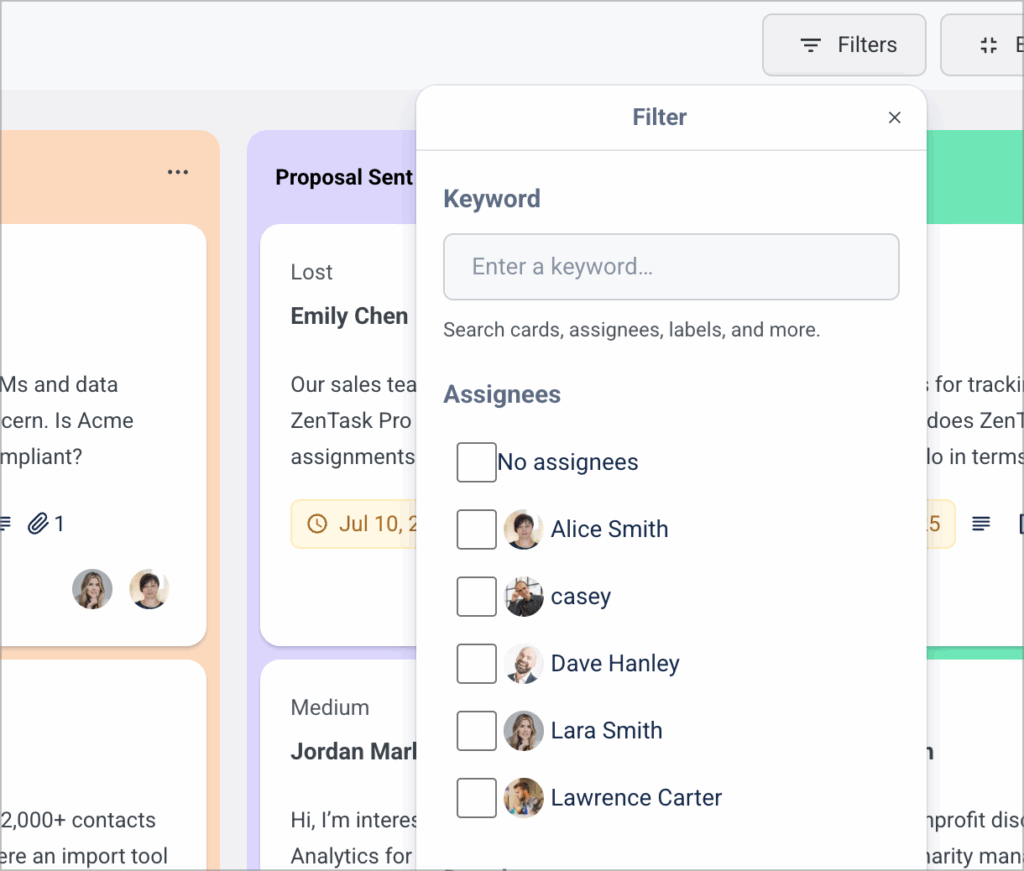
Bonus: Filter and share pipeline views with your team
Need to focus on specific leads? Use the built-in front-end filtering to view just the data you need. Each time you filter, the URL updates—meaning you can copy and share that filtered view with teammates instantly.
Try it yourself: Spin up a demo of GravityBoard
Want to see it in action before setting it up on your site? Try out the GravityBoard demo here.
Take control of your sales pipeline in WordPress
With Gravity Forms and GravityBoard, you don’t need expensive CRMs or complex integrations. In just a few steps, you can create a visual, collaborative sales pipeline that keeps your team aligned and your leads moving forward.
Ready to build your own pipeline? Get started with GravityBoard today and bring your entire sales process into WordPress!

Helpful tips right in your inbox.
Subscribe to get the latest articles, information on releases and helpful Gravity Forms tips!
More articles

Launch Log: theme template editing in Block MCP, Shield silentCAPTCHA for Zero Spam, and GravityView fixes
Block MCP adds safe theme template editing, Gravity Forms Zero Spam gains Shield silentCAPTCHA support, and GravityView fixes lightbox and notice bugs.

GravityKit turns 12: a year in review, and 30% off Lifetime All Access
GravityKit turns 12. A look back at a year of GravityView 3.0, GravitySearch, and AI-assisted building, plus a birthday sale on the Lifetime All Access Pass.

Launch Log: Row headers for screen readers, smarter conditional logic, and multi-View fixes
GravityView 3.1 adds row headers for screen readers, plus smarter conditional logic in GravityCalendar and fixes for DataTables, Maps, and Dynamic Lookup.
